HOLIDAY DONATION DRIVE - SUPPORT MSW - DO YOUR PART TO KEEP THIS GREAT FORUM GOING! (Only 13 donations so far - C'mon guys!)
×


Dan Vadas
-
Posts
3,261 -
Joined
-
Last visited
Content Type
Profiles
Forums
Gallery
Events
Everything posted by Dan Vadas
-
I was going to comment on the exact same thing. It looks like one of them at least is way too high and has no room for elevation, and all of them look like left-overs from some cheap kit . Danny
- 1,035 replies
-
- 6
-

-
- royal katherine
- ship of the line
- (and 1 more)
-
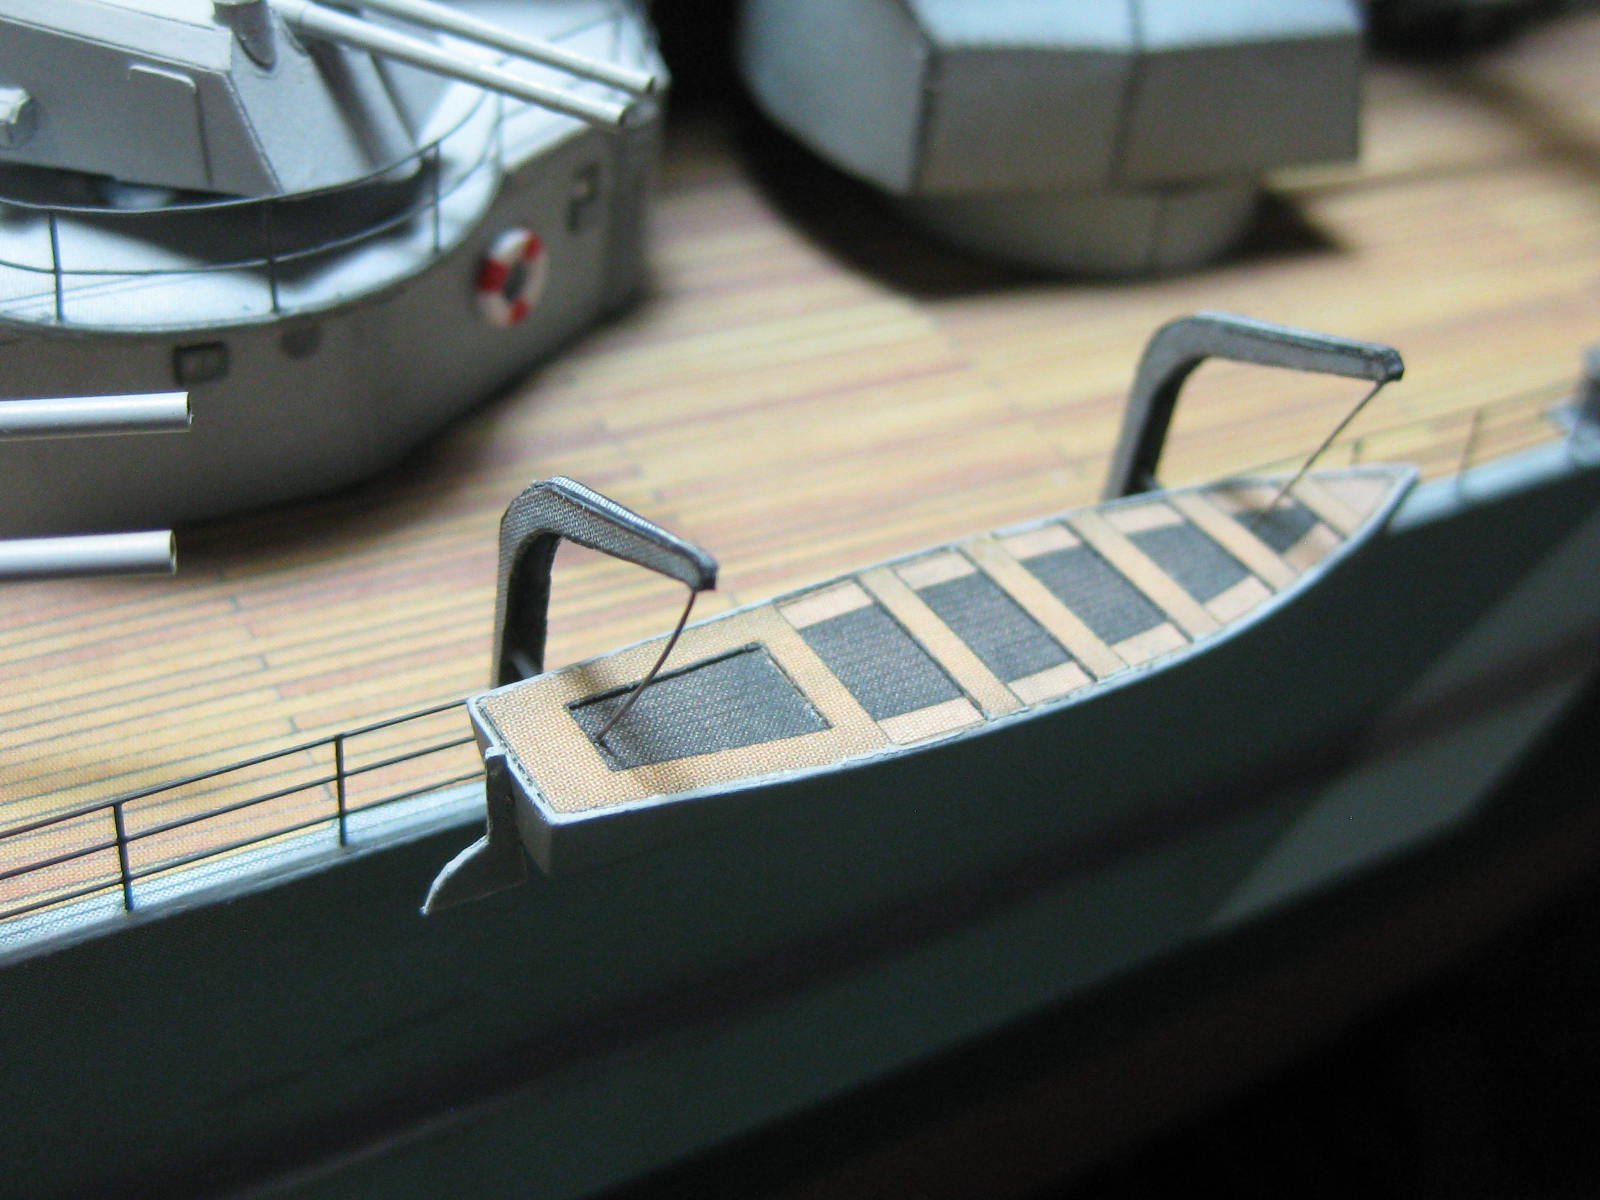
I've fitted the one boat that sits on the davits. I used 0.2mm wire to simulate the lowering cable, and some 0.4mm wire for the support bracket that holds it to the middle of the davit : All the railings are finally completed, apart from a bit of touch-up paint for the port side ones : Because I was two lengths of railing short I've had to use a some that was left over from Amatsukaze. Unfortunately it's only a 2-bar rail, but I managed to have enough 3-bar to get to the aft cleats so I did a bit of a "fudge". Unless you look carefully it's not really noticeable, and it'll do me : There's actually still quite a bit to do to finish this model, things I'd forgotten about. I'd left off fitting the portholes and steps to the hull in case they were damaged any time I had to move the model (which was a lot ). I've made a start to the steps - there are about 70 of them to fit. I'm using 0.2mm nickel-silver wire for them : Yes, I've noticed the bit of grey touch-up paint needed near the bottom . It's not the only bit either. Danny
.thumb.JPG.562d81ef9777261b90a387b3d4d4f672.JPG)
.thumb.JPG.c5c20f62b3154cca35219881ca7b6cca.JPG)
.thumb.JPG.df4e90d0f64d7c2c00c066d1770cb4b1.JPG)
.thumb.JPG.26a094da295440e2be736c7018126ed0.JPG)
.thumb.JPG.21ada12d858a741b27c572467ed53acc.JPG)
.thumb.JPG.a5233ee6fd2c9b067c148aa964188ec4.JPG)
.thumb.JPG.4b2461c7f33cff16c8c145be95995eb5.JPG)
.thumb.JPG.13bae65f874fc49c1dce8f6040d4630d.JPG)

- 524 replies
-
- 19
-
-
No, 500 metres . But that's only the main deck, there's about the same amount or a bit more on all the other decks in total. I used 6 metres of railing, multiplied by 200 equals 1.2km on the real ship. The stanchions are 8.3mm apart, so I've had to drill about 500 holes for them. Danny
-
Scott, have you ever tried using my "tiny drop or two of PVA glue" trick yet? Trust me, it works a treat for pieces like that. Use the PVA on each end, let it dry, then use CA on ALL the legs. The PVA will hold enough on brass to do the job, and you can re-position the part if needed before it sets. Use some car or furniture wax on the peg, and let it soak in well. CA won't stick to the wax. Do some experimenting first. Danny
-
My work here is done (rides off into the sunset ). Danny
-
Thanks for the replies guys . The four anchors are fitted. I used 15 link-per-inch chain for the main ones, and 40 lpi for the auxilliary chain on the foremost one. The rather poor quality printing really stands out in the different red colours, and that panel didn't line up properly either . More touch-up will be needed : I've also made the fore and aft flagpoles from 1.0mm and 0.6mm brass wire : Now i'm onto the railing for the main deck. This should take me a couple of days - there's over 2.5 metres of it . Danny
.thumb.JPG.81f975abad93f0a54c82dc708cb80b43.JPG)
.thumb.JPG.67d77ba0561199e39dacbc3f57b1d191.JPG)
.thumb.JPG.8eea3353e4067764d6b42e693504bf04.JPG)
.thumb.JPG.89c02dd48437c3d782f71e93330cbc15.JPG)
.thumb.JPG.0afbea87eefe9566e61b49bd1d74902a.JPG)
.thumb.JPG.3beb51fada300beb98fb25d1a0122d2b.JPG)
- 524 replies
-
- 21
-
-
Thanks John, Pat and CDW . It only weighs 1 to 1.5 kilograms. The wooden base (not yet fitted) weighs more than the model. Danny
-
Most of the smaller main deck details are now fitted. The rest will be done after the main deck railing is installed. The main guns are also permanently mounted : The Wash Deflectors took a while to fit, with all the very small support braces taking the longest : Danny
.thumb.JPG.c4c57d55ccb00172fa987c283e3681ee.JPG)
.thumb.JPG.688c9f3263296765a8d69984cc466f69.JPG)
.thumb.JPG.b3038a6b0b8c92f822c0feca19b1f783.JPG)
.thumb.JPG.daf799d697b7aa6a0731d3a658de2454.JPG)
.thumb.JPG.08ec2dff56a94fd7ac9ecfdde576bbbf.JPG)
.thumb.JPG.43aa756010e914cd086735f9fe4c187d.JPG)
.thumb.JPG.9198d2b8e41fe7aac2fc99826fb19ed9.JPG)
.thumb.JPG.1275fdee09e99b0d84114c7b7e85bdaf.JPG)
- 524 replies
-
- 23
-
-
Pat, I'd need to build a new room on the house just for that - these models are rather BIG . Danny
-
The last "major" pieces before I fit all the small details to the main deck, the four 20mm single guns : Here are a couple of pics of the main deck before I start fitting the details. The main turrets will be fitted after this work is completed, then on to the main deck railings : With the end in sight a welcome delivery came today : Danny

.thumb.JPG.f09688b14f1debbfd4d8101805204faf.JPG)
.thumb.JPG.45c6273b8be81acf98d02a245d8f00f3.JPG)
.thumb.JPG.34d6b909b8ebe02c5914943eb331557c.JPG)
- 524 replies
-
- 11
-
-
Fair enough . I thought you might be interested in THIS old movie about the Bismarck. Not bad for it's time . Danny
-
Can you file a "V" into the tip of the yard? Otherwise use a tiny spot of PVA glue to temporarily stick it on, wait until it dries, and then hit it with CA. If all else fails leave it off. Just tie the rigging line around the yard. Danny
-
Yep, I was going to do that . That's what usually happens Popeye . It always starts out rather dark, and fades after a day or so as it dries properly. Danny
-
Not if you use LH's suggestion about the Teflon sheet - there's not much that will stick to Teflon . Use the end of a toothpick to soak up any excess before the CA sets. BTW - I use the half-eyed needle trick almost exclusively for applying CA. When the needle eventually gets clogged I drop it inot a jar of Acetone for a couple of minutes to clean it. Danny
-
Thanks John . Pav, I've already ordered it from Halinski and paid for it. I was expecting it to be delivered yesterday. Hopefully it'll arrive early next week because I only have a couple of day's work left on this one . Danny
-
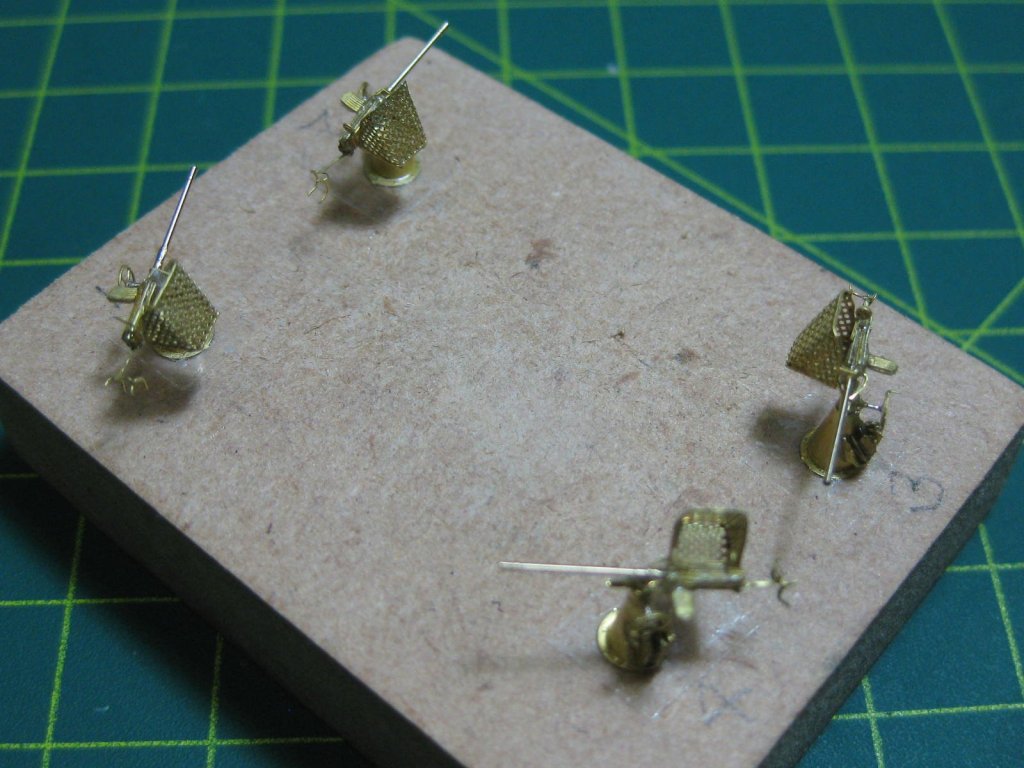
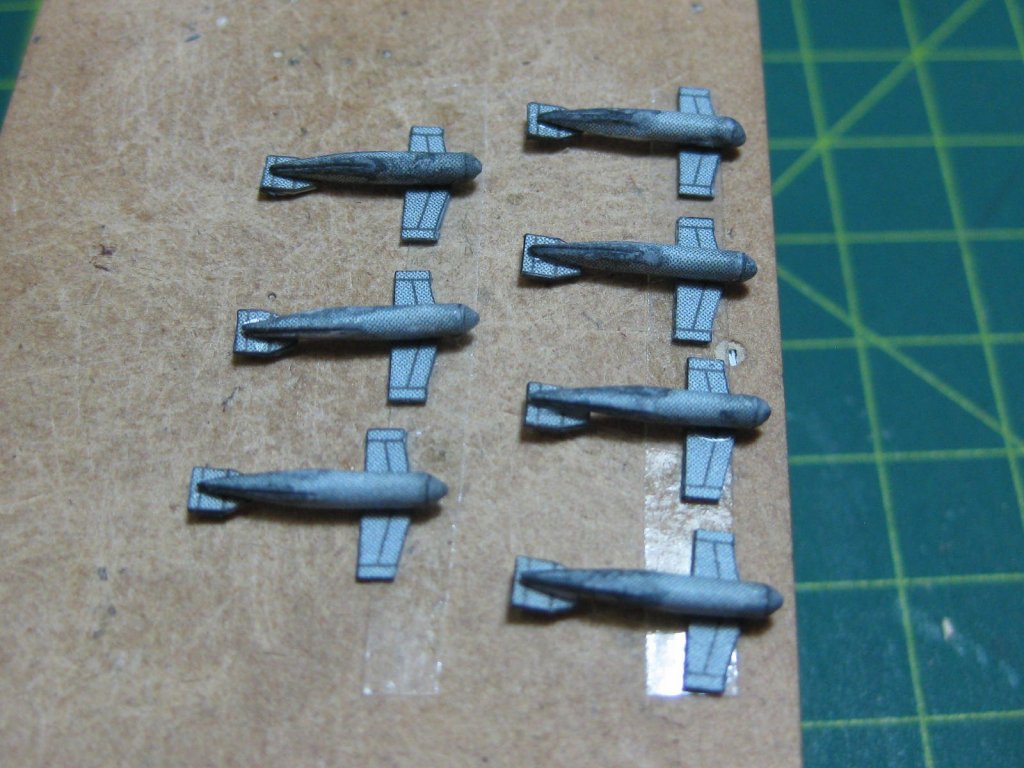
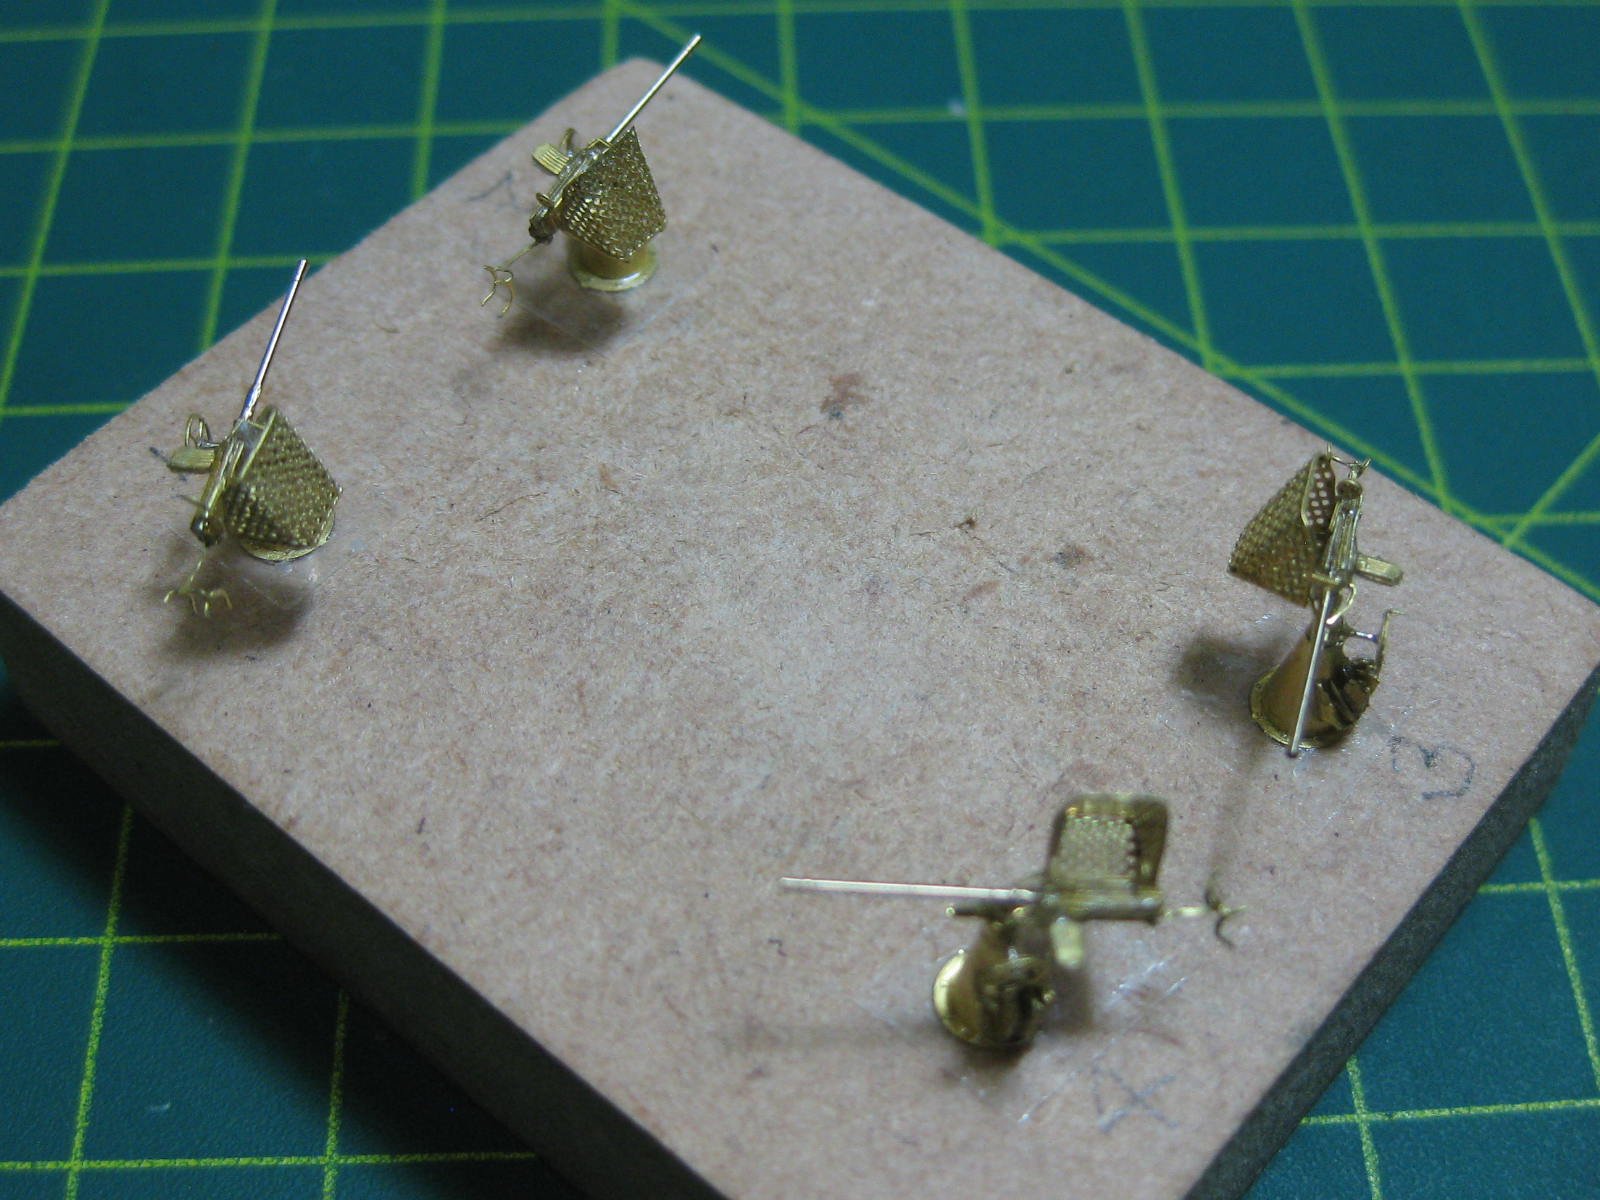
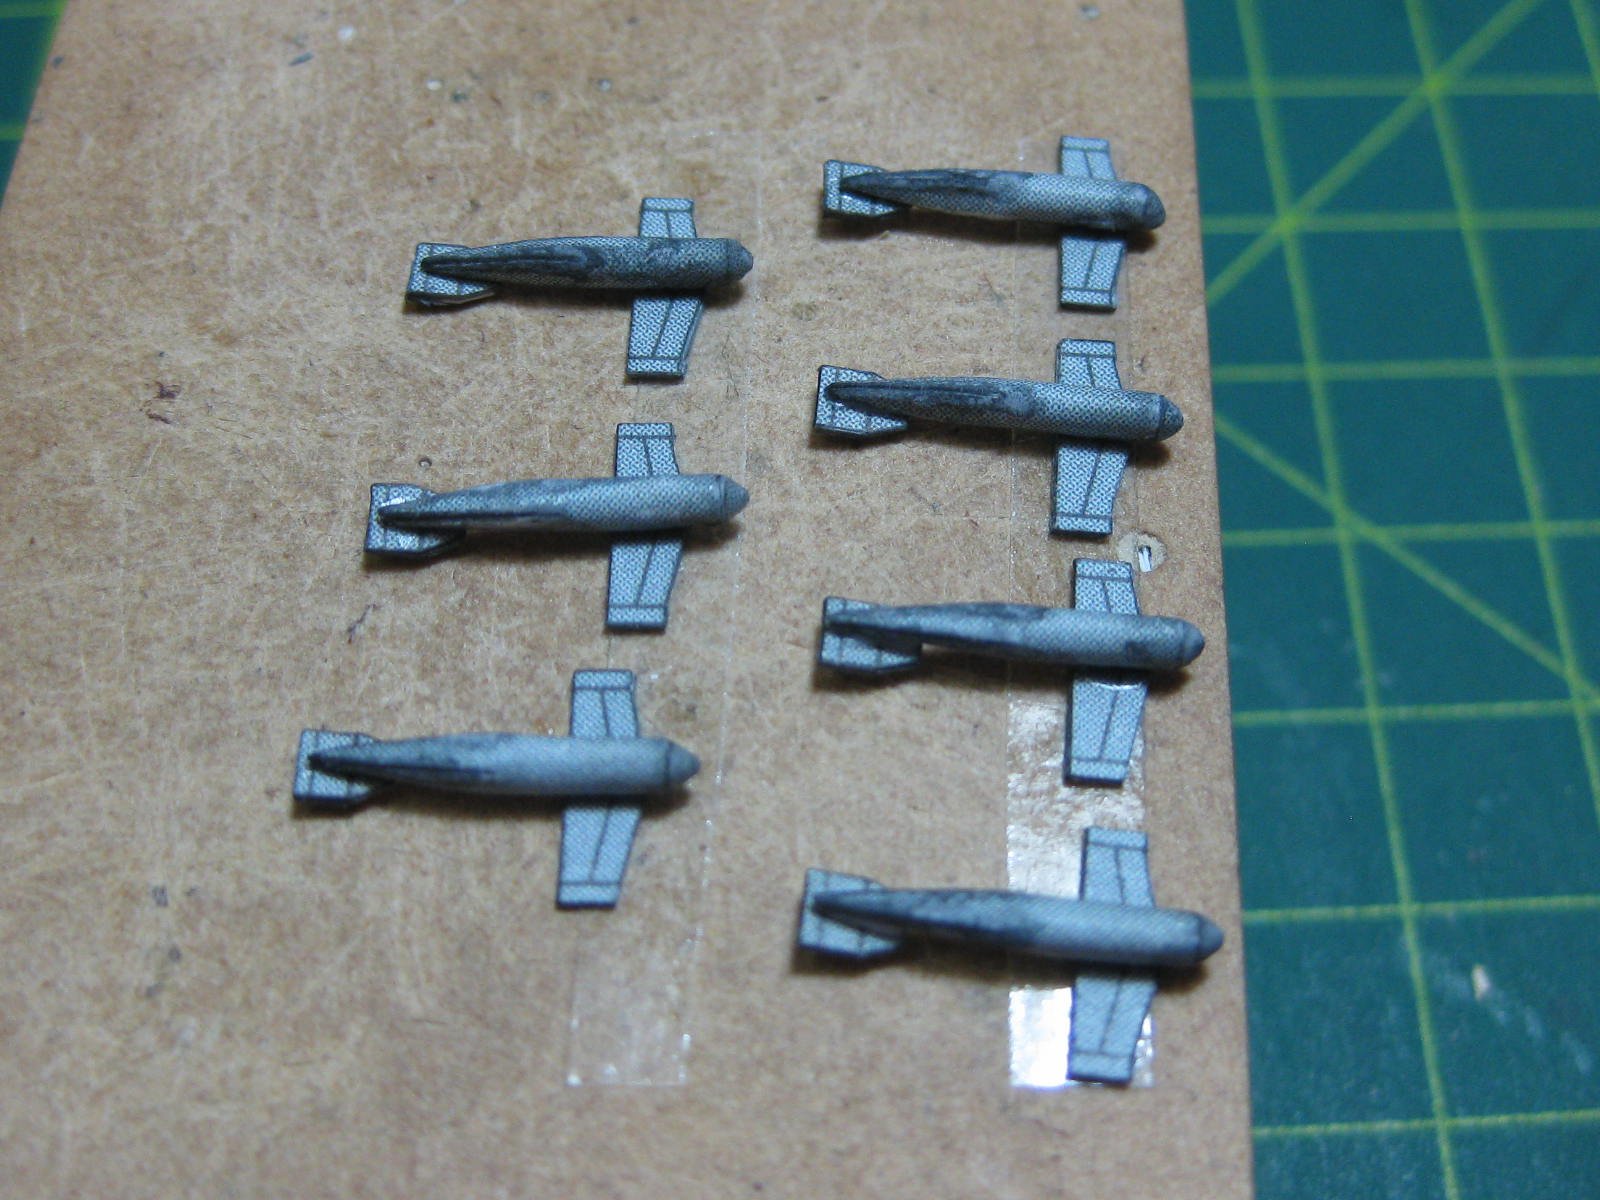
Correct Popeye (for the time being at least ). Here's my next model - another Card one from Halinski. HMS Hood : I'm not really interested in building a plastic model Yves, too much painting involved. I really don't like painting any more than is necessary. Moving right along. There are only two Davits supplied in the kit, so that's all that is going on. Quite difficult to cut out without distortion, but I managed it : There are also 7 Paravanes. These are a lot smaller than the ones on Amatsukaze, so there isn't as much detail. Also no PE for them : Making to nose cones for them looked impossible at first - they are tiny. They turned out to be surprisingly easy, once I de-laminated the card into about 1/3 thickness. I used my pointed taper tool : Ready to mount, after I make the support brackets from 0.2mm wire. The overly dark Pitt Pen touch-up will fade to a lighter grey in time : Danny
.thumb.JPG.ab81106b77ee9102974ae6d6604aa430.JPG)
.thumb.JPG.a3b189b3ae48d488b33a40c98fd6cd71.JPG)
.thumb.JPG.e201da6151dbe2869d874bfbb541b7ae.JPG)
.thumb.JPG.8bab8ec54894835e78a45f90b04411ca.JPG)
.thumb.JPG.6639f52a76f70f6d63dcc35874890195.JPG)
.thumb.JPG.a6a9b208817047f814c28f75ca1afa8a.JPG)
_-_March_17_1924.thumb.jpg.96c4652f837da250c49874947af53f92.jpg)
- 524 replies
-
- 12
-
-
What is it with us model ship builders and small white dogs ? He's never damaged or eaten a single thing to do with my models, although many a shoe has passed his choppers . Danny
-
I was only half-kidding with my reply . The main idea was to visit your father. Personally, I've transported both my "HMS Vulture" (twice) and "HMS Victory" (4 times) on the back seat of a Mitsubishi Lancer. "Victory" also travelled on the FRONT seat of my Toyota Hilux pick-up truck (only just - there wasn't much room for gear changing ). No damage was sustained on any occasion. As Jim suggested above, I packed the hull away from the back cushion to avoid damage to the yards. And .... I made sure the bowsprit wasn't crushed by the door handle when I closed it. Danny
-
Put it on the back seat of your car and take a drive to see your father ? In Australia that's considered a rather short trip . Danny
-
Thanks guys . Well, after all that extra work designing the pieces for the barrel boots ..... I discovered they were on the last Part Sheet WITHOUT PART NUMBERS. So naturally I missed them. They also weren't shown in the (almost) useless construction diagrams . Here's another one of many examples of the lack of thought that went into the design of this kit. The overlapping sections on the needlessly double-thickness parts are so close together that it's very difficult to separate them without distorting or otherwise damaging the pieces. Of course, there was at least 20mm of blank paper between them and surrounding pieces on the sheet. Thank God that I'm nearly finished - I'm really starting to HATE this kit : Anyway, rant over . If you've been wondering where I've been for the last few days - here's the answer. Making heaps of small detail parts to finish off the main deck before permanently installing the main guns. A lot of these parts would be more difficult to fit later on : I think these are Water Cannons? The four Anchors. These again were laid out in similar fashion to the parts above - almost touching in fact. They were also single-thickness paper in the kit - I tripled them in thickness prior to cutting them out : Here's a handy tip for picking up parts that are too small and/or fiddly for fingers or even tweezers. Cut an angle on the end of a toothpick, lick it and stick it : I had to roll a lot of small tubes for the Bollards. These were of a diameter where none of my brass or plastic tubing was the right size ID to hold them until the glue dried. I solved the problem by using an undersized piece of PVC tubing, cutting a slot down the length, squeezing it onto the correct size Number Drill and applying heat with my heat gun. The tubing stayed at the right diameter, and making the pieces was a piece of cake : I still have quite a few more small pieces to make, including four more 50mm PE guns, so I'll be back when I have more progress to show. Danny
.thumb.JPG.ab21cd7eaa4085bfca473eacf98c6320.JPG)
.thumb.JPG.c1da5ebd5aea51c497af4d13d7c9c45b.JPG)
.thumb.JPG.47cbfb9731e0d29b71935f326bac510e.JPG)
.thumb.JPG.f27e6059e2e17689dac73847a500c946.JPG)
.thumb.JPG.4d902db0cfe9da7dba1ccd4ae450ee6f.JPG)
.thumb.JPG.88933131eb4c31fa213bc4104c08723f.JPG)
.thumb.JPG.b8d03dcc5e14dd53ed0e6c4c1145c634.JPG)
.thumb.JPG.3c32872e429e0bd1d575d00c96a3ce58.JPG)
.thumb.JPG.b7a178b582d6629e2f47fd1cd077f254.JPG)
.thumb.JPG.61fcbf6cc3c26f7b4a8b58b642ad0519.JPG)
.thumb.JPG.78a82839e1186627650ce02673e68237.JPG)
.thumb.JPG.559c8744f11644db7fb2ae519cc90d2d.JPG)
- 524 replies
-
- 15
-
-
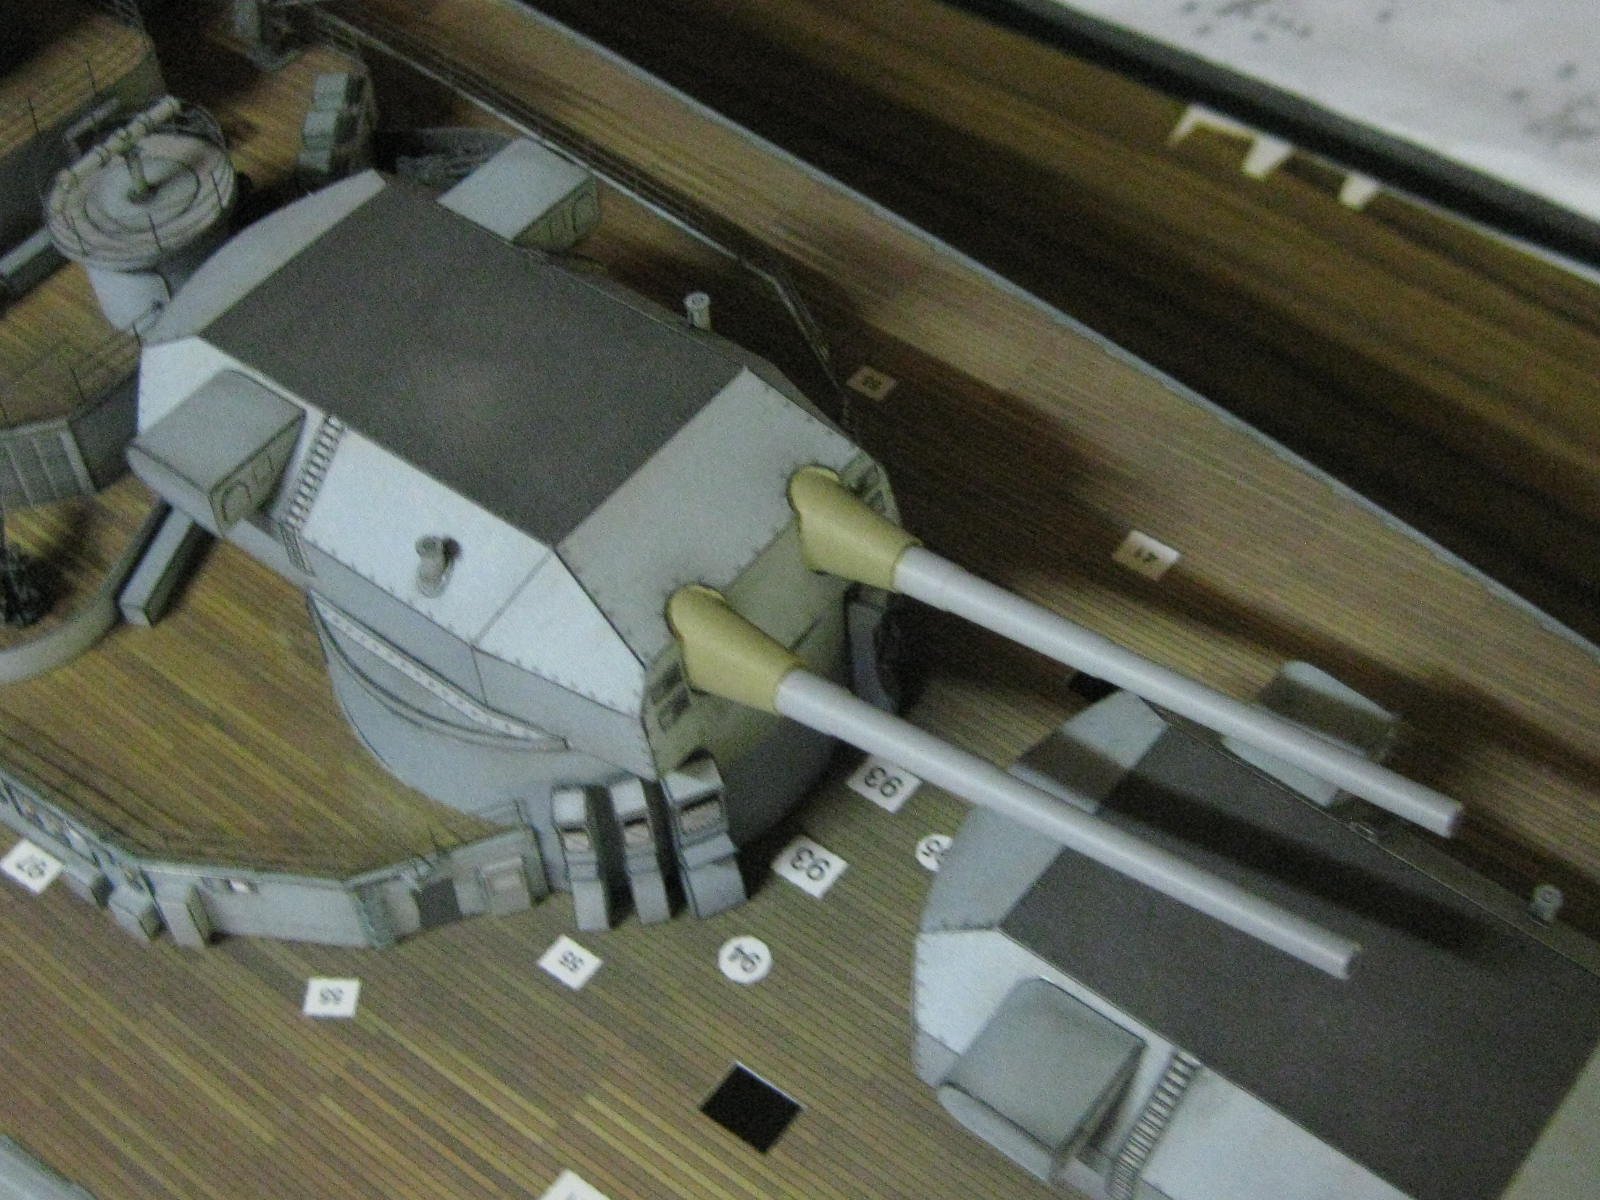
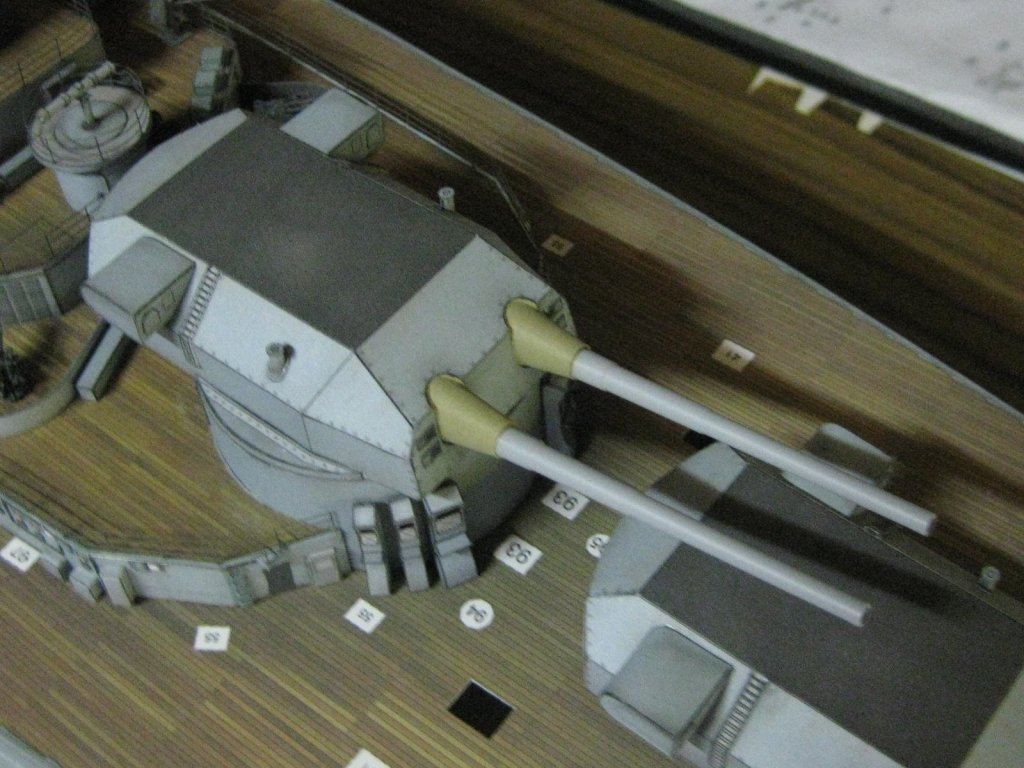
Thanks very much Popeye, Bernie (welcome back ) and Yves. Much appreciated. Yves, I'll take a pic of me holding Bismarck a bit later. Construction of the Main Guns begins with the usual inadequate kit-supplied framing, to which I've added a lot of extra card : One of the turrets skinned. I've modified these to swivel as well : There are 12 vents of varying widths that fit to the two higher turret bases. Here are a few pics of there construction : The vents fitted to one of the bases : One of the turrets with the gun barrels fitted : I've made "boots" in a similar fashion to the ones I made for the 150mm guns : Turret "Caesar" temporarily sitting in position on the deck. I've also painted the boots : Danny
.thumb.JPG.9df2c42af8995690dbd1def55d928299.JPG)
.thumb.JPG.bd4c878052af7ca753046ea5eac9e2f6.JPG)
.thumb.JPG.47b15f7126e72e86538a3e803cd4e7f7.JPG)
.thumb.JPG.4558ca665378c52e6e9b3c81e88a2dd4.JPG)
.thumb.JPG.b8cfd439946bd7dcd6ac9a3ac65b2b7b.JPG)
.thumb.JPG.dfeb7b23d412300f3052efb4c8be3645.JPG)
.thumb.JPG.6b5cd6a35a7e38f6b94d9ca8a43072ec.JPG)
.thumb.JPG.8d83b91f691d9813f0201b55b09b6934.JPG)
.thumb.JPG.12743cf62eb1a3bb5099aae81e89384c.JPG)
.thumb.JPG.9d90d178ac12be42794f11d33be86f78.JPG)
.thumb.JPG.0a29df270158b5c06d07f1aa5a297d95.JPG)
- 524 replies
-
- 23
-
-
I'm not the person to ask . The few "Restorations" or "Completions of models that were started and never finished that I've done for people whose model-building relative passed away" have netted me about 30 cents an hour. Maybe I'm too cheap . Apart from a couple I've kept, I've either donated some to Museums or given them away to kids and grand-kids. Danny
-
At least you now have the confidence to drill them when needed. A good skill to have for the future . Danny
-
I changed your title Steve . Here's a link to some figures in 1/35 scale. THIS ONE looked particularly suitable for a boat crew. You'll obviously have to modify them to suit. Danny
-
G'day Slog. I just re-visited this post and had a thought about the above problem - as the funnels are printed on thin paper, why not re-draw them and change the colour, then print it out. I'm sure you'd get a better result after a couple of tries. Danny
.JPG.ae400cb940077457cbd5e6f51d67df39.JPG)
.JPG.0a3f2bf583b3526d437826ca286cfd68.JPG)
.JPG.7073d7c624142f0948ffb2c28371671b.JPG)
.JPG.2790d3c0d14c3ba1db7b1603b7d6d5fe.JPG)
.JPG.b0ce1d619ed4ba2fc192479adace99a0.JPG)
.JPG.12239fe3b4bafe956bacd0c95dc35b67.JPG)
.JPG.81cf7201f3a72fe79d543c08c30b3d39.JPG)
.JPG.62f2d20add24c3e2b3d01c61736a9649.JPG)
.JPG.9bd0cb24f10a288077b6f116cc61b9cd.JPG)
.JPG.bab07a1033ed89352b56503848ee223a.JPG)
.JPG.3235d167fc3de79c486a70611e9ce9be.JPG)
.JPG.c825af283258ba8b7e557c7a8f94b3c3.JPG)
.JPG.b736cccc6601589ceed2bf832980a1b5.JPG)
.JPG.23a0e4f62d02f533e577c7e4f58ee525.JPG)
.JPG.3e86b7bd8596619358c164215cc7c8c2.JPG)
.JPG.24bda2e89752be68cbf71e8ffdc86803.JPG)
.JPG.2b354c18e9d69e0d04328048e6f0293d.JPG)
.JPG.f57e945b199364d79c000354c968e1ff.JPG)
.JPG.28965084be61c5943f1e4e53ad70ba41.JPG)
.JPG.82982491ed85e01762c2a1e57b3ffaea.JPG)
.JPG.c5a8ad9dea32692872278ab9d8a07a57.JPG)
.JPG.0c05fd967cd2a3cb34c9d5b8e423f796.JPG)

.JPG.d0714162b71a50951c258fd7a33565a2.JPG)
.JPG.4164adad3f7ca7aab78fddf4e6dd667d.JPG)
.JPG.a143c3dc9e86008bee9415d0918400fa.JPG)
.JPG.11fd05271e4fd877c0c29c6571cfae1f.JPG)
.JPG.40fa65b5473f47a2eaffa1394f021743.JPG)
.JPG.6cf6402d9a82fd670b0474107d434c12.JPG)
.JPG.a9138b84b132682405234a2174d722c9.JPG)
.JPG.2df14b3e2ea41a032d67ffdd043e93c7.JPG)
.JPG.2a997eaf306b31b5dde4671985fcc465.JPG)
_-_March_17_1924.jpg.2fcf70b448253b26565e3e530f0fdc18.jpg)

.JPG.d6639e592331691211fac0fa1e918335.JPG)
.JPG.f95bf1d78d20ee3b5fda403b405ba0c5.JPG)
.JPG.e8b077d454314129ea608d97a776634b.JPG)
.JPG.6e4885a46822c0ab4b7800d0e6f58128.JPG)
.JPG.c8f7db2622a624f3031ed78a4483342b.JPG)
.JPG.a127cf79249e5ae7a4314f1a146a391e.JPG)
.JPG.a6555a311f47de4e6063d760c9e1bf6d.JPG)
.JPG.2a3626403be5544e2261c66622f9ede1.JPG)
.JPG.13aa98e4818873738796fe1cbd8fddc6.JPG)
.JPG.0b762898b39f0fc320334c81052b4559.JPG)
.JPG.d4fe42a9458bc185bb4c92bc32b005f9.JPG)
.JPG.b87d0ccec858e4af24c678075ff795a3.JPG)
.JPG.ed529f924a82eb6e0c737ea70047ed48.JPG)
.JPG.8b51a7e13fcfecc262b7d28fb0e3c951.JPG)
.JPG.ef6d5d15645669f4b6a743574d359dee.JPG)
.JPG.6dab2f15dc7a0b38bcea523aa675c601.JPG)
.JPG.2ee2be3a922b27843e52aafa83e94a5b.JPG)
.JPG.56ff60f86b4f4ae3511e90562bbd0187.JPG)
.JPG.c4306f87de8f0a5302e1713886124976.JPG)
.JPG.b5efa651d5b6a35f9c99b4b11a8b95e6.JPG)
.JPG.be1e716d25cd91f843c8827cb98483d0.JPG)
.JPG.84c71888b2c55bd61a4b766a9fbad3ab.JPG)
.JPG.55da2e1bdd0eaf4215fc7f7c10d1d39c.JPG)