rudybob
-
Posts
216 -
Joined
-
Last visited
Content Type
Profiles
Forums
Gallery
Events
Everything posted by rudybob
-

AVRO Lancaster by Papa - FINISHED - Airfix - 1/72
rudybob replied to Papa's topic in Non-ship/categorised builds
Beautiful job on a great plane. -
1/200 Trumpeter IJN YAMATO - issued by MRC/Gallery Models
rudybob replied to yvesvidal's topic in REVIEWS: Model kits
I prefer brown shoes. You might seek out Victor on You Tube. He is taller than other historians. Battleships were used effectively at Guadalcanal, great for shore bombardment. Beautiful ships they were and I would enjoy a tour.- 104 replies
-
- 4
-

-
- MRC/Gallery
- Yamato
- (and 1 more)
-
1/200 Trumpeter IJN YAMATO - issued by MRC/Gallery Models
rudybob replied to yvesvidal's topic in REVIEWS: Model kits
Victor Davis Hanson writes quite well about the folly of the Yamato in "The Second World Wars." Recommended- 104 replies
-
- 4
-
-
- MRC/Gallery
- Yamato
- (and 1 more)
-
Paint and wait....sand some then paint and wait. I did a fair amount the last couple weeks. White was the hard color and the one I sanded. I tried 2000 grit which was ineffectual. 400, 1000 and 1500 did they job. I made some sanding sticks but the results did not justify the time and effort. Just as in an airplane model the innards are built first. I looked at many completed Revell PT-109 pictures. One Revell color scheme calls for blue grey matt. I made a mix of Fl Sky Blue and Dark Grey. I liked it and used it on the small decks but there is no way I can use it to hand brush the hull and deck so I am using it as an accent. The vast majority of the model is either blue grey matt or dark green matt (which I am going with) no reason I can't use my mix where I think it fits. I may yet buy a rattle can of model paint. It goes on less thick. I don't do much weathering on my builds because I could ruin it but I like trying. I dry brushed a light grey on the doors then dry brushed white over that. It's OK. I dry brushed gun metal over the black benches. One thing I find real helpful is looking at pictures of my paint. I find it real easy to discover areas that aren't up to my expectation so I can go back and attempt better coverage which I usually achieve. I do reach a point where I think...That's enough or I am going to make it look bad in a different way. That mostly occurs along color interfaces. Around the cabinets I just scrapped paint off detail. The window fit snap snug which is great cause I too easily smear glue on clear plastic. The single bulkhead paint looks OK to me I glued these pieces together using Tamiya cement and extra thin cement. In combo they work great. I must come up with a scheme to mask these parts when I spray.


-
Following the historical scheme is very important to many and I appreciate their accuracy and diligence. I am not one of those types and have no reason(s) why not.
-
1/200 Trumpeter IJN YAMATO - issued by MRC/Gallery Models
rudybob replied to yvesvidal's topic in REVIEWS: Model kits
Have fun. That ship was a HUGE white elephant.- 104 replies
-
- 2
-
-
- MRC/Gallery
- Yamato
- (and 1 more)
-
I have used RMR-141 RTU Disinfectant and Fungicide with good success to remove mold around the house. It kills mold fast and can be wiped off with a rag. I have used it in and out of doors. KLR makes a similar product which I find less efficacious but still works Good Luck with your project
- 16 replies
-
- 2
-
-
- hull repair
- Hudson Bay Company
- (and 2 more)
-
Thank You. Second try at it. The first was quite bad. The pinnace is on the shelf until fall. I spent about 3 months working on the planking and it was very hard for me to get the bow bend. I think it will be easier with my new and improved frame but I am not confident I will get "the bend". Maybe all I really needed to do was leave it for a spell and when I go back to it I may have forgotten my bad habits
-
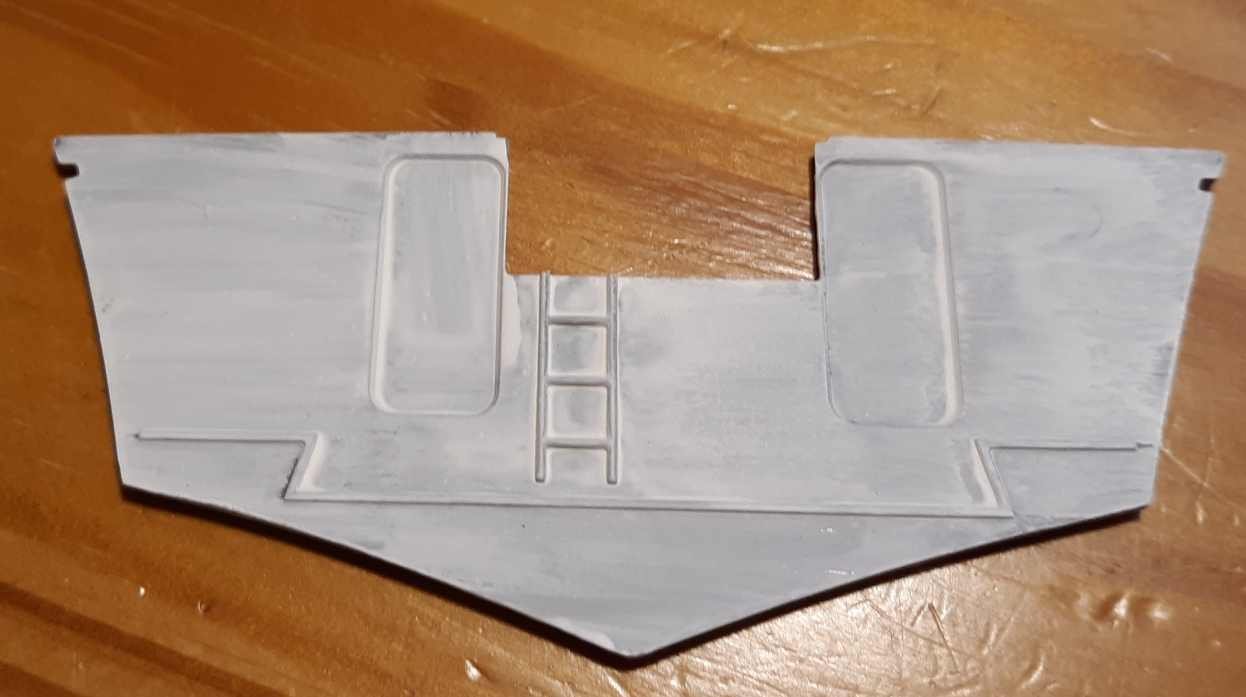
There were a lot of considerations for me going into this model. I have not done a plastic ship since the Oriskany in 1967 or so. I am well attuned to the order of build when doing a 1:72 WW II US or British plane. That's not the case with ships. The directions are actually pretty good. My concern is with order of paint as well as which paint. I normally hand brush everything on planes. If I am going to perfect a skill concerning paint it will be brushing. I find hand painting extremely fun and very relaxing. On a model this size I must rattle the bulk. The colors listed for the PT can't be found down to Walter's Tru Value so I must get as close as possible. I am going with the green scheme, actually I am tired of green or grey builds but I am not doing a hot rod so I am limited. The stores so far had nothing that I found acceptable. My preference is always to use what I have on hand so I am going with Rustoleum Hunt Club Green. All will not be rattle canned. I find white paint the most difficult color to brush and the bulkhead asks for Flat White. I have some 18 month since last use Testors that I opened today. Truly, I close the tops best I can with cleaning but after a year or so there is evaporation. A thick slur greeted me but I felt the jar salvageable. I added thinner drop by drop until I brought back an acceptable consistency. I tested it out on the the back of the nameplate and it looked about like I figured it would. Not swell at all. Since there was nothing for it (I'm not buying a new bottle) I did a coat on the bulkhead and it looked like one coat of white over grey plastic. Sometimes I prime first, this was not one of those times. I washed with Ajax first. I think washing best. Enamel paint needs a day or so to dry. I am going to sand with some 1600 or 2000 paper and see what goes. Sanding did little if anything but I will apply thin coats until I get something I like. White takes time. I post this picture to force me to make it good. Goals are good.
-
Thanks. My plan at this time is to glue the hull where it fits best which is in the middle. Then I can progress fore and aft holding the seam tight and applying from the inside. The extra thin allows for this. Third hand anyone? My goal on every model is to make the seam disappear. I have yet to do that though my skill level has improved greatly. If glue gets through...bugger. I will pay heed
-
Back in the 60's I was turned on to PT boats because of Lieutenant Commander Quentin McHale. Great show for a 9 year old. I built models then and always wanted to do a PT boat. Never did. Recently I read: The Expendable: The true story of Patrol Wing 10, PT Squadron 3, and a Navy Corpsman. and here is my build log. I don't spend much on plastic models. That's me. I stretched it to buy this one. I'm not interested in doing it as 109. I want to label it 34, 35, 36 or 37 which were if I recall accurately the PT's that got MacArthur out of the Philippines It's packed in one side open box which I do not appreciate so I taped all the sides closed and cut a flip lid. Much easier. Fair weather means I can get in the paint booth (firewood storage room) so I can use rattle cans. I will never air brush cause I don't want to learn the art or clean the device. I will get back to the pinnace in late fall. So far I have taped the hull together. It's a pretty good fit. I am happy to have Tamiya Extra Thin. I wish there was a similar product for wood More as life permits


- 55 replies
-
- 14
-
-
I made my own single ship display case. I bought some cut to size sheet acrylic and Weld-On brand solvent, watched a few video's. I used half of a small mahogany table top I had in the garage. I finished it off with some quarter round I also had. Very cost effective and satisfying. Two grand is not too much to spend on display. Dust is the enemy.
-
Work Table Recommendations ?
rudybob replied to DanB's topic in Modeling tools and Workshop Equipment
I have two 4 x 2.5 foot trestle tables placed in an L. Lots of leg room -
Which is what I decided to do because...though I need practice drawing straight lines I need practice on the bandsaw more. I do not want to draw my lines a third or is it fourth time to get them how I want. My erasing skill is quite high. It needs no more practice. Thank You :-)
-
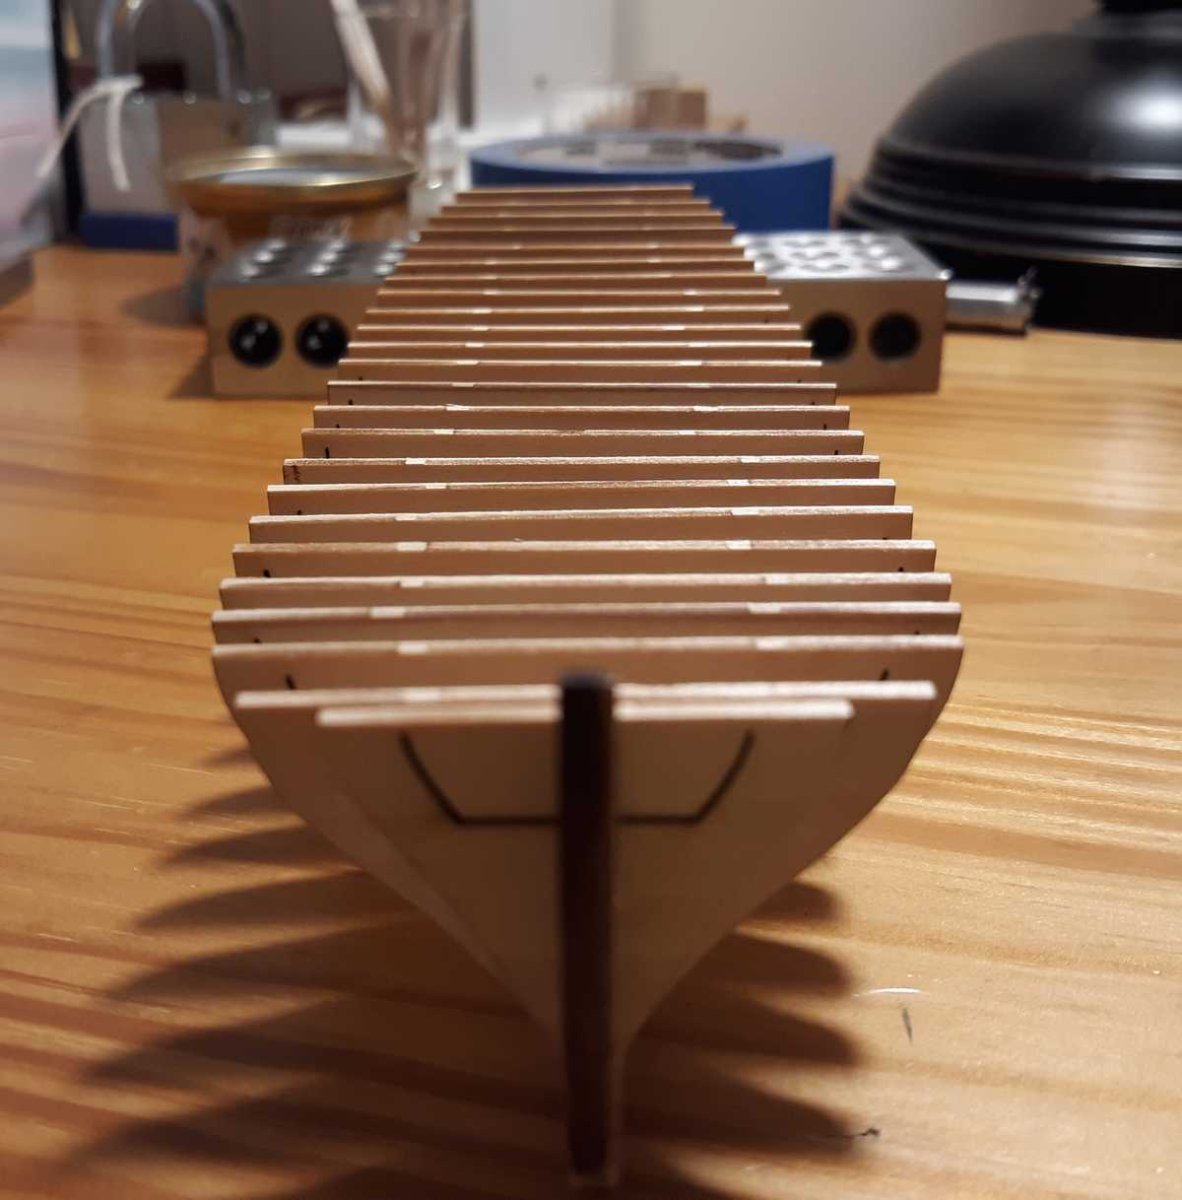
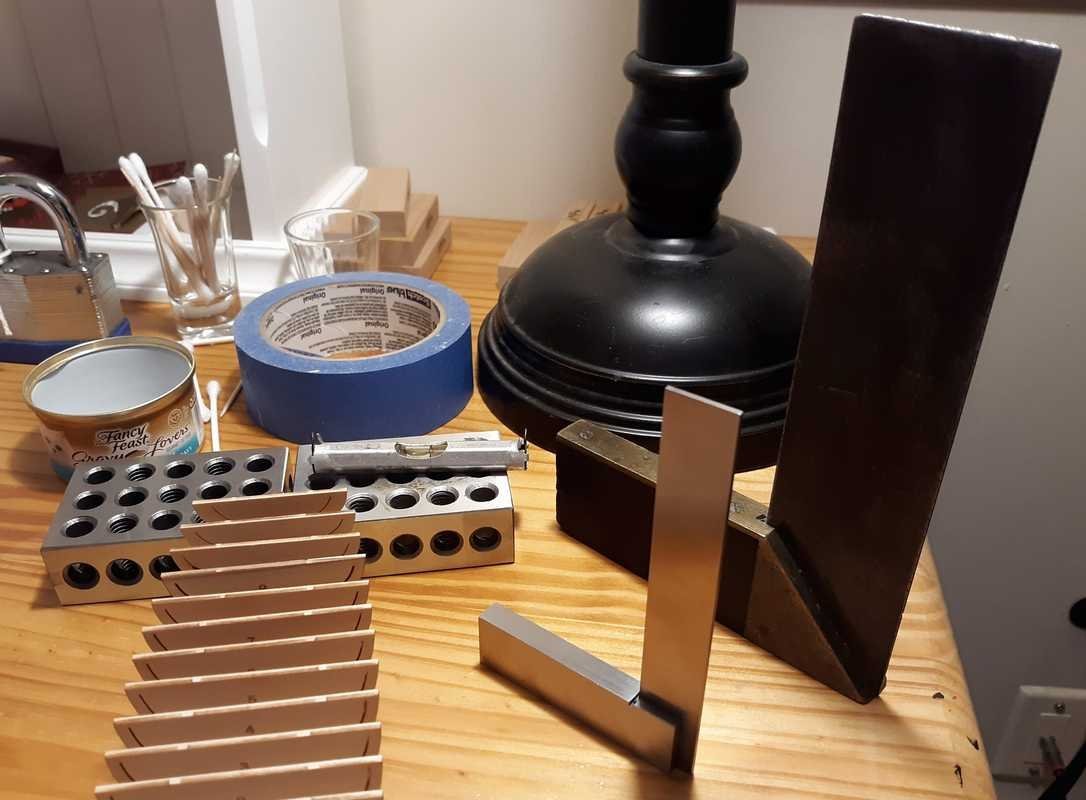
It has taken me awhile to get to this point. Some days only one bulkhead got placed. I settled on Gorilla wood glue because it dissolves nicely to fix poor placement. These are the tools I used to align the bulkheads. It's as good as I can do. Some bulkheads fit well right off others not so swell. Next up will be a scheme to support the bulkheads for ticking and fairing.

-
Yes flush with the bottom. Thanks
-
My low skill level precludes me from knowing if I should cut as I have drawn or can I lay the keel flat and save myself some cutting. It seems to me I can lay it flat but I don't know
-
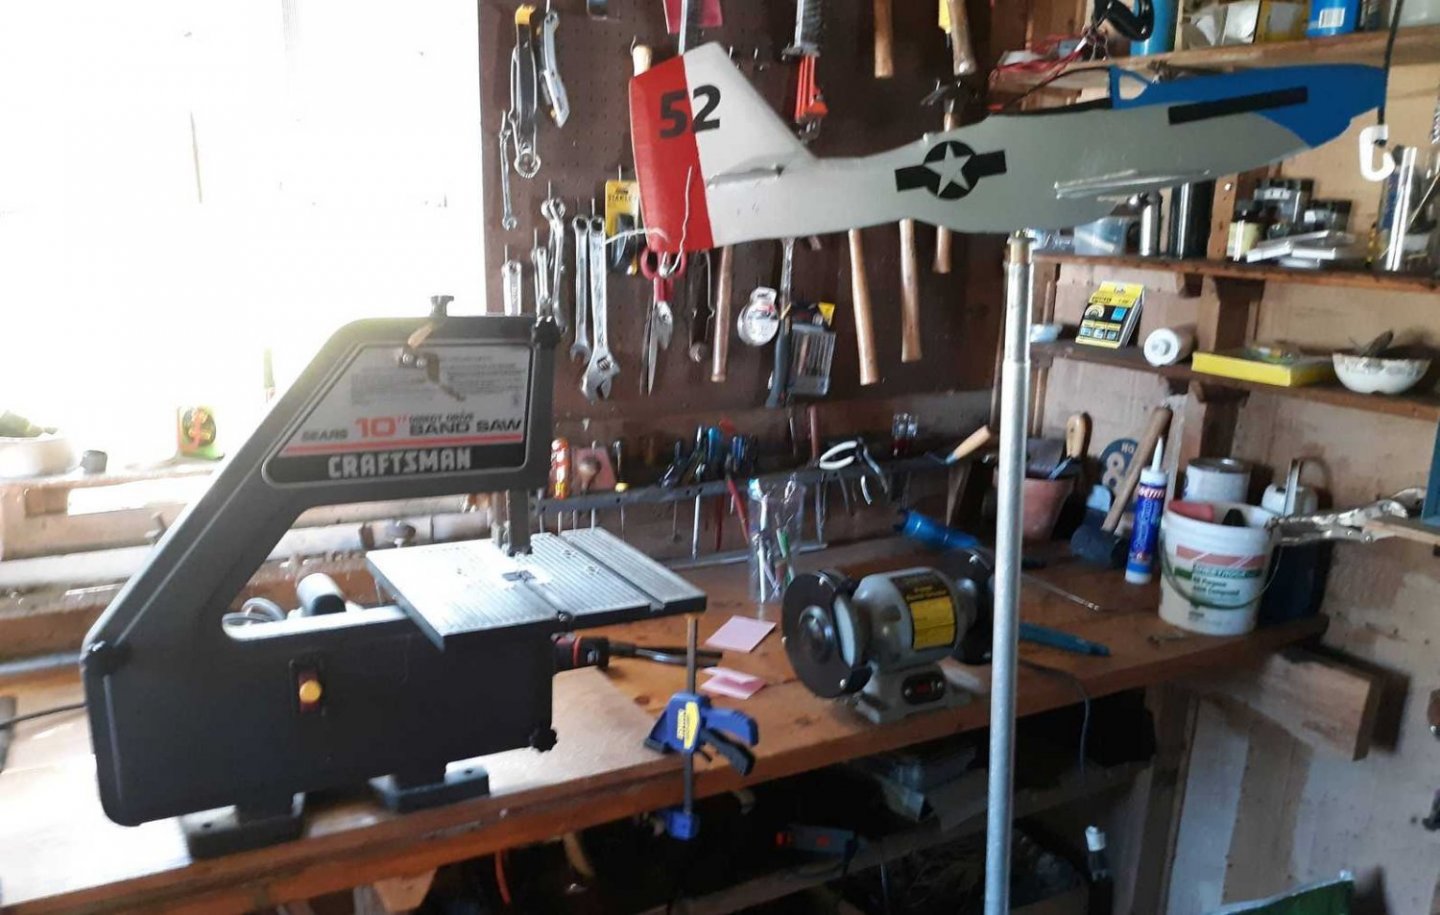
Yes, three wheeler's are generally panned. I am happy so far. The manual goes into detail regarding proper setup and alignment and is easy to follow. I got it turning yesterday. My first project was to cut a 2x2x 1/2 square that I then made into a circle. I am refurbishing my P-51 yard whirly gig that I made without power tools a few years back. The part that held the propeller blades was cracking. The blade was not difficult to install and it is still tracking center after my cuts. I found a guy that prints table inserts. This is by no means a saw I would depend on to crank out salable widgets. I am hoping that by frequently checking my tracking and keeping it clean it will last for my next few small projects. I agree with Captain Shaun....If I could only have one power tool this would be it. So easy to cut
-
I think it's lovely
-
"Uh oh, Spaghetti-O's! I will let you know how it goes
-
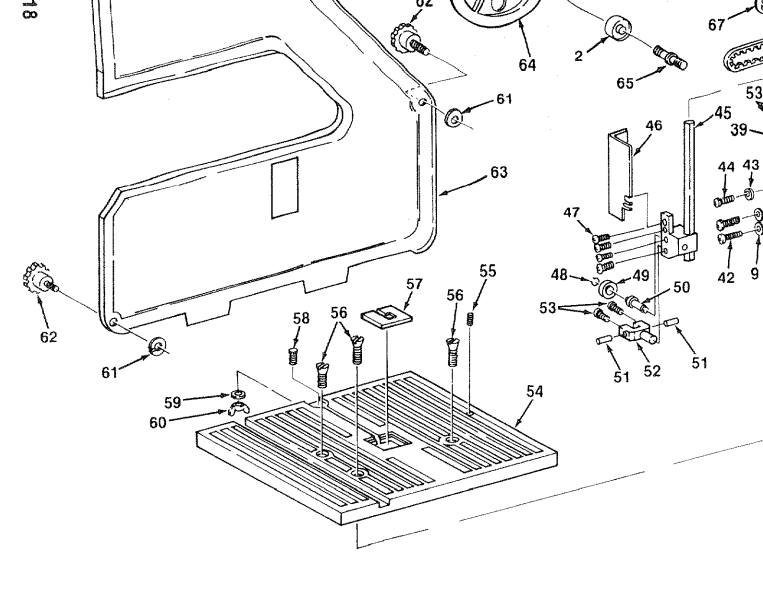
I was gifted this saw. It's complete except for the parts listed in picture 3. Picture 1 shows where they go. I have no experience with bandsaws. Looking at the machine I can see no absolute need for these parts. Do any of you guys know what purpose they serve? Thanks


-
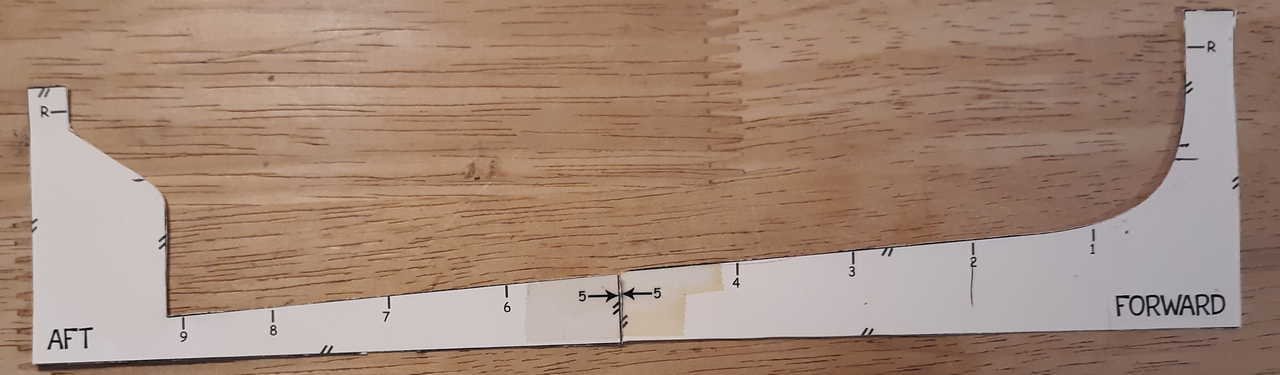
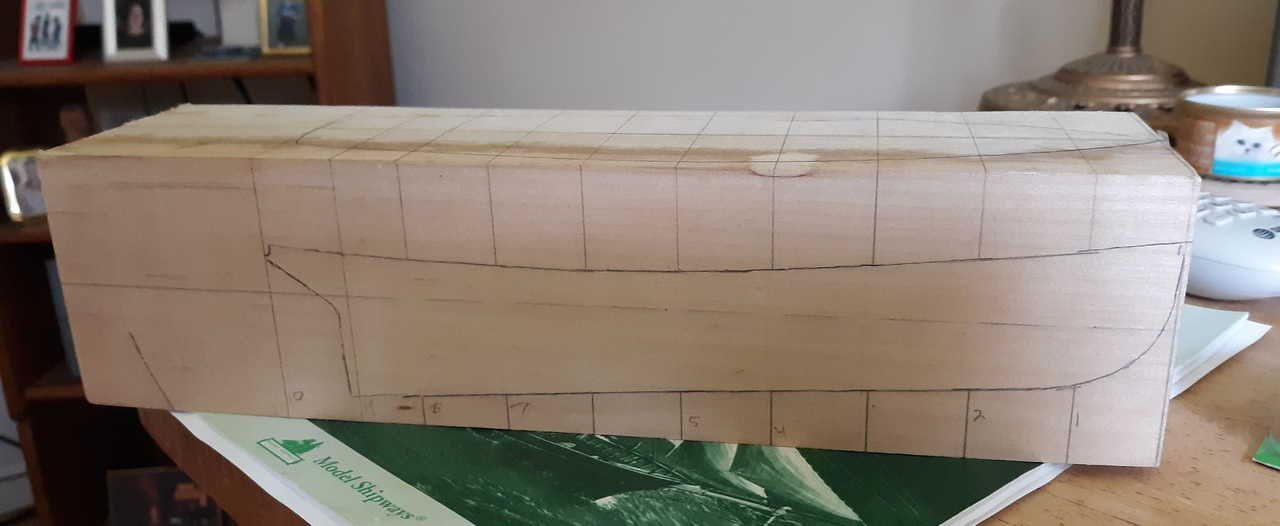
I noticed that tonight. The hull templates are too large.
-
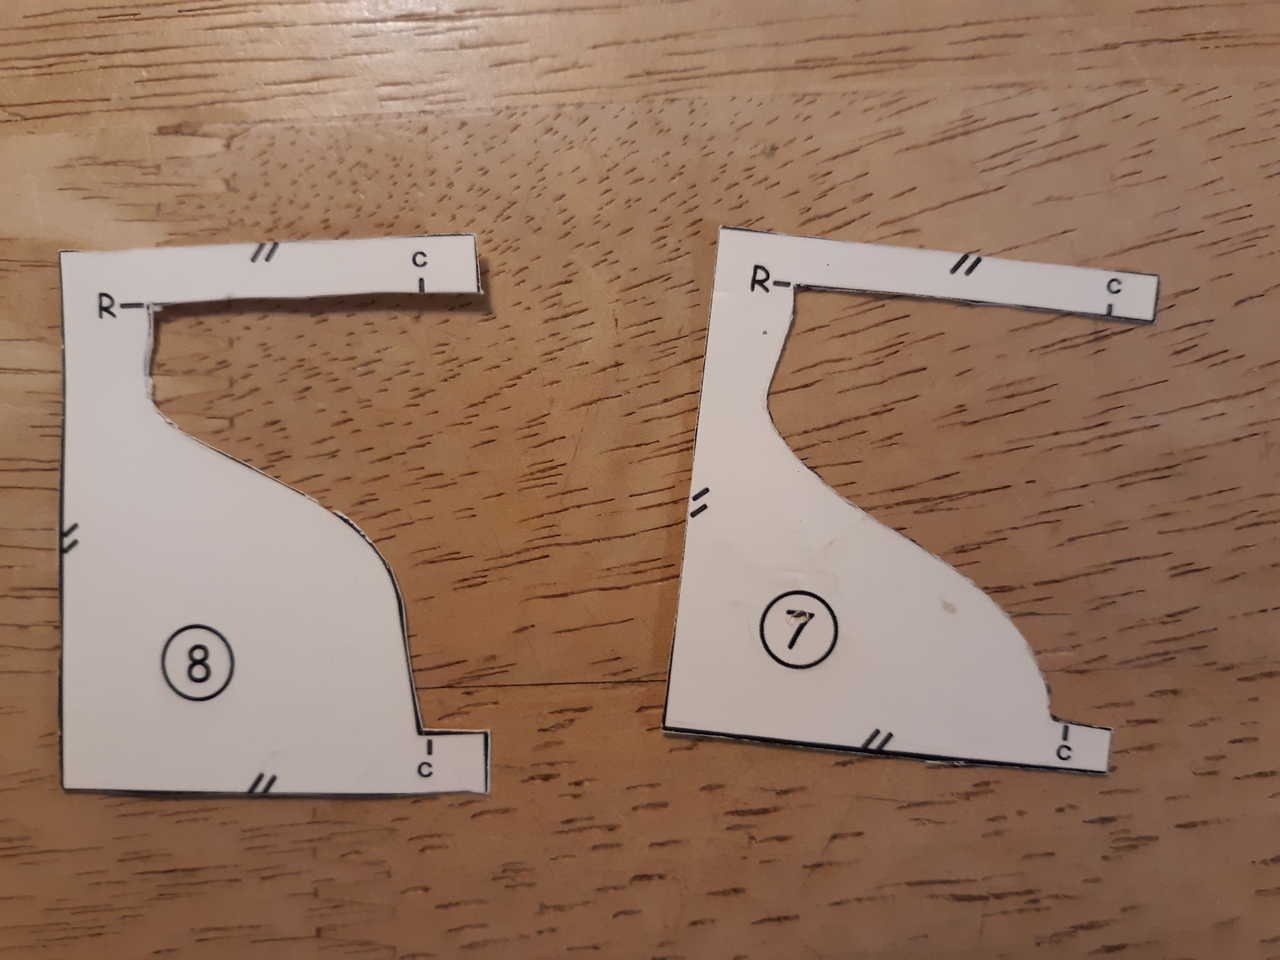
Here are a couple template pics. On each there is an R (for the rail?), a C (for the centerline?) and several moustaches. Am I correct in my R and C guesses? And what are the moustaches for , if anything? Thanks