


DocRob
-
Posts
1,297 -
Joined
-
Last visited
Content Type
Profiles
Forums
Gallery
Events
Everything posted by DocRob
-
 Thank you Mike, it is a fascinating plane, indeed. What´s mor with these old crates, there are so many different materials to replicate, wood, metal cloth, rope, ..., right down my alley. Cheers Rob
 -
Cant´t wait for Sally, Kevin and yes the night monster is my contribution to the LSM Twins GB. Cheers Rob
-
Thank you Ken, usually the WNW kits are very good, but you need to be careful, not to break the delicate parts. In case of the AEG, I re-bag the sprues, because of the very fragile parts. I don´t do that normally. Yes, there is the rigging, but I found out lately, that rigging a sailing boat is much more demanding. The build will be a challenge for sure, but I expect no unsolvable obstacles, other what I might produce with my clumsy hands. Cheers Rob
-
I cleaned a zillion parts after cutting them from the sprue. With the tight tolerances, WNW kits usually have, this should be done with great attention. Before I start painting, I´ve done some test fitting, to see, how the innards of the AEG lay out and how the fit will be and which parts are visible and need painting and weathering. Test fitting was promising so far, but yeah these tolerances will call for scraping away paint and use the fiber pencil as my best friend for mating surfaces. Cheers Rob
- 190 replies
-
- 18
-

-

-
I ordered the missing mechanic and Rexx exhausts for the AEG, my Albatros D.V and Fokker D.VII. The mechanic will be this fellow by Kellerkind: Cheers Rob
-
Some of your questions, I will answer later for myself Dave. It definitely is a large plane and huge project. I built some smaller WWI planes beforehand and somehow, these builds were very rewarding and motivating, but never easy. I hope it will be the same with the AEG, but generally the WNW kits are well designed and the delicate nature of these build lies in rigging and finishing. I´d like to see your effort with it. Cheers Rob
-
Welcome on board Egilman, it´s a three seater but it will be a bumpy ride, hopefully without a crash landing. I always liked lozenge camo pattern and built some day schemes and one naval, but never a night lozenged bird. I´m no expert about Richthofens vita, but I think, he was a gunner in a AEG G.II, an earlier model with less engine power and payload. Cheers Rob
-
Well, it´s a bomber, why not starting with the bombs and the exhausts. In this case, it´s because the smaller 12,5 kg bombs will be filled into inboard racks and have to be painted first. I glued the parts together along with the exhausts, to evaluate the need for substituting them with AM. There are bombs from Kellerkind and the metal exhausts by Rexx. The parts look promising, but I will decide after priming. This beast was able to carry a bomb load of up to 800 kg and a later -.b version could handle a 1000 kg bomb, a lot more than the Gotha. It seems the ground was the worst enemy of this type, as many crash landed, due to night conditions and the tendency to nose dive easily when touching down. Earlier types were used in daytime raids, but better fighter coverage pushed the AEG´s into night duty. Cheers Rob
- 190 replies
-
- 13
-
-
I have to admit, I was less than thrilled with the Twins-GB over on LargeScaleModeler initially, when I read about it on my Berlin vacancy. Back home, I decided to browse through my stash for inspirations, still unsure about my participation. Lots of twins to choose, but one immediately rang a bell, the monstrous (for it´s time) night bomber version of the AEG G.IV by Wingnut Wings. I have a soft spot for quirky designs and since I bought the kits years ago, it was sometimes on my schedule, but was dropped, because of sheer size and complexity. Well, now with the GB, there is another possibility to tackle this lozenged monster. I´m absolutely not sure, if I can finish the AEG until July, but will try. This is the kit and this will be the chosen scheme, but with the shark-? mouth only in white. The entire airframe will be decaled with the kit supplied night lozenge and I have to experiment a bit with the underlying color for contrast and accentuation. I will use some AM, like HGW Seat belts, Gaspatch MG´s and HGW masks. The figure of the boy will play a role along with a mechanic, which is still to choose. I think about adding Rexx metal exhausts and skipped the thought about adding Taurus timing gear for the engines. I watched at many pictures and decided, the gear is hidden under the wing in a tube metal cage, so not a lot can be seen and I will enhance the kit parts with some detailing. Rigging will be a nightmare and I´m not finally decided about the rigging material. I liked fishing line and Bob´s buckles a lot with other builds, but may simplify rigging a bit. A while ago I thought about a method, gluing in the thread directly into holes, pre drilled through the wing. this can be pulled taught from above, sealed with CA and cut flush, when dry. Because of the later to apply lozenge decals, the holes will remain invisible. Later I found a build log, where the builder used that method on his AEG build and it worked, lets hope the best. I will further use Karim Bibis great PDF-book, which I acquired from KLP publishing and use it as a guideline through the complex build. Cheers Rob
- 190 replies
-
- 19
-

-
-
Due to the Twins-GB over on LargeScaleModeler, the McLaren build is boxed and paused. It gave me a lot of grief, but i felt, that now the fun part of the build would have started, but that´s for later. Cheers Rob
-
Your Taube is a beauty, Richard. I´m always amazed, what you guys are able to do with card models, simply stunning. I have a WNW Jeannin Stahltaube in my stash, which I will build in a not too far future. These early birds have their own charm. Cheers Rob
-
For plastic modeling, my go to´s are Tamiya plastic cement (white cap) and Tamiya extra thin (green cap). I use this combo since many years and fully trust their abilities. The extra thin cement adds another dimension, as it can be applied with the parts hold together. It spreads through capillary action. Cheers Rob
-
Not to my knowledge Craig, unless some of these tiny Japanese letters on the package say so. I used Tamiya´s decal adhesive, softener type for application and afterwards used the Tamiya Mark Fit extra strong on top numerous times, combined with some hot air. Cheers Rob
-
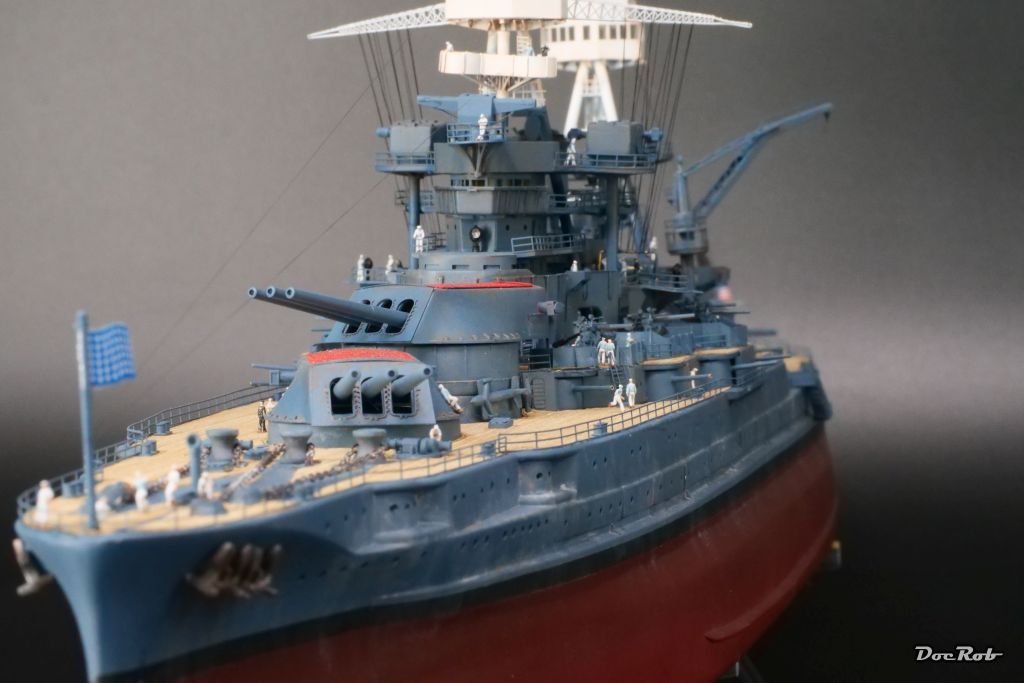
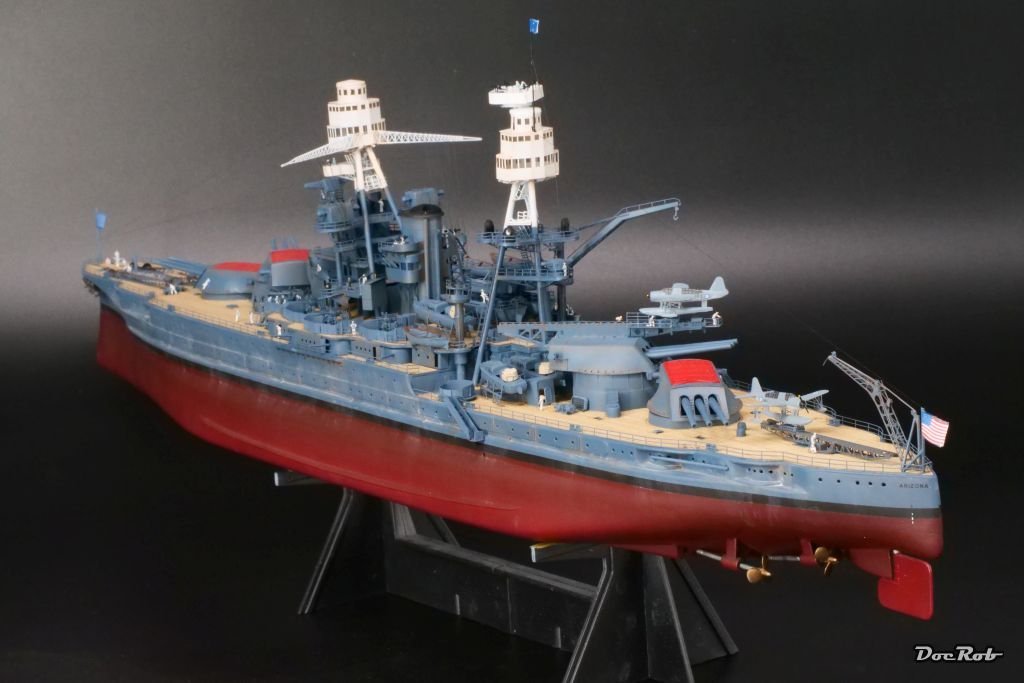
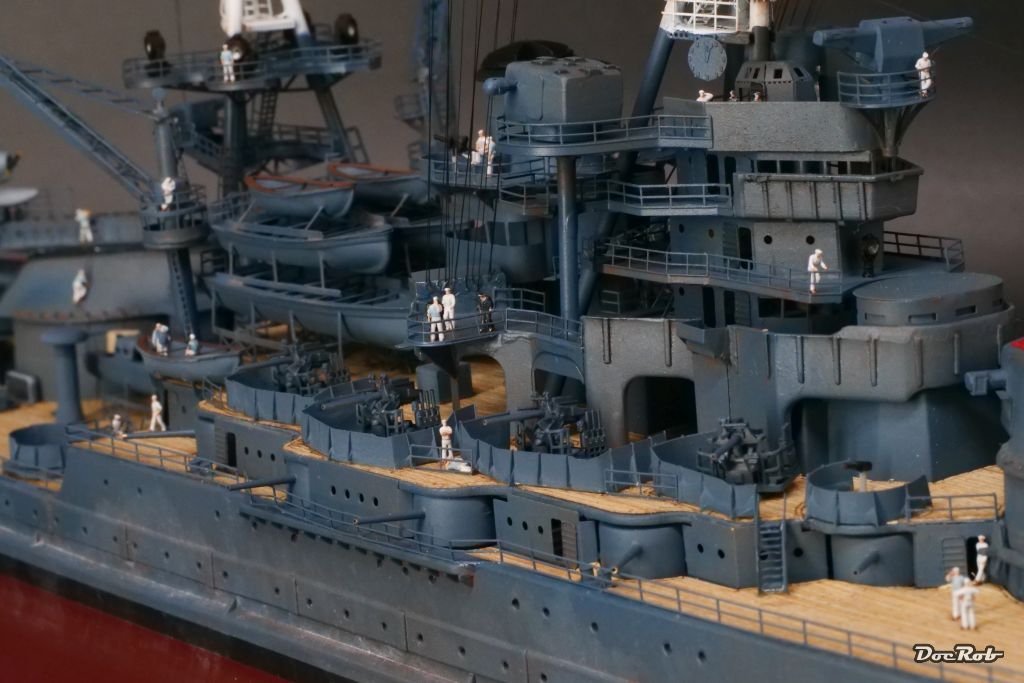
My only plastic ship so far model was the recently build 1/350 USS Arizona. The Hobby Boss base kit was a plastic nightmare, but the Eduard boxing included a lot of PE, brass and 3D-printed parts and I added wooden decks and figures. Cheers Rob
-
I think, I mentioned a while ago, that this build was supposed to be a fun build, but guess what, this beast keeps fighting me on all angles. After finishing the engine, I decided to give the Studio 27 carbon decals a try. There are over 80, luckily cookie cut with a very nice representation of different carbon patterns, along some rivets and fasteners. So far so good, but the decals are very thick and brittle. I broke many while applying. First things first, the preparation included removing cast textures on some of the plastic parts with files, sanding tools and chisels, then use Tamiya LP 1 gloss black as a basecoat. It´s best to develop an applying pattern for the decals, because they are slightly oversize on purpose to cover the edges as well. I started at the bottom sides and went up. It´s very time consuming as the brittle decals had to be bend around the edges with different numerous applications of strong decal softener and added heat from an hairdryer. When that is finished, you can go up further with decaling with the same exhausting procedure. I then applied a layer of AK Real clear flat for the finish and as protection. I finished further parts not shown here, but will continue with the body pan and then on to the cockpit. What you see on the pic are no decal seams, but different carbon patterns, some more glossy than others. Cheers Rob
- 62 replies
-
- 15
-
-
Sweet Craig, you´re on a roll with your car builds. I love your chosen two tone paintjob, which somehow fits perfectly to the sleek car. In my head spins some of my Reverend Horton vinyl, adding the right soundtrack to accompany your beautiful cruiser with some psycho billy tunes. Cheers Rob
-
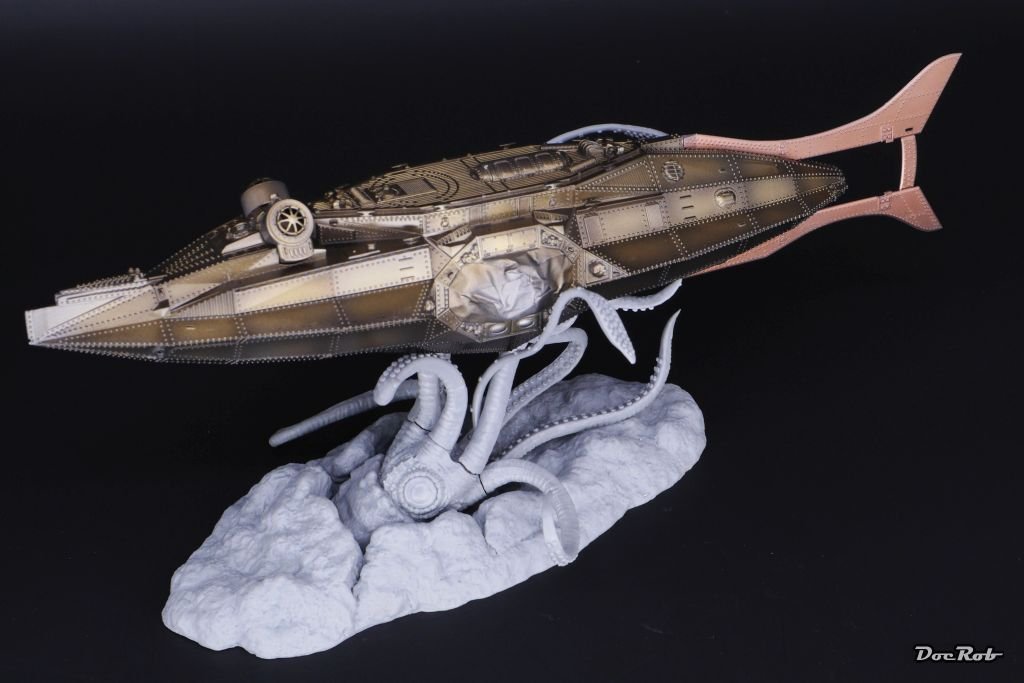
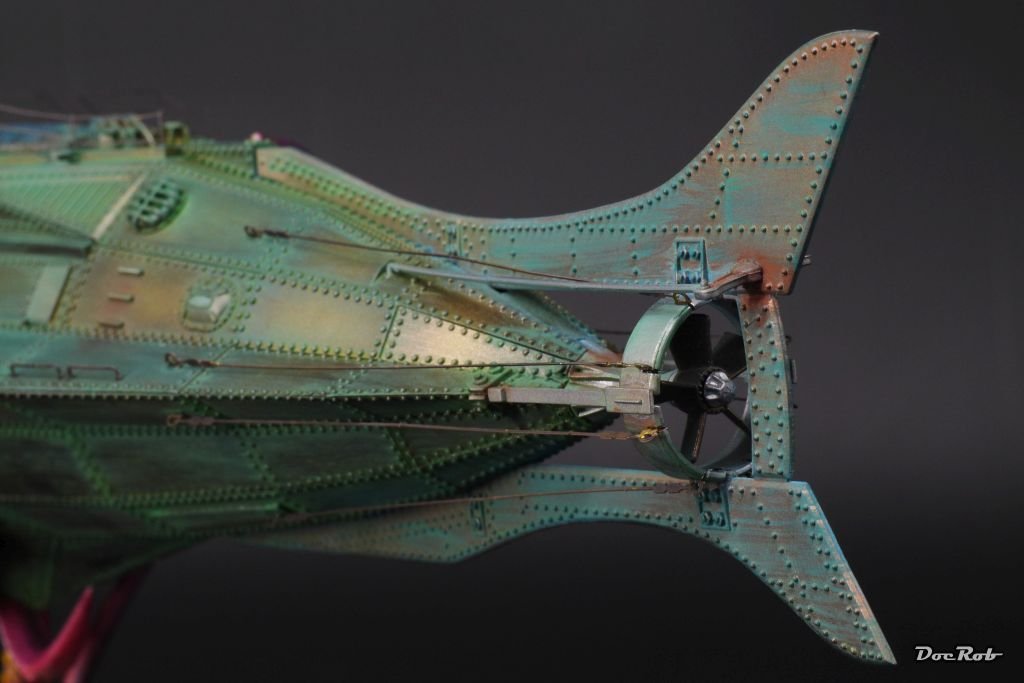
I used AK´s Extreme Metal colors for bronze and liked the result. I was after a patinaed look and achieved it with different techniques, like different shades of bluish and greenish pigments. I also used AK´s true metal wax bronze, which also has a good look after rubbing it onto black primed parts. with the wax and primer, you can ´steer´ the effect a bit. Here are pics of my Nautilus build some years ago, which I wanted to finish mainly in a NE-metal look. This was after spraying on bronze and copper with some post shading: After weathering and patina: Cheers Rob

-
What a nice little ship Chris and your pre chosen paint scheme looks outstanding and supports the sleek lines of the vessel. Like you, I have to finish my first square rigged ship with my DoK still lacking most of the rigging. I hope you have more guts than me and have a nice and soon outcome. Cheers Rob
-
Thank you Craig, the build is at snails pace at the moment, because of the festivities and other obstacles, but I hope to continue soon. Cheers Rob
-
Thanks for your confidence Phil, I hope, I can stay focused with this unruly build. I still hope, things will turn to the better with the kit. Next will be a lot of decaling. All the carbon around the chassis and monocoque will make it do or die. Cheers Rob
-
Nissan Fairlady 240Z by kpnuts - Tamiya - 1/12 - PLASTIC
DocRob replied to kpnuts's topic in Completed non-ship models
Very nice dio. I like the idea of the removed engine. Painting and finishing looks spot on. These large 1/12 car kits are absolutely great for some extra detailing and toying around with presentation ideas. Cheers Rob -
Late condolences for your loss Craig, what a tragedy. Your dragster looks spot on and your kit bashing will lead to a very unique result, which shows your great craftmanship all around. Thanks for the tip about the white Sakura pens, I will order one for exactly the same reason. tyre lettering. Cheers Rob
-
This kit is fighting me back all the way. I start to think, I´m the problem and this doesn´t feel good. Oh yes, this should be a mojo restorer feelgood project, Argh . Like always with my F1 builds, the exhaust assembly was a pain and I didn´t help myself, by adding the PE seals. The engine is not glued into the body pan, I only added it for the exhaust´s alignment. The exhausts were ´puttied´with CA and painted with AK Extreme Metals colors. First stainless steel, then metallic blue for the shadows and finally with pale engine exhaust for general highlighting. The effect isn´t too visible on the photo, but looks stainless to my eye on the kit. Cheers Rob
- 62 replies
-
- 16
-
-
My work with the engine continued. After a lot of cleanup, I sprayed the block with Tamiya LP5 semi matte black and added some details here and there. I thought about using the plating to my advantage, after it caused so many irritations and scratched the black color away to let some details show through in silver. I think, I will omit wiring and tubing with this build. 1/12 kits are better suited for that, so on with adding engine details. The cover under the cylinder trumpets, was decaled with one of the Top Studio carbon decals, which unfortunately broke and I have to do some re touching. The engine without the exhausts is more or less ready now. Cheers Rob
- 62 replies
-
- 14
-
-
-
Thank you Gary, albeit I don't share your optimism that much. The next steps will tell me, which direction the build will go, bin, middle detailed or reasonable detailed . My only F1 expertise is my recently finished Tamiya 1/12 Renault RE20 turbo, which I documented here. So far this kit was better than the modern Fujimi kit. Cheers Rob