


DocRob
-
Posts
1,297 -
Joined
-
Last visited
Content Type
Profiles
Forums
Gallery
Events
Everything posted by DocRob
-
 Thank you Egilman and you are absolutely right, I should have stripped the plating, but naively I haven't been expecting such a bad fit and went for a quick start. I'm a bit wiser now at least . Cheers Rob
 -
Hola fellow modelistas, due to different reasons, I neglected my bench and MSW for some weeks and the next weeks won't be much better. Despite all obstacles, I wanted to start a new feel good build to motivate myself and so I chose my favorite F1 car for the task. Since a while, I accumulated some goodies for this project and since some weeks everything arrived at my doorstep. The kit: The goodies: - Top Studio Cockpit detail set - Top Studio PE-set - Top Studio carbon decal set (was the hardest to find) - TBDecals sponsor decals - Tamiya seat belts - PE rivets - Colors from Zero Paints (a first for me) I considered starting with the body, but decided to start, like the manual suggests, with the engine. Big mistake, at least motivational. As you can see on the pictures, the parts are metal plated in an aluminum finish, what's not to like about it. First of all the plating has spots and foremost it's completely superfluos, because nearly the whole engine is BLACK. You might say, no biggie, but it is, because of the plating no part fits how it should, you have to scratch, grind, and re drill all holes. Beside this, you can't use normal modeling cement, so I was forced to use CA. That's not all. The engine parts sport all known types of plastic abnormalities, like prominent parting lines, ejector marks, burr and flash and the silver plating doesn't enhance general visibility. Strange thing, that other versions of the kit seem to include the engine on black sprues. In all the beginning was utterly frustrating, we don't speak about an ancient short run kit, cast in some garage, it's a relatively modern incarnation, Fujimi what have you done. This will not be a fast build, other than I sod the kit, if it continues to fight me back. Oh, I haven't spoken about detail. The positive so far, the engine is very detailed and has a large part count. On the pictures, only half of the parts are added for better painting. If you look at the picture above, you can see the cylinder heads with very prominent cooling ribs, which unfortunately doesn't exist on the real thing. This is how it looks, with the added PE parts from Top Studio. Fujimi, are you the Japanese Italeri? I'm still hoping the best for the non plated sprues and will not instantly bin the kit, but it's definitely on probation. Cheers Rob
- 62 replies
-
- 16
-

-

-
No Craig, luckily it was only a test part. I never used the stuff again. I discussed the probs with some fellow modelers over on LSM and others had similar issues. Tamiya LP gloss black is a perfect solution, dries fast and has a durable surface, why bother with the sticky AK stuff. Cheers Rob
-
If you mean the black base from the Extreme Metallic range, you'd better skip it. The stuff is horrible, never really dries. It is sticky even after weeks. I used Tamiya LP gloss black as a base for chrome and polished aluminum and this is working much better. Thinned with leveling thinner to a 1/3rd paint 2/3rd thinner ratio, you get a high shine surface, perfect for chrome. I experimented a bit with chrome for my Renault RE-20 build and found if you spray on Alclad chrome with very light coats, building up until the metallic blackness of the base is barely gone, you have a perfect shine. Xtreme Metal chrome from AK was slightly less shiny, but is more durable, if it comes to masking afterwards. Cheers Rob
-
Contact Glue
DocRob replied to RolBerg's topic in Building, Framing, Planking and plating a ships hull and deck
This is what the producer says: UHU | Product page Everyone in Germany knows this brand UHU and the product (Alleskleber or all purpose glue) and the old advertisement 'Im Falle eines Falles klebt Uhu wirklich Alles' Which means something like In every possible case UHU will glue everything. The stuff was first produced in 1932 as a complete innovation. I wouldn't use it for wooden ship planking, despite it's glory history . Cheers Rob -
Contact Glue
DocRob replied to RolBerg's topic in Building, Framing, Planking and plating a ships hull and deck
When I was a kid in Berlin, every family had a tube of UHU for all purposes, being it repairs or whatever kids glue together. It's an absolute classic, but I never used it in plastic or wooden ship modeling. It's clear (if it's still the same mixture) and gel like. For planking, I use generally white glue for the first layer, where I can use nails for fixing the planks and for the second layer, I use Colle 21 contact glue (Sacrilege for some here ). You have to be very careful with the application of the Colle 21 CA. It's relatively thin and I spread it on the plank using another plank rest. The good, it only glues on contact, which has to made relatively fast and correct, which means, the planks should be prepared thoroughly. I guess, UHU would glue the planks well enough, but the thickish gel would lead to residues, being pressed onto the planks surface. Cheers Rob -
Masking tape for curves .
DocRob replied to LEGION 12's topic in Painting, finishing and weathering products and techniques
With my modest experience with wooden hulls, Tamiya Kabuki tape or the yellow Tesa equivalent worked good. It adheres good enough on wood and has a certain flex for slight curves. The white flexible Tamiya tape worked well for me on plastic models, but I never used it on wood and I can imagine, adhesion wouldn't be the best. Cheers Rob -
Bugatti Type 35B by CDW - FINISHED - Italeri - 1:12 Scale
DocRob replied to CDW's topic in Non-ship/categorised builds
Fantastic result Craig, your Bugatti looks exactly matching the story behind it, what is more to say. I enjoyed to follow your multiple weathering techniques during the build and learned a lot. One little side note, for my liking the tyres look a bit too black, given the state of the car. Cheers Rob -
Bugatti Type 35B by CDW - FINISHED - Italeri - 1:12 Scale
DocRob replied to CDW's topic in Non-ship/categorised builds
You can also use very crude steel wool, like used to clean pots in the kitchen. By stretching the materia, you can have different effects and you can play with the distance from the sponge to the surface. It's a good technique for places, where it's hard to set the mask properly and you don't have the risk of color running under the mask. Cheers Rob -
Focus Stacking
DocRob replied to Dennis P Finegan's topic in Photographing your work. How to do this.
My camera, a Panasonic Lumix G9 has in build focus stacking, which allows to show lengthy objects or distanced objects all in focus. It's a camera mode, which allows to select different focus points as reference or use the complete front to rear area as focus stacking area. The camera takes several single pictures automatically then, which are stored as a movie in mp4 format. Finally merged in camera, stored as a single picture, you get what you wanted, voila. I had good results, even without a tripod. Cheers Rob -
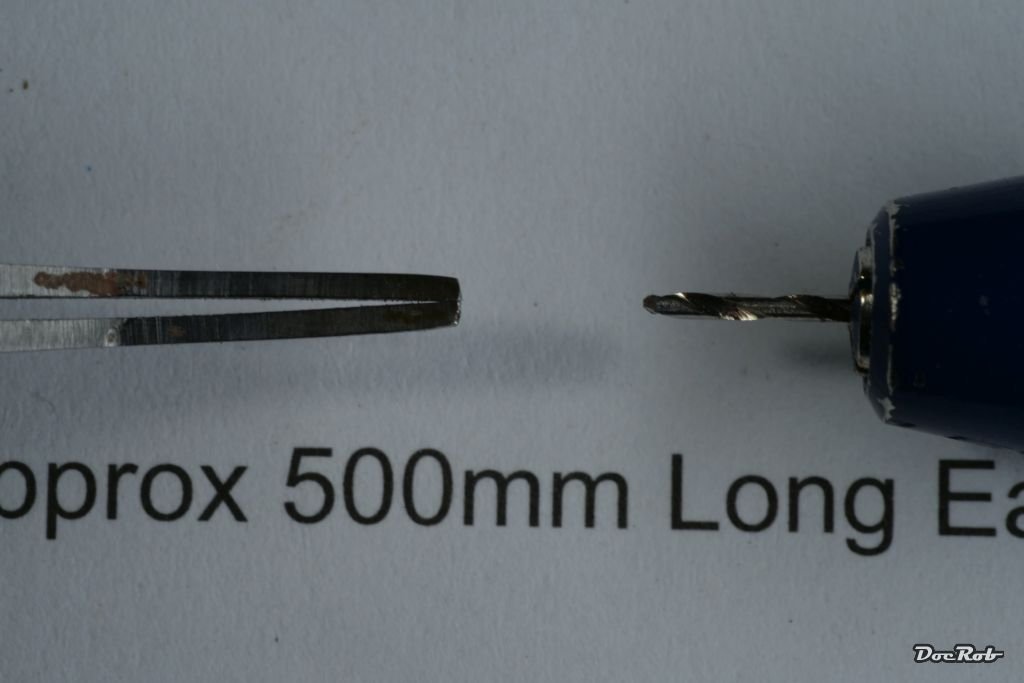
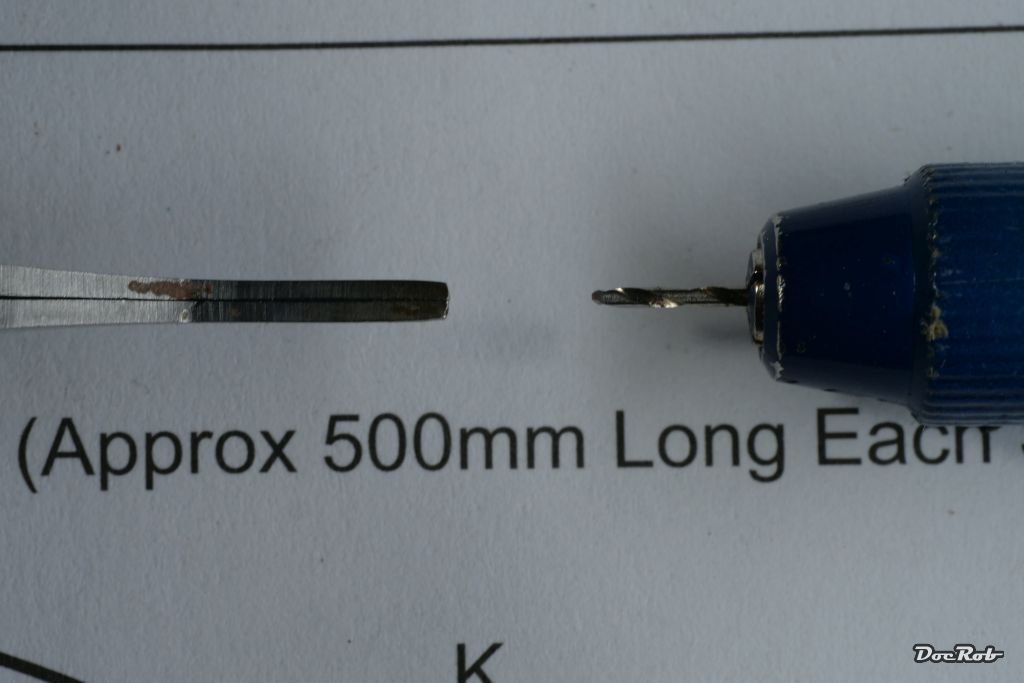
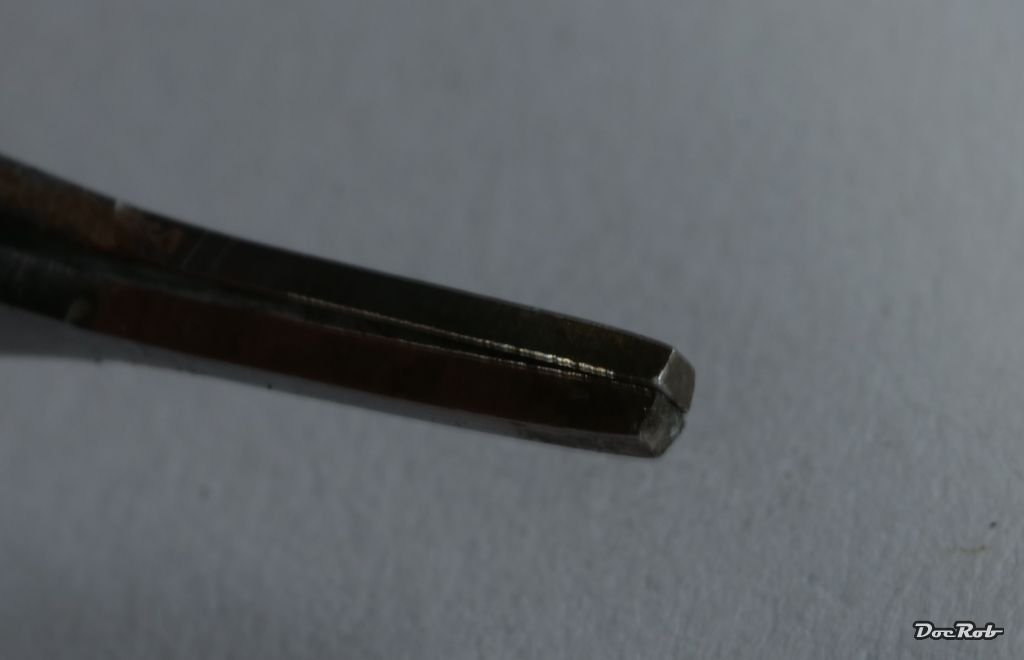
I made some quick (bad) pics from the tip of the Tamiya bending tweezers for you. The tip is ca. 1 mm wide and looks like this, when closed without force The drill bit has a 0,8 mm diameter for comparison: With slight pressure, it closes like this: The tip from the front closes parallel and is slightly trapezoid, which helps bending right angles with the slight elasticity of the brass, which gives a tiny bit after bending: Cheers Rob
-
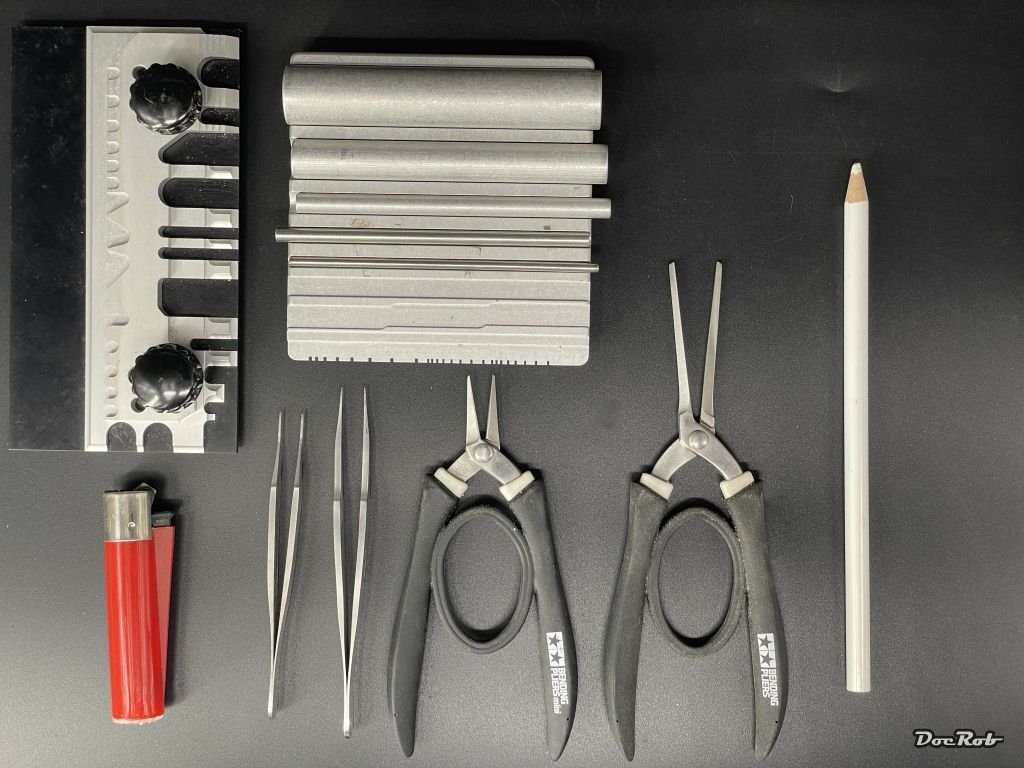
Actually these are my preferred tools for working with PE: The bending tool and the long bending pliers are good for long sheet parts, like landing flaps and larger parts on ships superstructures. The small tipped bending plier and the above mentioned tweezer is very universal with smaller parts and much faster in use, than the bending tool. The rolling tool is perfect for railings and AA nests on ships and was used a lot for my USS Arizona build. The back side has a thick rubber coating, which enables rolling parts with curved contours, specially when annealed. That's where the lighter comes into play. Annealing brass PE is often overlooked. Heating the brass above the tip of the flame, until it changes color to blue, changes the crystalline structure of the brass and softens the brass for easier bending, specially on curved contours. The pencil is a grease pencil, for holding or lifting up small parts. Not mentioned, different types of CA and a soldering iron. Cheers Rob
-
In 2018, I wrote this little review about the Tamiya bending tweezers over at LSM and the verdict still stands. I work a lot with PE and have a huge assortment of tools, pliers, bending tools, rolling tools, ..., but these tweezers are by far the most universal tool, when it comes to tiny parts, like with ship modeling. Buenos Dias, friends of the tool heavy workbench, I have a very special relationship towards photoetched parts in modelling. I love to work with metal, enjoy the enhancement of detail and after applying PE sometimes I whish, it would not be necessary to paint these parts because of the luster shine. On the other hand PE can be a real PITA and has the tendency to unify itself with the carpet monster even more than plastic parts. Over the years I used lots of tools for working with PE, there were bending tools, rolling tools, pliers and tweezers and all of them were helpful, but there was something missing between the pliers and a fine tweezer and then I bought this little gem. It is the Tamiya Bending Tweezers (for Photo-Etched Parts) with the Item No: 74117. I got it six weeks ago and I absolutely love that tool. It has become a nearly universal tool for small PE parts. Because of it's short tweezer tips which are finely grinded with sharp angles you can apply enough force to hold PE-parts in place and bend them around the edges. The smallness of the tips make it easy to bend complicated three-dimensonal forms. Another advantage is, that with mentioned small PE parts, there is a much reduced need for tool changes, because of the versatile design. I highly recommend this little helper. It improved my enthusiasm with small PE parts a lot, because of the easiness of use and it's versatility. Tools should make live easier and this one is a very fine example. Cheers Rob
-
Get well soon Chris. You had a nice trip, it seems. Looks like Lisboa and Obidos on the pictures, both places I really like and might have lived there, haven't I found my remote island. You are absolutely right about the looks of cruising ships, they are a disgrace for maritime vessels. I've seen a lot, cause they are cruising in our waters here around the Canary Islands as well. The nicer are the smaller, classic build ones. Would there be a GB for cruising ships here, I would pass . Cheers Rob
-
Mini self contained airbrush
DocRob replied to Bill Hudson's topic in Modeling tools and Workshop Equipment
I have never used one of these models, but use different airbrushes since over thirty years. I always bought quality in airbrushes and compressors as well. What you choose for your purpose should be determined through some factors, like: - how often do you use the AB - what type of airbrushing do you plan, meaning, how fine or how artistic do you go - which color mediums do you plan to spray - what are you planning to invest - are you willing to learn proper airbrushing (if that is not already the case) - ergonomics Choosing the right airbrushing equipment is difficult as is airbrushing itself. My personal view is biased to top quality, like H&S Infinity or Rotring airbrushes, a Sparmax compressor with tank a spray booth and a respirator mask, but I use my airbrushes almost daily and also spray aggressive materials, like lacquer paints. Assumptions: The mentioned airbrush might have a pulsing airflow with the tiny or non existent tank, it is bulky and I guess will lead to camps in the hand with longer usage. The cheap fabricated airbrush might be unreliable with the pressure consistency and not too easy to maintain. I don't now the price of the pictured airbrush, but are there fitting spare parts around, a very important aspect in long term use. Are different needle / nozzle sets available? One last anecdote about quality, My old compressor died away this year due to expansion tank corrosion. It was a good model and costed me about 400 (hard earned at the time) German Mark, about 200 € in 1984. Cheers Rob -
Since more than a week, we have 35° C in the day- and more than 30° C in the nighttime and in between some days of storm, so watering the garden and Siestas in the shadow are the way to go. The humidity is about 15%, which dries nose, eyes and brain and the weather will stay at least for another week like this, phew . Modelling wise, I made only little progress with the DoK and only managed to prepare one spar with lifts, footrests and other fittings. I should emphasize a bit more on the knots, as my basic household knotting isn't up to the game. I will simplify, but not too much. I will pre rig all the spars next, followed by the pre rigging of the masts, but it will take some time and maybe a tiny in between build . Cheers Rob
-
Your Macchi looks fantastic, Chris. It always amazes me to see, what great results you achieve with these card kits. I never tried one, but your logs are tempting, so maybe... Cheers Rob
-
Bugatti Type 35B by CDW - FINISHED - Italeri - 1:12 Scale
DocRob replied to CDW's topic in Non-ship/categorised builds
You are cruising through your build Craig, it seems and what you produce pleases the eye. The chassis, motor combo looks so realistic, same with the dashboard. Cheers Rob -
My first and only wooden ship build until now is Vanguard's Duchess of Kingston and it was a pure pleasure build. I finished hull and masts in about three month and had lots of fun learning new techniques and I'm a bit proud with what I achieved. After a longer brake, I now start with rigging and this will keep me busy for a while. The DoK might not be a beginner kit, but it's very well designed, has a great manual and plans and there are plenty of very helpful build logs here on MSW. My planking might not be historical correct (I consider to buy a NRG planking clinic kit for further enlightenment), but overall, the build never frustrated me. Like you, I wanted to start my wooden ship modeling career with a subject, I really like to build, but I knew beforehand, I will challenge me a lot. I have an engineering background and decades of model building, using lots of different materials on my back and have a personal quality approach and like to challenge myself. Without these, I'm sure, I would have failed with the DoK. Besides the pointed bow, she has all you asked for and adds some flashy decorations as a bonus. Cheers Rob
-
Bugatti Type 35B by CDW - FINISHED - Italeri - 1:12 Scale
DocRob replied to CDW's topic in Non-ship/categorised builds
The worn effect on the radiator looks fantastic Craig. This seems to develop into a clinic of wear and tear and I'm all eyes and ears, as I really like studying these effects. Cheers Rob -
Bugatti Type 35B by CDW - FINISHED - Italeri - 1:12 Scale
DocRob replied to CDW's topic in Non-ship/categorised builds
Very nice progress Craig and I learn a lot about the real thing. Definitely an interesting car. Cheers Rob -
I can't seem to find building time lately. Nonetheless, I added all the wooden fittings to the yards, glued the PE footrest holders in with CA and inserted brass rods for pinning the yards to the masts. Then all was sprayed matte black. Cheers Rob
-
Lotus 72D by gsdpic - FINISHED - Tamiya - 1/12 - PLASTIC
DocRob replied to gsdpic's topic in Non-ship/categorised builds
The Model Factory Hiro belts are a very nice addition and more detailed than the ones Tamiya supplies. Interestingly, it takes about the same time for the Spot Model parcels to arrive on my doorstep, but I live in Spain. The Canary Islands always need some extra effort, to ship goods here . Your engine looks busy and sports fantastic details. The exhausts are great. Cheers Rob -
True words Paul, thank you for that. Modeling for me is competing with myself only, as I never went to competitions. I like to challenge myself and as I'm easily bored, staying with the always same subjects, I like to diversify my projects and try to learn new techniques with every project, I start. You are absolutely right, that acting this way, never will lead to a mastership in all these disciplines, but I accepted that. I feel that working with many different subjects widens the view for possible solutions and applied techniques. If you are an accomplished airbrusher, like yourself, (I'm using airbrushes since over thirty years) it helps with wooden ship modeling as well, for two reasons, first, directly, you can avoid rattle cans and apply color smooth and fine, where many traditional model ship builder would use a brush. Second and even more important, you learned to have the correct disciplined mindset and quality approach, that is needed for both, airbrushing and ship building. I think, ship modeling has closed a bit into the direction of plastic modeling recently, due to extensive use of photoetch, resin casting, 3D-printing, ... and if you are willing to leave the traditional path, skills earned in plastic modelling, become more and more helpful. Your verdict is correct though, but general modeling experience and a quality orientated open mindset helps a lot to close the gap to the masters, but for sure, never reaching it, unfortunately . I hope your struggles with wooden ship modeling will be solved soon and you still have fun, because that's what count most. It's a hobby and meant to be fun. Cheers Rob
-
Thank you for your encouragements, I omitted some macro shots, revealing the shortcomings of my clumsy rigging . Cheers Rob
