chris watton
-
Posts
2,336 -
Joined
-
Last visited
Content Type
Profiles
Forums
Gallery
Events
Everything posted by chris watton
-
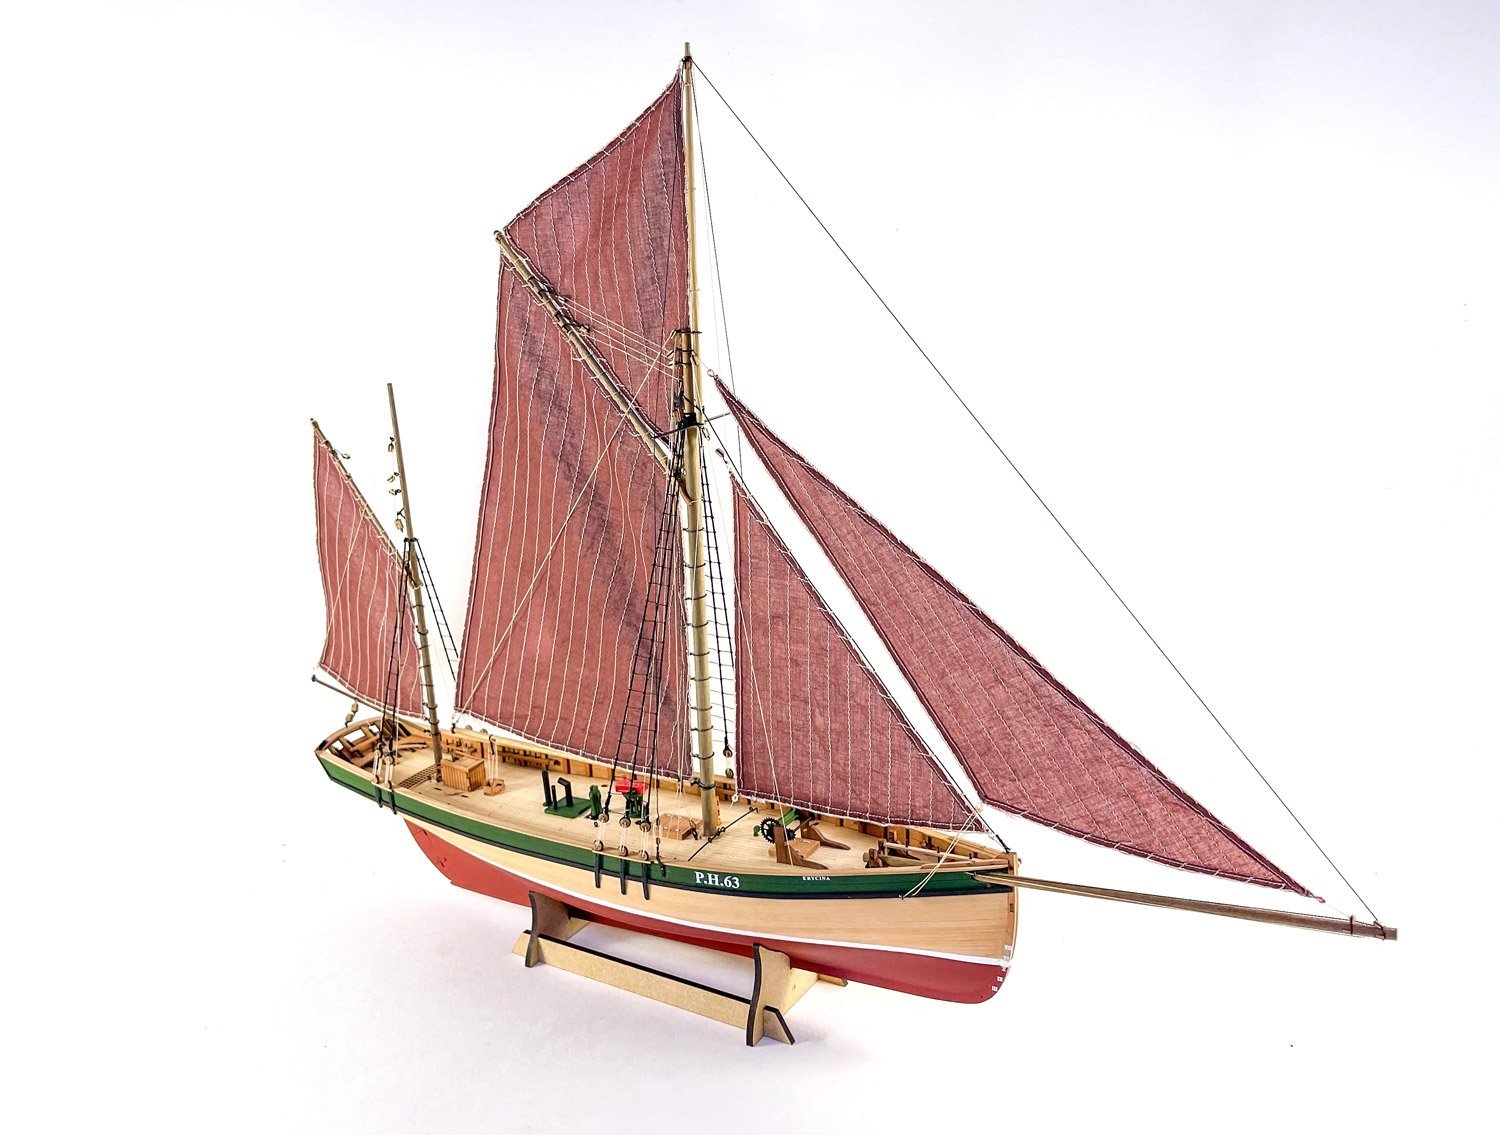
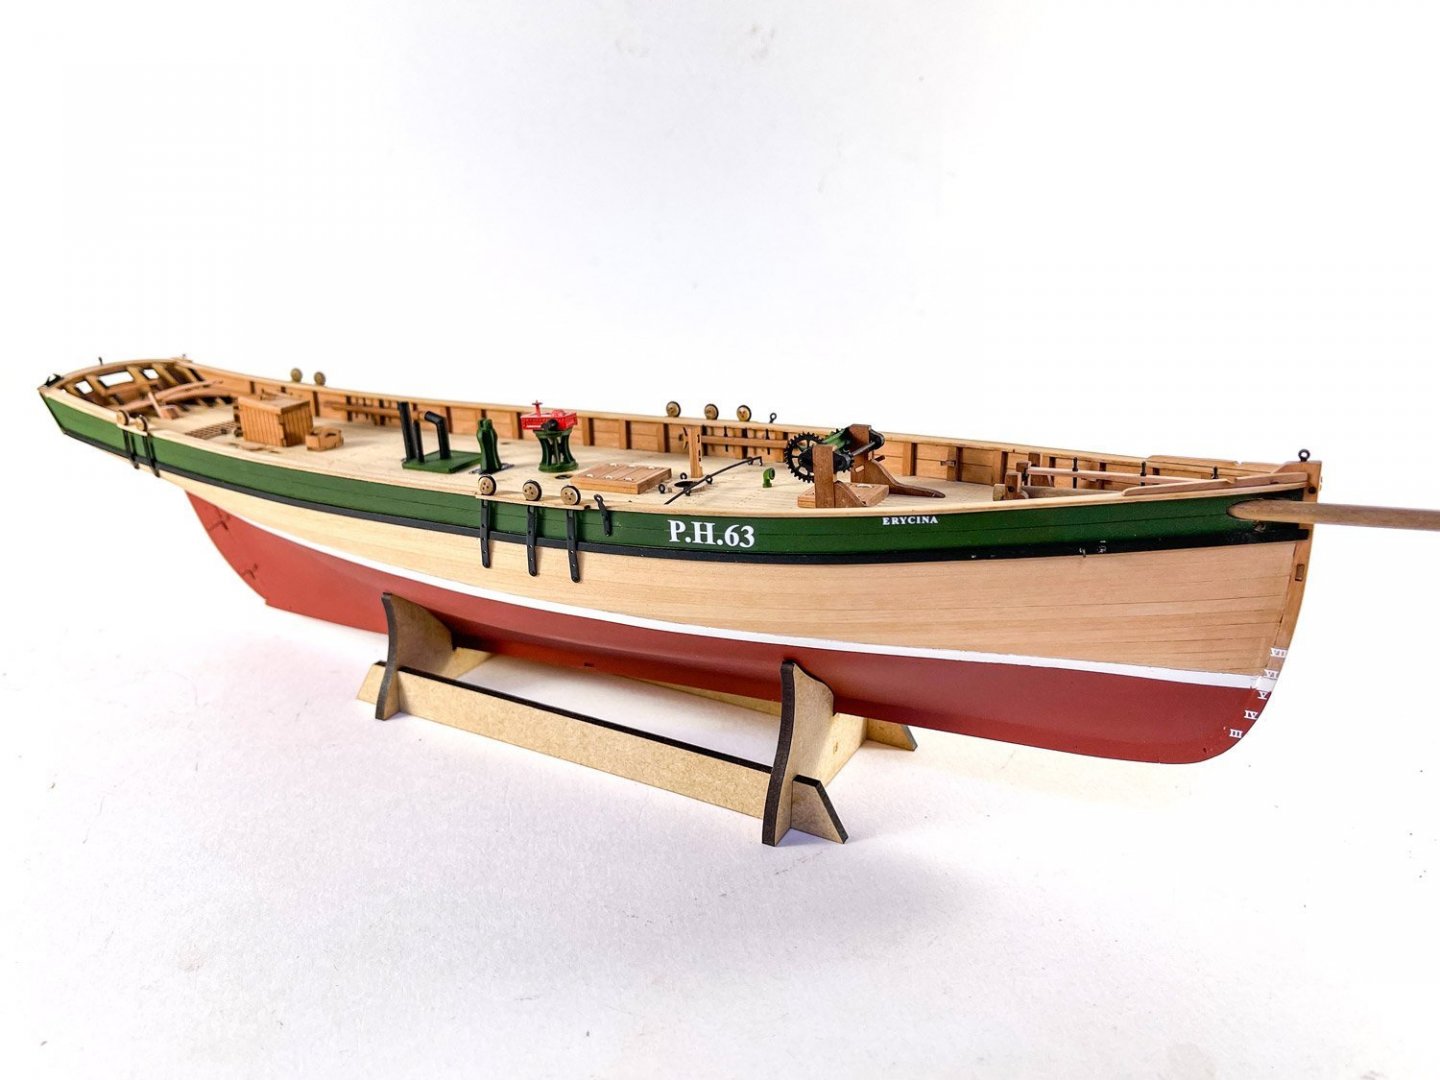
 And here is the completed Erycina!
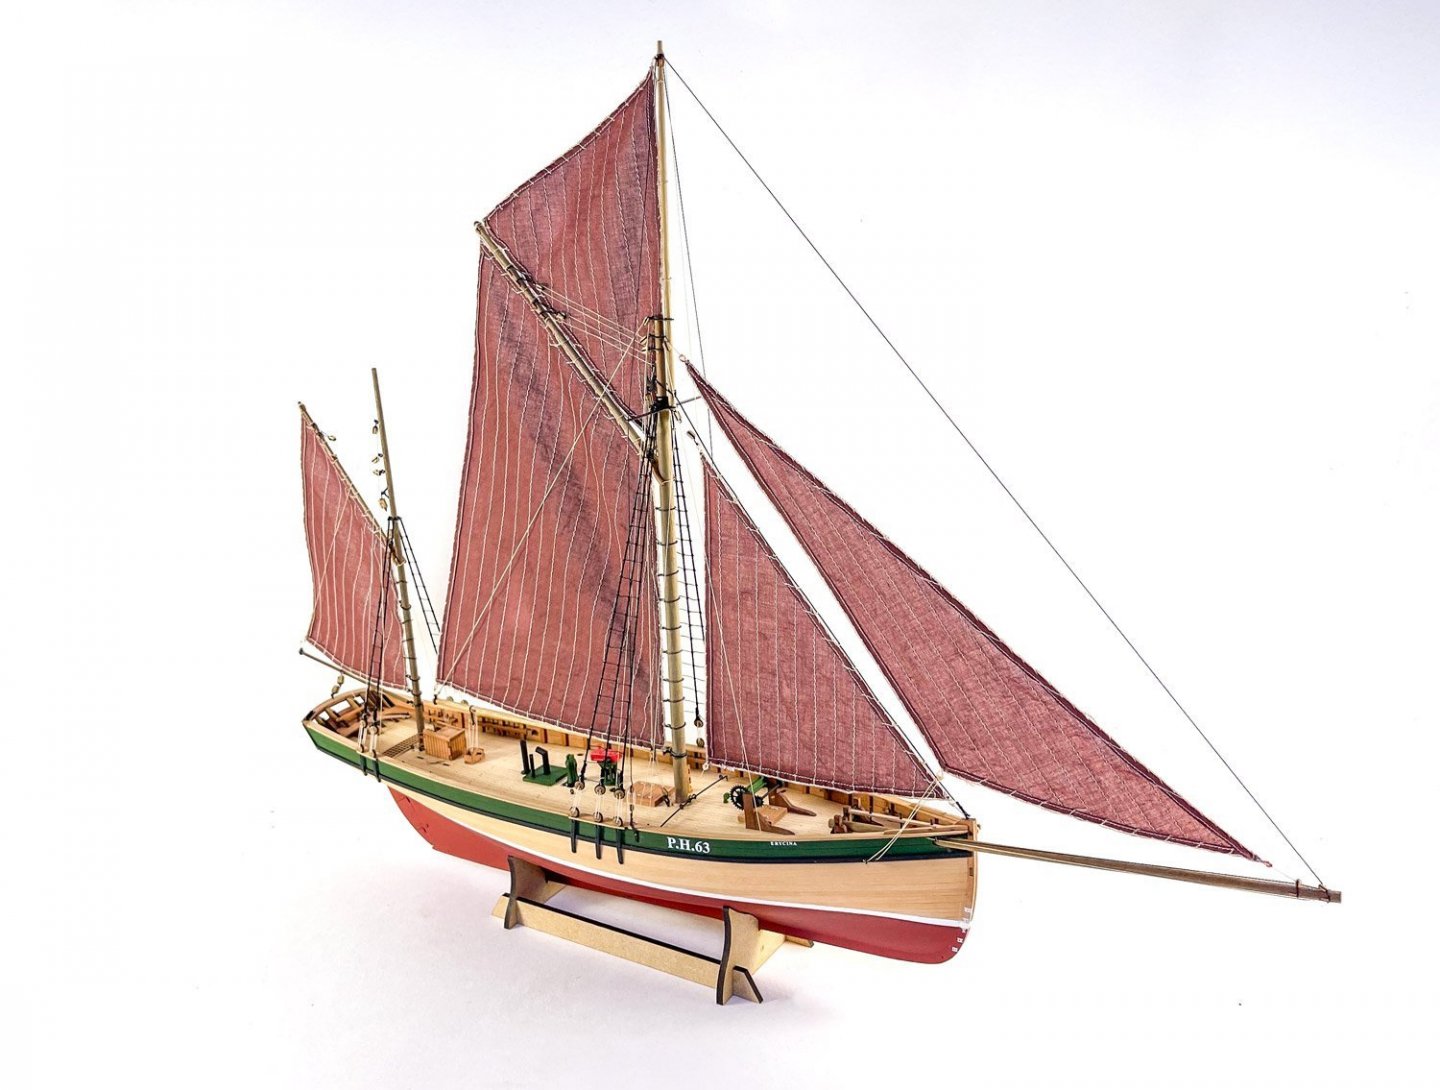
-
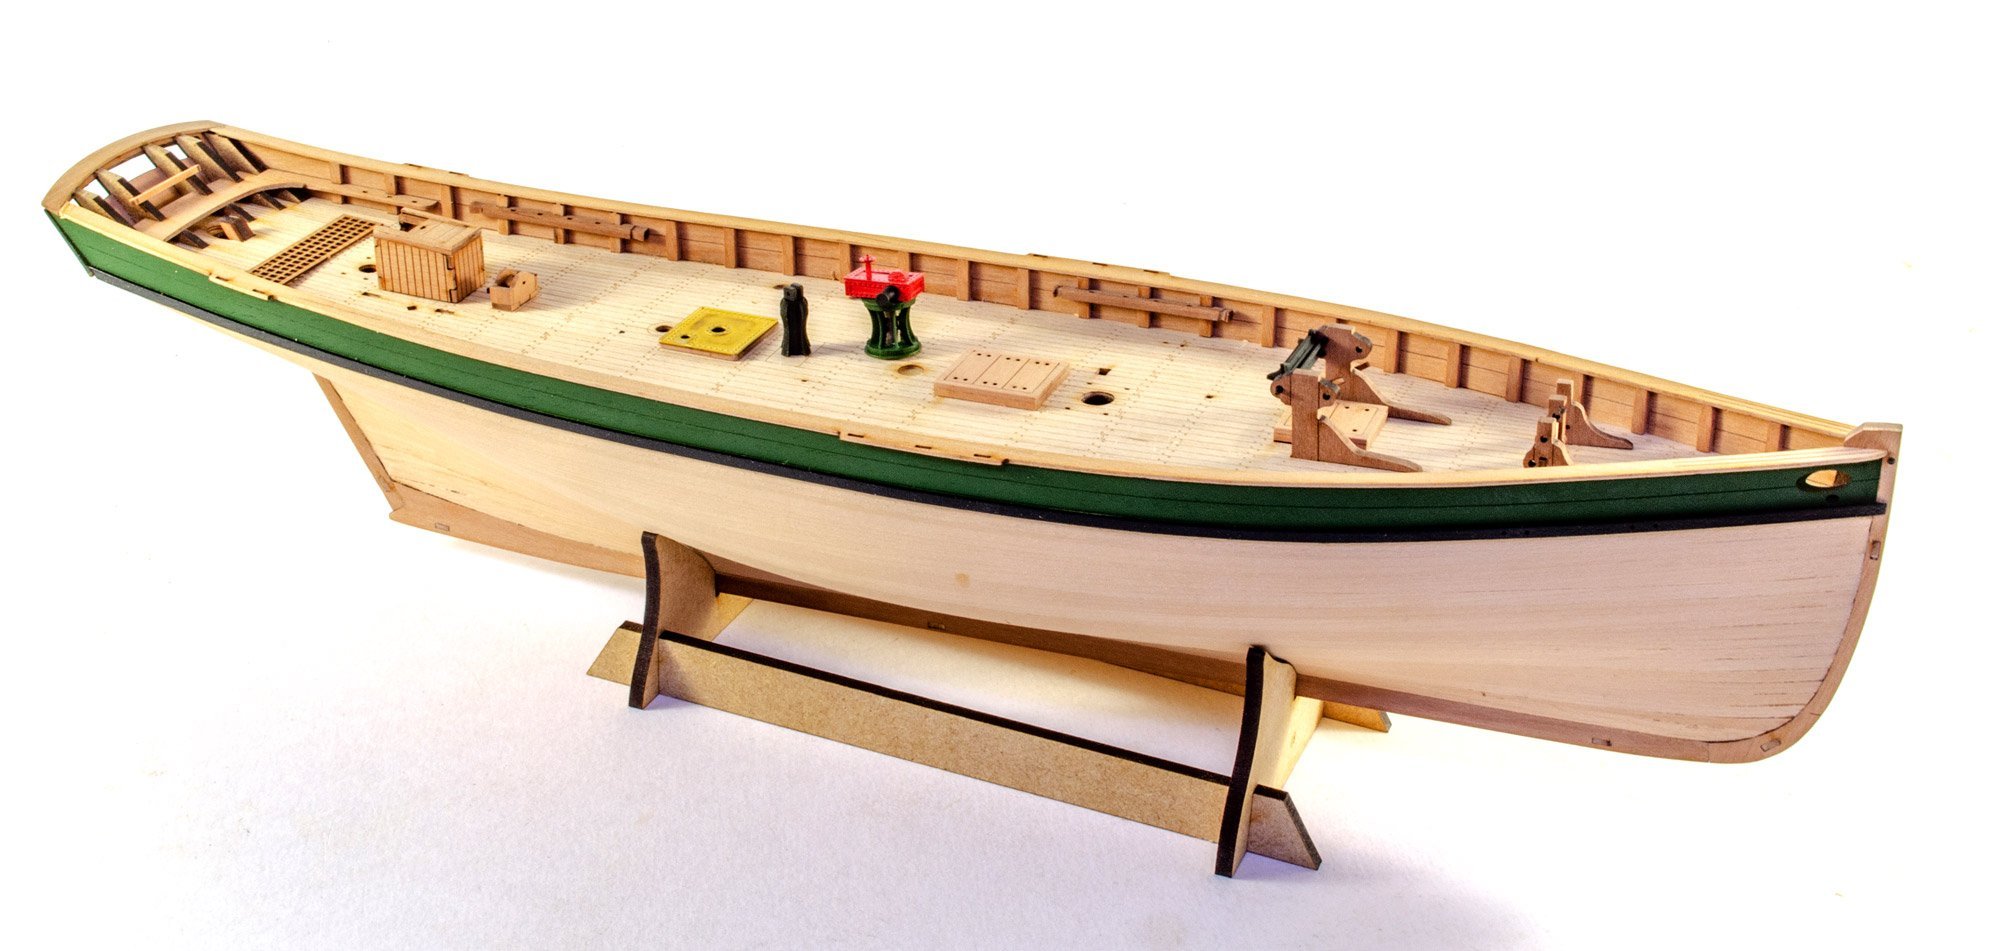
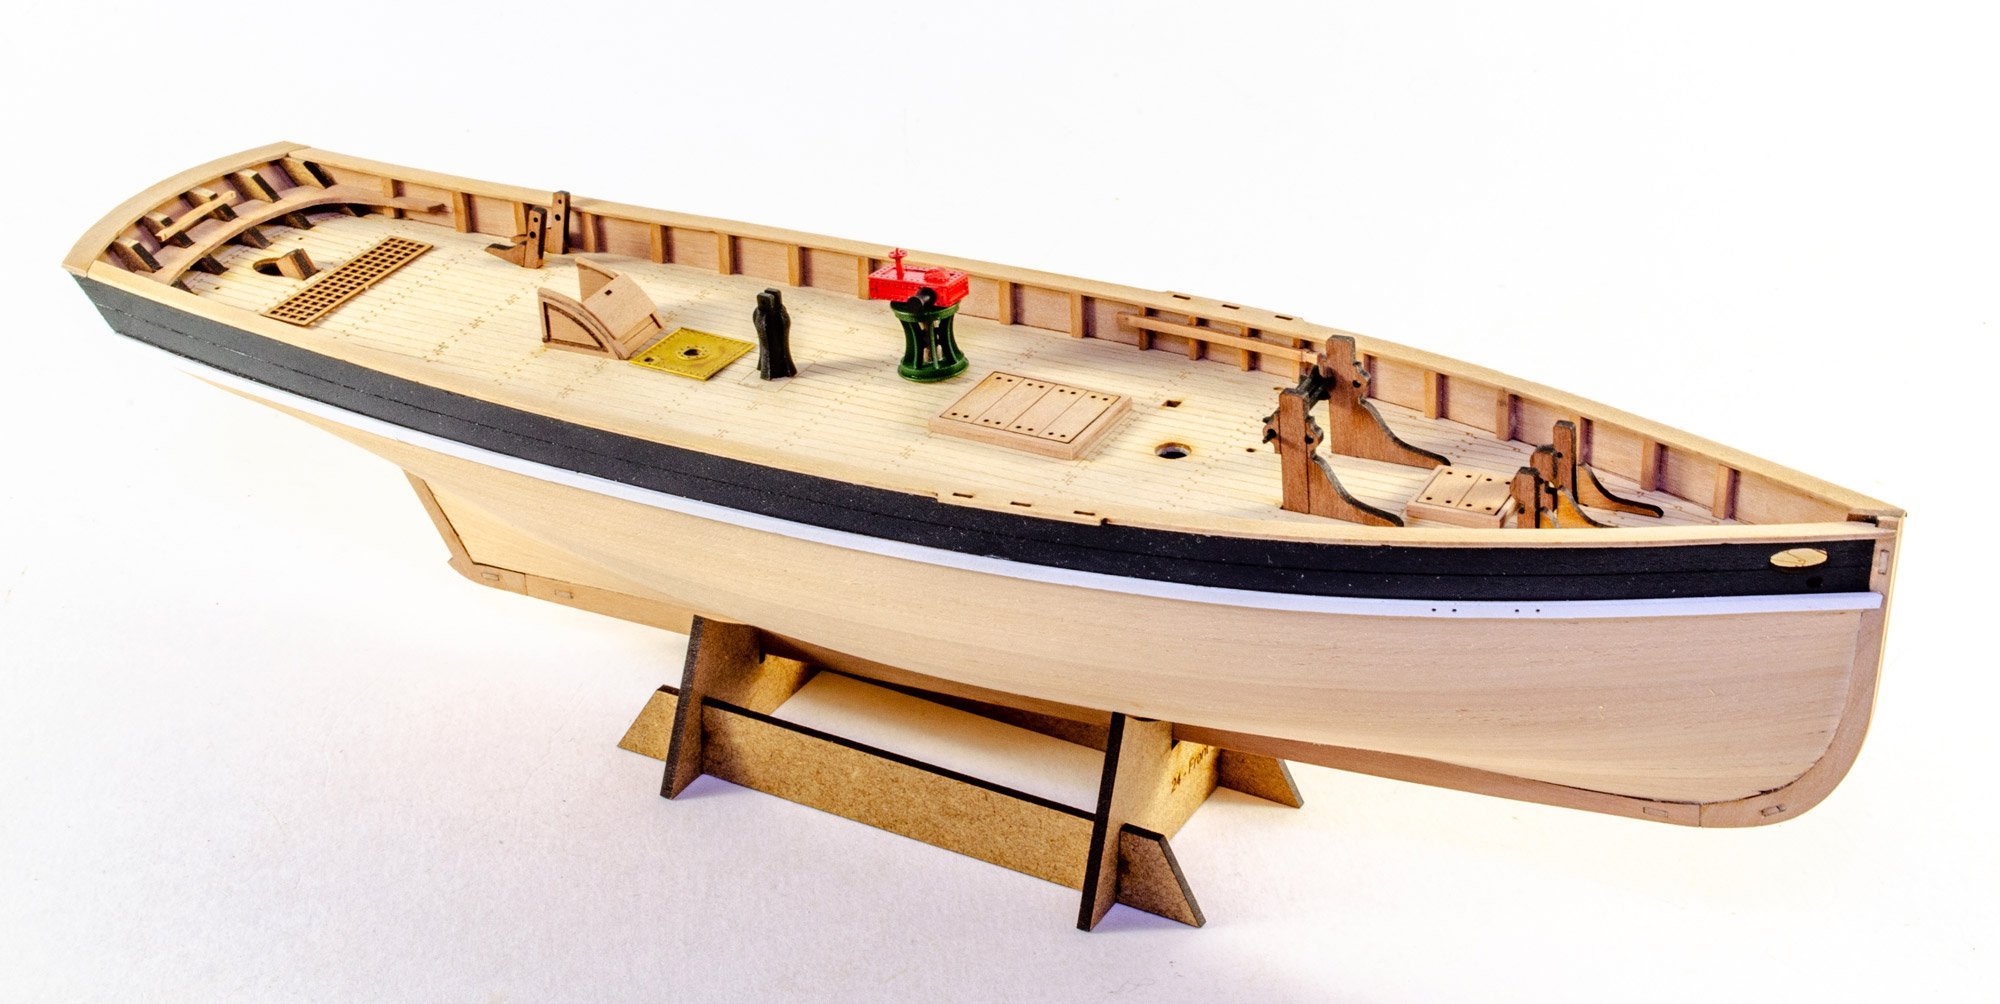
Will be sending files for plans, manual and box art to printers next week, so I shall have a better idea when I can release it then. Still laser cutting the parts for Nisha and Erycina, but that will finish Monday.
-
For a first build, that really is quite remarkable work, well done!
- 93 replies
-
- 2
-

-
- santa maria
- amati
- (and 1 more)
-
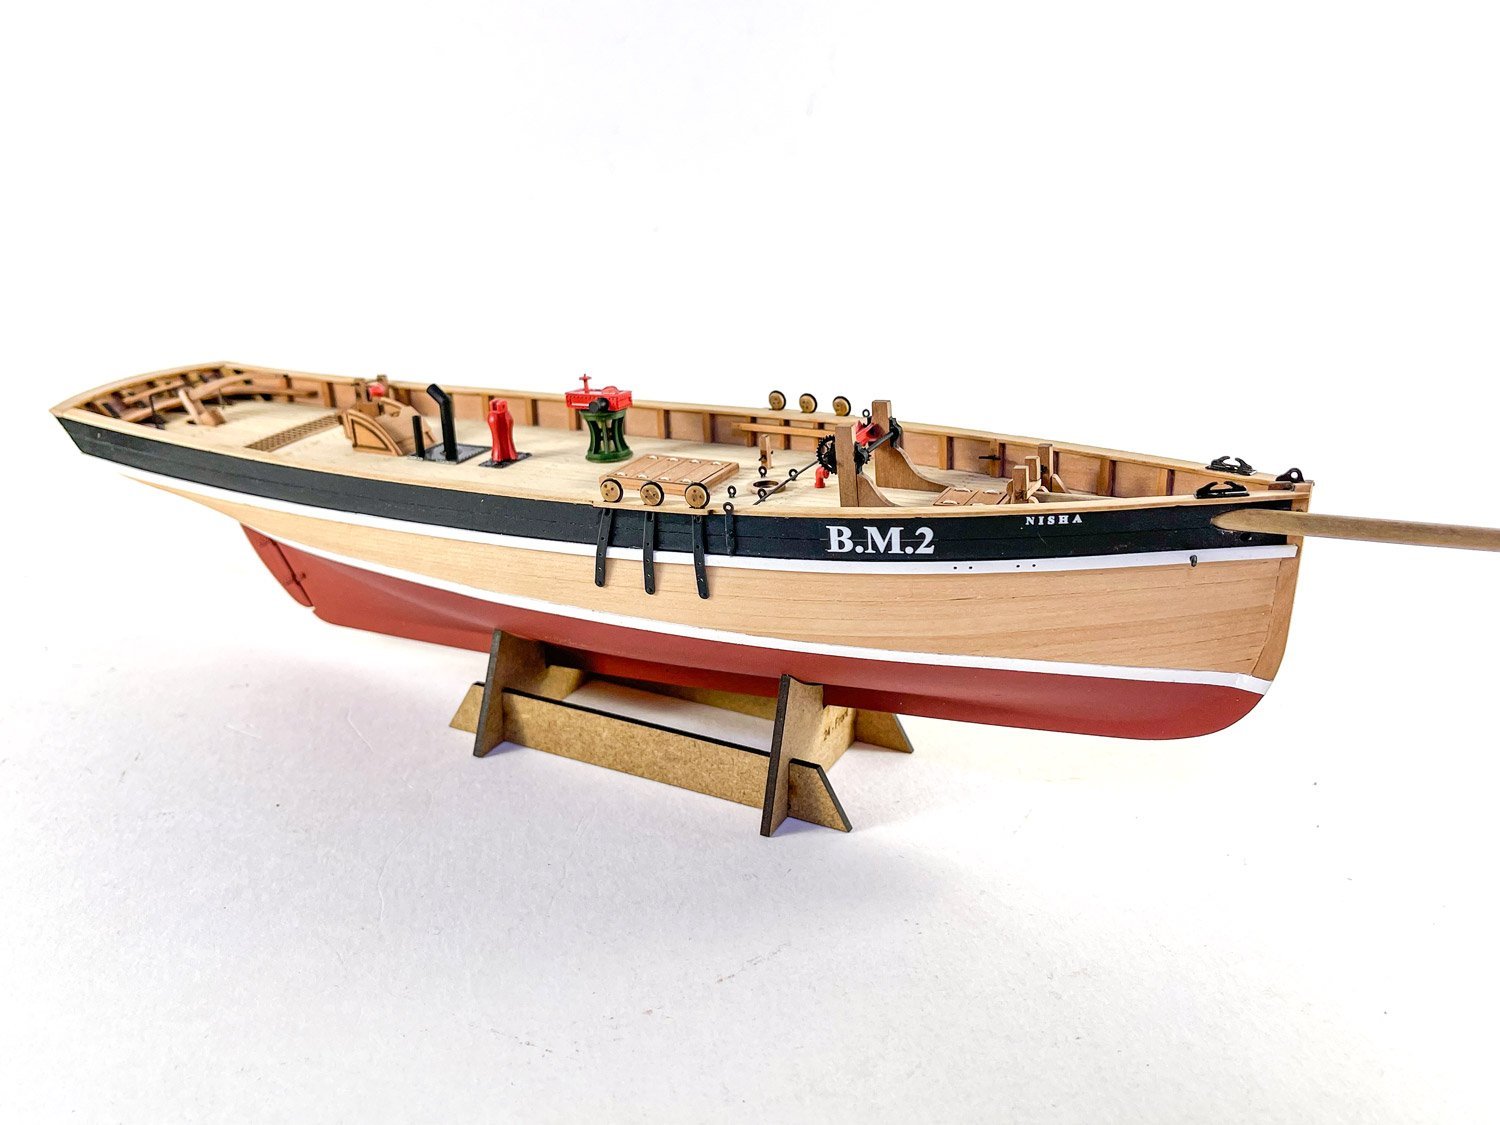
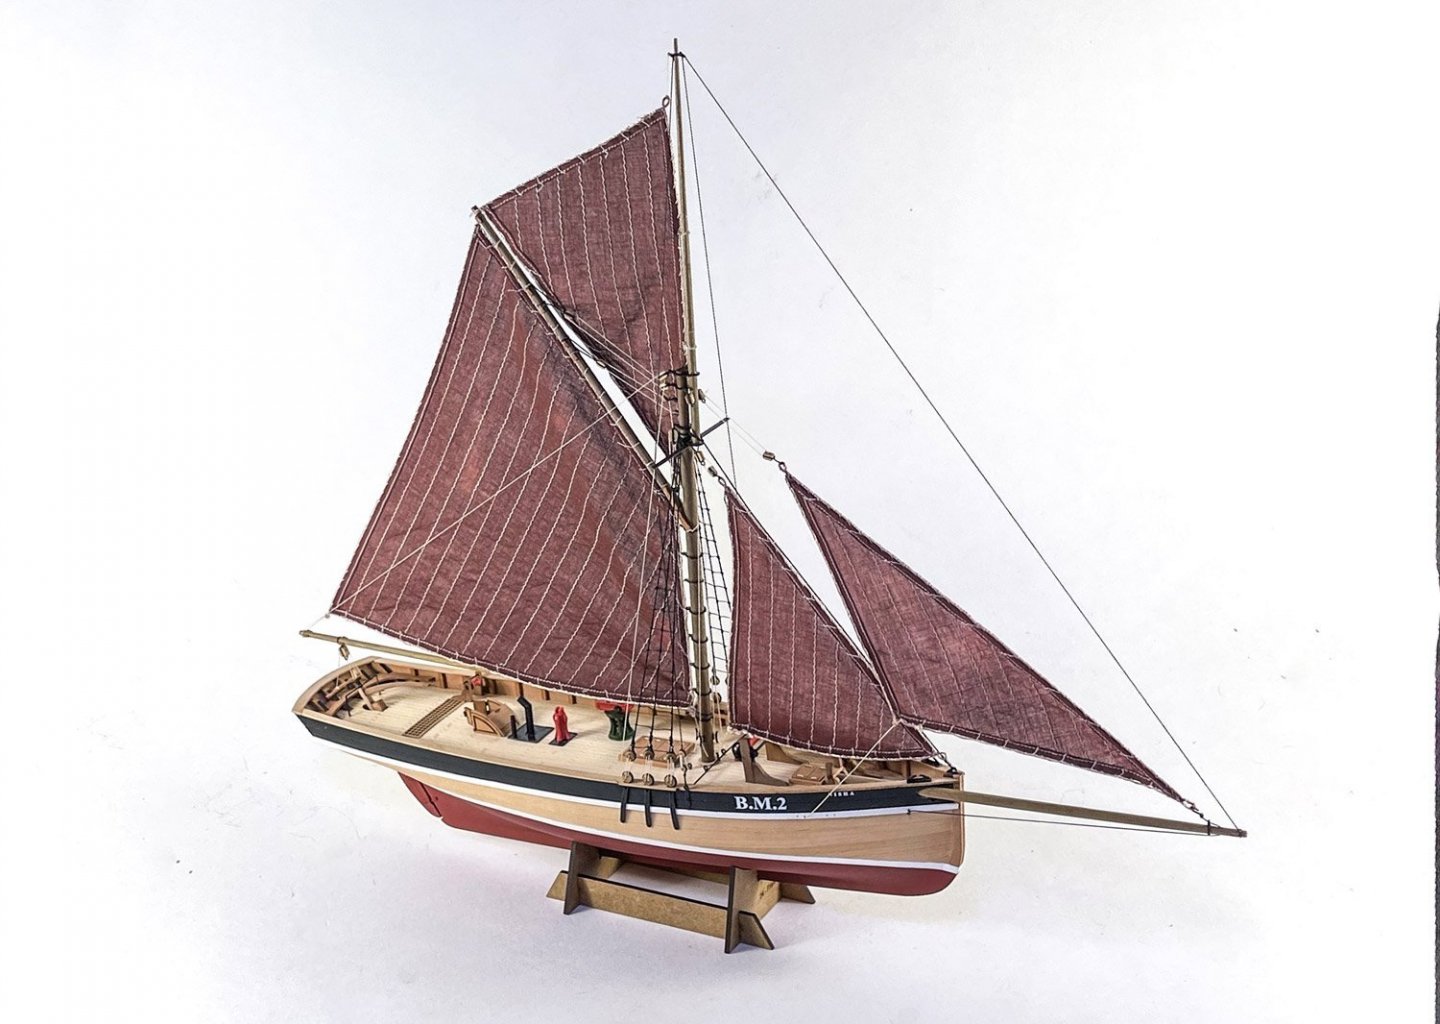
That's little Nisha complete, thanks to Jim Hatch. Just Erycina close behind....
-
Thank you! I am hoping to have full colour printed boxes for these new smaller kits (350x200x50mm) made in time for release. But as these will be printed in he EU, nothing is certain, so my contingency plan is to have a few box labels made, and fit the kits in the Fifie and Zulu box for the first batch. Have said before, I would love to have full colour printed box tops for all kits, but as my products are relatively low volume, the prices in the UK for printed boxes is comical, adding about 25-30% of the overall kit cost!
-
Forgot to mention, all laser cut sheets for this and Nisha have the part numbers etched next to each part. Not on the PE sheets though, as space was way too tight. (numbers would have had to be so small in order to fit, they would have been next to invisible) Also, the bulkhead tabs now taper inwards, going up, to make the fitting of the ply sub deck easier (less bending) - and for the bottom edge of each keel, there is a slot (hidden once the pear outer keel rabbet patterns are fitted) to locate to a tab on the rear cradle. This ensures the model sits at the correct angle, and also ensures the hull doesn't slide down the stand, as both are angled relative to waterline.
- 36 replies
-
- 6
-
-
- vanguard models
- Erycina
- (and 2 more)
-
Damn, Glenn, that is gorgeous, a real 'Museum Quality' example if ever I saw one! Gobsmackingly good.
-
There is certainly more to these than the Fifie and Zulu, even the diminutive Nisha has already surpassed those in page count for the main manual, and have not even finished that yet! Just because they're smaller doesn't mean they have less fidelity of detail, and because they may attract more beginners also doesn't mean corners being cut to keep prices down (the market is already awash with such products). They will not be the cheapest 'first or second kit' on the market, but I bet most will enjoy building them and, more importantly, finish them, before giving up in frustration. This is why everything is so important, from the materials and fit of parts, to the very important manual. Love what Jim has done with the livery of these!
- 36 replies
-
- 8
-
-
- vanguard models
- Erycina
- (and 2 more)
-
Lettering and stern nameplates are waterslide decals, I had Eduard produce them for me, so they are included in the kits (Erycina and Nisha)
- 36 replies
-
- 4
-
-
- vanguard models
- Erycina
- (and 2 more)
-
Black scroll bars
chris watton replied to Dr PR's topic in Using the MSW forum - **NO MODELING CONTENT IN THIS SUB-FORUM**
I am on a laptop now, Windows 10 using bog standard Microsoft Edge for the browser. No problems here. -
Still working on new work unit (ex garage), still needs proper wiring for sockets and lights, and insulated doors. Both people are coming tomorrow to size up and give quotes - and, all being well, my new laser arrives on Friday! In the meantime, me and Jim have been busy with Erycina and Nisha, the next two kits in the range. Jim just sent me these pics, the hulls for both are now fully complete, and masts, rig and sails won't take too long. I will have both of these available to buy before Christmas. The PE is being produced now, here in the UK, and I have a little more to do on manuals, which again, are printed here. I think Jim has done a fantastic job on these. I will eventually finish my Erycina prototype and keep it for my own display... Erycina has the green upper bulwarks, and Nisha has black. Still laser cutting production sets for both as I type!

-
For tapering the planks, I learned very early on that scientific methods go out the window very early on, unless you are a master craftsman and get the tapering and bevelling perfect on each plank, based on calculations painstakingly made before the first plank is even laid (talking about my own miserable experience, I know different modellers have their own way, and no doubt achieve better results than me - a few tapers not quite right can ruin the calculations..). Since then, and for years, well, decades, now, I mark out and taper/bevel one plank per side at a time. Usually I just need a couple of 'fill in' strips to close the gaps when I reach the bottom, and the usual stealers at the stern. All of my models have had either a copper or white bottom, so odd width strips at the bottom make no difference to the overall appearance of the completed model. In short, it is all too easy to overthink the planking, just try and take it one plank (per side) at a time. Again, I stress this is my personal method, others will have their own (and in some cases, better) ways - but I used to have to build decent looking prototypes to deadlines a lot of the time, so used methods that were comfortable to me, using a ruler, pen and Stanley Knife.
- 505 replies
-
- 11
-
-

-
- vanguard models
- Sphinx
- (and 1 more)
-
If the bottom is painted white, and the main wale is in place, there is not a lot of actual pear planking visible, so do not worry too much. Anyway, no matter how precise the planking, there is always a hell of a lot of filling and sanding required between coats of white paint.
- 505 replies
-
- 5
-
-
- vanguard models
- Sphinx
- (and 1 more)
-
Nice save. I did actually give a 1.5mm extra length for those bow parts, to take into account differing builds, so it's disappointing to see yours do not meet. Regarding the coamings, I never try to sand the edges until the top and bottom patterns are firmly glued together. I do have scrap sheets for spares, if you wanted a new coaming set.
- 542 replies
-
- 3
-
-
- Sphinx
- Vanguard Models
- (and 3 more)
-
I had originally done the outer skin in 0.6mm pear sheet, but this did curl too much when applying glue, so this was changed to 0.8mm, which was much better.
- 857 replies
-
- 8
-
-
- Sphinx
- Vanguard Models
- (and 1 more)
-
Another little update. Since the beginning of 28th September until last week, we had builders here to convert our garage into a proper unit, split into two rooms, one room for the laser cutting and raw materials, and another for packing (and gym...). They did quote 2 weeks, but it was over 5 weeks. We have a new roof, floor levelled and walls skinned in OSB boards, including the partition. All new shelving arrived yesterday, so this week we are fitting the rooms out. Next Monday my new laser machine arrives, so I will be able to develop much larger kits (Sphinx is the largest I could go with my current machine, unless I split the keel, and I prefer not to do that if at all possible) I now have all Vanguard Models kits in stock, after a nightmare couple of months chasing suppliers up with my orders (notably, photo etched brass). As I have mentioned, because of the headaches this has caused me lately, my next three kits are having the photo etched sheets produced locally here in the UK. They cost more, but then again, all photo etch suppliers are increasing prices anyway, due to shortages of raw materials. Right now, I am laser cutting the Nisha and Erycina production parts. Today I received the 3-d printed castings for the kits, as well as sample sail sets for each. The production versions are being made now, so will hopefully be ready in time for the kit releases. I have read all the build logs, most notably the Sphinx logs. When designing/developing Sphinx, my design philosophy for this kit (aside from wanting to develop kits that I would want to buy) was to make the build as painless as possible for builders who were used to kits like Fly, Vanguard, Duchess etc.. So intermediate modellers. I wanted to include cut parts that are never really included in older kits, where these parts are either left off altogether, or the modeller needs to make them from strips of wood or blocks of wood. All they then need is final finishing and, in some cases, like the quarter gallery, all three edges require shaping. But for the most part, if the parts are not painted, the top and bottom edges need slight filing/sanding to remove the char, which, being laser cut, I can do nothing about. Sphinx will still take a while to build, but a lot of that time should be cleaning up pre cut parts, and not making them from scratch. In summary, wooden model kits are not designed to fall together when you shake the box (as many allude to Tamiya), but each part still needs to be worked on and test fitted multiple times, and maybe adjusted, before fitting. Sphinx takes 8 hours to produce each kit. I have said before, if I designed each kit like most other mainstream manufacturers, I could honestly produce a dozen or so new kits per year, as there's really nothing to them. But where is the fun/challenge in that? When we get time, we will add a section on my website, grading each kit according to the experience required to build each kit. Cheers, Chris
-
I cannot supply you with my master files that I paid a lot of money to commission, sorry. As Jim says, it is easy enough to rectify with small brushes, I have never got the painting right on such thing on the first pass
-
Hull shape (Erycina was a thoroughbred cutter when built in the latter half of the 19th Century - Nisha is early 20th Century with a broader beam aft), rig, deck fittings (apart from steam winch, tow post and chain pipe). They both are quite different and designed from their own particular lines - if you're thinking one is just a scaled up (or down) version of the other. I try my best to make each new kit bespoke, with their own laser cut parts. Some of the parts look similar simply because they both had more or less the same job - but all of Erycina's laser cut parts, be it the winch posts or helmsman grating under the tiller arm would look a little silly on Nisha.
-
This thread is purely for my range of products, so yes, they are Vanguard Models kits. A lot more details will be revealed over the next 3-4 weeks. A while ago, a customer on here asked about flags, saying they would prefer flags over the free coaster. The problem with this is that I do not charge for the coasters in the kits (usually put them in for the first batch of new kits), as I produce them myself. I cannot produce the flags. I have been looking for a supplier of quality flags for one of my future developments, and the best pricing would add £25-30 per kit for the quality I would want for each set. This is why you get a free coaster and not free flags. I also would not pay for the flags, they are simply too much, and add too much to kit price. A coaster does not so much.
-
Jim gave me a couple of pics of the new kit production prototype models, Erycina and Nisha. I am aiming to have these released before Christmas. However, this all depends on whether the boxes will be delivered on time. I am having these made in the Czech Republic, so the box tops are full colour printed. Nisha, the small Brixham Mumble Bee will have a 4 pre made sail option and Erycina, the Plymouth ketch, will have 5. I live the lines of Erycina so much that my pre-prototype hull now sits on out mantlepiece! (Nisha has the white lower rail and black upper bulwarks, and Erycina has the green, with both awaiting their lower hulls painted)


-
Just a quick update, with a more substantial one in the next two weeks. I have just received all of my Sphinx photo etched sheets, so the kit is finally back in stock. I ordered more than usual, and wasn't sure if the PE company got the message in time, but it is all now here. I was meant to have this mid-September, but for some unfathomable reason, the term 'Repeat order of at least 50 sets each' translated into '20 sheets of one set of the 5 required'! So from mid-September till now has been hell for me! Because of this balls up, for my next two kits, I am having the PE sheets produced here in the UK, and not in the EU. I will do a nice update in the next two weeks...
-
Review HMS SPHINX Build Commentary
chris watton replied to hollowneck's topic in REVIEWS: Model kits
Just 'WOW' -
The main wale does fit as it should, it was trial fitted many times, and had many micro adjustments to the finished production part so it fitted as well as it is going to fit. With so many curves required to fit the hull shape, these parts always look a little odd. But they do fit.
-
Next batch shipping at the end of next week or beginning of week after, after receiving photo etch delivery confirmation. I put in and paid for (a lot of money) a 'Repeat Order' of Sphinx photo etch sets in August. Due to miscommunication within the Italian PE company, what they sent was one of the 5 sets required, making this my month of hell. Problems now resolved, so all back to normal at the end of next week.
-
There should be two slots for the two (each side) timberheads to locate into. Not a problem though, just cut off the half-engraved areas on the timberheads and glue in place.