
jereremy
-
Posts
23 -
Joined
-
Last visited
-
 mtaylor reacted to a post in a topic:
HMS Indefatigable 1794 by Blue Ensign - FINISHED - Vanguard Models - 1:64 scale
mtaylor reacted to a post in a topic:
HMS Indefatigable 1794 by Blue Ensign - FINISHED - Vanguard Models - 1:64 scale
-
Mr Whippy reacted to a post in a topic:
HMS Speedy by usedtosail - Vanguard Models - Scale 1:64
-
 I'd check with Chris about that missing planking. If it is like the standalone kit, it should be a .6mm laser cut sheet that also contains the oars, rudder, and knees.
 -
hollowneck reacted to a post in a topic:
HMS Indefatigable 1794 by Blue Ensign - FINISHED - Vanguard Models - 1:64 scale
-
 Blue Ensign reacted to a post in a topic:
HMS Indefatigable 1794 by Blue Ensign - FINISHED - Vanguard Models - 1:64 scale
Blue Ensign reacted to a post in a topic:
HMS Indefatigable 1794 by Blue Ensign - FINISHED - Vanguard Models - 1:64 scale
-
Mr Whippy reacted to a post in a topic:
HMS Flirt by jereremy - Vanguard Models - 1:64
-
Mr Whippy reacted to a post in a topic:
HMS Flirt by jereremy - Vanguard Models - 1:64
-
Mr Whippy reacted to a post in a topic:
HMS Flirt by jereremy - Vanguard Models - 1:64
-
Thukydides reacted to a post in a topic:
HMS Flirt by jereremy - Vanguard Models - 1:64
-
Thukydides reacted to a post in a topic:
HMS Flirt by jereremy - Vanguard Models - 1:64
-
rcweir reacted to a post in a topic:
HMS Flirt by jereremy - Vanguard Models - 1:64
-
jereremy reacted to a post in a topic:
HMS Speedy by Dave B - Vanguard Models - 1:64
-
jereremy reacted to a post in a topic:
HMS Flirt by jereremy - Vanguard Models - 1:64
-
Great to hear! You managed to leapfrog me pretty quickly, so I'm sure I'll be referencing yours soon enough.
-
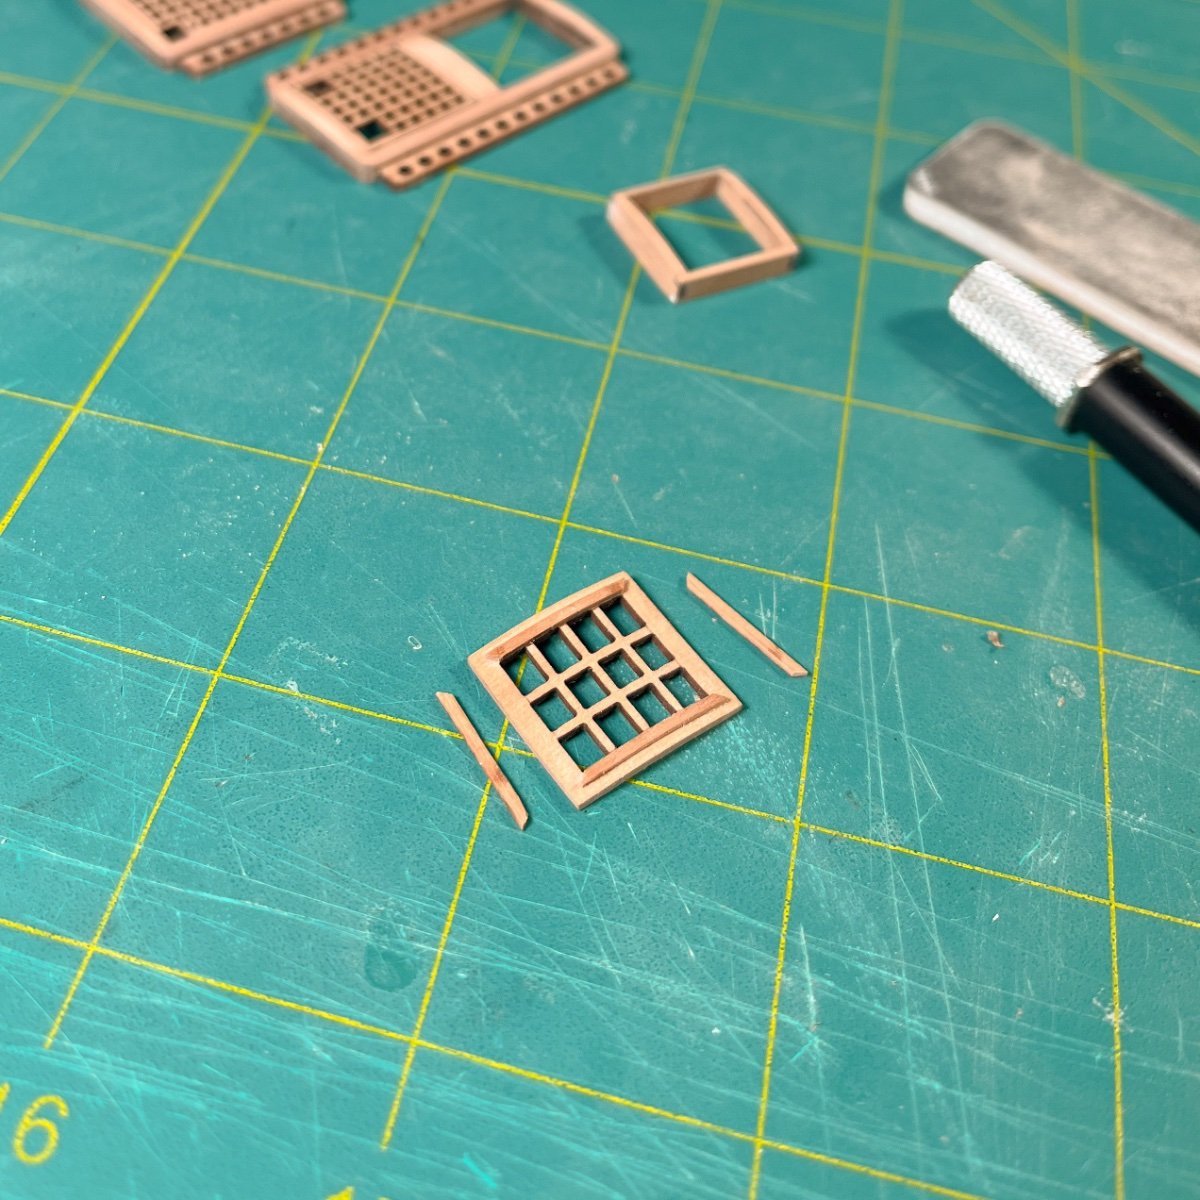
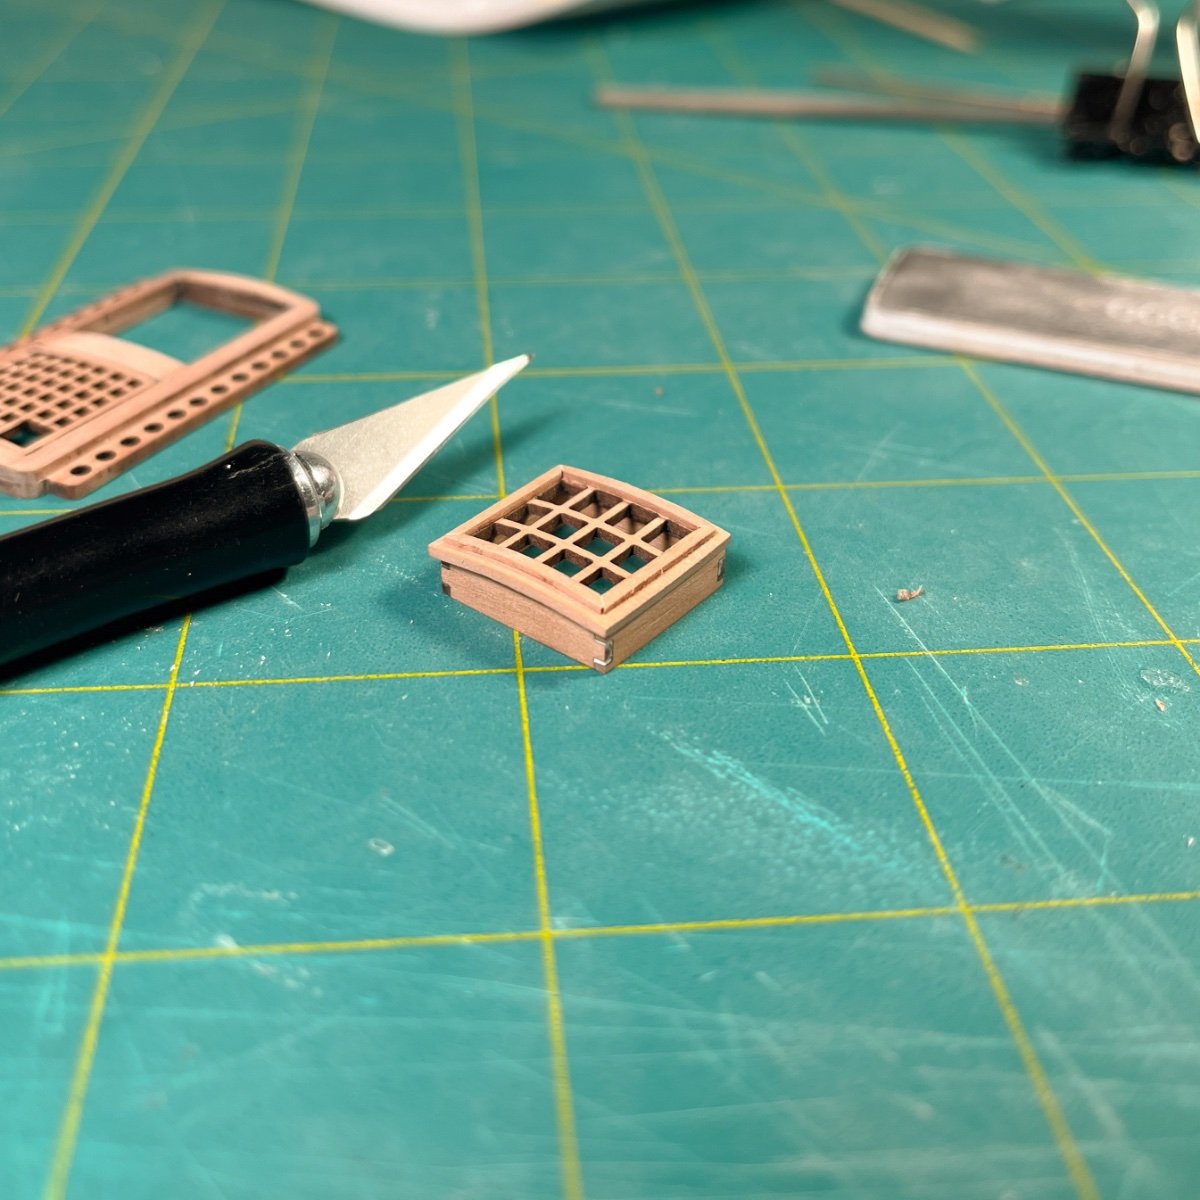
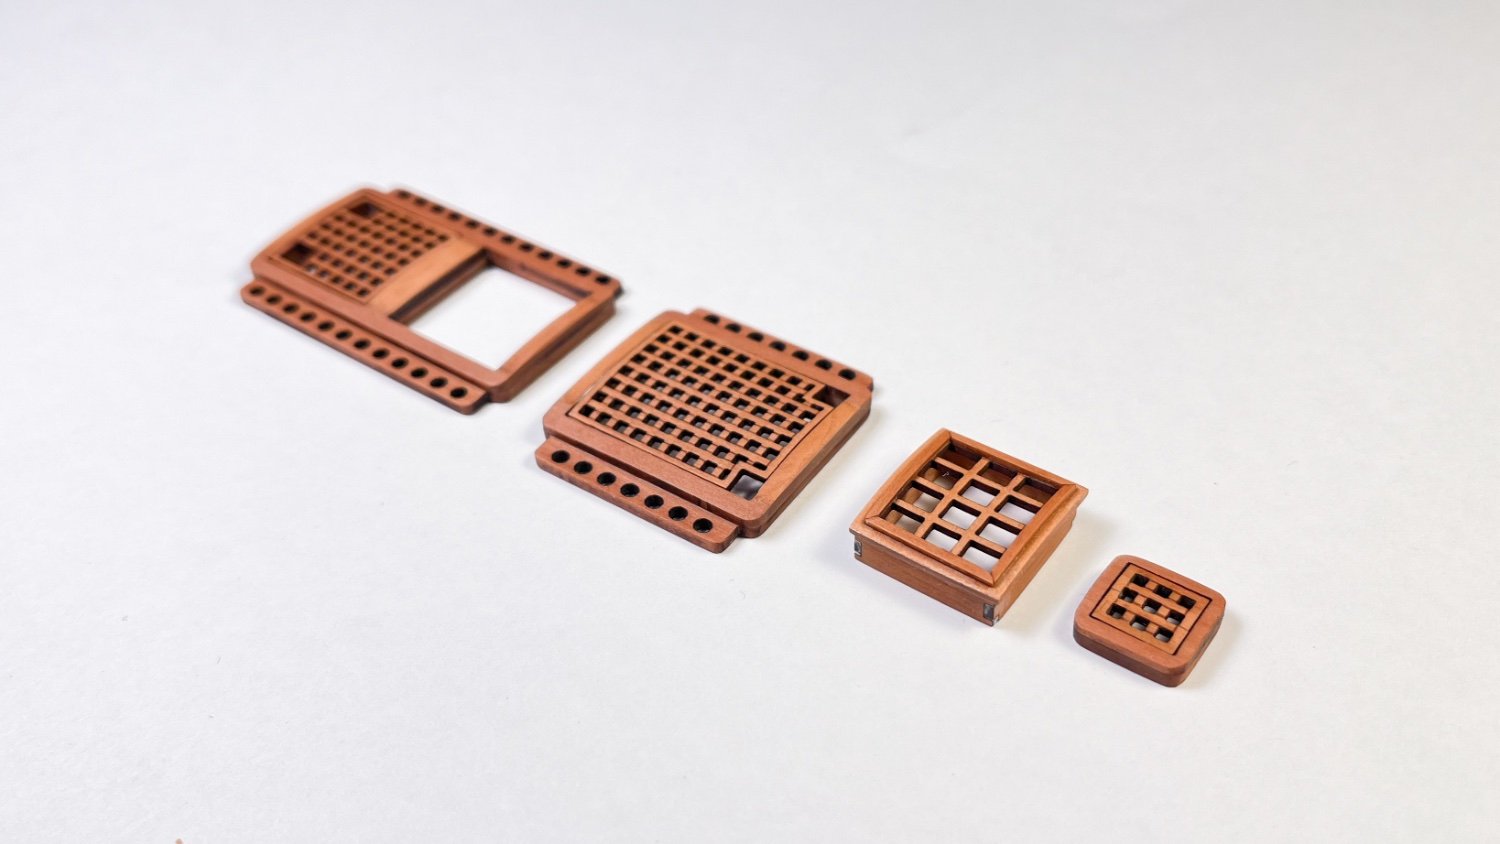
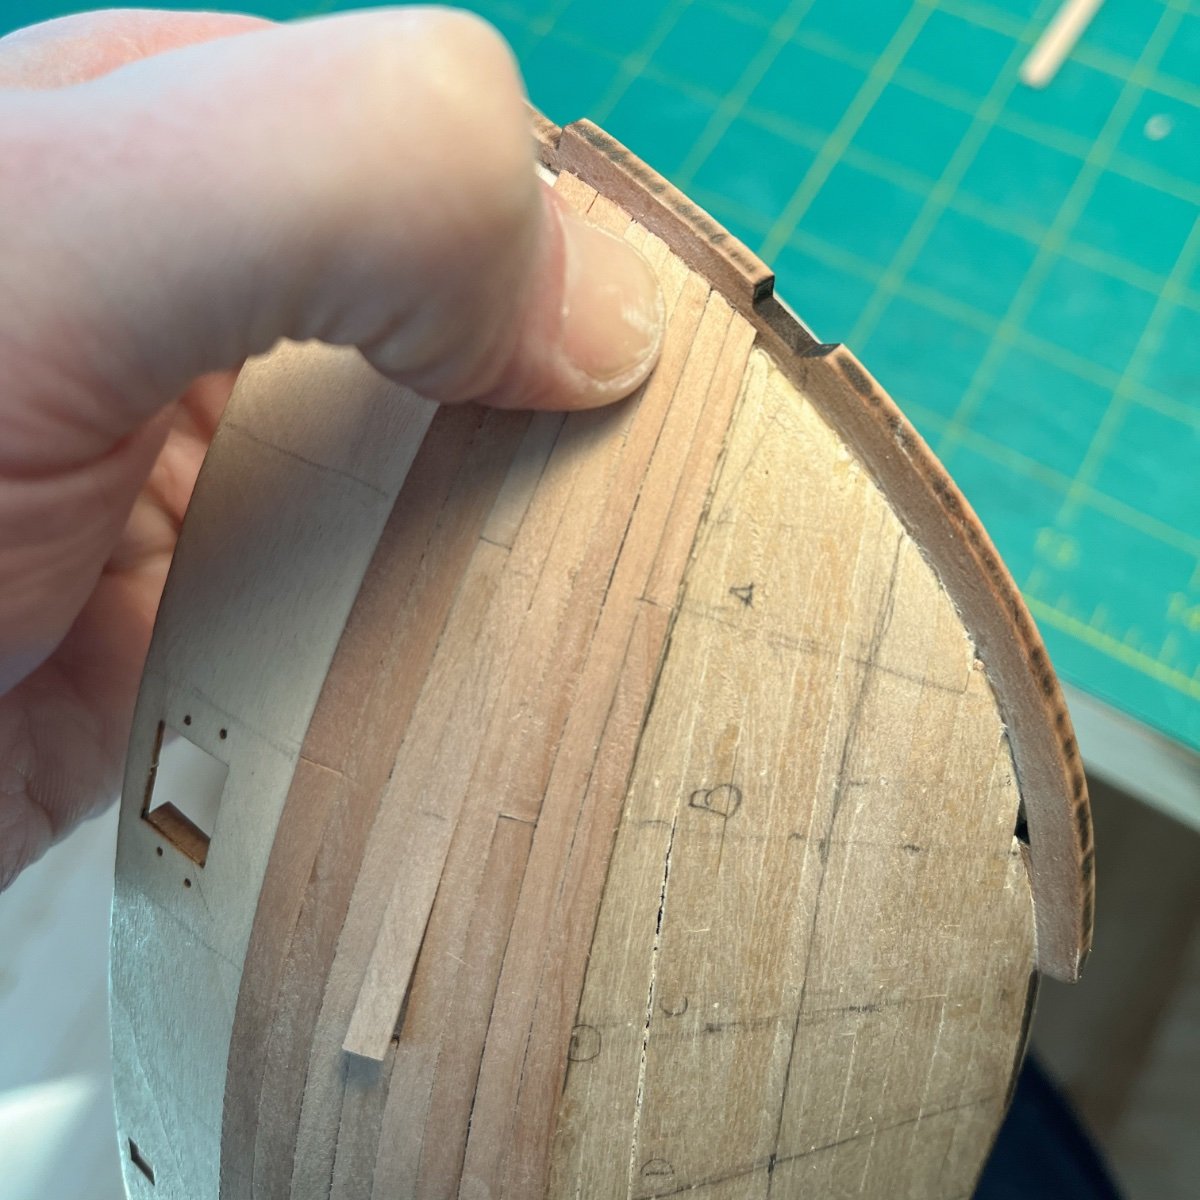
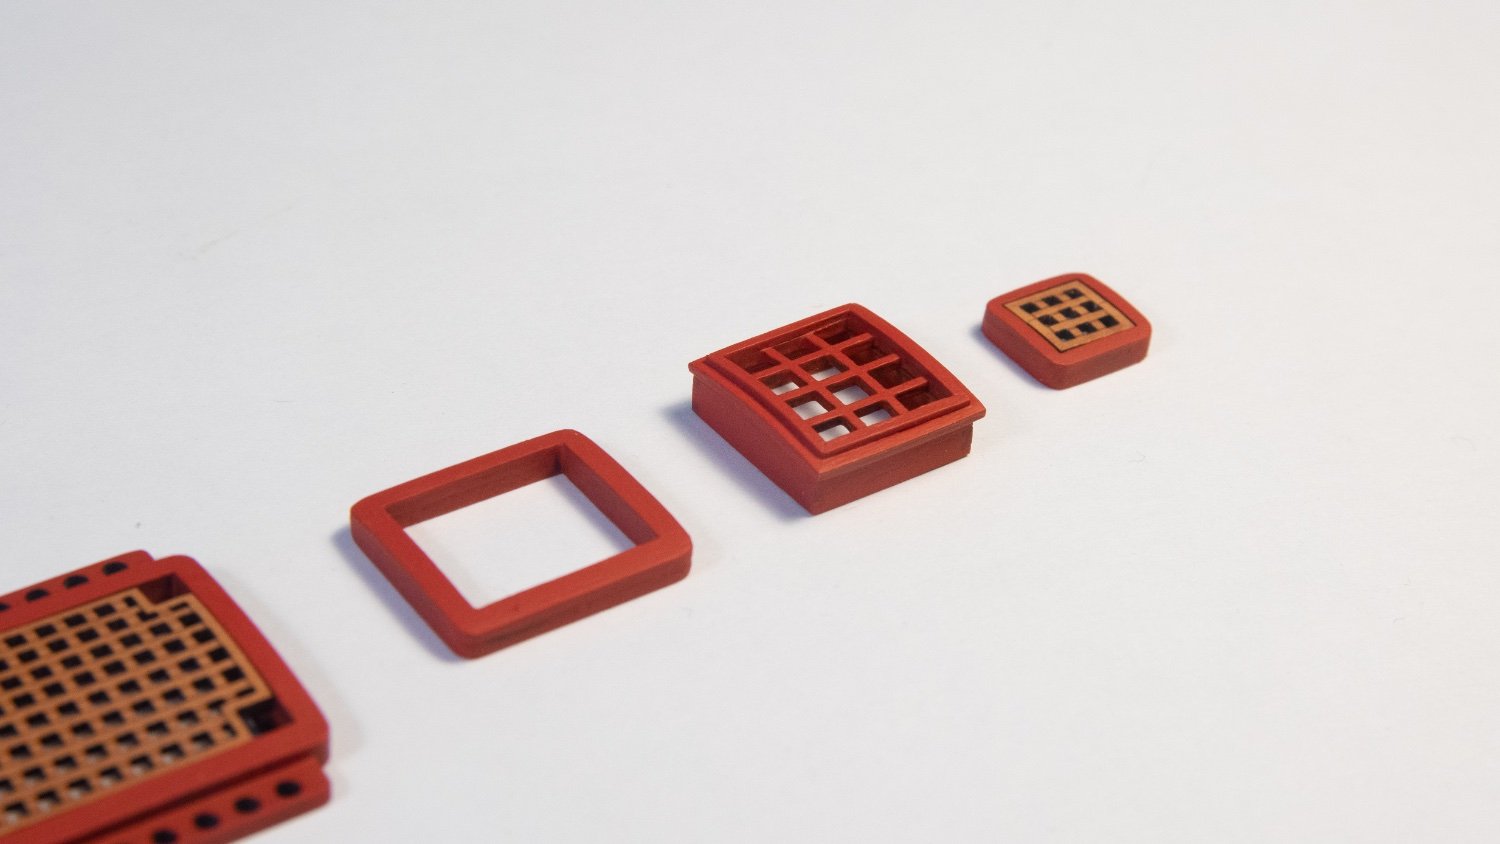
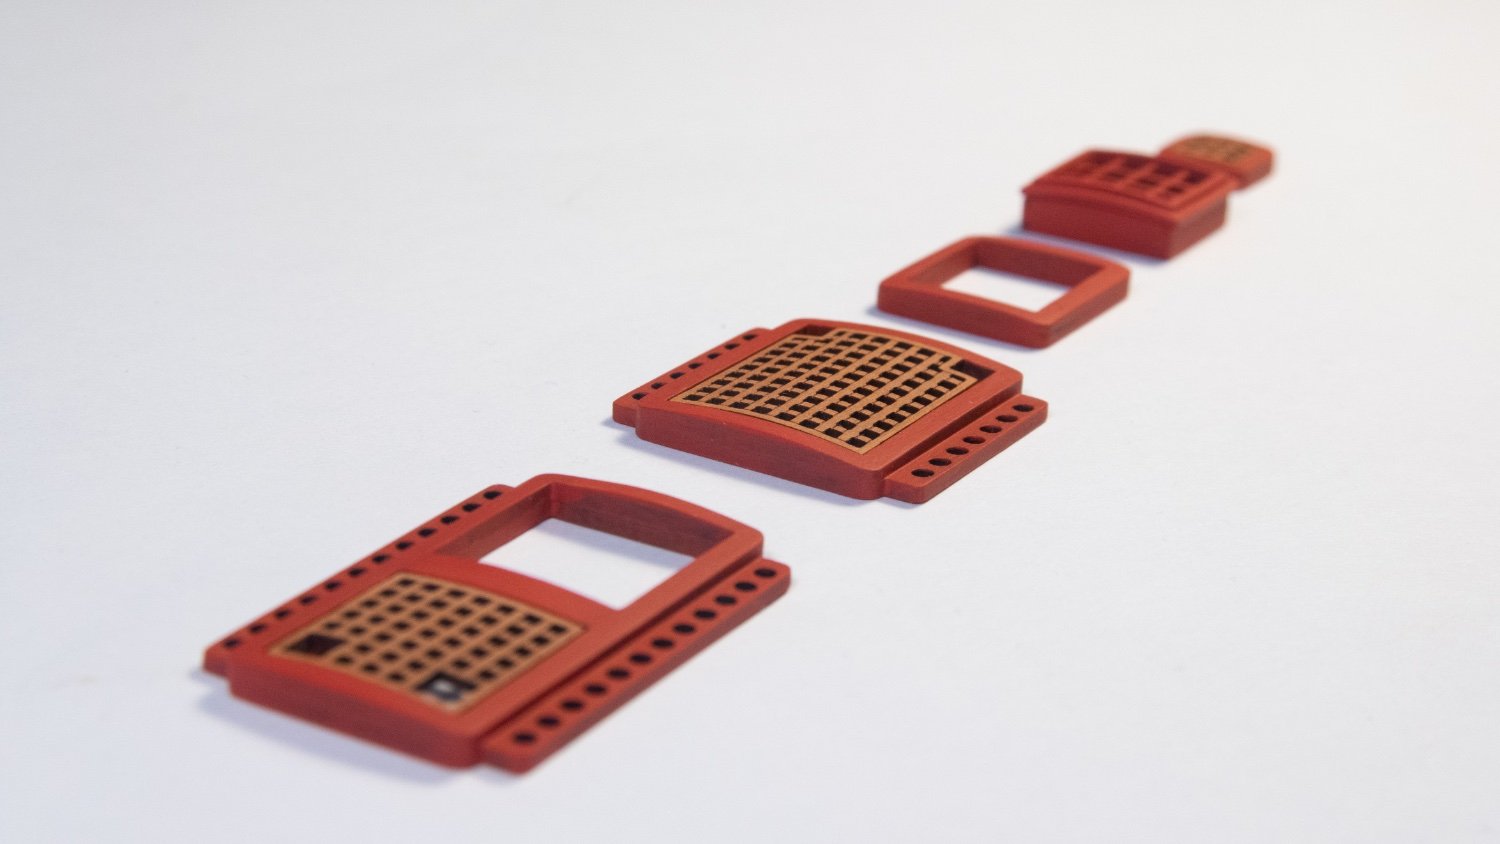
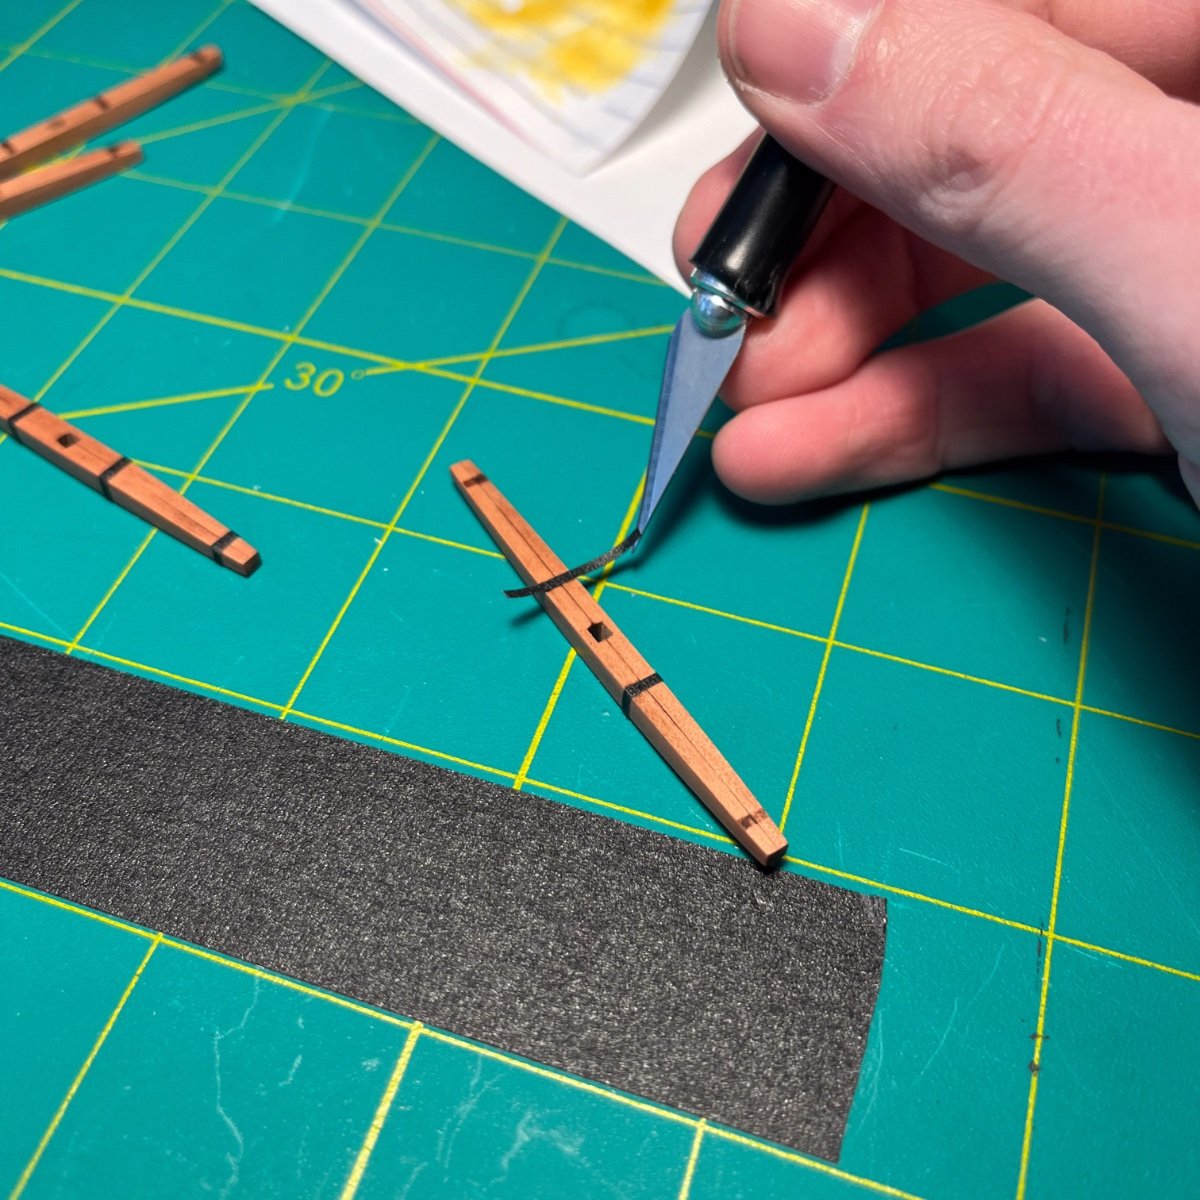
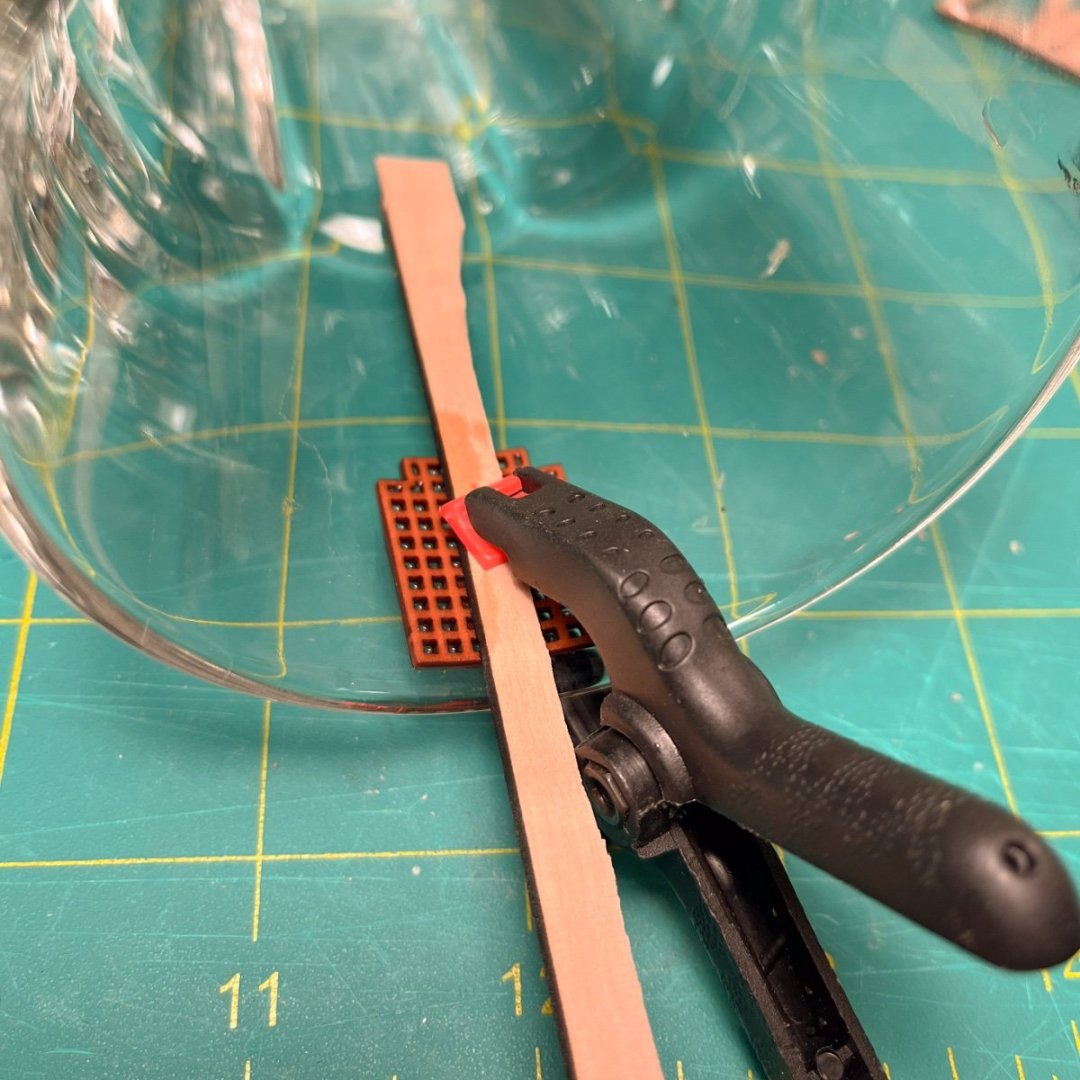
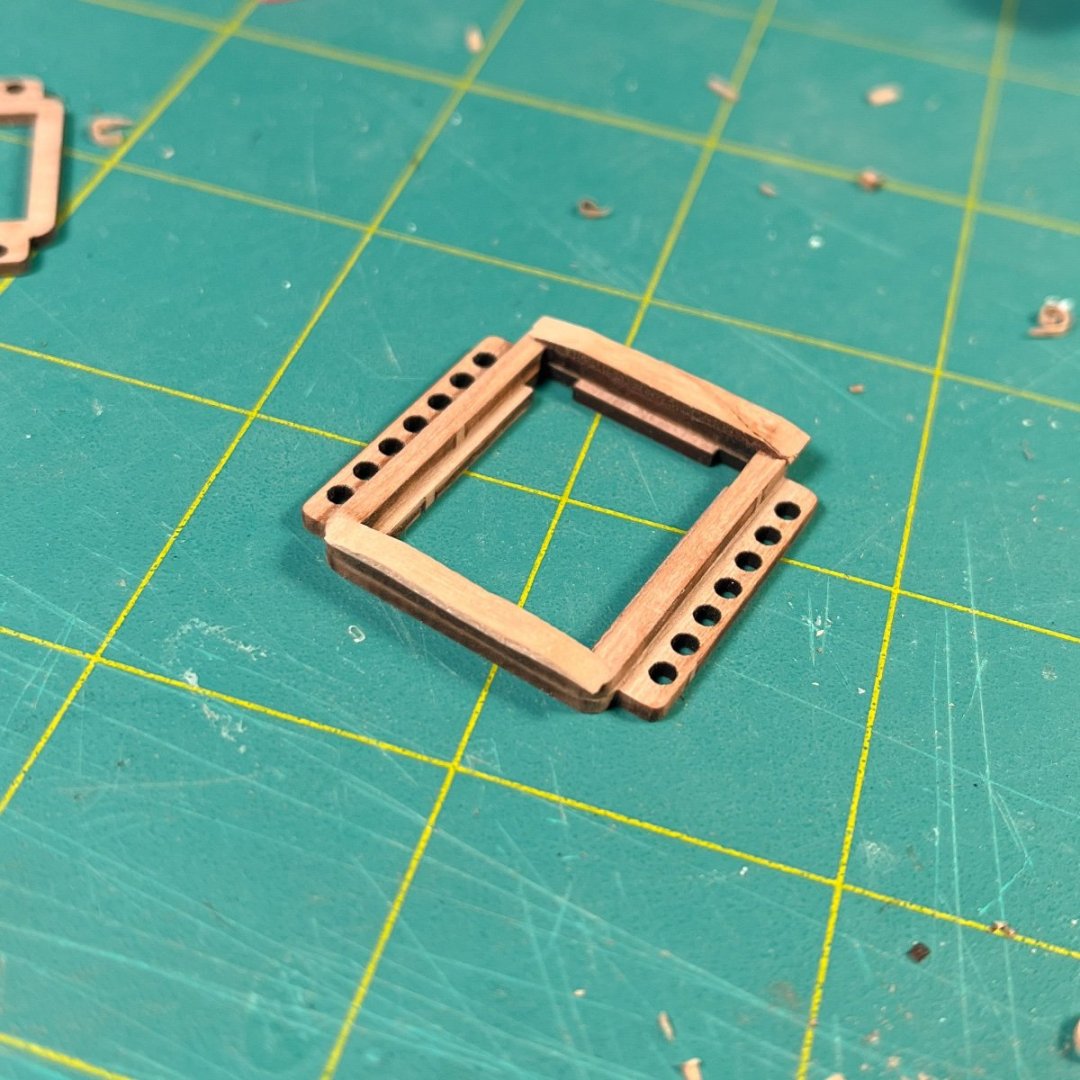
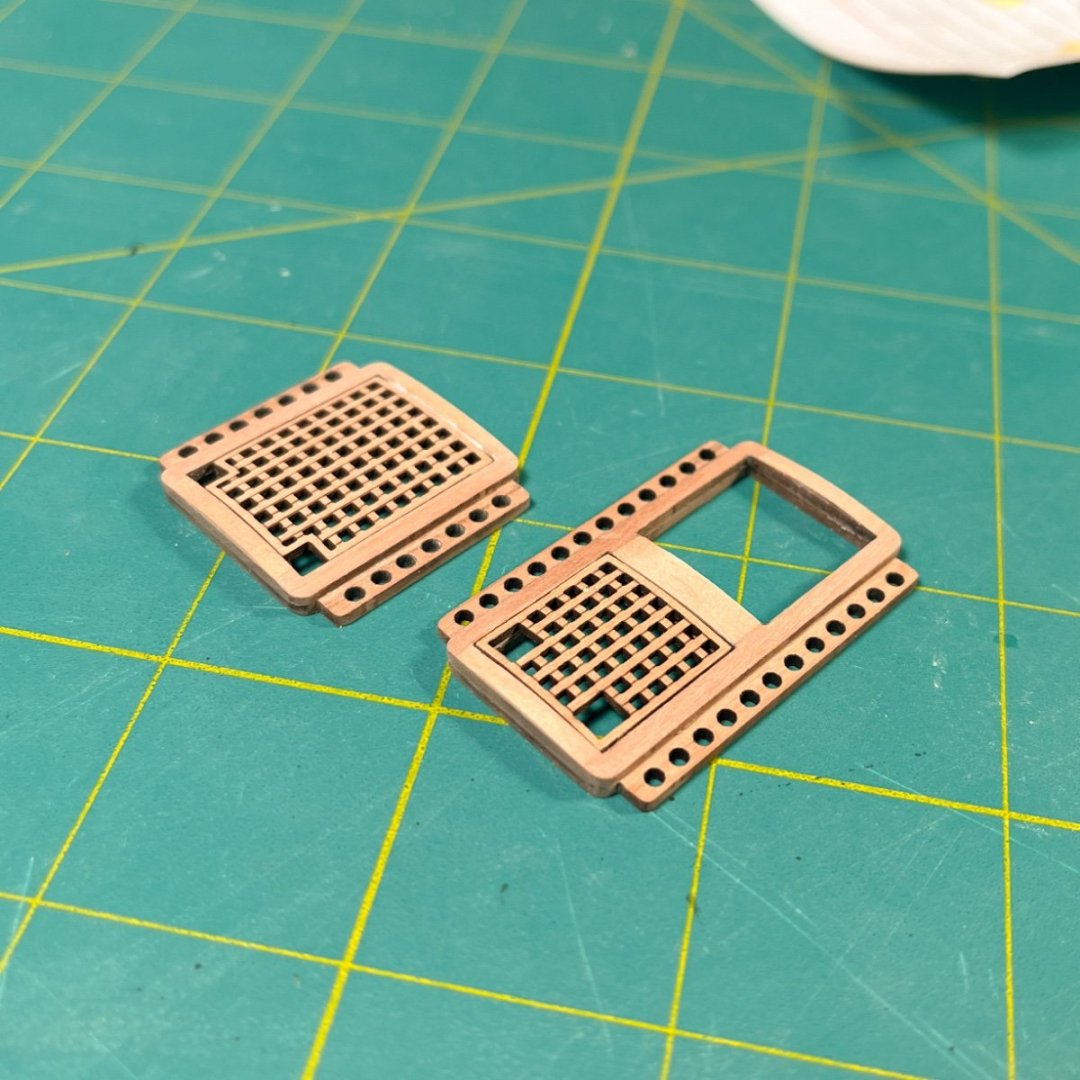
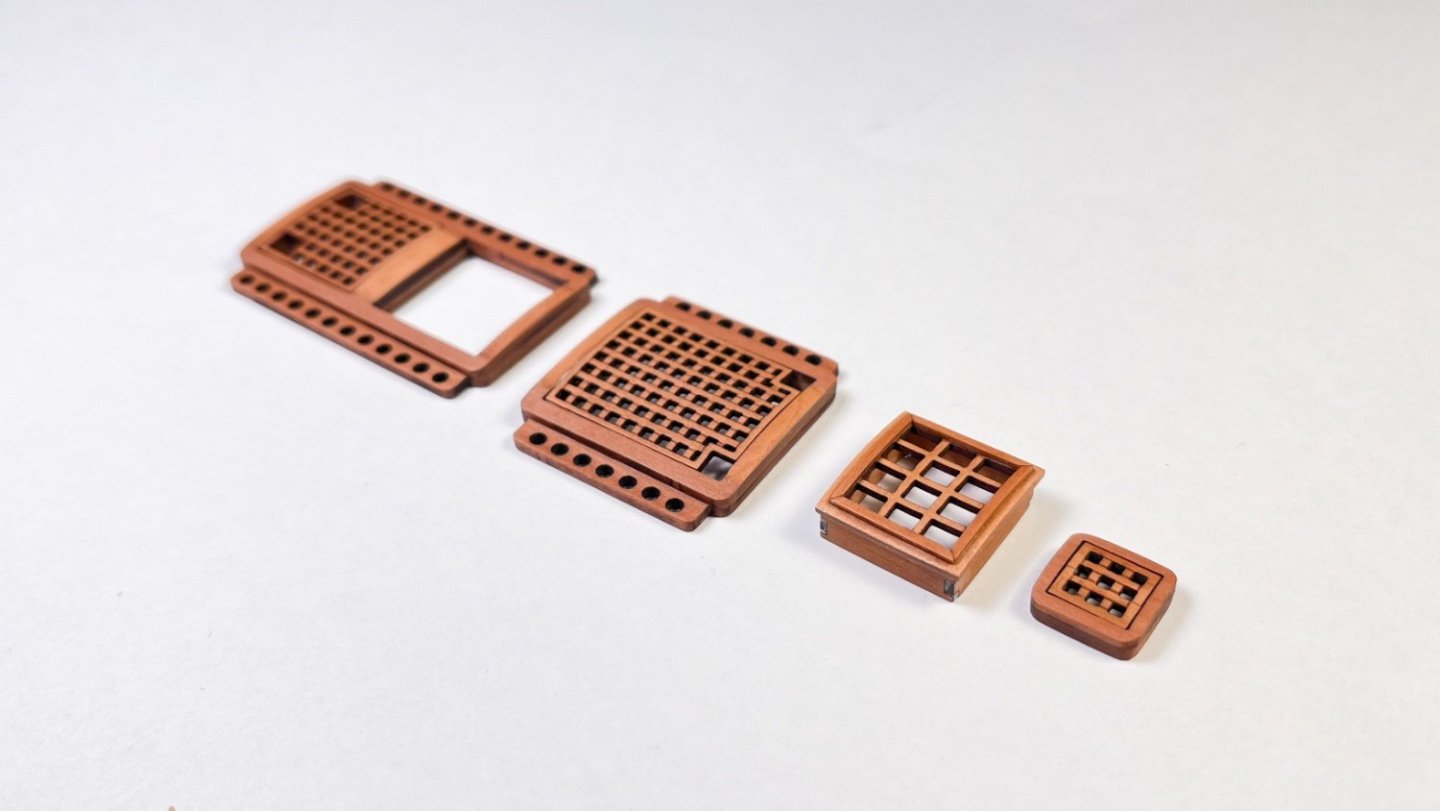
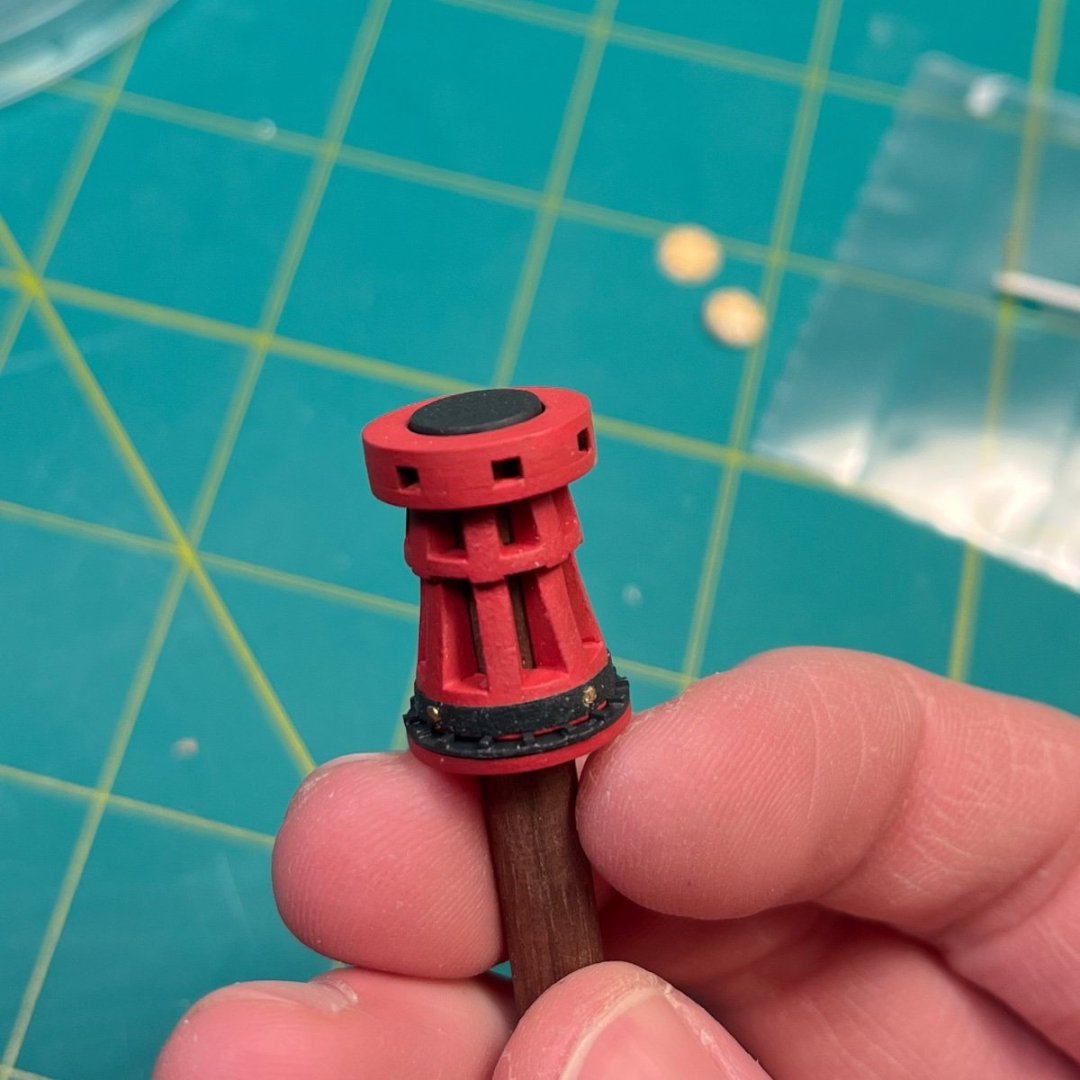
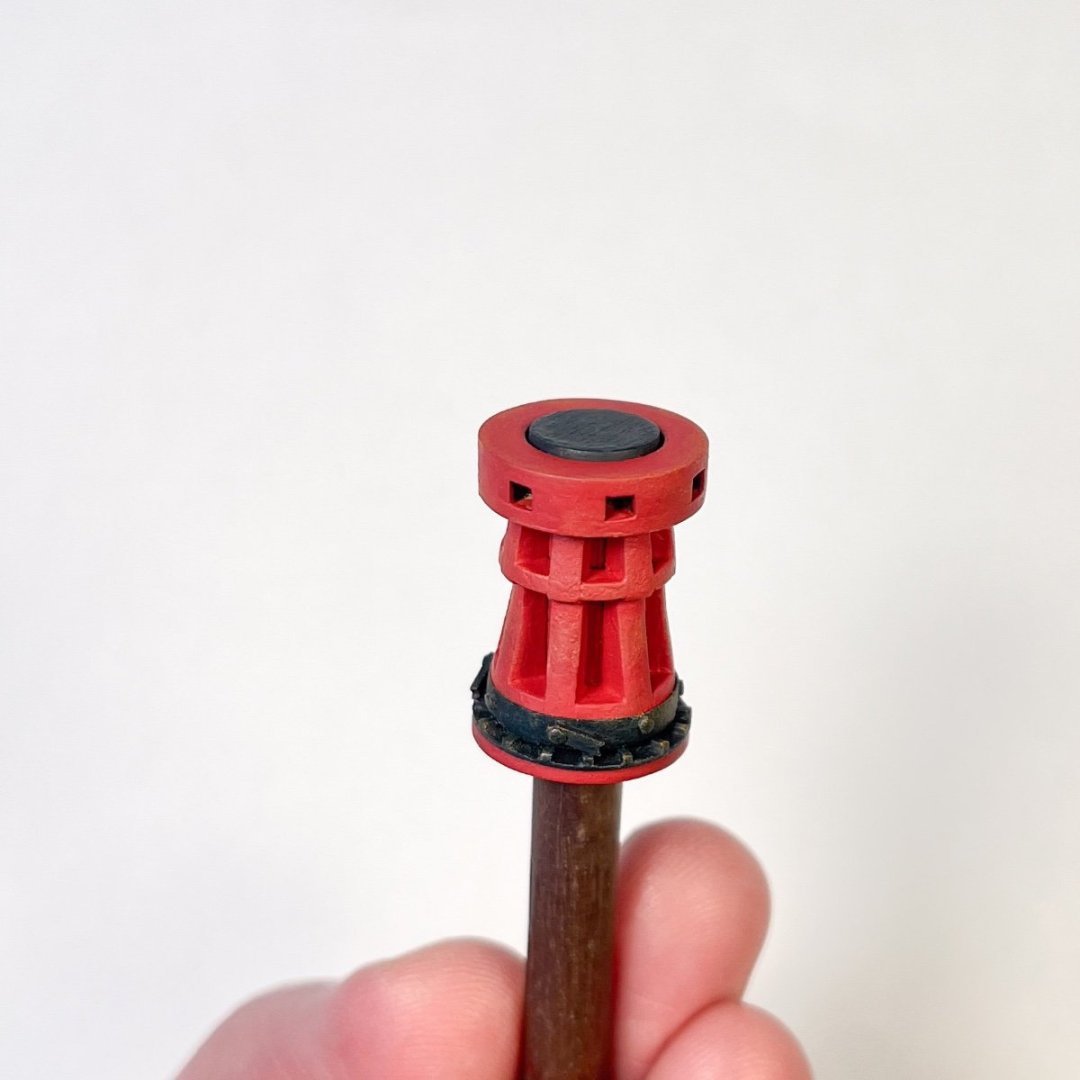
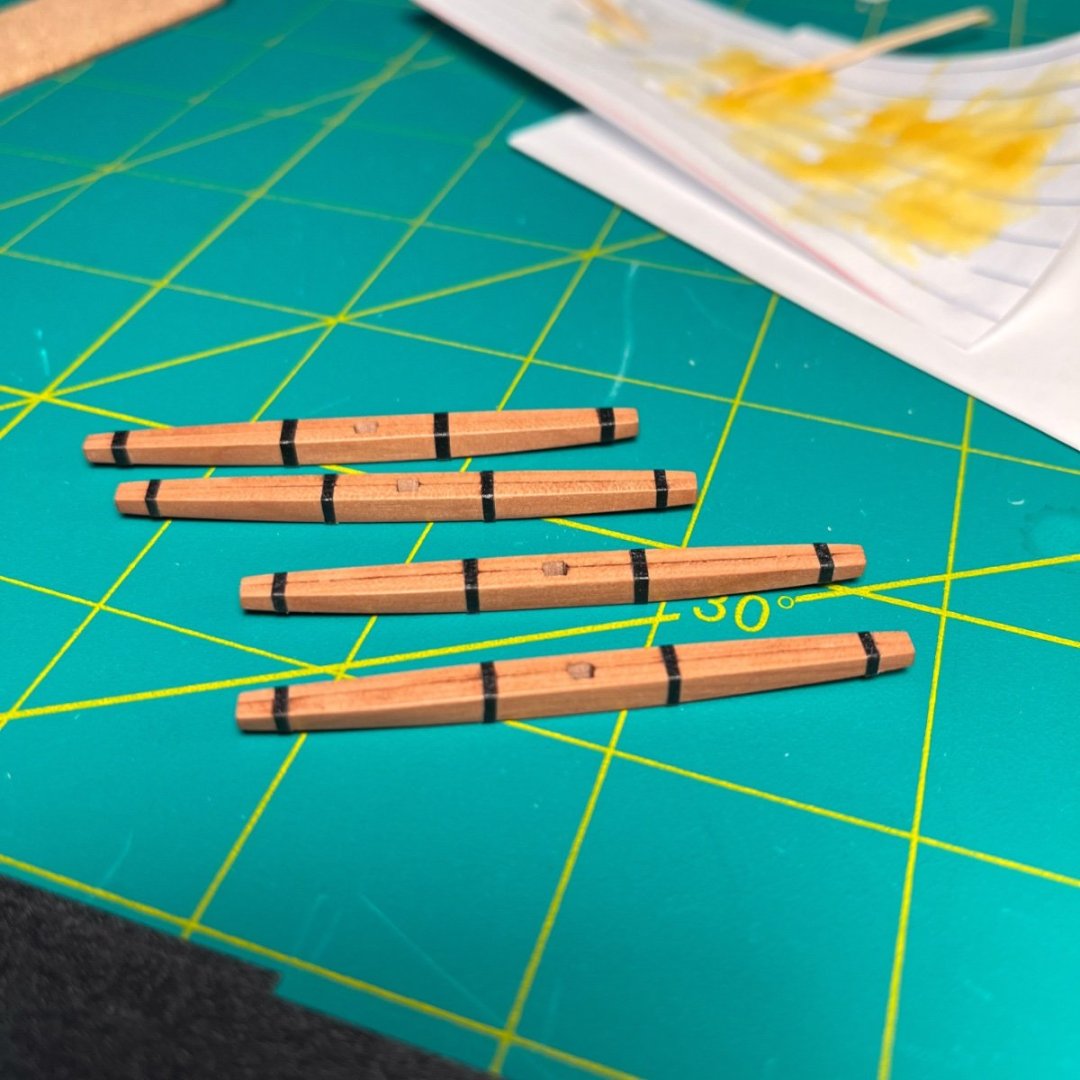
Planking continues... slowly. Mostly uneventful, except that I noticed a plank I’d previously installed hadn’t been milled squarely, and one edge was significantly thinner than the other (~.6mm instead of 1mm). I probably could have knocked down the surrounding planks enough to hide it, but decided it would be cleaner to replace. Here is a photo where I’ve started to cut out the offending plank. You can see the difference in thickness on the bottom edge, and this is after some scraping to knock down any high points, which is what brought it to my attention. After carefully cutting a portion out of the center of the plank, I was able to pry the two ends out without causing any damage. Remade the plank so it would fit snugly, and glued it into place. Otherwise happy with how it is coming along. Even though my assumption is that I will paint below the waterline, I’m continuing the shorter plank lengths just in case I end up preferring the look of the unpainted wood. I’m starting to transition to the darker pear strips now that I’ve passed the waterline at the stem and stern. I seem incapable of focusing on one thing at a time, so I have also been working on the coamings, gratings, and skylight. I like the detail of gratings having a camber, so I decided to add it to these. Don’t think I’ve seen anyone else add it to their Flirt or Speedy gratings, so perhaps it isn’t strictly accurate? Seems standard for ships of the era, so not sure why it shouldn't have had them. First I added some material to the fore and aft of the coamings as I didn’t want to thin them down too much when adding the camber. Soaked the gratings and let them dry clamped to the inside of a glass. Knocked down the new wood strips on the coaming as far as possible using a knife and then switch to files and sanding sticks. Here they are with the camber added. The top one lost a bit of the inside edge where I’d added new material, and you can see the bit of white where I applied filler to square it back up. It’ll be painted, so not concerned about the color. Also added the camber to the skylight. It looked a little flat and monolithic, so I added some trim around the muntins to give it a bit more detail. Note that I attached these .6mm pear strips AFTER adding the camber to the skylight as I didn't think they'd hold up to the soaking and bending. Will add some clear plastic to the back side to simulate glass once I’m closer to installing.


-
Looking nice! Are you planning on white below the waterline, or leaving the wood?
-
jereremy reacted to a post in a topic:
HM Cutter Trial 1790 by AJohnson - Vanguard Models - 1:64th
-
jereremy reacted to a post in a topic:
HMS Flirt by ECK - Vanguard Models - 1:64
-
That windlass is lovely. Very clean.
-
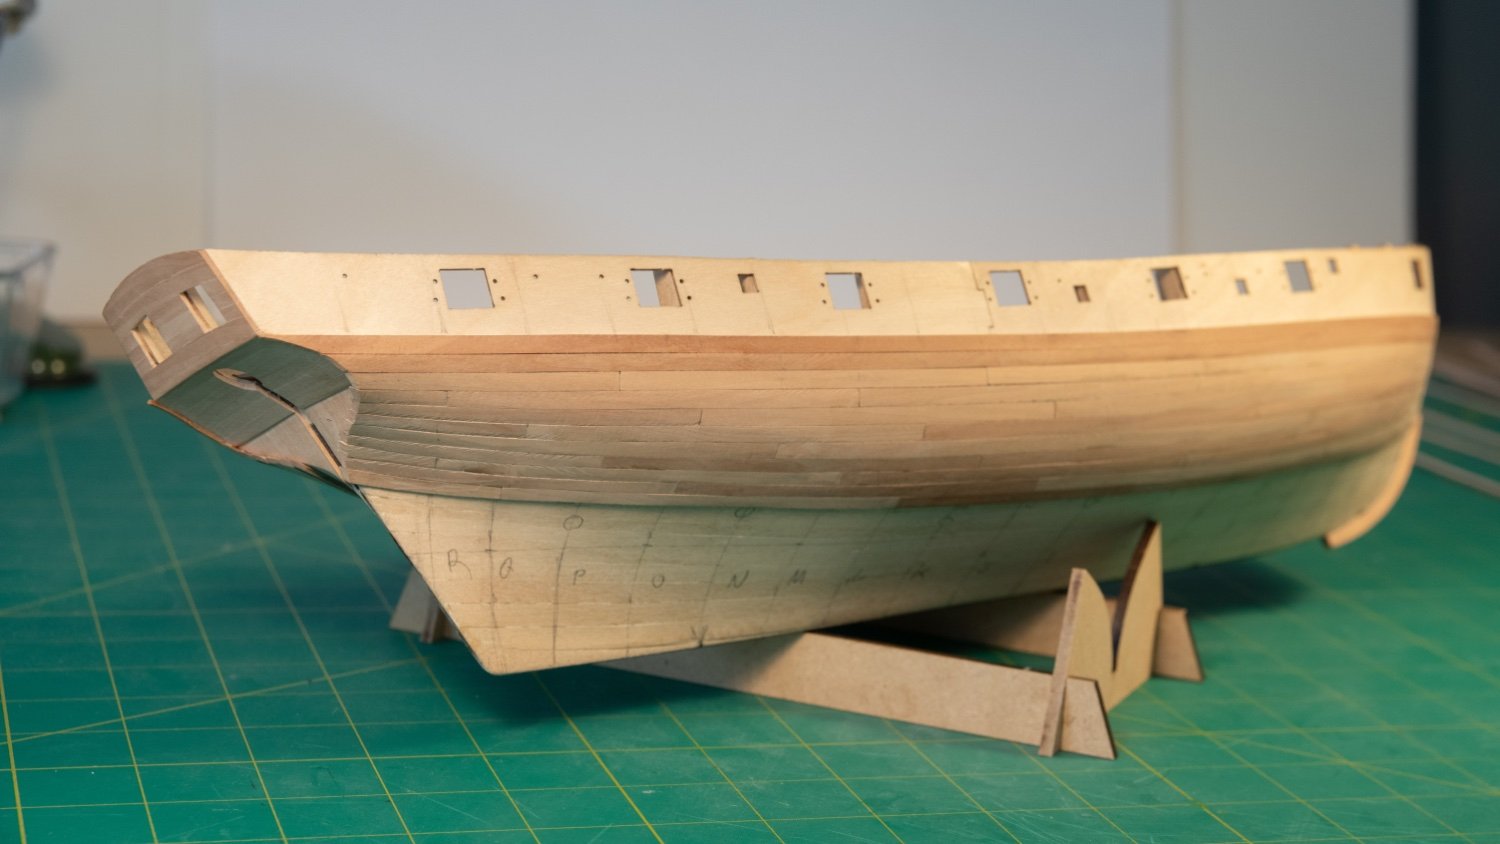
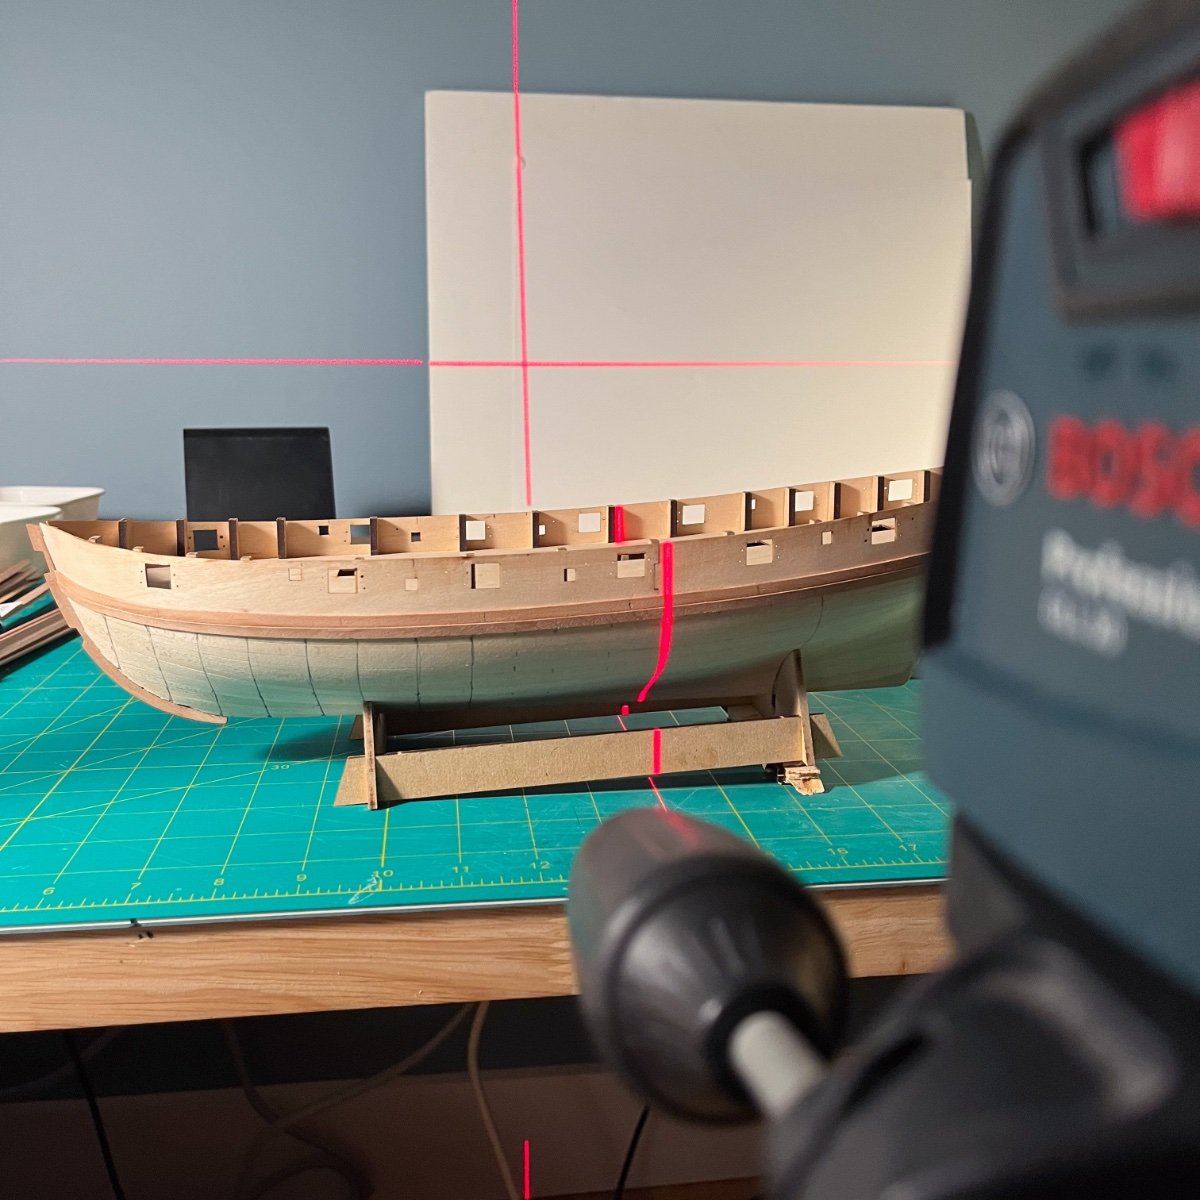
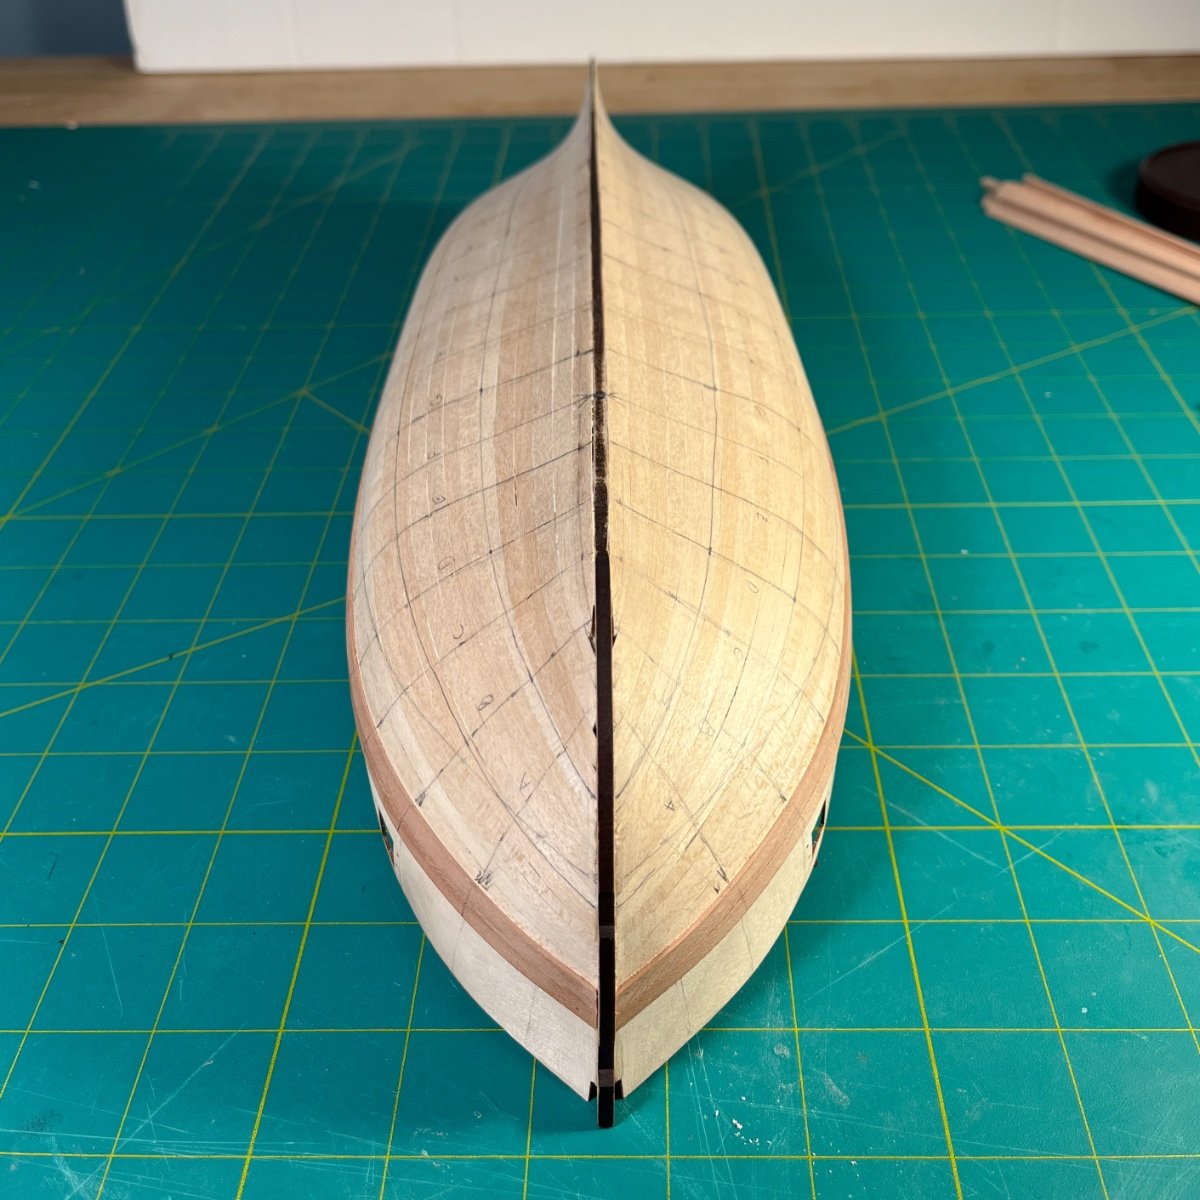
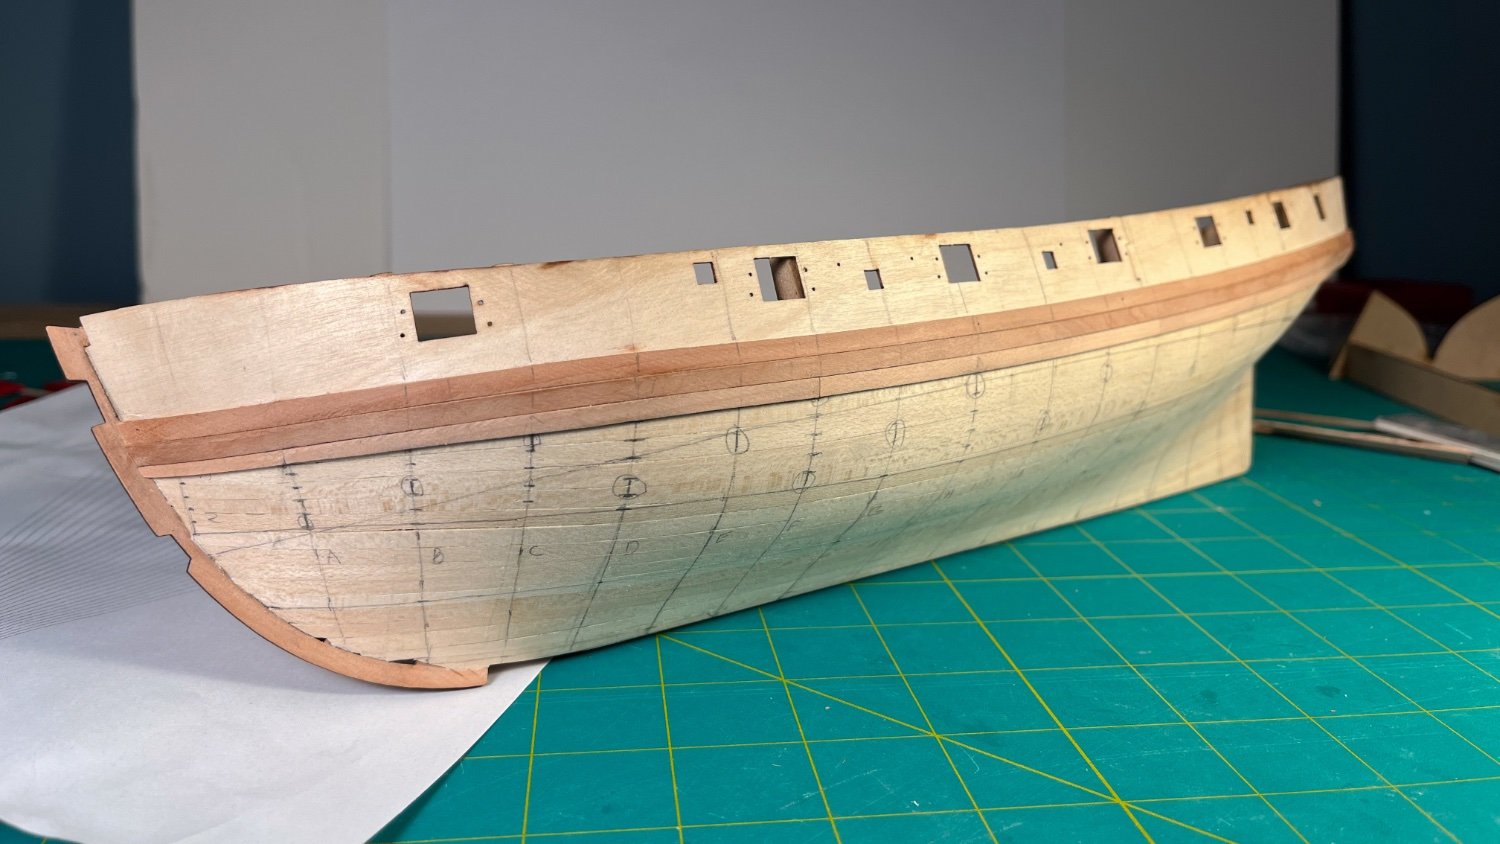
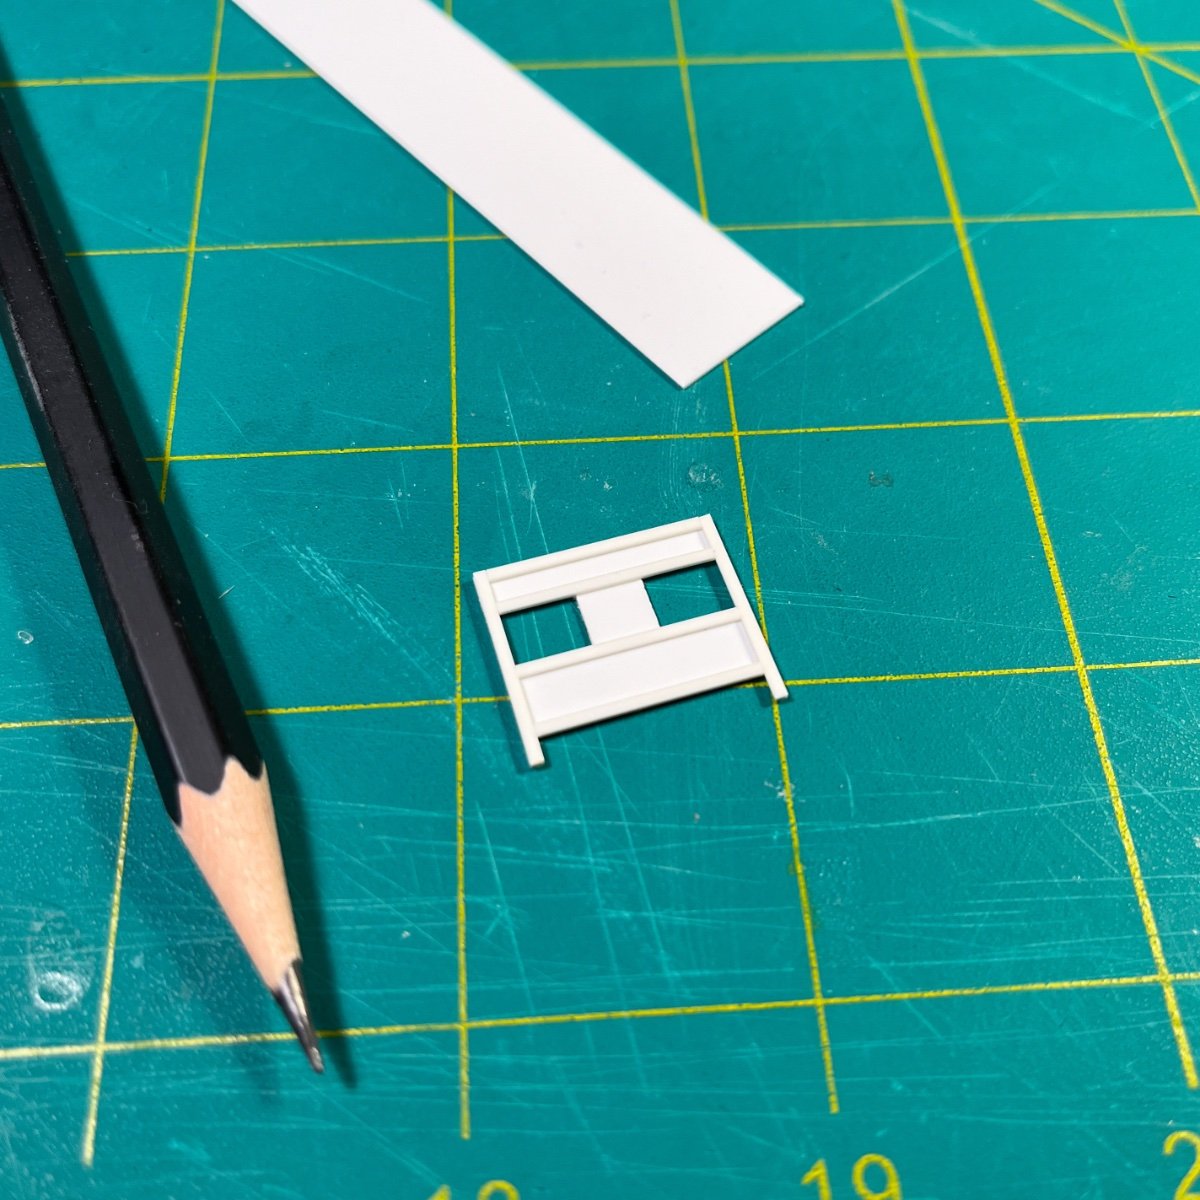
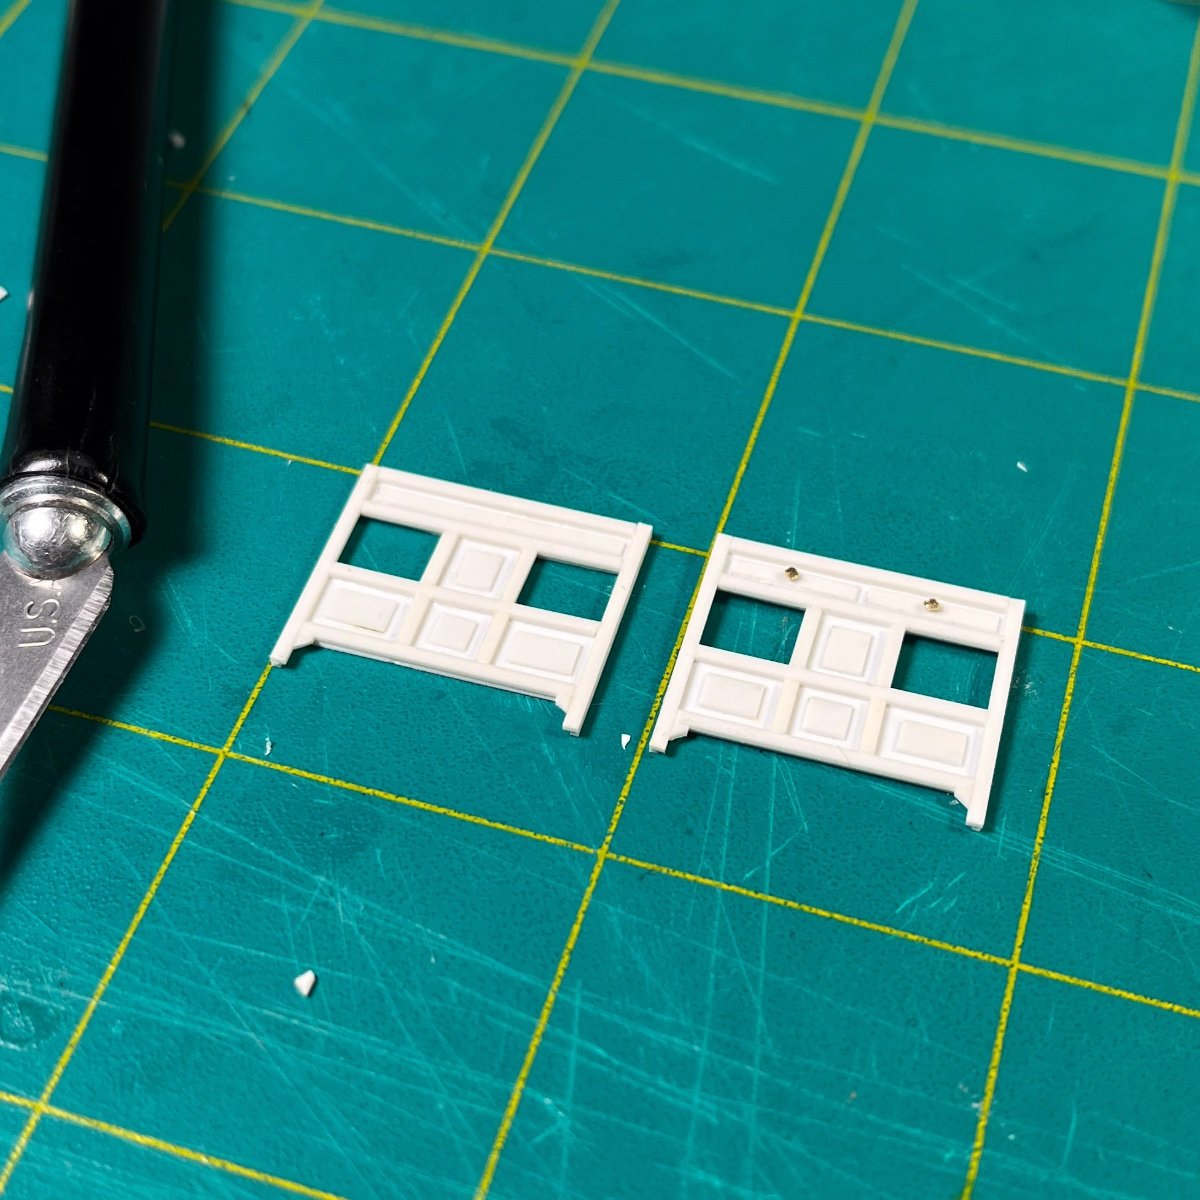
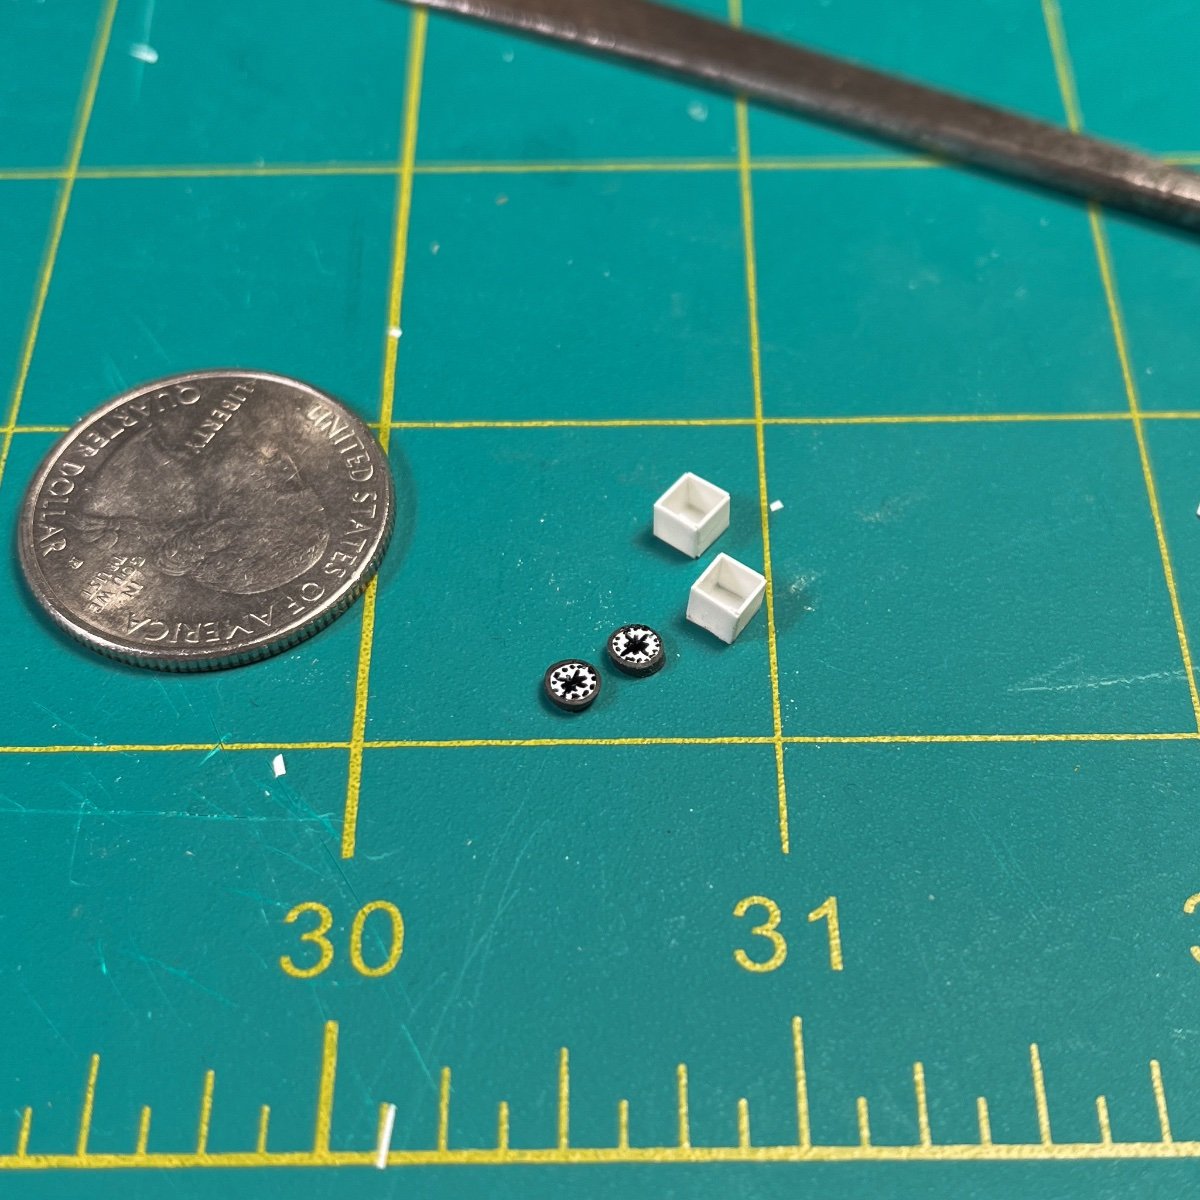
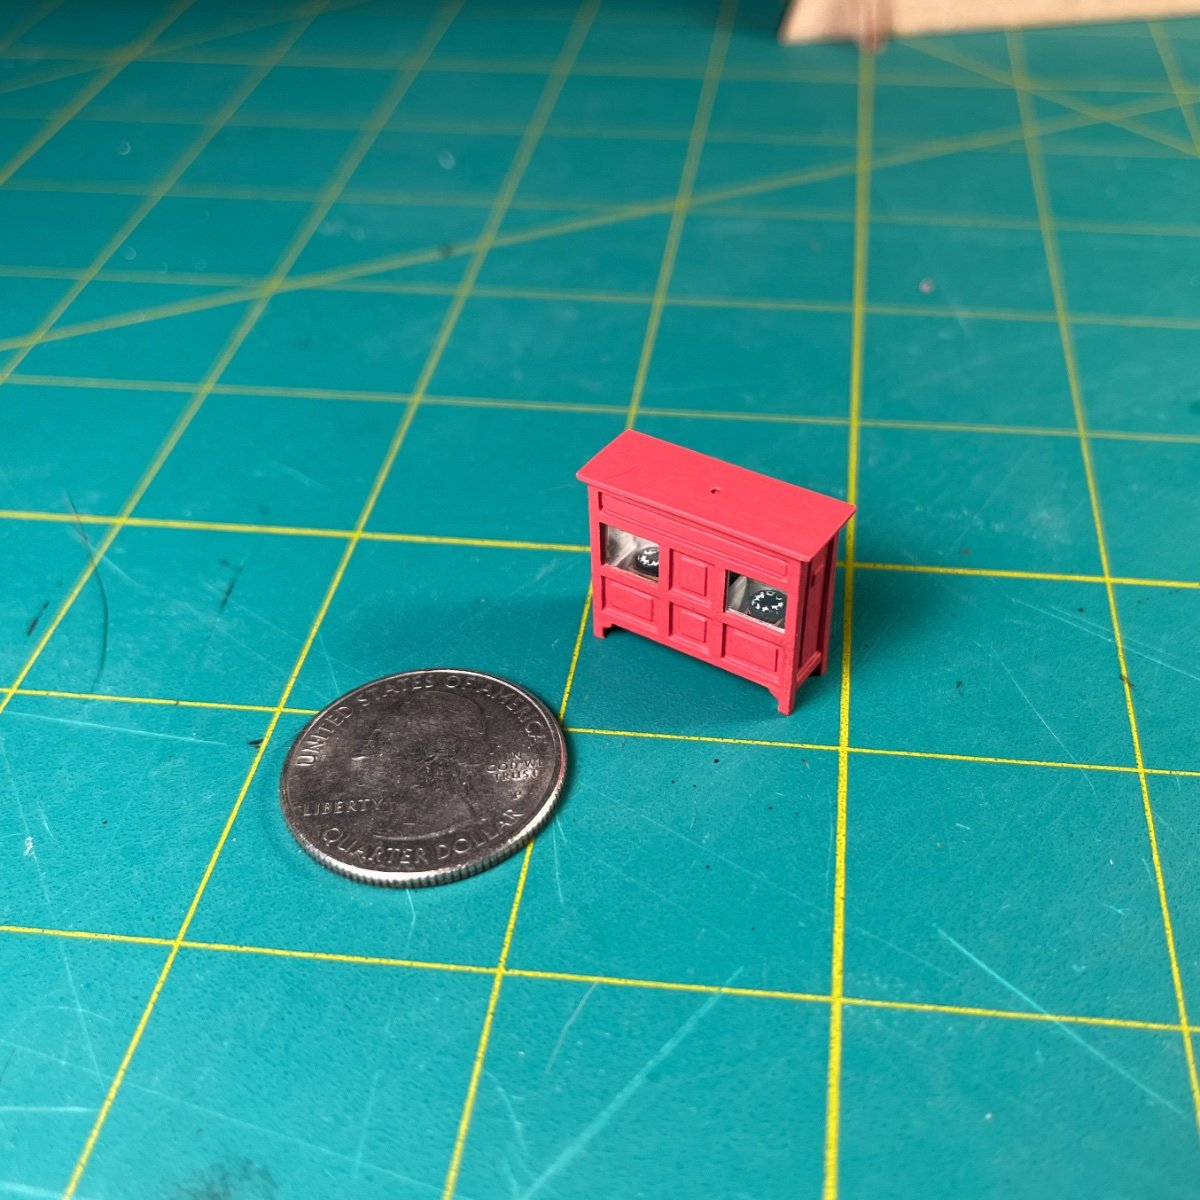
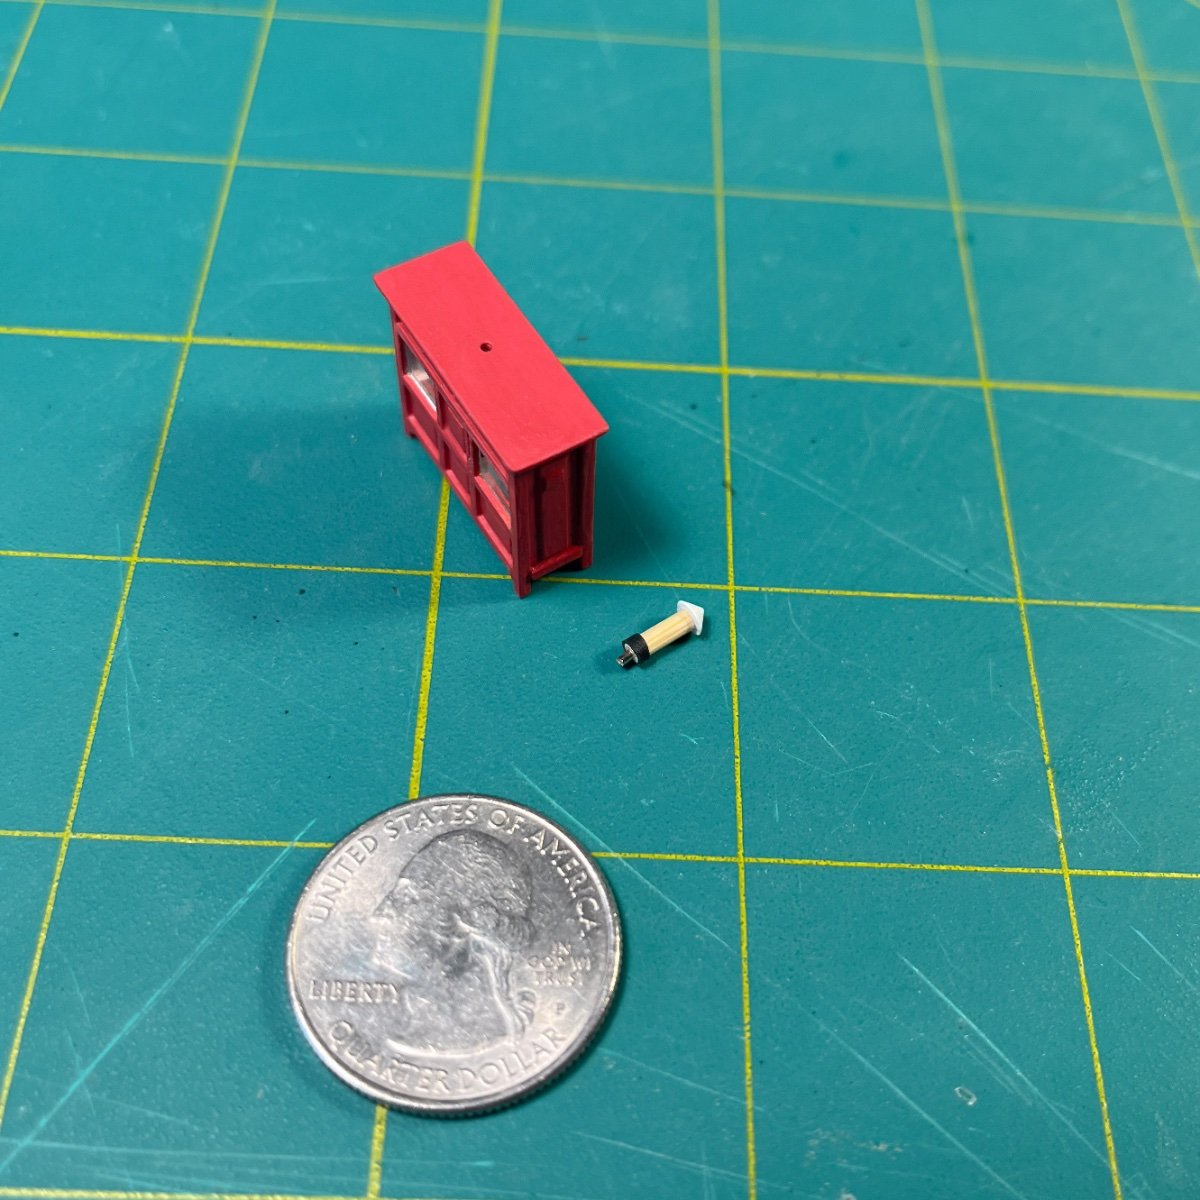
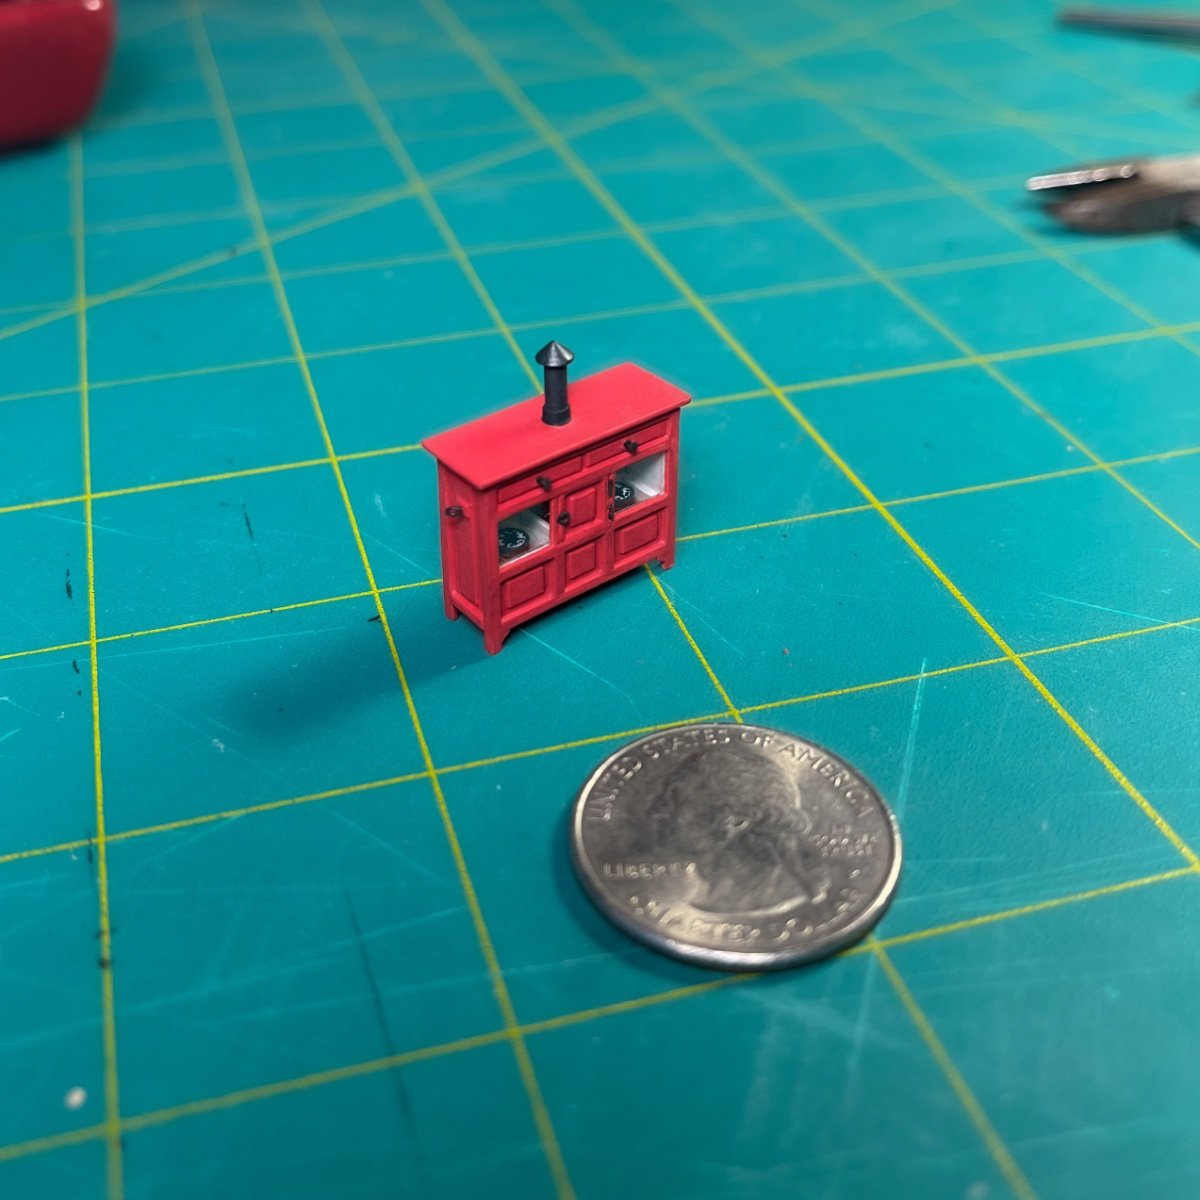
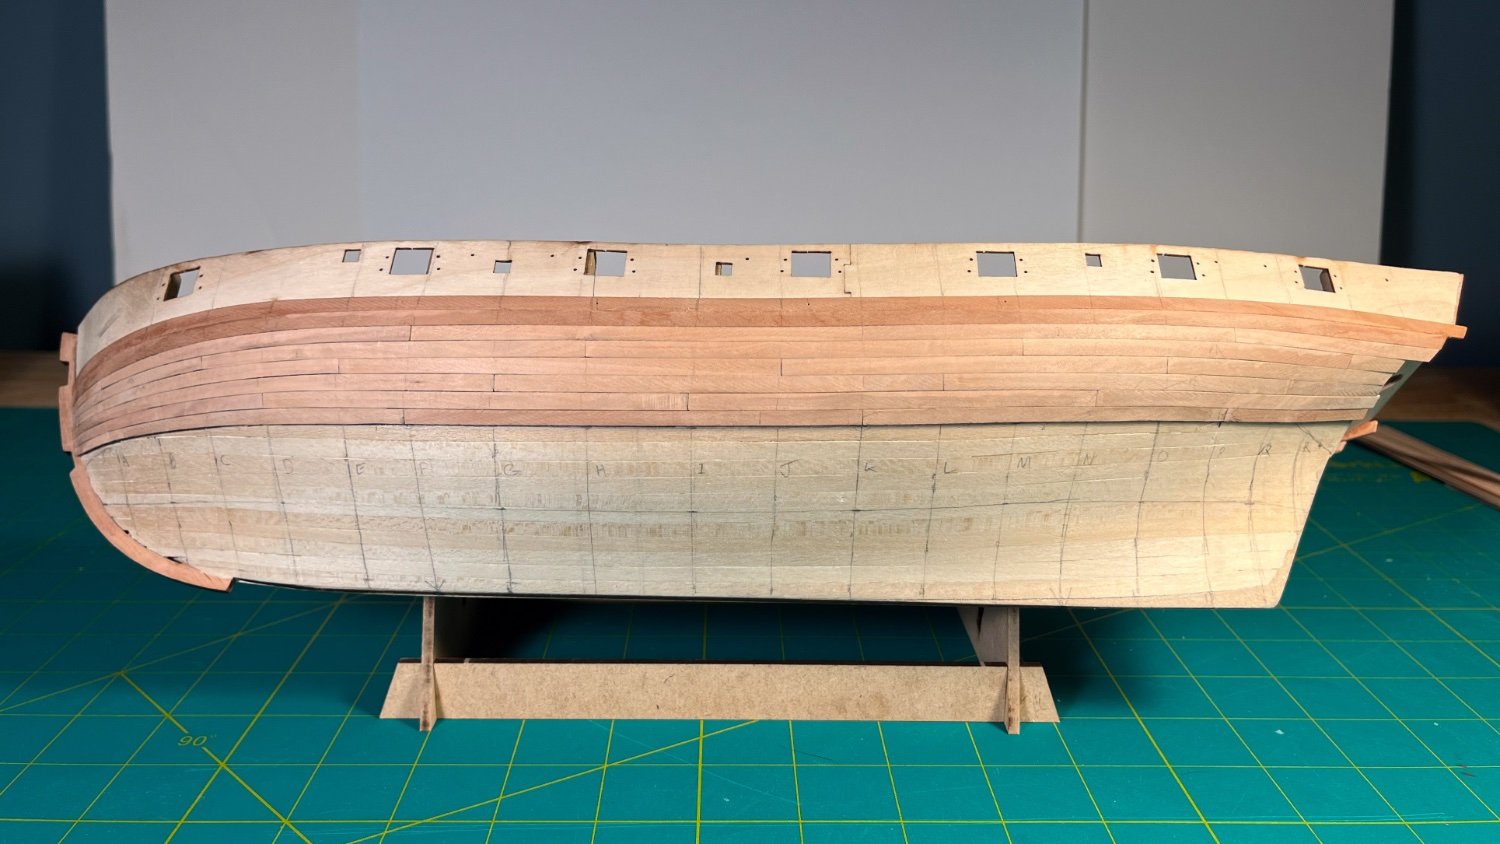
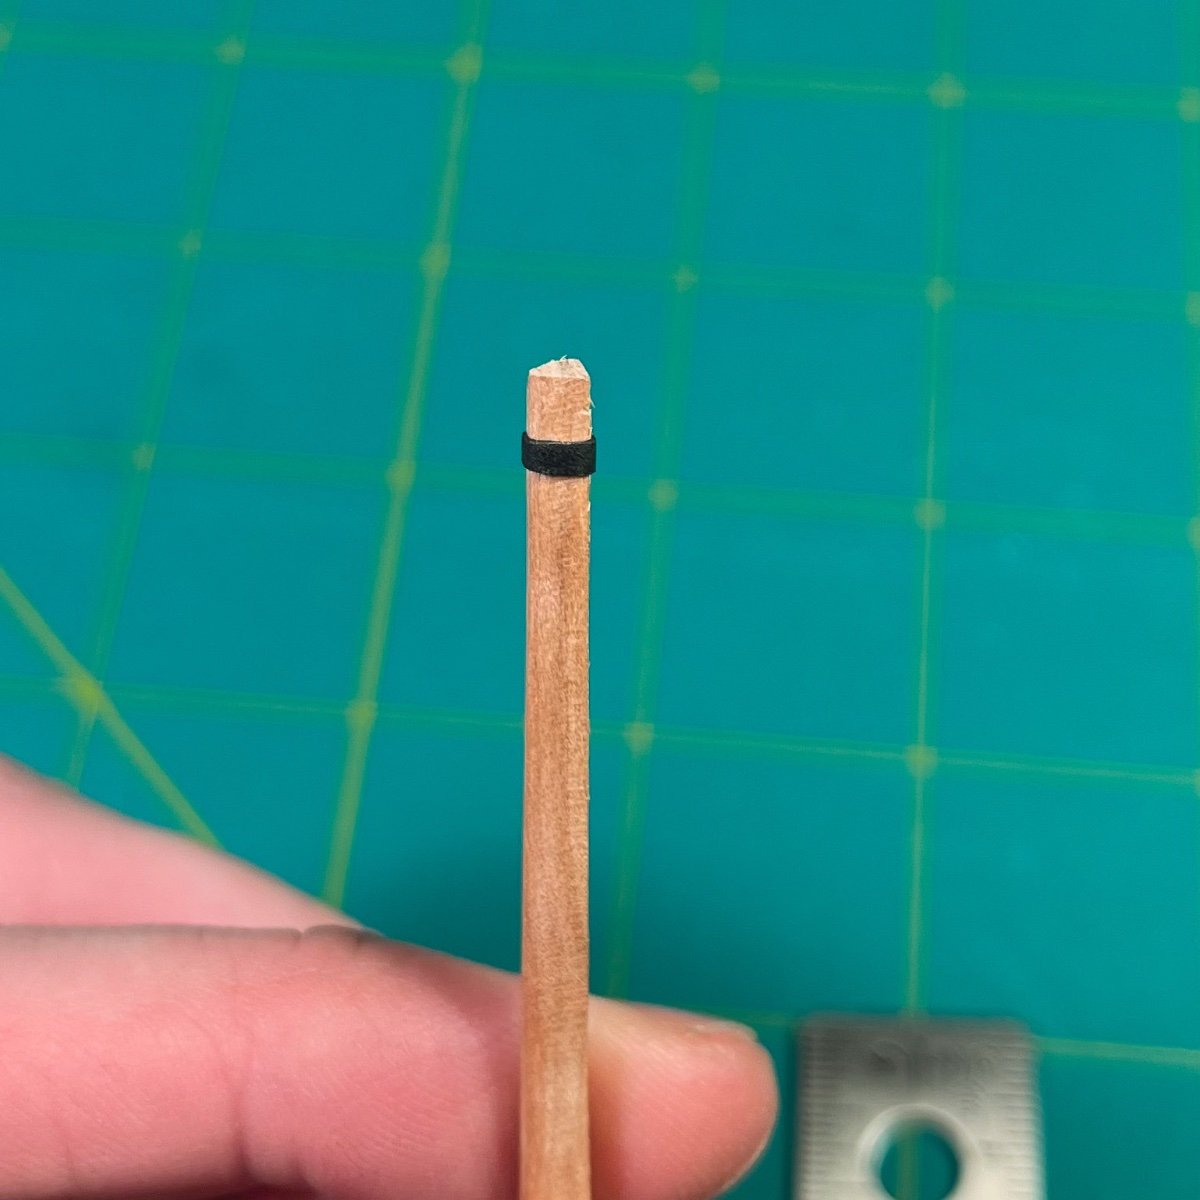
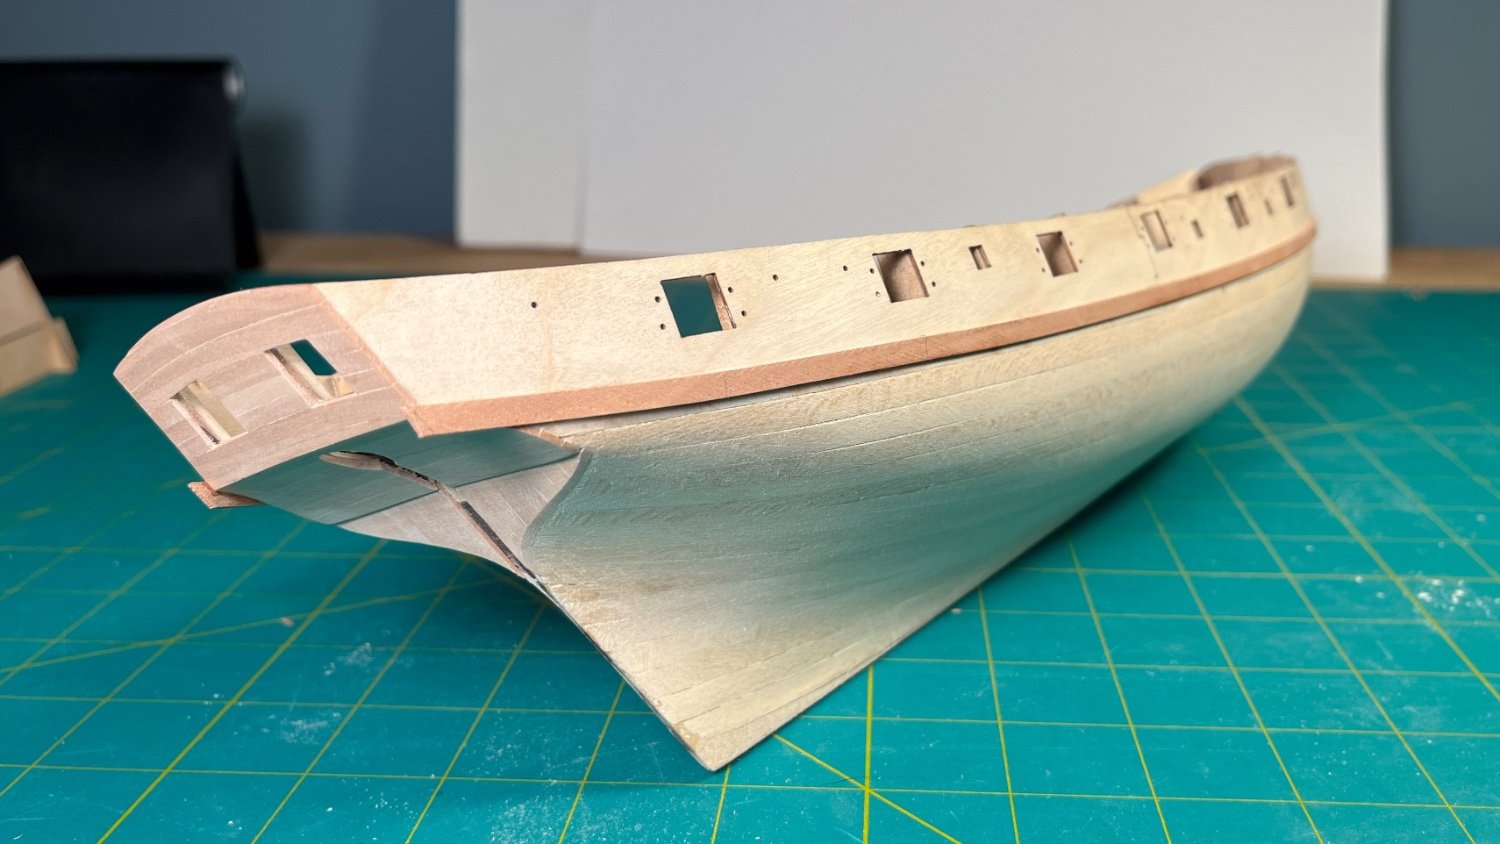
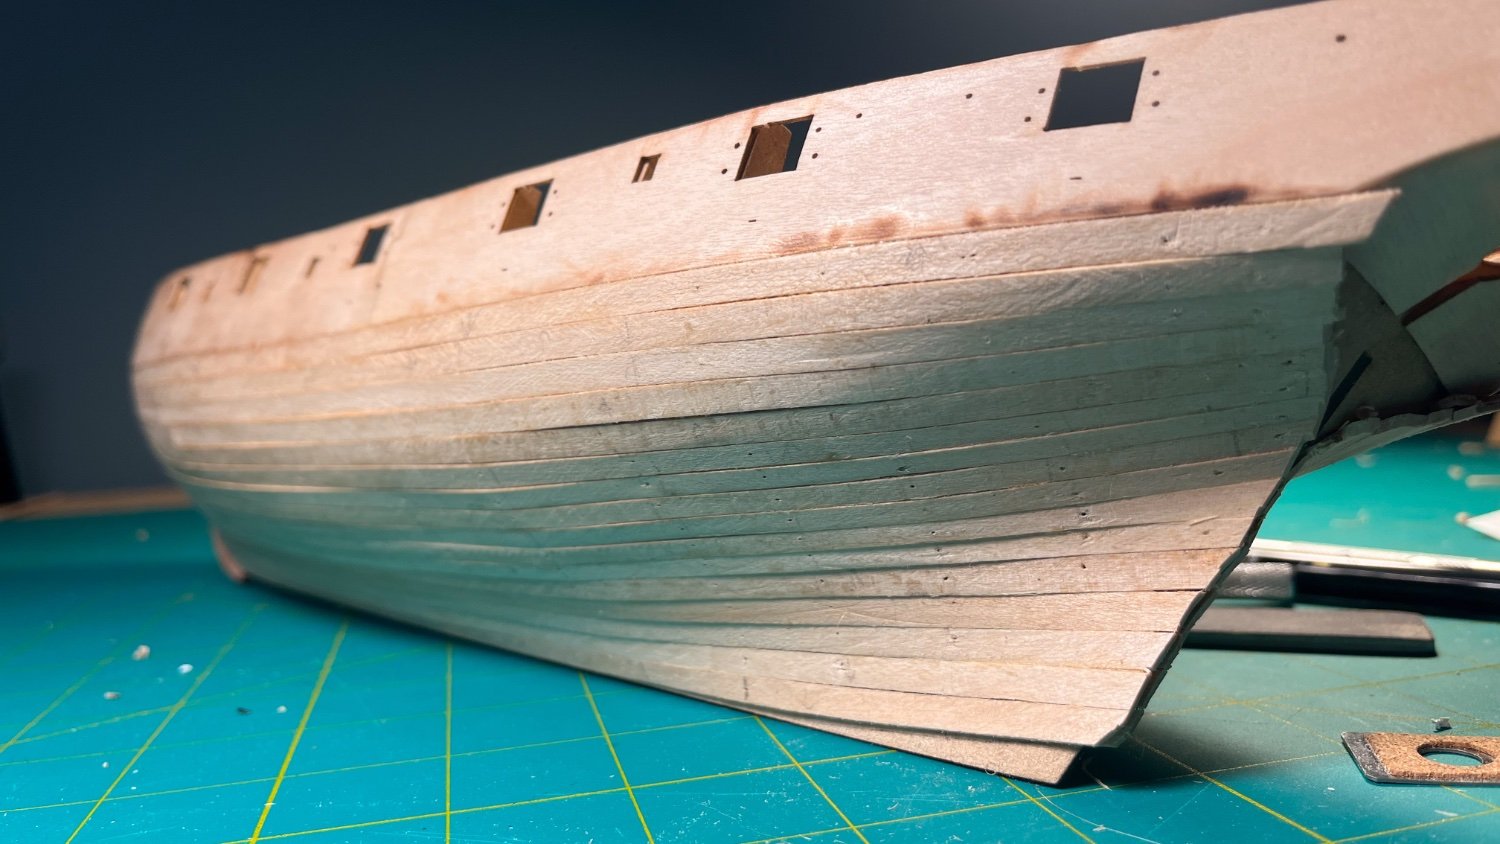
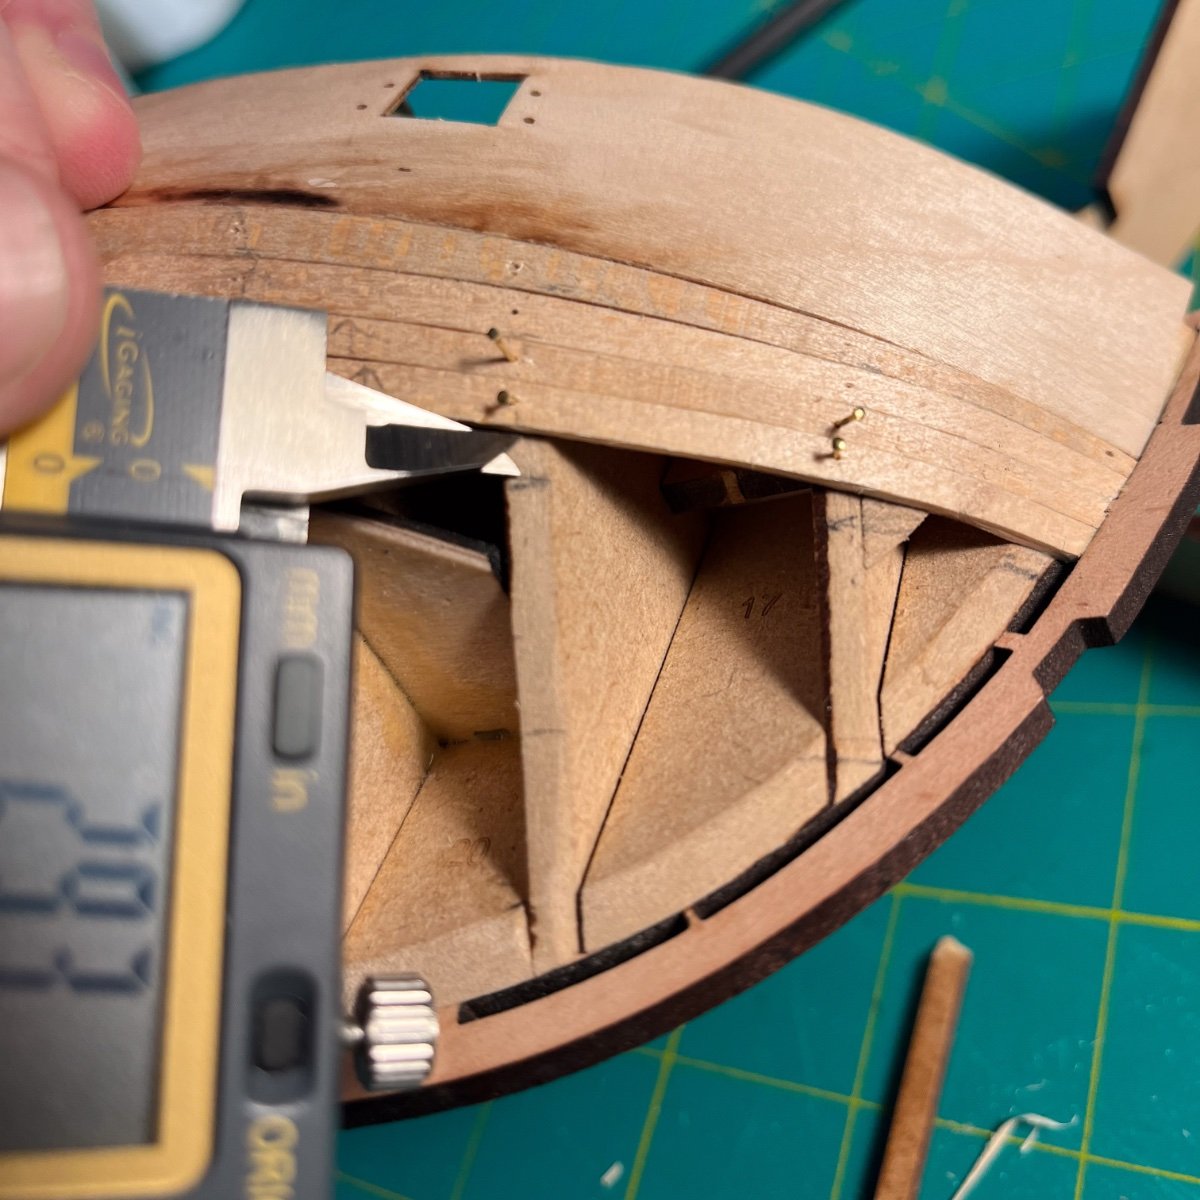
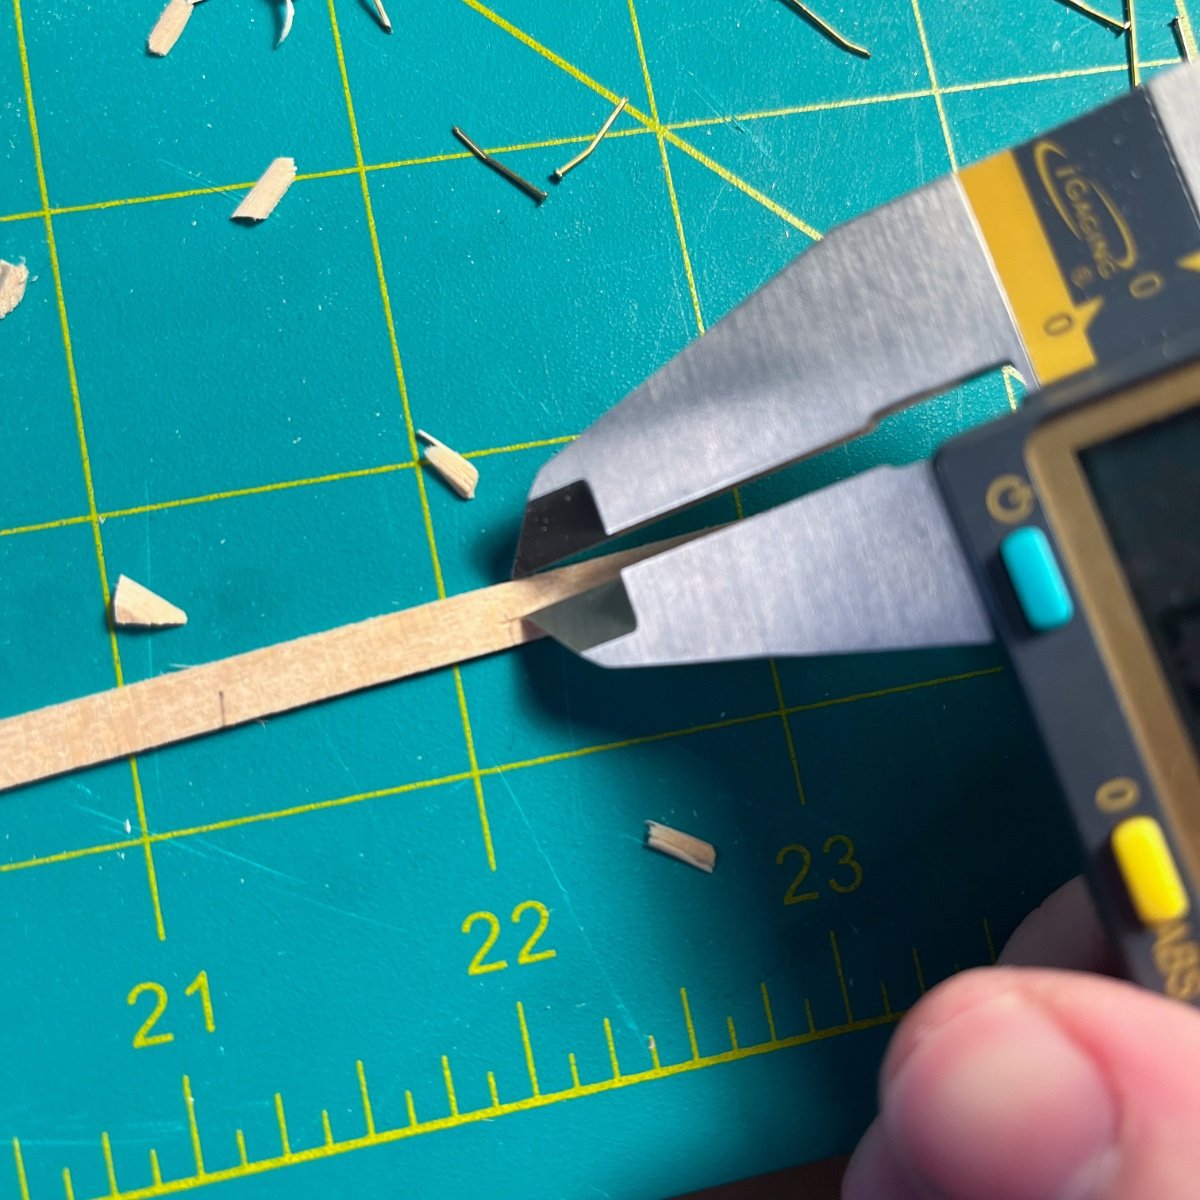
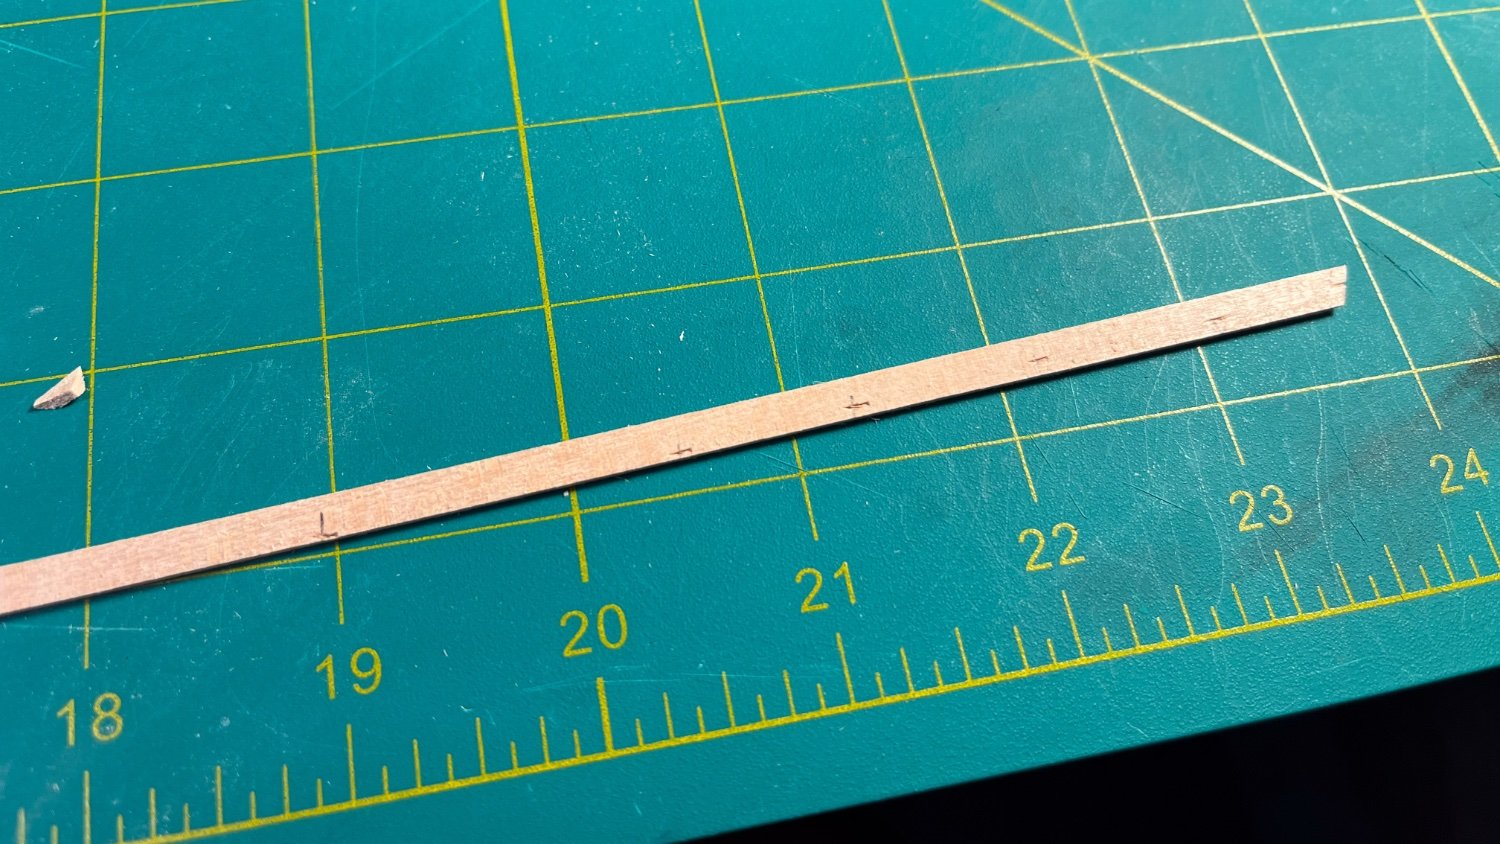
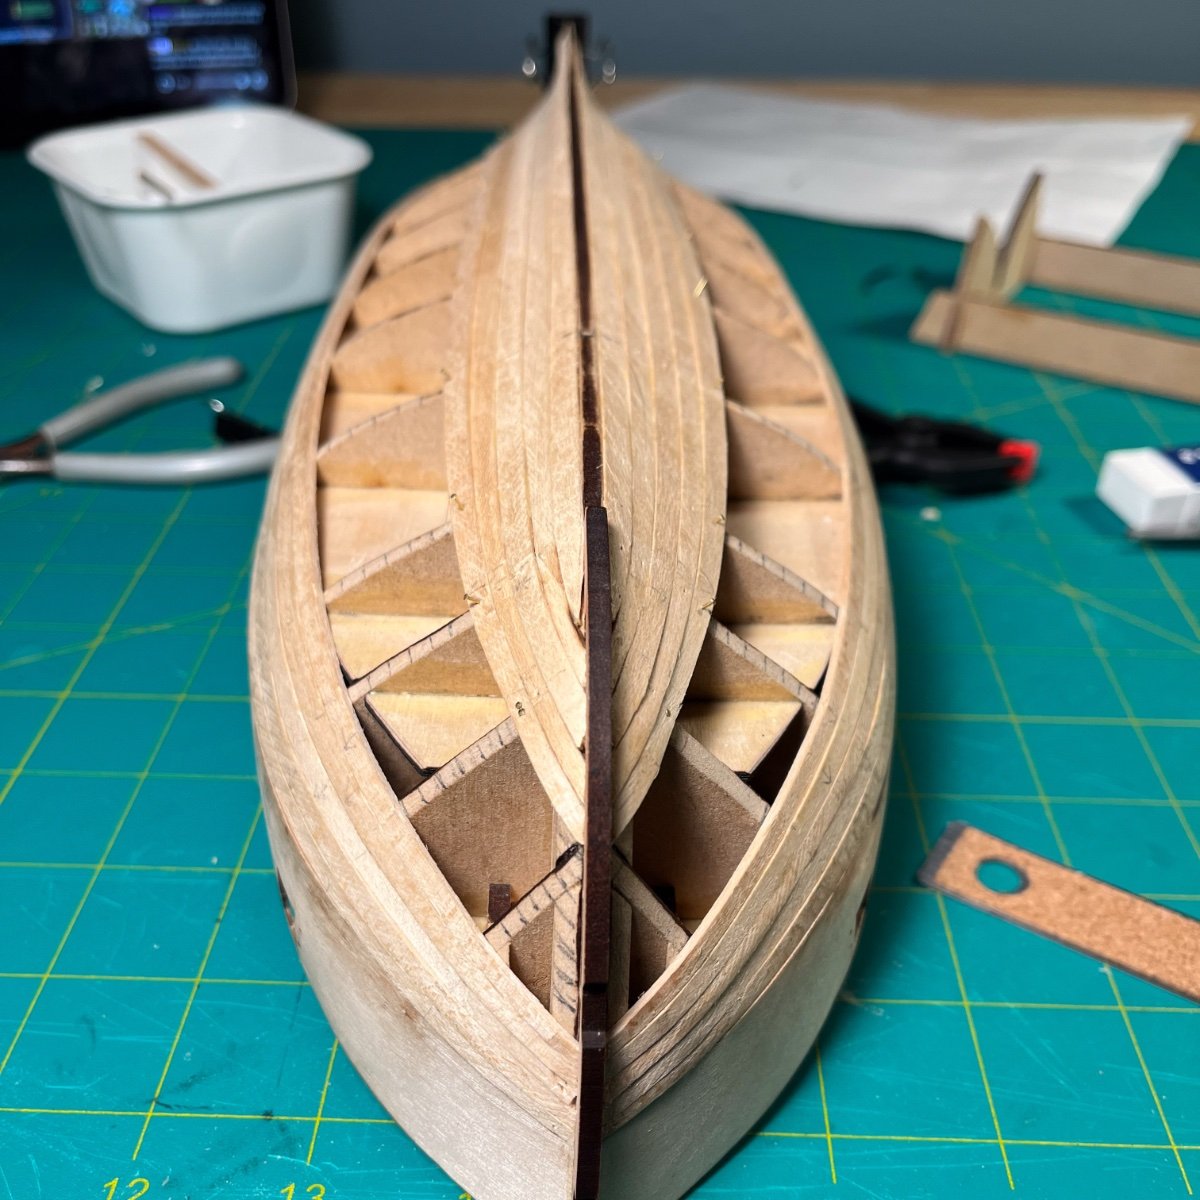
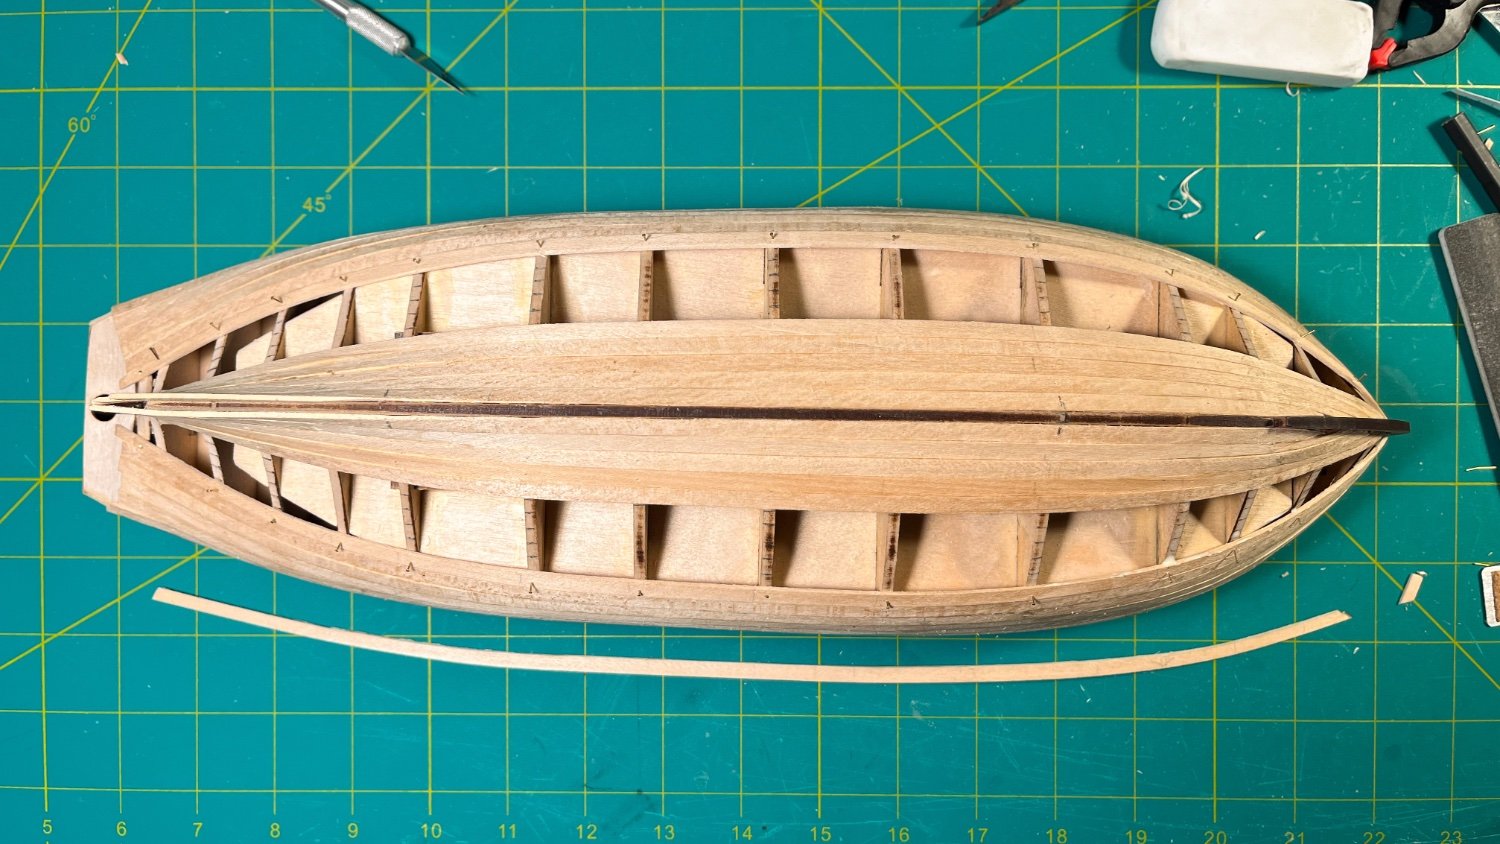
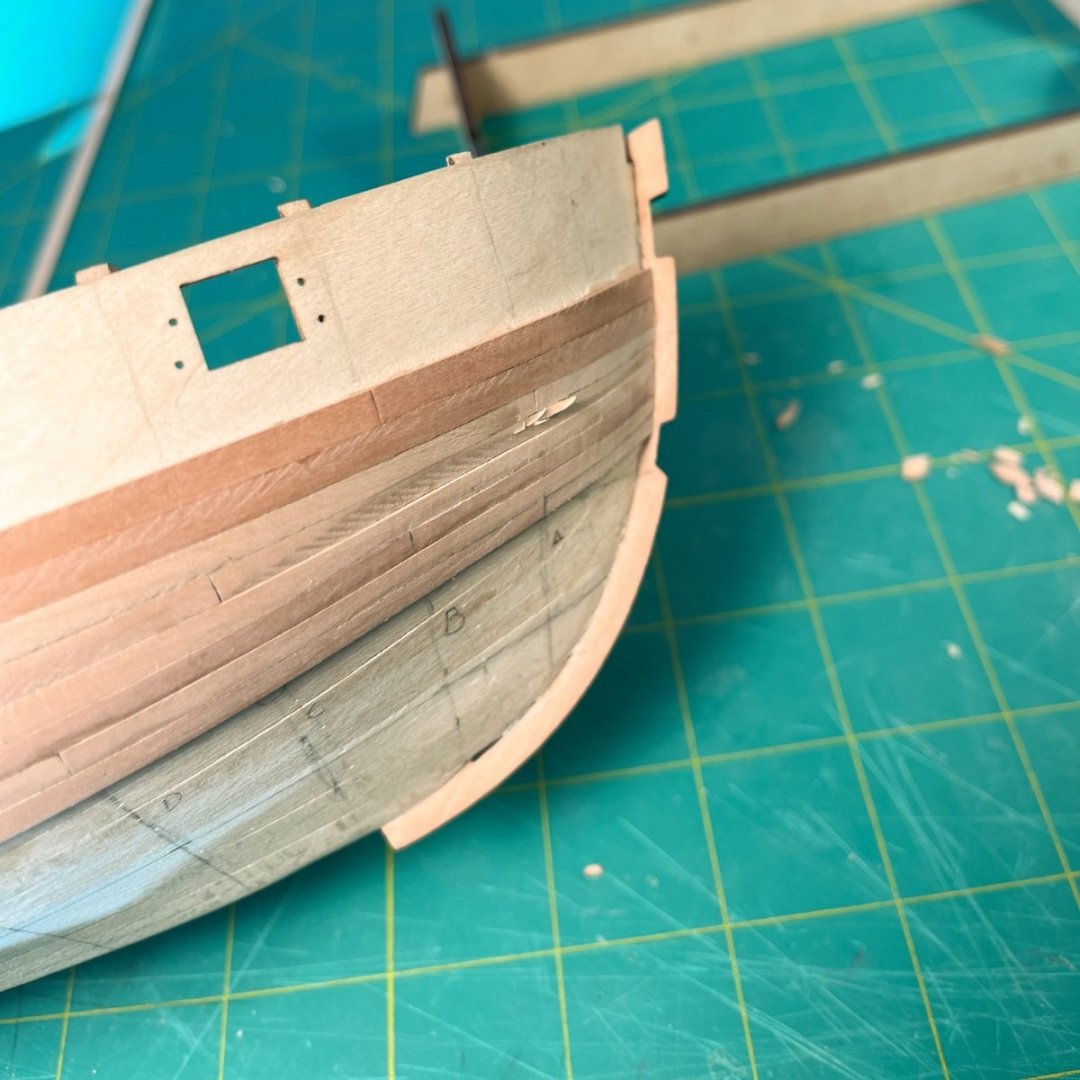
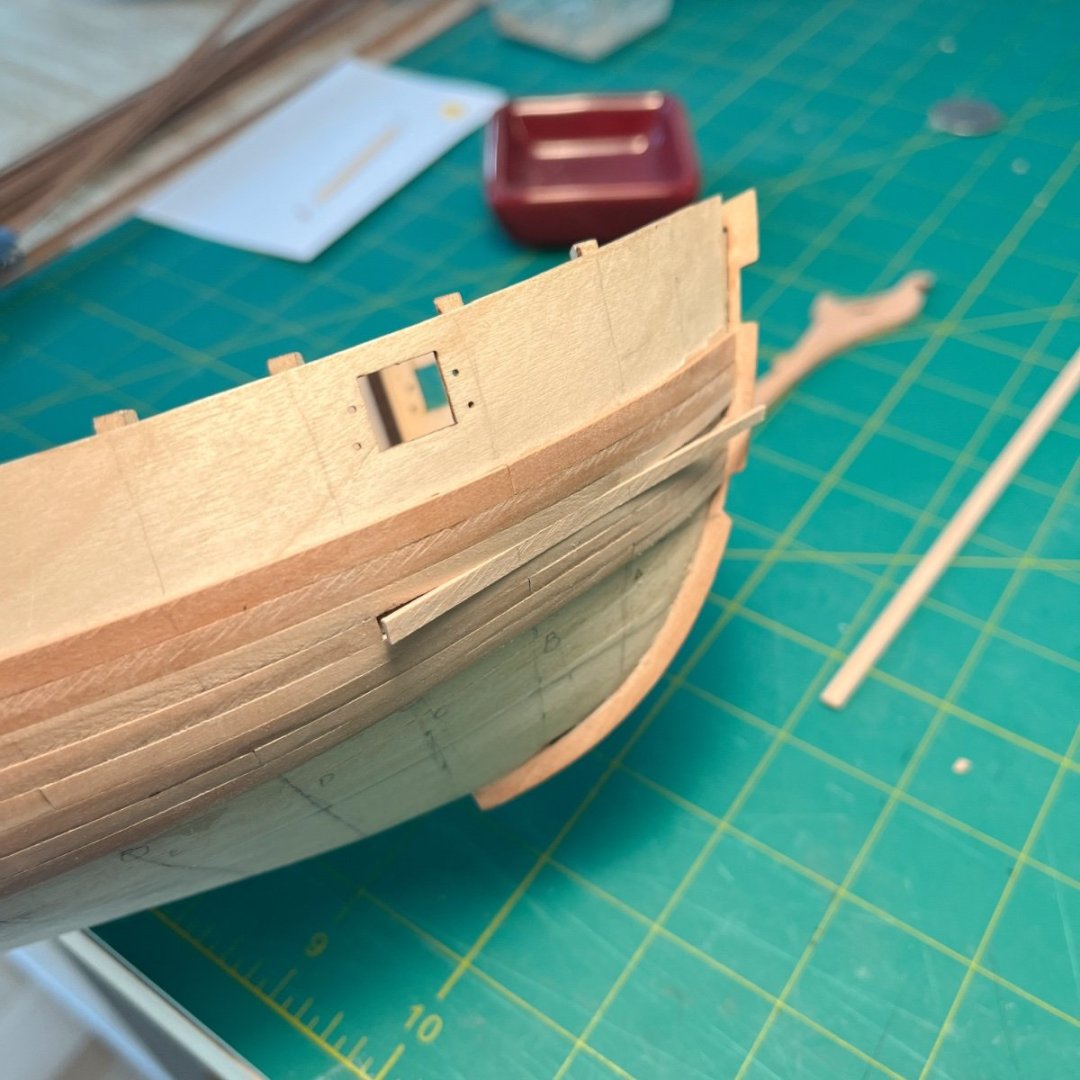
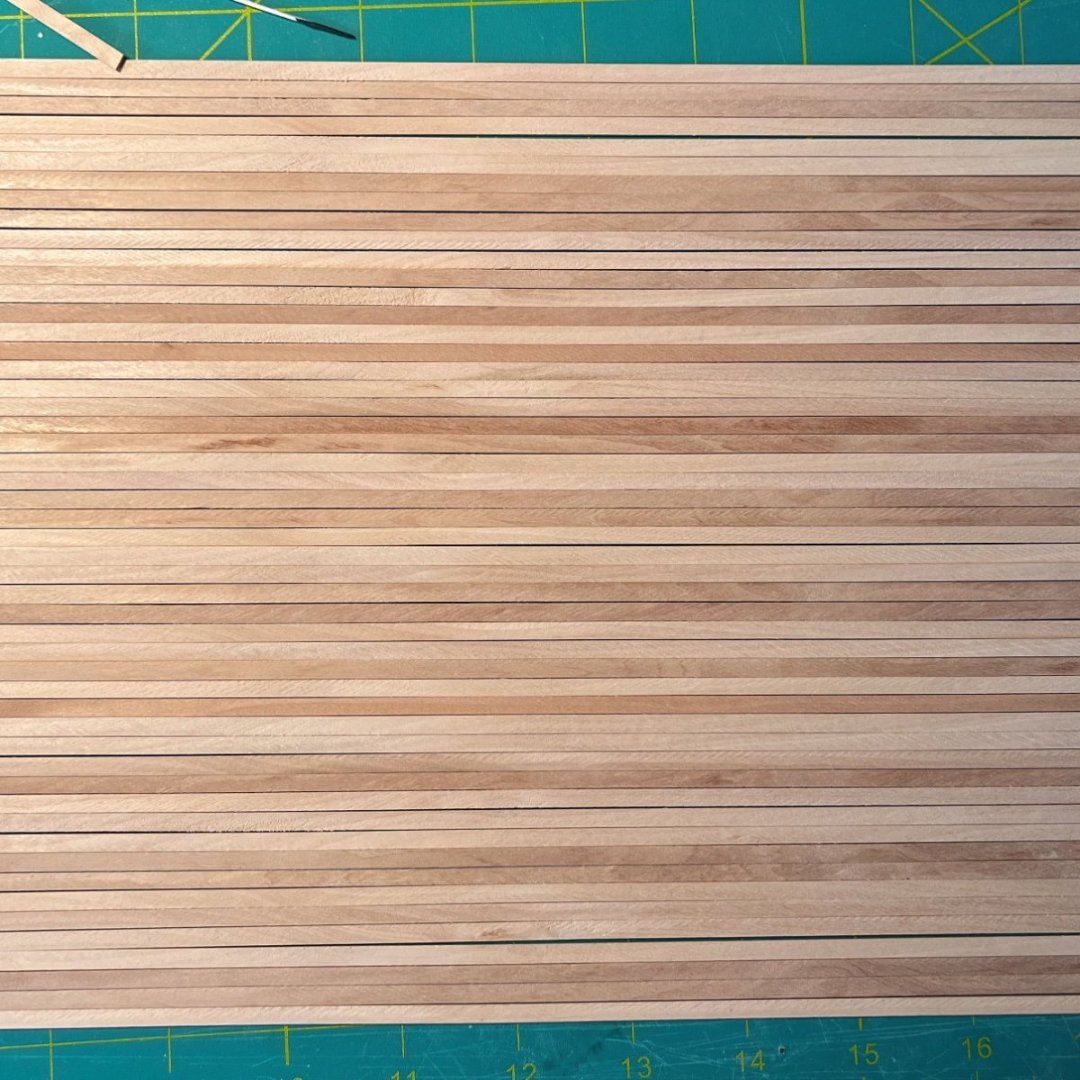
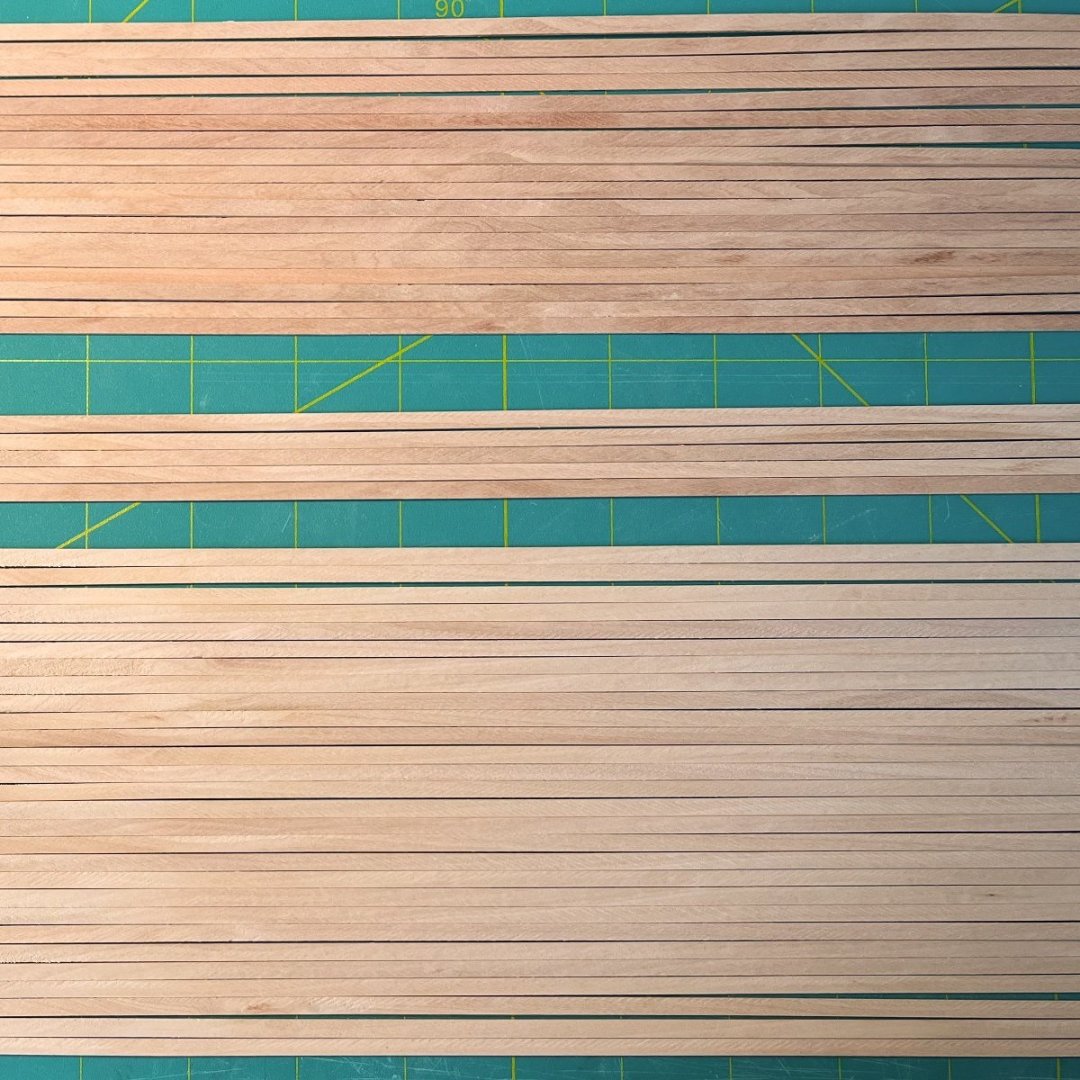
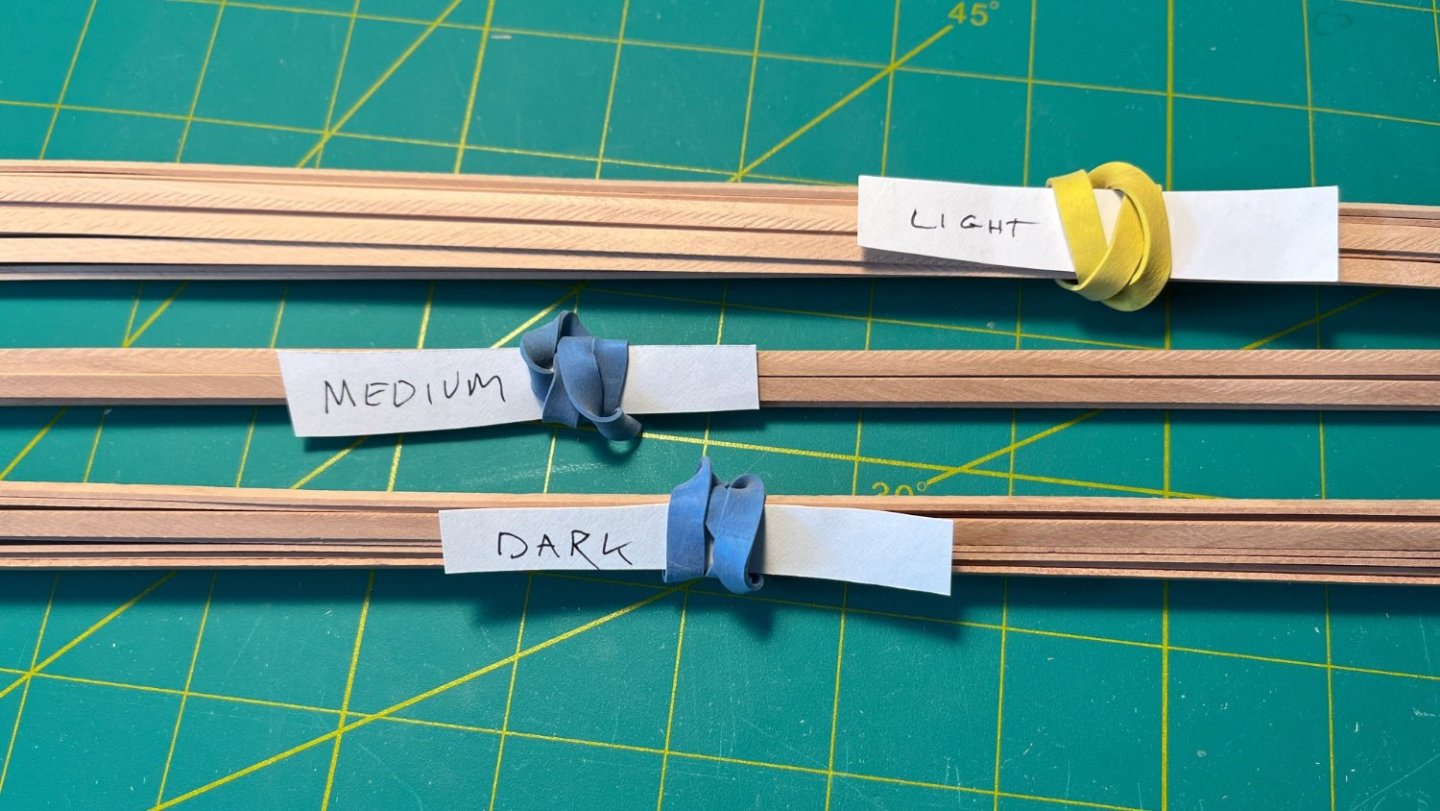
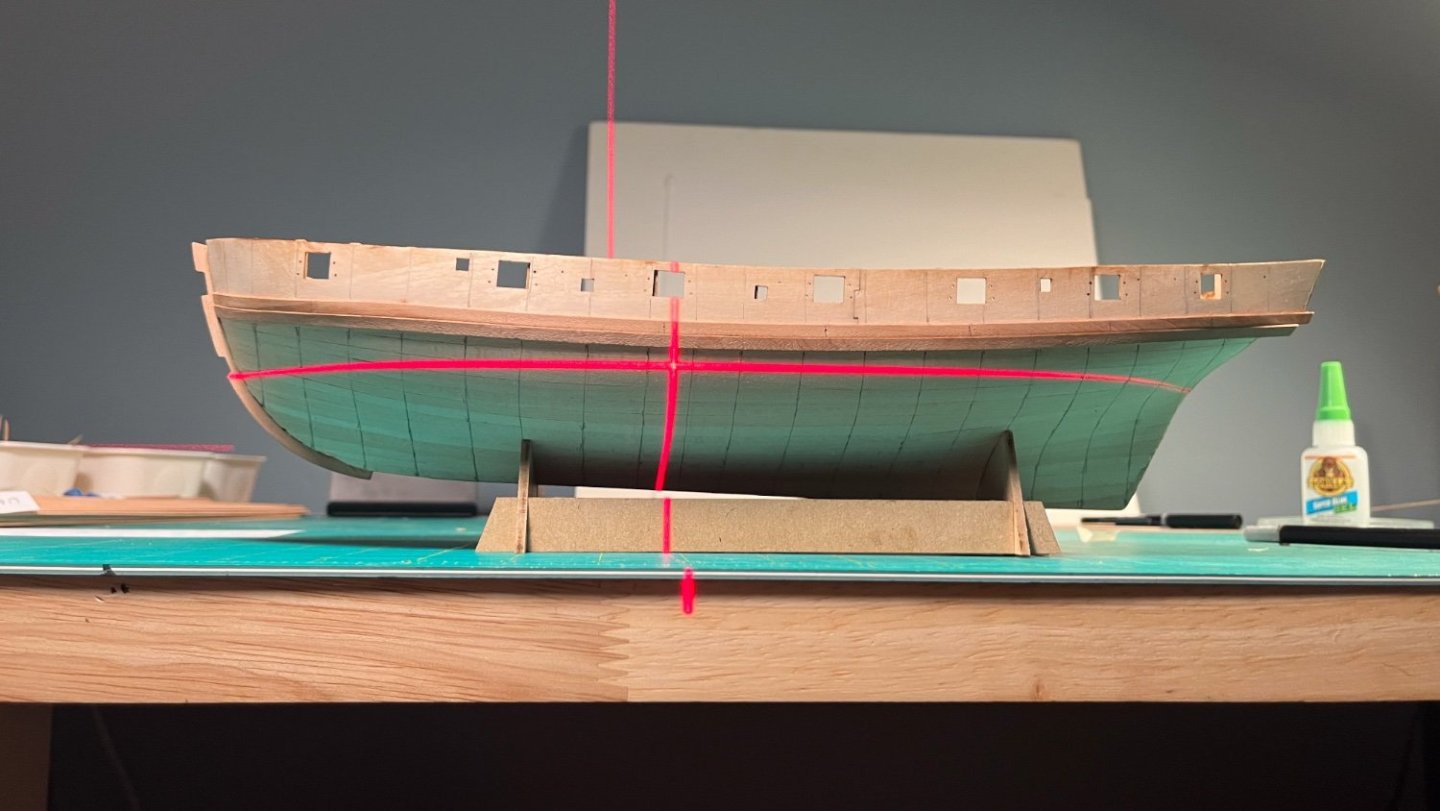
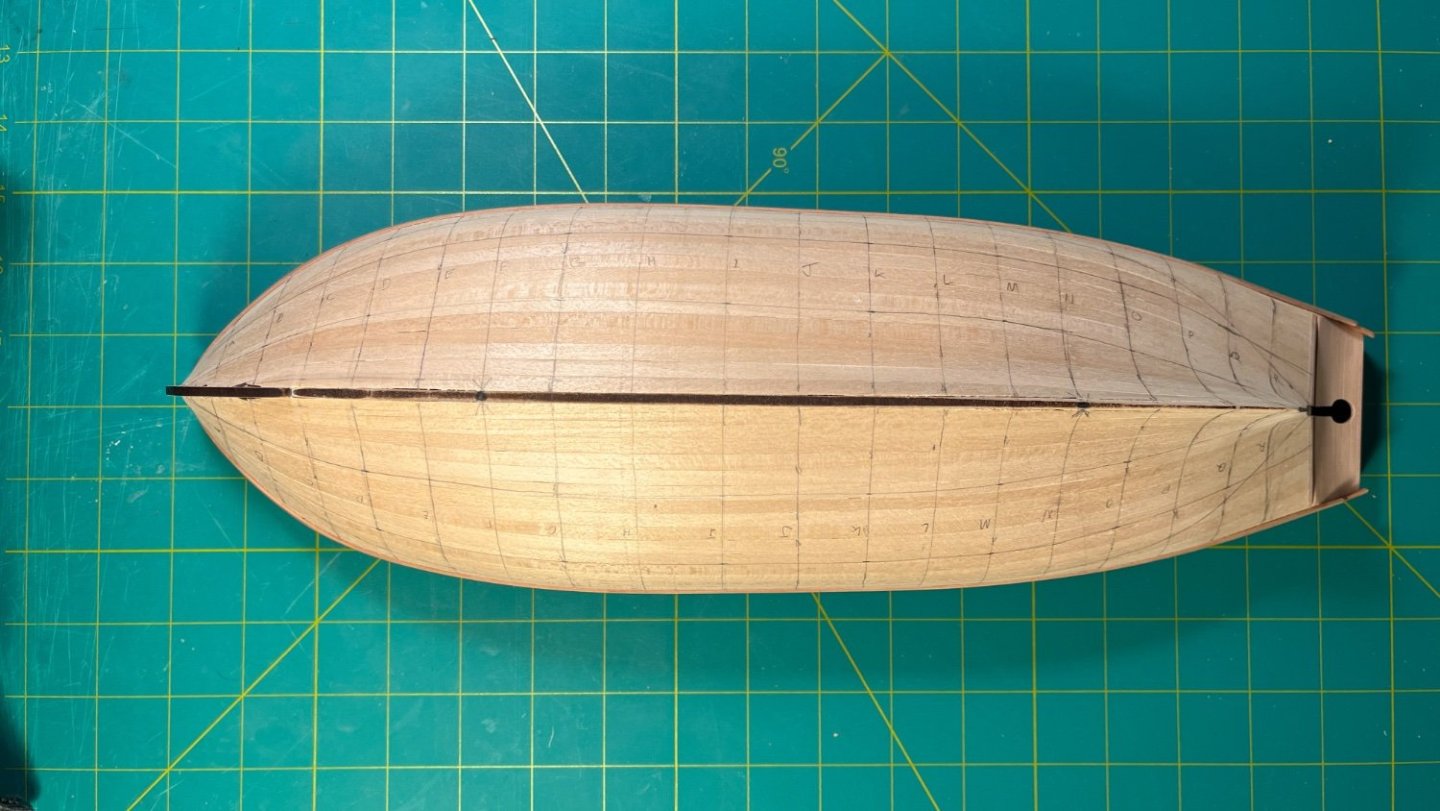
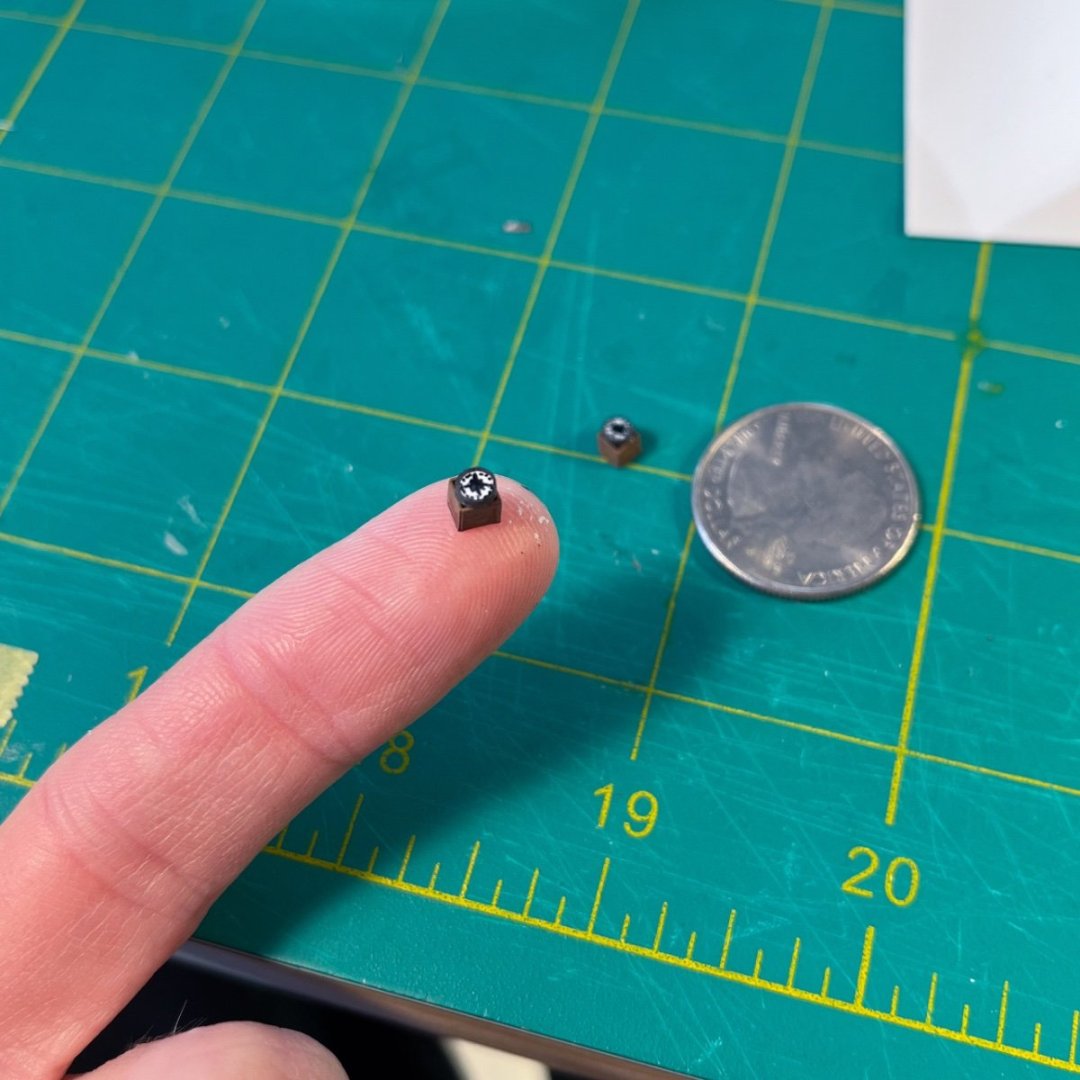
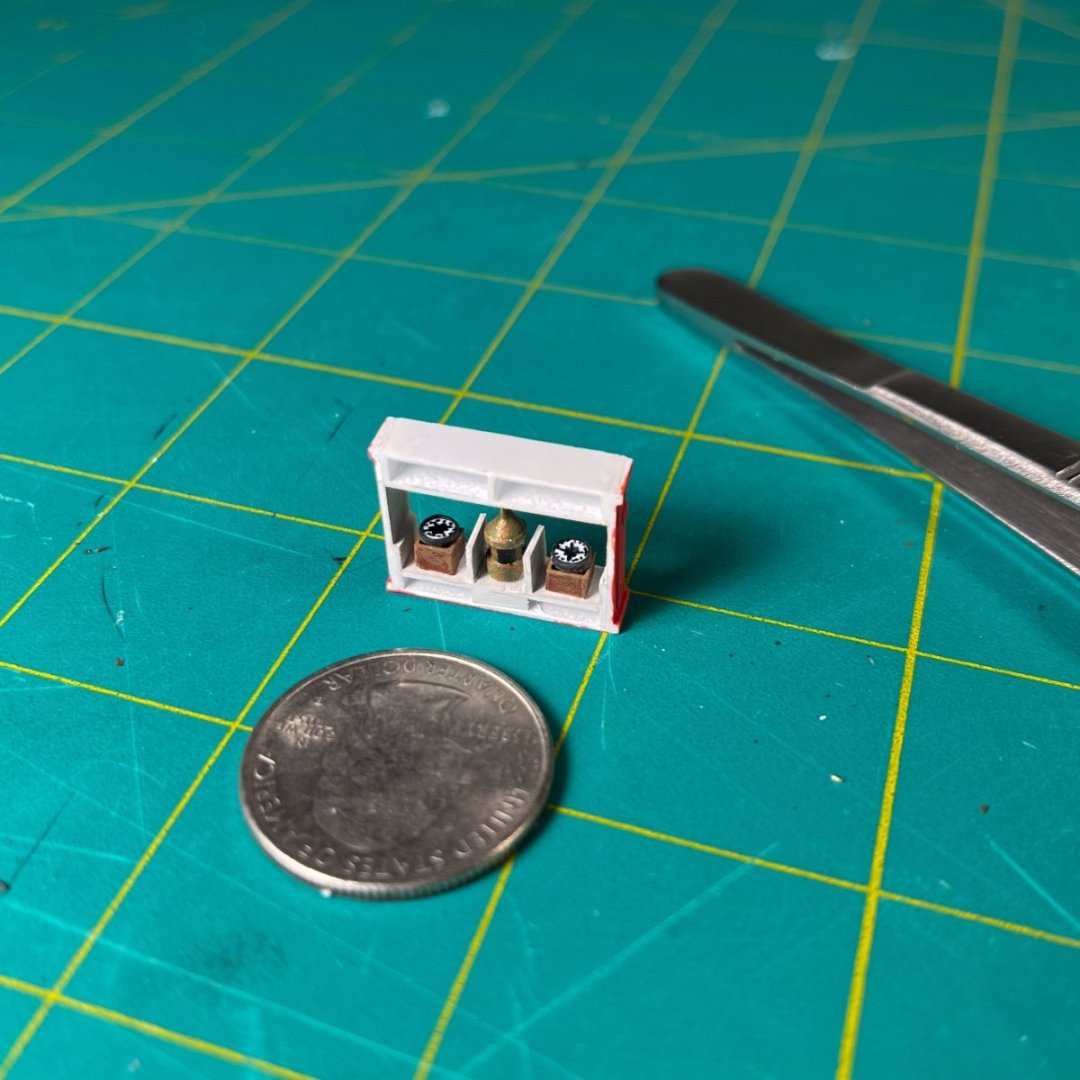
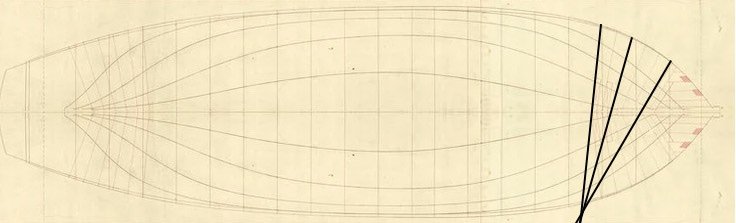
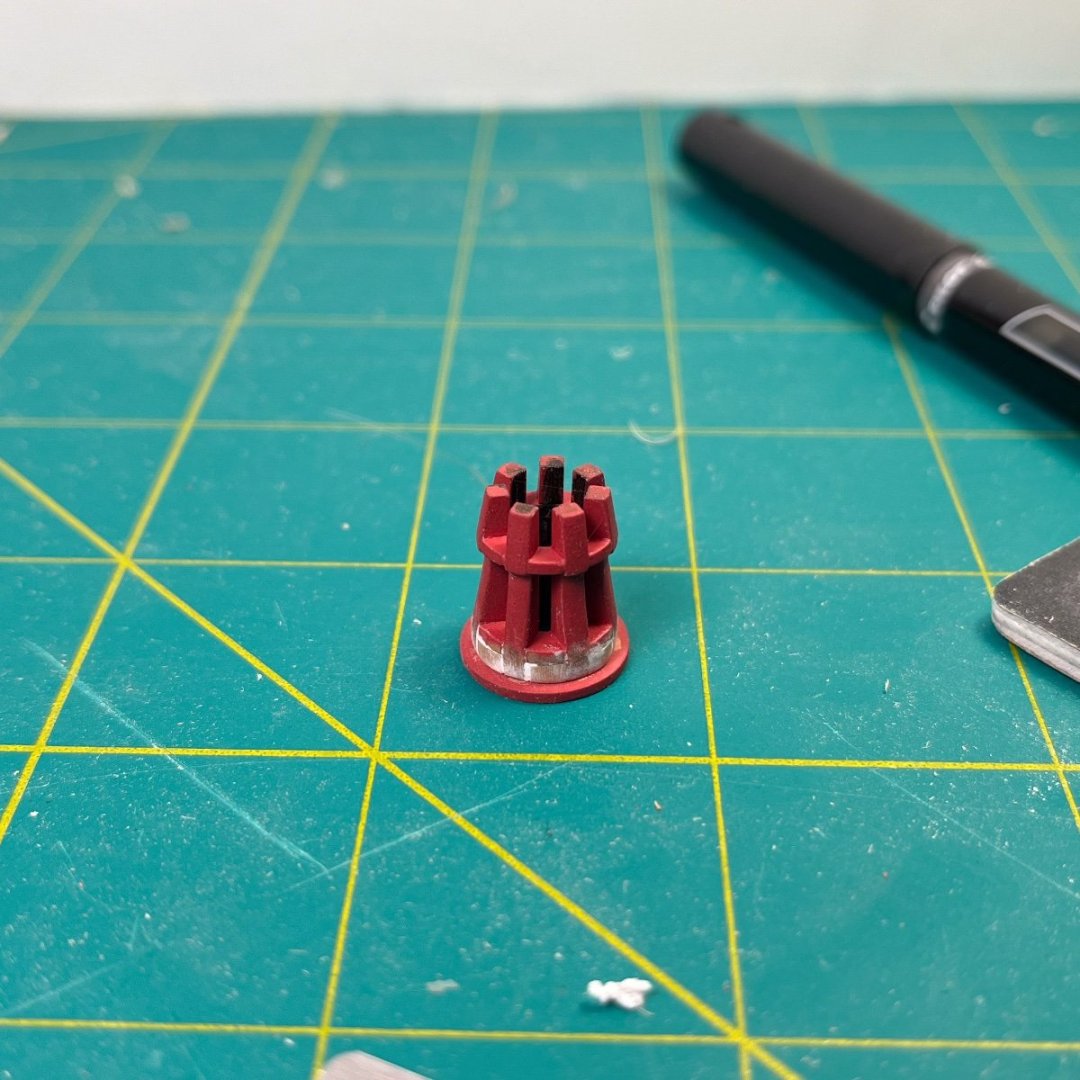
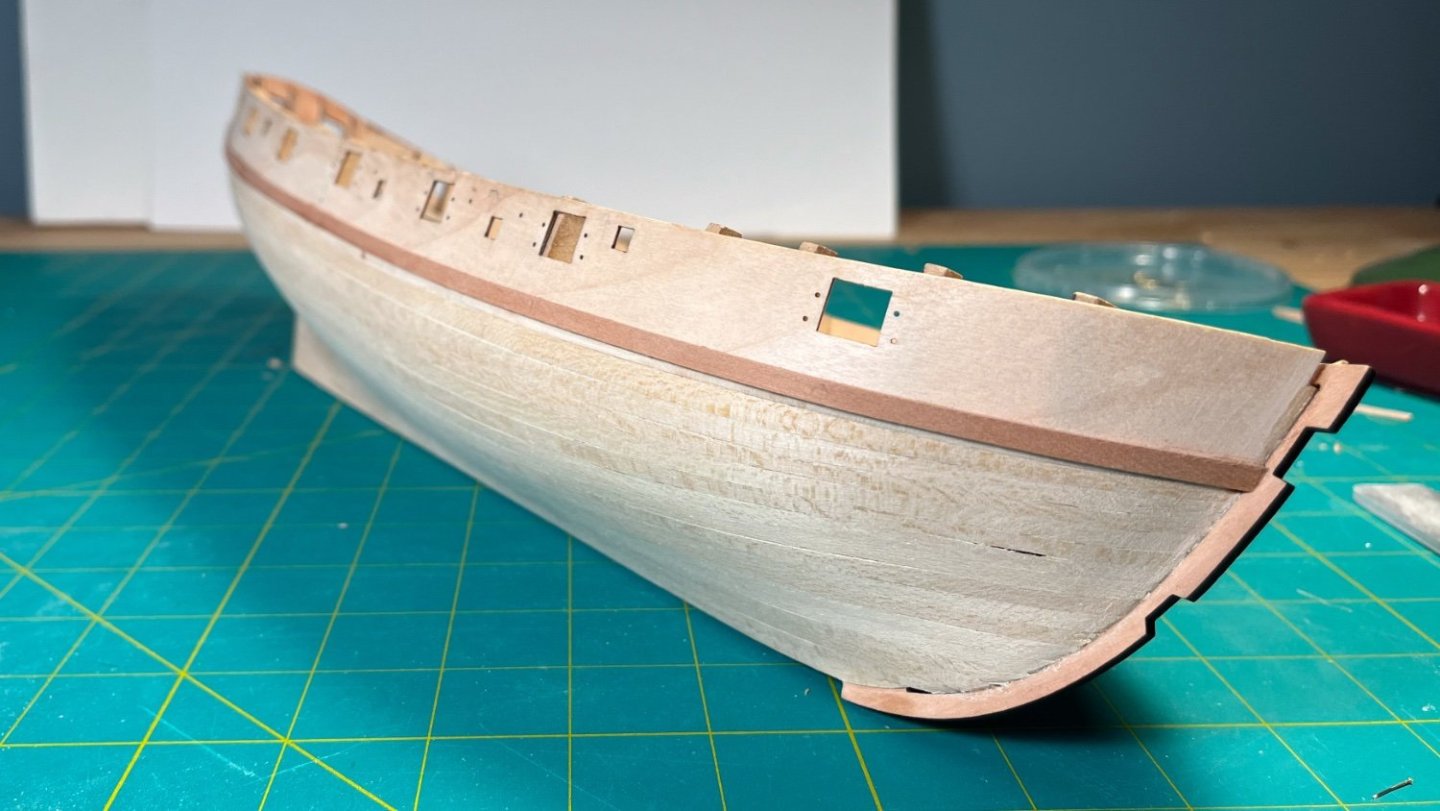
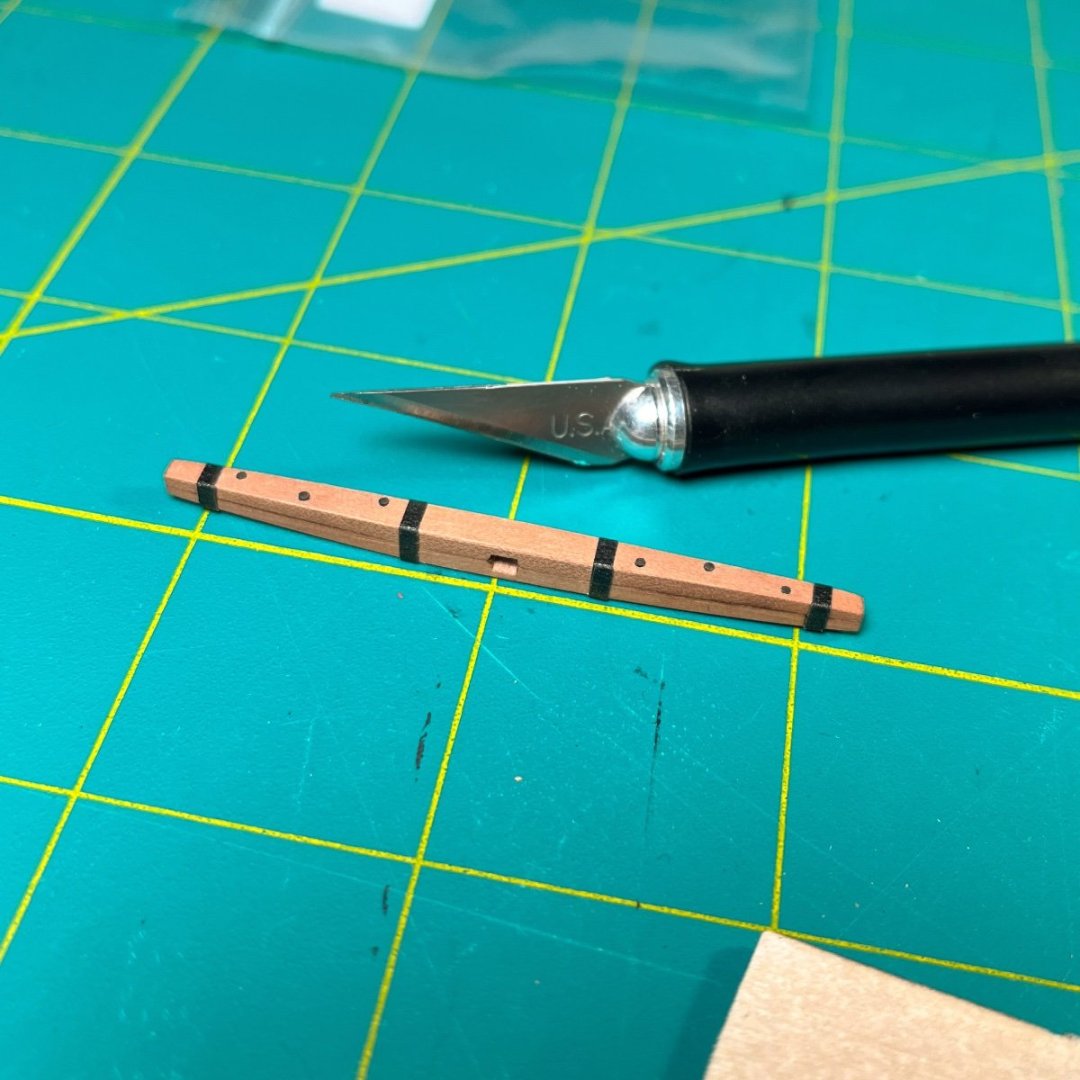
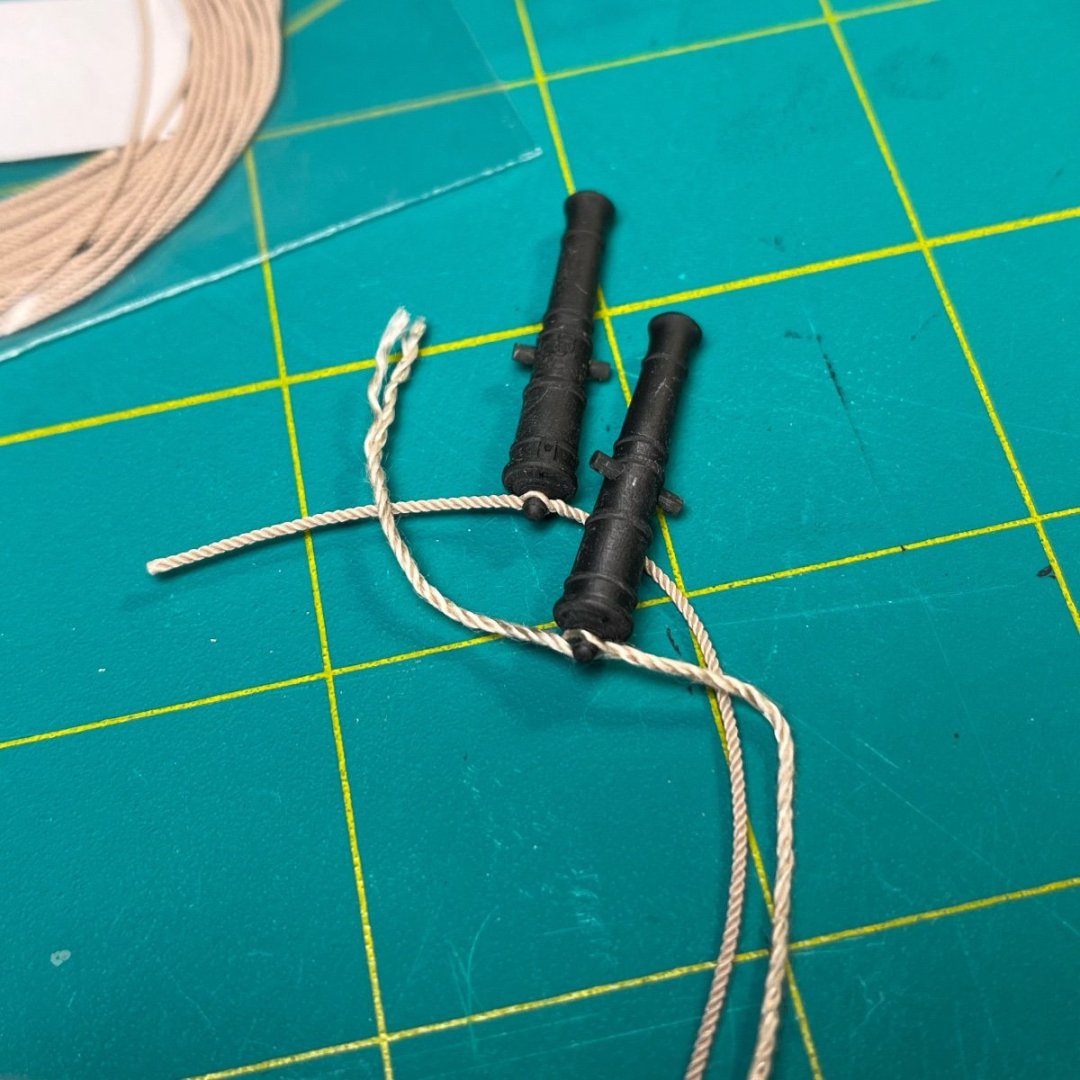
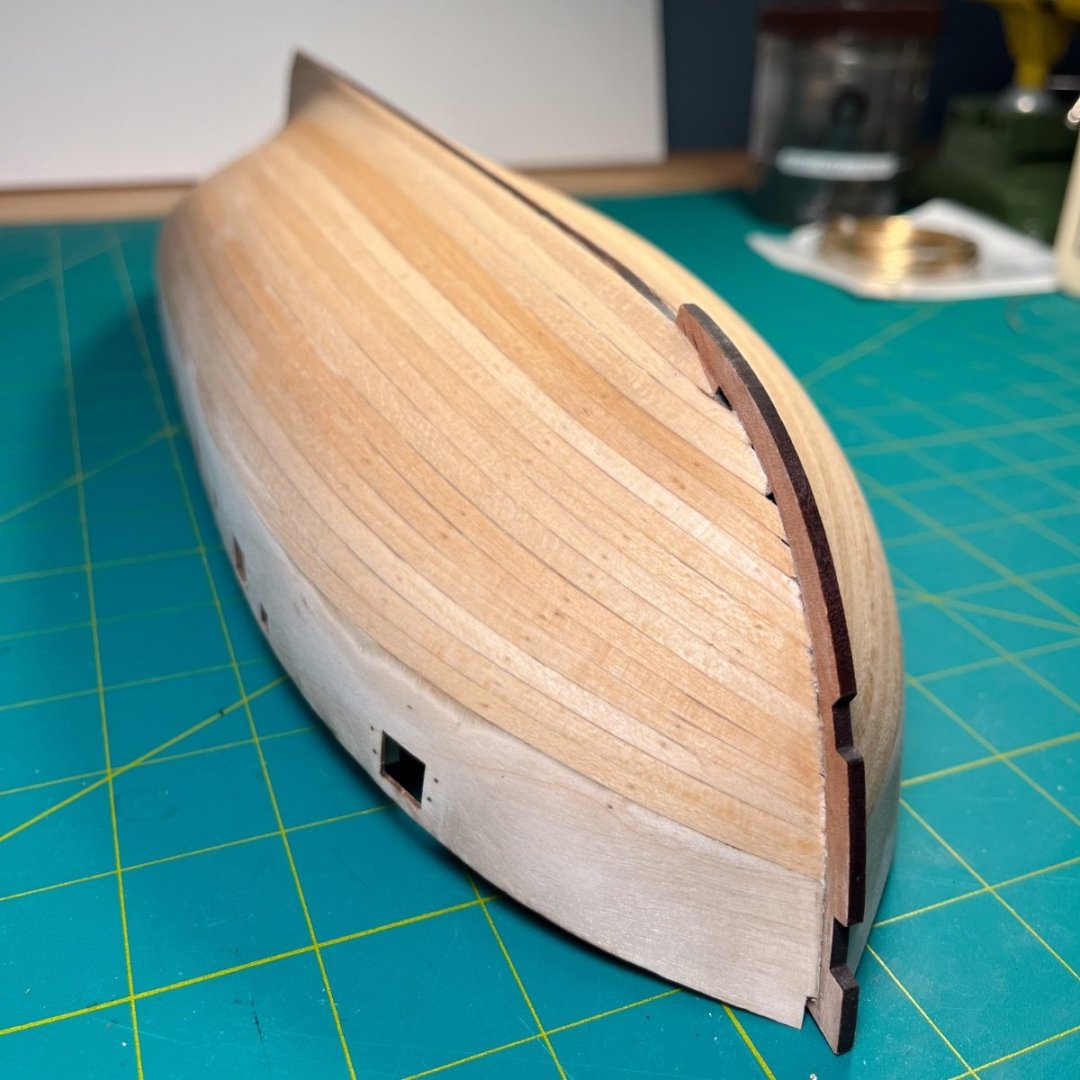
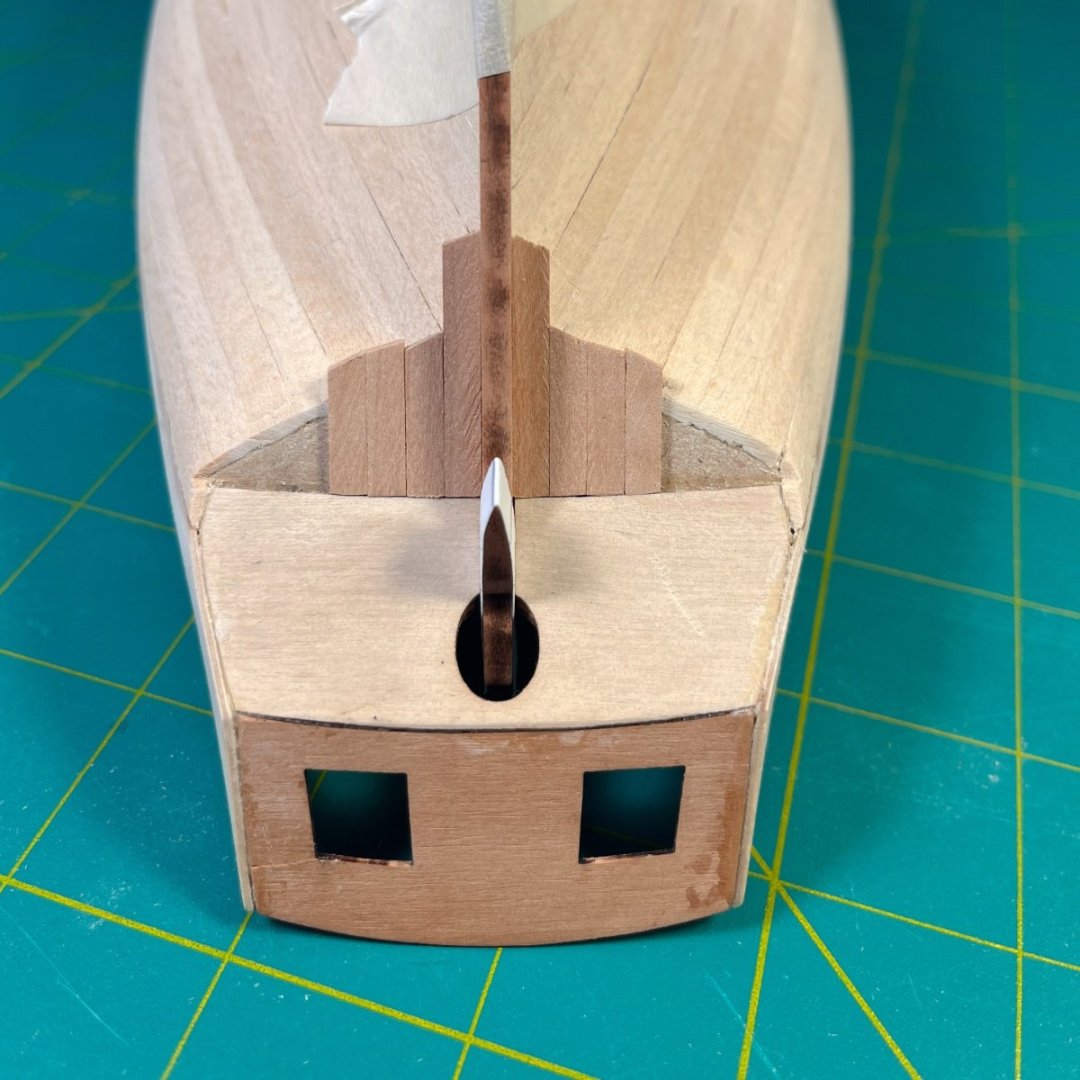
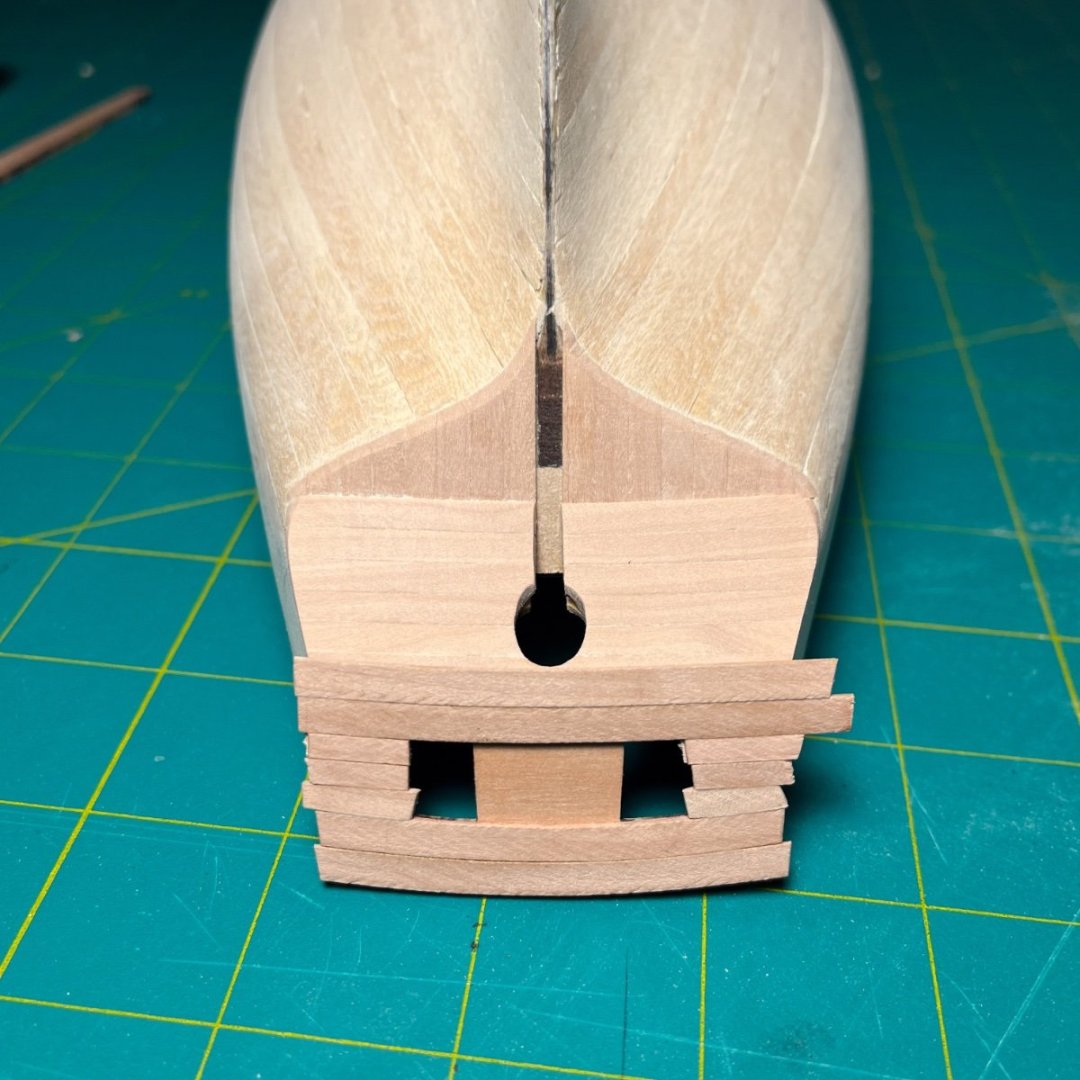
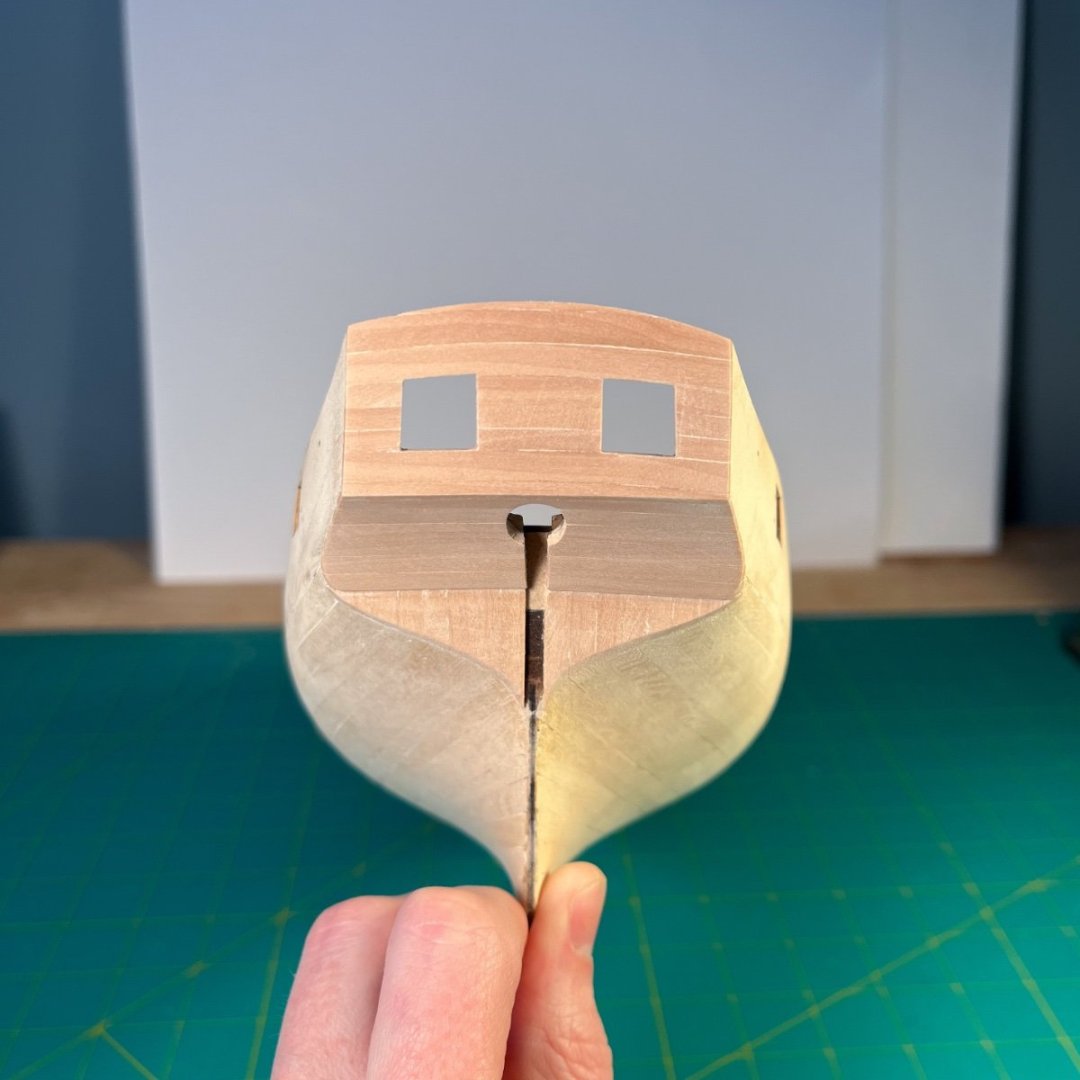
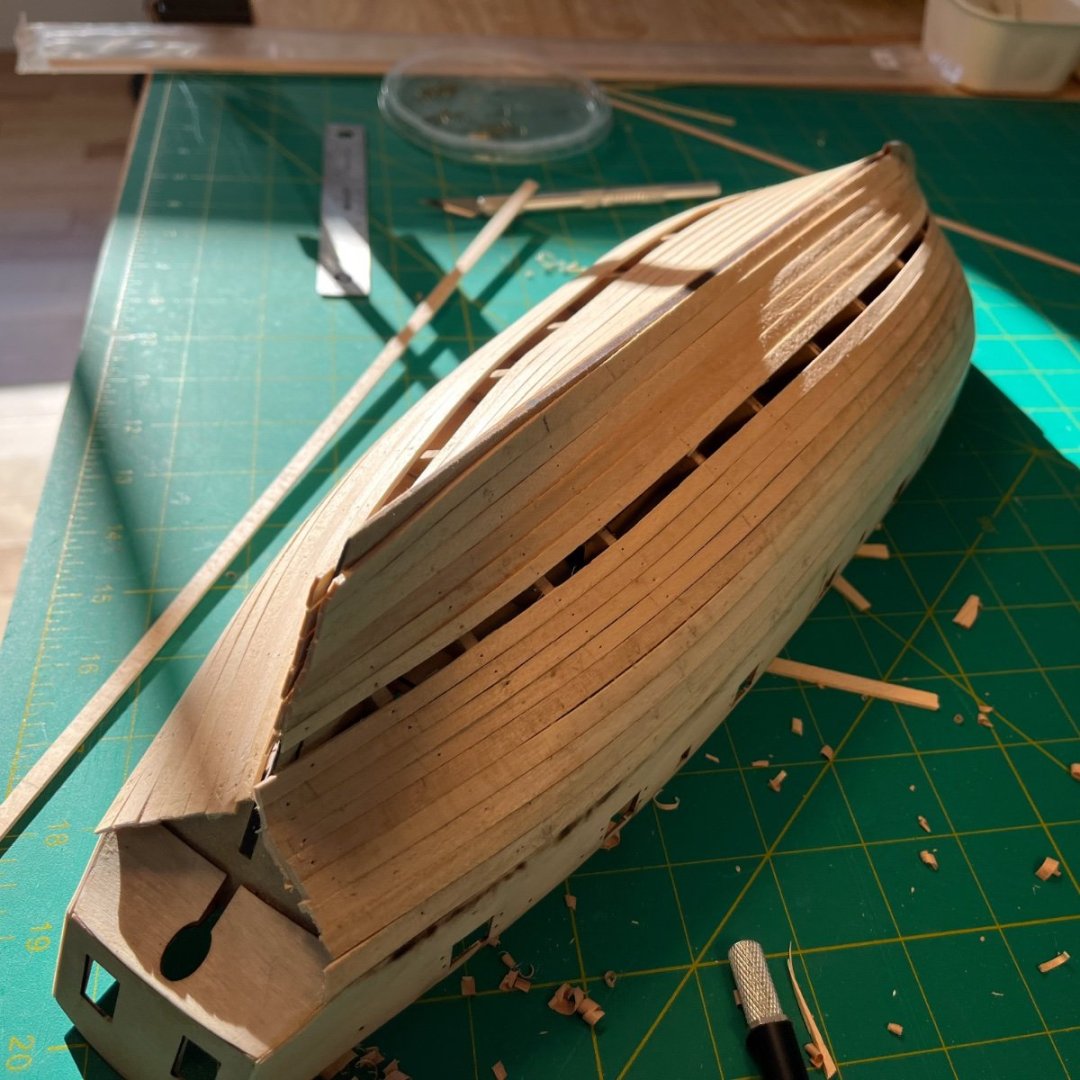
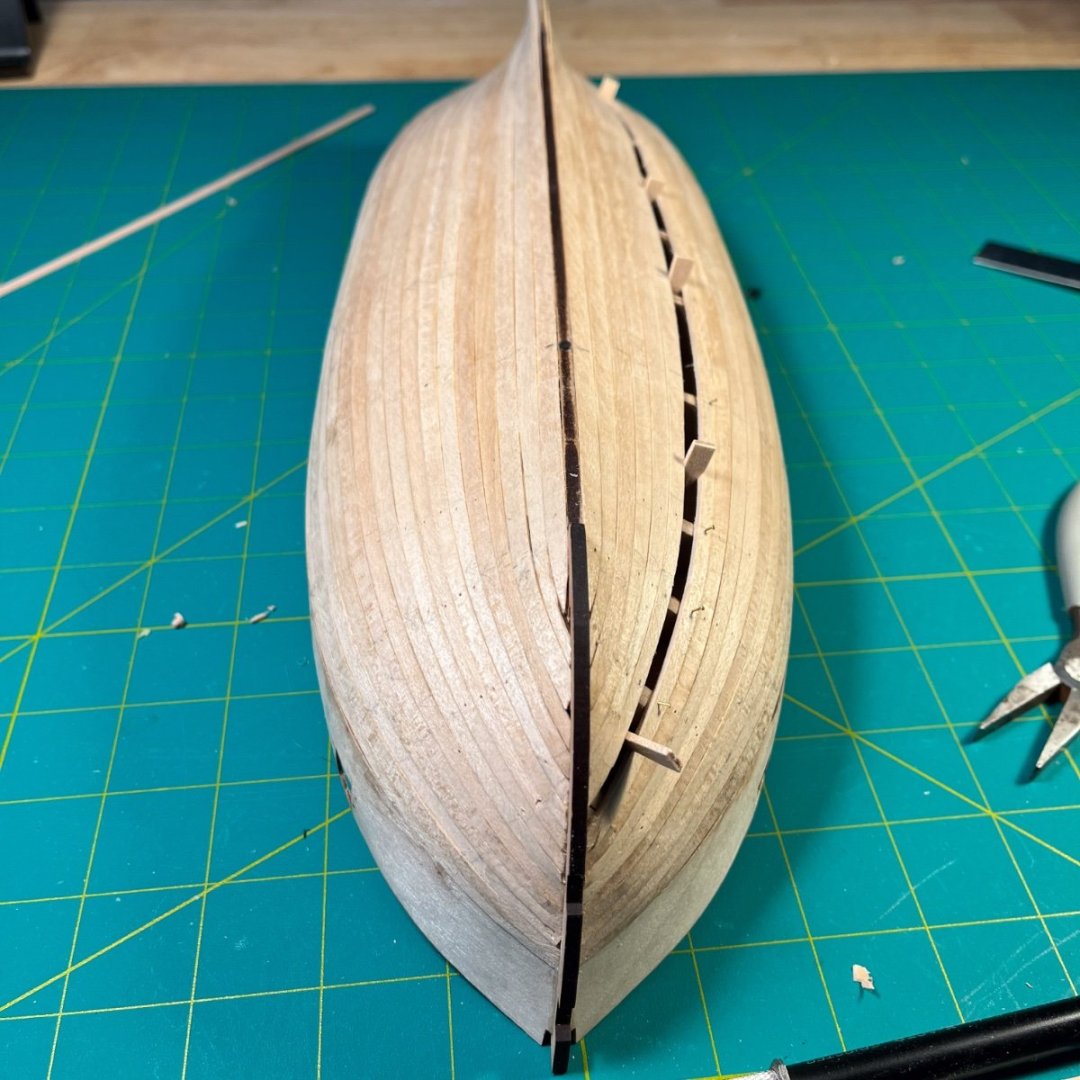
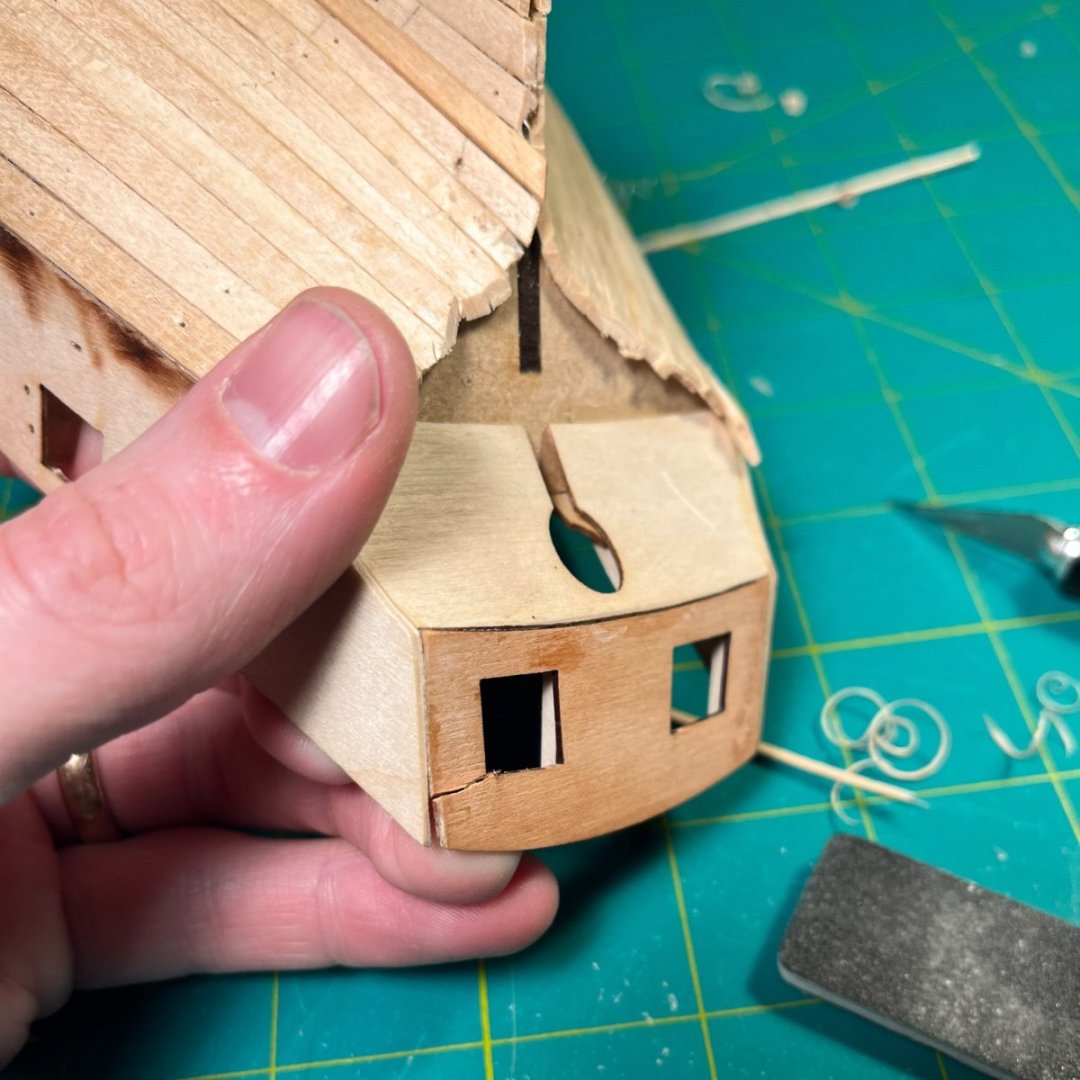
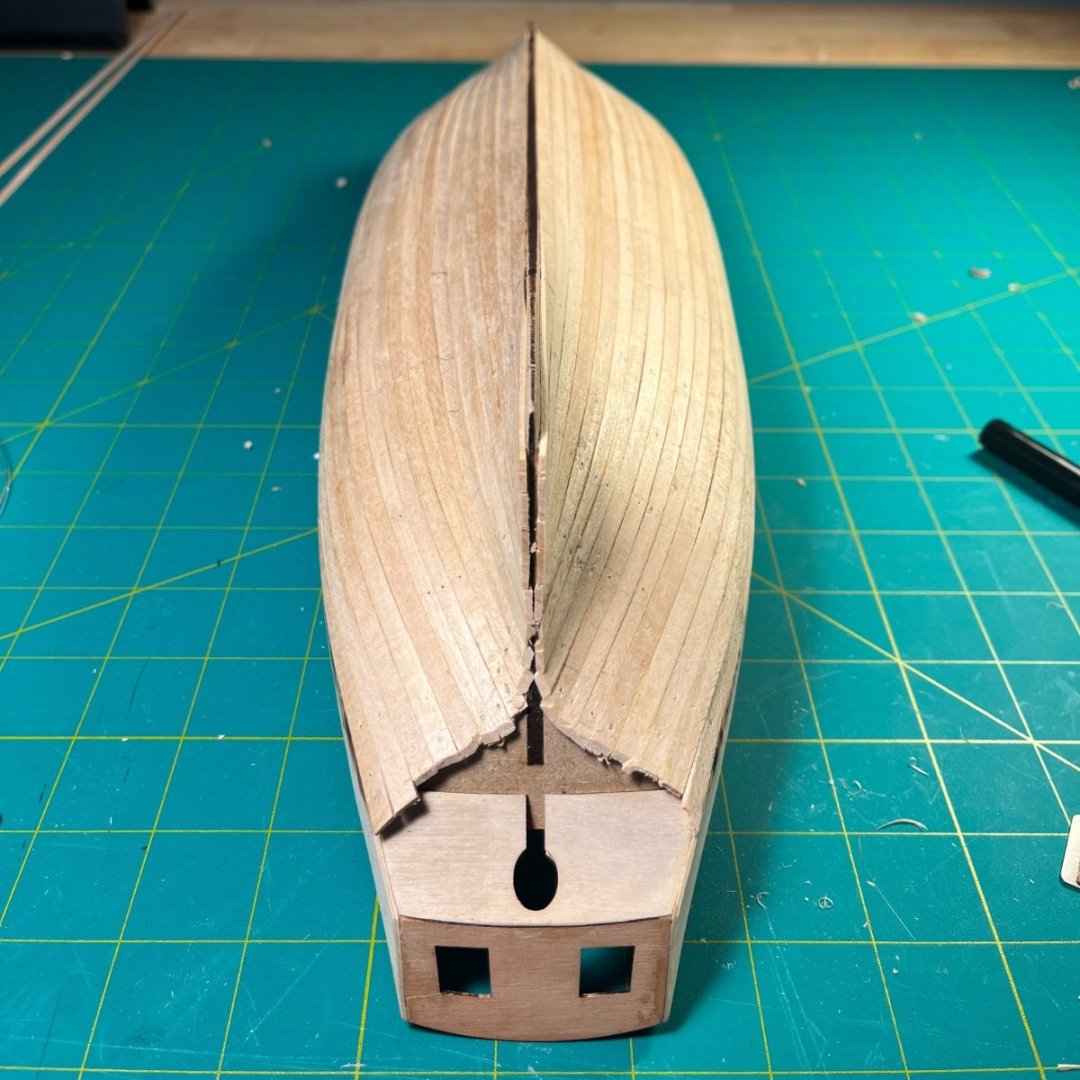
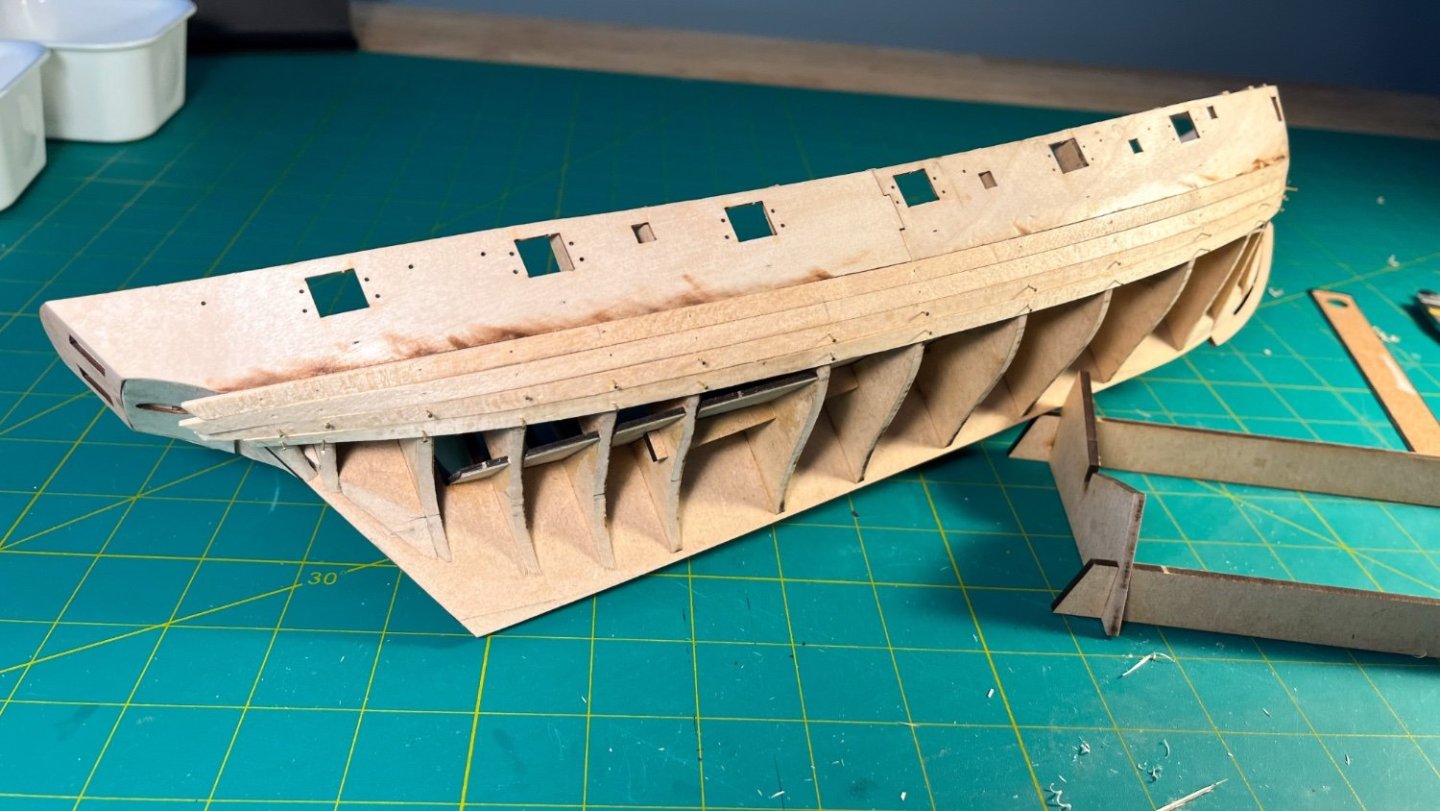
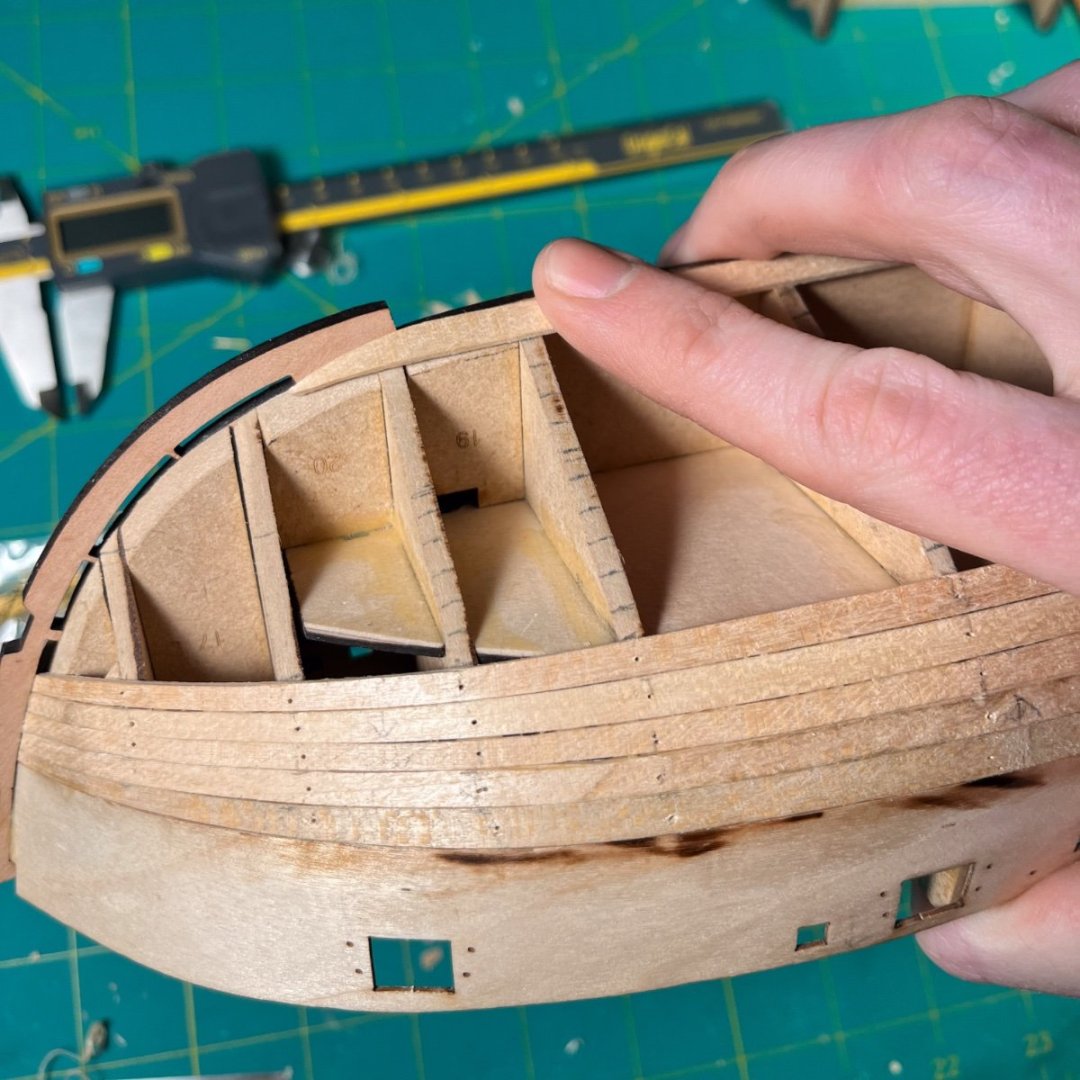
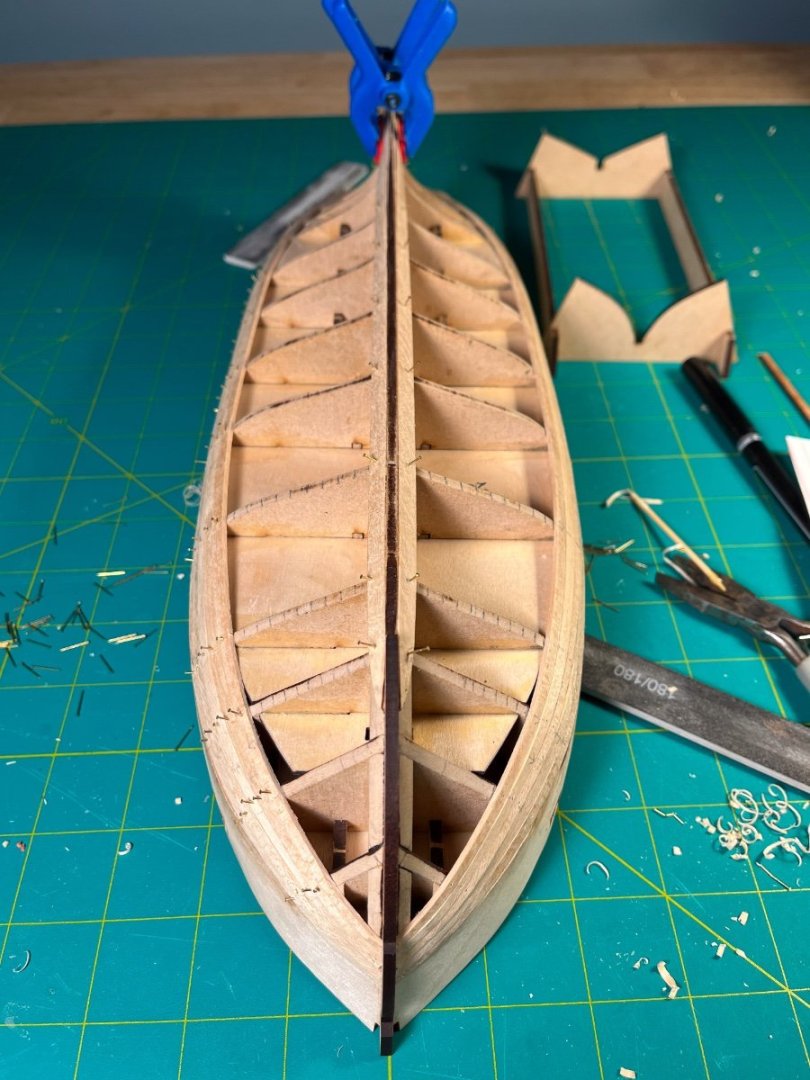
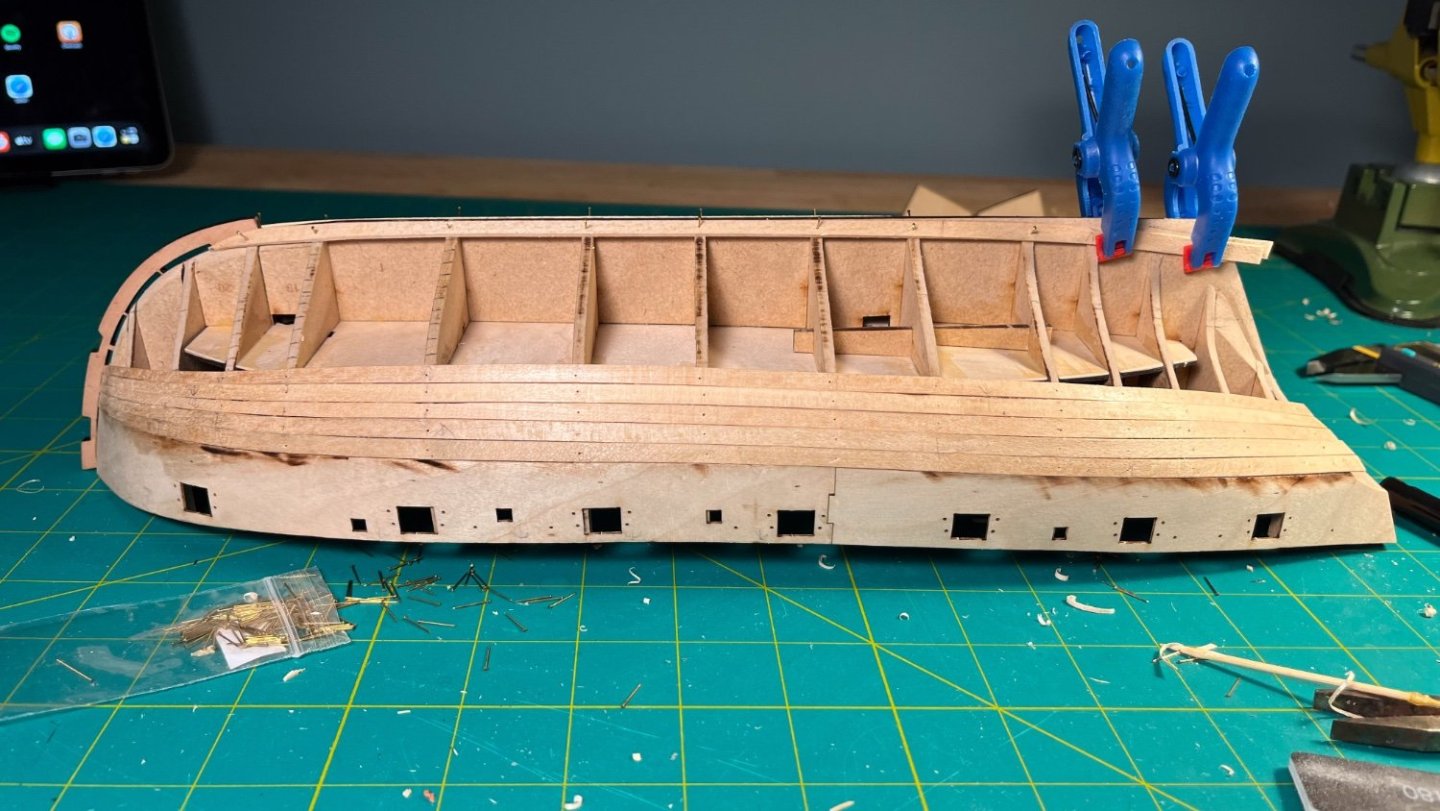
Progress has been a bit slower than I’d hoped, but at least it is heading in the right direction. First step for the second layer of planking was to mark off the hull. Since I’ll be using realistic plank lengths, I marked the frames where I want the planks to butt using a laser level. The frames would be vertically perpendicular to the keel, so I propped up the stand to where the keel is level. The bow and stern took a couple tries to get correct. My first attempt matched the frames on the kit, but realized pretty quickly that the frames at the bow and stern would actually angle inward, as you can see in the plans for the Speedy (dark lines are mine to figure out where the ‘radius’ of the bow frames is). I also used the laser level to mark the waterline. This is to give me a sense of what portions of the planking will be visible after painting, assuming I go that direction. I then marked up hull with 3 bands and labeled the frames. Before getting into the planking, I’d noticed that the pear strips vary in color significantly, so I organized the strips to avoid too much of a patchwork appearance. My plan is to use the light strips for planking where it will be visible/unpainted. On top of the color variation, I’m also finding that the ‘4mm’ planks vary in width from around 3.8mm to 4.25mm. Quite a few of them also have some unfortunate grain where small portions of them transition to what is essentially end grain on the face. These areas are extremely fragile and will need to be careful to only use them in places that don’t require bending and will be hidden. Here is the first course in place, and you can see I’ve circled where the butt joints in my planks should land. I’m using pencil on the edges of the planks to simulate caulking. Was very torn about doing it, so hopefully I don’t regret that decision. Here is the first band done (this side only). As @TJM recommended, I am planning to attach the keel and stem before adding the garboard plank, but figured I’d get the first band done to minimize the chance of accidentally knocking them off while handling. I've found that planking with realistic lengths is actually easier than the first layer when it comes to bending, since I can focus on that one section instead of needing all the different bends down the entire length. Probably still taking a bit longer than full length planks would have though. I needed something else to keep me engaged while planking, so I decided to scratch build a binnacle. The updated Speedy kit includes one, but not the Flirt. Don't know if it is historically plausible, but decided to go with a two compass version with a lantern between (what would have been found on larger ships). Chris's version for the speedy is a much narrower cabinet, presumably with a single compass. My design was based on various references I ran across, but owes quite a bit to what @DavidEN created for his Diana, which is similar to what is currently on the Victory. Created primarily using styrene sheets and strip. Realized after taking these photos that the compasses aren’t facing the same direction. Good thing they have two! The chimney for the lantern was made from a toothpick, styrene turned on my dremel as a lathe, and shrink tubing. The drawer pulls are pins from the kit and used 28ga wire for the other details. Apparently I didn’t glue the lantern down well enough before gluing the cabinet shut, as it is now loose in there. Probably not worth trying to break it open to fix it given that you can barely see it anyway. Might be a while before my next update as I’ll probably wait until I’ve finishing the planking. Then again, who knows what other deck fittings I’ll get distracted by in the meantime.


-
Welcome to the Flirt club!
-
jereremy reacted to a post in a topic:
HM Cutter Trial 1790 by AJohnson - Vanguard Models - 1:64th
-
jereremy reacted to a post in a topic:
HMS Flirt by jereremy - Vanguard Models - 1:64
-
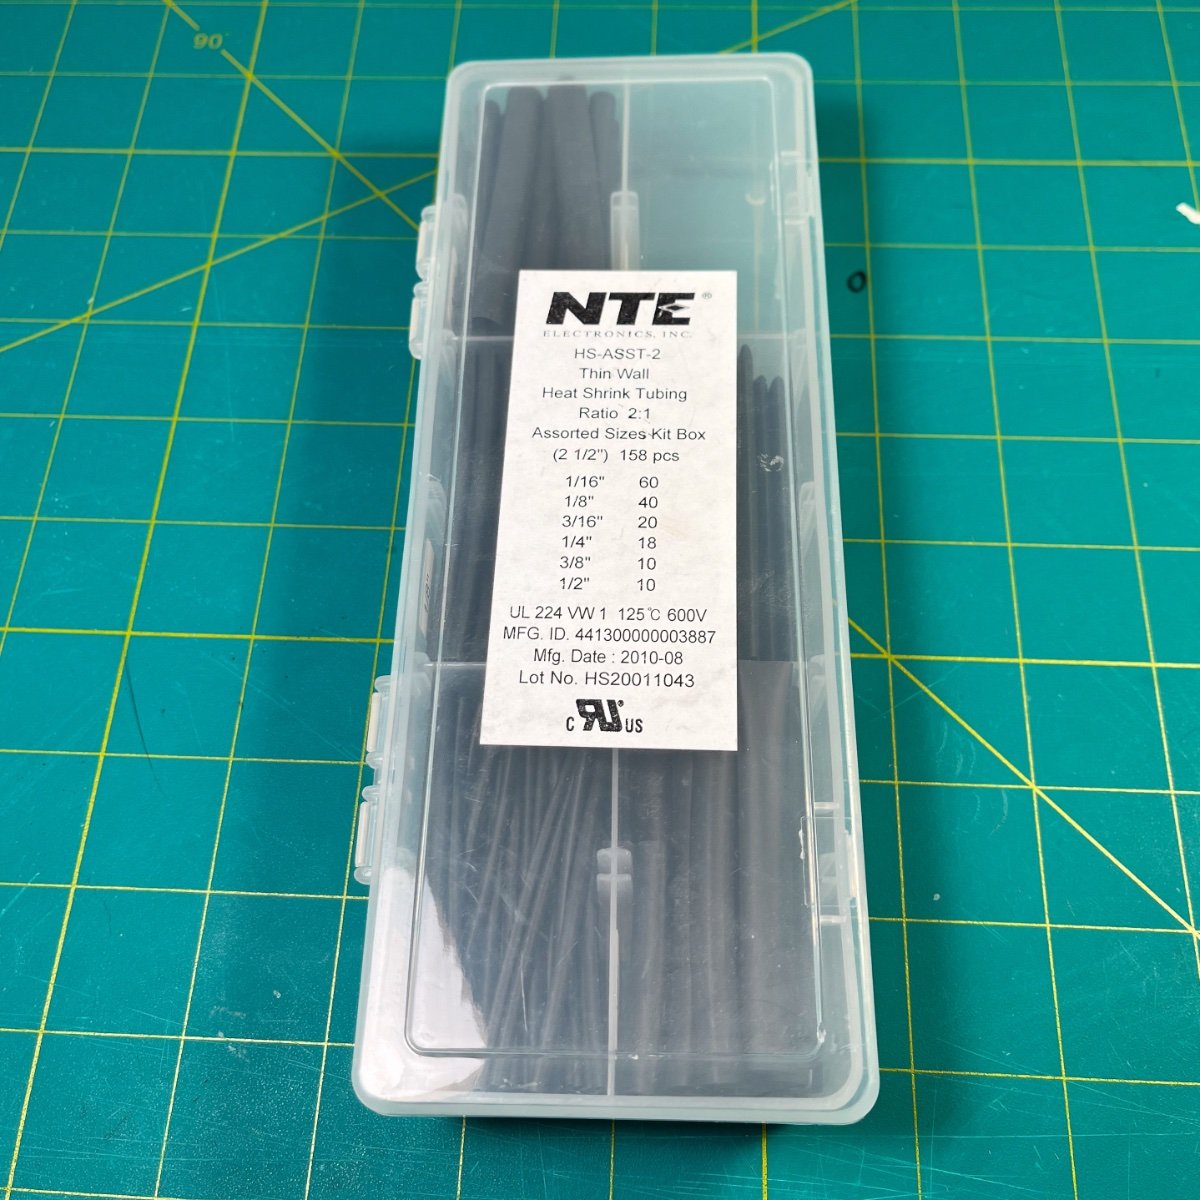
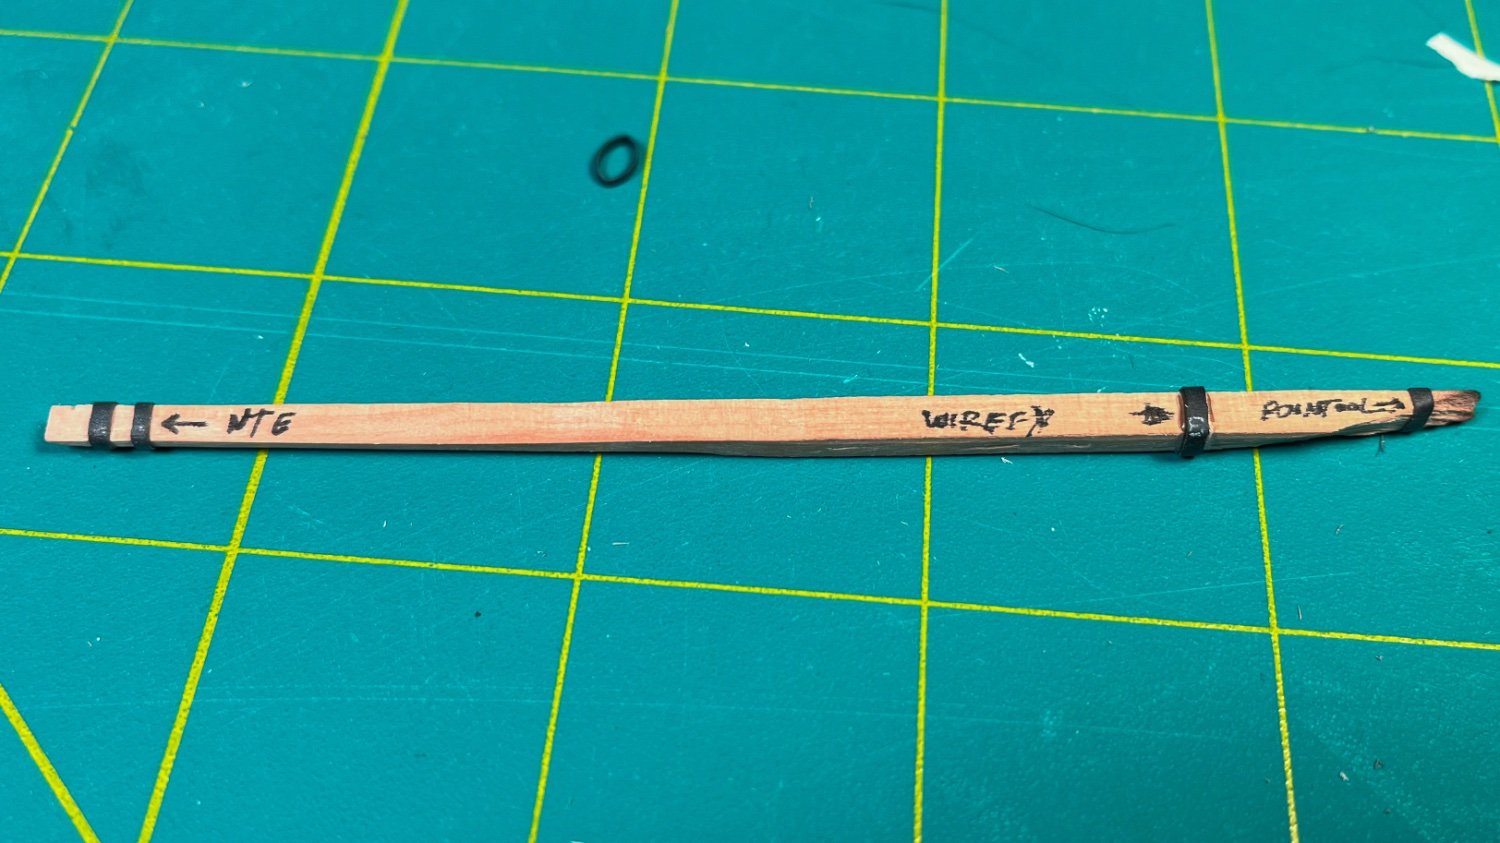
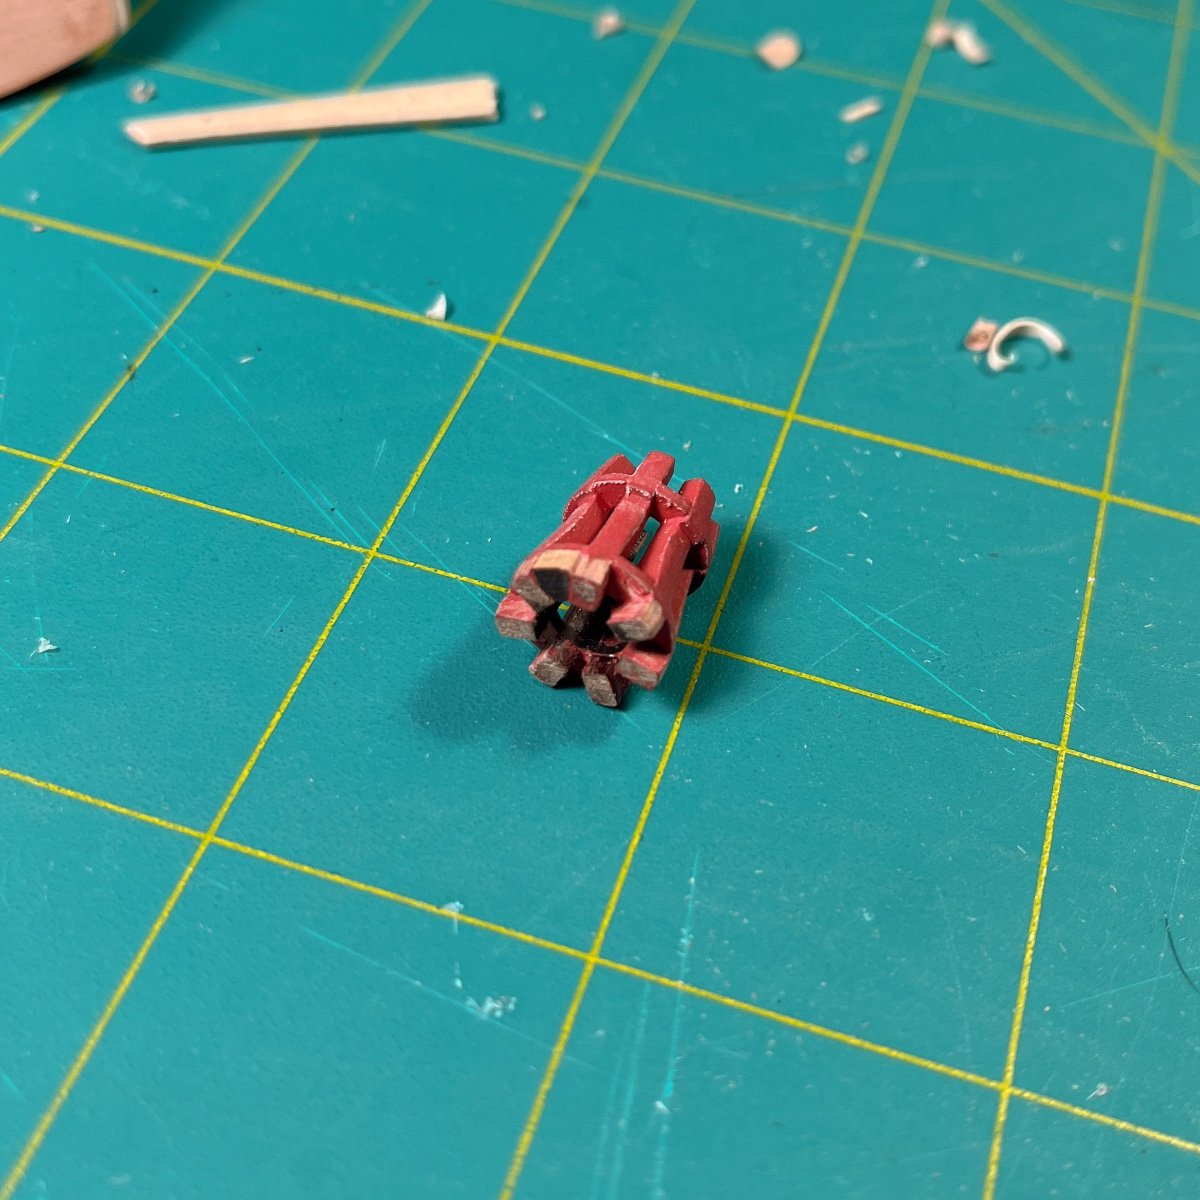
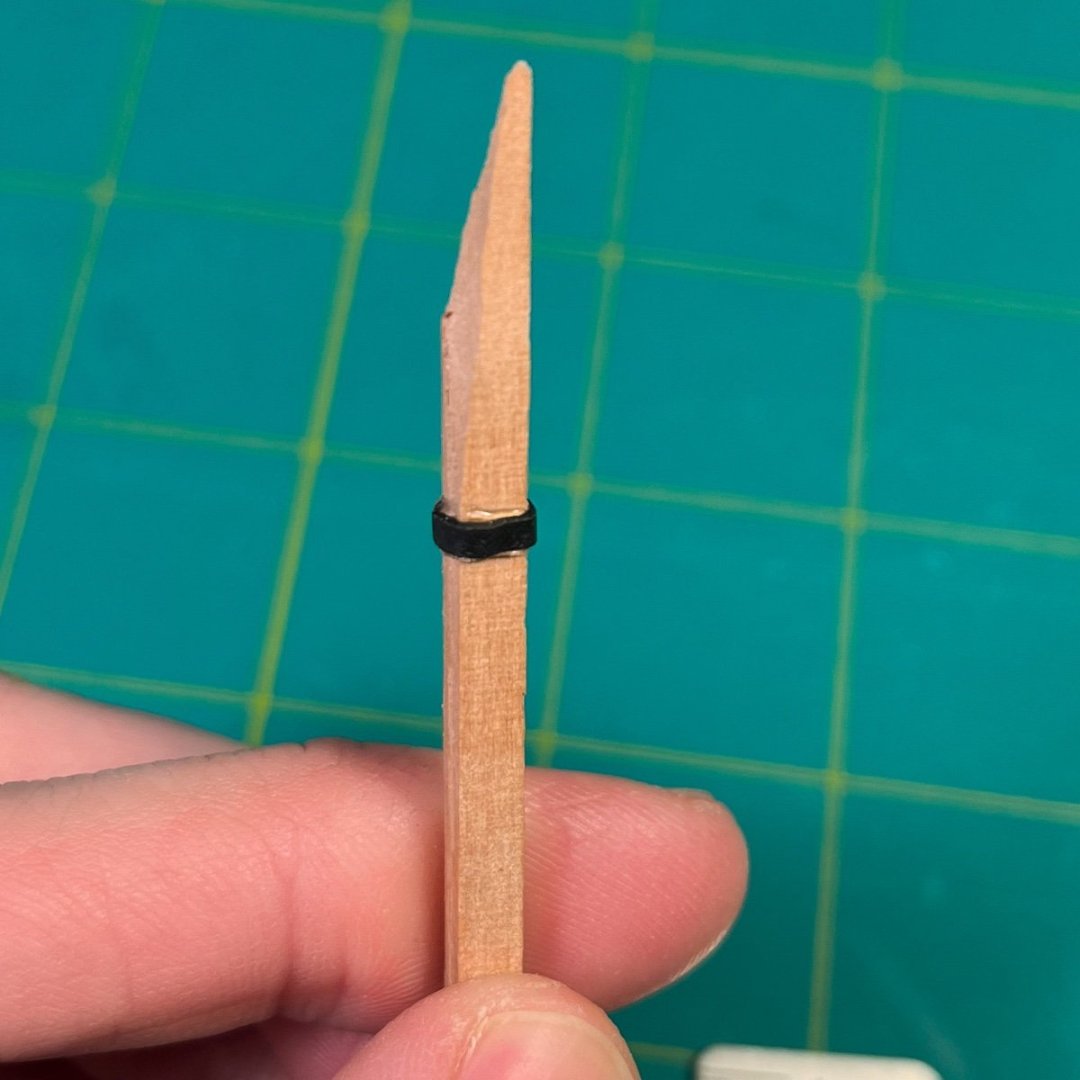
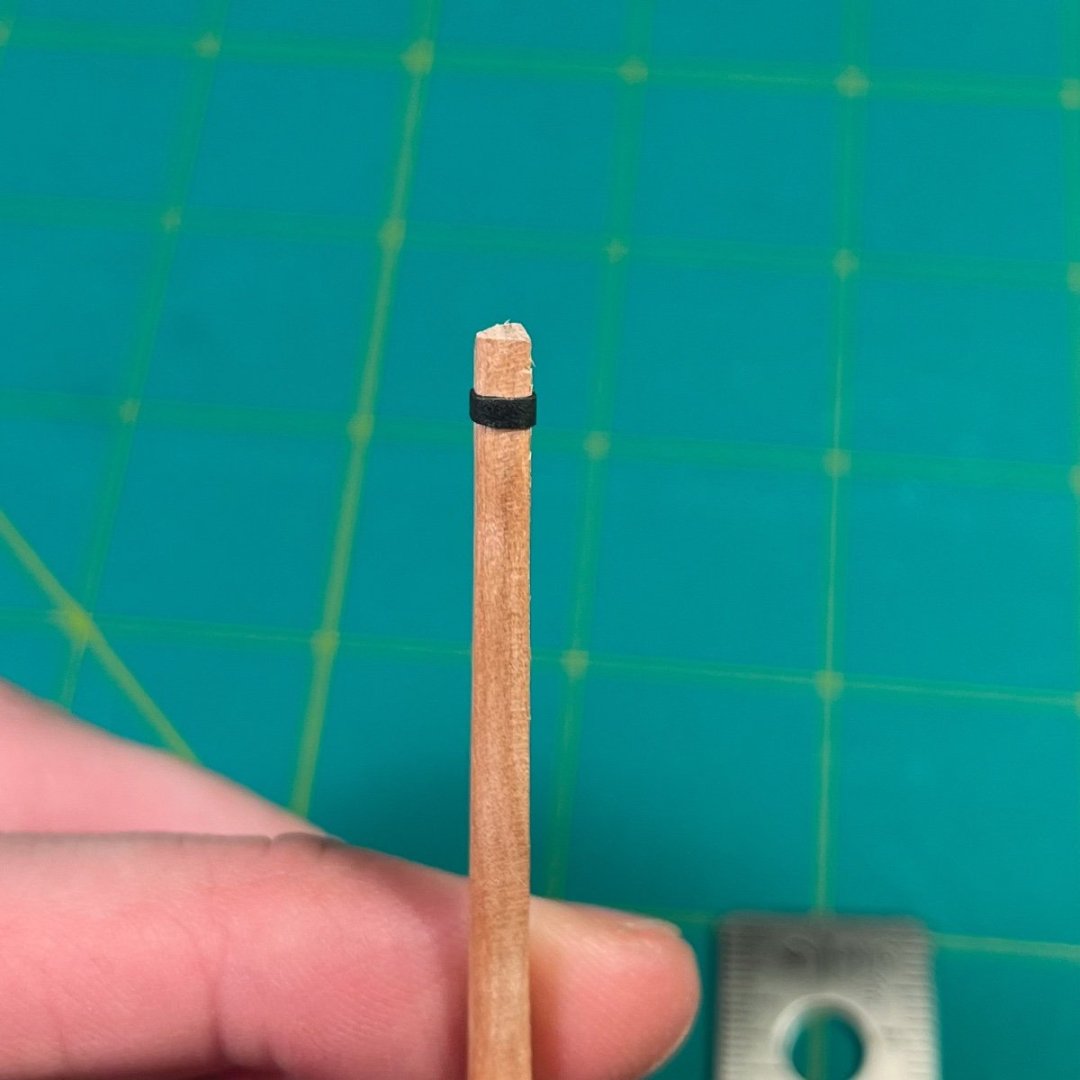
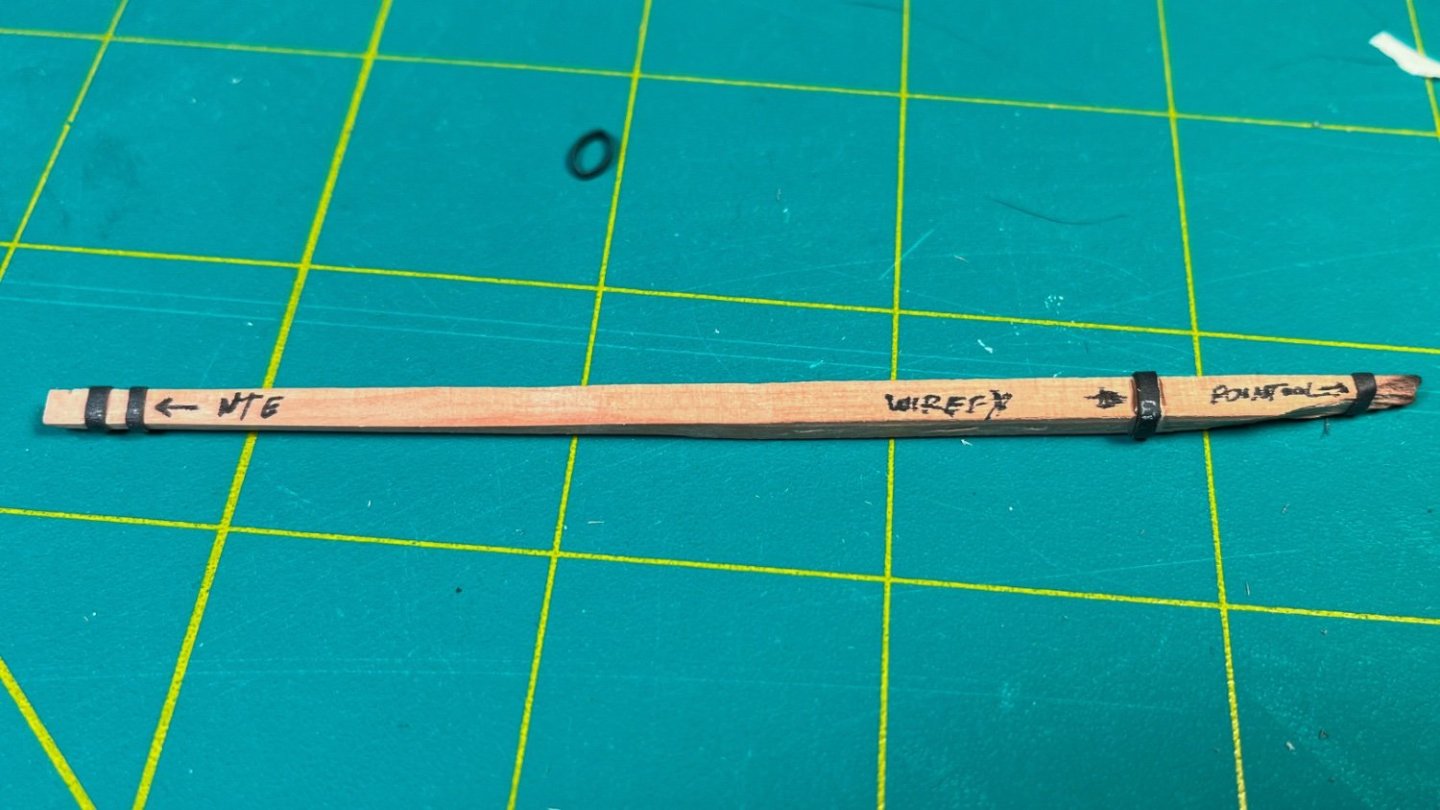
A brief aside regarding shrink tubing for metal bands. TLDR avoid "Adhesive lined" tubing, which seems to be the majority of what is available on Amazon. So far on this build I've been using black masking tape to simulate metal bands, as I'd experimented with shrink tubing and had results like this: Turns out shrink tubing sometimes comes with adhesive inside, which can ooze to and look terrible. This brand is also very thick (the packaging says "double walled"). I keep seeing others getting a cleaner look with it it, so earlier today I unearthed a different set of shrink tubing and found it gave much better results: Here are the 3 brands I tested. Left to right: NTE, Wirefy, and Pointool. NTE and Pointool both look acceptable, but the Pointool tubing has writing on nearly the entire length and I have a multicolor selection, so the black is only in a couple sizes. The NTE tubing has no writing on it. I don't have a large enough sample size to be sure, but in the future I'll be avoiding heat shrink tubing that is double walled or includes adhesive. I'm sure there are other good options out there, but I can personally recommend the NTE tubing. Amazon says I purchased it back in 2010, but seems to still be available (although not via prime). https://www.amazon.com/NTE-Electronics-HS-ASST-2-Shrink-Assorted/dp/B000FIJ7GA/ Note that it is more of a dark gray when compared to the others. I actually prefer that, but just something to consider.

-
Looking great! On my Flirt the plan is to omit the blue and keep that portion unpainted, but I'm really into the more muted color and now you have me reconsidering.
-
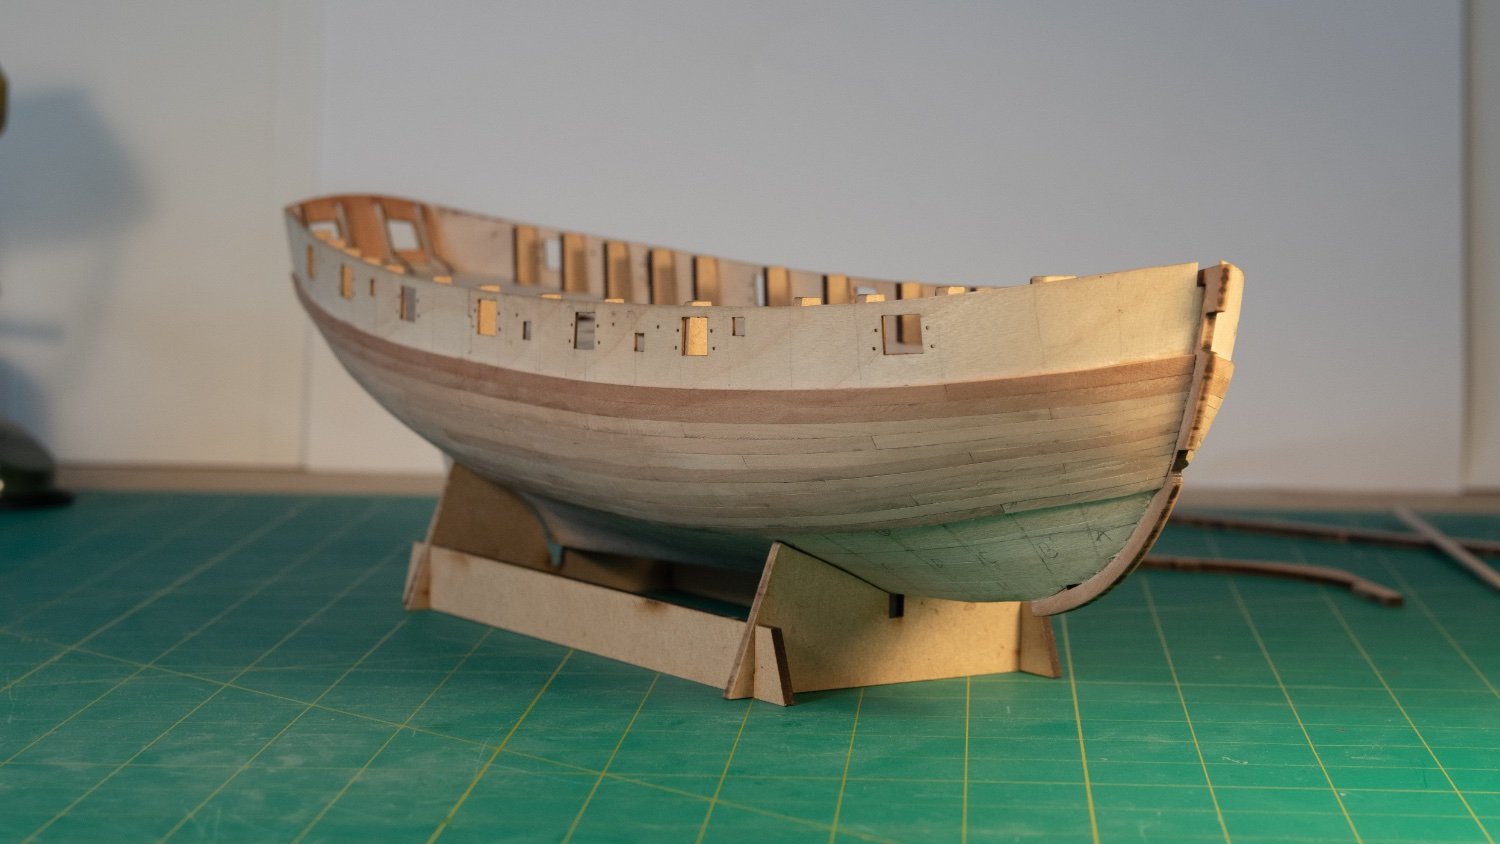
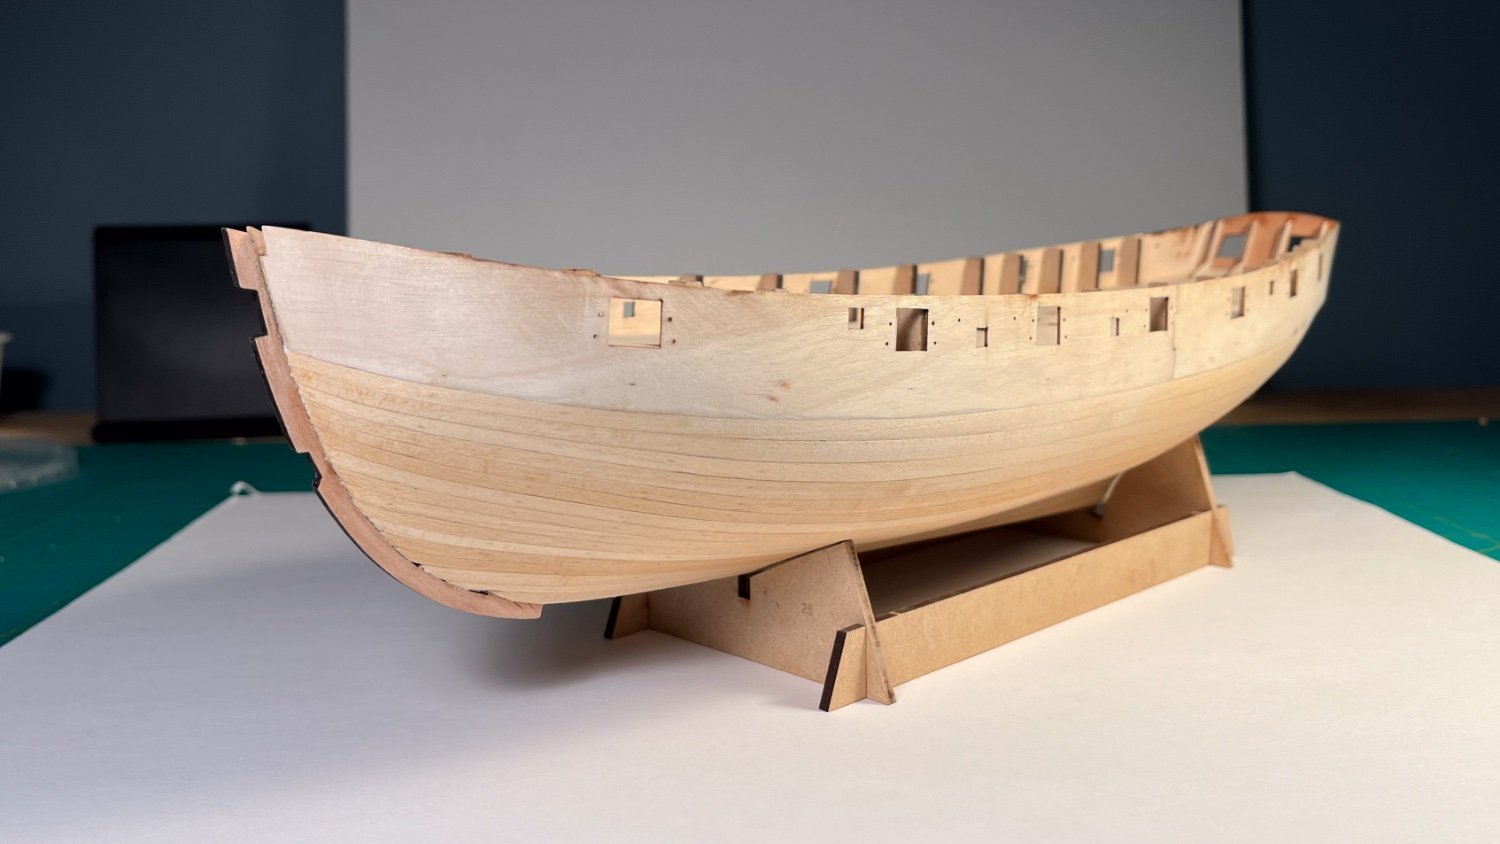
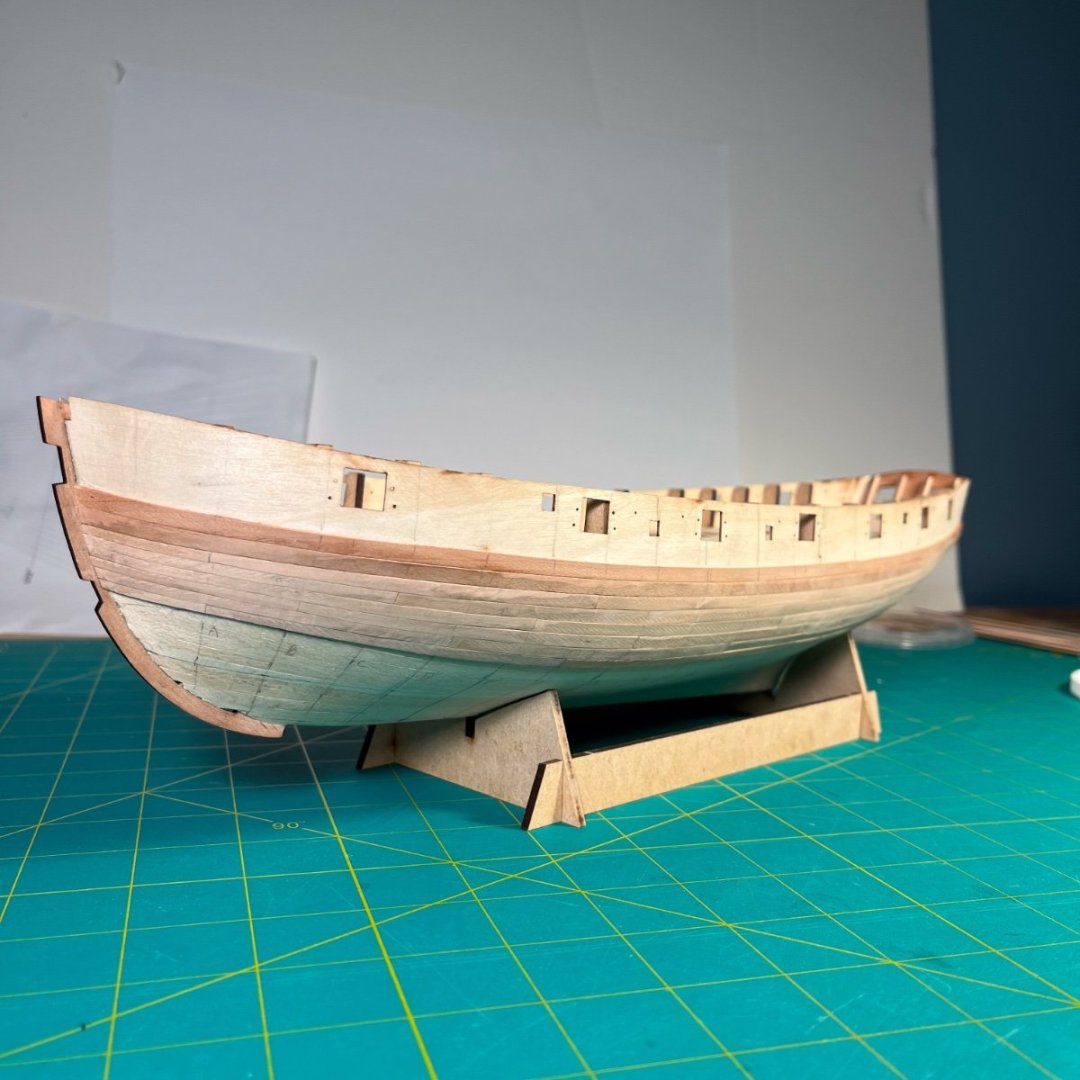
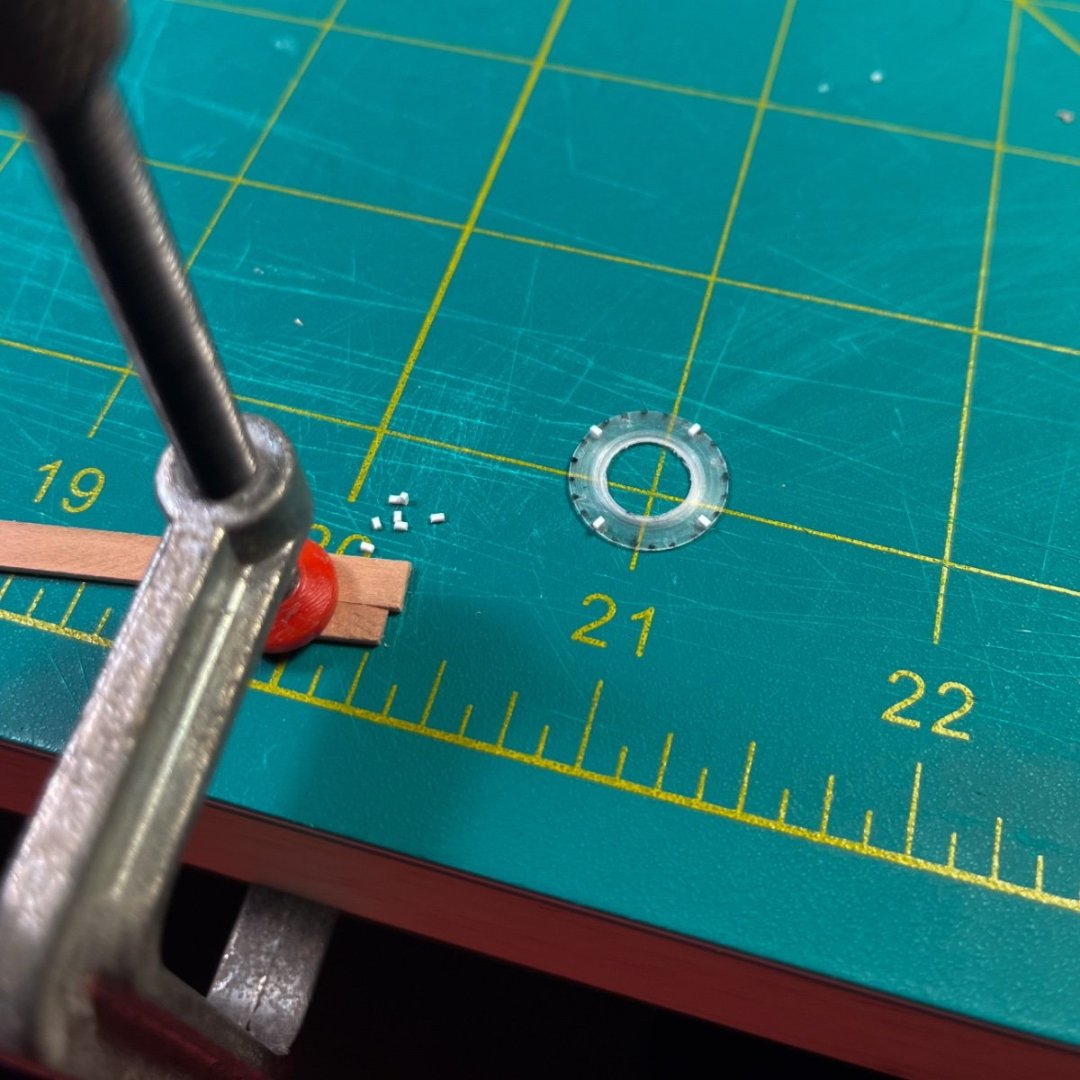
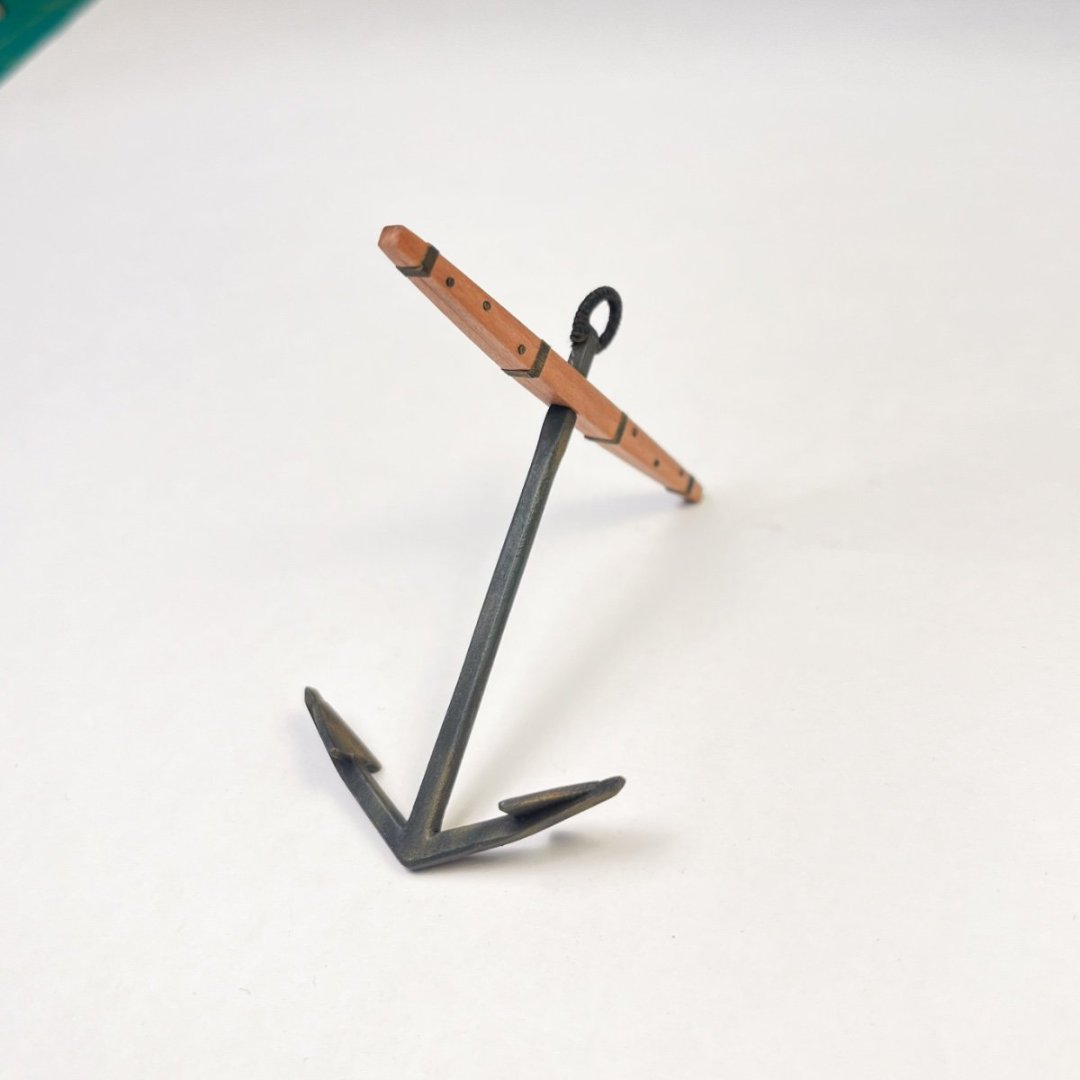
Thanks @No Idea and @mugje! I tend to only see the things I wish I'd done better, so it is nice to have people getting me out of my own head. Gave the hull one final sand to knock down a couple high spots and attached the first planks. The bulwarks have marks where the plank should sit, so placement should be hard to get too wrong. Did some minor bending, but didn't require much since the bulwarks are relatively vertical compared to the hull below. First tried PVA, but noticed a couple spots where they weren’t sitting flat, so I pulled them off and used CA gel instead. Worked my way from the bow to the stern a few inches at a time. The CA gel gave the perfect amount of time to properly position, but then only needing to it hold for a few seconds. Still debating if I should install the stem and keel now in order to properly place the garboard strake. The instructions wait until after planking, but I foresee either ending up with a gap or needing to cut material away to fit the keel. Leaning towards attaching now. My plan is to paint below the waterline, so I can always patch and fill, but I’d rather do it as cleanly as possible. Also considering using realistic plank lengths ala what @TJMhas done with his Flirt. Continued to chip away at deck fittings as well. Decided it would be fun to add some details to the capstan. Based on a bit of reading, it sounds like drop pawls wouldn’t have been used until 1800 or so, but I like the look even if not strictly accurate. Steps should be pretty self explanatory based on the photos. I used styrene rod to create the pawls and teeth, black masking tape for the metal band, and pins for the bolts. Then dry brushed the metal parts to pull out the details. The kit’s capstan is 7 sided, which resulted in an uneven placement of the pawls. Ended up adding 3, alternating every other side then with a gap of 2. In retrospect I should have just added the bolts and pawls independently of the sides of the capstan to space them evenly, but I’m happy enough with this. Added puddening to one of my anchors as a trial run. Used a bit of CA to hold the start, then diluted PVA as I went along to help it hold, finishing with a bit more CA at the end. Wasn’t nearly as frustrating as I was afraid of. When it did start to unwind sometimes, the PVA did a good job of keeping it mostly in place. I should probably stop procrastinating and get on with planking!


-
jereremy reacted to a post in a topic:
HMS Flirt by jereremy - Vanguard Models - 1:64
-
jereremy reacted to a post in a topic:
HMS Flirt by jereremy - Vanguard Models - 1:64
-
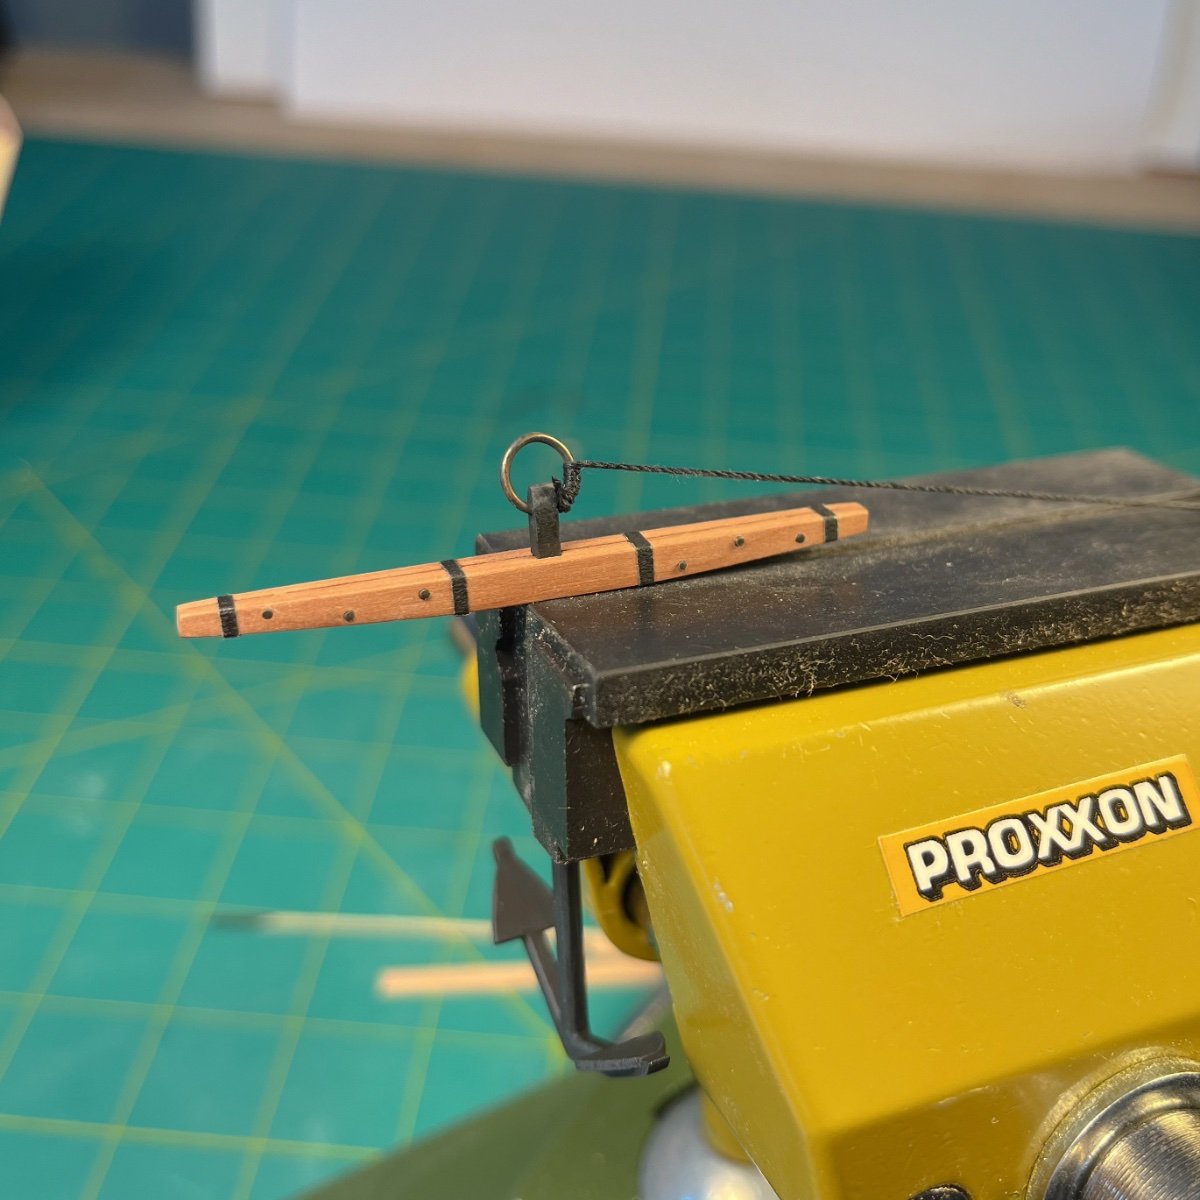
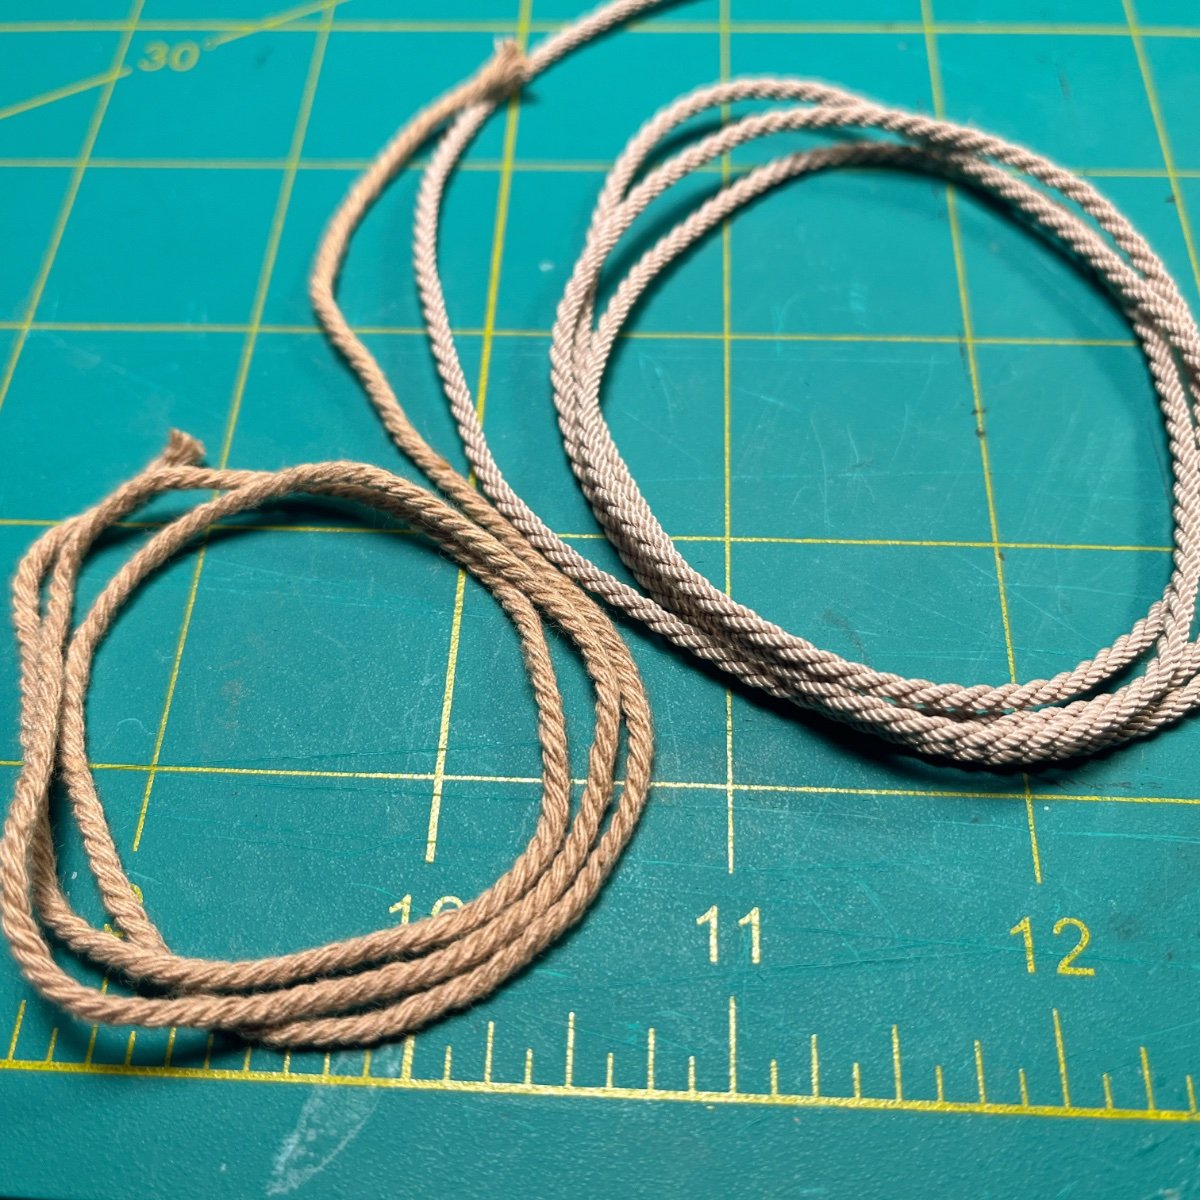
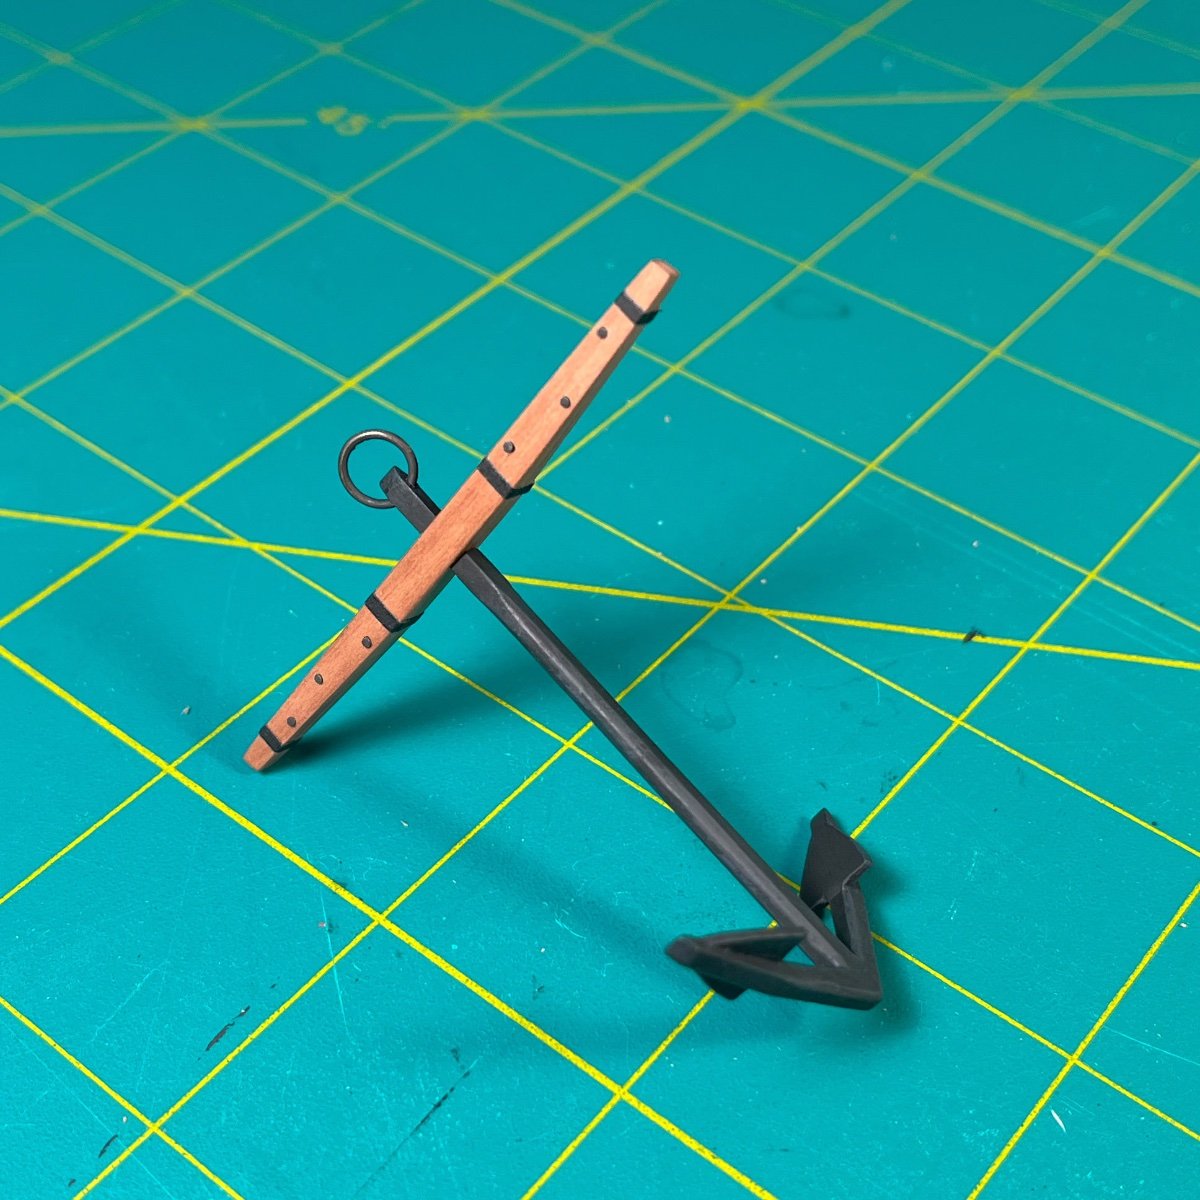
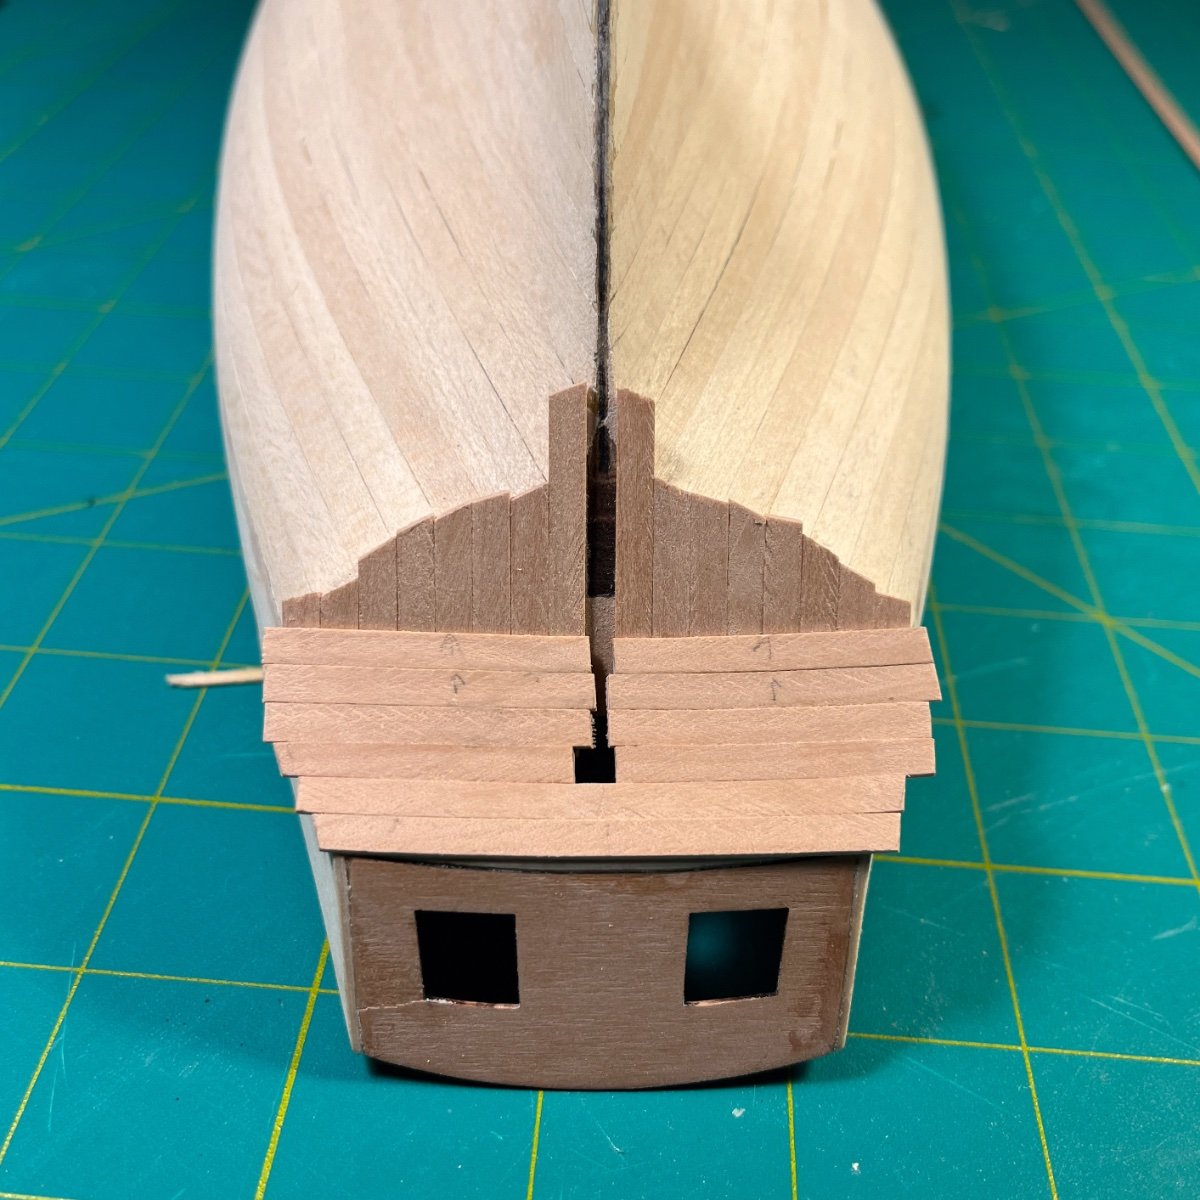
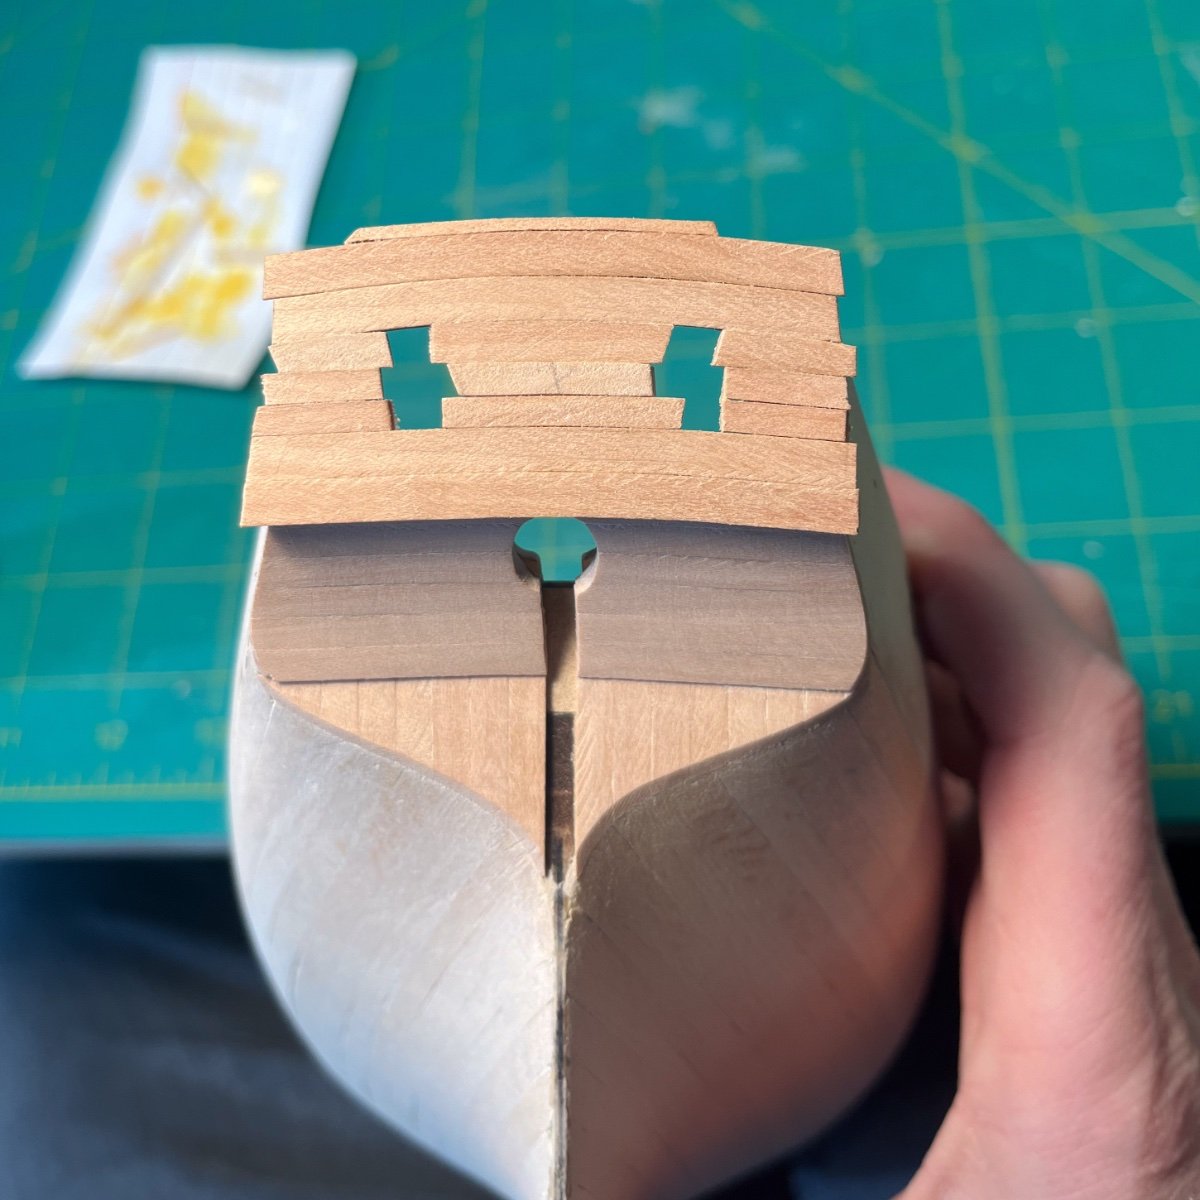
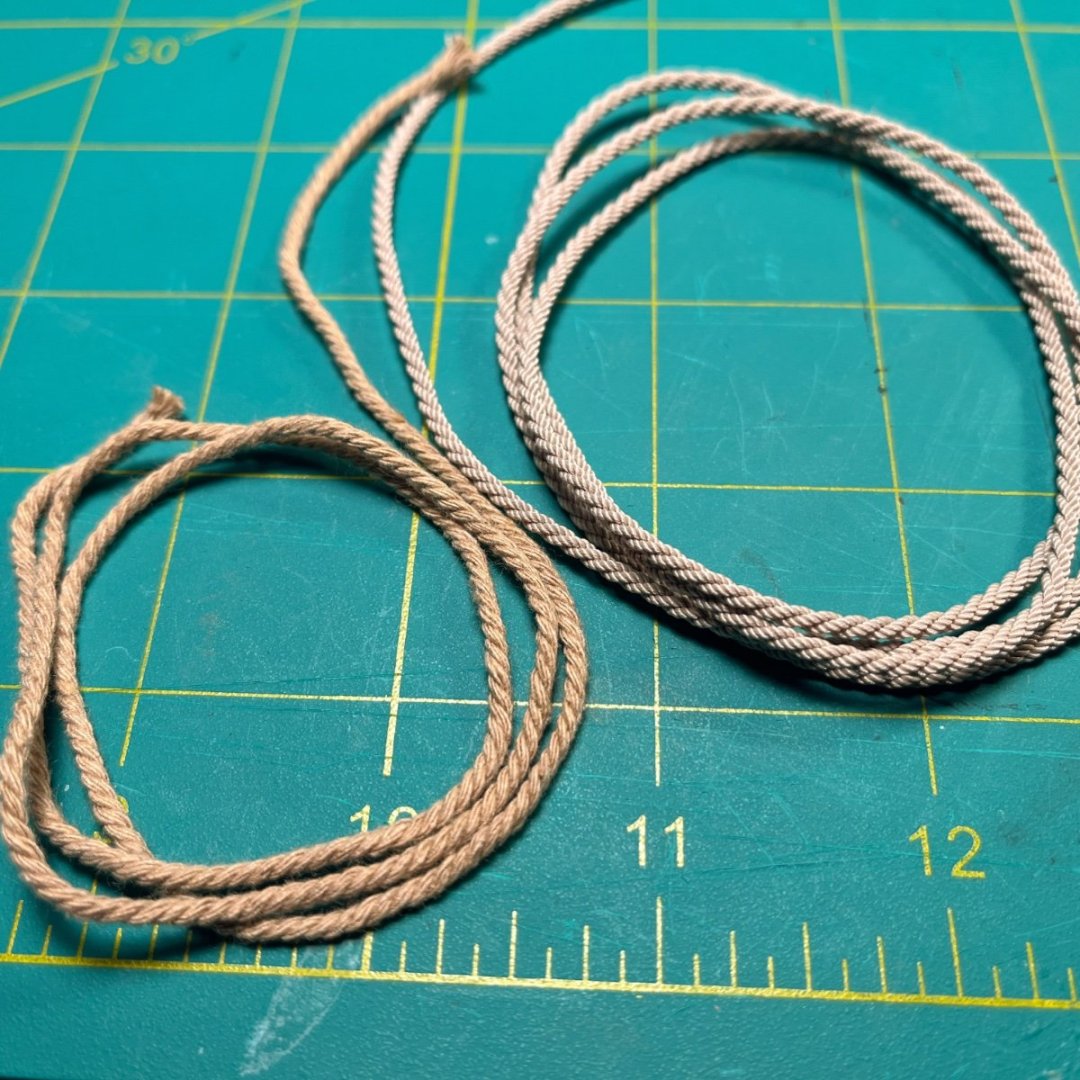
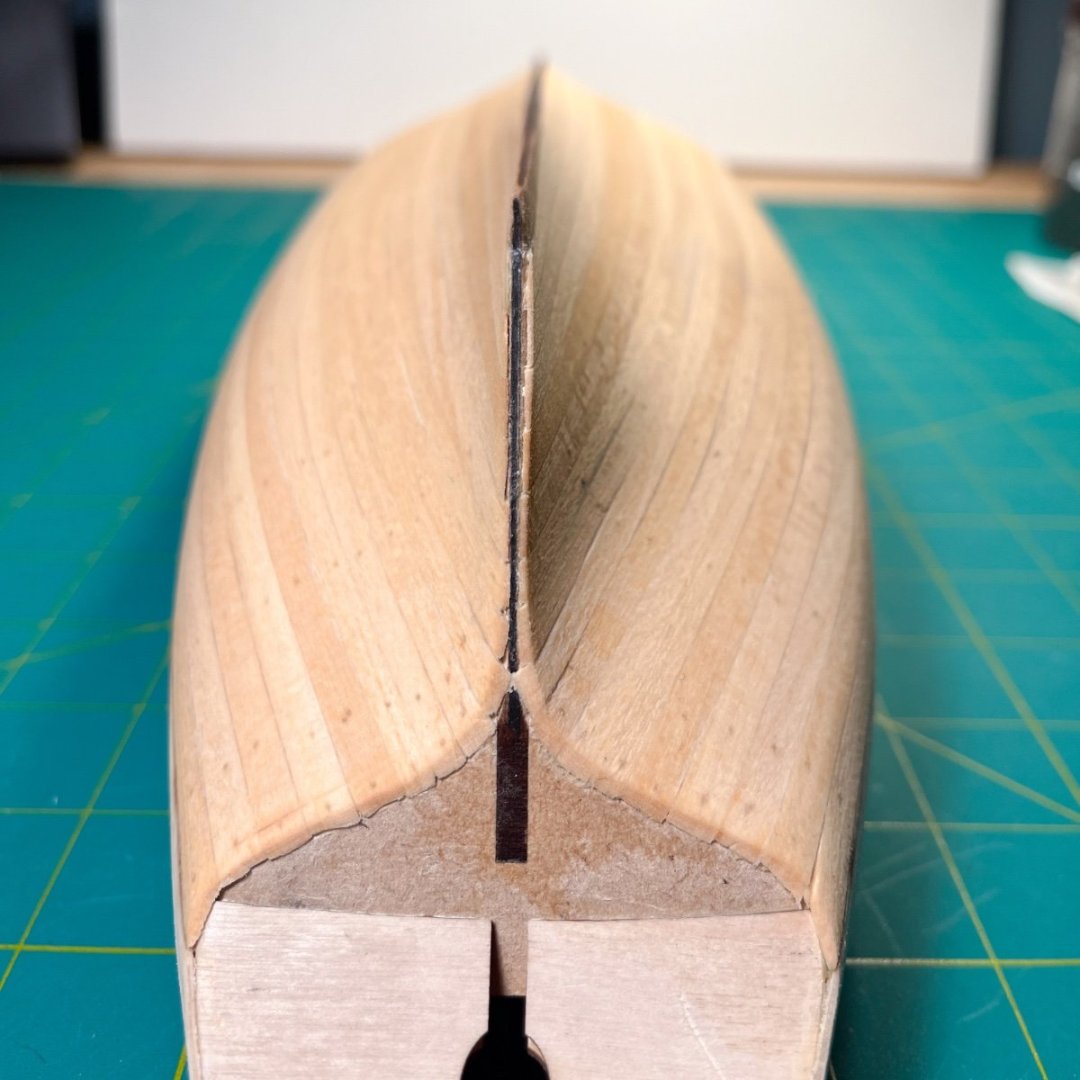
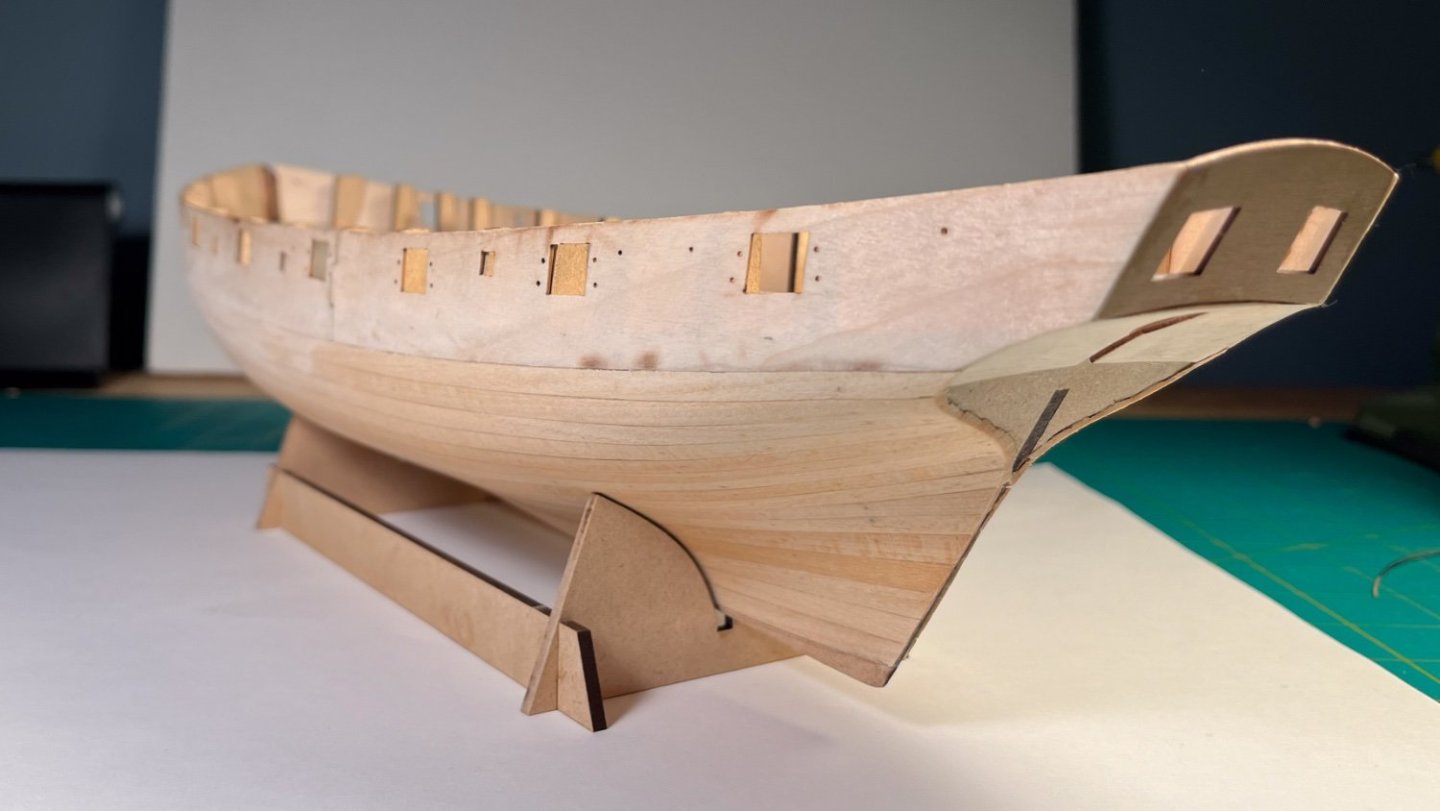
Work continues on the Flirt. Not breakneck pace, but moving forward. Sanded the first layer of planking smooth. Overall happy with the shape. These photos were taken before slowly narrowing the deadwood to ~1.75mm. The Stern post is 3mm and the final planking is 1mm on each side. So in theory the final planking will be sanded down by around 1/3 of a mm to end up flush with the stern post. After thinning the deadwood further as mentioned above, I started planking the stern. Taped on the stern post and used some card to center it in the upper counter gap. Beveled the edge of the first plank on the upper counter to sit a little closer to the planks on the lower counter. Also applied a slight bend to these planks to match the profile of the counter. At this point I made the executive decision to plank the stern board horizontally instead of vertically as suggested in the instructions. I noticed this was brought up in another build log, and that Chris has based this decision on contemporary models of similar ships. I personally just prefer the look of the horizontal planking. Feels more tidy to me. Tried my best to bend the planks to match the curve of the stern board. Started by adding a plank above and below the gun(?) ports, then adding planks above, below, and between. Wasn’t too concerned about consistent thicknesses plank to plank as 3 rails will break It up. Happy overall. Where the upper and lower counters meet looks a little uneven in the photos, but isn’t really noticeable in person. Could be a perspective thing, but should probably sand the right side a tad to even it out. Worst case I could apply a ‘rail’ at that joint. Looks like the 2023 speedy even includes laser cut pieces to put there. Hull could use one more sanding to get rid of a couple little bumps still present and then onto the second layer of planking. Meanwhile I have also been noodling with the anchors. I used blackened .8mm wire as bolts and for the ring. Just need to apply puddening. Already dry brushed some gray onto the black, but would like to go a bit further with the weathering. Just now noticing that perhaps the portion of the shank above the stock (where the ring attaches) would look better beveled or rounded. Anyone have some good historical reference? Also ordered some test rope from ropes of scale. Not that what comes with the kit is bad, but the real stuff does make a big difference. Onward!


-
Thanks for the kind words, @BobG. Finished up the first layer of planking. Very glad I spent the time practicing proper techniques here before the second layer where it really counts. Funny how some planks only took a couple bends to get perfect, and others I’d adjust a half dozen times and still feel like I’m forcing them into place. Was installing the very last plank, trying to pressure fit it into the gap, and heard an unpleasant sound... Uh oh. I wasn’t properly supporting it while applying too much pressure and managed to crack the stern board and separate it from the frames behind. Luckily it glued back together easily. Happy with how the planking is going. Seeing some slight issues with the bow, which could end up needing filling, but will sand it smooth before heading in that direction. The manual isn’t very specific about how much to thin the first layer of planking around the deadwood or stern where it meets the stern post, so my plan is to test fit with the keel and stern post throughout sanding to make sure the next layer of planks will transition smoothly into them. Also debating attaching the keel and stem before the second planking to make sure the garboard plank is positioned correctly. Perhaps temporarily attaching the keel while placing that one course would be a good way to go. Curious if others have wisdom to share? Might wait for some nice weather so I can sand the hull outside. I’ve been working on this in my home office, and would like to avoid too much dust getting everywhere. Unfortunately it is looking like highs in the 20s (around 0° to negative 6° for you non Americans) all next week, so perhaps I will go back to working on fittings for a few days.


-
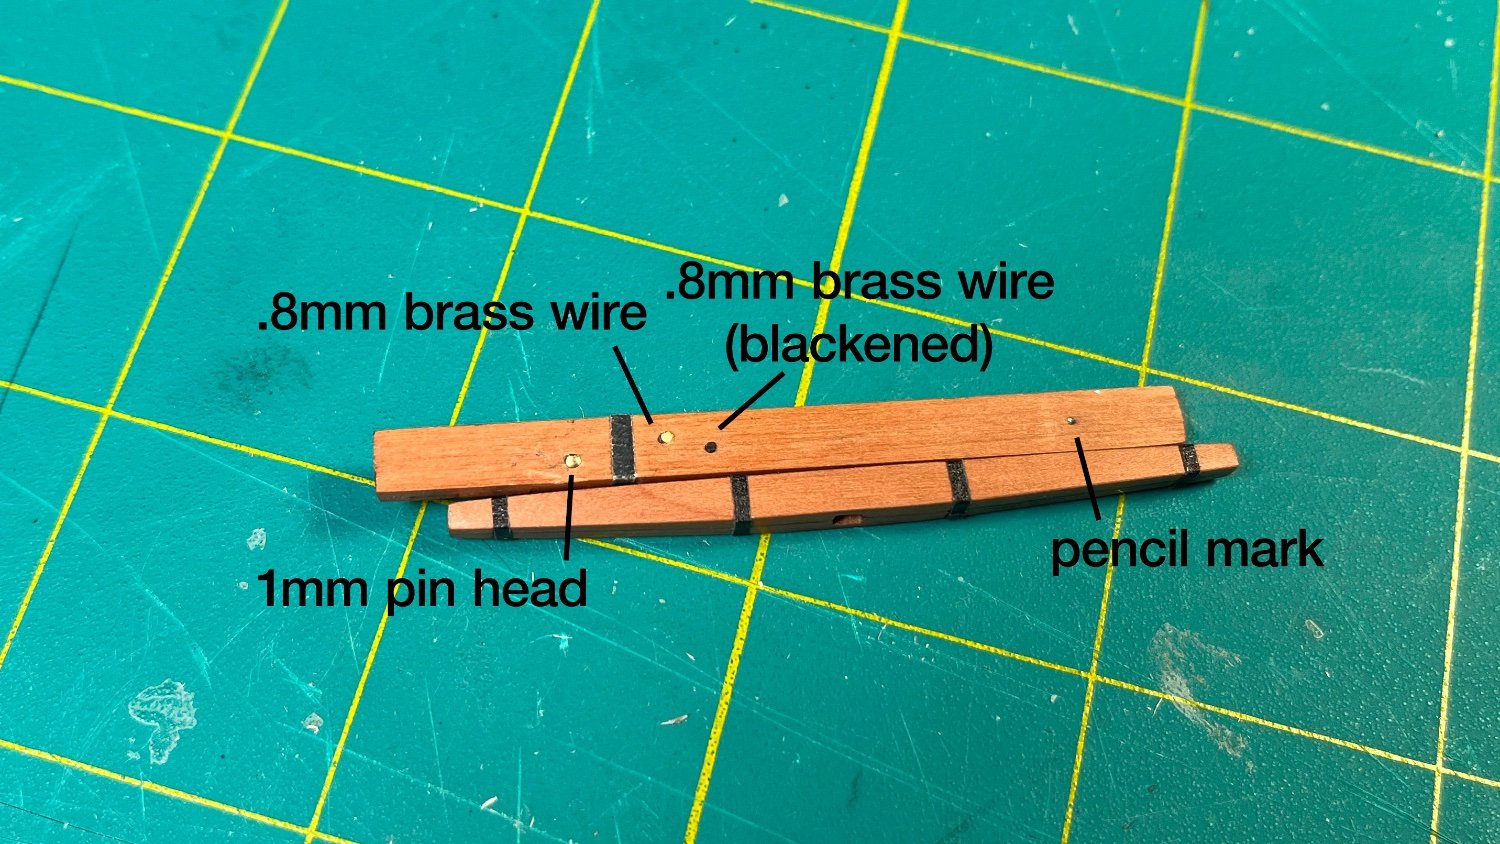
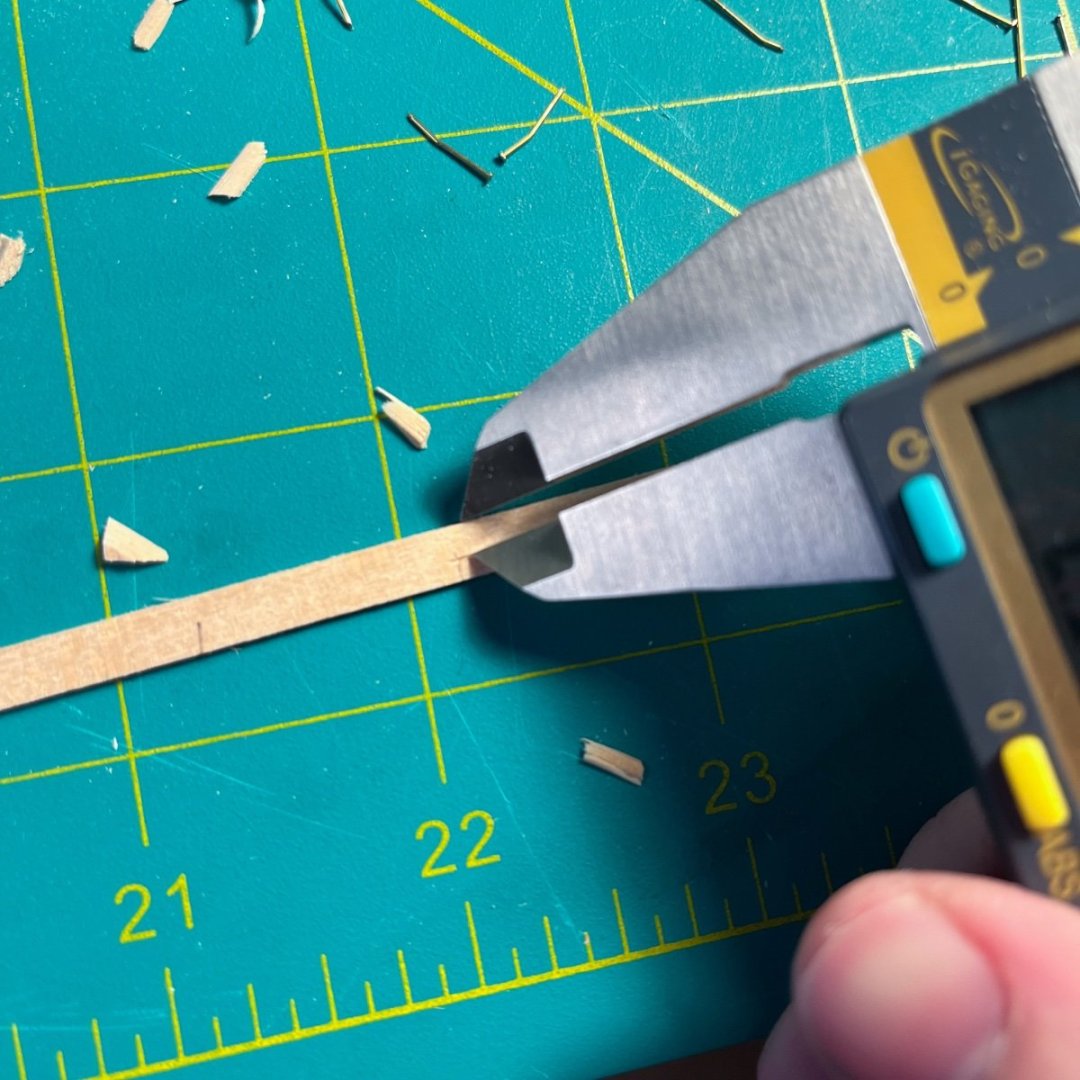
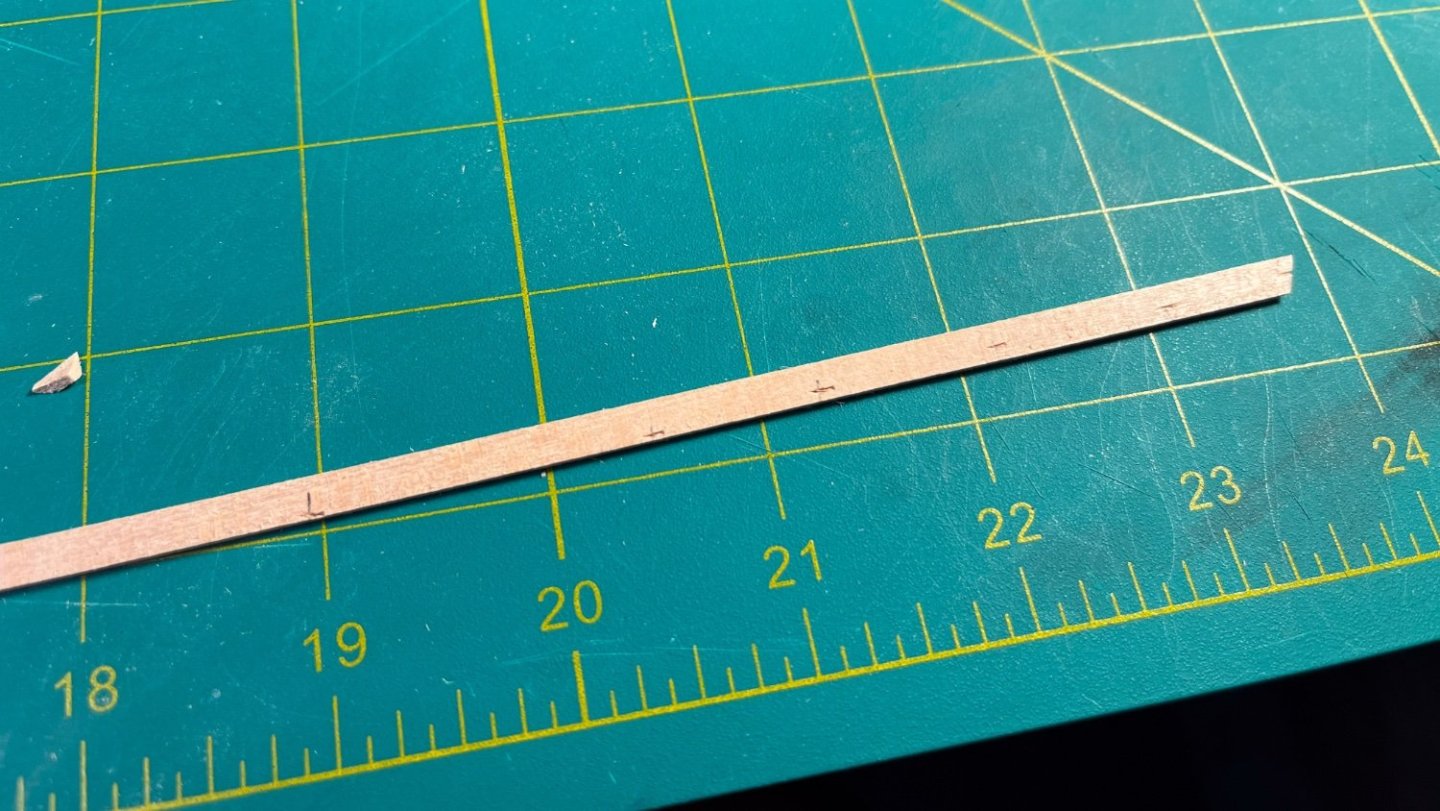
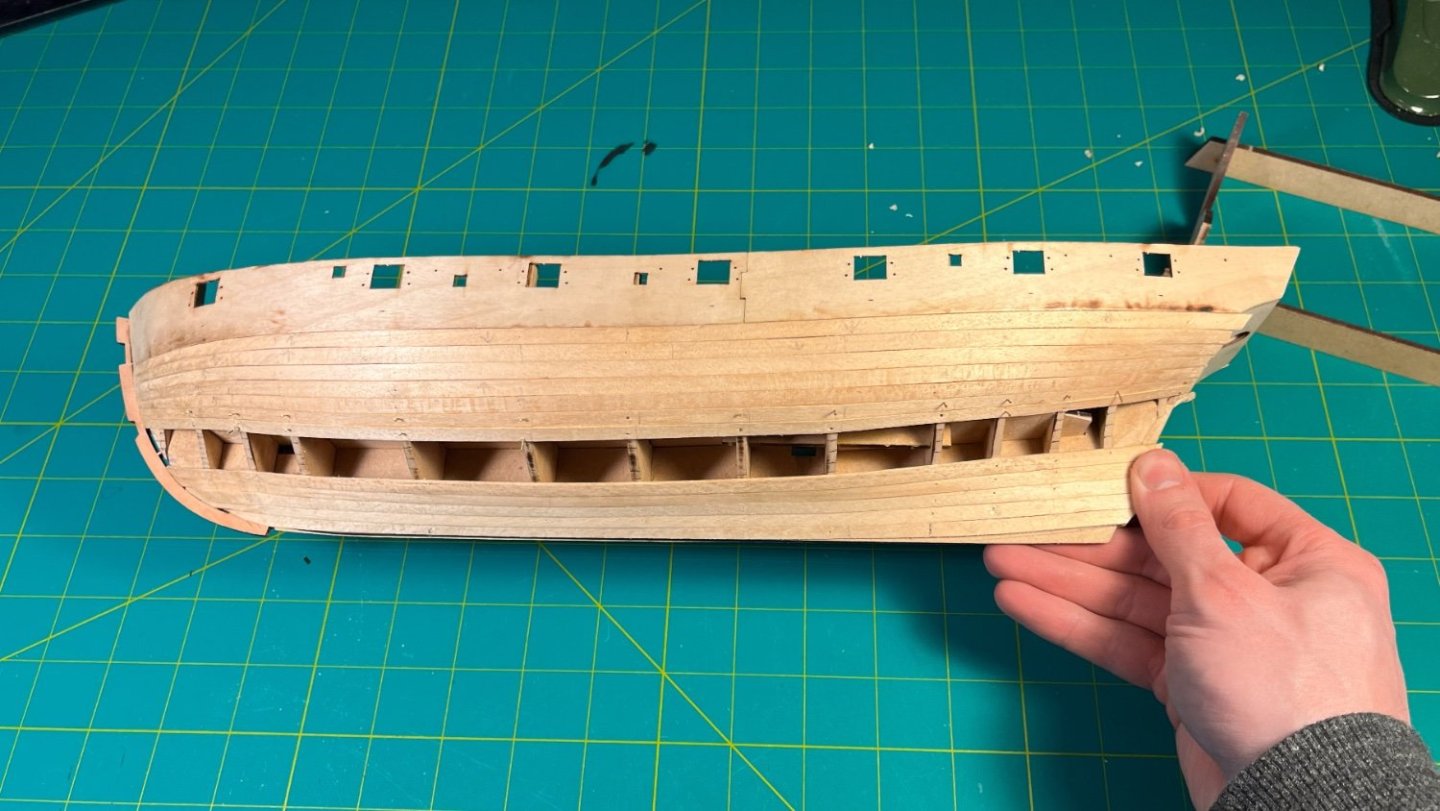
Spent yesterday and today continuing to apply the first layer of planking. Not getting too obsessive over it since it will be sanded down and covered, but still trying to make it a somewhat realistic practice for what is to come with the second layer. It is very satisfying when you get the bends just right and the plank pushes straight into place without needing to be forced against the previous plank. Definitely getting more intuitive about how I need to bend each plank to make that happen. Found the most efficient way of transferring the markings from the bulkheads to the plank is using calipers. Not worrying about what the measurement actually is, but just using it to mark the plank. Then I just connect the marks with a ruler and knife. The garboard strake was tough to figure out exactly how far to continue into the bow and what the profile should be, but am pretty happy with where it ended up. Continued on from there. Getting close! Hopefully I can get those final 8 planks sorted in an evening of work. On the anchor front, I used some black masking tape to simulate the metal bands on the stocks. Also planning to add ‘bolts’ going through them, but am still figuring out what to use. Tried some options on a bit of scrap. First thought was just a mark with a pencil would do, but that didn't work at all. Next idea was to blacken the pins that came with the kit (1mm heads), but I decided they felt a little too big for the relatively thin stocks. Last test was using .8mm wire, which when blackened, seems like the way to go. I like the amount the non blackened wire is protruding to give some dimensionality. I pushed the blackened one in just a little too far, and is essentially flush with the wood.


-
Thanks! As far as I can tell the bottom of the bulwarks and the first plank are pretty well lined up... At least nothing a little sanding won't fix.