HOLIDAY DONATION DRIVE - SUPPORT MSW - DO YOUR PART TO KEEP THIS GREAT FORUM GOING! (Only 13 donations so far - C'mon guys!)
×


jim_smits
-
Posts
653 -
Joined
-
Last visited
Content Type
Profiles
Forums
Gallery
Events
Everything posted by jim_smits
-
 If it's the triangular hole you're referring to, all I've done is to plank upto the penultimate bulkhead. My experience from planking Snake is that it makes planking the transom and the subsequent 2nd planking easier.
- 226 replies
-
- 2
-

-
- ballahoo
- caldercraft
- (and 1 more)
-
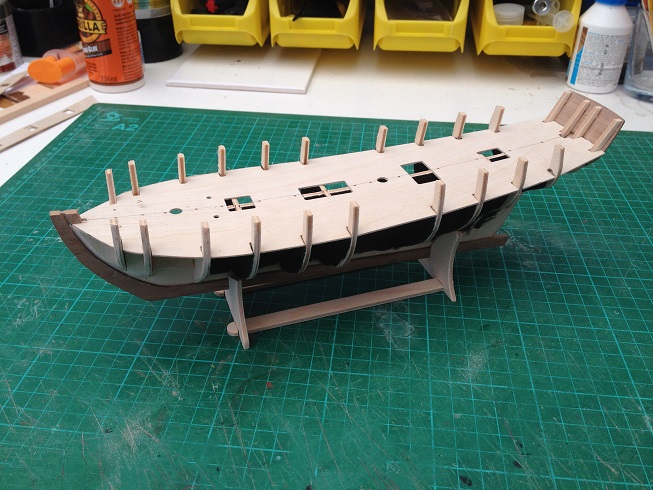
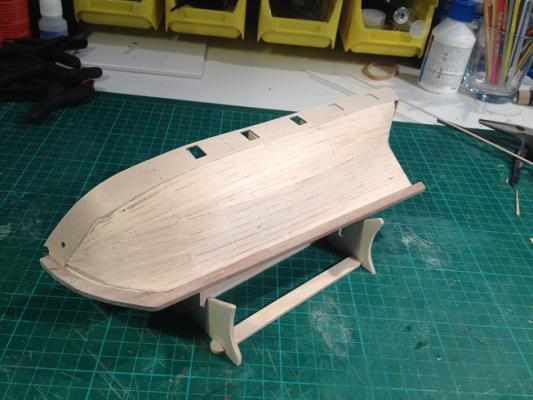
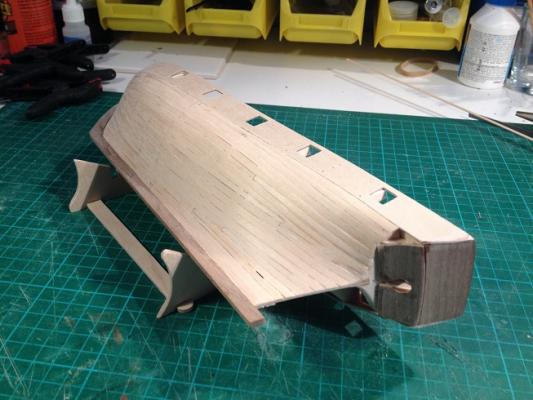
Quick update for you all. Managed to complete the first planking. It was interesting comparing the planking of this smaller vessel as compared to the Snake that I had previously done, with a far greater emphasis on the angle between the keel and the top of the bulwarks. I was adding in stealers from the word go. No great problems however, although the final couple of planks were not the most 'regular' shaped in the world but it will not matter in the big scheme of things. Next steps will be to continue sanding to a smooth finish, adding a few bits of filler in a couple of places with a slight depression and also to 'paint' the entire hull with a bit of diluted PVA to strengthen the build. The first planking really does the ship a sudden sense of being. The lines are now there....!
- 226 replies
-
- 4
-
-
- ballahoo
- caldercraft
- (and 1 more)
-
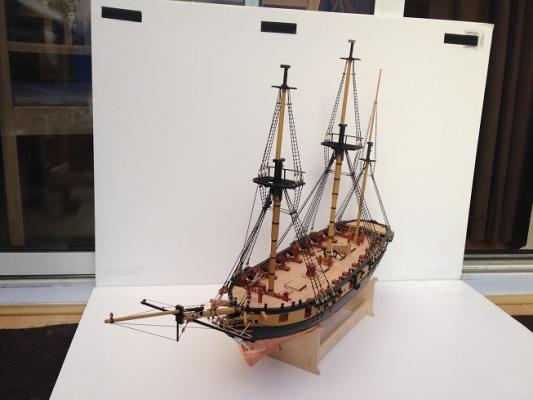
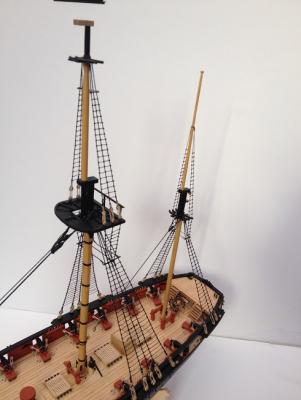
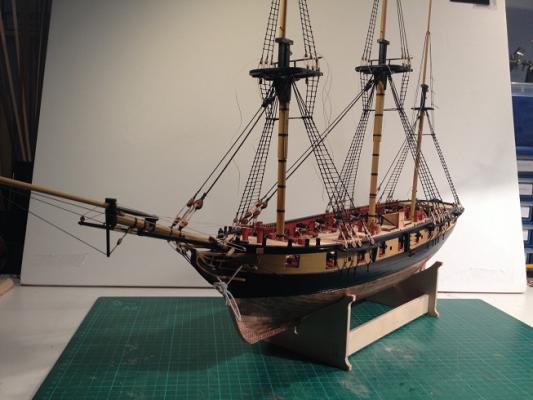
Ratlines........ Done! Finished off the mizzen mast shrouds and futtocks as mentioned in my previous post, and added in the remaining ratlines on the top mast. Rather glad to have got this all out of the way...! Next items to take care are the main stay and preventer stay. The tension has dropped out of both, so I will remove them both and refit. I cant simply re-tension at the heart blocks as they are now to close together. Gives me a chance to try out the serving machine and make improvements to the mouse on each stay.
- 412 replies
-
- 5
-
-
- snake
- caldercraft
- (and 1 more)
-
Hi Eamonn, I'm very surprised that you have been waiting so long for your order from CMB. I've always found them to be incredibly quick with orders; order in the morning and receive the following day. It's probably worth you giving them a ring and checking up on the order....?
- 1,039 replies
-
- 1
-
-
- ballahoo
- caldercraft
- (and 2 more)
-
Pinned the port side bulwark to the bulkheads and glued at deck level, and to the stem and stern. One thing I am finding is that the fit of the lower edge of the bulwark at bulkhead two is quite far from being flush to the bulkhead. I have steamed the bulwark and have clamped to try and shape the bulwark round the shape of the Bulkhead. Anyone else found this an issue?
-
Fully caught up now! The false deck has been pinned and glued in. All the bulkheads have been shaped to fit the bulwarks and planking. Shaped the bulwarks by immersing in boiling water and then pegging to the bulkheads. Both bulwarks are a good approximate shape now, so next step is to pin to the bulkheads prior to planking.Y Everything looking a lot better this time....!

- 226 replies
-
- 2
-
-
- ballahoo
- caldercraft
- (and 1 more)
-
Good solid bit of work last night. The keel bottom, stem and stern post have all had pinning holes made prior to bearding and rabbet work. Dremelled the bearding line and rabbet onto the false keel. Finally, attached all the bulkheads in place, ensuring square in all dimensions, using a few dabs of cyano before liberally adding gorilla wood glue to fix in place. All looking good so far and the false deck fits nicely. Need to bevel the bulkheads and the stern bulkhead to the deck level.
- 226 replies
-
- 1
-
-
- ballahoo
- caldercraft
- (and 1 more)
-
Big backwards steps. After adding the deck in place, I decided I really wasnt happy with the bulkheads positioning. It looks like a couple of them were off-canter and were really throwing out the lines that would be planked and the decking lay. Took drastic action and attempted to seperate off the bulkheads and try and re-glue. Unfortunately my initial contruction was far too sound and the glued joints refused to budge but a couple of the bulkheads split. Went back to JoTiKa and got a replacement ply sprue with the false keel and bulkheads. Just in the process and put it back together. I think the issue is that the bulkheads were quite loose originally so made lining up in all three dimensions difficult. I have taken the time to drawing some construction lines on the bulkheads to aid getting them lined up perfectly. Shouldnt take too long to catch back up.
- 226 replies
-
- 1
-
-
- ballahoo
- caldercraft
- (and 1 more)
-
Been a little bit busy of late, so no huge progress. In fact I have gone backwards a little bit.... I decided I really wasnt happy with the positioning of the futtocks on the mizzen shrouds and the tensioning in the shrouds on the top mast. Very carefully have cut the futtock taves and shrouds and have now added a couple of extra levels of ratlines and raised the level of the staves. The angles should look far better now. Just need to re-tie the catharpins in place and get the right tension and then seize the futtock shrouds back in place.
- 412 replies
-
- 1
-
-
- snake
- caldercraft
- (and 1 more)
-
Hi, I think between the builds from BeefW and myself there is quite a bit on rigging of carronades. Take a look on the builds and ask if there are any gaps.... Jim
-
To be honest I haven't tied the ratlines down to the deadeye as I can't decide if it will look any good or not....
-
Thanks for the image DFellingham. I had a rummage through Lever, and did a little experimentation. I found in the end I prefered the crossed catharpin, even if it might not be the most accurate method, it seemed to work the best in securing the futtocks at the main top mast. Moved onto ratlines on the mizzen top mast. These are surprisingly difficult due to the shrouds being thinner in this area. The issues of twisting the shroud are more evident as I tighten the clove hitches. Finally, I have made a stab at the first back stay on the fore top mast. Got all the rigging together and hooked into the channel ok. The blocks and the rigging of the stay seem to press against the deadeyes and lanyards a touch. Is it correct that the back stay would be 'outside' of the shrouds down to the channel, with the loose end of the rigging crossing under the last ratline in order to be belayed?
- 412 replies
-
- 1
-
-
- snake
- caldercraft
- (and 1 more)
-
Fantastic looking work Jason. Can't quite tell by looking at the pictures but did you cross the shroud line above the deadeye and knot together or did you simply siexe the two ends side by side? I crossed all of mine, and I can tell you it was really difficult to keep the deadeye in position and secure the shroud in place with it crossed.....
- 800 replies
-
- 1
-
-
- snake
- caldercraft
- (and 1 more)
-
Looking good Eamonn. I might have to go back to my Ballahoo soon as you'll ovetake me very shortly....!
- 1,039 replies
-
- 1
-
-
- ballahoo
- caldercraft
- (and 2 more)
-
One might look a bit odd so might go for crossed to keep the tension on the shrouds level....
-
Concentrating a bit on the Snake build at the moment. Sorry to the Ballahoo supporters....! Managed to polish off ratlines for the Main Top Mast. Need to add Futtocks and catharpins. I did have a question relating to catharpins, in that at the top of the main top mast, the mast itself lies between 50% of width of the futtocks, and would result in a catharpin that wraps quite considerably round the mast. I know I have a minor issue with this in the other shrouds but seems quite extreme in this case. Would it be correct to just fit a single catharpin between the futtocks or two with one of them pressed against the mast? Starting to think about back stays now for the foremast as well. Time to press on and make up for the lost month of build.....
-
Hi, I cut the bearding and rabbet down to the middle layer of the Ply. So, approx 1mm on each side leaving 2mm in the middle. Take make the keel more secure I drilled holes to pin the keel before I cut the rabbet line. Hope that helps.....
- 226 replies
-
- 1
-
-
- ballahoo
- caldercraft
- (and 1 more)
-
Hi Patrick Yeah my second bulkhead is short on both sides. Hopefully will be able to sort all these tomorrow evening. And yes, both bulwarks were round the same mug....! Jim
-
Quick check gives about 80mm for my third bulkhead. I think my second is slightly off as well. I probably won't get time to fix these until Thursday now.
-
Run into a minor issue I think. Having started to shape and test the bulwarks against the frames, it looks like the third bulkhead isn't quite wide enough and will result in a dip in planking on the starboard side. I am hoping that I will be able to solve this with some spare lime planking and then a careful reshape, using a plank to test the line of the hull. Hopefully this shouldn't be to difficult to resolve and I can commence with attaching the bulwarks and planking.
- 226 replies
-
- 1
-
-
- ballahoo
- caldercraft
- (and 1 more)
-
They look fantastic Jason. Really struggled with the mouse on my stays and this has made it look simple. Bet you're looking forward to ratlines now.....!
- 800 replies
-
- 1
-
-
- snake
- caldercraft
- (and 1 more)
-
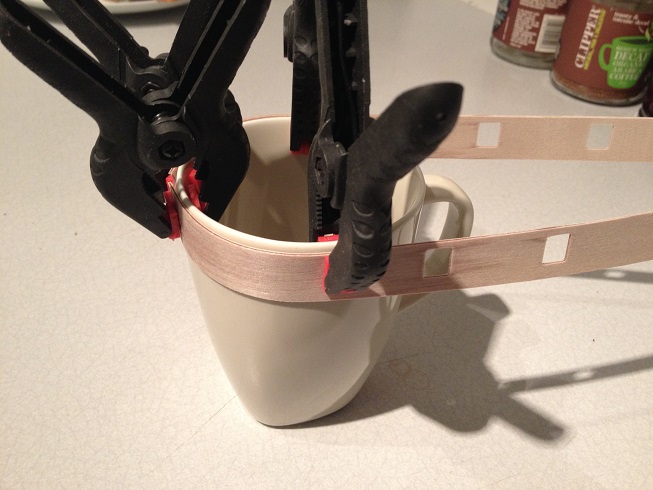
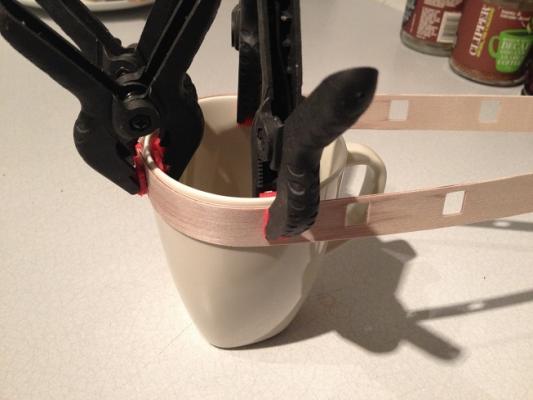
Got my replacement parts from JoTiKa today. Great service from them as I only spoke to them on Thursday. Next step for the build is to gradually shape the bulwarks. Using a mug and large clips at the moment. Once they are roughly the correct shape I will bend to the bulkheads on the ship.

- 226 replies
-
- 4
-
-
- ballahoo
- caldercraft
- (and 1 more)
-
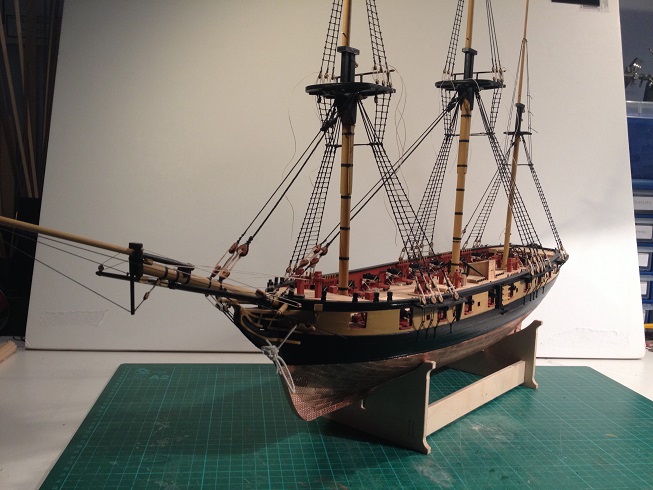
Excellent progress today! Glued the crosstree assemblies onto the fore and main masts and replaced the shrouds that I had previously removed. Rethreaded all of the shroud lanyards and just need to seize the ends around the shrouds. I'm pretty much back to where I was before the accident. After that it's back to finishing off the ratlines again. Never thought I'd be glad to be back to ratlines....!

- 412 replies
-
- 6
-
-
- snake
- caldercraft
- (and 1 more)
-
Crosstree assemblies are now complete. They're not perfect but i'm very happy with how they have turned out. I just need to paint both assemblies and then glue back onto the fore and main mast. Getting there......
- 412 replies
-
- 2
-
-
- snake
- caldercraft
- (and 1 more)