HOLIDAY DONATION DRIVE - SUPPORT MSW - DO YOUR PART TO KEEP THIS GREAT FORUM GOING! (Only 13 donations so far - C'mon guys!)
×


jim_smits
-
Posts
653 -
Joined
-
Last visited
Content Type
Profiles
Forums
Gallery
Events
Everything posted by jim_smits
-
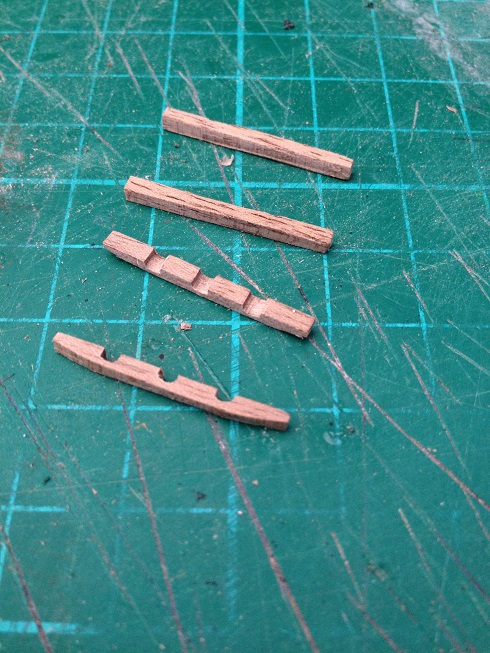
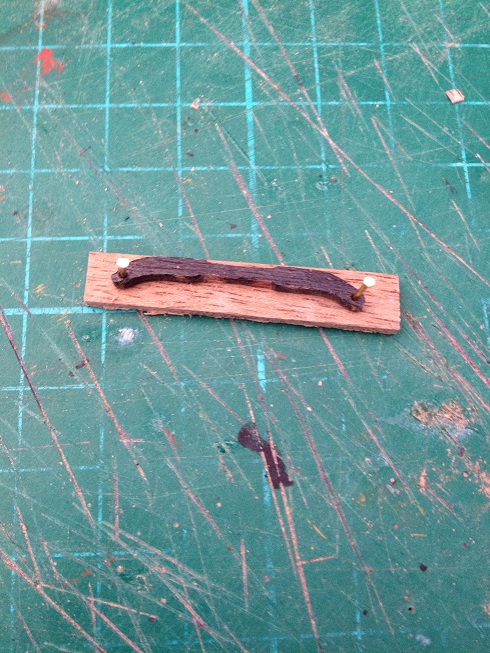
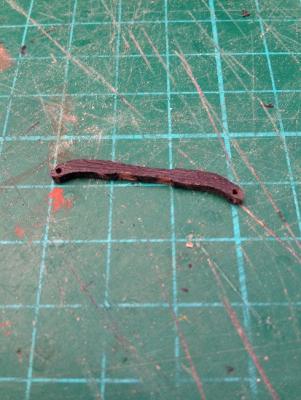
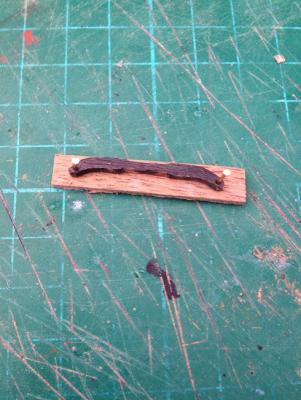
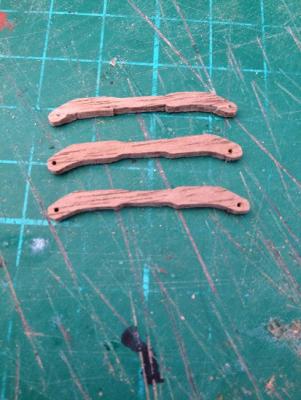
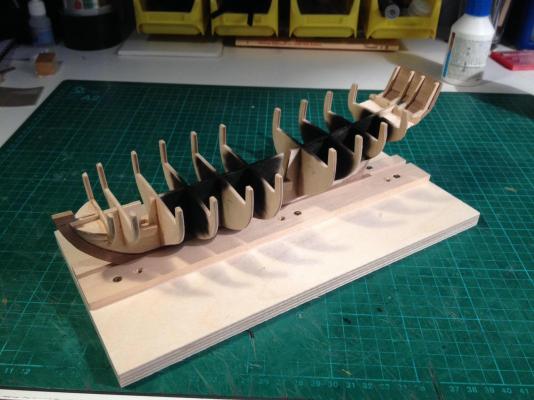
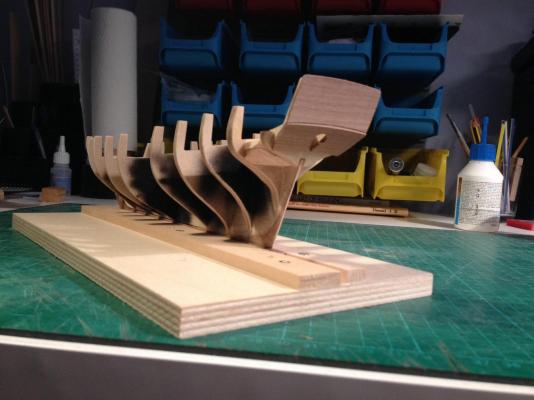
 Quite pleased with myself! The scratch building is going pretty well so far. Made two of the crosstrees. First cut pieces of 2mm x 15mm walnut to rough size, I then used a file to file the angled ends and then the notches to size. The trestletrees were a little more complex. Fortunately, I was able to rescue a single piece from the wreckage and use this as a template. I cut several pieces of walnut to approximate size and then pinned the trestletree to a piece. I was then able to cut and shave the wood to shape using the template. Managed to complete three successfully so far. Two more required.
- 412 replies
-
- 3
-

-
- snake
- caldercraft
- (and 1 more)
-
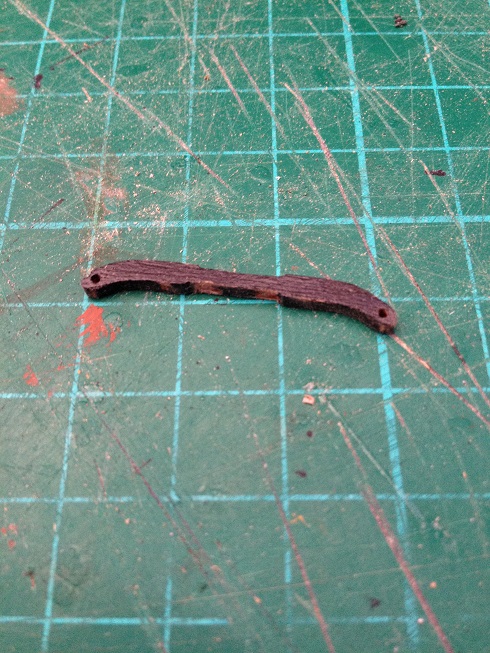
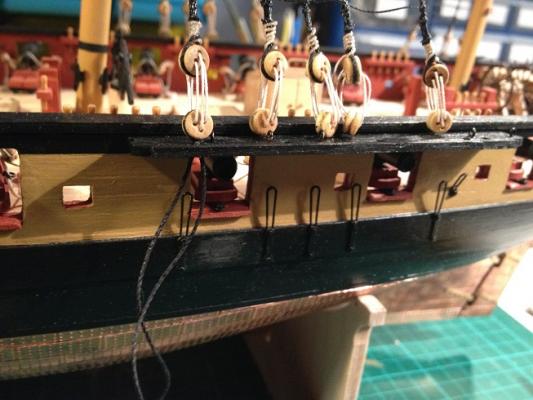
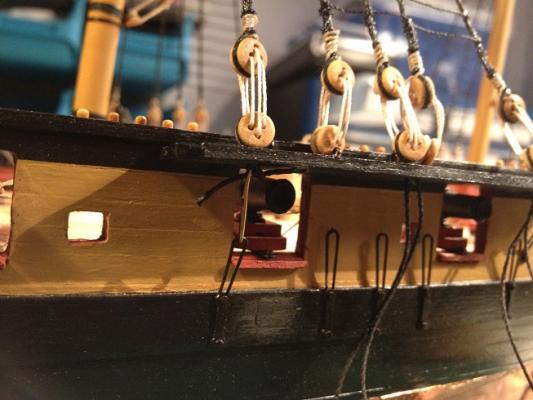
Ok. I have now tied down all the shrouds, and I just need to trim the excess thread and paint the chains black. The next main step is to very carefully remove the fore topmast shrouds. I plan to cut the lanyards, and slide the shrouds off in one piece. I need to do this as I have to replace the crosstree assembly, which is basically shattered. I need to do the same for the main topmast. Which leads me onto the difficult part.... I am going to scratch build the cross trees. This means 6 crosstree and 4 trestletrees pieces. Onwards.....
-
Hi Jason, Those look spot on to me. I didn't tighten too much when I rigged the lanyards, just enough to get some tension in the shrouds.
-
The JoTiKa office is back open today after New Year as I spoke to them earlier. You could try calling them and getting replacement walnut parts?
-
Finally got through to JoTiKa today and should hopefully have a new 2mm walnut sprue on it's way over to me tomorrow.
- 226 replies
-
- 1
-
-
- ballahoo
- caldercraft
- (and 1 more)
-
Hi I was considering this build at some point in the future, so I will follow this build with interest. I saw HMS Warrior in Portsmouth during the summer and I was very impressed. Best of luck with the build! Jim
-
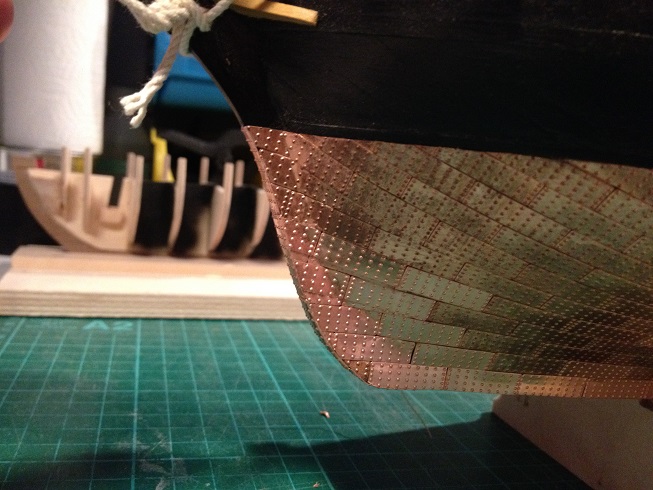
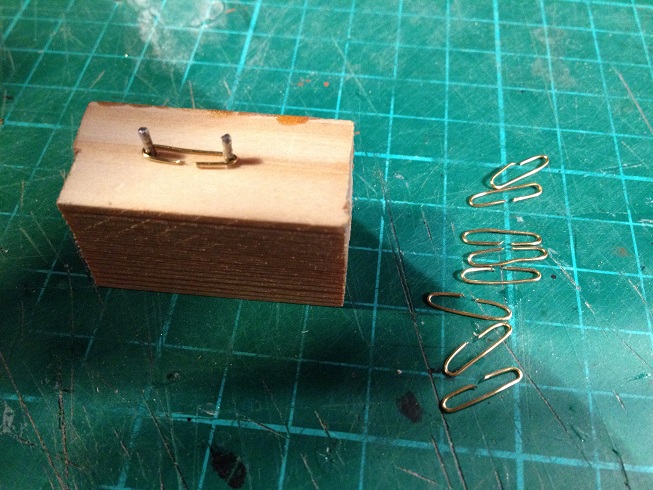
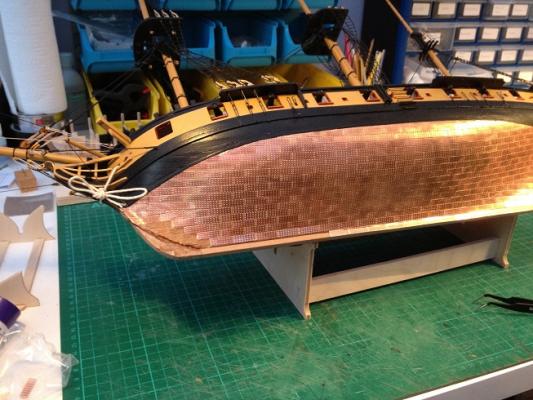
Coppering has now been fully replaced and the hull looks so much better now. The new plates don't actually stand out that much from the old plates so I will let them be and see how they look in a couple of weeks. Now working on re-rigging the shrouds. I had two chainplates snap on the starboard main channel, and all five went on the port channel that was torn off the hull. The easiest way to replace these has been to use 0.75mm black thread in place of the deadeye strop, and tie a double knot to the deadeye to simulate the strop.The loose ends are then fed through the channel and tied to the chain plates. I have had to replace these as well as they were bent out of shape. Used a little jig to create new chains from 0.5mm brass wire by looping several turns round two nails and then clipping down the side of one length.


- 412 replies
-
- 5
-
-
- snake
- caldercraft
- (and 1 more)
-
Cheers Mort! Happy new year to you. That image above does show the crack in the stem piece. Possibly more obvious as it is full of filler. Once the coppering is finished it will be gone....!
- 412 replies
-
- 1
-
-
- snake
- caldercraft
- (and 1 more)
-
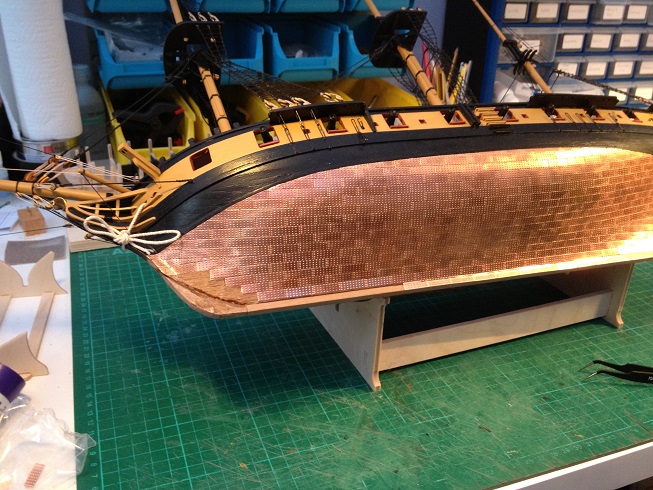
Channel has been re-pinned and glued back in place. I am now replacing the copper tiles along the keel bottom and at the stem. Port side is almost complete. Time to sign off for the new year. See you all in 2014!
- 412 replies
-
- 5
-
-
- snake
- caldercraft
- (and 1 more)
-
Bit more progress last night. I have airbrushed black any areas that are likely to be visible through the deck. I need to have another look at the Haddock plans though to confirm as they are different to Caldercrafts Ballahoo layout. Added mast supports from a little scrap wood and used balsa to make fillers at the bow and stern to aid planking. Finally, the stern has been built adding the supports and pieces of the transom. Next step is to soak and shape the bulwarks to shape and add the false deck. Coming together nice and easily so far......
- 226 replies
-
- 4
-
-
- ballahoo
- caldercraft
- (and 1 more)
-
I've done some more digging and I found a very nice model made by Kerry Jang that has been painted in Nelson chequer - Black hull with a yellow ochre band along the gunports and red ochre on the inside of the bulwarks and the deck fittings. IT will compliment the Snake build nicely as well....!
- 226 replies
-
- 1
-
-
- ballahoo
- caldercraft
- (and 1 more)
-
Hi Eamonn, My folks bought the paint set with the kit as it was 'recommended' by the website. I am actually trying to work out if there any areas that should be painted or not. Even to the extent of whether the hull was treated with 'white stuff' or not. Certainly the front of the box shows a largely natural finish.
- 226 replies
-
- 1
-
-
- ballahoo
- caldercraft
- (and 1 more)
-
Bulkheads attached. Glued with a spot of cyano and set to the correct position using the false deck. I have then added PVA and smeared into the joints using cotton buds. I will let these cure while I treat myself to a carvery...!!

- 226 replies
-
- 4
-
-
- ballahoo
- caldercraft
- (and 1 more)
-
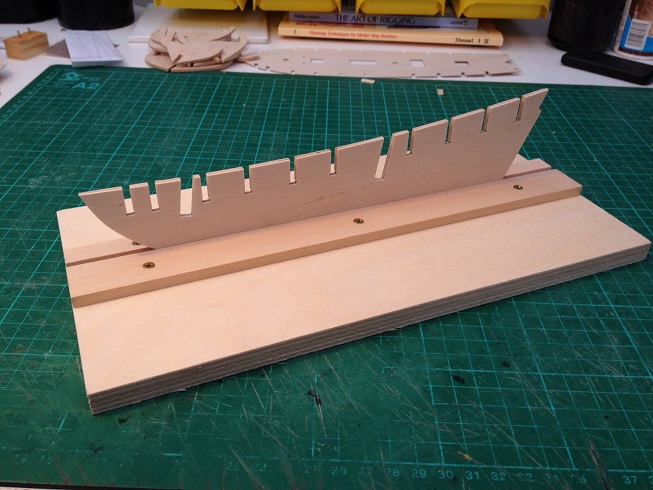
Last nights progress: All bulkheads are roughly beveled. I will do any fine tuning once they are glued in place, but I will also be adding some balsa blocks at the bow and stern to aid planking. I have also added my bearding and cut a rabbet up to the top of the stem. Lesson learned from the Snake, this is so much easier before glueing the bulkheads in place. Finally, dry fitted and pinned the stem and keel to the false keel. I will glue these in place today but leave the stern post until after second planking. Nothing really to see yet as it's all prep work mainly. Will update once the bulkheads are in.
- 226 replies
-
- 1
-
-
- ballahoo
- caldercraft
- (and 1 more)
-
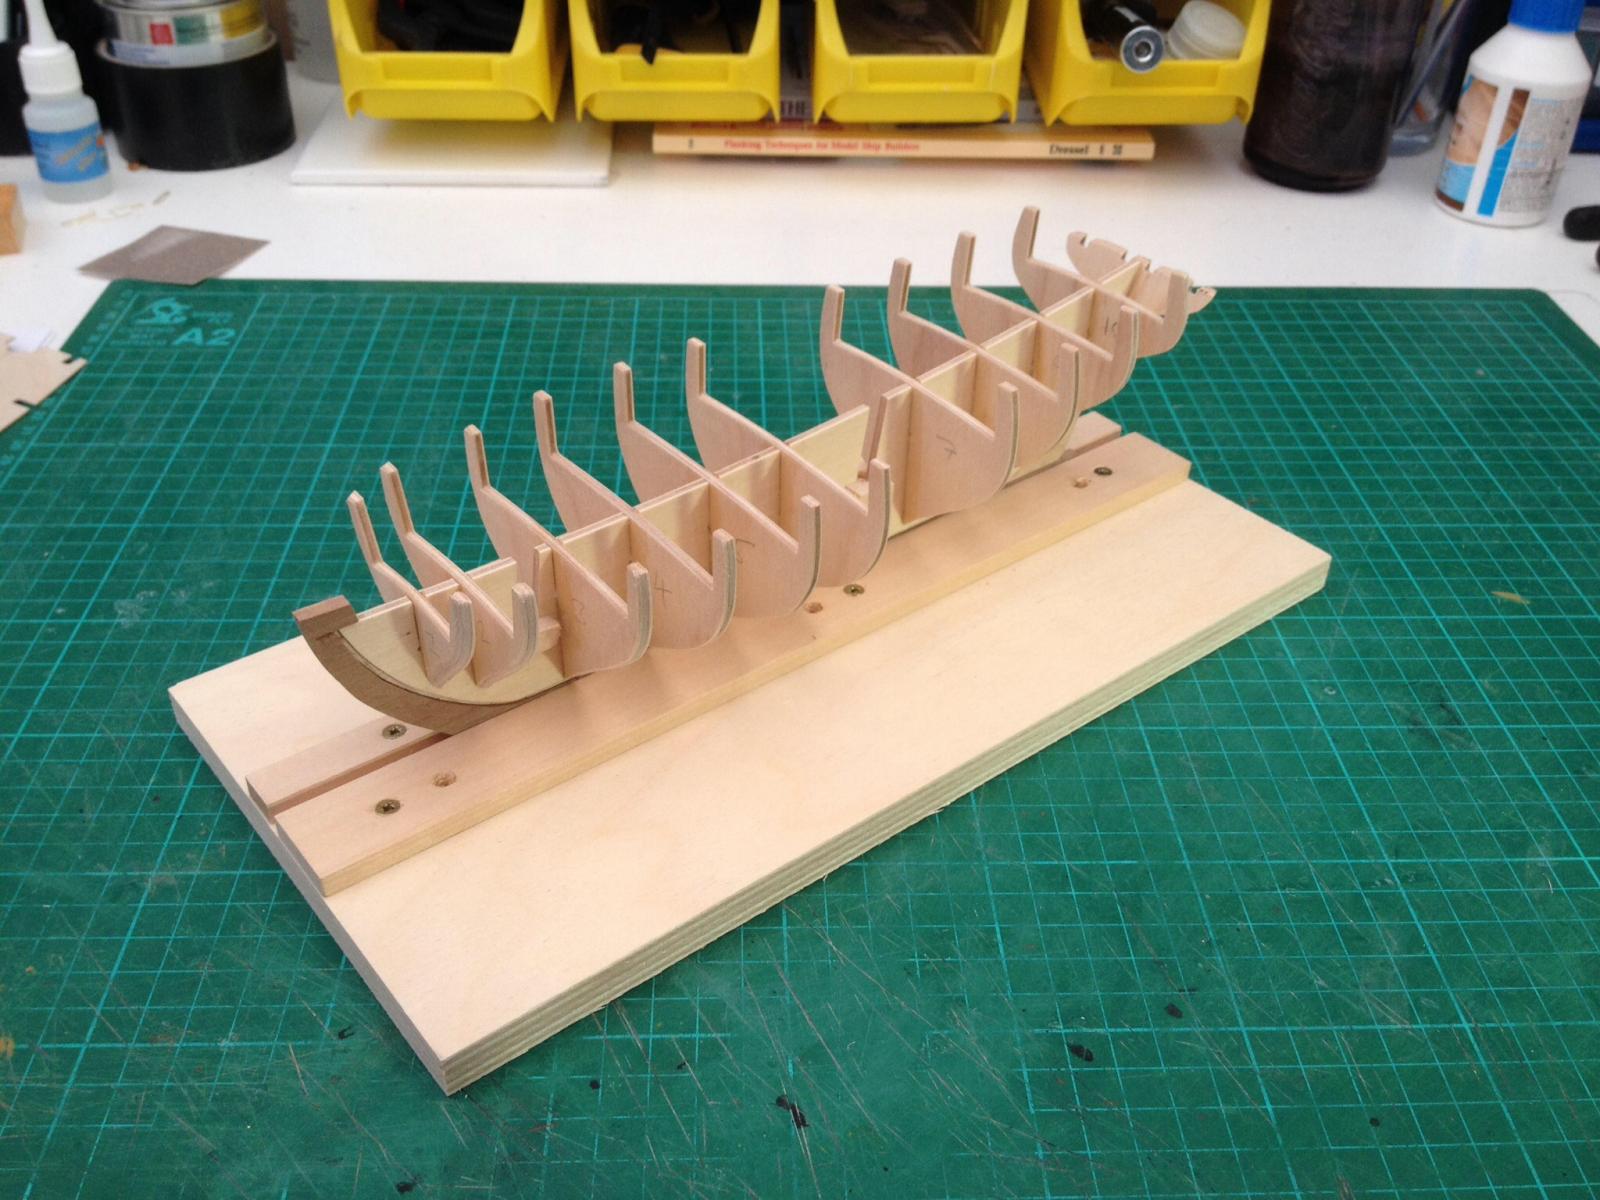
The baseboard is just a piece of thick plyboard with a couple of pieces of wood screwed into it. I sandwiched the keel between the two pieces and then screwed them down.
- 226 replies
-
- 1
-
-
- ballahoo
- caldercraft
- (and 1 more)
-
Jason - The Ballahoo/Haddock build will provide a change to the rigging on the snake and keep me fresh, although once my repairs on the Snake are complete, I will not have too many ratlines to complete. The instructions are around the same level as the Snake instructions although obviously more simplistic due to the nature of the ship being built. Couple of minor improvements; the eyelets on the deck have been specifically labelled as such. They were very simple to overlook on the Snake. Also, the mast plans also show the cleats to be attached. These were only shown on the belaying plan for the Snake. Eamonn - The build area has now been fully 'upgraded', there will be no more feline / heavy object relating incidents....! Patrick / Sam - Good to see you both on board. Hope we can all learn from each other. Today's progress has been to make a build board for the keel. The keel is not warped at all and is one less thing to worry about, Waiting for my Dremel to recharge and will make a start on bevelling bulkheads.

- 226 replies
-
- 4
-
-
- ballahoo
- caldercraft
- (and 1 more)
-
Couple more repairs today. All of the carronades on the port side of the ship needed to be glued back to the deck. Fortunately because the carronades were all rigged in, they were still held pretty much in place, albeit a bit loose. Also, one of the fenders had been knocked of the hull. This was re-pinned and glued back in place. Finally, the main channel isn't badly damaged, so I have replaced the eyelets and sanded the channel down. It now needs painting again and pinning back on the hull.
- 412 replies
-
- 3
-
-
- snake
- caldercraft
- (and 1 more)
-
Your deck looks fantastic Jason. The extra detail of the chimney and on the companionway look great. I like your adjustments to the masts. I went the rather simplistic route of cutting the square sections of the mast from the dowel.
- 800 replies
-
- 1
-
-
- snake
- caldercraft
- (and 1 more)
-
I am hoping to compliment this with Longridge - Anatomy of Nelson's Ships. Between the two I imagine I should be able to cover most aspects and also check differences between trafalgar spec and Portsmouth spec.
-
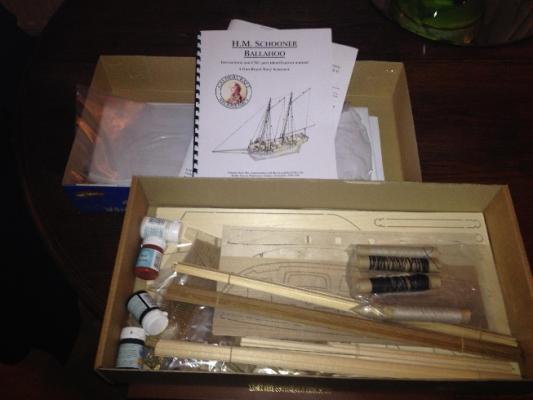
Made it back from my folks today and got to checking through the Ballahoo contents. Unfortunately the 2mm walnut sprue is missing from the box. Tried to call Caldercraft today but haven't got any answer. I will try again on Monday and see if I can get an answer. As for the contents, the quality is reasonable but not amazing, but then the kit is only £60 so I won't complain. Lime first planking and walnut second planking. The contents list shows 0.5mm Lime for the decking but the manual states that it is 0.5mm maple. The two sets of wood look very similar (other than being 0.5mm and 1mm) and I am no expert on differences between Lime and Maple. Are they of similar appearance? First steps so far have been to cut the keel, frames and cradle from the 5mm ply sheet. All pieces have been sanded and a basic check of the fit has been made. Over the weekend I will make a start on bevelling the frames.
- 226 replies
-
- 2
-
-
- ballahoo
- caldercraft
- (and 1 more)
-
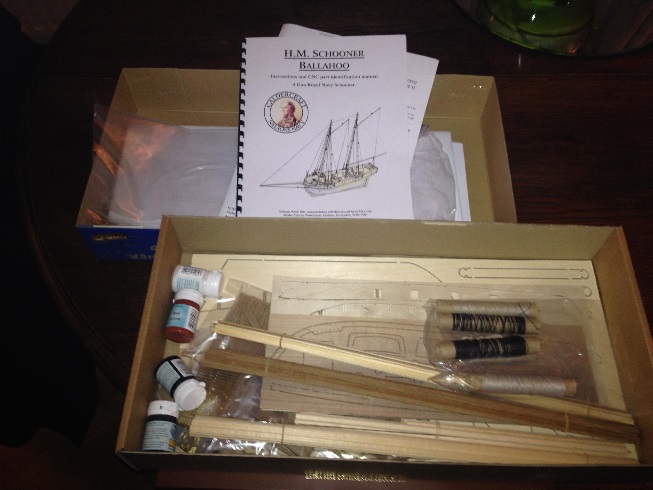
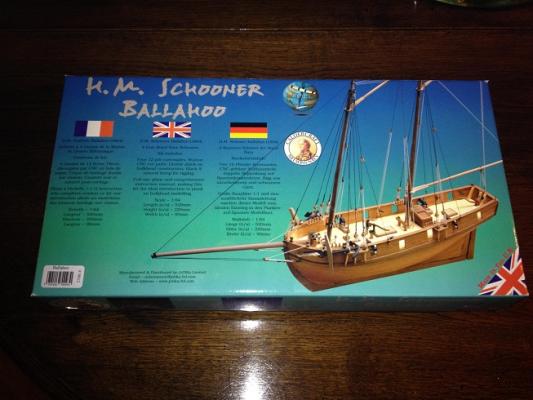
Hi all, Today received my Christmas gift of the HMS Ballahoo kit by Caldercraft. In the Ballahoo class I have only found National Maritime plans for the HMS Haddock, so I will try to base my build around these plans. Still at my folks so will not start the build until tomorrow. In the meantime I will post the kit pictures.
- 226 replies
-
- 3
-
-
- ballahoo
- caldercraft
- (and 1 more)
-
I am very lucky to have received the full two volume copy of this book and plans from my partner AJM77. From what I can see it is an excellent book and set of plans for Victory. Has anyone else got a copy or seen one and what is their opinion? Can't find any review online. Jim
-
Chrimbo present from partner - 'HMS Victory - Building, restoration and repair' by A R Bugler. Looks really helpful for my eventual attempt at Caldercrafts Victory....! Hope you're all having a good one!
- 412 replies
-
- 1
-
-
- snake
- caldercraft
- (and 1 more)
-
A bit of extra info for you Patrick, as I have done a little digging into the Ballahoo. There were several craft that were built as Ballahoo or Fish class. The National Maritime Museum has some information on one of these, the HMS Haddock. I will probably be building my Ballahoo kit as the Haddock. Hope this helps! Jim