HOLIDAY DONATION DRIVE - SUPPORT MSW - DO YOUR PART TO KEEP THIS GREAT FORUM GOING! (78 donations so far out of 49,000 members - C'mon guys!)
×


jim_smits
-
Posts
653 -
Joined
-
Last visited
Content Type
Profiles
Forums
Gallery
Events
Everything posted by jim_smits
-
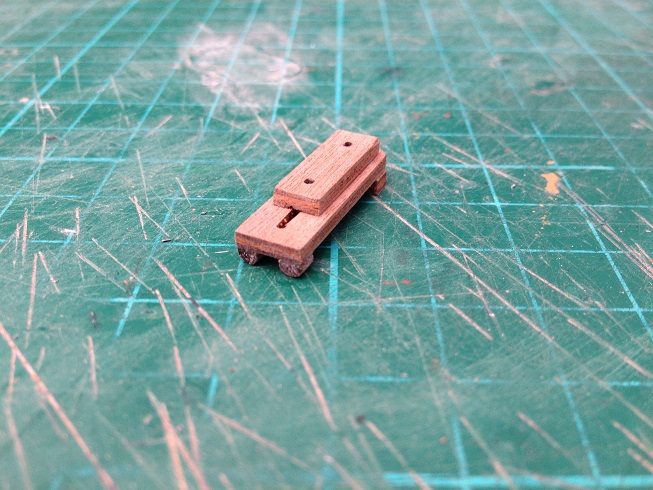
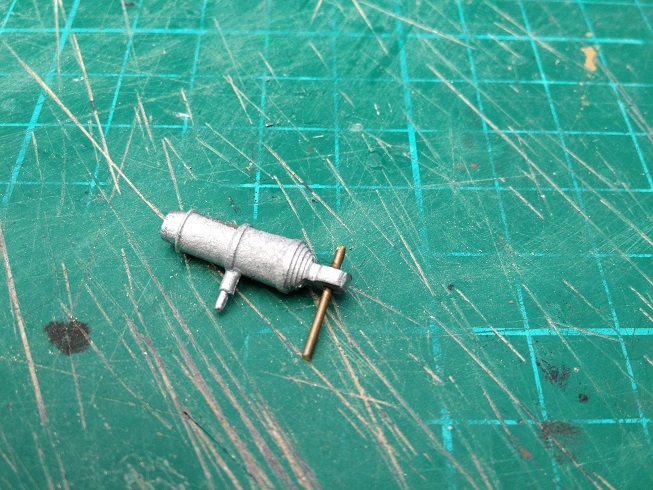
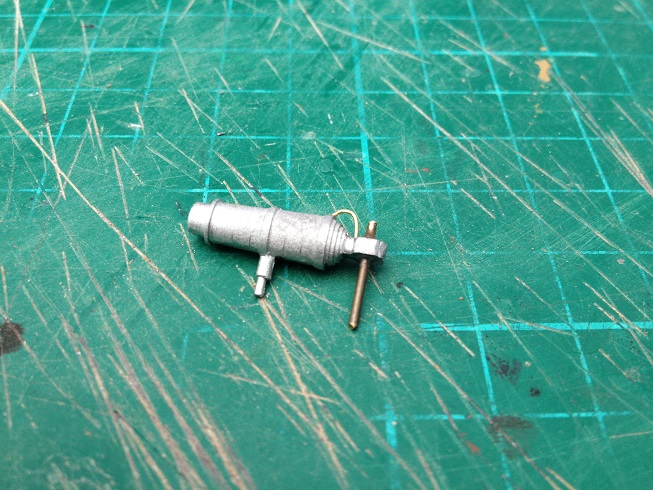
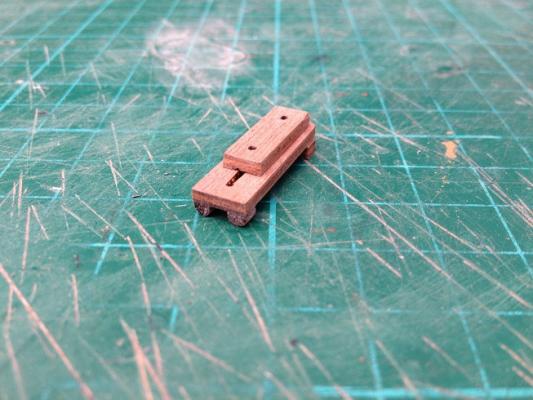
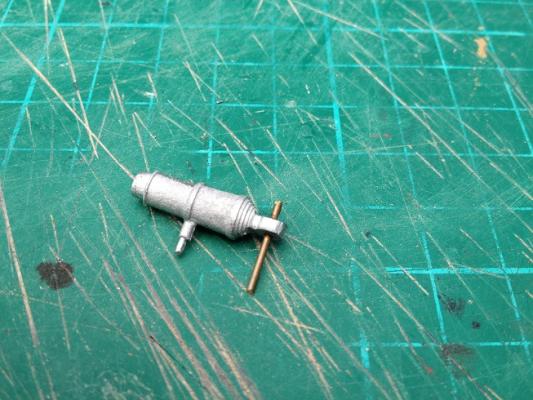
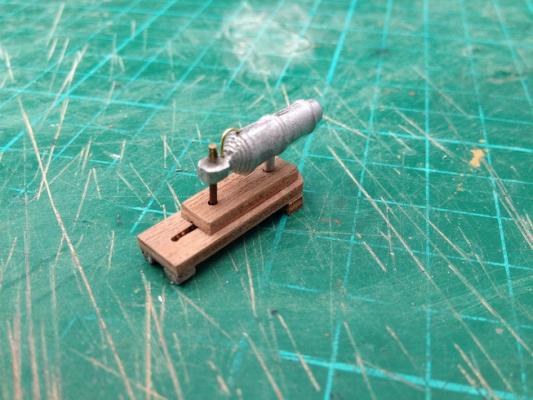
 Cheers as always Eamonn. Made a start on the carronades today. The kit supplied carronades are pretty basic, there are simple blocks for the stand with no rear wheel detail, the elevation screws were very bent and one had snapped, and the carronade itself does not have a ring for the breaching rope. First step - cut off the dodgy screws and replace with some 1mm brass rod. Not perfect but it will do. Second step - cut a notch out of the rear block and sanded the two remaining square to rounded 'wheel' shapes. Third step - drilled a couple of small 0.5mm holes and added small 0.5mm brass wire for the breaching ring. Just need to repeat for all four carronades, drill holes for eyepins and paint.
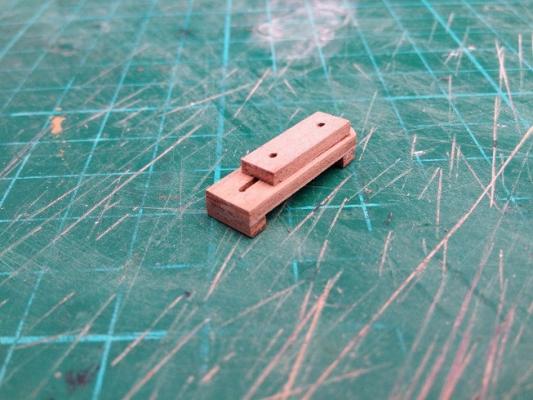

- 226 replies
-
- 5
-

-
- ballahoo
- caldercraft
- (and 1 more)
-
Yes that would be 21...... Ooops!
-
Hi mate, Yes, there are three pairs on the rear platform. On sheet 3, which has the belaying plan, the others are marked: A pair at belaying point 5 towards the middle of the main channel. 5 on the foremast. 5 on the mainmast. 3 on the mizzen mast. This makes 23 which is more than is provided..... I had to order some extra.
-
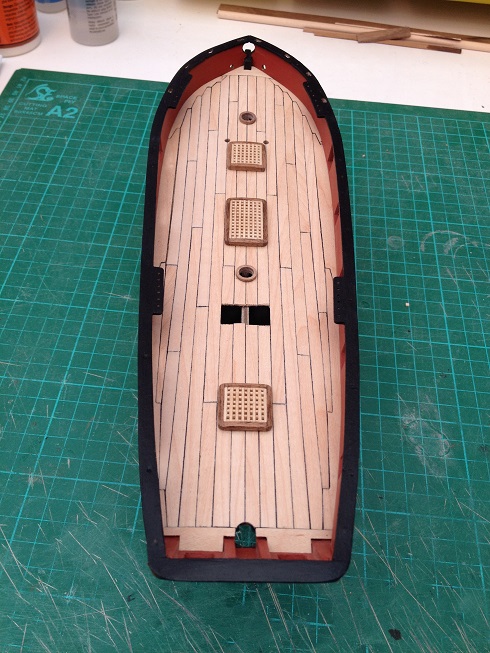
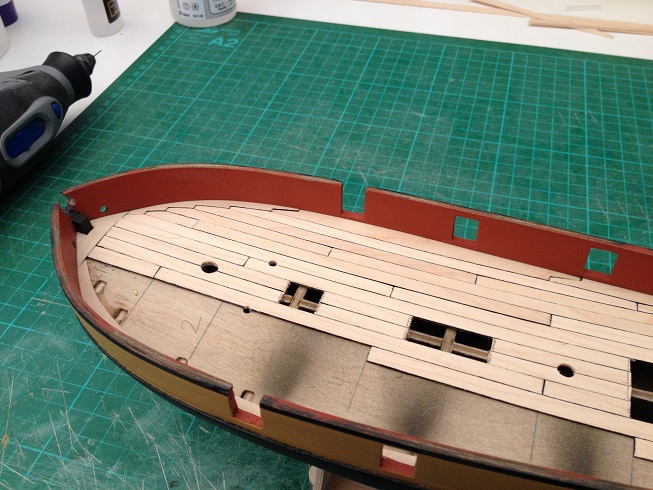
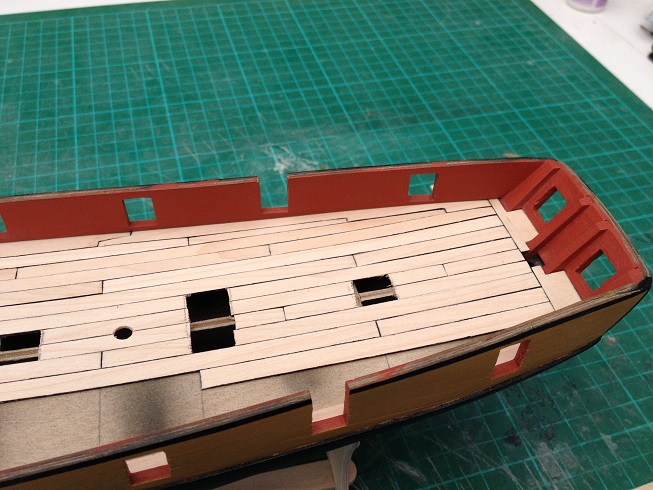
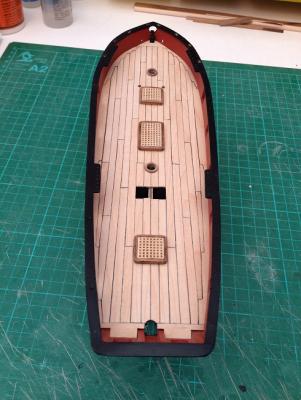
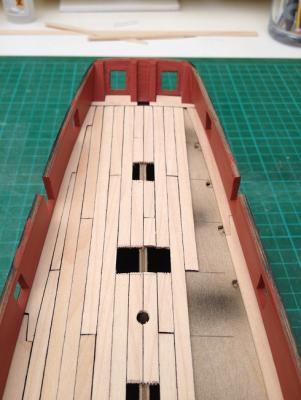
Thanks for all the likes everyone! Bit more progress. Put together the grates and surrounds, sanded the corners round and also a slight curve to the top of the grates. Varnished and glued to the deck in the appropriate position. Also added the mast bases and sanded a circular hole for the rudder. Next steps: Drill holes for all the deck eyelets and carronade rigging points. Put together the carronades and rig up.
- 226 replies
-
- 2
-
-
- ballahoo
- caldercraft
- (and 1 more)
-
Just got back from the southwest model and hobby show. Had a fun day at Royal Bath & West show ground and there were several ship clubs in presence but I was greatly surprised at the lack of tall ships on display. Just a single Victory model and that was it. Rest were modern warships, fishing boats and yachts.
- 226 replies
-
- 1
-
-
- ballahoo
- caldercraft
- (and 1 more)
-
Problems?
-
It is important to get a good fit. It is a balancing act however, between drilling a small enough hole to get a tight fit for the eyelets and making the hole too small and not being able to actually fit the eyelets. They have a tendency to bend under the slightest pressure, so very careful use of fine nosed pliers to push the eyelets in would be advised. I think I use a 0.5mm drill bit for the holes and then some thick cyano applied to the eyelet when fixing in place.
- 1,144 replies
-
- 1
-
-
- snake
- caldercraft
- (and 1 more)
-
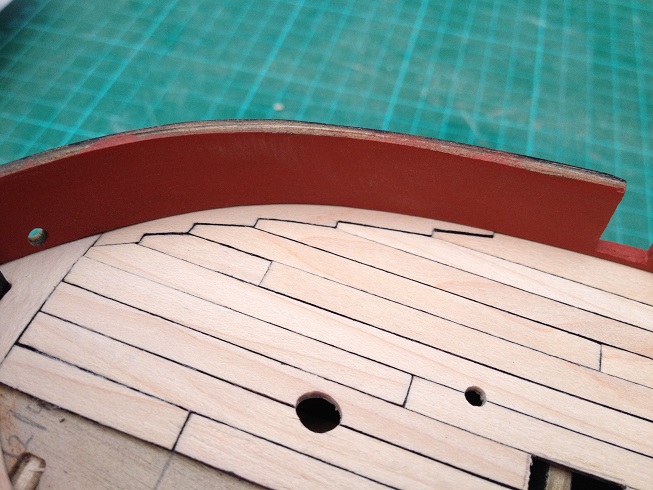
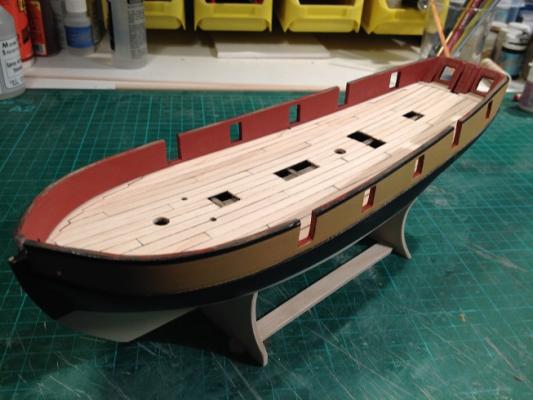
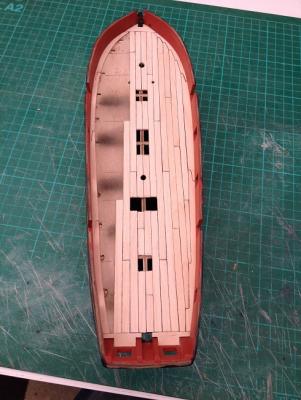
Quick update. Varnished the deck twice and now have a lovely hue to the maple decking. Also added the bulwark rails. The rear piece wouldn't fit properly, so I cut a new piece from the sprue that was slightly wider and gave a better fit. Finished off the rails with black paint. The rails give a great final look to the hull now. Now onto adding fixtures and fittings.....

- 226 replies
-
- 6
-
-
- ballahoo
- caldercraft
- (and 1 more)
-
Seeing as I did my Snake the other way round, you could progress onto the deck furniture? My gratings and the hatches were in place before I did the carronades and I would definately do it the other way round next time...! Also, try and map out where the deck eyelets need to be placed, they are shown on the belaying plan. There are far easier to install now rather than when the deck is full.
-
Looking fantastic as ever Jason, setting the standard. I shall obviously have to start getting back to my snake build...
-
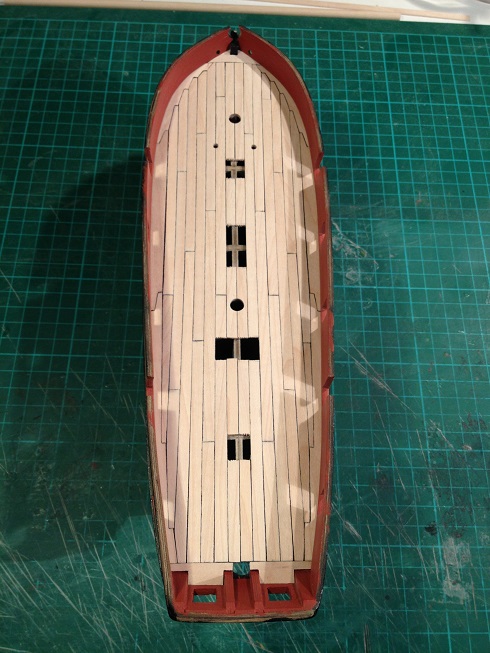
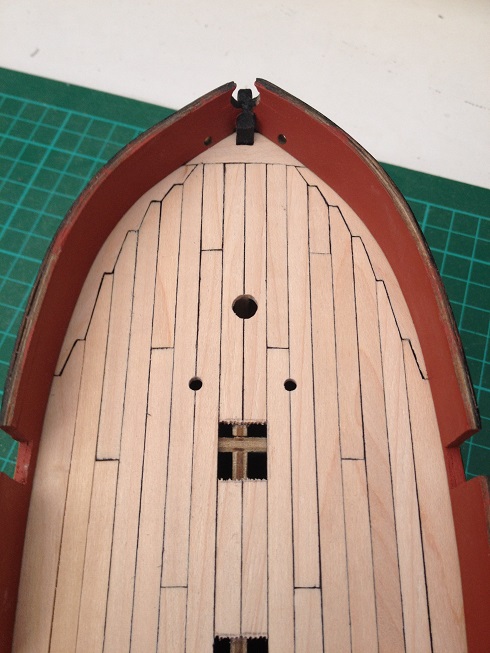
Decking is now complete! Had a minor issue on the port side. After dry fitting multiple times and being happy with all the plank shaping, I proceeded to glue all the pieces in place. Got to the final plank that was to fit against the amidships margin plank and suddenly there is a gap....! Only about 0.5mm but seemed to appear from nowhere after all the dry fitting had been very snug. It's not very noticeable so I have gone with it and fitted the plank so that the gap is on either side and so makes it less noticeable. Filed the gaps for the anchor rope and the masts and given a coat of satin varnish. Will give it another couple of coats tonight and then move onto the bulwark capping rails.
- 226 replies
-
- 2
-
-
- ballahoo
- caldercraft
- (and 1 more)
-
Looks like a great show. Going to a model fair of sorts here in SW UK this weekend. Interesting to see if there are any kits on display. Just received some blocks and line from chuck to use on my Ballahoo kit and they look top notch!
- 800 replies
-
- 1
-
-
- snake
- caldercraft
- (and 1 more)
-
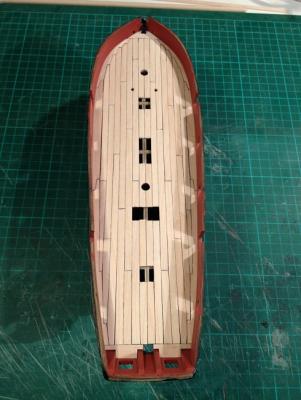
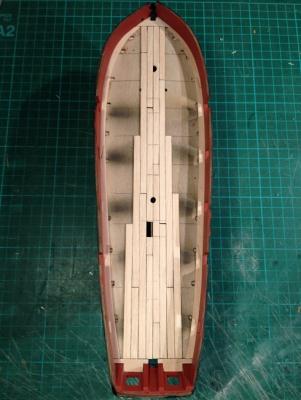
Planks between the deck fittings have been replaced as per advice - thanks Jason. Also, added the nibbling and planking at the port bow section. as before replaced the margin plank amidships. Still need to finish the stern section and then sand down the deck for a fully smooth finish.

- 226 replies
-
- 4
-
-
- ballahoo
- caldercraft
- (and 1 more)
-
Cheers for the suggestion Jason. I thought about that after I had fixed the planks in place. However there are only a couple that would need sorting and I may be able to use a chisel to remove the pieces and replace. I'll check tomorrow.
-
Crazy decking fun today! Completed the starboard side of the deck. Nibbing and joggling initially went well and got the first few sets of planks fitted properly. However ran into a potential problem with the planks amidships, with the last plank laid leaving a gap of only 2mm. Gave it some thought, and decided to redo the margin planks from amidships back to the stern. Used a wider plank, shaped to fit the bulwark but left the other side flat to fit against the existing planking. This gave a good result but took a while to redo. Dry fitted all the pieces and ensured everything was correct, and then removed them all, varnished the edges and coloured with a sharpie. Then glued all the pieces back into place starting with the margins. Just need to repeat with the port side of the decking.


- 226 replies
-
- 5
-
-
- ballahoo
- caldercraft
- (and 1 more)
-
It's interesting the journey that I have made since starting the Snake build in Dec 2012. I've gone from very much being a 'follow the instructions' type of builder, where I wouldn't question the manual and plans as I assumed they would be correct to being more confident and experienced. I now have no qualms of venturing away from the plans if it seems like they could be improved upon are are indeed just plain wrong. The 'cat and heavy object' incident gave me a reason to start scratch building parts, as a requirement to replace damage, and this has helped me no end. And finally, simply reading builds like yours, BeefWellingtons and Gil Middletons are just inspiring.
- 269 replies
-
- 5
-
-
- Caldercraft
- First build
- (and 3 more)
-
The main deck planks are glued but as per image above the three short planks that fit to the margins are loose as they will be replaced with correct lengths to fit the shift pattern.
-
Thats some fantastic work you are putting in Tony. This is what inspires people to go beyond the standard kit and try new things. Keep it up!
-
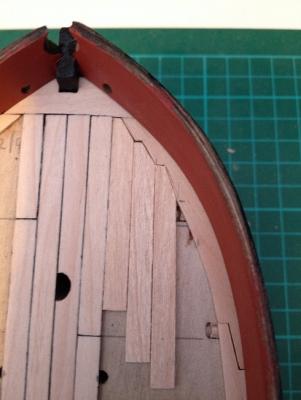
Some good progress on deck planking last night. I'm using 120mm deck planks, sanded to size and to give a smooth finish, then a coat of satin varnish is applied to the edges and allowed to dry before using a sharpie to colour the edges black to simulate caulking. I've started with the centre line of the deck and gradually working my way out towards the margin planks. The margins are not yet glued in place as I want to be able to cut the nibbles and 'caulk' the margins outside of the ship before fixing in place. Made a start on nibbling the foremost margin plank on the starboard side. Using test deck planks for the moment, but got the first three nibbles cut in place. Used a heavy duty x-acto blade and VERY carefully cut the nibble. I used the test planks to mark the two points at which the deck plank 'intercepts' the margin to mark out the size of cuts to make. The test planks were then shaped to fit for a final check on the shape. Minor adjustments made using a needle file. Happy so far with the process but it is quite stressful the more nibbles are cut as there is more work to lose if an error is made. If in doubt, cut less and then file to shape.....! Once all the nibbles are finalised for each margin plank, it will be varnished, 'caulked' and glued in place. The proper deck pieces can then be cut to fit and glued in.
- 226 replies
-
- 7
-
-
- ballahoo
- caldercraft
- (and 1 more)
-
If you thought that was scary you've still got nibbling to go yet......
- 1,039 replies
-
- 1
-
-
- ballahoo
- caldercraft
- (and 2 more)
-
Minor update. I've now marked in the butt shift pattern on the deck. As a result of this I also remade the margin planks at the stern posts to make it a little wider. This now gives an exact fit from the bow piece to the stern of 11 'shifts'. This should make life a little easier. I've gone with a deck plank length of 120mm, so a shift of 24mm in each case. Tonight I will fix the bow and stern pieces in place and start the centre line planks and work outwards.
- 226 replies
-
- 1
-
-
- ballahoo
- caldercraft
- (and 1 more)
-
Anyway...... back to business. Should hopefully be starting on the deck this evening. Need to mark out the shift pattern and decide on my plan for the masts and deck furnishing holes....
- 1,039 replies
-
- 1
-
-
- ballahoo
- caldercraft
- (and 2 more)
-
Muah ha ha ha! I arranged for all those visitors to spend time with you so I could catch you up..... and now you've seen through my plan.....
- 1,039 replies
-
- 2
-
-
- ballahoo
- caldercraft
- (and 2 more)