HOLIDAY DONATION DRIVE - SUPPORT MSW - DO YOUR PART TO KEEP THIS GREAT FORUM GOING! (Only 13 donations so far - C'mon guys!)
×


jim_smits
-
Posts
653 -
Joined
-
Last visited
Content Type
Profiles
Forums
Gallery
Events
Everything posted by jim_smits
-
 Slight upgrade to the plank bending and shaping equipment. Went to B&Q and purchased a 2 metre length of 32mm diameter platic waste pipe and a removable end cap. Chopped part of this off to the length of the strips supplied in the Ballahoo kit and I now have my very own hot bath for soaking several planks at a time. I still have plenty of spare pipe length to fashion for future builds. Should accelerate second planking....
- 226 replies
-
- 1
-

-
- ballahoo
- caldercraft
- (and 1 more)
-
Hi Paul, First off, fantastic build and looking forward to more updates now that you're going again. As for the 'Add to post' problem, I had the same issue and it is caused by the latest version of Explorer. If you can downgrade one version it will allow you use the 'Add to post' functionality.
-
Jason - we're both on the same wavelength. Thinking of replacing the thread and blocks for my Ballahoo with Chucks lovely products.
- 800 replies
-
- 1
-
-
- snake
- caldercraft
- (and 1 more)
-
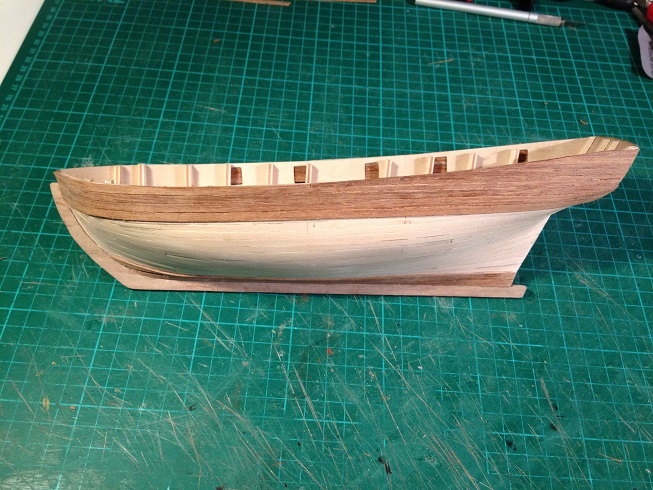
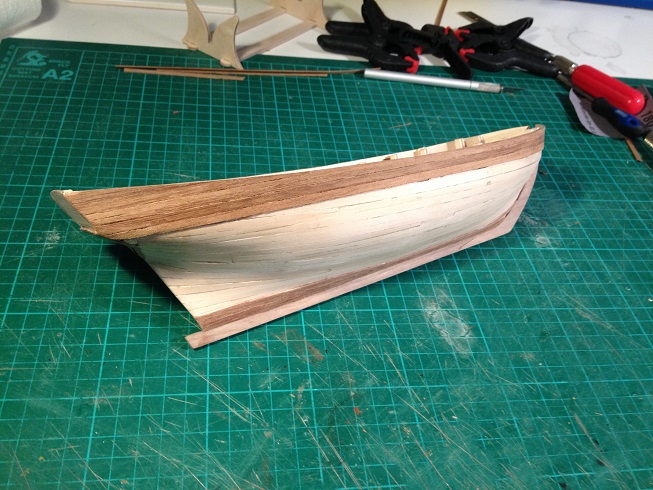
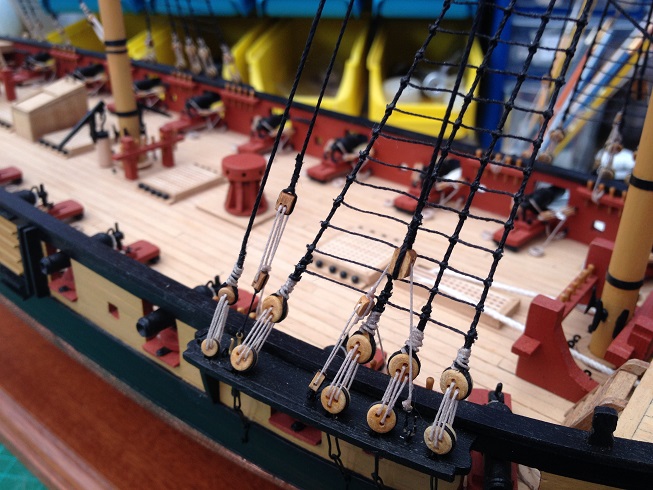
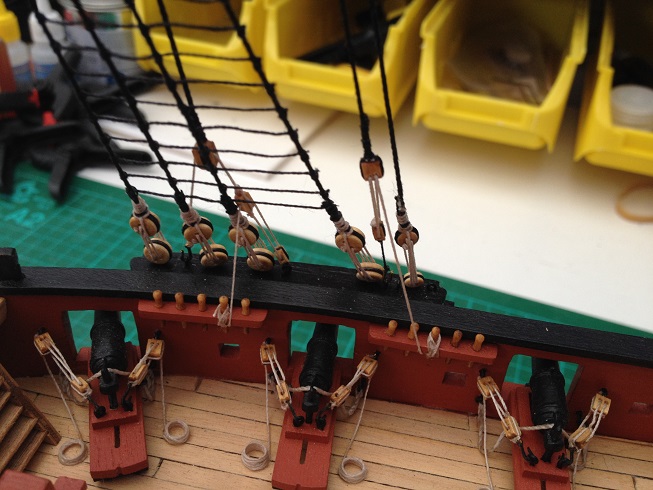
As promised earlier, here are the latest images. Second planking underway, with most of the bulwarks covered and two planks down by the keel. Lots more to go though....!

- 226 replies
-
- 3
-
-
- ballahoo
- caldercraft
- (and 1 more)
-
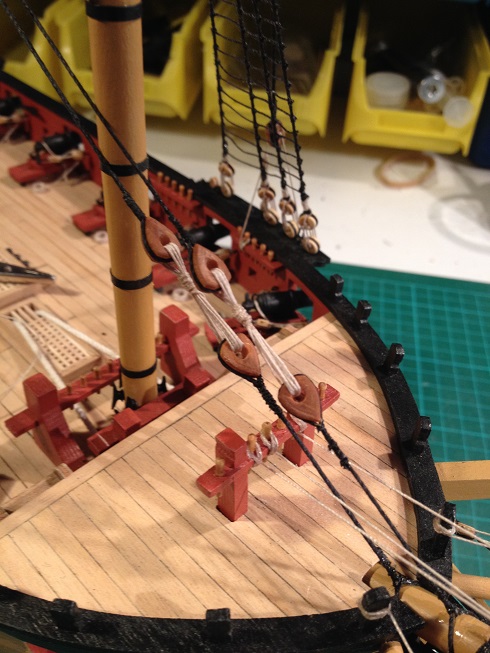
Was thinking of placing a 'King' plank down the centre to align everything else from.
- 1,039 replies
-
- 1
-
-
- ballahoo
- caldercraft
- (and 2 more)
-
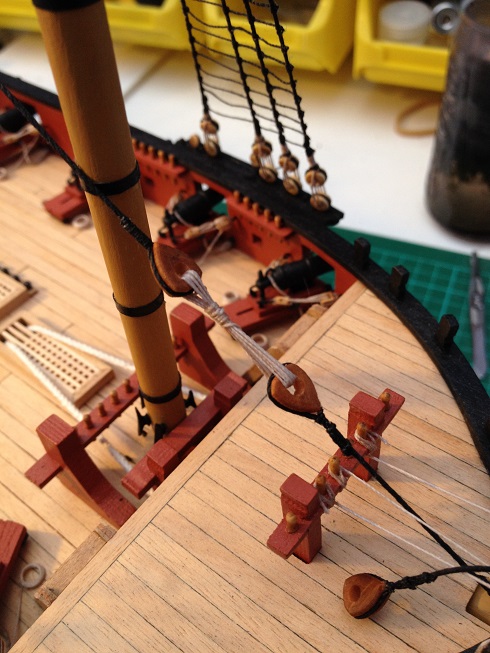
Back to work on the Ballahoo after my rigging session on the Snake. Second planking is well underway. I took the decision the set the top plank, at the bulwarks, to the top of the stern and follow round to amidships along the top of the template. After this the natural shape of the hull pulls the plank down towards the bottom of the transom. I couldn't follow the top of the bulwark all the way without laterally bending the plank (big no no!). To fill in the empty section at the stern, I essentially cut a stealer notch out of the first plank and butted a second plank up against it. I repeated this all the way to the top and stern of the ship. The main reasoning was that I didnt want any 'sharp points' at the end of any planks where the contours of the bulwark passed each row. Once complete, I could then shave the excess wood back down to the bulwark templates. Hopefully this all makes sense. I will hopefully follow up with images tonight when I get back home.
- 226 replies
-
- 1
-
-
- ballahoo
- caldercraft
- (and 1 more)
-
Hi Mate, Not sure if the template is off on mine but I drew a pencil line down the centre of the template and aligned this with the false keel to ensure that the mast holes etc were dead centre and also to aid decking. Hope yours doesn't cause too much bother. Jim
- 1,039 replies
-
- 1
-
-
- ballahoo
- caldercraft
- (and 2 more)
-
Looks really good Eamonn! Time for me to put the Snake away and catch you up a bit!
-
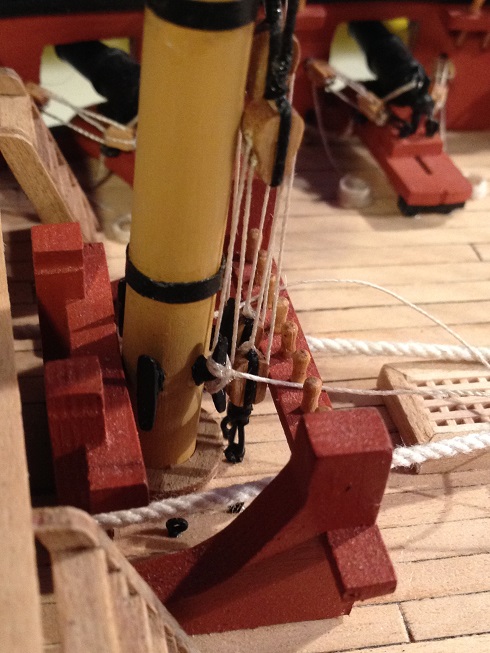
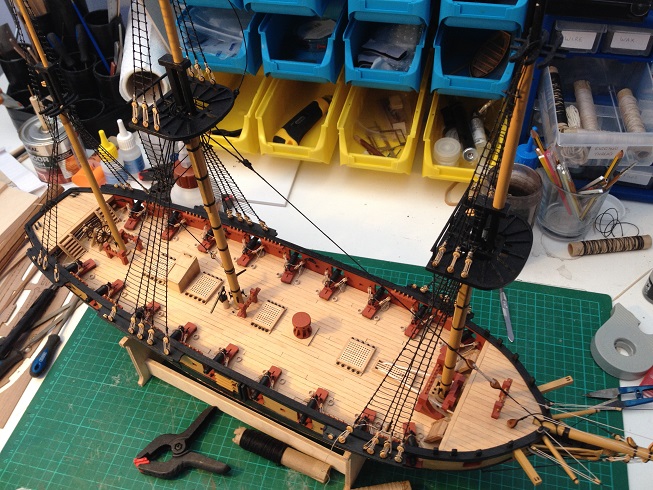
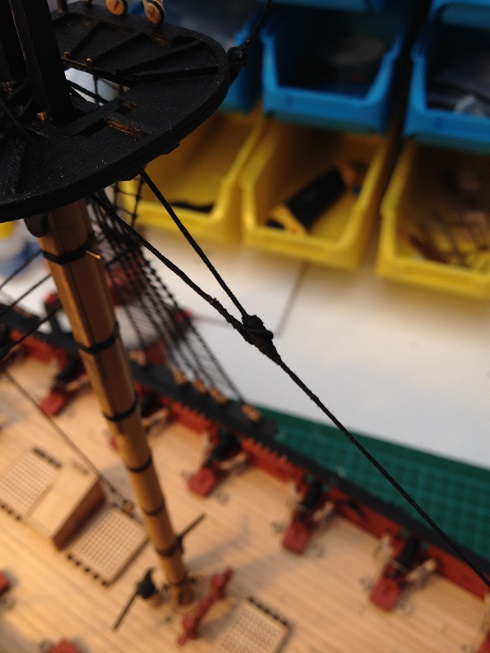
Good building session today and over the last week; I have now completed all of the standing rigging as per the plans and this feels like another big step towards completion. Completed the Main Topstay and preventer stay after deciding to belay to two of the spare mast cleats. It was a touch tricky to complete the rigging of the sister block and single block, as I needed to hook the single blocks to the deck eyelets that were between the foremast and pinrail. Also completed the top gallant fore stay, and thanks to Jason, by use of a pair of thimbles to rig the end to one of the forestay heart blocks. The ship really does start to come alive with all of the extra rigging in place. Need to check all of the running rigging plans and add any remaining blocks required to the masts. Next main steps will be to put together all of the spars. Change of pace first perhaps, and to complete the second planking of the Ballahoo kit.


- 412 replies
-
- 7
-
-
- snake
- caldercraft
- (and 1 more)
-
Cheers Jason Yes I have got Petersson, so I'll have another look at that tonight....!
-
I've had a stab at it and got the first of the two stays rigged in place. I have gone with the option of belaying the line to one of the spare mast cleats for the time being. As far as I can see the plans show ( and I have constructed) a mast with five cleats in place, with only two of these indicated as required by the rigging plans. I'll get the other stay completed tonight or tomorrow and follow up with some images. Also completed the fore mast top gallant, so will fix this and the main mast top gallant in place and rig the back stays. Another query is thrown up here and that is the fore mast top gallant stay which is shown to be tied to the top gallant and then passes through a block at the end of the jiboom. However, the plans are about as clear as a pile of mud when it come to the end of this line. It sort of appears to show a mouse (and therefore loop) around the fore mast stay heart block on the bowsprit. Doesnt really make sense to me. Any ideas? Other methods for rigging the fore top gallant stay show the line attached to the jibbom and passing through the top gallant and then belayed via a set of blocks to one of the fore mast channels. This seems at odds with Snake plans as there would aleady be a pair of back stays rigged in place.
-
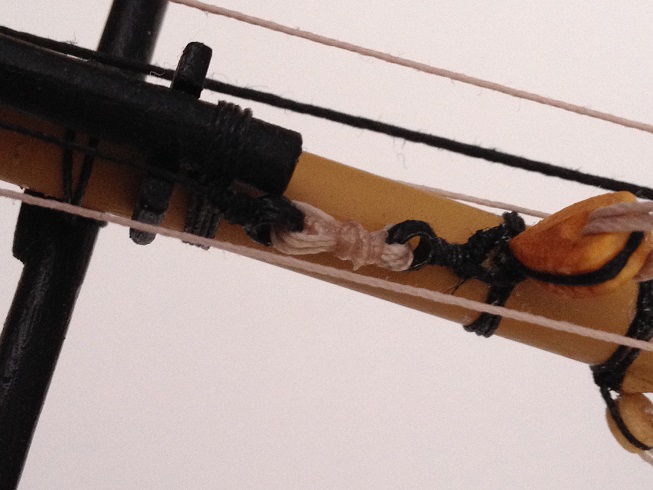
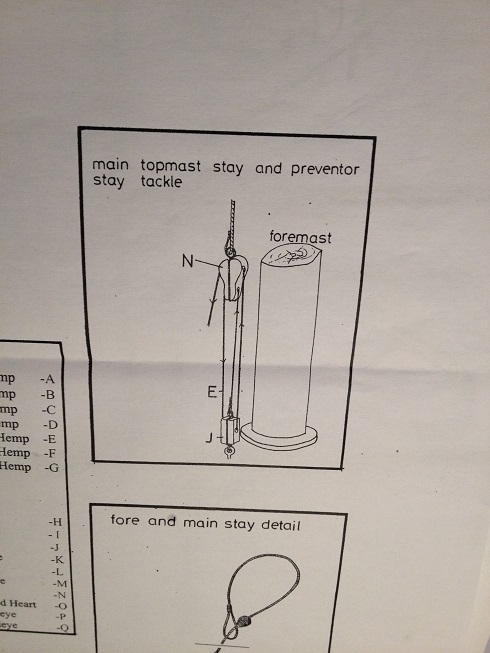
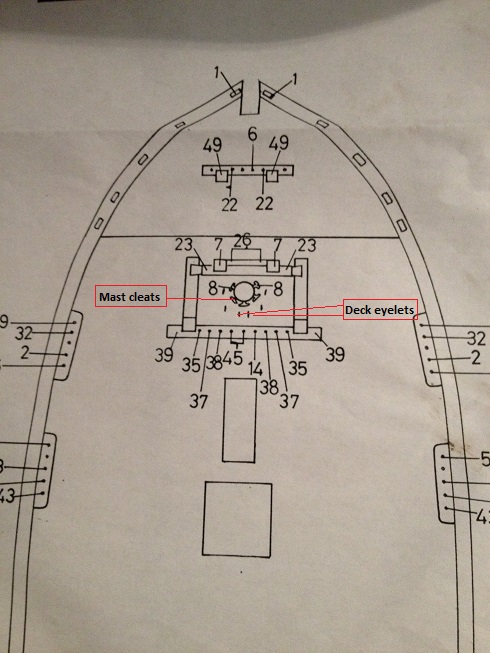
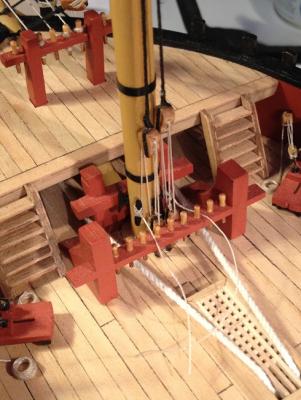
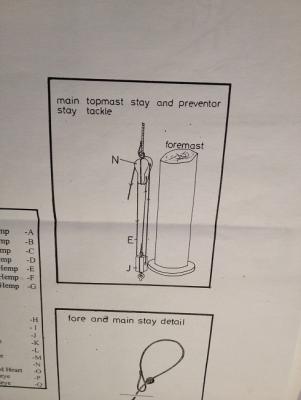
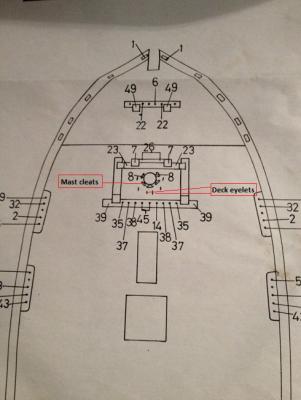
I'm looking at installing the main topmast stay and preventer stay. I am however stumped by the plans lack of detail in regards to the belaying point for the tackle. The tackle pictured is attached to the stay at the sister block (N), and to the deck at block (J) using one of the deck eyelets. The missing detail is where the line that is passed through the tackle is belayed to. The belaying plan as below shows what is belayed to where. By process of elimination, non of the numbered pins or points are matched to the stays. Would the line be belayed to the mast cleats pictured on the plan? Or somewhere else?
-
Definitely wish I hadn't added the jibboom and the rigging on the bowsprit..... Got over excited and went for it. Whilst I haven't broken anything it has got in the way a touch....
-
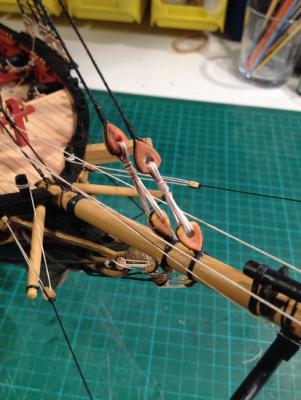
Looking really good Jason. I like the strops you've produced, together with the hooks for the futtock shrouds. Did you consider silver soldering the strops and then clamping around the deadeyes? This is an area I have been tinkering with for use in future builds, and gives a really strong result. It will be interesting comparing builds as you are going with the approach of completing the lower masts first and then adding spars, whereas I am braving the full mast assembly before adding the spars. Hopefully, I wont bludgeon the masts apart with my big ham fists.....
-
Work is continuing at a good pace on the back and mainstays and I think I have the end of the standing rigging in sight! Just a couple more backstays for the top masts to complete and then I need to fit the two top gallant masts. I already have the main top gallant prepared, I will just need to repeat for the fore top gallant. After that, add in a pair of backstays for each and the main stay. I'll update with photos once complete. Hopefully with a bit of hard work, this will be done by the weekend. Then it's onto the crazy fun of working out all of the running rigging diagrams..........
- 412 replies
-
- 1
-
-
- snake
- caldercraft
- (and 1 more)
-
Hi Jason, The lines are belayed at least twice round the pin and then fixed with some GS-Hypo, no other knots required. Once you've belayed twice the line should lock itself in with just some slack at the loose end. I normally weight down with a croc clip whilst i glue.
-
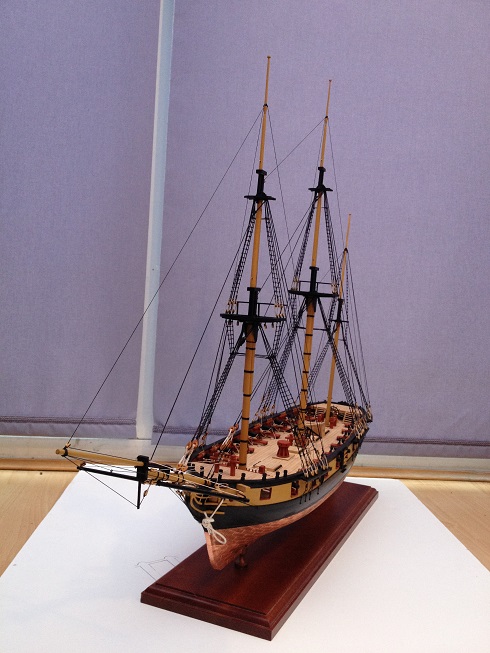
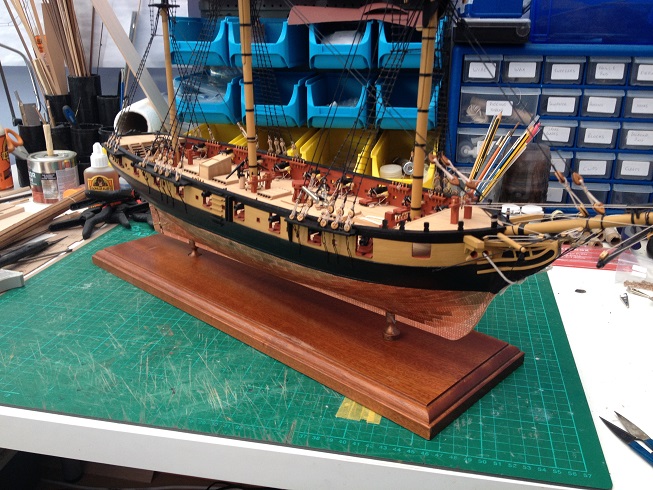
I am now finally back ahead of where I was before the great disaster of 2013....! Spent a while last night drilling out the centre of my mounting pedestals and corresponding holes in my mounting board. Two guide holes through the keel of the ship, and a couple of long screws were fed through the bottom of the base, up through the pillars and into the keel of the ship. It is all nice and solidly mounted. Progress made on backstays for the fore top mast. There are three on each side, each of which is slightly different. Finished the three on starboard side. Just need to finish one final backstay on the port and then it is on to the main mast. Outboard view of the backstays showing the three different types. Inboard view showing the belaying of two of the backstays. Eventually, I will add coils to each of the belaying points to finish.


- 412 replies
-
- 8
-
-
- snake
- caldercraft
- (and 1 more)
-
I'm officially awarding myself 'Muppet of the Week'.....! Busy adding backstays to the fore top mast. Had gone through the process of seizing a loop around the mast, and spent a while tying a series of half hitches to perform the seizing. Just need to trim off the short length of thread forming the back stay to leave the seizing and the main length of stay. However, like a halfwit I proceeded to snip the wrong thread and chopped of the long length of the actual back stay itself. DOH! Cue muttering and slightly blue self depreciation. Whilst I only lost 10 minutes of actual work, it was the sheer basic stupidity of the error that stood out.....
- 412 replies
-
- 1
-
-
- snake
- caldercraft
- (and 1 more)
-
Hi, The fore and main mast stays have now been fully refitted and lanyards added and frapped. Glad I made the decision to go back and redo all of these. The tension in the stays is far better and the frapped lanyards look much nicer than my original attempt. Now working on the backstays for the foremast.....

- 412 replies
-
- 6
-
-
- snake
- caldercraft
- (and 1 more)
-
Hi Stergios, I've just used some matt varnish for the ladders. Thinking about touching up the visible layers of the ply with some walnut coloured paint. A lot of the other deck fittings were painted red ochre.
- 1,144 replies
-
- 1
-
-
- snake
- caldercraft
- (and 1 more)
-
Also feeling slightly smug as I've just picked up a 1st edition copy of James Lees - Masting and Rigging English Ships of War for £8.50 from eBay.
- 412 replies
-
- 3
-
-
- snake
- caldercraft
- (and 1 more)
-
Been a little while since the last update. Busy with all sorts (including Ballahoo!) but I have my partner moving in currently so the house is a huge state of flux at the moment. Finally got round to removing the main and fore stays for refitting. Used the serving machine in anger for the first time, and after a little playing around got the technique sorted in my head. Made an estimate of 15cm of line to be served to give the loop around the mast, the mouse and a little further down the stay. Made the mouse in the end by simply serving back and forth over a 1cm length of line favouring one end to give the correct shape. A couple of dabs of GS Hypo to secure and sorted. Added the heart blocks to end of the stay, and many thanks to Gil Middletons build, with a false splice. The technique takes a little while but gives a really good tidy result. Almost want to redo all my shrouds, almost.....! Added the lanyards between the two heart blocks and frapped. This looks far better than my old lanyards. Only three more to go.... The last photo shows the improved splice for the upper heart block and the old method for the lower. Should have replaced the lower before frapping but I think I can replace in situ.


- 412 replies
-
- 6
-
-
- snake
- caldercraft
- (and 1 more)
-
Looking really good Jason! You are catching me up at a rapid rate of knots. Quick question about your serving. Are you having to pre-measure the length that must be served before proceeding with the serving itself? For instance for the catharpins, pre-measured at, say, 3cm to be served between the eye splices with an additional 1cm for both of the eyes themselves. Just started re-doing my main stays and fore stays, and I have guestimated the length to serve to cover the eye-splice down to just past the mouse. Do you use anything more scientific than this? In addition to guides from Lever etc.
-
That answers a question I was going to ask, which was how you managed to fit a single plank along the top edge of the bulwark. The answer being it is many lengths of plank instead. The reason I ask is that one of the rules of planking that I have seen is that planks should never be bent laterally, and that is what would be required. I think the angle I will attempt is to fit my second planking from the bow, parallel with the keel, and then add 'stealers' to plank upto the top of the bulwark at the stern.
- 1,039 replies
-
- 1
-
-
- ballahoo
- caldercraft
- (and 2 more)
-
Are there other sites like Cornwall model ships out there
jim_smits replied to kpnuts's topic in Wood ship model kits
Westbourne were very poor when I attempted to make an order around a year ago. Difficult to get hold of and eventually I cancelled my order and got a full refund, two months after I originally ordered. Subsequently went to Cornwall Model Boats and got the order through the post next day.......