


Patrick Haw
-
Posts
416 -
Joined
-
Last visited
Content Type
Profiles
Forums
Gallery
Events
Posts posted by Patrick Haw
-
-
Hi Lawrence,
Thank for your kind words. I've been using Weldwood contact cement I bought at Lowes here in the US. It's worked very well. I put a coat down on the hull area I'm getting ready to copper and then put a generous amount on each copper plate so it gives me time to maneuver the plate into position. They haven't all been perfect, so you have to be willing to rip off sections of copper and re-do them. I just ordered an additional 500 copper plates from Cornwall Model Boats to cover the wastage. Wear a respirator or else the fumes will make you loopy!
Love your progress on your build. Keep it up!
Patrick
-
Looking really good sjors. The deck furniture and the guns are really bringing her to life. It's about 94 F here and very very humid, but 78 F in my garage/workshop. Two words: air conditioning!
Patrick
-
Kevin, David, Grant, Sjors, and Derek,
Thank you so much for your kind words, but seriously if it wasn't for people like you who've "been there, done that" and posted your trials, tirbulations and successes in your logs I'd probably still be sitting here with a bag of copper plates thinking to myself that coppering this behemoth is not possible. You don't know how many times I've dashed to the computer thinking "Hmmm, I think Shipyard Sid had something posted about this", or "Kevin ran into this problem and had a good solution" and voila, one of you had already solved my current problem for me. That's what I love about MSW.
Cheers,
Patrick
-
The Coppering Diaries (cont.)
Well I'm 10 days into coppering, working most days 3-4 hours on the ship, with a couple of days off, and I've finished the upper coppering band on the port side. Boy, those tiny little triangles when you get up to the waterline at bow and stern drive you crazy! All in all I'm pretty happy with the result so far for a first time coppering experience. Have to thank folks like Kevin, Derek S, and a bunch of others whose logs I went to school on to figure out how to copper...and especially Shipyard Sid for his encouragement and sets of photographs of his coppering. I figure I'm about 2/3 done on one side, so it'll be the end of August by the time I'm finished with the copper.
Patrick


-
Fantastic work Kevin! I just went back a few pages and looked at the shots taken outdoors...wonderful. Yours is on of the builds I've been using as a guide for my coppering and I'm happy to say that, so far, my coppering looks a lot like yours. If I can keep going as half as well as you have done, I'll be in good shape!
Patrick
-
Hi Ross,
Generally all barrels for water, beer, food, etc., would be stored in the hold and brought up and opened as needed. Barrels for gunpowder would of course be stored in the magazine(s) and spirits in the spirit room. Barrels on deck would be a) and encumberance to working the ship;
 very dangerous if they broke loose and rolled around the deck; c) exposed to sea water and changes in temperature, accelerating spoilage. As druxey mentioned, probably the only barrel(s) normally on deck would be small water butts.
Patrick
-
Hi Rob,
Just catching up on your build. So sorry about the flooding you went through, but glad things are returning to relative normalcy. You and I are going through the joys of coppering together right now...I've been at it for a week. Will it ever end? Stay patient and keep plodding away, you're doing a great job.
Patrick
-
The first picture is definitely the windlass, the second could just be a scupper.
Patrick
-
Jerry,
Great work! It all seems to get a little tedious at times doesn't it? (I'm in the midst of coppering!), but the end results are worth it. Keep up the great work!
BTW, the third pic above above looks like a classic circular firing squad!
Patrick
-
David,
Thanks again for your coppering comments on my log and for the coppering pics and your encouragement.
Patrick
-
Thanks David. And thanks for the message with your coppering pics...huge help!
Patrick
-
The Coppering Diaries (cont)
I'm 6 days and about 16-18 hours of actual work time on the coppering. As I mentioned previously, I got a little too enthusiatic with pushing the rows of copper closest to the waterline too far forward so had to remove between 30-40 plates and then keep coppering up from toe gore line toward bow and stern.
I have never coppered a model before and was a bit intimidated, but here are some observations on coppering so far:
1. It's not as hard as you think it's going to be! I went down 15 rows from the waterline at about midships to establish the gore line. Once I got that figured out and drawn onto the hull, laying the plates got pretty easy.
2. I'm using contact cement (Weldwood from Lowes here in the USA). It gves you plenty of time to move and position the plates.
3. When using contact cement a good respirator is essential. By using one you save yourself from headaches, dizziness, and random acts of stupidity!
4. The copper plates tend to stick together in the bag and it's easy to put two plates on instead of one, which is usually ok, beacuse the top plate falls off when you clean up leaving the glued bottom plate intact.
5. It's tedious and boring! Put on some music, relax...it'll get done. I go out to the workshop with the intent of putting on, say, two rows of plates. I do them and then do another row for good measure.
6. Doing this tedious and repetitive task is a good time for reflection...usually along the lines of "What the hell was I thinking!"
Here's the latest update pics:
Patrick


-
Hi Mobbsie,
She's looking fantastic! The brass etched pillars are supposed to be painted, as you say, and I kind of like them painted from an accuracy standpoint; however, given the other wonderful personalized touches you've given to the ship, leaving them unpainted could have quite a dramatic effect. You're the captain, it's your ship!
Cheers
Patrick
-
Hi David,
Thanks for your comments on my log. Since I've been using your log as one of my guides for coppering it's good to know that you started out making the same mistake I did, and to know that it's recoverable. Your coppering looks great!
Patrick
-
David,
Good to hear from someone whose log I've been using as a guide for the coppering made the same mistake as I did, and to know that it's not insurmountable!
Patrick
-
-
Daniel,
I read one source saying that the hammocks were doubled into a 'U' and lashed, then placed in the hammock nets with the 'U' end down and the two ends upward. This sort of makes sense in that doubling them would provide for a much more dense barricade to stop musket balls and grape shot, which is why the hammocks were placed there. I'm looking for the source.
Patrick
-
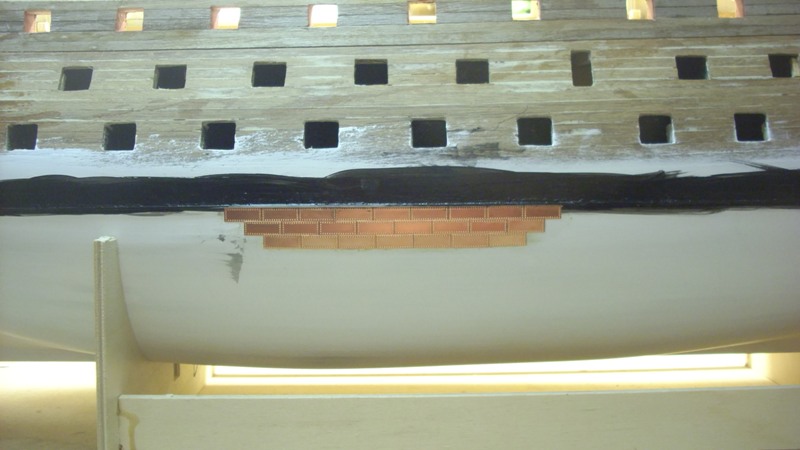
Coppering continues, slow and tedious but making progress. I started at the waterline at midships and put down 14 rows of plates, down to about where I think the gore line is reasonable and well concealed under the body of the hull. I think I got a little enthusiatic putting down the first 8 or rows down from the waterline and carried them a little far forward and was running into the possibility that each row was going to be completely parallel to the waterline. So now that I've got the gore line coppered and am coppering up from there I'm going to have to remove some of the forward plates to accomodate the curve of the gore line. I've already removed a few, not a big deal but a good lesson learned for when I do the other side. Lousy pics as usual, but you get the idea.
Patrick


-
Hi there The Ship's Cat. Caldercraft is the company name under which Jotika manufactures its kits. Jotika is the parent disribution company through which Caldercraft and many other manufacturers products are distributed. So when you see Jotika or Caldercraft kits they are the same thing.
Cheers,
Patrick
-
Hi Sjors,
They say it takes 2,600 copper plates to complete the job...give or take a few. All I know is that I have less than 1% of the job done. The plates I've put on so far look really good close up, then you stand back and look at the entire ship and realize that you have a long, long way to go! Putting an air conditioner in the garage/workshop was the best idea I've had in a long time. It's in the 90's F here and really, really humid.
Patrick
-
David,
You're right. I have never coppered a model before and have to admit I have been intimidated by the prospect. But now I've jumped in and started the task I'm actually enjoying it. We'll see how long that lasts! The hardest part is working while wearing the respirator mask...but it's essential with the contact cement. So far I've found that a paper towel with a little acetone on it, rubbed rapidly over the plates does a great job of cleaning them after they've been applied. Of course, not getting glue on my fingers when attaching the plates means they don't get messy in the first place...but that seems to be impossible!
Patrick
-
-
Great work Jerry. You are really flying along, you started after me and are way, way past me now! Maybe I spend too much time cleaning up my work area and not enough building! I'll go with the once-every-two-year method from now!
Patrick
-
Beautiful job on the boat Grant, a perfect little model in its own right. Keep up the great work!
Patrick


HMS VICTORY by Kevin - FINISHED - Caldercraft - 1/72
in - Kit build logs for subjects built from 1751 - 1800
Posted
Kevin,
Looks fantastic! Calm sea, make-and-mend day, gun ports slightly open for ventilation as she drifts along on the breeze, Great stuff!
Patrick