


flyer
-
Posts
1,015 -
Joined
-
Last visited
Reputation Activity
-

 flyer reacted to mtaylor in HMS Triton (1/64) by Aldo - POB
Aldo,
Fantastic. You have made the leap to the darkside and are shining.... Great work.
-
 flyer got a reaction from rdsaplala in HMS Pegasus by flyer - FINISHED - Victory Models
Hi Aldo
Thanks for looking in.
I got the impression that you are taking a break in the work on your Pegasus, concentrating on your wonderful Triton. Another one lost to the dark art of scratch building…?
Hi Ray
Thank you for the sound advice. Of course it’s a bit of a dilemma – after finishing the rigging there will not be enough space to fix the spars and boats. I guess those ‘ships-in-a-bottle-problems’ are part of our hobby and you probably would meet them even if building in original size. We know it from other work areas, e.g. trying to bring the furniture into the new house and realizing you should have done it before fixing the roof…
The spars are still provisionally mounted and I delay the definite fix as much as possible until I will have missed the optimal point…
Take care
Peter
-
flyer reacted to Ferit in ROYAL CAROLINE 1749 by Doris - 1:40 - CARD
suddenly...
then...
then...
then...
then...
finally...
-
 flyer got a reaction from Mirabell61 in HMS Pegasus 1776 by Mirabell61 - FINISHED - scale 1:64 - 16-gun sloop
Hi Nils
That copper is looking fine and you work really fast. That way you will finish your scratch built Pegasus long before I finish my kit.
Cheers
Peter
-
 flyer got a reaction from riverboat in HMS Pegasus by flyer - FINISHED - Victory Models
Hi Mobbsie
Thank you.
As I will stow the smaller cutter inside the blue one, there will be no further detailing of this boat. But on the smaller cutter I will try some detailing with oars etc.
Hi Martin
Thanks. Fortunately there are some etched brass oars included in the caldercraft kits and they will do for my level of detailing.
Hi Michael
Thank you. I think those little caldercraft kits give an acceptable result for a moderate amount of work although it’s only a resin shell with a few attachments. As we “suffer” presently from a partly southern Californian climate here in central Switzerland (daytime temperature 35°C but about 500km to the next beach) I try to minimize the amount of any actual work.
Take care
Peter
-
 flyer got a reaction from Kathy Teel in HMS Pegasus by flyer - FINISHED - Victory Models
The rudder could be hanged. It was previously coppered and fixed with a spectacle plate made from paper and 2 eyebolts.
The channels were pinned and glued and deadeyes and chainplates attached as per instructions.
-
flyer got a reaction from Kathy Teel in HMS Pegasus by flyer - FINISHED - Victory Models
Now the guns under the quarterdeck were fixed there with the tackles.
The Deck was then closed and planked. To simulate the caulking I used a black textile marker to paint the sides of the strips.
Now it was time to finish the bulwark inner planking, the capping rail and the headrail and cathead assembly.
The last was quite a puzzle and finally I made the complete lower bow rails from the decorative white metal strips filed into
size.
-
 flyer got a reaction from billocrates in HMS Pegasus by flyer - FINISHED - Victory Models
Initially I thought that Pegasus’ galley stove was placed under the main deck (similar to Granado) and fixed only a chimney leading up under the forecastle.
This was the initial chimney.
Unfortunately I found those excellent build logs of that marvellous Kingfisher kit in this forum and had to rethink.
So it was back to the yard again. The chimney was pulled out and with help of the pictures of the Kingfisher logs I assembled a much simplified stove from scratch (mostly wood, wire and some leftover copper plates) with the same proportions. It would just fix between the supports for the riding bitts.
To be able to put it in place the part just below the chimney was made separate.
You really don’t see much of the finished stove, but the little building project was fun.
(Looking at it now, I wish I had made it more acute...ok, replacing is impossible because it’s fixed with epoxy, I will make a better one on the next ship.)
-
 flyer got a reaction from kier in HMS Pegasus by flyer - FINISHED - Victory Models
The next step after finishing the 2nd planking was the coppering. I did this rather early in order to have unrestricted access to the hull and less risk to break anything.
The copper plates were attached slightly overlapping. Following the waterline is a double row of complete plates as top of the coppering. This pattern is according to one found in ‘Ship Modelling from Scratch’ by Edwin B. Leaf. It is rather easily done and in my opinion gives a satisfying result. And those copper plates from Victory Models are a pleasure to work with.
(I find I must apologize for the quality of my pictures but when I took them there was no intention to post them.)
After coppering the plates were cleaned with a brass brush in a little drilling machine. This was to clean all leftovers of the CA glue and let the copper get a natural patina.
By the way – for the colouring of the hull I tried to follow the colour scheme of HMS Bellona.
-
flyer got a reaction from billocrates in HMS Pegasus by flyer - FINISHED - Victory Models
The general idea about colour was to use it as sparse as possible. So all the deck furnishing along the centreline was left in
wood. As far as I know, they did also use varnish to protect the wood in the 18th century.
The gun carriages are also just varnished. With those wooden ones this is fortunately possible and I like it better than red.
(One of the comments to my first build log pointed very correctly to the rather ugly narrow sides of all the plywood parts. He was right of course and later I did try to mask them, where still possible, according his suggestion with wood colored paint. On future builds I will do this before assembling and building in.)
A lucky shot against the sun rising behind the forecastle
-
flyer got a reaction from billocrates in HMS Pegasus by flyer - FINISHED - Victory Models
While laying the planks on the forecastle I grew more and more irritated by the size of the midship gun ports. Compared to those which will be fixed with port lids they seemed too large (and would have offered only a limited protection to the gun crew behind them).
Old layout with the B I G gun ports
Quite reluctantly I finally decided to scrap off the already partly fixed decoration, tear off some planking and fix those ports
with a frame. Then the side was planked again. Now the ports looked more right to me. They were now also quite similar to those of my caldercraft HMS Granado.
(I learned a lot with the Granado kit – except how to make rope coils – and still think it is one of the kits with the best value for money and excellent material and instructions. It lets you build a really beautiful model.)
The lower sills of the gun ports and the sweep ports were no longer in line but I find the overall picture more convincing.
-
flyer reacted to Blue Ensign in HMS Pegasus by flyer - FINISHED - Victory Models
Sorry to disappoint Peter, but this is a tricky problem. Logic to us would dictate that some sort of chock arrangement would be fitted across the spare topmasts to seat the boat on.
My books contain a few photos of contemporary models with boats stowed on the booms and these don't seem to support that theory.
Here's a sixth Rate from 1745.
You can't see all the boat, which I have seen in a book, but the boat sits down slightly between the booms and appears to simply be lashed to the booms.
Here's a shot of the Lowestoft model
Again no indication of any sort of chocking, the beam of the boat is supported by the booms and is held down by lashing.
You only tend to see one boat on the gallows on contemporary models, possibly because the larger one was towed?
Nesting of boats again seems to be a logical solution to a problem, but according to Lavery (Arming and Fitting of English Ships of War)
This is unlikely to have been done in the eighteenth century or before. Although boats often had some removable thwarts, these were intended to allow the carriage of casks, and there were enough fixed thwarts to make nesting very difficult. At least one thwart was fixed and kneed in midships to support the Mainmast.
He goes on to cite the case of a ships Pinnace which was often longer and narrower than the Longboat, making nesting impossible.
I'm dodging the problem by only showing one boat on the gallows
Cheers,
B.E.
-
flyer got a reaction from Mirabell61 in HMS Pegasus 1776 by Mirabell61 - FINISHED - scale 1:64 - 16-gun sloop
Hi Nils
You definitely do not believe in taking the easy way! Wonderful!
I hope you don’t mind a remark about the treatment of the hull: I wouldn’t mix two different protection methods on the same build and only show the coppering of the prototype on one side. Otherwise you could overload your model. There is the saying “less is more” to consider.
Oh and about dictionaries… I find www.leo.org helpful for most words and it contains some basic naval vocabulary as well.
Keep up the fantastic work.
Peter
-
 flyer got a reaction from mobbsie in HMS Agamemnon by mobbsie - FINISHED - Caldercraft / Jotika - 1/64
Hi Mobbsie
She's looking great!
Cheers
Peter
-
 flyer got a reaction from dafi in HMS Pegasus by flyer - FINISHED - Victory Models
The standing rigging on the main mast was now finished.
Amati’s 2,5 mm deadeye with a single hole seemed worth a try as wooden thimbles. They look ok.
The bosun is happy about the new thimbles.
Installing the crowfoot on the main top I saw that I had made 2 mistakes on the mizzen: First I took the wrong (0,2) thread and for the euphroe block I only took one photo etched part while you better use the two identical parts together, glued back on back. I will have to rig the mizzen crowfoot again.
Main top with finished standing rigging
Ascending to the main top
Main topmast trestletrees
Foot of the foremast with topmast stay and preventer stay
-
flyer got a reaction from dafi in HMS Pegasus by flyer - FINISHED - Victory Models
The New topmast could be set up using the existing rope work. Initially the top cap was left off so the shrouds and stays could slip over the new mast. Then they were set up with the old deadeyes and new lanyards. Only one ratline broke and had to be retied. Now it’s better than new and it was an interesting piece of work.
The captain checks the new topmast from the main top
Backstays are in place again
A last critical gaze from the captain – all is well
-
flyer got a reaction from dafi in HMS Pegasus by flyer - FINISHED - Victory Models
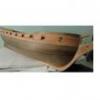
In between the work on the masts I started on the first boat, Caldercrafts 24’ cutter.
The rips were made according CC’s instructions. Contrary to them the floorboards were not mounted on the prepared piece of plywood but directly on the floor. A cockpit floor and a small ’deck’ up front (I wonder what’s that actually called?) were added.
For those 2 details and a lot more information I used Chuck’s beautiful longboat as source – thank you, Chuck. The rowlocks were filed into the side as per CC’s instruction.
Further detailing of the boats interior will not be made as the smaller cutter will be stowed inside this one. For the coloring I followed mostly the instructions and just added some blue to make it ‘the blue cutter’.
The rips are made from cartridge paper
Floorboards are added and the risers are being glued in place
Cockpit floor added (the boat sits on a copy of Chuck’s longboat- that’s a perhaps a bit impertinent)
It’s now the ‘blue’ cutter
Front platform added
Cockpit seats added – the captain inspects the new boat
Provisionally stowed – looking at those pictures I think I will have to make a kind of support to keep the boat stable on the spars
-
flyer got a reaction from Mirabell61 in HMS Pegasus by flyer - FINISHED - Victory Models
The standing rigging on the main mast was now finished.
Amati’s 2,5 mm deadeye with a single hole seemed worth a try as wooden thimbles. They look ok.
The bosun is happy about the new thimbles.
Installing the crowfoot on the main top I saw that I had made 2 mistakes on the mizzen: First I took the wrong (0,2) thread and for the euphroe block I only took one photo etched part while you better use the two identical parts together, glued back on back. I will have to rig the mizzen crowfoot again.
Main top with finished standing rigging
Ascending to the main top
Main topmast trestletrees
Foot of the foremast with topmast stay and preventer stay
-
 flyer got a reaction from Blue Ensign in HMS Pegasus by flyer - FINISHED - Victory Models
The standing rigging on the main mast was now finished.
Amati’s 2,5 mm deadeye with a single hole seemed worth a try as wooden thimbles. They look ok.
The bosun is happy about the new thimbles.
Installing the crowfoot on the main top I saw that I had made 2 mistakes on the mizzen: First I took the wrong (0,2) thread and for the euphroe block I only took one photo etched part while you better use the two identical parts together, glued back on back. I will have to rig the mizzen crowfoot again.
Main top with finished standing rigging
Ascending to the main top
Main topmast trestletrees
Foot of the foremast with topmast stay and preventer stay
-
flyer reacted to chris watton in Newsworthy updates from Chris Watton
Actually, as you did bring it up, I have designed special copper plating for awkward areas, which does include the leading edge of the bow and stem (in one whole strip each with different 'nail' patterns) - for the latter, the strip is pre-tapered, as is the strip for the back edge of the rudder. As for the rudder itself, there is one piece to add either side:
Ha!
-
flyer reacted to realworkingsailor in Newsworthy updates from Chris Watton
Actually... If you don't mind me bringing up the copper plate subject one more time... A small suggestion... For those of us who are half cracked enough to add plates to the leading edge of the stem, or the like, would it be possible to supply a small quantity of plates that are symmetrical, as opposed to the directional left/right plates on offer?
Andy
-
flyer reacted to md1400cs in Wasa by md1400cs - FINISHED - Corel - 1:75
Hi Peter,
340s are sweet big machines. Advantage for you guys; Leave it to the French to have your lunch tray slide out right in front of you.
Regarding my flight experience, I trained up to B727s, and then DC10s (simulator only). I rode "side-saddle" as an FX with a regional operator PSA (later sold to US Air) in the late 70s in 727-200s. I also upgraded to the right seat. Though we were working 6-8 cycles every duty. Got a bit tiring after a couple of years. And in 1978 there was an in-company crash that caused a lot of family pressure for me to leave the airline bus (my wife always hated flying). I did, and I taught Aeronautics at UCLA for 5 years, and worked for a charter company.
Turns out that I actually preferred driving left seat in the smaller; P. Aerostars, King Air 200s, C 414, and 421s rather than the big busses. Also, we only looked at analog (you remember). You guys flying glass, along with all the redundant systems today including Jeps on iPads, taxi profiles on-screen have it so easy (:-) When HSI's, and flight directors came along for smaller airplanes, we thought that was so great. We would just drive the airplane on ILS's with the two orange bars. Fun...
I then went into business with partners and build up just shy of one million miles on Star Alliance in about ten years (sitting). All long-hauls; peaceful. Loved the drink button. Never rode in one of yours at LX. Hmmm need to, it seems.
I did ride in an amazing machine three years ago. One of yours; a Pilatus PC-12 (not the ng), a friend was deadheading it for a client, and he asked if I wanted to ride along. Hmmm, now that is some sweet airplane. Nice work Switzerland!! Things looked nice at Fl24 in one of those, along with a cabin altitude of 9000 ft, and a Vso of 69kts, (over the fence at about 85). A rate of climb of about 1,600 fpm it is close to the old 727s that where good for about 1,800 ftm above 12,000 feet.
You've prob. already seen this--nice 360º tour. http://www.pilatus-aircraft.com/#11
OK done with "off topic". I don't want to bore those whom are interested in this Wasa (:-) Though I enjoyed our short personal chat. Here are a couple of photos of my favorite machine the 601p. On that flight we were outbound from BUR to BOI.
SO----I have returned to my real life and will start posting ship updates after removing the dust, and getting back to having fun at home. Cheers... Yes there were some amazing views from the front. Especially on top above overcasts during sunsets. Those I miss (:-)
Regards, MJD
PS: Your Pegasus is stunning!!!
-
flyer got a reaction from dafi in HMS Pegasus by flyer - FINISHED - Victory Models
Now the work on the main topgallant mast could continue.
The shrouds were a straightforward job (no ratlines!!!!!).
The size of the backstays had to be corrected. Again they should be made of the same rope as the stay. The lower ends however presented a problem.
According to the plan and James Lees a thimble should be used. As such parts are not provided with the kit I used a small dead eye on the backstay of the mizzen topmast but this looks somewhat oversized. Now I tried to simulate it with just an eye split. But this looks wrong as well. Therefore I ordered the smallest thimbles available from cornwallmodellboats and will have a try.
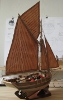
While waiting for them I started fixing the spare spars with some hidden nails in preparation for placing the ships boats. Those will be Caldercrafts 24’ cutter and 19’ launch.
Work on main topgallant mast has been stopped after the first backstay
Unsatisfactory lower backstay end with spliced eye
Mizzen topmast backstay with rather large deadeye
Spare spars in place and shells of boats placed provisionally
-
 flyer got a reaction from Padeen in Newsworthy updates from Chris Watton
Hi Chris
Your Victory looks a truly wonderful ship.
However her size could somehow reach a ‘critical mass’ in the eyes of the admiralty when discussing where to berth the finished model.
Therefore a smaller model of a heavy frigate would probably fit better in many a household. Although Shannon is somehow similar to Diana there are still quite a few points in her favor besides those already mentioned: Not only has she British and American connections but also French – her lines seem based on those of the captured French frigate Hebe. http://www.kenthistoryforum.co.uk/index.php?topic=14775.0
And the fact that she was also mentioned in Patrick O’Brian’s books won’t really reduce her chances for a commercial success.
Perhaps a kit variant to build Hebe would also be possible (albeit I have no idea of their relative sizes).
I only hope that you find somebody to produce the kits for all your splendid models. There is still Bellona and didn’t you also build a Cutty Sark?
Keep up the good work.
Cheers
Peter
-
flyer got a reaction from mobbsie in HMS Agamemnon by mobbsie - FINISHED - Caldercraft / Jotika - 1/64
Hi Mobbsie
Not only the copper shines, but also your workmanship.
And reworking the rudder is a very good point, almost always neglected in kits instructions (and promptly forgotten on my build).
Take care
Peter