


bhermann
-
Posts
545 -
Joined
-
Last visited
Reputation Activity
-

 bhermann got a reaction from Ryland Craze in Bluenose by JohnU - Model Shipways - 1:64
John - like you, Bluenose was my first planking job and the filler was needed to hide my mess . About the walnut veneer - I found other uses for it, mostly in covering the roof of deck structures, and also as a filler for a couple of the bulkheads that were just a tad too thin on their own.
Bob
-
 bhermann got a reaction from Boxbuilds in Bluenose by JohnU - Model Shipways - 1:64
John - like you, Bluenose was my first planking job and the filler was needed to hide my mess . About the walnut veneer - I found other uses for it, mostly in covering the roof of deck structures, and also as a filler for a couple of the bulkheads that were just a tad too thin on their own.
Bob
-
 bhermann got a reaction from Nirvana in Bluenose by JohnU - Model Shipways - 1:64
John - like you, Bluenose was my first planking job and the filler was needed to hide my mess . About the walnut veneer - I found other uses for it, mostly in covering the roof of deck structures, and also as a filler for a couple of the bulkheads that were just a tad too thin on their own.
Bob
-
.thumb.jpeg.fc5d633a7b34428fcf19419a73d56d55.jpeg) bhermann got a reaction from EricWilliamMarshall in Bluenose by JohnU - Model Shipways - 1:64
bhermann got a reaction from EricWilliamMarshall in Bluenose by JohnU - Model Shipways - 1:64
Very nice start, John. That will give you a great basis to work from. I used decals for the Bluenose name at the head, still haven't figured a way to do the stern lettering yet. I did the scrollwork by hand. You can find the details in the summary log I posted (link in my signature). Looking forward to watching your build develop.
Bob
-
bhermann reacted to JohnU in Bluenose by JohnU - Model Shipways - 1:64
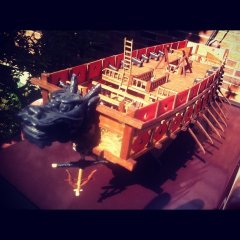
I debated about adding the scuppers. They were so small I thought the detail might not be visible on the finished model. After looking at other build logs I decided they were worthwhile. It's a nice detail if done properly. By having them painted the same color as the waterway they stand out nicely against the black. I'm still undecided about the cove just below the waist. On the prototype it's quite noticeable and the color is yellow. Some people just paint a yellow stripe and others create the actual cove. The problem is how to make such a small detail in a uniform way. Need to make a tool to get this right.
The scuppers turned out pretty good except the plank leaves a noticeable line that needs filling. Of course filling will also close the scuppers and they will need to be cleaned out later. Just have to deal with that when the time comes to sand and paint.
There was no wood supplied with the kit the right height for the quarterdeck scupper plank. I made a jig using a drill press and sanding drum. The fence is positioned to the finished size of the plank from the drum. Then it's just a matter of carefully feeding the plank through.
The actual scuppers turned out to be the easiest part, but tedious. I had a file the thickness of the scupper width. It just took a bit of file/check/file to cut them. This makes a really neat slot with square corners. There are a LOT of those little things!
Here's the finished result. Please ignore the rough planking job. This was my first attempt at planking and the last part is much better than the first part.
-
bhermann reacted to JohnU in Bluenose by JohnU - Model Shipways - 1:64
Hi Bob, Thanks for the info. You must have a very steady hand to do that scrollwork! I was thinking I might try decals for the scrollwork. I could scan the drawing and print it on the decal paper. The prototype does appear to have depth though. I read one log that used a 3-D printer to make it.
I looked through your log. Wish I had done that before I did the scuppers. That was a great way to do the layout.
John
-
bhermann got a reaction from Nirvana in Bluenose by JohnU - Model Shipways - 1:64
Very nice start, John. That will give you a great basis to work from. I used decals for the Bluenose name at the head, still haven't figured a way to do the stern lettering yet. I did the scrollwork by hand. You can find the details in the summary log I posted (link in my signature). Looking forward to watching your build develop.
Bob
-
 bhermann got a reaction from Rik Thistle in Bluenose by JohnU - Model Shipways - 1:64
Very nice start, John. That will give you a great basis to work from. I used decals for the Bluenose name at the head, still haven't figured a way to do the stern lettering yet. I did the scrollwork by hand. You can find the details in the summary log I posted (link in my signature). Looking forward to watching your build develop.
Bob
-
bhermann reacted to yvesvidal in U-552 by yvesvidal - FINISHED - Trumpeter - 1/48 - PLASTIC - Type VIIC U-boat
Still waiting for my professional photographer to show up.... I think it will not happen, as he is probably hiding in his basement....
Anyway, I wanted to look quickly and very superficially at the cost of building such a model. We will assume you already are in possession of a bunch of tools, including a Dremel hand machine with a nice set of bits.
The kit itself is around $450, the RCSubs PE sets add another $270-300 depending on how far you are going, $50 in glues of all kinds, $100 in paints (The Humbrol paints coming from Europe to paint the hull and deck cost me close to $50), LEDs (close to 50), electric motors and many yards of very thin electric wires, the stand made of wood and brass tubes, switches and many little things here and there. We are probably not far or slightly above one grand. Even more if you start buying books and DVDs on that subject.....
But when you look at the time it takes to build such model, it is no more than $3 per day which is less expensive than beer or tobacco. We all know that the cost of our passion is no object and as such should be disregarded.
I have immensely enjoyed building this model and being able to present it to you readers and enthusiasts. I have to confess that your support and encouragements have been my fuel to continue through that, at times, difficult endeavor. In retrospect, I just cannot believe that this thread was visited close to 80,000 times over a period of 16 months.
Thus, to conclude that Build Log, let me offer you some last pictures of the model and of the real thing. I simply hope the model will not terminate like the real submersible....
Although it is not completely clear how U-552 finished its days, I think it was scuttled before the Allies could take possession of it in one of the Brittany ports in 1945.
Yves
-
bhermann reacted to mog in PT 105 by mog - FINISHED - Dumas - 1:30 scale
Test fitting the tubes , added the detonator housing
-
bhermann reacted to Retired guy in Bluenose by Retired guy - Model Shipways - scale 1:64
Thanks very much Dave, Robin, Eamonn, Michael, Gary and Denis for your very kind comments, I think these parts were the last items of metal work to be made did just finish the last handle, will need to blacken them.
Now have to the finish the painting of cove , adding ship name, scroll work on the hull, look for all the small stuff like eye bolts and rings etc etc that I have not added yet then will start to paint some of the items in my parts box, then I can start to assemble.
Also thanks for all the likes until next time
Regards
Richard
-
bhermann reacted to Retired guy in Bluenose by Retired guy - Model Shipways - scale 1:64
Looked at Gary's (FriedClams) Bilge pump on his 1920 New England Stonington Dragger and he built a Edson Model #2 so looking at the drawing of Bluenose supplied it did not look the same so I have gone with the drawing.
Made some rough sketches
Machined the body first out of 5/16" brass bar here it is just taken it off the lathe
Machined the top brackets
Once all that was done, cut the part were the water would flow out and ground sides so that I could solder a piece of bent brass to the body, also machined the bottom tabs for mounting pump
Then parted off then press fitted it upside down onto a piece of wood and machined the excess metal between tabs also drilled the holes in tabs for mounting.
Then made the mount plate with a small piece tube for easy of gluing to deck
Blacken the mount plates and made them so they would be parallel and flat because the deck has a curve, did carve out a step so they would sit right
Next was to make the plunger this was .135" dia
Next was to make the links, I took a piece of 1/16" tube machined the sides to get .049" then soldered this to a piece of brass same width, but I did notch it with the angle as per drawing
After some cutting drilling and clean up got the links looking as per the drawing supplied then made the handle started with the width of the tube hole then filed to shape, got to do the second one, blacken the two pumps at this time
Got them just sitting there not mounted but they turned out ok
Thanks to everyone who made a comment and all who looked in and and left a like do apricate.
Regards
Richard
-
bhermann reacted to closehaul in Atlantic by closehaul - FINISHED - BlueJacket Shipcrafters - 1:96 Scale
120 timberheads have been gauged and installed. The cap rails then steamed, bent to form and installed along with the bow grating and taffrail. I wish that the final painting of the transom area was cut cleaner than my skill allowed but I'm going with it.
-
bhermann reacted to mog in PT 105 by mog - FINISHED - Dumas - 1:30 scale
Torpedo tubes fabrication coming along, looking at maybe 2 more weeks to complete
-
bhermann reacted to Blue Ensign in Muirneag 1903 by Blue Ensign – FINISHED - Vanguard Models - 1:64 scale - A Scottish Zulu Fishing Boat Based on the Vanguard Models Zulu Kit
Post 21
Fitting the Steering Box.
The Steering Box and related fittings present the most fiddly modification.
The kit has a simplified all in one bench pattern (51) which incorporates a knee at the stern, doubler, and aft thwart against which the steering box butts.
Muirneag differs both in the size and position of the steering box and the layout of the thwart, knee and doublers.
There is a fair bit of trial fitting to get it all to sync together involving making separate parts.
The first job is to get the position of the steering box fixed and to cut away some of the stringer to allow the aft thwart to sit down just below the level of the rail top.
7931(2)
A spacer is used to position the box the correct distance from the companionway.
7922(2)
The next step is to work out the run of the rudder chains thro’ the hull to the steering rods which protrude beyond the box.
This particular chain I discarded in favour of a finer version with 26 links per inch.
With that done the box can be safely glued down along with the aft thwart.
7934(2)
The tricky business of shaping and fitting the doublers and stern knee can then be done.
Why 'doublers' I don't know, they are for all practical purposes rails.
For the doublers I am using 4mm Pearwood strip, edge bent to suit the line of the stern. These need to sit flush with the top rail line.
7947(2)
Trial fitting the wheel, it always helps to have a scale figure handy.
7945(2)
The height of the wheel above the box has been reduced as covered in Post 13.
7975
The wheel is quite a delicate item, so the stem slots into a micro brass tube fixed in the steering box which allow for its removal.
7978(2)
It is a slightly simplified design with the spokes radiating from the hub simply bent into the vertical position to provide the hand grips.
In reality the spokes extended beyond the rim and the hand grips were either bolted or welded in position.
To replicate this at 1:64 scale would be a stretch too far for me.
I will leave the final cleaning up of this area until the rudder is fitted which is the next task.
B.E.
18/10/20
-
bhermann reacted to mog in PT 105 by mog - FINISHED - Dumas - 1:30 scale
Fabricated torpedo tube brackets and locks. Took allot of time but I’m happy with the result.
-
bhermann reacted to CPDDET in Bluenose by CPDDET - Model Shipways - Scale 1:64 - First ship build
I’ve been working on the smoke stack / vent that mounts on top of the main cabin house. I really wanted this to be copper so again, there was a bit of a learning curve.
I started by placing 2 pieces of Blu Tack on a carbon block. Cut a piece of 3/32 brass tube at a 45 degree angle and aligned them for soldering.
After soldering I cleaned it up a bit, cut it to proper dimensions and glued a brass washer on the short end where it will meet the cabin top.
For the resting block I used a small piece of 1/16 square brass stock and filed a notch for the pipe to rest in.
Still have some cleanup to do on this piece. But now that the skylight, vent and compass housing are finished I can finally get everything mounted on the cabin roof.
-
bhermann reacted to yvesvidal in U-552 by yvesvidal - FINISHED - Trumpeter - 1/48 - PLASTIC - Type VIIC U-boat
I am waiting for a professional photographer friend to come over and do some nice quality pictures, but he is struggling with the software of his Sony cameras or too scared to come to my place.... Go figure. In the meantime, here are a few low quality pictures I took of the finished model.
I will try to add more pictures taken at night, as it is more dramatic.
Yves
-
bhermann reacted to jwvolz in Benjamin W Latham by jwvolz - FINISHED - Model Shipways - 1:48
Bit of an update.
The model is mounted on it's baseboard, which is made from rosewood, with two simple brass rods to hold it in place. Rare event for me to get this done so early, as I'm usually trying to carefully mount a fully rigged model! I also completed a number of deck fittings such as the main and fore hatches, the galley hatch, the wheel box, dory cradle, quarter bitts and a few other little things. It's fun to have to scratch build most all of this as MS only provides wood and plans.
-
bhermann reacted to JeffT in USS Constitution by Jeff - Model Shipways - Scale 1:76
Both sides glued in. Now I just need to figure out what to do about the star at the top. Not perfect but I'm happy.
-
bhermann reacted to Retired guy in Bluenose by Retired guy - Model Shipways - scale 1:64
Last update I stated that up next was going to be making the Ratchet Quadrants and associated parts which go along with them, so it has taken me awhile to figure out how I was going to make them, so went back to the drawing from LB Jenson and also looked at a picture on the web of a Ratchet Quadrant and this is my take on these.
Picture from LB Jenson book (this is to help with my build if not allowed please delete)
With the gears I had made they were .046" wide so I needed .046" + width for middle part then add .010" for sides which go passed gear teeth. and looking at drawing I assumed they had a ridge in the middle because I see he drew 2 lines, so made body from three pieces of .016 brass sheet, the middle piece I cut out a little bigger to have a ridge, the sides I made from ,010" sheet brass. Once I got the shape I soldered the three pieces of .016" and one of the .010" together then the other .010" side I CA glued so that I could remove later then I made an easy jig so that I could drill holes as per drawing.
https://imagizer.imageshack.com/v2/800x600q90/923/tZJ4eu.jpg
https://imagizer.imageshack.com/v2/800x600q90/924/NxqcgE.jpg
Then made a jig so that I could work out heights
https://imagizer.imageshack.com/v2/800x600q90/922/gmFoD8.jpg
https://imagizer.imageshack.com/v2/800x600q90/922/mJZDx9.jpg
Made the shackles and did a some clean up and then put back in jig to work out link
https://imagizer.imageshack.com/v2/800x600q90/923/bYaK9L.jpg
https://imagizer.imageshack.com/v2/800x600q90/924/LmFVCy.jpg
Got the dimension needed then bent and soldered links
https://imagizer.imageshack.com/v2/800x600q90/922/vZHvgu.jpg
https://imagizer.imageshack.com/v2/800x600q90/924/QVkOb9.jpg
After this I un-glued the one side on both pieces so I could solder a piece of .010" round brass so that it would hold to the gear once I install, forgot to mention the three pieces of .016" I ground away so that the pawl would fit.
https://imagizer.imageshack.com/v2/800x600q90/922/v4iv60.jpg
https://imagizer.imageshack.com/v2/800x600q90/924/He1km6.jpg
https://imagizer.imageshack.com/v2/800x600q90/924/pK8TFL.jpg
Next was to make the handle shafts, made from brass machined to fit square rocker then filed to round for the shaft, mounted rocker with some small bolts then made the handle parts.
https://imagizer.imageshack.com/v2/800x600q90/923/ulGqsD.jpg
https://imagizer.imageshack.com/v2/800x600q90/923/XKJSsL.jpg
https://imagizer.imageshack.com/v2/800x600q90/924/h7ru8d.jpg
Reworked the jig so that I could solder the handle parts to the shaft
https://imagizer.imageshack.com/v2/800x600q90/923/SCxUCT.jpg
And it came out just as I had planed
https://imagizer.imageshack.com/v2/800x600q90/924/ENQ1gi.jpg
Made the small pawls and then Casey Blacken all parts
https://imagizer.imageshack.com/v2/800x600q90/924/Ir5S1F.jpg
Last pic off the whole Windlass still need to make the u-bolt pins
https://imagizer.imageshack.com/v2/800x600q90/923/6GkfRR.jpg
Kit supplied parts
https://imagizer.imageshack.com/v2/800x600q90/922/YjoI2B.jpg
Next up to make some pump parts, will be looking at Gary's (FriedClams) blog did see he has made some of these 🤔
https://imagizer.imageshack.com/v2/800x600q90/923/K8e2m8.jpg
Thanks again to all who comments and all who hit the likes do apricate it 👍
Until next time
Regards
Richard
-
bhermann reacted to JeffT in USS Constitution by Jeff - Model Shipways - Scale 1:76
Thanks for the likes and thanks Grant!
I've made a little progress on the trail boards: Here is one side dry fit in place. There's still a bit of cleanup to be done before I call it good but overall I'm happy with how it looks.
-
bhermann reacted to JeffT in USS Constitution by Jeff - Model Shipways - Scale 1:76
I've decided not to use the kit part. I tried painting it and just didn't like the result. So, instead I'm cutting out the trail board design.
I have one of these and I'm using #3/0 jewelers blades.
I also have this image that I got somewhere (don't remember where). I printed the image onto avery full sized label paper. I cut it down to size.
I debated on what material to use and settled on .040 thick Evergreen sheet. I tried initially to use a 1/16" basswood sheet but the wood was just to soft and kept breaking.
After muffing it up a couple times I ended up with this. A bit of a tedious task but not too bad and just needs to be cleaned up a bit.
And dry fitted to the model.
-
bhermann reacted to mog in PT 105 by mog - FINISHED - Dumas - 1:30 scale
While waiting for supplies, worked on the wiring plugs for the Nav horn, port spotlight bracket. There very small, hard to shape, but I think they will add to the effect, when the cables are connected, also added the mounting brackets for the , cabin vents and running lights. Test fitted the reworked 20mm base
-
bhermann reacted to JeffT in USS Constitution by Jeff - Model Shipways - Scale 1:76
I have finished the steps and the rudder.
The plans for the steps showed a 3-layer type structure but there wasn't any stock in the kit thin enough to make them to scale. So, I ended building them with 2-layers instead.
After that I moved on to the rudder. Pretty straight forward work there. I also installed the rudder chains. I made the chain iron from wood and installed two eyebolts. It would have been nice if there had been some rudder hinges in the kit but I made do.
Next step is the trail board carvings at the bow. The kit parts leave a lot to be desired. I guess the intent is that you are to paint the kit parts but that doesn't look to be an easy task. At this point, I need to figure out what to do here. I think the best way to go is to create them from scratch. I'm thinking about trying to cut them out of the stock part but the wood is very fragile. We'll see.