

JanV
-
Posts
394 -
Joined
-
Last visited
Reputation Activity
-

 JanV got a reaction from mtaylor in Prins Willem 1650 by Michiel - 1:50 - POB Zeeland ship from own plans
Good to see progress again after this long period.
-
 JanV reacted to Michiel in Prins Willem 1650 by Michiel - 1:50 - POB Zeeland ship from own plans
Slowly moving towards full treenailing on port side. Two new ports added as well and the final row of timbers. Still 4 more small ports to add on this side. Afterwards I ll turn her around and continue on that side.
-
 JanV got a reaction from EJ_L in Royal Louis 1780 by Ulises Victoria - FINISHED - Mamoli - Scale 1/90 - French 126-gun ship
Good to see you back
-
JanV reacted to Ulises Victoria in Royal Louis 1780 by Ulises Victoria - FINISHED - Mamoli - Scale 1/90 - French 126-gun ship
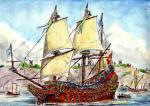
Hello all. Thanks for the kind words. Here is another update.
First the wrong stuff...
I tried to drill the holes for the bowsprit gammoning and this was the result: ugly holes!
So I made these "plates to cover up the mistake.
And here is the result
I am glad to say that the standing rigging is done!
I followed strictly the steps in the instructions:
So here is some photos of the ship in her present state:
Thank you all for your time. On with the running rigging, which has already been placed in some parts as you can see by all those light color threads placed everywhere.
See you next time!!!
-
JanV reacted to marktiedens in HMS Vanguard by marktiedens - Model Shipways - scale 1:72
Hi - added the rest of the cannons to the deck plus the chimney & gratings.
Before finishing off this area, I thought I would move to the bow deck area & work on the head rails. First thing I had to do was chisel out the top of the wales so the gratings would sit on the supports properly. after a lot of filing to the head rail slots in the supports, they were glued in place along with the upper cheek rail.
Then, the middle & lower head rails were shaped & glued in place - this took almost a whole day to get them even on both sides. Finally, the gratings were added. Got a bunch more to do yet in that area.
Mark
-
JanV reacted to marktiedens in HMS Vanguard by marktiedens - Model Shipways - scale 1:72
update - finished up the poop deck by adding some bitts, a few timberheads, stern brackets, the skylight, & a bunch of eyebolts. I used liquid window maker for the skylight windows.
Next, the bow railings & timberheads were installed. The cap rails, railings, & timberheads were all laser cut to shape and fit nicely - basically just had to assemble, paint them & glue them on & cut 4 short sections out for the last 4 cannons.
Thanks for looking in.
Mark
-
JanV reacted to Sjors in HMS Snake 1797 by Sjors - FINISHED - Caldercraft - Scale 1:64
And a little update again.....
Thank for the likes and the visiting.
Second planking done and after a few hours of sanding I'm happy how she is.
It is so smooth the I can not trust my fingers 🙂
On the picture it looks otherwise but that's the light I believe.
I have now a good underground for the paint nd the copper plaates.
But first the inner bulwark and deck planking.
Sjors
-
JanV reacted to Sjors in HMS Snake 1797 by Sjors - FINISHED - Caldercraft - Scale 1:64
After a few weeks of planking and a little bit more sanding the hull is smooth!
A smooth substrate for the second planking.
That will start in a few days....
For now pictures.
I don't make any stealers or drop planks because you don't see a thing about it!
Just the easy way 🙂
Sjors
-
 JanV got a reaction from Sjors in Battle Station by JanV - Panart - 1:23
Activities of this weekend. Finished lower deck and started with Hull part.
Replaced plywood part with walnut lookalike
-
JanV got a reaction from Sjors in Battle Station by JanV - Panart - 1:23
Overview of the contents of the kit.
Started with assembly
next step will be the planking of the deck
-
 JanV got a reaction from ccoyle in Battle Station by JanV - Panart - 1:23
Overview of the contents of the kit.
Started with assembly
next step will be the planking of the deck
-
 JanV got a reaction from marktiedens in Battle Station by JanV - Panart - 1:23
Activities of this weekend. Finished lower deck and started with Hull part.
Replaced plywood part with walnut lookalike
-
JanV got a reaction from marktiedens in Battle Station by JanV - Panart - 1:23
Overview of the contents of the kit.
Started with assembly
next step will be the planking of the deck
-
 JanV got a reaction from Ulises Victoria in Royal Louis 1780 by Ulises Victoria - FINISHED - Mamoli - Scale 1/90 - French 126-gun ship
Good to see you back
-
 JanV got a reaction from JeffT in Battle Station by JanV - Panart - 1:23
Overview of the contents of the kit.
Started with assembly
next step will be the planking of the deck
-
 JanV got a reaction from VTHokiEE in Battle Station by JanV - Panart - 1:23
Overview of the contents of the kit.
Started with assembly
next step will be the planking of the deck
-
 JanV got a reaction from James H in Battle Station by JanV - Panart - 1:23
After long period of no model building due to moving to new house and renovations I decided to restart with a standard kit.
In the mean time build some RC kits (Hovercraft and DF65 Sailing boat) fo use within the Modelclub
Selection was made for this small Battle station from Panart. Once this is finished I will restart with the Wasa
I need no to check how I can share pictures.
Log will follow shortly
-
JanV reacted to Sjors in Nuestra Señora del Pilar by Anja & Sjors - FINISHED - OcCre - Scale 1:46
Thanks for the likes and everyone who is visiting from time to time.
Ratlines are done!
I can not see any ratline for a while now.....
I don't count them but there are a lot.
Pictures are a little bit bad because she is to big to get het in one shot....
Sjors
-
JanV reacted to Sjors in Nuestra Señora del Pilar by Anja & Sjors - FINISHED - OcCre - Scale 1:46
Small update....
All the shrouds and ratlines at the lower fore,- , main,- , and mizzenmast are done.
All black so that was not so easy to see it all.
Next stop....the upper parts 🙂
Sjors
-
JanV reacted to amateur in Vasa 1: The Archaeology of a Swedish Warship 1628
Last information Fred gave dates back a full 12 months. He was negotiating with a publisher.
Planning was that Wasa II should become a Wasa II-a, to be published last autumn, and a Wasa II-b, published later.
Fred never replied to enquiries made in september last year....
Jan
-
 JanV reacted to Andre in Wasa by Andre - FINISHED - Corel - 1:75
Thank you for the nice comments!
Jan,
Indeed, I had noticed that your model (updates) had stopped for a long time.
I will be looking forward to see your resumed updates.
-
 JanV got a reaction from aaronc in Vasa 1: The Archaeology of a Swedish Warship 1628
A very nice book, published by the team who are resposible for the recovery of the Vasa
over 500 pages,
some impression of the book:
next issue is expected for 2013, according one of the authors Fred Hockner (working in the Vasa Museum) and will be mostly about the masts, and all related details.
I cannot wait to order this book as soon as it is published -
 JanV got a reaction from Andre in Wasa by Andre - FINISHED - Corel - 1:75
Looks very good Andre.
I will review your log, when I start finishing my model after a stop of more than 4 years.
-
JanV reacted to Andre in Wasa by Andre - FINISHED - Corel - 1:75
The last item of the model that I wanted to do was to make the name badge. I used the kit supplied shield and printed (at work) a sticker with the (translated from Dutch) text "Vasa Swedish ship of war, built and sunk in Stockholm 1628. Model in scale 1:75, built 2012-2021, by <me>". The sticker was cut to fit into the shield.
I have added some photos of my now completed VASA:
The next big thing for me is building a display case. I have seen a very nice one here on MSW and will use it as guideline:
The display case made by Shipshaper for his Emma C Berry
-
JanV reacted to Andre in Wasa by Andre - FINISHED - Corel - 1:75
I made and installed the flags, which were supplied in the kit.
I have shaped them with via the ' tin can' method, using diluted wood glue to fixate the shape of the flags. This worked quite well.
The flags were made with small rope loops, and I connected one long line/rope that ran circular: from the top of the flag, through the block and then to the bottom of the flag, using the same 'knot' as for the sheet lines. This left thus a double rope to tye to the belaying pin. To make it easier to attach these double lines to the belaying pin, I had glued the two lines together.
The big flag at the stern flagpole was not done using a seperate block at the top of the flagpole, but I had made the top of the flagpole to function as a block, by drilling two small holes in the top. The line runs through this.
I did so, because the (much smaller) flagpole of my fathers ship (see one of my completed builts) also had the block inside the top and not separately.