DONATION DRIVE - SUPPORT MSW - DO YOUR PART TO KEEP THIS GREAT FORUM GOING!
×


Thanasis
-
Posts
652 -
Joined
-
Last visited
Content Type
Profiles
Forums
Gallery
Events
Everything posted by Thanasis
-
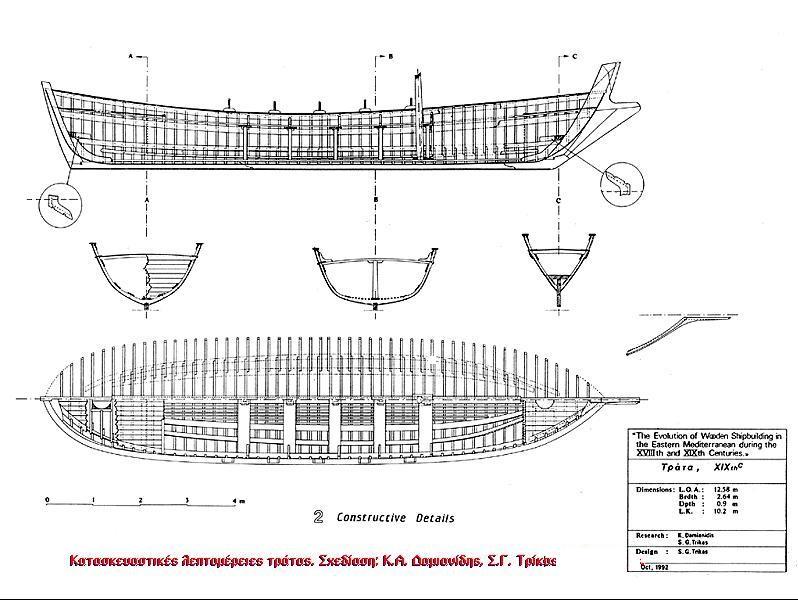
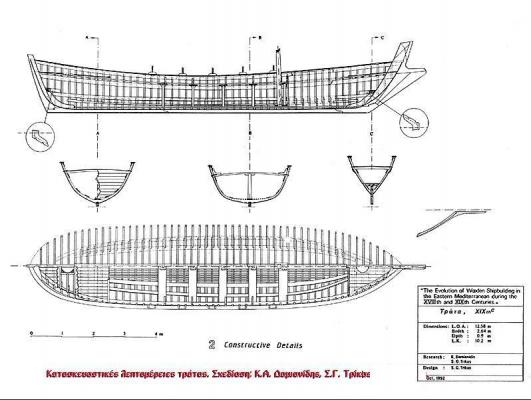
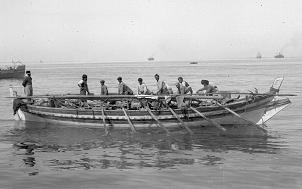
Zoran, I really don't know... As the log goes on, I think the only connection between those two vessels apart of the name is just something... drom the beak. I think Gr Trata comes more narrow and long. It was an open hull boat, with small decks at the bow and stern in some versions...Its purpose was the fishing itself and not just the transportation of the catch. Sailing mainly by the use of oars, there were benches for the paddlers. See the below drawing from the book "The evolution of shipbuilding in the Eastern Mediterranean during the 18th-19th centuries." and you can see more photos of Trata vessels at http://www.naftotopos.gr/index.php?option=com_phocagallery&view=category&id=246:trata&Itemid=622〈=el Allow me also two queries... -As in the real boat I guess, you placed a bulwark on the left side of the stern to keep the nets on deck...But if she was made just to transport the catch, what the necessity for nets to be on her deck. -From what kind of vessels she was collecting the catch to be transferred ashore. Thx
- 150 replies
-
- 1
-

-
- TRAJTA
- fishing and cargo boat
- (and 2 more)
-
Ok. Let me be more specific. I do accept what you saying about the protruding construction on the Trajta or Leut. What I'm trying to point out is that this construction (with its extended stem and the side supports of the beak) has many similarities, with the beak of other vessels in the Mediterranean Sea. My point of view is that no matter the size of the boats, this construction, was not initially constructed to help the approach to the boat but and without being an expert, this is an influence from older vessels. As you have also said the tradition was passed around the neighboring nations and some of them certainly made adjustments. If you like, I'm finding more similarities between the beak of the Greek Trata and the Maltesian Xprunara-Sperunara, but I made all the above thinking-discussion because of the name Trajta-Trata.... Btw. Having seen in photos the model of Mr Skomeršić, please give him my best regards (if he still remembers me…) Thx

- 150 replies
-
- 1
-
-
- TRAJTA
- fishing and cargo boat
- (and 2 more)
-
Maris Stella, I don't want to be misunderstood... I was not talking about the "walking board" itself but as a possible remnant of the beak of other vessels "like Tartana". It's only a guess of mine and as an example it could be also a "Chebec" or a "Galeotta"). Thx

- 150 replies
-
- 1
-
-
- TRAJTA
- fishing and cargo boat
- (and 2 more)
-
Well, there has been some discussion about this "walking board" also for "our" Trata. Greek Trata hasn't had this flat timber on the beak, so we can't say for sure whether the reason was to help the embarkation or disembarkation. If was so, then every fishing boat should have such a similar construction. It could be a remnant of beaks of older Mediterranean vessels (like tartana) that was utilized according the needs by some nations. … Thx
- 150 replies
-
- 1
-
-
- TRAJTA
- fishing and cargo boat
- (and 2 more)
-
If I understood correct you're describing the method of planking by the use of "drop stake-joggle plank" and "stealers" which certainly is acceptable, although I think it was used only in large vessels. So, there is no any disagreement and we can move on... Thx

- 150 replies
-
- 1
-
-
- TRAJTA
- fishing and cargo boat
- (and 2 more)
-
MarisStella, it just appeared strange to me that a hull planking can be completed starting only from the gunwale (or the margin plank) and yes, it's not my method. Most of the times the shape of the hull doesn't allow a plank or the planks of the same row, to reach the edges (stem at bow and stern). At least without force and some work with putty afterwards... And I'll agree with you that there is nothing wrong in ship modeling, although you should consider going along with logic and aesthetic... Btw, good work ... Thx


- 150 replies
-
- 1
-
-
- TRAJTA
- fishing and cargo boat
- (and 2 more)
-
Maris Stella seeing the new photos, am I guessing right...The planking is going to be completed by going down from the margin plank to the keel.? I thought it would end at the middle of the hull, making also progress from the keel... Thx
- 150 replies
-
- 1
-
-
- TRAJTA
- fishing and cargo boat
- (and 2 more)
-
I don't know whom "expert" you are referring to... but you really deserve the praise. Keep on the good work Thx

- 150 replies
-
- 1
-
-
- TRAJTA
- fishing and cargo boat
- (and 2 more)
-
Very nice planking MarisStella. It shows your skill... Thx

- 150 replies
-
- 2
-
-
- TRAJTA
- fishing and cargo boat
- (and 2 more)
-
Hi Newton. Have you tried searching the web by the option of your browser "Images" and the words "Santa Maria crows nest"... Thx
-
I guess you're right, since as far I know, the "Greek Trata" (τράτα) was used only for fishing. But we're certainly sharing the shape of the hull and the name modifications... I'll be here... Thx
- 150 replies
-
- 1
-
-
- TRAJTA
- fishing and cargo boat
- (and 2 more)
-
Hello MarisStella. Thank you for this interesting story of "Trajta". Well, I didn't see it but among the other nations which are claiming the "trata" as their traditional vessel, you can list the Greece as well.... We call it as "Trata", and has been served by our fishermen in many sizes with or without sails. Unfortunately there isn't any provided kit, so the modelers here have to make it from scratch. I'll follow your built log with interesting.. Thx
- 150 replies
-
- 1
-
-
- TRAJTA
- fishing and cargo boat
- (and 2 more)
-
Hi. Search for REVISTA 01 AMNCAT-SOTAVENTO Thx
-
Bracera (Brazzera) by Albuk
Thanasis replied to Albuk's topic in - Kit build logs for subjects built from 1851 - 1900
Hi Alex. You're doing beautiful work on your model and I like that you don't stay on what is provided with the kit.. As about the colored glasses, consider whether you can use part of a colored ballpoint pen (from the crystal tube) or from the curved side of a colored lighter. Keep up the good work Thx -
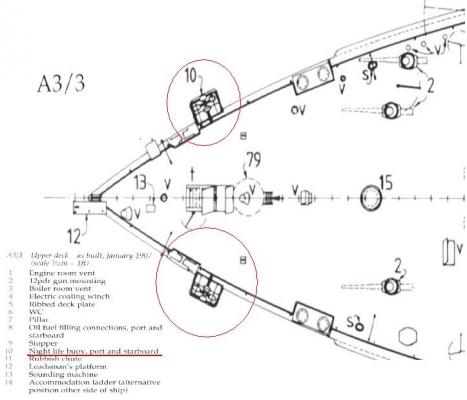
Ok. I made some additional search and I have found the answer... According to the book "Anatomy of the ship dreadnought" and the drawings in page 81 these devices are "Night life buoys". Thx
-
Hi Robert. Sorry but it's been a long time ago that I built the model and I haven't kept the manual neither the model... But just now I remembered a friend of mine that he had built the same model and he had post photos of her construction in another forum (I think here as well but in MSW 1.0) Take a look at his photos in the below link and I hope you find some answers. http://shipmodeling.net/photopost/showgallery.php?cat=643 Thx
-
Hi Robert. I wish you to have a nice journey making this model. See the drawing from the book "Planking model ships" by Richard Mansir, to see how the planks should be in sequence...This is what I meant, when I wrote you for "some cuts close to the edges". I suggest to follow David's method with card templates. Thanks

-
Hi Robert. I have built the Greek Galliot but unfortunately I haven't kept photos from her construction. Reading in the manual to leave the planks " lie naturally", it means that you should do so, but after you have curved them in a form close to the shape of the hull. You might also need to make some cuts close to the edges to bring the planks close. Because of the painting, you can't see what I have done to my model, I place a photo of another Galliot (from scratch-not mine) and I think you'll get the idea... Thanks

-
In previous MSW.com, a member with the name “Zarko” painter and modeller, (he might watching us here as well…) had presented an interesting method. According to him, he used to apply over the model, a thin coat of “asphalt”, a product for car chassis protection. It is provided as a thick liquid, which after it has been dried, it's wiped and what remains gives the sense of wood surface. I haven't tried it, I just post his method for further experimenting… Thanks
-
Hi Wayne. I wish you a nice trip with this project... My two cents. I had never built a ship in bottle kit, so I have no experience about the easiness of a supplied bottle. But having been dealing with ordinary bottles, I would firstly check the clearness and worry less about the diameter of its neck. Looking at the photo, the bottle in front of the manual, I would like to know how much of the text I could read, on a part of it being placed inside the bottle...Then I could figure how much of my work, could be visible. Certainly all the above make no sense, if you want to use the kit as it is, including the old bottle. Thanks
- 15 replies
-
- 1
-
-
- bottle
- constitution
- (and 1 more)
-
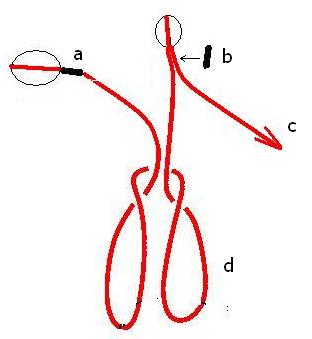
Hi Hamilton. In my below suggestion (this is what I do…) you will need at least one false (zip) seizing. You seize one block at the end of a thread (a), you make a cow hitch knot (d), through which you pass the bowsprit, you make a loop and adjust the false seizing (b.) and the second block. By pulling the free end of the thread (c.) you bring together the two blocks while you fasten them on the bowsprit. You finish with a drop of glue at the false seizing. Thanks
-
About the Greek "Π" (P) shape of the bended wire at the base of a mast... I have also used nylon thread on wooden mast, after I had stiffen the edges and glued them in holes on the deck. Nylon thread, because of its elastic nature, gives also some tightening, when keeps the mast in the upper position and after you have glue it on the deck, with the mast in an angle... Thanks
-
Well, a similar talk about the color of the creature, had been made in that Greek modeler's build log... So, it had been said that since the octopus (here kraken probably would be also a member of Cephalopoda Greek plural κεφαλόποδα (kephalópoda); "head-feet") has the advanced ability to change colors for camouflage as well as to express emotional conditions, then its color, while it's attacking the ship, should be expressing at least anger... I don't know whether he had made any research before he paint his creature as in photo, but certainly it's up to any one, to create and present his work as he thinks better. Thanks