Some Idea
-
Posts
1,108 -
Joined
-
Last visited
Content Type
Profiles
Forums
Gallery
Events
Everything posted by Some Idea
-
 Hi Mate - the thickness of your second planking depends on how good the first layer was. If the first layer after sanding and filling is pretty much the shape of the finished hull then 0.5mm will be enough. You are just giving the first layer a nicer finishing coat so to speak. If you still need to do a bit of sanding then 1mm is more appropriate as it gives you something to go at. If you use too thin a wood its really easy to break through and show the first layer. Take stock of what you have done so far and then decide what type of finish that you want. That will give you the thickness that you need.
 -
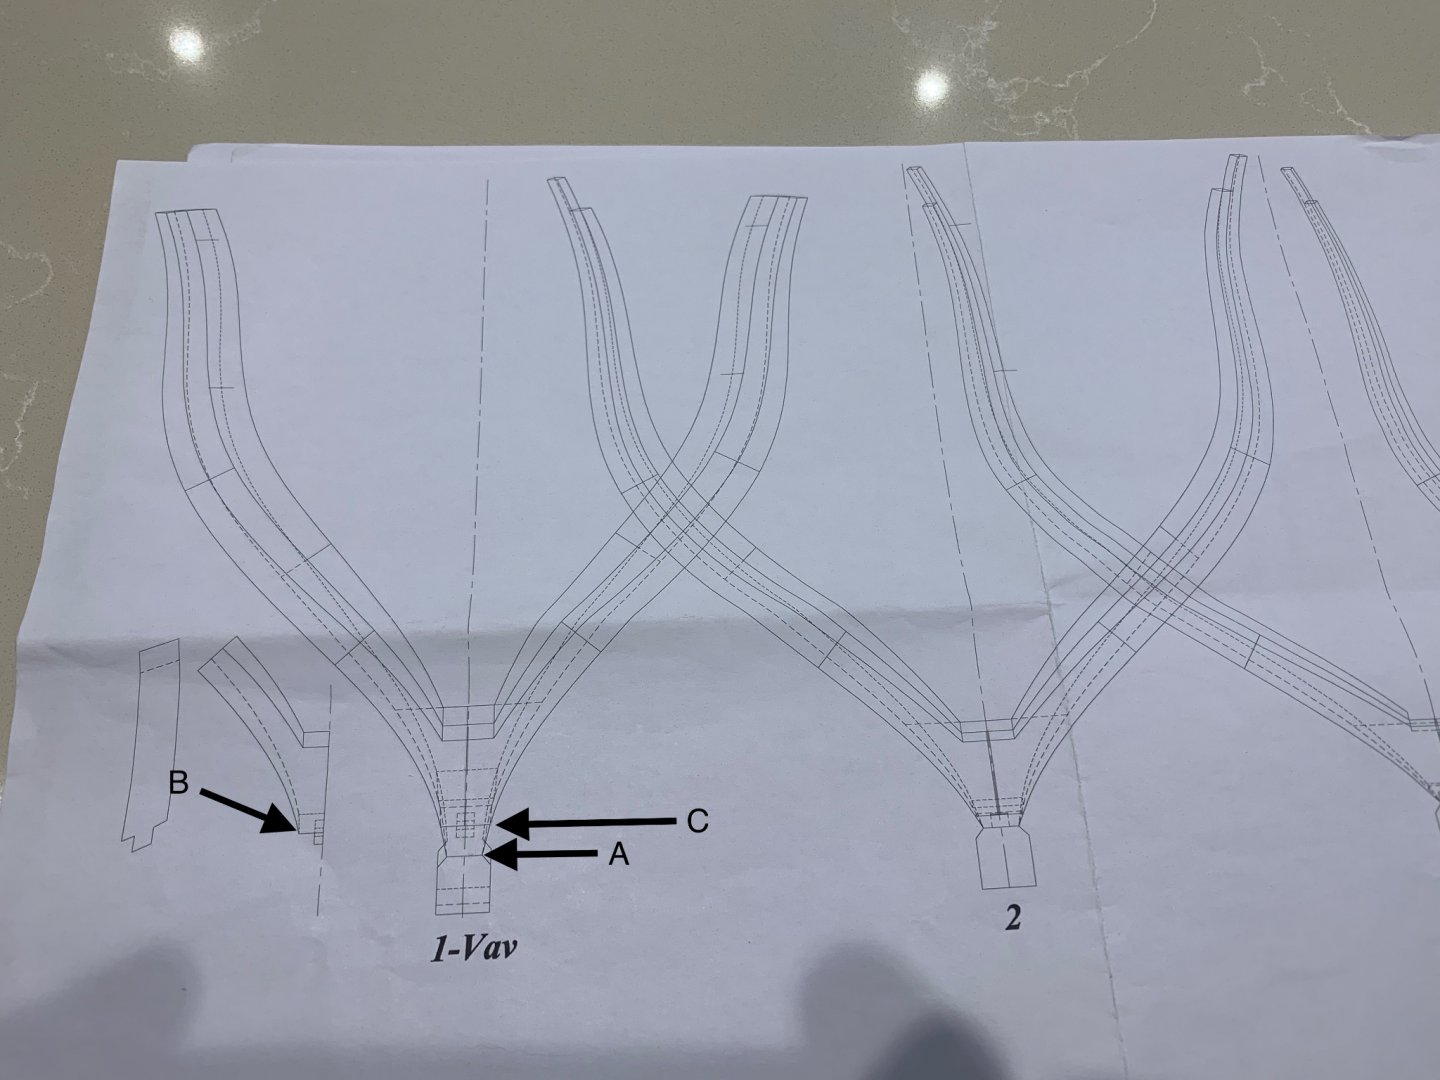
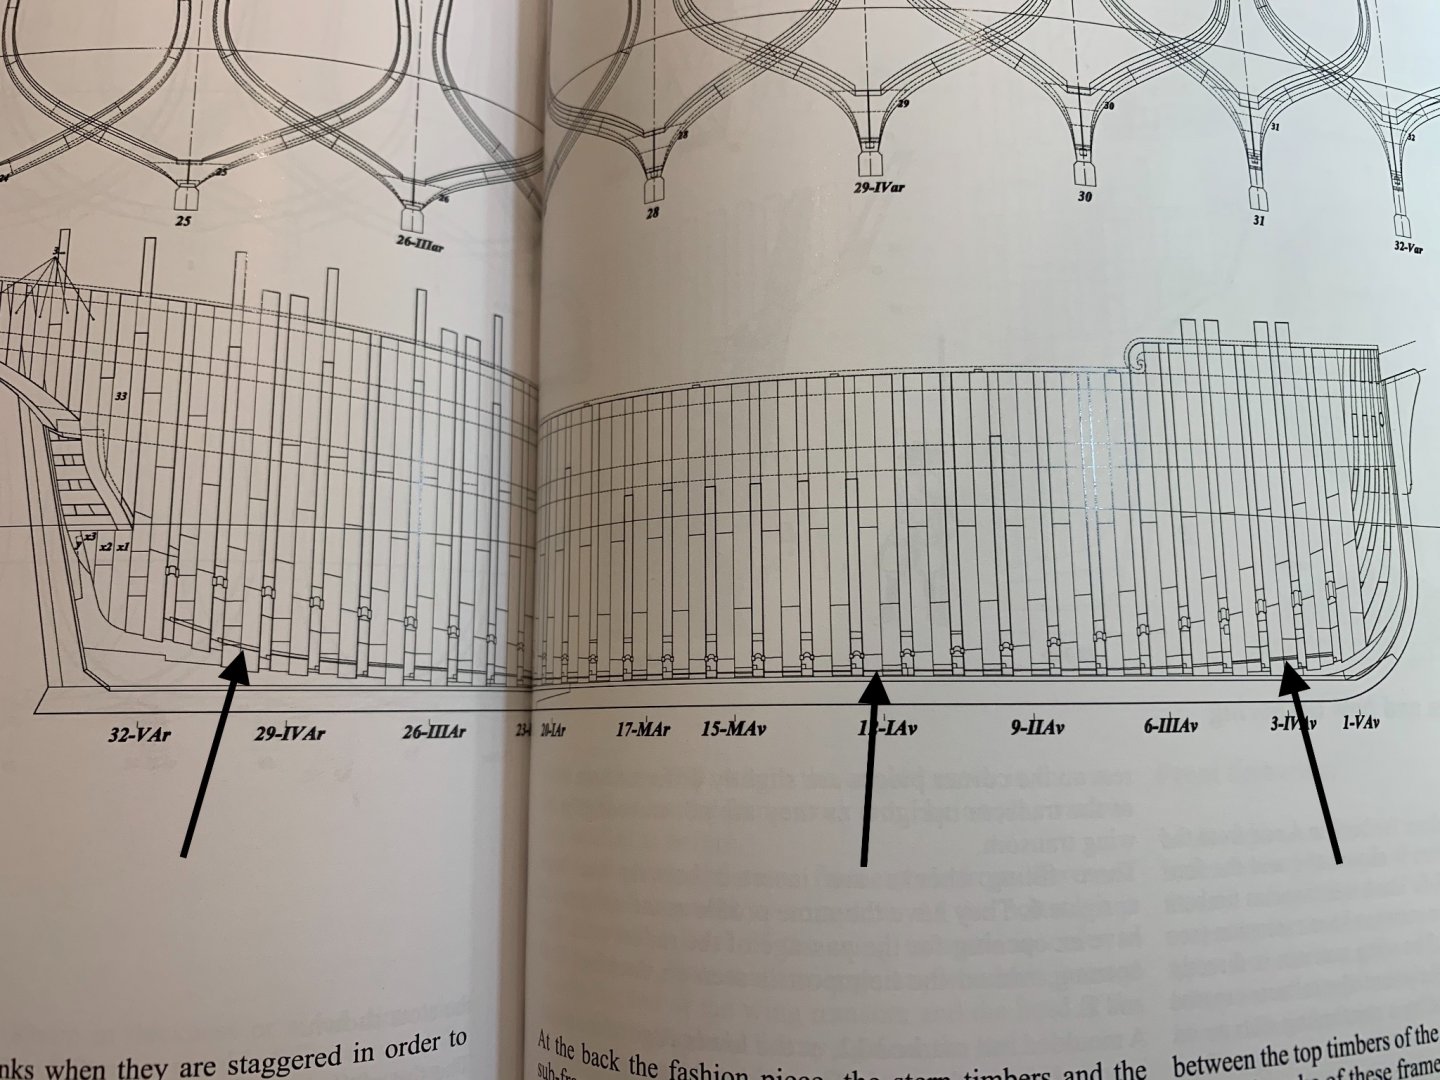
Barkeater thank you very much for you input I very much appreciate it. I also after a couple of mistakes thought that C was my point of contact. I couldn't though see that this was correct as point C at its base would have been wider than the rising wood which wouldn't have made any sense. So I had a look at a further drawing and low and behold the rising wood is on the other drawing is exact same width as point C. So looking at the drawing that I posted regarding the frames I think there is a bit of draughtsman licence going on here. I think that the lines going down to the rising wood on this drawing just follow the natural line of the frames. I would have stopped at the base of the frame and hinted at the mortise below. Maybe even done another drawing to explain and emphasise the mortise. This is my first fully framed build so interpreting the drawings is often an issue for me. I left engineering some 35 years ago so reading drawings has become very much a homework project for me. Thanks for your help
-
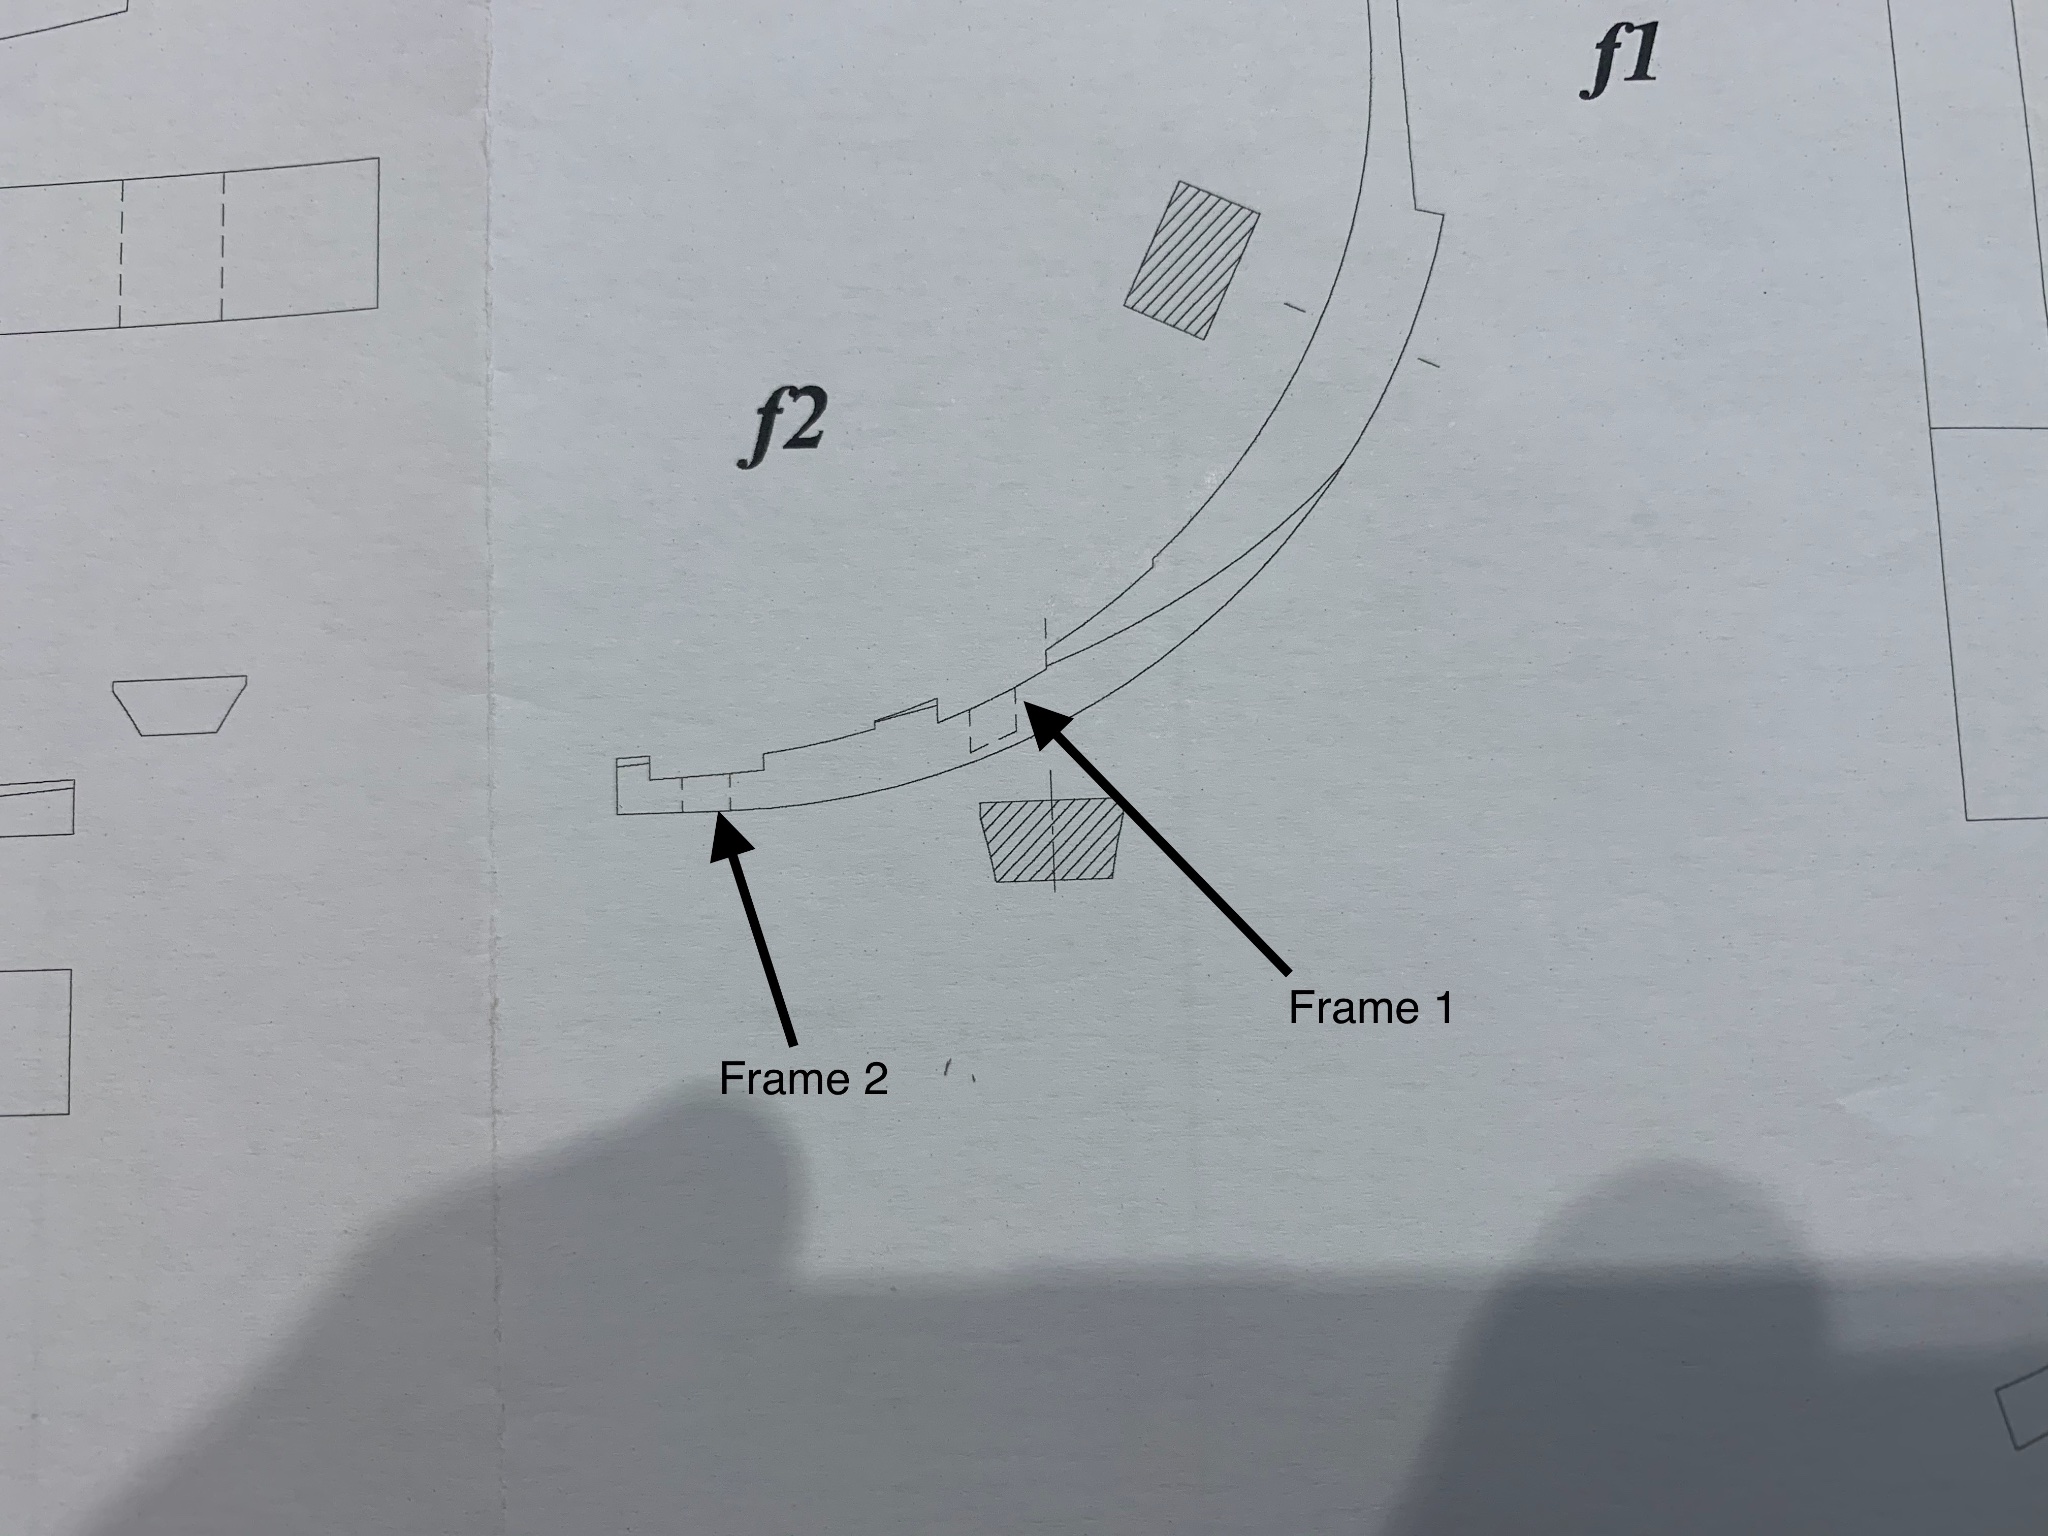
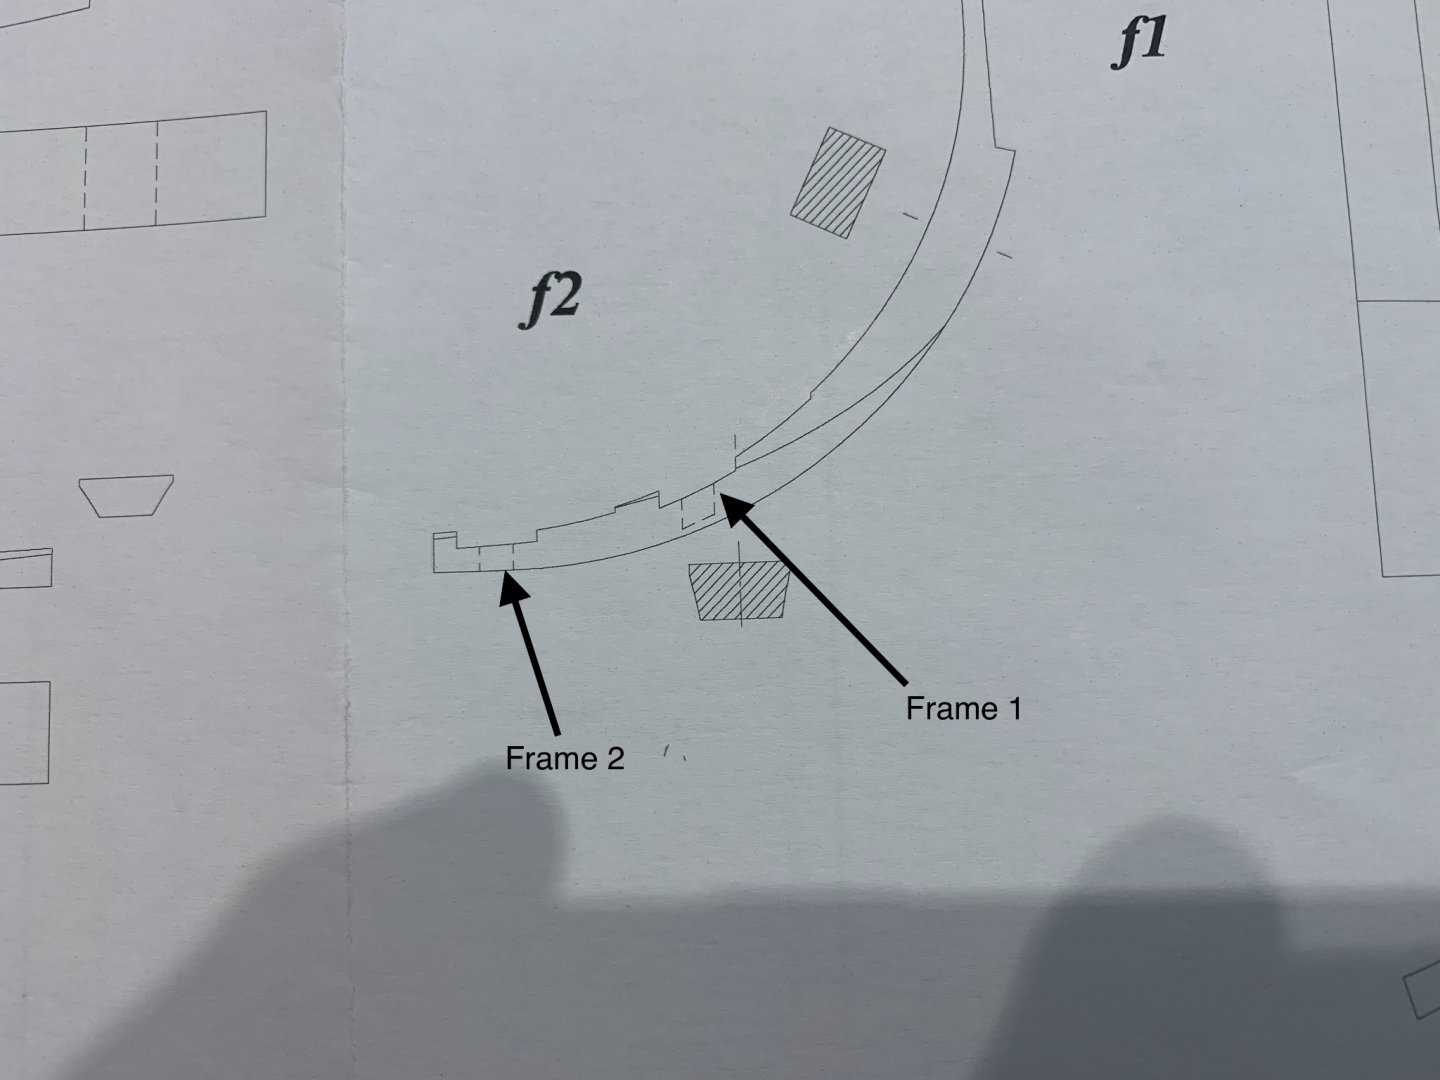
Hi All I hope that someone may be able to help me as I just cannot get my head around two of the frames on my Le Rochefort build. I have studied them for days; made what I think are countless errors and keep on ending back to my confused start point. The frames are rising coupled frames and I understand the construction of how they are put together. My problem seems to stem from where they meet the rising wood. They have a tenon in the floor frame and this is probably my issue. I cannot seem to make the lines on the plan match what I think I need to do with the frames. I have attached two pictures - One being of frames 1 and 2 and I have marked out what I think is my confusion. Point A - This seems to be the point where the frame meets the rising wood? Point B - This horizontally lines up with point C on the drawing which suggests to me that this is actually the point that meets the rising wood. That would mean that the line A may have something to do with the tenon. However the width of the frame at point B would be too wide for the rising wood? The second photo is where they sit on the rising wood for a bit more information for you. As you can see I have managed to really confuse myself here so any help would be great. I'm sorry that I cannot explain this any better Thanks Mark
-
New to PE, need suggestion about tools to fold
Some Idea replied to Jsks76's topic in Modeling tools and Workshop Equipment
I asked a mate thats into PE and he uses something like this for bending https://www.amazon.co.uk/ExcLent-Model-Photo-Bending-Parts/dp/B07VCRVJMN/ref=asc_df_B07VCRVJMN/?tag=googshopuk-21&linkCode=df0&hvadid=480823740401&hvpos=&hvnetw=g&hvrand=9107795329982163659&hvpone=&hvptwo=&hvqmt=&hvdev=c&hvdvcmdl=&hvlocint=&hvlocphy=9045455&hvtargid=pla-1068787235182&psc=1 -
Fortunately for the OP they live in the UK and Castello boxwood is easily available in very handy sizes https://shop.exotichardwoods.co.uk/boxwoods/page/4/ So you don't need to cut down or dry out your own wood. You just need tools to shape what you want to make. If you need to see the tools I don't live a million miles from you and if you're in the Midlands you are welcome to try out my tools. Importing a Byrnes saw is not that big a deal - Jim has just made me an 18' table for mine. I'm only a truck driver and I got it sorted out so it cannot be that expensive. Just compare it to a set of golf clubs that my mates buy - you'll be quids in. Luckily I don't play golf
-
Limber Channel??
Some Idea replied to Some Idea's topic in Building, Framing, Planking and plating a ships hull and deck
Hi Tony thanks for the reply - That was a timely reminder to me to read a little bit further than I did! I'm using Ancre's plans which are so detailed and yes you are right they are discussed and the line on the framed sheer plan is for the limber channel. I'm thinking about cutting these in as I'm building in 1/24 scale. I've still not quite made my mind up on this. -
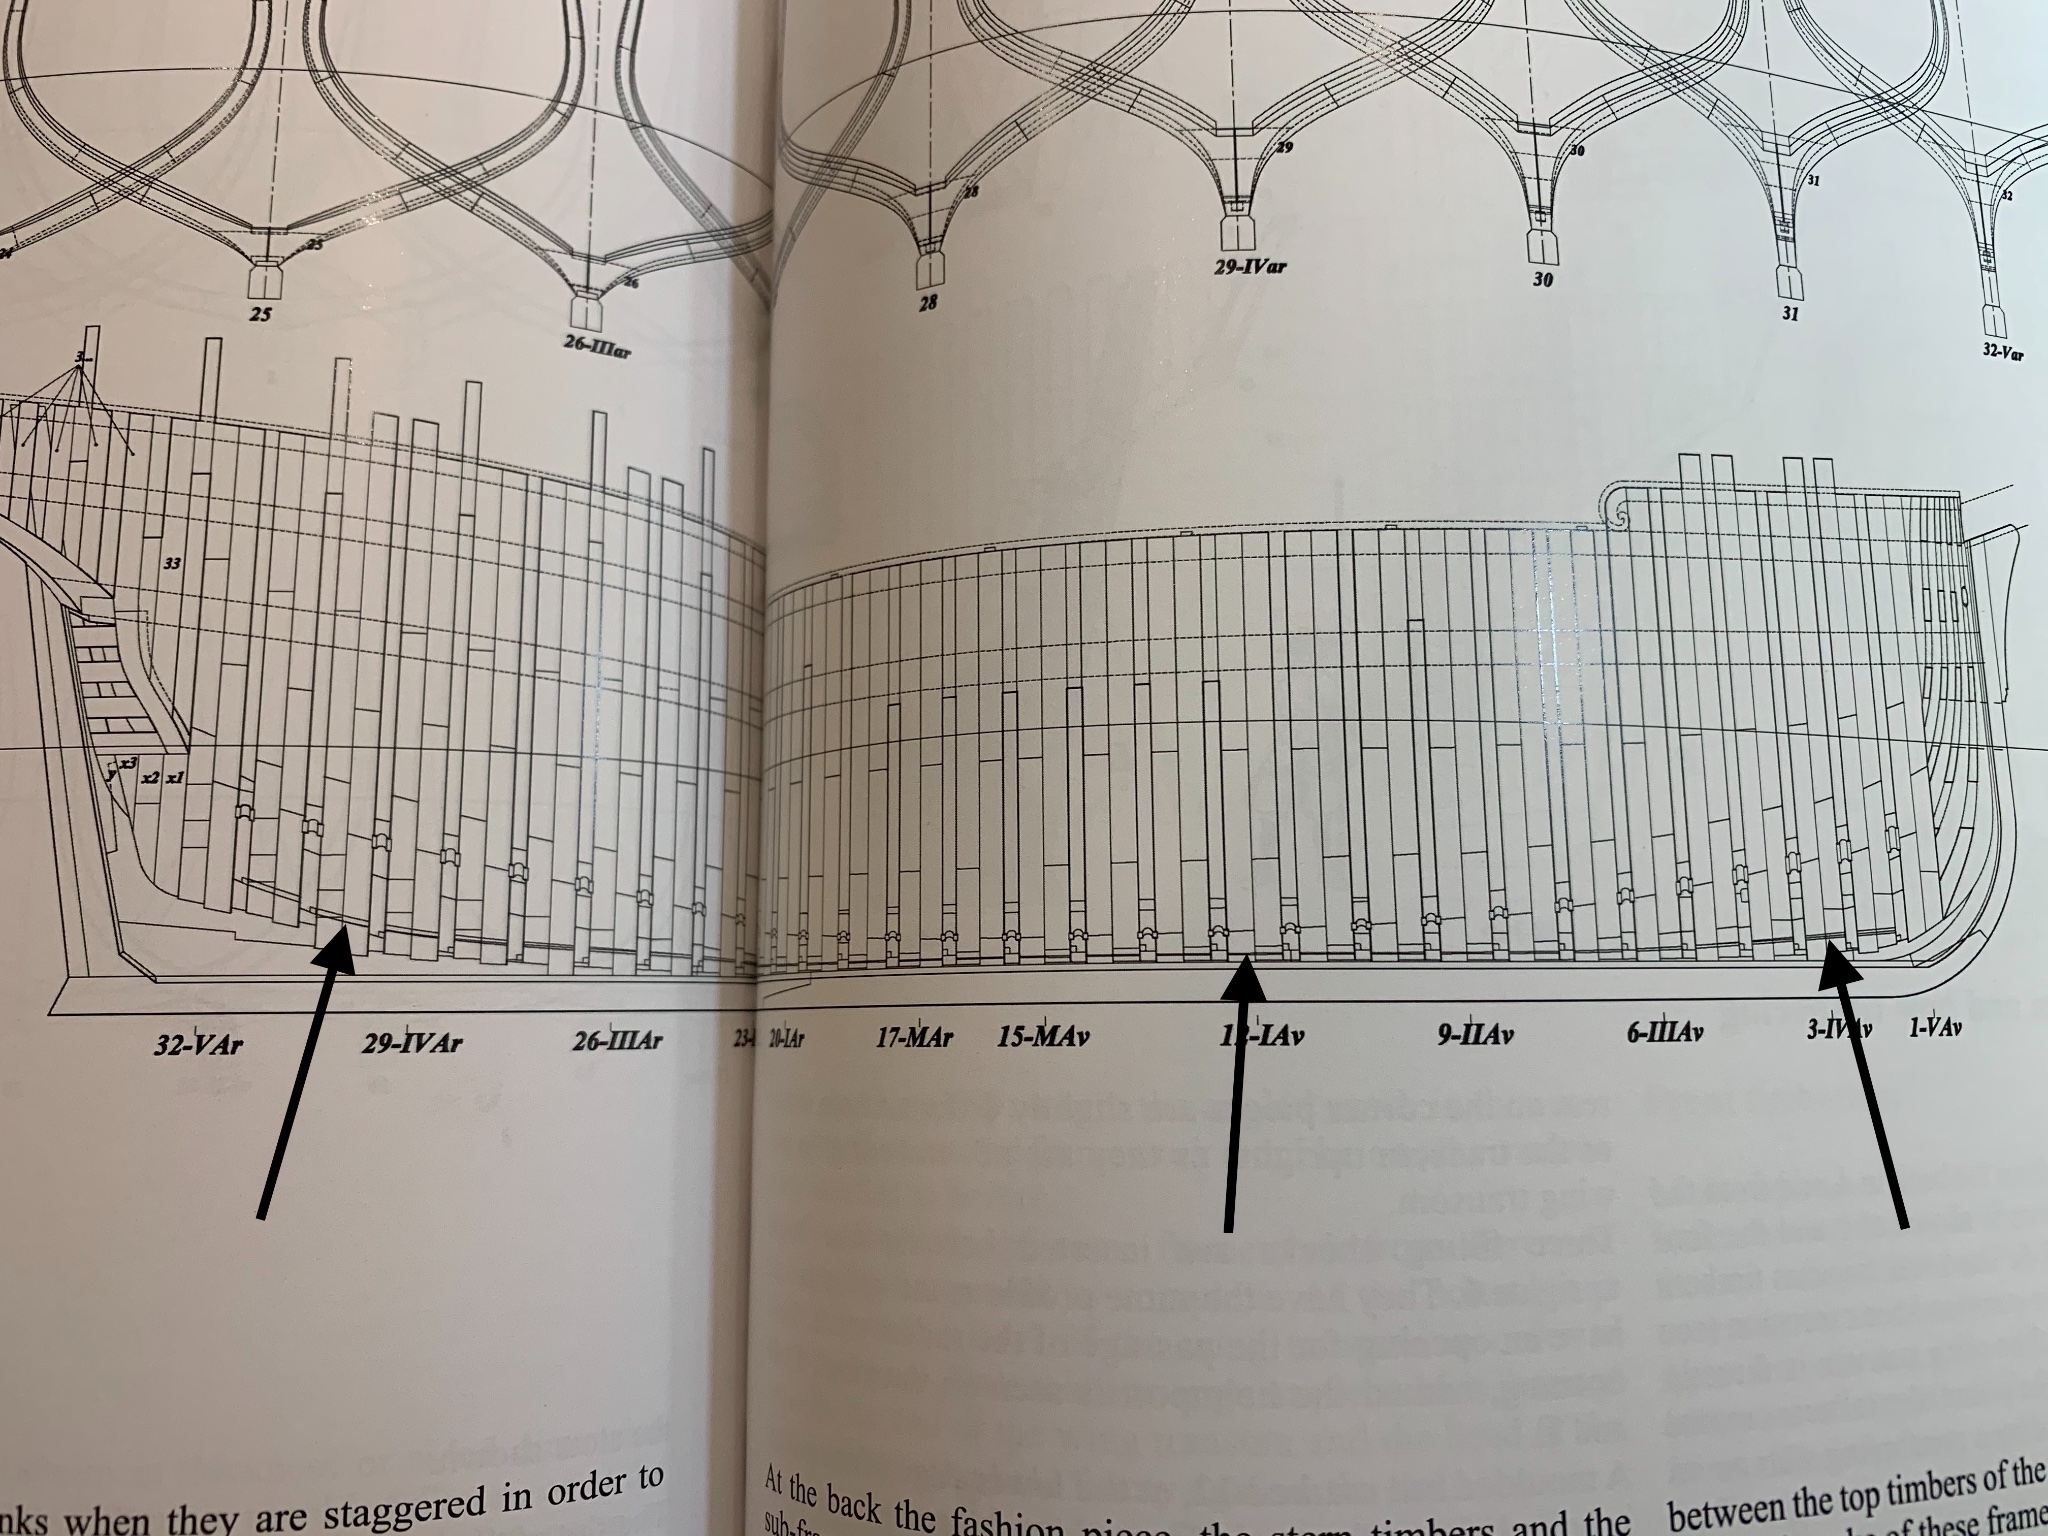
Hi All I'm currently building Le Rochefort and I was hoping that someone could help me interpret a drawing. I believe that the line on the drawing that I have indicated is the limber channel that is cut into the bottom of the frames? Does anyone know if this is correct or am I misinterpreting this particular feature. Thanks Mark
-
Hi Slowhand - for the parts that you have listed to make; both the mill and table saw would be a good investment. However you could make all of those parts on a mill but that comes with experience. So to answer your question - If budget is not an issue I would buy a Byrnes table saw and a Proxxon micro mill as this would make the process more precise and quicker. They are both quite small but also both extremely capable, so after a purchase you just need to practice your art. There are many YouTube videos to watch but if you have no experience of machinery you're local collage generally does classes. Seriously you only have one set of fingers and both of these machines would remove them in a heart beat. I have both machines and treat them with the utmost respect and I was tool room trained as an apprentice. So great machines but do your homework and get some help if you have never used machines like this. Also there is no comparison between a scroll saw and a table saw. There is far more comparison between a scroll saw and a band saw but again not entirely. Scroll saws and Band saws are for shaping wood into shapes. Well as far as simple modelling work goes anyway taking out of the equation roughing out large pieces of timber. Table saws are for precise straight cuts and rebates etc Mills make precise cuts in already precisely cut wood unless you have a big mill which most people do not. Confusing I know but there is not one tool that is better than another. They all do very different tasks in my opinion for what its worth
-
Hull Planking Question
Some Idea replied to tomsimon's topic in Building, Framing, Planking and plating a ships hull and deck
You know..... we built lovely model ships and conversations like this make me wonder why people join forums - They must read this and think I’m not getting involved in that. I wonder how long my forum ban is going to be for that then -
Great post - I too use my use my thickness sander a lot. As an example I've just used it today to to sand 4 x 450mm long planks that are 140mm wide down from 8.5mm thick to exactly 7.9mm thick. Thats a lot of wood to run through a small machine but it did it great which is a nod to its amazing design and quality build. I too have the same problems to over come and the biggest problem by far is the outfeed is too short for me. I over come this by clamping the piece using my thumb to the outfeed side but its far from perfect. I've resigned myself to loosing the last 10 - 15mm of each piece as it always tips up towards the sanding drum no matter what I do. If someone could produce an extension I would buy it in a heart beat as this would definitely improve my sander. Another thing I've found is that sometimes I feed the piece in and due to my lack of concentration it sometimes turns a bit. An adjustable guide would be great but all of these things add a cost to what is such a fantastic machine for our hobby. Its a lovely bit of kit and I'd be lost without it
-
Hull Planking Question
Some Idea replied to tomsimon's topic in Building, Framing, Planking and plating a ships hull and deck
Hi tomsimon - Your question is one that I wondered when I first started building and for me it came back to one thing - time! If your in no rush and are happy to take your time then carpenters glue or better aliphatic resin is my choice. It gives me loads of time to place whatever I'm gluing where I want it and the clean up is so easy. It is for me the laid back enjoyable way of building. If however you need to build somewhat faster, then CA can be dropped between the carpenters glue to grab what your gluing much faster. I find this method very unforgiving but thats just my way of building - others find this way better. Try both and you'll find what suits your building technique -
So all of the above is about right then? For realism only the necessary joints are caulked and if you highlight the lot your a bit of a show off 😉
-
Allan thanks very much for that information and it makes sense. I assumed that sometimes they were simply darkened to show the model makers attention to detail. I don’t know why I thought that I just simply did.
-
Hi Everyone Making joint lines stand out seems to be quite a personal thing the way that they are achieved. Some builders use card and some pencil to name only two methods. My question though is which joints should be highlighted. Should it be just the keel parts or is it again personal choice? For example should the joints on the frames be highlighted or is this going to far? Whats people’s thoughts on this as I’m just starting a new build and would like to know your thoughts Thanks Mark
-
tilt arbor table saw
Some Idea replied to Anthony Hearne's topic in Modeling tools and Workshop Equipment
Yes that’s right and why you also use the larger diameter blade too. Jim recommends a certain blade on the website. It’s never going to be as easy as have a tilting arbour saw but why have another saw just for that purpose. It does take practice but doesn’t everything -
tilt arbor table saw
Some Idea replied to Anthony Hearne's topic in Modeling tools and Workshop Equipment
Hi Anthony - there is a fence fitted to the tilting table which I always use. Small stock I have found does not have to touch the bed as the tilting table is now the new bed. It’s hard to explain but once you’ve had a good play it all comes together. I’m sorry that I cannot be more descriptive -
tilt arbor table saw
Some Idea replied to Anthony Hearne's topic in Modeling tools and Workshop Equipment
I’ve got the tilting table and I find it easy to use. The reason is I actually use it and like any tool the more you use it the easier it becomes. It was a bit awkward at first but so was my first block plane. Once mastered it’s a great bit of kit and I do not regret my purchase at all. I’m just waiting on Jim to contact me so that I can upgrade the table to the larger size. -
Cheers Bruce - This is what I use here's a pack of 3 for £7.99 https://www.amazon.co.uk/Sakura-Pigma-Graphic-Pigment-Calligraphy/dp/B01M24ONH8/ref=sr_1_16?dchild=1&keywords=3mm+chisel+tip+archival+ink+pen&qid=1606586152&sr=8-16 Have a play first but I have found that my best results are by using it on both planks that meet. Good luck!
-
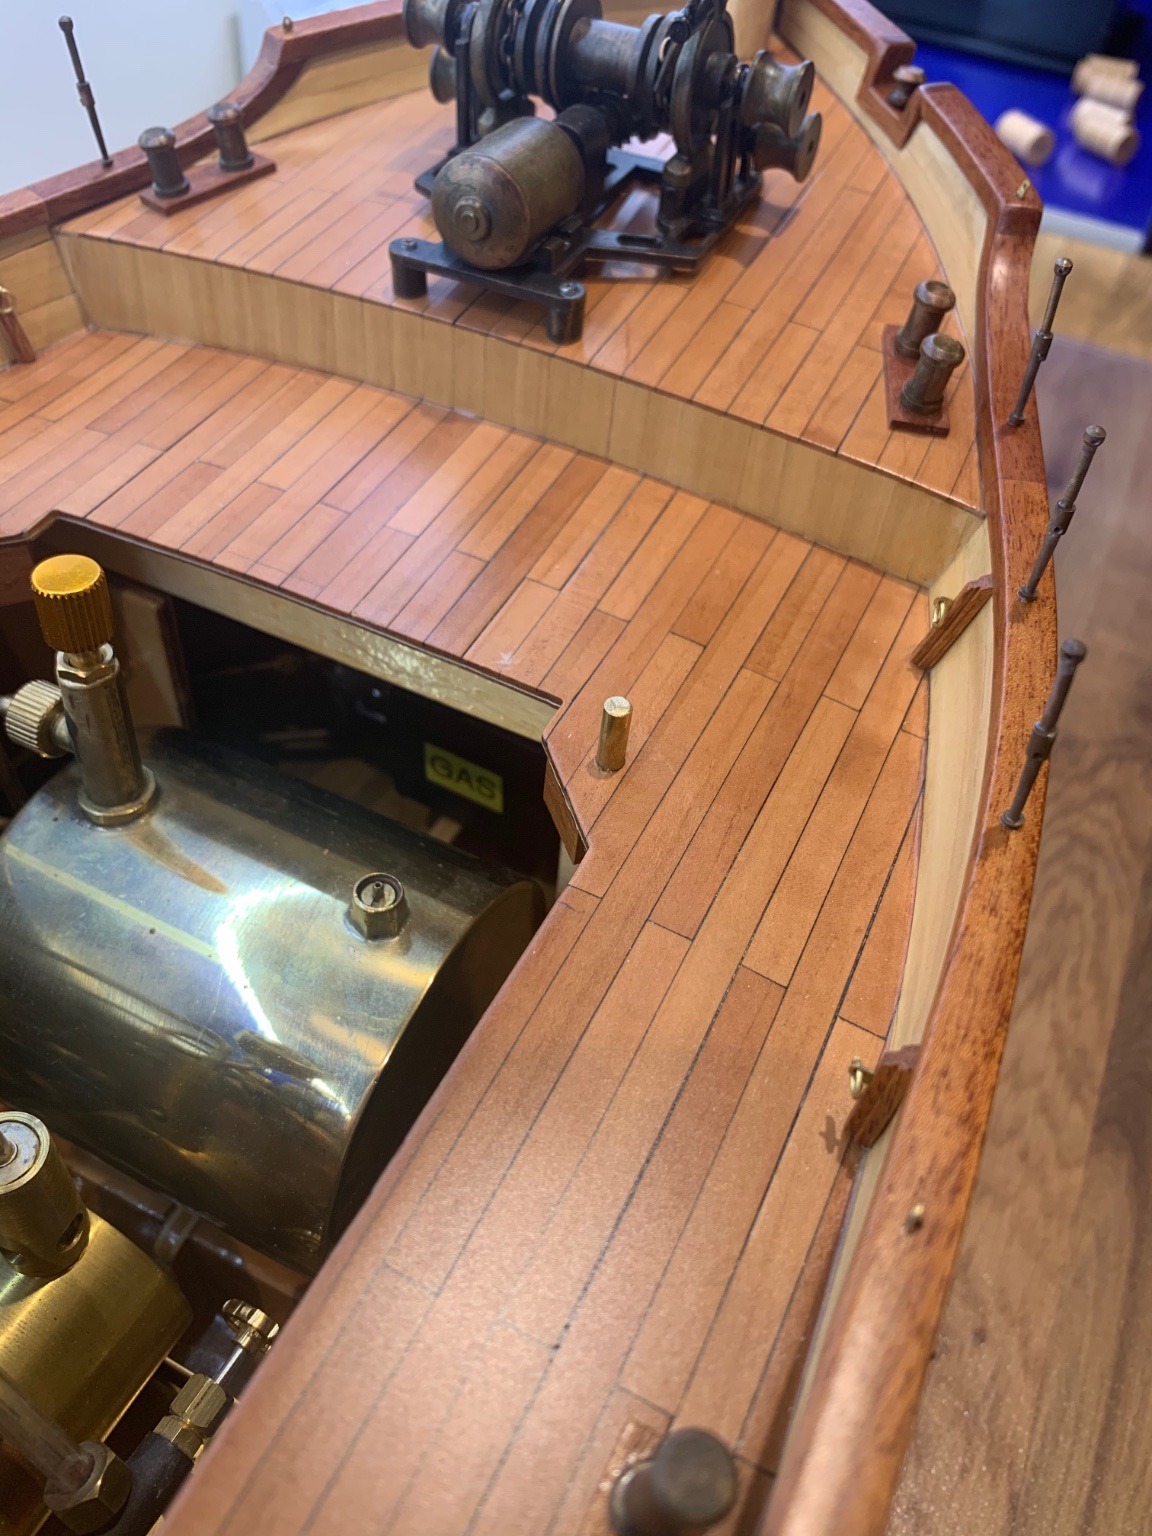
Hi Bruce - I've just taken this picture of my current build. Its pear wood planking with archival ink for the tarring. I've also experimented with boxwood and I had no bleeding with that either. I would suggest getting a pen and doing some trials first but I've never had it bleed
-
I use a chisel tipped marker that is filled with archival ink. You can get them on the internet and the ink doesn't bleed. It makes the job so much easier.
-
Complete the machine plan
Some Idea replied to Bitao's topic in Modeling tools and Workshop Equipment
In my experience the best cut off switch is my wife - when she comes into my workshop and tells me enough is enough and dinners ready Always works for me! -
Hi All Not my sale but I found this today if it helps any builders on here. I use mine quite a lot its a great little tool. https://www.ebay.co.uk/itm/Aeropiccola-Electric-Plank-Bender/324371420787?_trkparms=aid%3D111001%26algo%3DREC.SEED%26ao%3D1%26asc%3D225076%26meid%3D9afe999851414b62ae580618277f14b5%26pid%3D100675%26rk%3D2%26rkt%3D15%26mehot%3Dnone%26sd%3D293634870779%26itm%3D324371420787%26pmt%3D0%26noa%3D1%26pg%3D2380057&_trksid=p2380057.c100675.m4236&_trkparms=pageci%3A4cfe2134-2689-11eb-8ac4-7aadce336392|parentrq%3Ac74023d21750a4d361e9136bfffa690c|iid%3A1 Mark
-
Glue for Templates UK
Some Idea replied to Some Idea's topic in Building, Framing, Planking and plating a ships hull and deck
Thats great thanks very much for your help - I'm off to buy a glue stick and get going on this build -
Glue for Templates UK
Some Idea replied to Some Idea's topic in Building, Framing, Planking and plating a ships hull and deck
Hi Per thanks for the reply - do you use something like this Pritt stick? https://www.amazon.co.uk/Pritt-Original-Childproof-washable-cardboard/dp/B004QFI99Y