Some Idea
-
Posts
1,109 -
Joined
-
Last visited
Content Type
Profiles
Forums
Gallery
Events
Everything posted by Some Idea
-
 That really is such clean and precise carving - I have to ask how you did it? I wish I could achieve such a nice crisp finish
- 589 replies
-
- 3
-

-
- le gros ventre
- cargo
- (and 1 more)
-
Thanks for the review of this book. I’ve ordered mine today and happily await it’s arrival
-
Byrne's saw accessories question..
Some Idea replied to CPDDET's topic in Modeling tools and Workshop Equipment
Bob spot on - Tools are only as safe as the user and their experience. Whilst experience has to be earned, knowledge can be gained through YouTube and many other places. In the demo above she is using a soft wood which is pretty forgiving when you get things wrong. A hard wood on the other hand is far less forgiving but this should not put anyone off. Get reading and watching and then put some time in on the table saw. You'll get it in no time and the results are worth the learning. -
Byrne's saw accessories question..
Some Idea replied to CPDDET's topic in Modeling tools and Workshop Equipment
To prevent this type of kick back when cutting thin planks you still need to push the wood on the thin side. This stops the wood from turning in toward the blade which is dangerous. All you need Is a sacrificial push stick that passes over the blade and carries the thin piece through. Use a nice big piece to keep your fingers well clear of the blade -
Byrne's saw accessories question..
Some Idea replied to CPDDET's topic in Modeling tools and Workshop Equipment
It is but just don’t follow her technique as it’s dangerous. Lots of kick backs due to pushing the wrong side of the work piece and using the fence and mitre together. Get a good book on table saw practice as these little machines are quite powerful for their size -
Cutting Planking
Some Idea replied to English Rebel's topic in Modeling tools and Workshop Equipment
I agree razor saws are great and come in different teeth per inch too. I quite often like to cut too long and then sand back to my required length. -
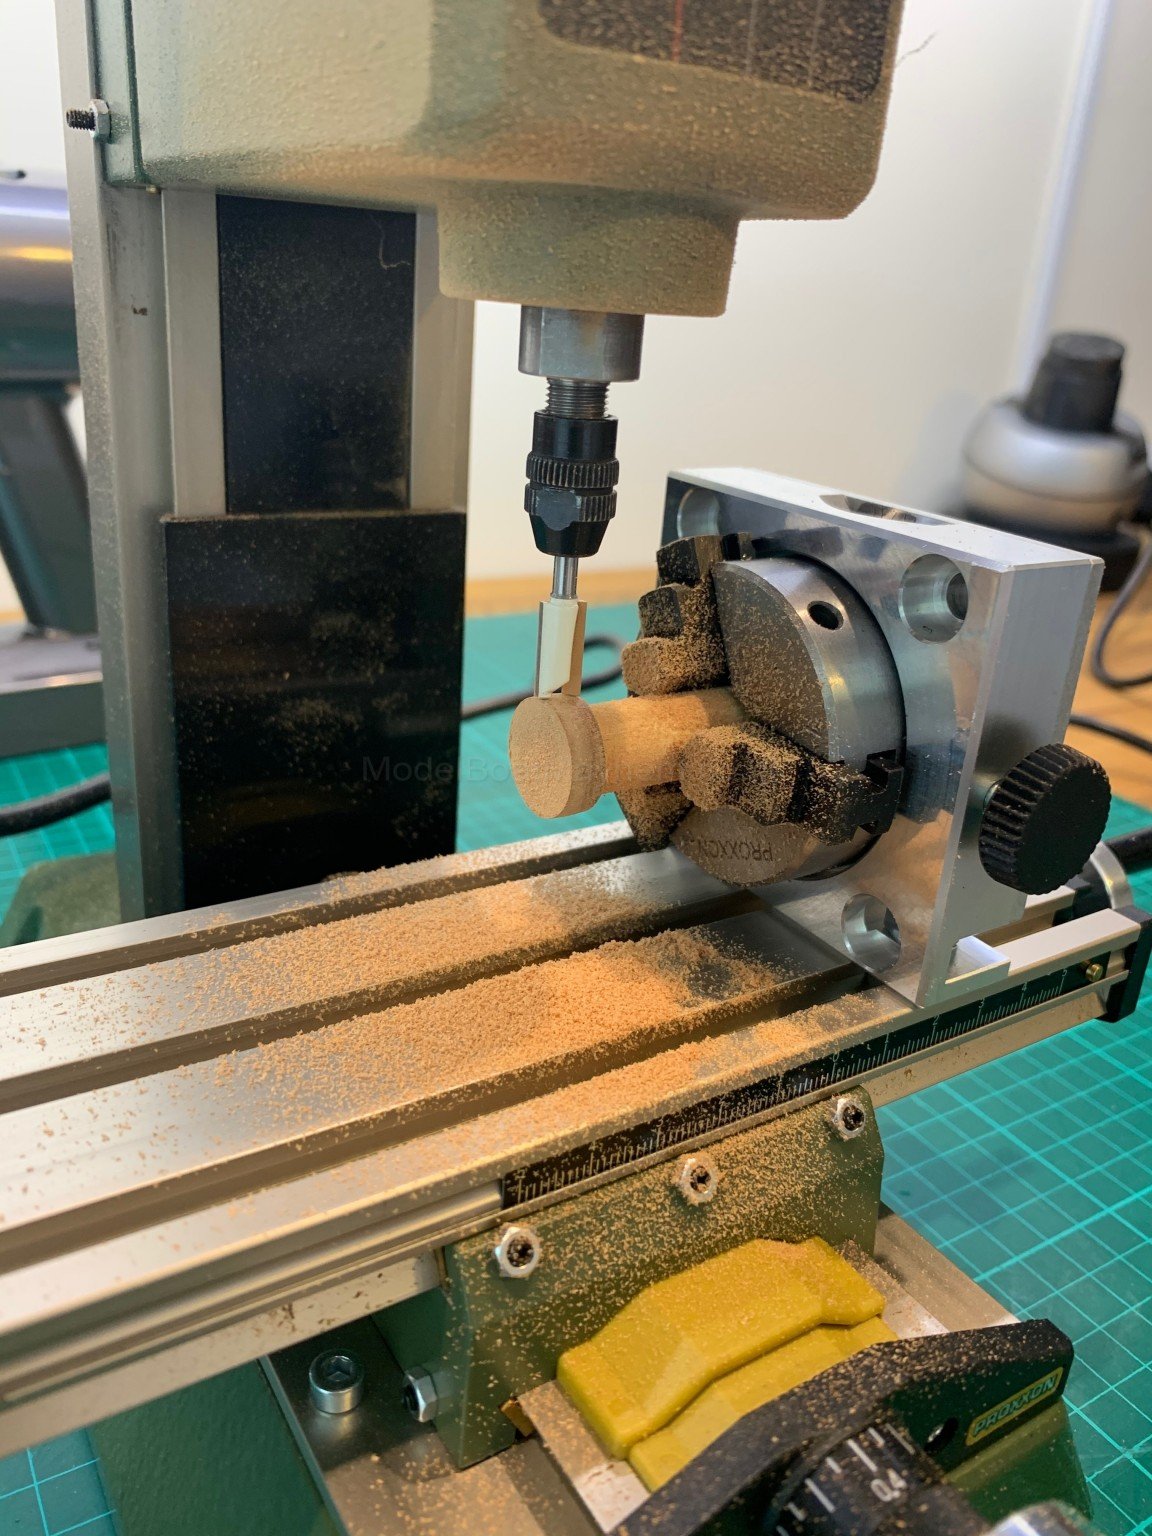
Here’s another example to help you though this time the head is in the horizontal position. I’m milling the cap for a bow bollard and I also cut a shallow rebate in it too. Have the cutter at high speed and take lots of shallow cuts. After I had cut the correct diameter I then set the head vertically and milled the correct thickness.


-
Hi DelF I have to agree with you its a very good bit of kit for what we need. Here's a ring a cut from 3mm boxwood I think it came out ok
-
Hi wefalck yes I do this with metal too. I have this milling machine and dividing head and with limited tooling comes imagination. If I'm gluing or soldering my piece to a dowel to rod to get it in the dividing head I leave it thicker than the finished article. That way when I do remove the mount if it takes a bit of the job with it I still have plenty of material left to clean it up. I also have the proxxon vice and for the MF70 mill its more than adequate if a bit over priced for what it is. Its a great mill for wood mainly because of the very high spindle speeds.
-
This can be done quite easily with the dividing head that you have. You can turn it by hand once the job is locked into the vice just mind your fingers. If the piece you want to cut is not round, glue it to a piece of round dowelling to mount it onto the dividing head. Once you have finished machining cut it away from the dowel and clean it up.
-
Mill Speed to Avoid Chipping
Some Idea replied to ChrisLBren's topic in Modeling tools and Workshop Equipment
I've been milling some pear wood on the same machine and I too have had chipping issues. I solved this by running the machine flat out at 20,000 rpm and using a twin flute cutter to get rid of the chipping quickly. Sorry my reply is late but I've only been doing this work this week -
Planking help
Some Idea replied to Sheerline's topic in Building, Framing, Planking and plating a ships hull and deck
Yep that’s what I see too- 4 replies
-
- 1
-
-
- hms victory
- planking
- (and 1 more)
-
If you cannot afford a compressor the air cans are a waste of money. Instead get the spare wheel out of your car and inflate it to a nice high pressure. Then just connect your airbrush to the valve - job done.
-
Byrnes thickness sander vs Micro Mark's
Some Idea replied to twintrow's topic in Modeling tools and Workshop Equipment
I use the Byrnes thickness sander quite a lot mainly on boxwood, pear wood, and mahogany. I’ve had it now for 18 months and I have only changed the abrasive that Jim supplies once in that time. I use a Bosch Vac and I find that it runs with no dust in the room as it extracts directly above the sanding drum. It’s extremely accurate and I love it. However - like all tools it does take a bit of time to get used to its feel and only then will you get the best from it. But that’s true of all tools. -
Wow - That truly is just beautiful. You have an amazing talent and should be so proud of your work.
- 589 replies
-
- 2
-
-
- le gros ventre
- cargo
- (and 1 more)
-
I use a chisel tipped black marker pen 3mm wide but most importantly it must have archival ink in it. I think the last one I bought cost about £3 so they are dead cheap. I have found that they don't bleed into the wood and putting poly on the top has no effect either. As always do a small test first
-
angle of attack of my blade
Some Idea replied to agamemnon9's topic in Modeling tools and Workshop Equipment
Thanks for the tips all - I've ordered some erasers I think that its a great idea! -
angle of attack of my blade
Some Idea replied to agamemnon9's topic in Modeling tools and Workshop Equipment
I too have had this problem once or twice on my Byrnes saw. Once like you I was using a blade with many teeth and feeding the wood in too fast. Another time was because the wood I was feeding in was slightly warped. So although the blade was above the wood at the start of the cut it was level further along. And this problem becomes amplified because the blades have no clearance on the kerf so they bind and throw the work piece upwards. Over time and with much use I've discovered these quirks and tend not to get them anymore simply though experience -
Jointer question/recommendation
Some Idea replied to davec's topic in Modeling tools and Workshop Equipment
Or you could always make a sled thats does exactly the same thing - for the builders that have a Byrnes saw a miniature one of these can be made very easily. Here's the idea -
Jointer question/recommendation
Some Idea replied to davec's topic in Modeling tools and Workshop Equipment
Hi davec - I used to have the same problem as you but I solved it using my own table saw. As I understand it all you need is a true clean edge that you can work from? Or at least that was my issue. I solved this by fixing my 1 metre strips of wood to an aluminium 1m straight edge on the side of the fence. I then run the wood through the saw making sure that the straight edge runs against the fence. The aluminium is obviously no where near the blade and gives me a true edge on my timber. One cut is all it takes and everything else follows. Saved me from buying a jointer Mark -
Hawse holes
Some Idea replied to allanyed's topic in Building, Framing, Planking and plating a ships hull and deck
I could be wrong but they look like they are parallel to the deck to me -
I've just finished a deck and used a 3mm wide marker pen that contained black archival ink. Being 3mm wide chisel tip it was easy to run down the side of the planks and it did not bleed into the grain. I think it cost £3 and the results are really good
-
tool review Perma-Grit tools
Some Idea replied to James H's topic in REVIEWS: Model Shipwrighting Tools, Parts and fittings
Hi Tracey its good to see Perma- Grit on here and thanks for letting us know about the competition. Going back to my comment - is it possible for Perma-Grit to make a two sided block that has 400 grit on one side and maybe 240 - 320 grit on the other? I would definitely buy the block sanders with this combination as my current ones are just to course on the course side. I do use them by not often enough - I really like the flatness of them and would like to use them more.- 17 replies
-
- 1
-
-
- permagrit
- perma-grit
- (and 3 more)
-
tool review Perma-Grit tools
Some Idea replied to James H's topic in REVIEWS: Model Shipwrighting Tools, Parts and fittings
I agree with the comments above - I have many of these tools and the finest side is still quite course for our needs. If they could make them with a less course abrasive that would be great for our kind of modelling. Unfortunately mine sit in the drawer more than they are used.- 17 replies
-
- 2
-
-
- permagrit
- perma-grit
- (and 3 more)