


BLACK VIKING
-
Posts
476 -
Joined
-
Last visited
Reputation Activity
-

 BLACK VIKING reacted to RGL in HMS Kent F78 by RGL - FINISHED - Trumpeter - 1/350 - PLASTIC - Type 23 Frigate
So I added wring for the rear deck lights, then a fire hose and extinguisher. The railing have taken me hours, primer, black for the wires the silver for rehire turnbuckles and touch ups to go.
-
 BLACK VIKING got a reaction from flying_dutchman2 in The Flying Dutchman by BLACK VIKING - first scratch build
Hi all sorry I haven't posted for a while but life and stuff has got in the way. I have been slowly working away on the FD . I have finished the hull and have now put some details on the stern galleries and the sides. As I'm no good at carving I have used modelling clay to make the scary faces and strange fishy things and to make her look old and battered I have put some barnacles and clamy things on the sides. I need to find away of putting some smaller barnacles on the lower hull.
Thanks for looking.
Martyn
-
BLACK VIKING reacted to Tim Moore in Supermarine Spitfire by Tim Moore - FINISHED - Guillow’s 403 - 1/16 kit, built as display model
My son gave me this throwback kit for my birthday, one I had built and flown many, many years ago. So before I get cracking on finishing the last bits of rigging on HMS Bounty I thought I’d do this as a holiday project. Decided to employ my wooden ship skills such as they are by modifying the kit so it will make a reasonable display model to hang in the new workshop.
Its a simple kit so I’ll just summarize the process so far. The laser cutting is exceptional and putting together the basic frames is straightforward. You’d normally now just cover this with tissue. Instead I inserted 150 pieces of balsa into the framework and then applied a thin watered down layer of latex wood filler and lightly sanded to give a final form, sort of like a clay model. For the wing, I covered the frame with 1/16 balsa underneath and 1/32 basswood topsides. I’ve nested wheel assemblies into the wing so it will look right flying off the ceiling. I ditched the tail assemblies in the kit and formed a more functional rudder and stabilizer from 1/4” balsa. So now I have the basic form of the Spit, and will work on incorporating more detail before painting.
-
 BLACK VIKING got a reaction from Yann Kermeur in The Flying Dutchman by BLACK VIKING - first scratch build
Hi all sorry I haven't posted for a while but life and stuff has got in the way. I have been slowly working away on the FD . I have finished the hull and have now put some details on the stern galleries and the sides. As I'm no good at carving I have used modelling clay to make the scary faces and strange fishy things and to make her look old and battered I have put some barnacles and clamy things on the sides. I need to find away of putting some smaller barnacles on the lower hull.
Thanks for looking.
Martyn
-
 BLACK VIKING got a reaction from firdajan in The Flying Dutchman by BLACK VIKING - first scratch build
Hi all sorry I haven't posted for a while but life and stuff has got in the way. I have been slowly working away on the FD . I have finished the hull and have now put some details on the stern galleries and the sides. As I'm no good at carving I have used modelling clay to make the scary faces and strange fishy things and to make her look old and battered I have put some barnacles and clamy things on the sides. I need to find away of putting some smaller barnacles on the lower hull.
Thanks for looking.
Martyn
-
BLACK VIKING got a reaction from Yann Kermeur in The Flying Dutchman by BLACK VIKING - first scratch build
Hi all .
I have been a bit busy on the FD . The planking has been finished and sanded down. I was going to second plank the hull but I like the look of it as she is meant to look all beaten up.
Next job planking the decks and capping the bulwarks. All the wood has been left over from all the other builds I have done so this has cost me next to nothing so far and quite pleased with the outcome. I'm not very good at carving so I plan to use modelling clay for the carvings so just wondering what the best one to use .
Thanks for following
Martyn
-
BLACK VIKING got a reaction from Yann Kermeur in The Flying Dutchman by BLACK VIKING - first scratch build
Hi all
I have now completed cutting out all the bulkheads and kell and have dry fitted to see how they fit and all seems fine.
Next job cutting out the decks from some 2mm ply .
Thanks for following.
Martyn
-
BLACK VIKING got a reaction from Yann Kermeur in The Flying Dutchman by BLACK VIKING - first scratch build
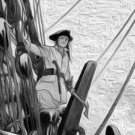
Hi all . I have cut out a few more bulkheads and the false keel . I must admit they take a lot longer than I thought but I'm not going anywhere so they will take as long as they take. As you can see from the pictures I have cut them way side the line so I can sand them down to the right level. Hopefully it's going to be a nice day tomorrow so I can cut some more.
Cheers for following
Martyn
-
BLACK VIKING reacted to md1400cs in The Flying Dutchman by BLACK VIKING - first scratch build
Martyn,
Glad that you are back 🙂 She looks to be a very interesting project - really like the look and your details - well done
Regards,
-
 BLACK VIKING got a reaction from Ainars in The Flying Dutchman by BLACK VIKING - first scratch build
Hi all sorry I haven't posted for a while but life and stuff has got in the way. I have been slowly working away on the FD . I have finished the hull and have now put some details on the stern galleries and the sides. As I'm no good at carving I have used modelling clay to make the scary faces and strange fishy things and to make her look old and battered I have put some barnacles and clamy things on the sides. I need to find away of putting some smaller barnacles on the lower hull.
Thanks for looking.
Martyn
-
 BLACK VIKING got a reaction from CiscoH in The Flying Dutchman by BLACK VIKING - first scratch build
Hi all sorry I haven't posted for a while but life and stuff has got in the way. I have been slowly working away on the FD . I have finished the hull and have now put some details on the stern galleries and the sides. As I'm no good at carving I have used modelling clay to make the scary faces and strange fishy things and to make her look old and battered I have put some barnacles and clamy things on the sides. I need to find away of putting some smaller barnacles on the lower hull.
Thanks for looking.
Martyn
-
BLACK VIKING reacted to kostas_gr in HMS Victory by kostas_gr - FINISHED - Corel - 1:98 Scale - cross-section
Hull is almost ready, I will keep adding some details while working with main mast and rigging
-
BLACK VIKING reacted to Blackreed in Slo-mo-shun IV by Blackreed - Billings Boats - 1/12 - hydroplane
Once all of this had dried I cut the keel free.
This was fairly easy, the Zona saw made quick work of the rear couple, then because the frame got in the way I turned to the Dremel, oh the smell of burning wood.
Only one of the frame support pieces popped free, easy fix, these pieces all fit together so well there’s practically no reason for glue. I am going to pin them together, I do not want any of this coming apart later.
I am going to be working off the supports for the engine mounts, or at least in my mind that’s how it’s working so far.
-
BLACK VIKING reacted to Eugenio Treviño in HMS Victory by Eugenio Treviño - Corel - 1:98
Port side hammock netting installed.
Experience is paying dividends!!! I was able to set it very rapidly by first threading the “u”shaped supports with the brass wire and then gluing them into position.
Here are the picks !!!
Best regards.
-
BLACK VIKING reacted to Bedford in Royal Caroline by Bedford - Panart - 1/48
The fore deck is planked, it was much easier to joggle the planks on this deck due to ease of access. I've also done the kings cabin with two of my favorite pics of my little girl. I milled some flat brass bar into the picture frames and added a little furniture just for the heck of it. Now with the cabin top on you can't really see much in there but I know it's there.
-
BLACK VIKING reacted to Lucius Molchany in Heinkel He-111 by Lucius Molchany - FINISHED - PLASTIC
Thanks it came out really nicely and was a quick easy build!
-
BLACK VIKING reacted to Lucius Molchany in Heinkel He-111 by Lucius Molchany - FINISHED - PLASTIC
Added a couple bombs for fun!
-
BLACK VIKING reacted to G.L. in Norwegian Whale Boat by G.L. - FINISHED - scale 1/10 - SMALL
9.5 Boat protection
In the logs for model boat kits I found the log of Mike_in_RI who was building a New Bedford Whale boat in the davits. He made mats to protect the keel of his boat from shafing on the cranes. His first idea was to use mats but finally he made baggy wrinkles. Personally I like the idea of mats and I use his method to make some. I suppose that Mike can forgive my plagiarism as he didn't use himself mats.
When the two mats are weaved, I stain them with dark brown stain and soak them with textile glue around a piece of wood with the same dimensions as the crane to fix the shape of the mats and to flatten the rope fibers.
Then they are tied on the cranes.
With the boat keel standing on the mats:
When standing on the cranes, the boat is also leaning against the bearing posts. In heavy weather the boats' rub rail can be damaged by chafing against the bearing posts. To protect the rail I make a rope seizing round the bearing posts.
As finish of the seizing I want to place a Turkish knot above and below it. To make the knot I use a googled jig
When the whole pattern of the jig has been followed I slide the knot on a round tube to tighten it up a bit ...
... and to double it.
Then I place the knot on the bearing post on top and at the bottom of the seizing.
Finally the rope work is stained dark and coated with mate varnish.
Thank you very much for reading this log, for your likes and for your encouraging comments.
Till next week!
-
BLACK VIKING reacted to John Clements in Le Soleil Royal by John Clements - Heller - 1/100
Latest progress. As you see from the pictures, I have extended the fleur design to fill all the available space, except for two larger areas where I have inserted a sun design, the same sun with a face in the middle that appears on French cavalry flags of the Bourbon era. As you commented, Marc, there is not a lot of room to do much else. I also extended the looped L design to the stern as I plan that area will be visible at the back of the single gallery I intend to mount. I've cut all the panels out of the Heller quarter galleries - the designs they have used don't seem to fit anything very authentic anyway - and will fill the lower level with false windows, and have cut the floor out of the lower stern gallery so it will fit flush up against the stern bulkhead with a bit of adjustment and filling.
I have some more detail to do on the hull itself and I'm waiting an order for the cannon, and the blocks, hooks and eyebolts for their tackle, to fit on the main deck before going further.
Now that the sides are in place, I've realised what an ugly tub this ship actually is! It might look spectacular when done, but compared to the beautiful lines of Le Glorieux..................well, maybe without the masts the hull looks out of proportion but it does show how the design looks back as much as forward, I think.
-
BLACK VIKING reacted to Landlubber Mike in F4F-4 built as FM-1 Wildcat by Landlubber Mike - FINISHED - Tamiya - 1/48
With my foray into plastic, I've done four Accurate Miniatures kits - well, I guess technically two were in-house creations (the F3Fs), while the F4B-4 and the P-6E were repops of some older Monogram kits. I was looking up other kits with yellow wings and came across the AM Vindicator - I had read about the plane, but never knew what exactly it looked like. When I found it, I was like, man this is quite the ugly bird, but kinda in an attractive way. Plus, when I saw there was a yellow wings version available, I was in. The knock on the kit is that a number of them had an ugly depression in the side of the rear half of the fuselage, which was a pain to fix because it was in that area that looks corrugated. When I bought the kit from UMM-USA, I asked if the particular kit they were selling had that issue and the owner, John Vojtech, kindly included another set of fuselage halves that look perfect. What a nice guy!
Thanks for the clarification on it being pre-way versus neutrality patrol. I think I had actually copied those words from either the instructions or another build log, so good to have my terms correct! I'll probably go with the kit markings, as they are different and I won't have to paint the cowl a separate color. Otherwise, I have the Yellow Wings decals set for this plane and can do it up in the typical fashion of other yellow wings (like the other planes I built) with the belly band, painted cowl and tail, etc.:
For the wing fold, the kit does not include any instructions at all, but includes the insert pieces necessary when you cut the wings in half. Another gentleman actually went through with it, and posted pictures here: http://www.hyperscale.com/2008/features/sb2u1cb_1.htm
-
BLACK VIKING reacted to Baker in M29 Weasel family 1/72 (scratch) by Backer Finished
Building the rear "floating tank"
This seemed to be the simplest of the 2 to build, so I started with this.
Top
sides
"bottom"
rear plate
Ready for sanding an cutting
rough shape ready
Next to do, the front floating tank.
Thanks for following
-
BLACK VIKING reacted to Vegaskip in Ship paintings
Third in the 'Marina Raskova' series. Minesweeper T114 torpedoed with heavy loss of life.
W/C 14” X 10”
-
BLACK VIKING reacted to RGL in HMS Kent F78 by RGL - FINISHED - Trumpeter - 1/350 - PLASTIC - Type 23 Frigate
So a few cool action shots from the rear section, the torpedo launchers
766B07F0-8338-4212-ACE8-67CC6EE49A8F.webp
-
BLACK VIKING reacted to Chilliard in Black Pearl by Chilliard - Zvezda - 1/72
I have been reading this forum for several years and have learned a lot. I finally decided that I would post a build log. I have been building models all my life, including model trains, military armor, and airplanes. This is the second sailing ship that I have built. The first one was the Lindberg Jolly Roger that I built as the La Flore. You can see images of it in my album. My current build is the Black Pearl.
I started the Black Pearl by scratch building a replacement bulk head out of styrene and then painted and weathered it.
I then painted and weathered the decks.
I wanted to have some lighting in the ship. So I installed some flickering amber LED's. I also programmed an Arduino to adjust the flickering rate for the captain's cabin and the lanterns using conventional LED's
The kit's parts that are supposed to be used for the stairs are horrible. I decided to replace them with 3D printed parts that I designed.
I then painted and weathered the rest of the ship.
Here are a few current photos.
-