

.jpg.f26acc9a74319261612561bfa7da1303.jpg)
vaddoc
-
Posts
1,523 -
Joined
-
Last visited
Reputation Activity
-

 vaddoc got a reaction from Vladimir_Wairoa in 24' gaff-rigged ketch by vaddoc - FINISHED - Scale 1:12- exploration - a Tad Roberts design
Thank you both, I will certainly be asking for help very soon. There is no doubt that it is very difficult to get accurate results with just hand tools plus it is time consuming. I decided I needed a scroll saw and a disc sander. I bought the Dremel scroll saw but the disc sanders were just too expensive. The problem was solved when my neighbour gave me a jigsaw, an old single speed drill and a bag full of sand papers, I would make a homemade disc sander!
I put a cap on £15 in term of costs so I used whatever I had in the garage. The end result functions almost flawlessly. I had to find a way to reduce the speed but as this old drill has a universal motor it just needed a £1.5 rheostat. It has a 200 mm plate and it is not rally too noisy. Total cost was around £11.
I had to cut up the old lofting table though to reclaim the MDF. Serves it right for being inaccurate though.
-
 vaddoc got a reaction from Jim Cricket in 24' gaff-rigged ketch by vaddoc - FINISHED - Scale 1:12- exploration - a Tad Roberts design
The 3D program is amazing, I printed out the lines for the frames, the planks, the apron and the stem. The lap for the frames is now much better and the bevels are easily visible. I arranged the pieces closely to minimise wood wasting as pear is expensive. The question is whether I ll be able to shape the wood accurately enough. I intend to use spray glue to attach the paper to the wood.
-
 vaddoc got a reaction from MikeB4 in 24' gaff-rigged ketch by vaddoc - FINISHED - Scale 1:12- exploration - a Tad Roberts design
Clearly the job call for better and more accurate lofting and an easier wood than lime. So far it has taken me some months to get to this stage but the decision is taken: Start again!
This time I plan to use a 3D program to design the frames, keel, planks, stem and false stem. I intend to use pear wood and also get some power tools. I have a better understanding of the plans now so I am optimistic that things will work out in the end!
So at last a nice picture: Pear wood is truly beautiful!
-
 vaddoc got a reaction from mikegerber in 24' gaff-rigged ketch by vaddoc - FINISHED - Scale 1:12- exploration - a Tad Roberts design
I tried the microwave but it did not work. Instead of heating the wood it completely dries it. The hair thingy however was instant and brilliant. Wet the strips and pass them through, taking care not to crush the wood. There seems to be a small learning curve of about 3 strips!
All the strips now are on the jig waiting to cool down. I ll probably leave them overnight. The pressure from the pegs is gentle so hopefully the epoxy will not squeeze out this time
-
vaddoc got a reaction from mikegerber in 24' gaff-rigged ketch by vaddoc - FINISHED - Scale 1:12- exploration - a Tad Roberts design
It is time then to bent the strips. But how to do it? Different options exist.
1. Stew the strips. From previous experience it works but it is very messy
2. Use my mother's old hair thingy
3. Microwave the strips
-
vaddoc got a reaction from mikegerber in 24' gaff-rigged ketch by vaddoc - FINISHED - Scale 1:12- exploration - a Tad Roberts design
It looks alright!
-
vaddoc got a reaction from mikegerber in 24' gaff-rigged ketch by vaddoc - FINISHED - Scale 1:12- exploration - a Tad Roberts design
The previous jig was just pieces of wood nailed on the lofting table and this causes the clamps to compress the strips unevenly. I need clamps that will lie flat on the strips and that will not exert too much pressure. I decided to modify ordinary wooden pegs. I sanded the ends and gave them a slight curve
However they still would not lie flat so a bevel was needed. All these were done in a flash with the disc sander which I must say is brilliant. I am still on the first 120 grit sand paper!
-
vaddoc got a reaction from mikegerber in 24' gaff-rigged ketch by vaddoc - FINISHED - Scale 1:12- exploration - a Tad Roberts design
The process for making the frames seems to go well but I am still thinking about the disastrous results of the first attempt to laminate the stem. Since then I have done some studying and I feel ready to try again. I am thinking of using walnut as it is a very nice wood which sands nicely, steam bents and looks good. Also I can get 0.5 mm strips which I hope will minimise spring back. Anyway, I intend to steam bent the strips first.
The first step is to built a jig. I had the design in my mind for some time so it took little time to produce it. I used offcuts of MDF and 1mm plywood. Again I am afraid the result is far from elegant!
-
vaddoc got a reaction from Jim Cricket in 24' gaff-rigged ketch by vaddoc - FINISHED - Scale 1:12- exploration - a Tad Roberts design
Thank you John, i will need all the support I can get!
Back to the frames, even just glued on the edge the pieces hold together very securely. The disk sander makes sure that the edges are perfectly square.
The alignment pins are inserted, the joints are lightly sanded and the pieces are set back to back, the contact areas outlines and then glued
The frame pattern is glued and a strip added to strengthen the frame
Then the scroll saw and the disc sander are used to cut along the pattern. The final sanding and the bevelling are done with the needle files.
It is too early to tell but the notches and bevels don't look too far off. Certainly there is a world of difference to the previous attempt. I might need to deepen the notches but the amount of wood to be removed will probably be small
-
 vaddoc got a reaction from pergynt in 24' gaff-rigged ketch by vaddoc - FINISHED - Scale 1:12- exploration - a Tad Roberts design
I am ready to start cutting the frames. I am posting a photo of the cant frames and the Transom where the bevelling is shown. Initially there will be a temporary form instead of the cant frames and I will need to think of something to hold the Transom securely. Also, Tad does not give precise dimensions for the centerboard but the computer program was again very helpful
-
 vaddoc got a reaction from Mark Pearse in 24' gaff-rigged ketch by vaddoc - FINISHED - Scale 1:12- exploration - a Tad Roberts design
and ending up with all the frames, apron, keel and stem including bevels!
-
 vaddoc got a reaction from hexnut in 24' gaff-rigged ketch by vaddoc - FINISHED - Scale 1:12- exploration - a Tad Roberts design
According to the plans the frames can be half or full lap and need to be 4 mm thick. However the first frame I built was flexing a lot so I decided to increase the thickness to 6 mm. These are all the frames ready, as well as the Transom and the temporary mould at station 0 which later will be replaced with the cant frames. The dots are toothpicks I glued to increase the strength. The frames now are super rigid and finished with Tang oil.
-
 vaddoc got a reaction from mtaylor in 24' gaff-rigged ketch by vaddoc - FINISHED - Scale 1:12- exploration - a Tad Roberts design
It looks alright!
-
 vaddoc got a reaction from avsjerome2003 in 24' gaff-rigged ketch by vaddoc - FINISHED - Scale 1:12- exploration - a Tad Roberts design
Back to the boat now. The frame segments are cut initially with the saw and finished with the disc sander. Then they are assembled on the paper pattern and edges glued together. Dots placed on the print outs are used to align everything. This produces very accurate results. Using power tools makes a world of difference. Also pear is so much nicer than lime and despite being much harder seems to sand as easily. The spray glue does not penetrate the wood and is very easily removed with isopropyl alcohol.
-
vaddoc got a reaction from Vladimir_Wairoa in 24' gaff-rigged ketch by vaddoc - FINISHED - Scale 1:12- exploration - a Tad Roberts design
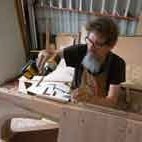
I think maybe expand a bit on the tools. For a scroll saw a blower is necessary and indeed a fish tank pump works brilliantly and is silent. it is the black box next to the saw. I got a strong one but really even the weakest one would be fine. The holding mechanism is temporary, I ordered a coolant lathe hose.
I thought also a router (kind of) might be useful so I improvised a bit and the assembly is solid and square.
I am sure all these could be made more stylish but at least they are functional!
-
vaddoc got a reaction from avsjerome2003 in 24' gaff-rigged ketch by vaddoc - FINISHED - Scale 1:12- exploration - a Tad Roberts design
Thank you both, I will certainly be asking for help very soon. There is no doubt that it is very difficult to get accurate results with just hand tools plus it is time consuming. I decided I needed a scroll saw and a disc sander. I bought the Dremel scroll saw but the disc sanders were just too expensive. The problem was solved when my neighbour gave me a jigsaw, an old single speed drill and a bag full of sand papers, I would make a homemade disc sander!
I put a cap on £15 in term of costs so I used whatever I had in the garage. The end result functions almost flawlessly. I had to find a way to reduce the speed but as this old drill has a universal motor it just needed a £1.5 rheostat. It has a 200 mm plate and it is not rally too noisy. Total cost was around £11.
I had to cut up the old lofting table though to reclaim the MDF. Serves it right for being inaccurate though.
-
 vaddoc got a reaction from qwerty2008 in 24' gaff-rigged ketch by vaddoc - FINISHED - Scale 1:12- exploration - a Tad Roberts design
Back to the boat now. The frame segments are cut initially with the saw and finished with the disc sander. Then they are assembled on the paper pattern and edges glued together. Dots placed on the print outs are used to align everything. This produces very accurate results. Using power tools makes a world of difference. Also pear is so much nicer than lime and despite being much harder seems to sand as easily. The spray glue does not penetrate the wood and is very easily removed with isopropyl alcohol.
-
vaddoc got a reaction from qwerty2008 in 24' gaff-rigged ketch by vaddoc - FINISHED - Scale 1:12- exploration - a Tad Roberts design
I think maybe expand a bit on the tools. For a scroll saw a blower is necessary and indeed a fish tank pump works brilliantly and is silent. it is the black box next to the saw. I got a strong one but really even the weakest one would be fine. The holding mechanism is temporary, I ordered a coolant lathe hose.
I thought also a router (kind of) might be useful so I improvised a bit and the assembly is solid and square.
I am sure all these could be made more stylish but at least they are functional!
-
 vaddoc got a reaction from yvesvidal in 24' gaff-rigged ketch by vaddoc - FINISHED - Scale 1:12- exploration - a Tad Roberts design
I am ready to start cutting the frames. I am posting a photo of the cant frames and the Transom where the bevelling is shown. Initially there will be a temporary form instead of the cant frames and I will need to think of something to hold the Transom securely. Also, Tad does not give precise dimensions for the centerboard but the computer program was again very helpful
-
 vaddoc got a reaction from aviaamator in 24' gaff-rigged ketch by vaddoc - FINISHED - Scale 1:12- exploration - a Tad Roberts design
Thank you both, I will certainly be asking for help very soon. There is no doubt that it is very difficult to get accurate results with just hand tools plus it is time consuming. I decided I needed a scroll saw and a disc sander. I bought the Dremel scroll saw but the disc sanders were just too expensive. The problem was solved when my neighbour gave me a jigsaw, an old single speed drill and a bag full of sand papers, I would make a homemade disc sander!
I put a cap on £15 in term of costs so I used whatever I had in the garage. The end result functions almost flawlessly. I had to find a way to reduce the speed but as this old drill has a universal motor it just needed a £1.5 rheostat. It has a 200 mm plate and it is not rally too noisy. Total cost was around £11.
I had to cut up the old lofting table though to reclaim the MDF. Serves it right for being inaccurate though.
-
vaddoc got a reaction from Jim Cricket in 24' gaff-rigged ketch by vaddoc - FINISHED - Scale 1:12- exploration - a Tad Roberts design
Dear all, this is my second scratch built and I must admit I am reluctant to start a built log after the amazing builds I have seen in the forum. But then again there might be room for a complete amateur!
I feel much more attracted by the more modern elegant yachts and sailboats than the ships of the line and 18th century ships. There are too many boats I find stunning but I stumbled on the website of Tad Roberts, where I saw this sailboat which I liked and found interesting. Tad has also released the plans so I decided to give it a go. The design is quite unusual I think, it has plywood bottom with fibreglass sheathing and plank on frame for the sides. The frames are notched to accept the planks and it is designed for rowing as well. I am not sure if I am ready for this but we ll soon (or not too soon) find out.
I
-
vaddoc got a reaction from mtaylor in 24' gaff-rigged ketch by vaddoc - FINISHED - Scale 1:12- exploration - a Tad Roberts design
Back to the boat now. The frame segments are cut initially with the saw and finished with the disc sander. Then they are assembled on the paper pattern and edges glued together. Dots placed on the print outs are used to align everything. This produces very accurate results. Using power tools makes a world of difference. Also pear is so much nicer than lime and despite being much harder seems to sand as easily. The spray glue does not penetrate the wood and is very easily removed with isopropyl alcohol.
-
 vaddoc got a reaction from Mirabell61 in 24' gaff-rigged ketch by vaddoc - FINISHED - Scale 1:12- exploration - a Tad Roberts design
Thank you both, actually it does not get hot at all. This is a drill made almost entirely of steel, very heavy and It gets used only for short periods of time. Also pear seems to produce larger particles so there is little dust and the sand paper does not get clogged. I played with the idea of self adhesive sand paper but in the end i varnished the MDF, sand it down to 400 grit and used ordinary sandpaper with re-positionable spray glue. It works perfectly and now I wonder how I lived up to now without one.
-
vaddoc got a reaction from hexnut in 24' gaff-rigged ketch by vaddoc - FINISHED - Scale 1:12- exploration - a Tad Roberts design
I am ready to start cutting the frames. I am posting a photo of the cant frames and the Transom where the bevelling is shown. Initially there will be a temporary form instead of the cant frames and I will need to think of something to hold the Transom securely. Also, Tad does not give precise dimensions for the centerboard but the computer program was again very helpful
-
 vaddoc got a reaction from gieb8688 in 24' gaff-rigged ketch by vaddoc - FINISHED - Scale 1:12- exploration - a Tad Roberts design
Thank you both, I will certainly be asking for help very soon. There is no doubt that it is very difficult to get accurate results with just hand tools plus it is time consuming. I decided I needed a scroll saw and a disc sander. I bought the Dremel scroll saw but the disc sanders were just too expensive. The problem was solved when my neighbour gave me a jigsaw, an old single speed drill and a bag full of sand papers, I would make a homemade disc sander!
I put a cap on £15 in term of costs so I used whatever I had in the garage. The end result functions almost flawlessly. I had to find a way to reduce the speed but as this old drill has a universal motor it just needed a £1.5 rheostat. It has a 200 mm plate and it is not rally too noisy. Total cost was around £11.
I had to cut up the old lofting table though to reclaim the MDF. Serves it right for being inaccurate though.