

catopower
-
Posts
1,900 -
Joined
-
Last visited
Content Type
Profiles
Forums
Gallery
Events
Everything posted by catopower
-
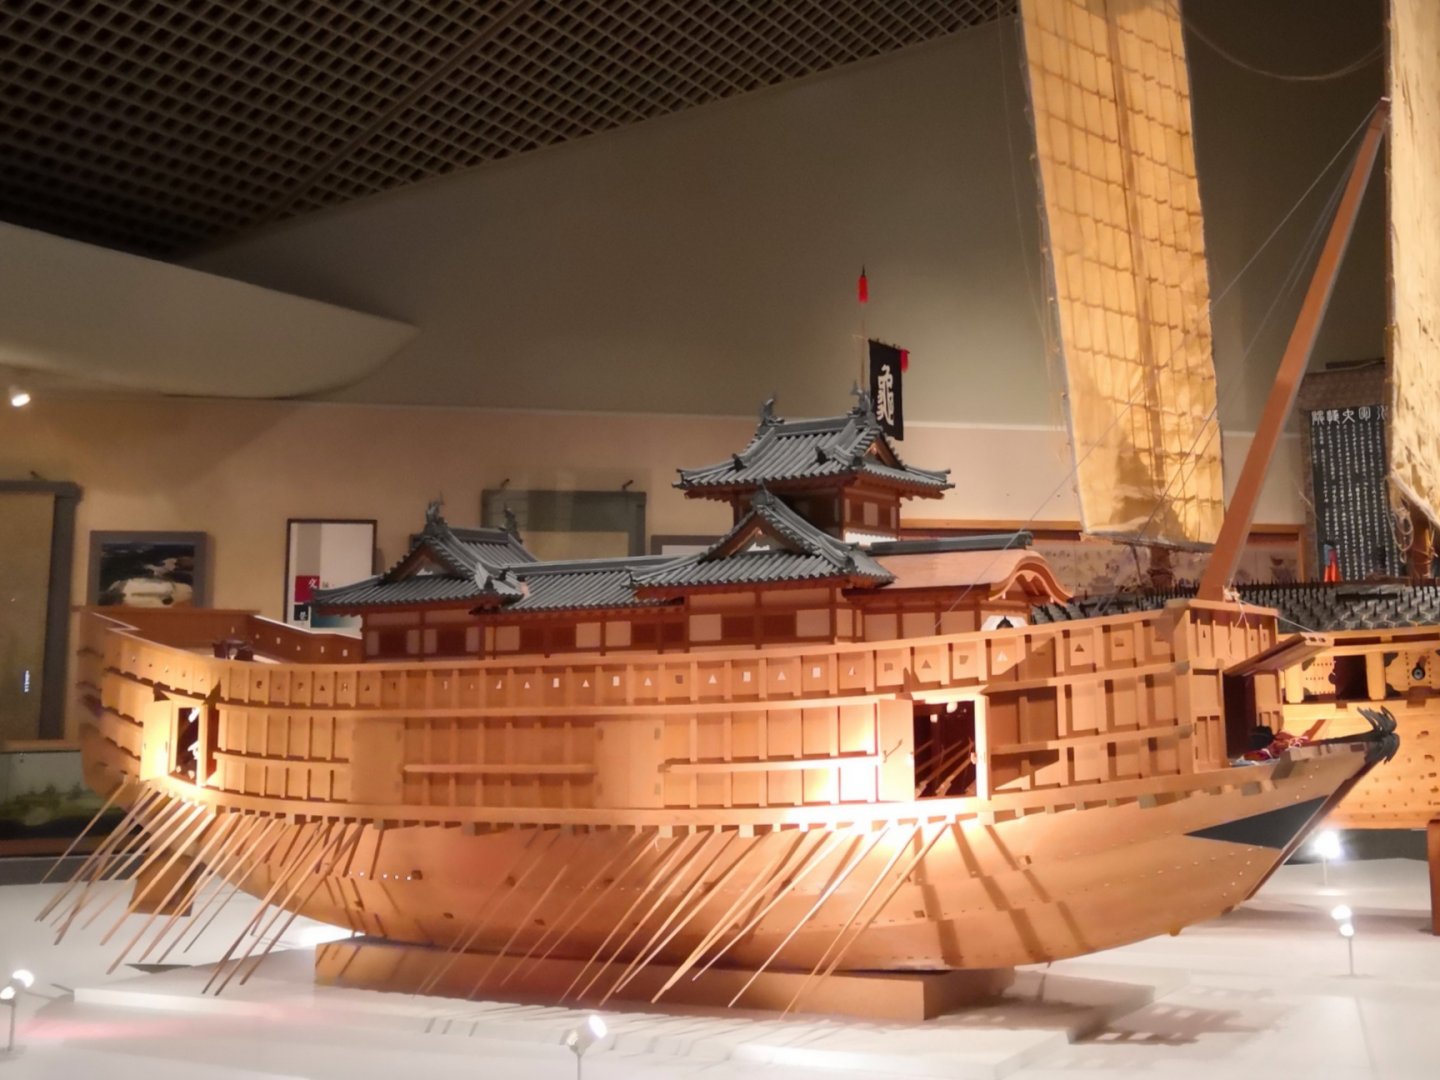
 At long last, it’s happening! After some enthusiastic petitioning by Kazunori Morikawa, myself, and others to the Japanese wooden model kit maker Woody Joe, it appears that the company is now developing the prototype for an Atakebune model kit. For those who didn't already know, there were three major classes of warships used by the Japanese feudal armies of the warring states period: The large Atakebune, the medium-sized Sekibune or Hayabune, and smaller Kobaya. The Atakebune were boxy-looking, lumbering ships that were effectively floating fortresses. While they were equipped with one large mast and square sail, as well as a single bank of oars, they were often towed by the smaller warships. Woody Joe just announced development work is under way. The new model is 1/100 scale, and it’s only a prototype, so we won’t know if it’s going to go into production yet. I’m a bit disappointed that the model is not 1/72 scale, as that scale would then match Woody Joe’s Higaki Kaisen and Kitamaebune kits, plus it would then be compatible with 1/72 samurai figures that are currently available. However, a 1/72 scale model would almost 40% larger than a 1/100 scale model. And, considering these were large ships, that would be a fairly big kit that might be harder for company to manufacture. Also, such a large model may be less appealing in Japan, which is their primary market. \ By the looks of the photo they posted, they are actually working on a model that resembles the model at the Nagoya Castle Museum, which is on Kyushu, Japan's souther most and western most of the four main islands. The museum model is based on an old painting, also in the museum. In a follow-up post, Woody Joe confirmed that they've been working with the museum staff in developing this model. This is great news, as I'd asked my contact at Woody Joe about the possibility of such a model kit last year, and they'd indicated that they had considered the idea before, but felt they could not do it, as there was not enough firm information about these ships. I don't know if I made any difference, but I did suggest that they didn't have to do all the research from scratch and that they should consider designing a kit based on one of the many existing museum models. That's what they're doing, so it's a model of a model, which I think makes for a perfectly valid subject. I'm very happy to see they've reconsidered and have made such great progress. Here's a photo of the 1/10-scale model in the Nagoya Castle Museum, courtesy of Kazunori Morikawa of Zootoyz.jp. This Atakebune is identified as the Nihon Maru, built by Toyotomi Hideyoshi. No idea what the cost will be, but I don't expect it will be cheap. It's a lot of structural material, I would think. Plus, there are castle-like structures and details on top. Given that the coastal transport kits are around $250, I'm guessing this will be around $500, maybe more depending on how much detail they put into it. Of course, they're likely to make some simplifications to keep the difficulty and costs down to make it more marketable. Here's to hoping it goes into production in the near future!
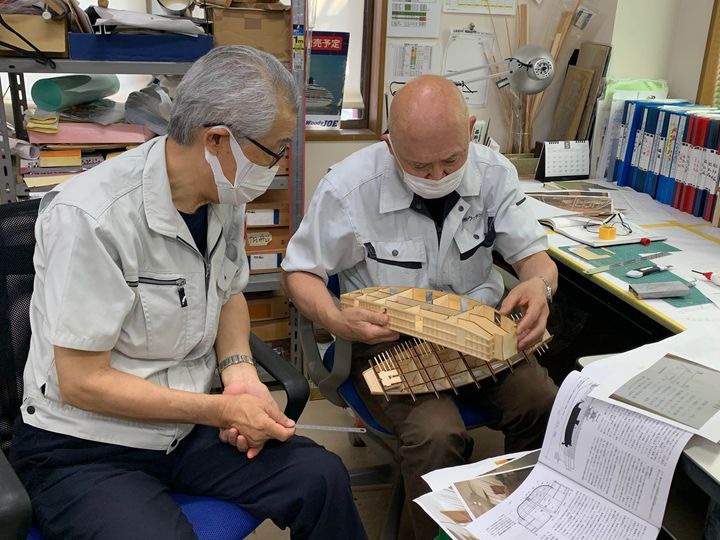
-
Jean-Pierre, I'm not sure I agree that the shrouds look heavy at all. Where they turn around the deadeyes, the thickness of the line seems a bit prominent, but that may be due to the design of the deadeyes. Actually, looking closely at the photos on the Disar site, the scale detail of these models look very good. The gratings, the cannons, the stanchions all look good. And, the detail in the stern carvings and gallery lights looks very good. Main problem for me is just that I don't like the weathering effects. If I want a model to look like that, I just leave it out of a case for a few years 😉 I guess we won't really know until someone has some hands-on time with the kits. Being that I do some work for Ages of Sail, I'm very much looking forward to that myself.
-
New Member from Western Washington State
catopower replied to Michael Jones's topic in New member Introductions
Hello Michael and welcome! My sister lives in Shelton. Very pretty area. Do you ever get over to the Wooden Boat Festival in Port Townsend? I had a table set up for my Japanese boat models there a couple years ago. Good chance I'll be there again this Fall. That's a nice looking model – hope to see more about it. -
From Disar's photos, the kits look quite nice. And, if the cannons and deadeyes shown are any indication, the fittings look reasonable. But, these kits have been listed for quite some time. I've talked to the owner of Ages of Sail, which is a Disar distributor, about getting them in stock, but I think they just haven't been available, and I'm not sure why. Now that it's been brought up, I'll check with him again. Edit: I found out the the kits are available. Ages of Sail has them on order and they're in transit now. Unfortunately, things being the way they are with Covid, shipping is delayed, and they're stuck in France. I'm guessing they were either sunk or captured by the British...
-
My rare supply of Syren Pear Wood Blocks is running dangerously low on certain sizes. Anybody have 3/32", 1/8", or 5/32" Pear Wood singles left over? Also 3/32" doubles? Just Pear Wood blocks, please. I know I can try to stain boxwood blocks, make my own, or buy Master Korabel instead, but I would just prefer these same blocks as they look so good and I want to use my reserves, I'm just low on the most common ones. 😕
-
- 1
-

-
My favorite is Eins (ist die einsamste Zahl)... But, kind of a downer song for the party boat.
- 130 replies
-
- 3
-
-

-
- wütender hund
- hanseatic
- (and 2 more)
-
No doubt playing the oldies by Steppenwolf and Drei Hund Nacht... 😁
- 130 replies
-
- 3
-
-
- wütender hund
- hanseatic
- (and 2 more)
-
Hi Chuck, I didn't realize that the Wütender Hund was a party boat! Although The Crow's Nest does sound like a good name for a bar...
- 130 replies
-
- 3
-
-
-
- wütender hund
- hanseatic
- (and 2 more)
-
Welcome Hank! That's quite a circle of people you've known, pretty much the same people I've spent a ship modeling age admiring, though I've only met one of them, Clay Feldman. But, I did have a nice phone conversation with Henry Bridenbecker WAY back when, who was extremely gracious and helpful to me. Also had the honor of meeting Ed Marple, who's carving work and ship modeling skills were phenomenal and on display at the Channel Islands Maritime Museum, where our ever-rescheduled NRG conference will someday, hopefully, take place! I look forward to swapping ship modeling ideas with you here!
-
Anyone out there working on a card model?
catopower replied to gagliano1770's topic in Card and Paper Models
Just been in touch with a guy on papermodelers.com that has returned to paper modeling after a hiatus. When I built my Shipyard 1/96 scale paper model of HMS Alert, I ran across his build of Shipyard's 1/72 scale version, which has all the parts laser-cut, plus brass cannon barrels, etc. His model was so cleanly built, it was an inspiration to see. He just posted his pics of that model again. Makes me want to build that kit, but I already built almost the exact same thing, just smaller. Doris's builds that GrandpaPhil mentions are almost too good to be true. And, of course both Doris and Ab are scratch modelers, a fact that kind of floors me too. -
Aleenes Tacky glue
catopower replied to Don Case's topic in Building, Framing, Planking and plating a ships hull and deck
Hi Don, that's a good question. I have it because I use it for paper modeling. For wood modeling I use mostly Original Titebond or Titebond II. I THINK Aleene's is a little on the soft side when dry, but I've never really tried it on wood. -
Yeah, since the model is an open boat, Mantua used a method to have nice planking inside and outside, with the middle layer to help keep the shell rigid. I think the planking style they're showing is mostly to keep beginning modelers from trying to force planks into curves. It's one thing when you do that with an enclosed plank-on-bulkhead hull, but when you're working on something with essentially no internal frames, an inexperienced modeler can end up with a real mess. The method shown may require a lot more tapering so you don't end up with gaps – Gaps/Fillers are the last thing you want when you can't hide the inside planking. You really need to taper the planks to fit. Then again, there's probably enough stuff inside the boat that nobody will ever notice that the interior planking is not authentic. With the outer layer, it's probably easier to make the planking look more correct. Additional Thought: I just remembered... The planks aren't supposed to be attached to the frames. So, there's no easy way to make sure they conform to the shape of the bulkheads unless the are laid very naturally across them, without any edge bends or twists at all. The planks initially are only glued to adjacent planks, and If you try anything fancy, I think you'll end up with some weird bulges. I'm pretty sure that's why Mantua shows to plank this way.
-
Ooooo! An undiscovered kit! Jean-Pierre appears to be correct about Gunze Sangyo being the maker. The poster indicated that it was an old kit he had gotten a long time ago and wondered if it was from the 1980s. With all those details, I would think it's much later, but he didn't specify when he'd purchased it. I too love this era of ships where we see steam taking over from sail. Too bad to discover this is an old out-of-production kit. Little chance of finding one to build. I'll ask a couple ship modelers in Japan if they know anything about it. Looks like a pretty advanced kit – nice details, and it has you build up the ships boats from molds. I think Imai, and certainly Woody Joe, provides you with plastic boats.
-
Anyone out there working on a card model?
catopower replied to gagliano1770's topic in Card and Paper Models
I just finished Shipyard's Hanse Kogge Bremen 1380 card model kit. It's the type with all the parts provided, laser cut. Paper models are nice in that they don't cost as much to make, and as you say, they don't require many tools. They also don't need as much room to work on and there's not much mess with them. I like my wooden models, but I have found paper models to be a fun and interesting alternative. That's a nice shopping site – appears to be in Germany. I've purchased from gpm.pl, which is in Poland, which seems to have a similar paper model selection. Also, Shipyard kits can be purchased through Cornwall Model Boats in the UK, as well as Ages of Sail in the US. -
But, their heights would remain unchanged!
-
Hello Salty Dog, That classic basswood deck really does have a nice look to it, doesn't it? Your progress looks very good. But, I think you should post in a build log, even if it's mid-build, it doesn't matter. It's just a place to check in on your build now and again – much better than trying to look for it in the General Ship Models Discussion section. And, I'd love to see the occasional update.
-
What sails did a ship like Vasa have set in severe weather?
catopower replied to ubjs's topic in Nautical/Naval History
Wouldn't it also depend on what direction you're trying to travel, in relation to the wind? -
Or the capstan is for all of the above, and any other thing that comes up that requires more power than can be mustered from just pulling on a rope?
-
I agree that it looks good. But, my thought was from the cartoon The Jetsons, where George Jetson worked for Spacely Space Sprockets and the rival company was called Cogswell Cogs 🙂 And, when I read your first sentence, where you wrote "front porch", maybe because it's your Woody Dog, I thought I read "front pooch"! About those repairs, they're completely unnoticeable.
- 130 replies
-
- 3
-
-
- wütender hund
- hanseatic
- (and 2 more)
-
Your fix looks very good Chuck! And, I like the decorative trim on that stern castle. Looks very nicely done. Sorry I can't comment on applying the wipe-on poly over oil based stain. Have you tried it yet?
- 130 replies
-
- 1
-
-
- wütender hund
- hanseatic
- (and 2 more)
-
kit review ENDURANCE by OcCre - 1/70 scale
catopower replied to ccoyle's topic in REVIEWS: Model kits
That damaged keel wouldn't have happened if they left the keel in its sheet, rather than removing it from the sheet and packing it in the box. I guess it's a weight saving measure. Plus, as they shrink wrap all the laser cut parts together, it should be fairly well protected. But, clearly, that's not always the case. -
Wooden single block hole count
catopower replied to Dsmith20639's topic in Masting, rigging and sails
Yes! -
Wooden single block hole count
catopower replied to Dsmith20639's topic in Masting, rigging and sails
Dsmith20639, It helps a lot if you try to understand how a block works, which is what I think people are really getting at as they try to help you here. The second hole is not exactly what I would call redundant, though, yes, you will only run a line through one hole or the other. For one thing, a block with two holes looks more like a real block than ones with only one hole. Also, having only one hole can result in you stropping the block upside down – something I see a lot in beginner's models, and it looks silly once you realize what you're looking at (But, I can't bring myself to point out the error in people's models). A block with two holes helps to prevents you from making that error since it's the same, whichever way you orient the block. -
I think it's partly because they have to make 12 special packages with instructions tailored to them. I guess they also look at the total subscription cost as the regular price, where they give you a nice discount if you just buy them all at once. Saves them all the trouble of keeping track of you and packing each month. Plus, I imagine they must have to worry about having a bunch of miscellaneous left over stuff from people who cancel early. Everyone gets pack 1, but how many must cancel after about pack 2 or 3 when they realize how much they're spending on a kit they'll never finish? Rob, As far as I know OcCre is about the only company that offers these "buy as you need them" packs, and they are only for the kits I listed. The only other company is Mantua, which offers their big Titanic model in 5 packs (actually, it's the only way it's sold), and the Albatross, which is their small Baltimore clipper kit. Though, I can't for the life of me figure out why they bother to make that one available in parts. By the way, the OcCre Packs are only about 6-8% more expensive than the full kit. The biggest problem now, is that shipping from Europe has become a lot more expensive, so that drives the costs way up. Maybe by the time you're ready, shipping options will open up again and bring the cost back down a bit. Anyway, only you know what's best for you and your situation, so good luck with whatever you do!

