catopower
-
Posts
1,900 -
Joined
-
Last visited
Content Type
Profiles
Forums
Gallery
Events
Everything posted by catopower
-
 The Katy manual is very good. I checked the current manual and it's pretty much the same as the old manual I have by Jim Roberts. When he developed the Lively, he did the same thing in regards to the line sizes, blocks sizes, what's siezed, what's served, etc. I personally think it's the most detailed I've seen, which I suppose you can do with such a simple rig. That may be why I got so interested in these early schooners, and the pilot boat type in general. But, it would certainly make for an interesting modification to a very popular kit. In any case, this is an ideal kit to try out various upgrades. I actually think that all Artesania Latina kits are pretty well like that, as they go together very cleanly, and are easy to build. It's easy to change a little here and there to suit your needs. It's also nice to end up building a kit that looks different from all the other kits. Good chance to develop scale accurate details, sail making, etc. And yes, I think it's better to finish the model than mess TOO much with "improvements". Sometimes, that hard to do – I know I have that problem! Good Luck!
 -
Hi Tim, Sorry, I missed the part about you building the AL Swift kit. That was one of my earliest builds too. It was actually the third one I'd completed, with the intent of doing up all the small details, including replacing the wood for the deck planking and replacing the forward deck house with a simple grating. Before I built the schooner Lively, I'd considered just beefing up the rig of the Swift and adding a pivot gun in place of the forward deck house to convert it to an early War of 1812 privateer. That's basically all that the Lively was supposed to represent. I would normally suggest you just buy a copy of the Katy plans from ME, to protect their intellectual property. But, I can't seem to find it on their site. So, if you PM me your address, I'll just send you mine. It just sits on the shelf now anyways!
-
Actually, I wouldn't refer to the Model Shipways Katy kit as a crappy little old kit. To my recollection, it's one of the better researched kits around. It may not have all the glamour of the bigger ships, but those instruction don't need much modification. In fact, I knew the designer of that kit, and he seemed to know his stuff. I even keep a copy of the instructions and plans on my shelf. I also keep a copy of the instructions he wrote for his kit of the fictional privateer the Lively. It's so well written and detailed that I used it to help me rig a model of the American revenue cutter Dallas, so many years ago. As for Petersen's Fore-And-Aft Craft book, I have it, but I'm not a fan. I don't think much of his choice of examples for a schooner – a ship type which is so important. The others are probably okay, but I don't know them as well as schooners. I think if you study that instruction booklet for the Katy, and build the model without skimping on details, you'll have a very accurate model. Not glamorous, but accurate. It's an interesting point, but I don't see that as an error. It may be just as likely that the builders would save the expense of the iron bands and eyebolt and just seize the stays around the masts. Only thing is that there is nothing to keep them from sliding out of position, so I'd think the eyebolts/bands make more sense.
-
Hello Druxey, good question! It's not actually scalloped. It's simply that the sails are individual cloths that are laced together. The sheet lines are attached at the foot of the sail at each of these lacings, so these "seams" can't billow out, but the sail material itself can. You're just seeing sail material here just kind of hanging down, or out. On a model, I can achieve an illusion of this effect a little better by actually scalloping the foot of the sails a little, which I ended up doing with the Takasebune model. The head of the sail would actually be similar in that the sail material at the "seams" would be up close to the yard, but hang down slightly in between "seams". Yes, I'm back... or rather back from lurking... 😳
-
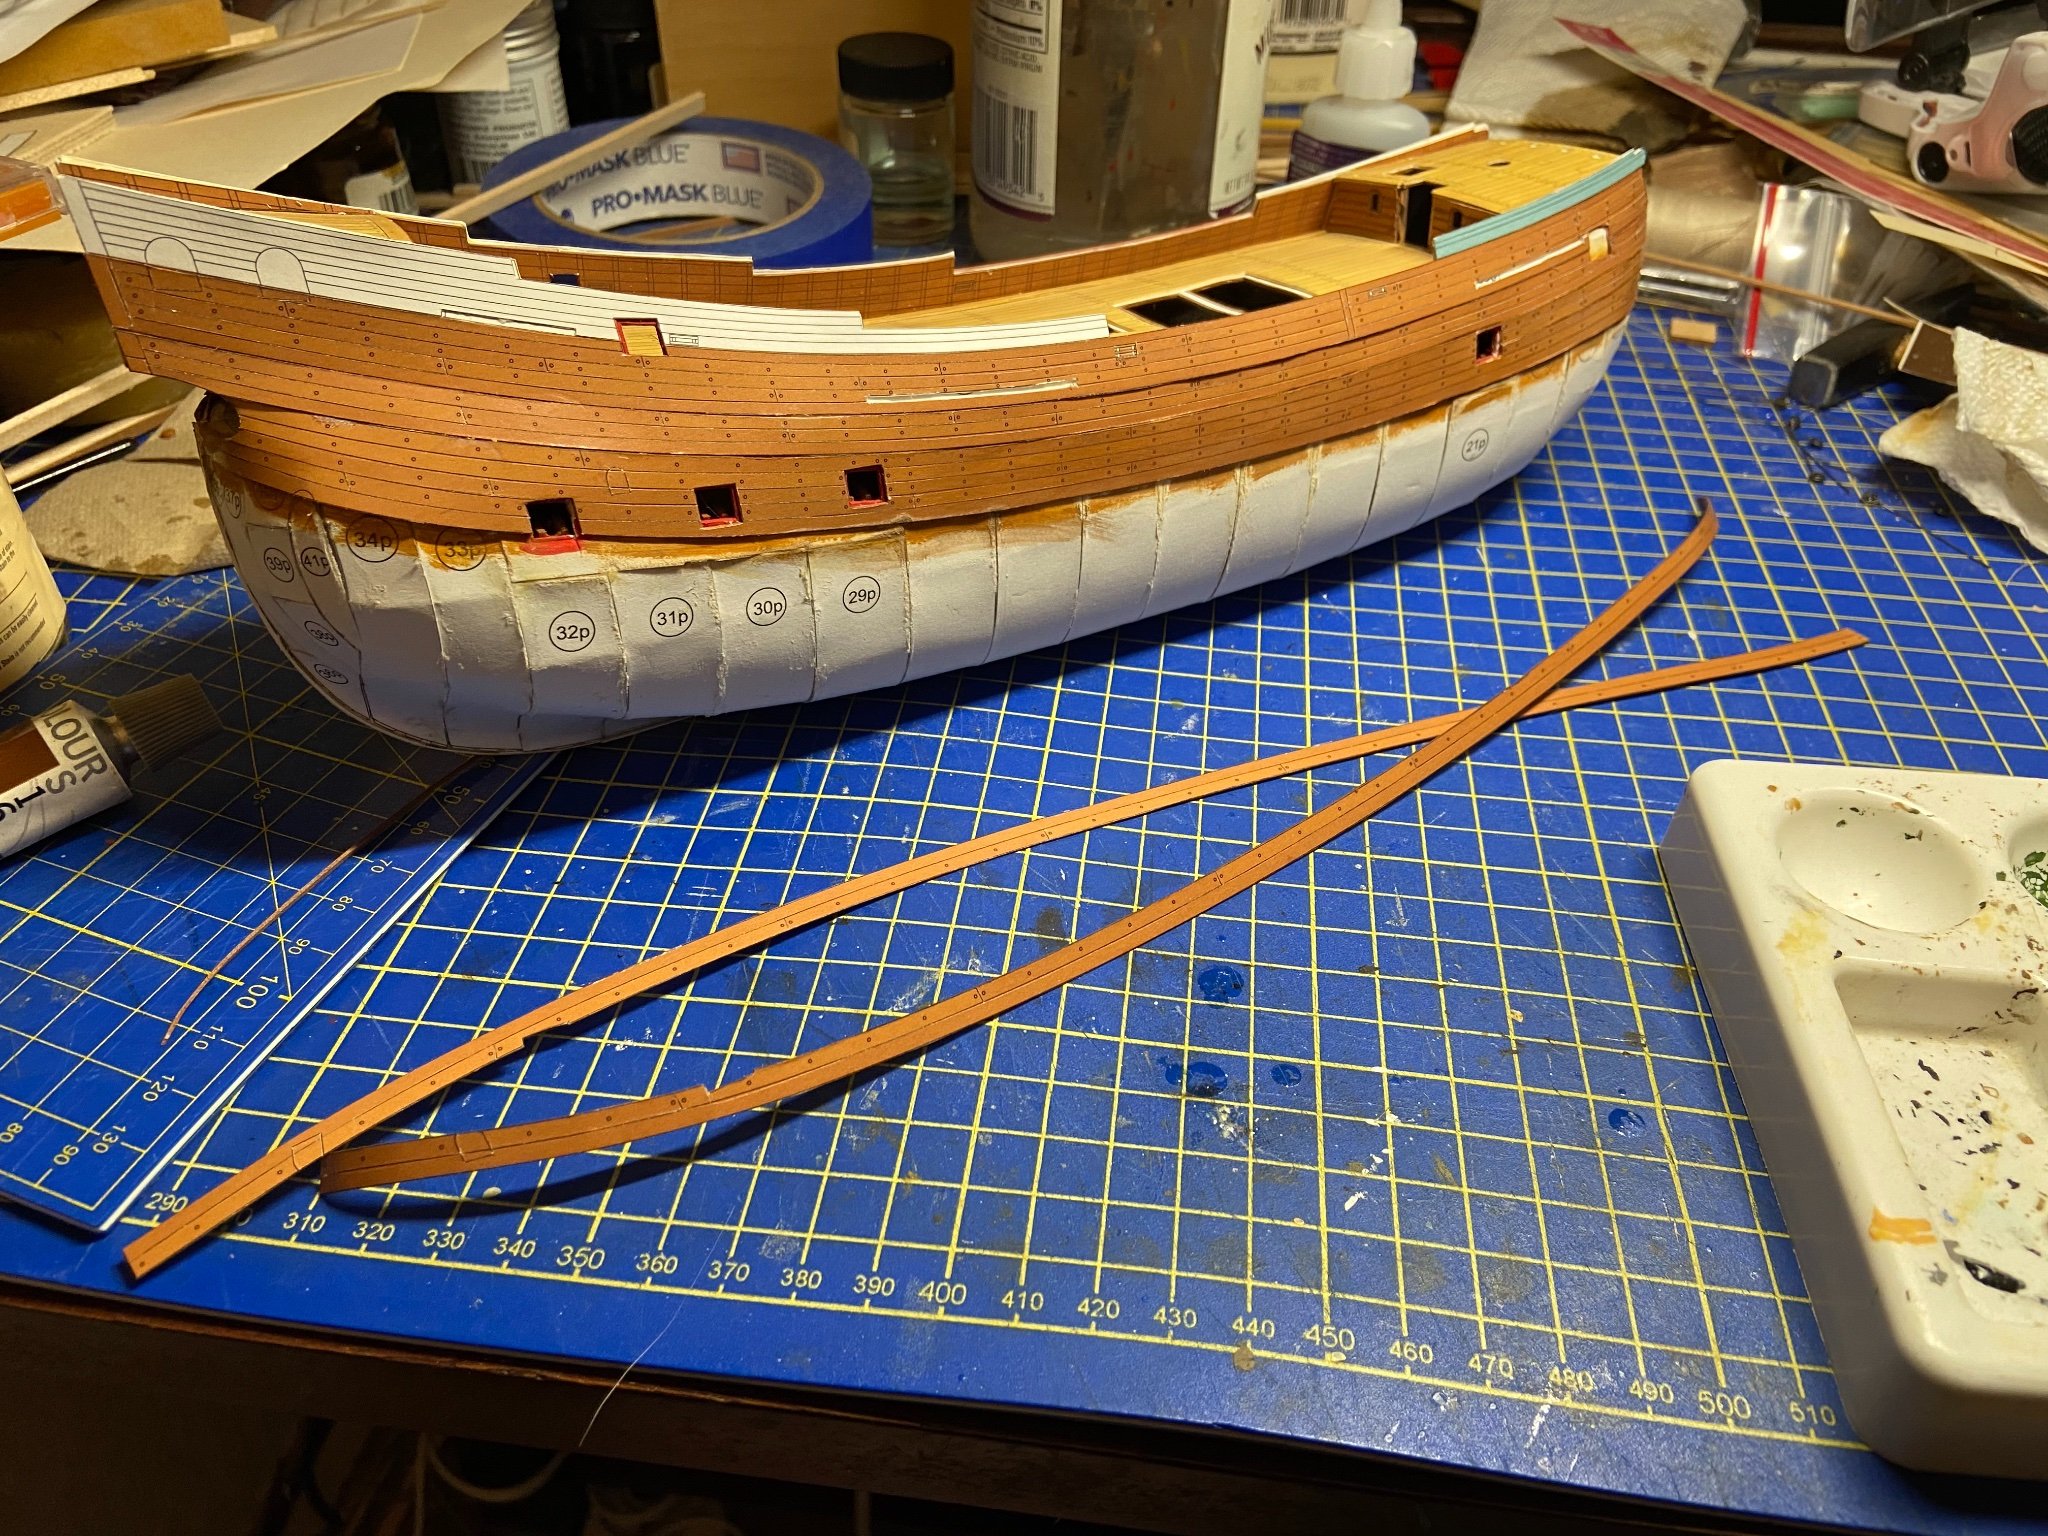
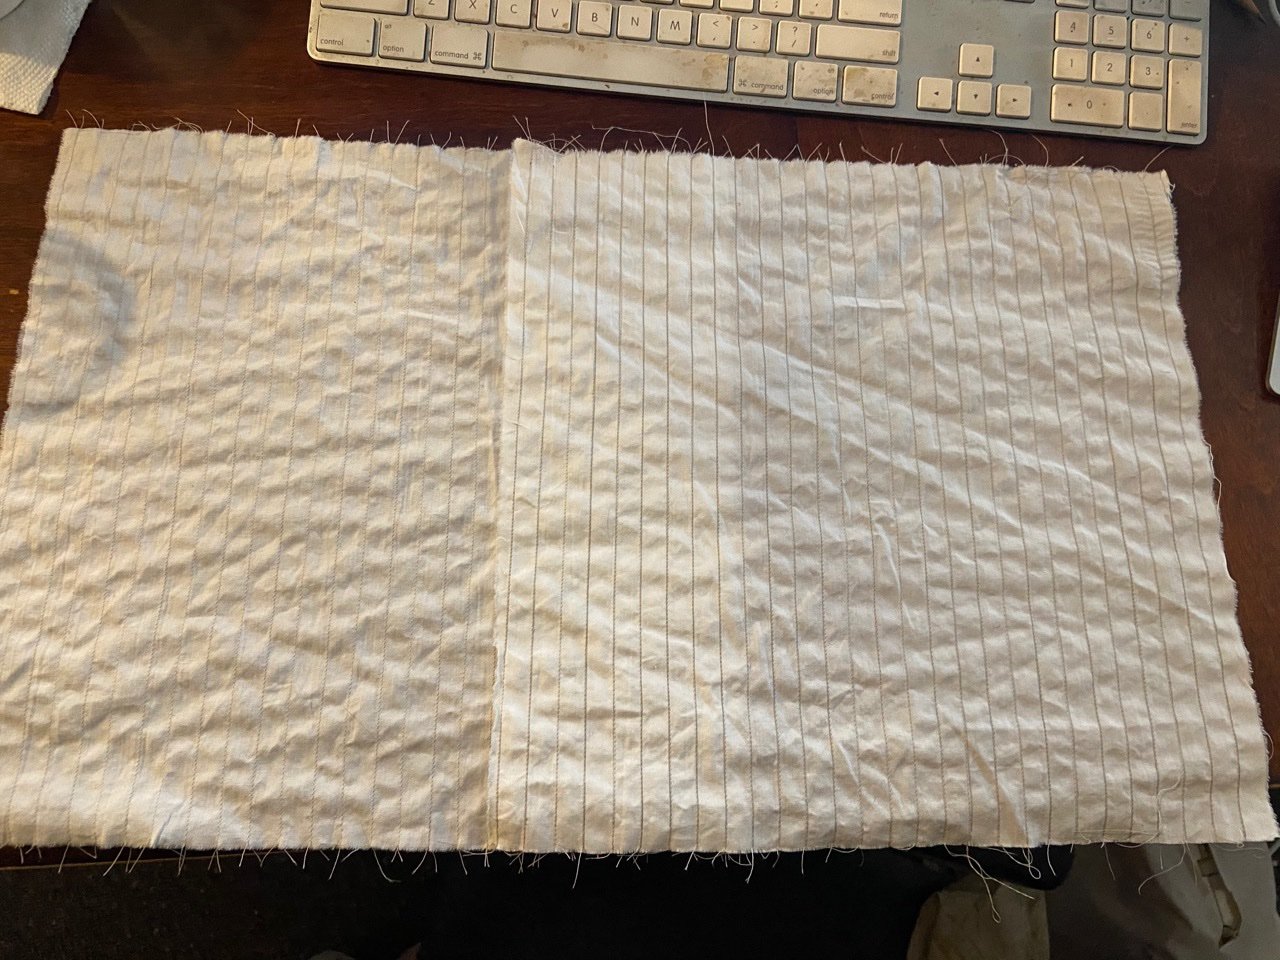
I've been awfully idle this year, and have had a hard time starting back into my projects again. So far, the only thing that I've had any motivation for has been a card model from Shipyard of the Dutch fluit Schwarzer Rabe. I started that kit as simply something to do while I was out of town taking care of my aging mother for a month. Later, it turned into an ongoing project, and at some point, I had a hard time putting it down. I finally managed to pull myself away from it, but it still took a while to get back to my Japanese boats projects. Then, earlier this week, I managed to make a trip to Monterey to study a model of a Japanese fishing boat that I was alerted to by the curator of the Japanese American Citizens League Hall (JACL) and Museum in Monterey. I'd made arrangements to meet him and to examine and record measurements and details of the model. At some point, I'll try to create a drawing and maybe a larger scale model based on this information. But, that whole process kind of got the juices flowing again. Plus, a friend of mine is organizing a "Japan Day" event at the Asian Art Museum in San Francisco and invited me to set up a station to display my Japanese boat models and to possibly work on them there during the event. With there being plenty of Kitamaebune in Japanese art and my model being so close to completion, I finally broke down this past week and started back into it. So, here I am, back at the sails. I've decided that the method I used for the Tonegawa Takasebune may be too delicate for so much larger a sail, so I've gone back to earlier design ideas. Basically, I'm back to simply sowing the seams between the strips of sail cloths. I will make the sail up from 4 panels, and I'll attempt to then lace these panels together. I didn't use the Terial Magic stuff that I did for the smaller sails. I found that it stiffens the cloth so much that it make it harder to sew straight lines. Also, I had used my Cameo Silhouette to draw dotted seam lines for me to follow. I modified this to just draw some tiny reference marks at the top and bottom of the sail cloth, which I would then connect with pencil line. The full dotted seam lines stood out too much, and since I couldn't sew straight enough at the time, my stitching kept drifting, revealing these lines. But with pencil lines, after the sewing is all done, I can wash them out. So, I sewed the cloth for a new set of sails (well, two pieces of cloth for one big sail and enough left over for the small sail) a few days ago, using a lighter colored thread. I hadn't done much sewing in a long time, so my seams were a bit off in places. I was actually pretty impressed with how much straighter my seams were, but if you take a closer look, you can see it's still off in places. But, since I realized that I did prefer the darker thread for a more authentic look anyway, I set these aside and yesterday I repeated the whole process with darker thread. The above cloth turned into a practice run, and I think it actually paid off. The newest cloth seams are pretty well right on the money and very straight, if I do say so myself. Those, I washed by hand to get rid of the pencil lines, and they're air drying now. There is actually one more continuous, horizontal seam that I need to sew about 2/3 of the way down the sail. In the kit, this has an arch to it that follows the arch of the foot of the sail. I just realized that these are arched to give more of the illusion of a billowing sail. Though not exactly accurate, it's actually quite effective, and it makes the model look more like a real ship. So, I'll look at doing the same with this model. One thing is that I plan on "scalloping" the bottom edge slightly, to give more of an illusion that the individual cloth strips are billowing and held back by these seams, much like in the photo from the Takasebune book I posted previously. But, at this point, I need to pause and think about the order of tasks and give some thought to how I'm going to finish up the sail. More later!

-
Dear Paul, I've been ship modeling for over 25 years now, and I still make silly mistakes! It never seems to go away. It's good that you are scratch building your own replacement parts. I think that is the best way to move beyond a simple kit. Some modern kits pre-make the parts for you in perfect scale. But, for me, the fun has been that the kits aren't perfect and I've always enjoyed learning how to make them better. You are doing that with the San Juan. It gives one much more sense pride that just following someone's instructions. I understand what you're saying about complicated rigging of the square-rigged ships. My most recent projects are lateen rigged or have a simple, single mast and sail. It is much simpler to get to the rigging stage. It doesn't last too long, and the then model is compete! About the lugger, do you mean that it is something you are interested in trying to build? I built one lug-rigged gunboat model and it was kind of nice to do such a simple rig. I have often looked at building a model of the French lugger Le Coureur. It's a nice looking ship with history and there are a couple kits available in wood. There are even a couple available in paper, which is something I've been doing a little the last few years. By the way, it's funny that we're discussing simpler rigging, but I too have an OcCre Montañes kit in my workshop! It is difficult not to love and be lured by the big complicated square-rigged ships 😁 Anyway, good luck with your San Juan build. It looks like you are nearly done. I'm looking forward to seeing how the scratch built details look on the model.
-
Paul, I don't know why nobody else has commented since you started this build. But, it is looking very nice. I agree that this is a very nice looking ship. Although you are an experienced modeler, I think it would make an ideal first model for a beginner. It has a nice easy hull shape for planking, and a square-tuck stern, which also makes for ease of planking. There are some metal parts, so they simply need to be painted, and glued into place. Again, this is easy for a beginner to do. Plus, the lateen rig is simpler than a square rig, and it's interesting. You've done a nice job making your own replacement parts and showing us what an experienced ship modeler can do with this kit!
-
Anyone out there working on a card model?
catopower replied to gagliano1770's topic in Card and Paper Models
Hi All, I just thought I'd post a pic of my Schwarzer Rabe kit from Shipyard. The last photo I posted here was over 3 weeks ago. So, here's what it looks like now.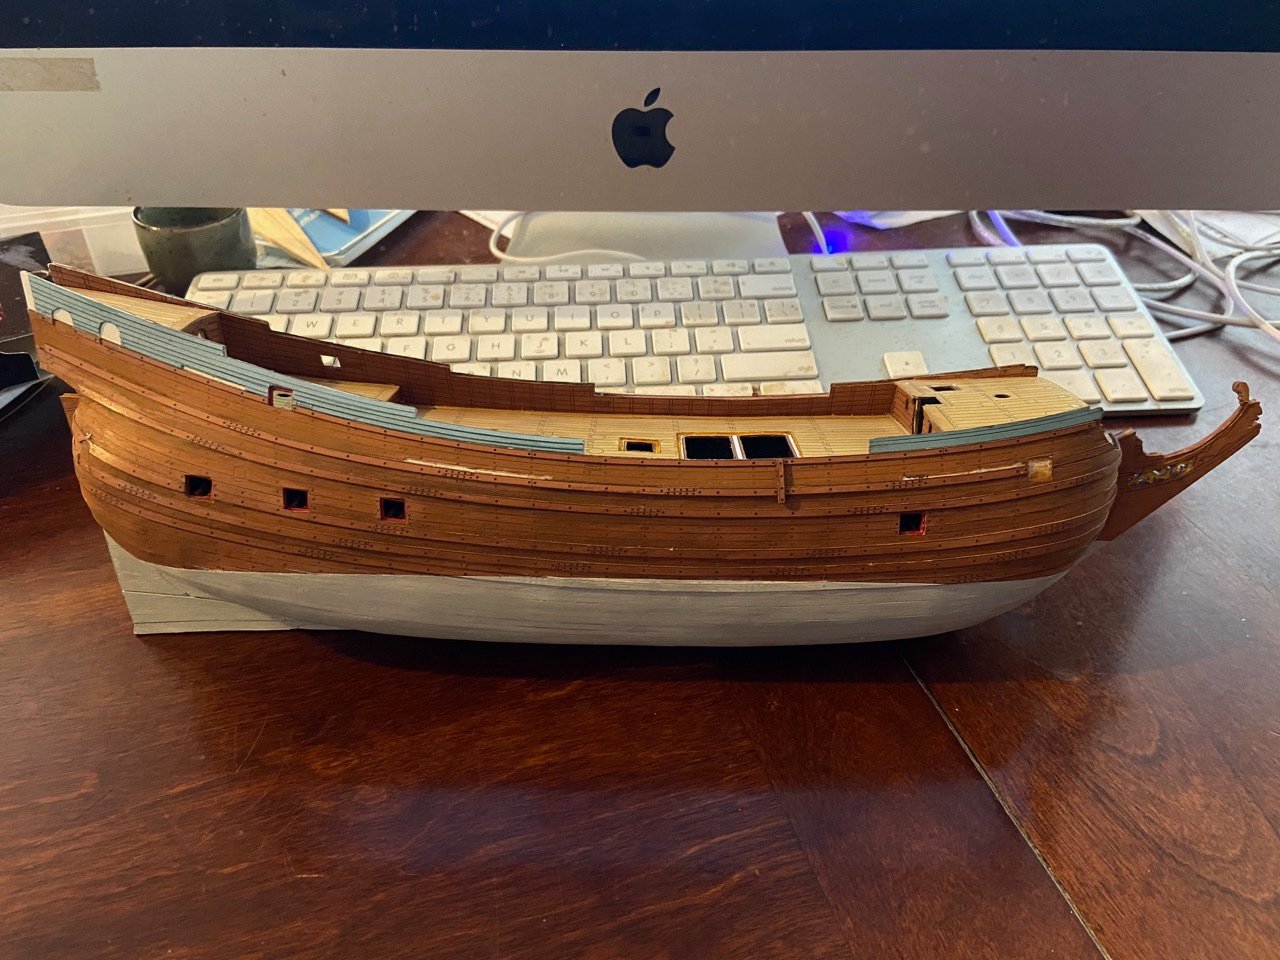
- 57 replies
-
- 11
-

-
Congrats, Tim! I've been thinking about ordering that kit, or the Duyfken, or the Meerman... I keep playing around with the shopping cart, adding something different, but haven't gotten around to submitting the order yet. Just can't make up my mind!
-
Daniel Filipe, you are doing a wonderful job with this build. your model is looking great!
-
Hi Tim, Well, I have to say I'm a bit lost on where to go on this project at this point. I want to add the outer planking "skins", as they will make the hull sturdier. But, I think for rigging the guns, the easiest thing is going to be to make all the eyebolts/ringbolts long and drill through the hull. That's probably best to do at this stage. I did just make an investment in this project. Since I'm not really happy rolling my own cannons yet, I went ahead and I ordered a set of cannon barrels from GPM. I'm also trying out some barrels that I might use with the Schwarzer Rabe, but they don't have an actual set for that one. The HMS Mercury cannon barrel set should include both sizes of carriage guns, swivels, and carronades. But we'll see. The barrel set says it contains 46 pieces and I count 48 on the model, so we'll see. If anything comes up short, I just hope it's the swivels, as I won't really care about them. There are plenty of sub-assemblies I can work on too, I just don't know where to get re-started.
-
Chris, these kits look great. Thanks for bringing them to our attention, because I REALLY NEED more projects! Especially these relatively inexpensive card model projects, because I can load up on so many of them for so little money. Plus, they take up so little room in my stash that I can fit half a dozen with all the available accessories in the space of one wooden ship model kit! 🤪
-
Anyone out there working on a card model?
catopower replied to gagliano1770's topic in Card and Paper Models
Jan, those are all really wonderful models. Very realistic. I'm not sure how my cat would react to them... (!) -
Anyone out there working on a card model?
catopower replied to gagliano1770's topic in Card and Paper Models
Card models of animals confuse the heck out of my brain. How is it they can look so realistic? That's absolutely incredible, Leo! Thanks for sharing (and confusing the heck out of my brain!) -
Having completed my laser-cut Hanse Kogge from Shipyard and put in a little time on Shipyard's 1/96-scale fluit Schwarzer Rabe kit, I can't help but think about this HMS Mercury project. I basically put it on hold as it's a complex project that I felt a bit ill-prepared for. However, now that I'm well into the planking of the Schwarzer Rabe's hull, it's making HMS Mercury seem a little less daunting. So, don't it out even though I have posted any real progress here in... over 3 years! 😮 This week, I think I'm actually going to get all the parts, instructions, and assemblies together to take stock of where I'm at on this model.
-
I don't know how this one slipped past me! Shipyard's 1/72-scale HMS Mercury is already a great kit. But Pitr, that is one gorgeous model! I started working on a 1/96-scale version long ago, but never finished. This model is very inspiring. Thank you for sharing all the great photos of it! Are you planning to eventually rig this model? There's so much great detail on your gun deck and cabins that it almost seems a shame to cover it up with the spar deck. Looking forward to seeing more from you.
-
Anyone out there working on a card model?
catopower replied to gagliano1770's topic in Card and Paper Models
By the way, this discussion of paper models got me to looking at a couple projects I've had in the works. One is a bit too complicated for me to continue with just yet, that's Shipyard's 1/96-scale paper model of the frigate HMS Mercury. The other, however, is much simpler. It is Shipyard's 1/96-scale paper model of the fluit Schwarzer Rabe. I started this one early last Fall when I had to temporarily relocate to take care of my elderly mother after she had a mini-stroke. The model kit kept my mind busy and required few tools, so it was easy to work in my bedroom's desktop workshop. I didn't really plan on making it a regular project – it was mostly just to fill in the spare time I had. However, this past week, I decided to pull it out of storage and do a little work on it. I started a build log on my own blog site as well as on Papermodelers.com, but I may go ahead and post it on MSW. I'm not sure, as I have other build logs I need to wrap up here before I add yet another! It's just the way I like to work 🙂 I work on this kind of thing in spurts. So, maybe now I'll wait until my next burst of progress before I start the build log here. But, hey, at least I finished the Bremen Cog build (and build log) this year!
-
No, the Hermione is definitely a new Disar kit. Ages of Sail just got the shipment in. Disar also came out with a new stern paddlewheel river boat kit called the Marieville. So far, I'm only getting early reports on the new Hermione kit. It is a 1/72 scale kit, as opposed to AL's weird 1/89-scale kit. The result is a model that's just over 36" long. It looks very comparable to the AL kit, but the rigging appears to be more complete in regards to the sail handling lines, mostly bowlines and buntlines. Cannon barrels actually look like cannon barrels. Probably for many modelers, they will also appreciate the printed instructions, as opposed to AL's instructions on CD only. Looking forward to seeing the kit in person. Sadly though, that means no Navio Glorioso or Principe de Asturias yet. Maybe this kit held up their development of those?
-
What glue are these instructions calling for?
catopower replied to rooster's topic in Modeling tools and Workshop Equipment
Hi Rooster, Welcome to MSW! They're showing contact cement there, but I think it's better to use medium-cure, gap filling CA glue. I built this model and that's what I did, at least in part. I used masking tape to hold the strip into place while adjusting the strip to get it aligned just right on both sides. Then, using a pin, apply tiny drops at various points along the strip. The tape can then be removed. Then you can hit it with a little thin CA at a few places. The thin CA will run all along the seam, completing the bond. Hope that helps!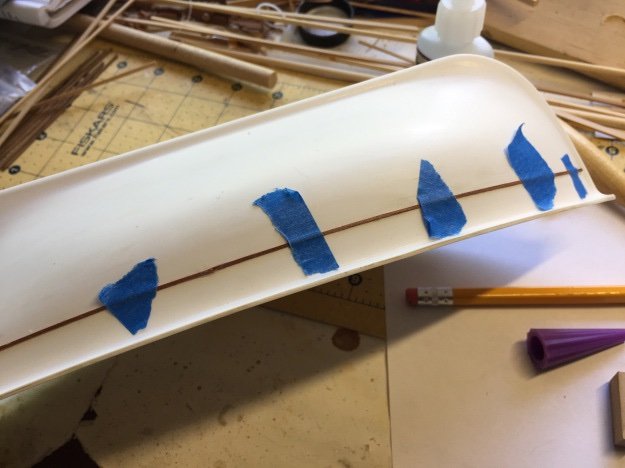
-
Omissions and lack of source citations aside, I think it is still the best handbook on ship modeling for beginning and intermediate ship modelers. Eventually, one may "graduate" to various sources for more specific details. But, if I were to hand a promising ship modeler one book to help him or her out, it would be this one.
-
Hello Karkka, I'm familiar with the kit and the instructions are correct. You are trying to input your own assumptions about the build, which is not necessarily correct. Others are right about the curvature of the boat. You'll need to bend the plank just enough to follow that nice curvature formed by the tops of the frames. Now, some frames may be off a little bit due to variation in how you glued them into place and also slight variations in the slots in the keel and the frames. So your plank may not be EXACTLY 3mm down from ALL of the frame tops. But, as long as its true for most of them, you'll be fine. It's really not as complicated as it sounds. The planks are fine, the kit is fine, the instructions are fine. Just get that first plank curved and that sets the nice gentle curve for the next planks to follow. The only thing that I wouldn't do from the instructions is to use a hammer and nails on open frames like that. I think you're more likely to snap a frame. I'd just glue the planks to the frames and use small spring clamps to hold them into place while the glue dries.
-
Hull repairs
catopower replied to bluenose2's topic in Building, Framing, Planking and plating a ships hull and deck
Since it's a Dumas kit, is it used for RC operation? Looks to me like the planking is flexing a little and causing the cracking in the finish. If you can open up the model (as in the RC operation question), I'd make sure to reinforce the backside of the planks, maybe by gluing some wood behind it, or at least coating the inside with epoxy to strengthen in. After that, you can worry about the finish. I'm sure any mahogany stain will do to hide the crack. When that's dry, apply a finish coat to seal it up, and I think it should be just fine. It's not anything serious looking. Barely noticeable, even. Anyone else have suggestions? -
Jean-Pierra... So, I cleared up with Roger, the owner of Ages of Sail. He's funny in that he sometimes just tells the manufacturer "send me a dozen of everything" without knowing what he's actually getting. In this case, turns out that he did get a new Disar kit ordered, but it's the Hermione, not one of these big Spanish kits. These are STILL "coming soon" 🤨 But, now that we're discussing it, I'm really interested in what Disar is going to do. I want to take another look at the Santiago de Compostella, which is a Spanish galleon, and I think maybe the best looking kit they currently produce.
-
Thanks Steven! Unfortunately, I can't blame it on a spell checker – Just my brain thinking one thing and my fingers typing another 🤔