

molasses
-
Posts
455 -
Joined
-
Last visited
Reputation Activity
-

 molasses got a reaction from IgorSky in OGALLALA by molasses - FINISHED - 1/96 scale - BOTTLE - Prairie Schooner
Welcome!
I worked on several parts of Ogallala - the undercarriage components, several deck detail items and some of the wagon detailing.
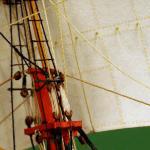
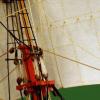
The four undercarriage components that will be assembled inside the bottle set in place on the bottom of the lower hull section - from left: front axle, axle tiller, brake / tiller attachment beam and rear axle. The three cross pieces have pegs that fit into holes in the hull section. The tiller fits in a hole in the front axle. I did a mock fit-up in an imaginary bottle with a toilet paper tube neck to check that it can be assembled working through the neck. That test went well, I hope the real assembly will be as easy. The front and rear wheels will be attached to the axles before the axle assemblies go in the bottle.
Hatch frame with cover planks, and fore and main pinrails. The fore pinrail will also serve as the bits for the bowsprit. The belaying pins were cut from .010 inch (0.25mm) entomology pins. Each pinrail leg has a belaying pin reject glued into the end that will glue into holes in the deck upon assembly.
Deck details in their approximate positions for a photo.
Each cargo hatch has three simulated planks that need handles to use when they are removed for loading and unloading. I decided to try making ring bolts as handles. Here's the first one made from 40 gauge wire (.0055 inch / 0.14mm) with a ring that is 4 scale inches (100mm) in diameter - 1/32 inch (0.08mm) on the model. Yes, it was very fiddly. Just 17 more to make.
No photos yet on the exterior hull detailing, still in progress. Thanks for viewing.
-
molasses got a reaction from IgorSky in OGALLALA by molasses - FINISHED - 1/96 scale - BOTTLE - Prairie Schooner
Sorry, I tend to forget to include a size reference when I take the photos, I'll try to remember on the rest of my posts. I like to use an X-acto blade - I suspect it's more universal than even a US cent to this crowd. The hull is 4 inches (100mm) long with a beam of just under an inch (25mm).
The bottle is a gallon jug. The model itself will be 6 1/2 inches long X 5 3/8 inches tall (165mm X 137mm). It's a nice change for me to work on a model this big at this large a scale.
I made some progress.
View from port side with deck installed and hull planking complete. It's still planking even if one plank covers the entire side, isn't it?
Starboard side planking with the freezer paper still in place. The upper line matches to the deck and the lower line is the cut line to divide the hull into upper and lower sections. I cut the plywood about half way through on the sides and ends before gluing them in place. I admit that I'm pleased with myself - and surprised - that all those pieces actually fit the way they were planned and drawn on my three-view plans.
After taking those photos I discovered that my "sea of grass" materials had arrived in the mail. After inspecting them I decided to post my progress.
I found this HO scale mini kit on a model railroad supply website and bought two of them. The photo on the box blew me away, it's exactly what I was looking for. (I hope I don't get banned from the "dark side" for using kits for a small portion of my scratch build.)
The kit is made up of ten of these to cover an area 4 inches square (100mm x 100mm). I intend to use very small amounts of thinned yellow and darker green paint to give the "sea of grass" a little irregularity in color. The strips with the plants will be glued edge to edge (like planks) to build up a field.
Close-up of grass stalks showing the detail. By giving individual plants a twist and/or bend they will be more three dimensional. The same company molds these in a straw yellow to depict a harvest-ready wheat field but I went for the green of a barley field to better depict wild buffalo grass. Individual stalks are .40 inches (10mm) tall. According to the description each kit has 5000 stalks.
More to come, soon.
-
molasses got a reaction from IgorSky in OGALLALA by molasses - FINISHED - 1/96 scale - BOTTLE - Prairie Schooner
Glad to have you aboard, Mark.
Made some progress. Click an image for the full size photo.
Image of Ogallala inside the bottle. The blue tape indicates the planned "waterline" (actually soil line) inside the bottle. Good fit with about 3/8" (9mm) clearance between the masthead and the bottle.
Hull piece templates attached to 1/64" (.4mm) and 1/32" (.8mm) plywood. Templates were printed onto the paper side of freezer paper, arranged on the plywood, then ironed (waxy side down) to the ply. The pieces will be cut out with scissors and sanded to size. During assembly the paper is easily removed.
Hull under construction, plank on bulkhead technique - never mind that individual planks cover the entire bottom, sides and ends. The two inner decks are spaced about 1/64" apart - the upper and lower hull sections will be separated between those decks at a later stage of the construction.
Decking section, print-out of decking plan and the left over piece of raw deck material. Planks were made from 1/16" (1.6mm) basswood with thin black paper glued (thinned white glue) to one side then the wood cut into strips about 1mm thick. After cutting planks to match the decking plan they were glued black edge to wood edge. Black paper was glued to the end of one plank at the butt joints. Ordinary transparent tape applied to the assembly fixture's bed prevents gluing the planks to the fixture. After the glue dried the deck was sanded to less than 1/32" thickness, ready to glue to the deck former after it is in place.
Thanks for looking.
Dave
-
 molasses got a reaction from popeye the sailor in Pilot Cutter by Michael Mott - 1:500 scale
I've been following this build because of its similarity in scale to most of my projects - and to learn from the wonderful work you're doing.
I found a source for enameled winding wire as fine as 45 gauge in small amounts. Google "Temco". A two ounce spool of 45 gauge is 7 miles long! according to their website. Bare wire should be .0017, this enameled wire measures .0035 as near as I can tell.
I also un-lay fly tying thread. The easiest way I've found is to feed a length of the thread through a wire loop (I use about an inch in diameter) fixed horizontally, then separate the three strands for about an inch so each lays over the loop, about equally spaced. Clamp a small weight (mini clothespins work well) to each of the strands and the bottom end of the thread. These weights will un-lay the thread for you, completely hands off. Just watch to keep the spinning thread and weight from tangling with the spinning strand weights.
I added this photo of a sample set-up with a short piece of 16/0 size, 2 strand fly tying thread. I usually start with about 3 feet (1 meter) of the thread and hang it over the edge of my table almost to the floor. As soon as I release the large clothespin gravity will take over and un-lay the thread. It goes rather quickly - I tried to get a photo without the large pin but that short thread un-layed before I got to the shutter button.
Also, definitely invest in an Opti-Visor. You will wonder how you ever managed without one. I use diopter #3 (1.75X magnification). That magnification gives me a comfortable focal distance of around a foot (30cm). Higher magnification requires closer focal distances and lighting the work becomes a problem.
-
 molasses got a reaction from AndrewNaylor in Queen Anne's Revenge by DSiemens - FINISHED - ~1:1250 - BOTTLE
It's been done.
By Phil Mattson
-
 molasses got a reaction from GrandpaPhil in OGALLALA by molasses - FINISHED - 1/96 scale - BOTTLE - Prairie Schooner
Thanks for the very kind comments. Here's the best of the photos of the finished Ogallala.
Thank you to all who viewed this log and especially to those who contributed with 'likes' and with comments - you all pushed me to do my best possible work.
Now I can get back to work on Esmeralda. I learned a few things here I can apply to "The White Lady".
Dave
-
molasses got a reaction from GrandpaPhil in OGALLALA by molasses - FINISHED - 1/96 scale - BOTTLE - Prairie Schooner
Ogallala is finished.
Tensioned and secured all of the lines but had to redo one that was done wrong. Had to cut it loose at one end and glue another thread to it end to end, then re-tension the line, glue and trim it inside the bottle. Don't bother looking for the splice - you won't find it.
Cleaned the inside glass again then located the prairie disc and ship using the four threads from the wheels taped to the outside of the opening. Once in position I epoxied the disc to the glass in three places. When the epoxy cured I painted the inside of the bottle below the soil line and re-checked the tension on the four threads. I had intended to simply epoxy the other medallion over the opening to trap the threads but decided this may not be secure enough. I cut a block of basswood to fit between the medallion and the bottom of the prairie disc and epoxied it to the medallion. When cured I epoxied that assembly to the disc and the opening.
The medallion with the basswood spacer after checking the fit. I epoxied the
assembly to the disc and the face of the opening to trap the lines as well.
After the epoxy cured and the outside of the bottle / sphere was cleaned I took lots of photos. Here's two full view photos.
I'm still going through them all and will post more tomorrow or the next day. Click on the photos for larger versions.
Dave
-
 molasses got a reaction from JesseLee in ESMERALDA by molasses - 1/640 - BOTTLE - Chilean Navy Training Ship
Welcome to resumption of work on Esmeralda.
I haven't worked on it in over a year so picking up where I left off was a bit difficult. I decided I have some re-work to do to incorporate some techniques I learned or improved upon since the last work done. I also have a lazy streak.
There are a large number of round port lights on most of the deck hatches that I didn't originally intend to reproduce but decided I can't leave off. I realized I could do them as decals on the eight hatches and prepared them on the computer and printed them on decal stock along with the yellow metal stern relief detail and name.
Hatch cover details and stern relief decals.
Before applying the decals to the tops of the white deck hatches.
After applying the decals. The difference is more noticeable when you click the image. There are 146 port lights in the hatch covers.
To do the stern detail I had to photo-shop the relief from a photo of it and adjust that image for the curvature of the stern to print it on a flat surface and for the distortion from the angle the photo was taken. I also had to do some color correction to make it look bright and shiny (the photo was taken on a dark, overcast day so the relief looked very dull). then reduce it for the model.
Esmeralda's stern relief. I have to wait about 24 hours before coating all the decals with a couple coats of artist's matte varnish.
The photo from which I extracted the stern relief.
I realized while I was making the decals that this was the way I should have done the port lights on the hull. Live and learn. If I ever decide to do Esmeralda's sister ship Juan Sebastian de Elcano (a topsail schooner while E is a barquentine), any of the Gorch Fock sisters and clones (nine of them) or any ship with lots of port lights, I'll know what to do.
Dave
-
.thumb.jpg.6fd4c1b78768bb3efd745ab810936005.jpg) molasses got a reaction from vaddoc in ESMERALDA by molasses - 1/640 - BOTTLE - Chilean Navy Training Ship
molasses got a reaction from vaddoc in ESMERALDA by molasses - 1/640 - BOTTLE - Chilean Navy Training Ship
Welcome to resumption of work on Esmeralda.
I haven't worked on it in over a year so picking up where I left off was a bit difficult. I decided I have some re-work to do to incorporate some techniques I learned or improved upon since the last work done. I also have a lazy streak.
There are a large number of round port lights on most of the deck hatches that I didn't originally intend to reproduce but decided I can't leave off. I realized I could do them as decals on the eight hatches and prepared them on the computer and printed them on decal stock along with the yellow metal stern relief detail and name.
Hatch cover details and stern relief decals.
Before applying the decals to the tops of the white deck hatches.
After applying the decals. The difference is more noticeable when you click the image. There are 146 port lights in the hatch covers.
To do the stern detail I had to photo-shop the relief from a photo of it and adjust that image for the curvature of the stern to print it on a flat surface and for the distortion from the angle the photo was taken. I also had to do some color correction to make it look bright and shiny (the photo was taken on a dark, overcast day so the relief looked very dull). then reduce it for the model.
Esmeralda's stern relief. I have to wait about 24 hours before coating all the decals with a couple coats of artist's matte varnish.
The photo from which I extracted the stern relief.
I realized while I was making the decals that this was the way I should have done the port lights on the hull. Live and learn. If I ever decide to do Esmeralda's sister ship Juan Sebastian de Elcano (a topsail schooner while E is a barquentine), any of the Gorch Fock sisters and clones (nine of them) or any ship with lots of port lights, I'll know what to do.
Dave
-
molasses got a reaction from IgorSky in ESMERALDA by molasses - 1/640 - BOTTLE - Chilean Navy Training Ship
Welcome to resumption of work on Esmeralda.
I haven't worked on it in over a year so picking up where I left off was a bit difficult. I decided I have some re-work to do to incorporate some techniques I learned or improved upon since the last work done. I also have a lazy streak.
There are a large number of round port lights on most of the deck hatches that I didn't originally intend to reproduce but decided I can't leave off. I realized I could do them as decals on the eight hatches and prepared them on the computer and printed them on decal stock along with the yellow metal stern relief detail and name.
Hatch cover details and stern relief decals.
Before applying the decals to the tops of the white deck hatches.
After applying the decals. The difference is more noticeable when you click the image. There are 146 port lights in the hatch covers.
To do the stern detail I had to photo-shop the relief from a photo of it and adjust that image for the curvature of the stern to print it on a flat surface and for the distortion from the angle the photo was taken. I also had to do some color correction to make it look bright and shiny (the photo was taken on a dark, overcast day so the relief looked very dull). then reduce it for the model.
Esmeralda's stern relief. I have to wait about 24 hours before coating all the decals with a couple coats of artist's matte varnish.
The photo from which I extracted the stern relief.
I realized while I was making the decals that this was the way I should have done the port lights on the hull. Live and learn. If I ever decide to do Esmeralda's sister ship Juan Sebastian de Elcano (a topsail schooner while E is a barquentine), any of the Gorch Fock sisters and clones (nine of them) or any ship with lots of port lights, I'll know what to do.
Dave
-
molasses got a reaction from vaddoc in ESMERALDA by molasses - 1/640 - BOTTLE - Chilean Navy Training Ship
Finished Ogallala and can now get back to work on Esmeralda. I hadn't intended to take this much time away from Esmeralda but Ogallala turned into a much more comprehensive project than I had originally planned. I did find some more, useful, photos of E for some details on deck and aloft and kept her in mind during my side journey. I learned a few things from O that I will apply to E and I have a bit of re-work to do and some details to add before I pick up where I left off. I'll post my progress soon.
I came across an interesting variation on a ship in a bottle with Esmeralda as the subject but the method is a bit too ephemeral for my taste.
Dave
-
 molasses got a reaction from Chasseur in ESMERALDA by molasses - 1/640 - BOTTLE - Chilean Navy Training Ship
Welcome to resumption of work on Esmeralda.
I haven't worked on it in over a year so picking up where I left off was a bit difficult. I decided I have some re-work to do to incorporate some techniques I learned or improved upon since the last work done. I also have a lazy streak.
There are a large number of round port lights on most of the deck hatches that I didn't originally intend to reproduce but decided I can't leave off. I realized I could do them as decals on the eight hatches and prepared them on the computer and printed them on decal stock along with the yellow metal stern relief detail and name.
Hatch cover details and stern relief decals.
Before applying the decals to the tops of the white deck hatches.
After applying the decals. The difference is more noticeable when you click the image. There are 146 port lights in the hatch covers.
To do the stern detail I had to photo-shop the relief from a photo of it and adjust that image for the curvature of the stern to print it on a flat surface and for the distortion from the angle the photo was taken. I also had to do some color correction to make it look bright and shiny (the photo was taken on a dark, overcast day so the relief looked very dull). then reduce it for the model.
Esmeralda's stern relief. I have to wait about 24 hours before coating all the decals with a couple coats of artist's matte varnish.
The photo from which I extracted the stern relief.
I realized while I was making the decals that this was the way I should have done the port lights on the hull. Live and learn. If I ever decide to do Esmeralda's sister ship Juan Sebastian de Elcano (a topsail schooner while E is a barquentine), any of the Gorch Fock sisters and clones (nine of them) or any ship with lots of port lights, I'll know what to do.
Dave
-
 molasses got a reaction from hexnut in ESMERALDA by molasses - 1/640 - BOTTLE - Chilean Navy Training Ship
Welcome to resumption of work on Esmeralda.
I haven't worked on it in over a year so picking up where I left off was a bit difficult. I decided I have some re-work to do to incorporate some techniques I learned or improved upon since the last work done. I also have a lazy streak.
There are a large number of round port lights on most of the deck hatches that I didn't originally intend to reproduce but decided I can't leave off. I realized I could do them as decals on the eight hatches and prepared them on the computer and printed them on decal stock along with the yellow metal stern relief detail and name.
Hatch cover details and stern relief decals.
Before applying the decals to the tops of the white deck hatches.
After applying the decals. The difference is more noticeable when you click the image. There are 146 port lights in the hatch covers.
To do the stern detail I had to photo-shop the relief from a photo of it and adjust that image for the curvature of the stern to print it on a flat surface and for the distortion from the angle the photo was taken. I also had to do some color correction to make it look bright and shiny (the photo was taken on a dark, overcast day so the relief looked very dull). then reduce it for the model.
Esmeralda's stern relief. I have to wait about 24 hours before coating all the decals with a couple coats of artist's matte varnish.
The photo from which I extracted the stern relief.
I realized while I was making the decals that this was the way I should have done the port lights on the hull. Live and learn. If I ever decide to do Esmeralda's sister ship Juan Sebastian de Elcano (a topsail schooner while E is a barquentine), any of the Gorch Fock sisters and clones (nine of them) or any ship with lots of port lights, I'll know what to do.
Dave
-
 molasses got a reaction from tadheus in ESMERALDA by molasses - 1/640 - BOTTLE - Chilean Navy Training Ship
Welcome to resumption of work on Esmeralda.
I haven't worked on it in over a year so picking up where I left off was a bit difficult. I decided I have some re-work to do to incorporate some techniques I learned or improved upon since the last work done. I also have a lazy streak.
There are a large number of round port lights on most of the deck hatches that I didn't originally intend to reproduce but decided I can't leave off. I realized I could do them as decals on the eight hatches and prepared them on the computer and printed them on decal stock along with the yellow metal stern relief detail and name.
Hatch cover details and stern relief decals.
Before applying the decals to the tops of the white deck hatches.
After applying the decals. The difference is more noticeable when you click the image. There are 146 port lights in the hatch covers.
To do the stern detail I had to photo-shop the relief from a photo of it and adjust that image for the curvature of the stern to print it on a flat surface and for the distortion from the angle the photo was taken. I also had to do some color correction to make it look bright and shiny (the photo was taken on a dark, overcast day so the relief looked very dull). then reduce it for the model.
Esmeralda's stern relief. I have to wait about 24 hours before coating all the decals with a couple coats of artist's matte varnish.
The photo from which I extracted the stern relief.
I realized while I was making the decals that this was the way I should have done the port lights on the hull. Live and learn. If I ever decide to do Esmeralda's sister ship Juan Sebastian de Elcano (a topsail schooner while E is a barquentine), any of the Gorch Fock sisters and clones (nine of them) or any ship with lots of port lights, I'll know what to do.
Dave
-
 molasses got a reaction from Omega1234 in ESMERALDA by molasses - 1/640 - BOTTLE - Chilean Navy Training Ship
Welcome to resumption of work on Esmeralda.
I haven't worked on it in over a year so picking up where I left off was a bit difficult. I decided I have some re-work to do to incorporate some techniques I learned or improved upon since the last work done. I also have a lazy streak.
There are a large number of round port lights on most of the deck hatches that I didn't originally intend to reproduce but decided I can't leave off. I realized I could do them as decals on the eight hatches and prepared them on the computer and printed them on decal stock along with the yellow metal stern relief detail and name.
Hatch cover details and stern relief decals.
Before applying the decals to the tops of the white deck hatches.
After applying the decals. The difference is more noticeable when you click the image. There are 146 port lights in the hatch covers.
To do the stern detail I had to photo-shop the relief from a photo of it and adjust that image for the curvature of the stern to print it on a flat surface and for the distortion from the angle the photo was taken. I also had to do some color correction to make it look bright and shiny (the photo was taken on a dark, overcast day so the relief looked very dull). then reduce it for the model.
Esmeralda's stern relief. I have to wait about 24 hours before coating all the decals with a couple coats of artist's matte varnish.
The photo from which I extracted the stern relief.
I realized while I was making the decals that this was the way I should have done the port lights on the hull. Live and learn. If I ever decide to do Esmeralda's sister ship Juan Sebastian de Elcano (a topsail schooner while E is a barquentine), any of the Gorch Fock sisters and clones (nine of them) or any ship with lots of port lights, I'll know what to do.
Dave
-
 molasses got a reaction from cog in ESMERALDA by molasses - 1/640 - BOTTLE - Chilean Navy Training Ship
Welcome to resumption of work on Esmeralda.
I haven't worked on it in over a year so picking up where I left off was a bit difficult. I decided I have some re-work to do to incorporate some techniques I learned or improved upon since the last work done. I also have a lazy streak.
There are a large number of round port lights on most of the deck hatches that I didn't originally intend to reproduce but decided I can't leave off. I realized I could do them as decals on the eight hatches and prepared them on the computer and printed them on decal stock along with the yellow metal stern relief detail and name.
Hatch cover details and stern relief decals.
Before applying the decals to the tops of the white deck hatches.
After applying the decals. The difference is more noticeable when you click the image. There are 146 port lights in the hatch covers.
To do the stern detail I had to photo-shop the relief from a photo of it and adjust that image for the curvature of the stern to print it on a flat surface and for the distortion from the angle the photo was taken. I also had to do some color correction to make it look bright and shiny (the photo was taken on a dark, overcast day so the relief looked very dull). then reduce it for the model.
Esmeralda's stern relief. I have to wait about 24 hours before coating all the decals with a couple coats of artist's matte varnish.
The photo from which I extracted the stern relief.
I realized while I was making the decals that this was the way I should have done the port lights on the hull. Live and learn. If I ever decide to do Esmeralda's sister ship Juan Sebastian de Elcano (a topsail schooner while E is a barquentine), any of the Gorch Fock sisters and clones (nine of them) or any ship with lots of port lights, I'll know what to do.
Dave
-
 molasses got a reaction from robnbill in First Attempts at Photo-Etch with Micro-Mark Pro-Etch
I received the Micro-Mark Pro-Etch Kit and set out on the learning curve - which is rather steep to successfully make usable photo-etch parts on the first try. It took me three.
After ordering and waiting for delivery, I set about drawing in my drawing program the etched letters I wanted on two brass discs - one as a seal for the bottle and one on the display base. Keeping it simple, I planned to remove lettering on one side of the discs that I would later fill with paint, black letters on the brass discs. When the kit arrived I read the instruction book multiple times and identified all the tools and materials in the kit.
Following the instructions, I made the masks for both sides of a disc and printed them on the backside of the mask transparency film. Follow the instructions carefully. The black areas of the mask are the areas that need to be removed from the metal and this mask will be printed backwards (flipped horizontally) so that the print is on the backside of the film. After the ink is dry the two masks are perfectly aligned, print side to print side and taped together.
The print side of the mask transparency. The face side of the disc with reversed
lettering and the back side with interruptions in the circle so that the disc will stay
partially attached to the square of base metal. The black is what will be removed,
half-way through from both sides with most of the edge all the way through.
With directions in hand I cut two 2.5 inch / 64 mm squares of .005 inch /0.13 mm thick brass sheet. Before I opened the package of photo-resist film I set up a darkened work area lit by a single yellow "bug" bulb, then opened it, removed the resist and cut two squares, put them in an envelope lined with black paper, and returned the photo-resist film to its package and sealed it shut. This film hardens in UV light. I prepared a brass square by wet sanding each side of the square with a provided 3200 grit sanding pad until very shiny and so that the water sheeted across the square. I pulled one piece of the resist from the envelope, peeled off the inside cover film and, like applying a decal, attempted to lay the resist film on the wetted square, get it aligned to the edges of the square and adhered to the square without bubbles of air or water between the film and the brass. This turned out to be rather difficult and I had problems with it. On my second through fourth tries I submerged the brass square in just enough water to cover and applied the resist film through the water. (An old school decal application trick.) I did the same to the back side.
While doing this I had the Pro-Etch laminater plugged in and warmed up. I cut two squares of carrier sheet (card stock with one side treated so that it is glossy and smooth) slightly larger than the brass squares. I made a sandwich of the photo-resist covered brass square with the two squares of carrier, glossy side to the photo-resist and ran it through the laminater twice, flipped over and turned 90 degrees for the second pass and let it cool in a black envelope.
Next the cooled, laminated brass square (carrier sheets set aside) is slipped between the two masks and centered, then placed in the center of one of the Plexiglas squares provided, the other Plexiglas square placed on top and clamps applied at the four sides. All of this has been done with minimal exposure to UV light, just the yellow "bug" bulb - a suggestion in the directions.
Again per the instructions I exposed each side of this sandwich to full sun at local noon for 20 seconds. The UV light hardened and turned the photo-resist in the areas not masked a deep blue from its original light blue. I disassembled the sandwich and returned the brass square to a black envelope while I set up for the next step and put away what I wouldn't need right away.
I prepared a solution of sodium hydroxide and water per the instructions, removed the outer protective layer of the photo-resist film from both sides and submerged the brass square in this solution. This chemical reacts with the masked and un-hardened photo-resist film, softening it so that it will brush away. This is the most important part of the process, if the film is not completely removed from the areas to be chemically etched it won't etch properly. This is where I messed up in my first two tries; for the third and fourth tries I used my 2.75X Opti-Visor and inspected and brushed with the solution and inspected and rinsed and brushed some more until I was certain that every bit of resist was removed from the areas that needed to be etched. I made use of a hand held magnifying glass with the Opti-Visor to make sure every bit of un-exposed resist film was gone.
The second brass disc with blue photo-resist and bright brass showing through the
areas that will be etched. I thought this was good enough but it was not. Many areas
did not etch properly, especially from the backside, due to my lack of diligence.
Paying close attention to the instructions, I set up the equipment for the actual photo-etching. I had to supply a rinse bucket and a smaller rinse bowl, both filled with water. I warmed the bottle of ferric chloride in hot water running from the tap before filling the etching tank. I plugged in the aerator (to circulate the etching solution) and submerged the brass square. I set a 5 minute timer.
Etching in process. There's a clamp on the hose to prevent the etching solution from
flowing back into the pump plus the pump is placed on two pieces of foam packaging
to raise it above the solution level.
After five minutes, I removed the brass square from the etching tank (turned off the aerator and pinched shut the hose clamp - the fumes must be assumed to be nasty) rinsed and re-rinsed to inspect the progress. Most of the double side etching at the edge of the disc was cut through, so I turned the brass square 180 degrees in the clamp, returned it to the solution (turned on the aerator and released the clamp) and waited three minutes. Upon inspection, it was done and I rinsed it in hot tap water before setting it aside and cleaning up.
Now, to see the results. I poured out just enough of the sodium hydroxide (undiluted this time) into one of the trays provided to cover the brass square. Full strength this chemical removes the photo-resist from the brass with a little help with a brush. When cleaned of the resist the brass was rinsed in hot water from the tap and set aside.
Here's my first try with some practice with black enamel to fill in the letters. There are
several places where the photo-resist did not adhere and laminate properly as a result
of my difficulty with getting the resist in place as directed and etching solution got into
them from an edge exposed to etching solution. I had no more problem with this using
the submerged technique of applying the photo-resist film. Many places in the lettering
have incomplete depth because I didn't get all the masked film removed the way I should
have. Micro-Mark was right when they said this was the most important step.
Third and fourth tries, both appear perfect. The lettering has not been filled with enamel
yet, just the result of better photographic technique learned since the photo of the first
disc. I didn't even bother stripping the second attempt since I could see that I had not
removed all the masked and un-hardened photo-resist film. The discs are 1.73 inch / 44
mm in diameter.
I am very pleased with the Micro-Mark Pro-Etch Kit. It has everything needed except for a yellow "bug" bulb and the two rinse buckets I provided. I bought a better pair of rubber gloves than the single use, throw away gloves supplied in the kit for my second session when I made the last two discs. I also added a small in-line on/off switch to the aerator electric cord so I would not have to crawl under my work bench to unplug it when I needed to turn it off.
The process does have a steep learning curve, a mistake made anywhere in the process will affect the results. READ AND STUDY THE INSTRUCTIONS and MAKE SURE YOU UNDERSTAND EACH STEP.
I hope my experience helps others learn from my mistakes.
Dave
-
 molasses got a reaction from dafi in Modeling Scale Figures
I don't know where else this should go but this seems to be the closest. I'm sure it will get moved if another forum is more appropriate.
I mostly build small scale and miniature ship models at sea in bottles. They seemed naked without sailors at work on deck and aloft. So I set out to find an easy way to make them until I came across Lloyd McCaffery's technique in his book "Ships in Miniature". I used his materials and technique to make these five figures at 1/96 scale.
They attracted some interest so I'm posting the information for others to use. Here's an article I put together from my build log for submission to the Database here and at ship bottling sites.
Modeling Scale Figures for Ships in Bottles.pdf
A little more information on the figures can be found in my Ogallala build log.
-
 molasses got a reaction from Piet in Preussen by Chasseur - BOTTLE - barque
Jack Needham in his book "Modelling Ships in Bottles" has an entire chapter covering this subject and it's the best discussion of the interaction of wind, swells and ships I've seen. I highly recommend it.
You can look at wave propagation theory but that's mostly calculus based and isn't much help except for some of the basics. As wind velocity increases so does the height, interval between crests and the speed of the swell. One aspect of wave theory that's interesting is how waves of different magnitudes and velocities interact and may be useful - the Wikipedia article on wave theory has several animated representations of the effect.
A study of the Beaufort wind force scale is also very useful. Look at several graphic representations on the web, there are lots of them. Notice in the scale that there is only a narrow range of wind velocity that causes wind swells to break and roll over. Below but near that range, crests may get a bit frothy at random peaks, and above that range the crests get blown away as spray in the air and froth down the lee side of the crest. Many ship bottlers tend to make their waves look more like surf with lots of breaking waves rather than a series of swells as seen in open, deep-water seas, but you're not making that mistake.
All in all, you seem to be on the right track. I like the effect you show on the lee side where the bow wave has combined with the swells to change their angle, it's spot on; other than a "bone in her teeth" nothing else is needed on that side. I'm aware that you haven't addressed bow waves and a wake but I suspect you have a good handle on them. There's also a wave that can propagate from the water that passes under the hull, rises to the surface (following the hull shape) and meets the water passing along the side. Where this occurs, it's magnitude and the angle of this small wave depends on the hull shape. Compared to a prop driven vessel, the wake will be relatively smooth with much less froth.
I may be mistaken, but I seem to recall that you intend to depict Preussen under shortened sail in high wind. I suggest that you consider increasing the interval and magnitude of your swells and depict them with blown-away crests. The wind effects on the sea need to match the number and set of your sails. The way you have it now the wind is from the starboard quarter, but when the forward motion of the ship is added in, the apparent wind from the deck of the ship will be closer to being off the beam so keep that in mind when you brace the yards.
I like your very methodical approach, it bodes well for a successful completion of this very ambitious project.
-
 molasses reacted to Chasseur in Preussen by Chasseur - BOTTLE - barque
Today the Polar Vortex hit and we have snow, minus 21 degrees Celsius with the windchill. Good day to be inside. The first two shots shows my second attempt with deeper carving and wood primed in grey to show the fuzzes. I took my dremel and sanded the fuzzes off before continuing.
Next shot is middle section done with Games Workshop acrylics. Old paint but still works! This picture shows wood primed with Regal Blue.
Next shot is the right section done with enamel & oil paints. This piece is primed with Testors Dark Sea Blue.
Next two photos we finish the middle section with some Regal Blue mixed with varnish (secret sauce) then some Scaly Green and Ice Blue, followed with some Testors White enamel for the white caps. I just love mixing things up to try new techniques. These seas as my wife call them are "Happy Seas" full of life and nice swells. I dislike them! They look like moguls on a ski hill. They do however look sort of Folk Artish.
Next two shots we have the right section with Dark Sea Blue, secret sauce, and a rubbing technique I'll describe further on here in this post.
Next shot is the same seas with different lighting. The color change is quite dramatic. I like this outcome!
Next shot is the two side by side for comparison. My Eldest and youngster like the right, and the wife likes the middle acrylic section. I am still undecided at the moment. I still think I can do better!
The one example on the right which most of us liked was a freak occurrence. I was in the process of using, and laying down, a bunch of artist's oil paint and was going nowhere real quick. I basically was making mud. I got mad and took a towel to wipe it all off and was pleasantly surprised at the outcome. It was the effect I was looking for. I know I'm close I just have to tweak it a bit and I should be ready to go for it. It's really hard to paint ocean on wood at this scale however I know I can pull it off. Still waiting for Jack Needham's book to arrive for color inspiration as well.
Jeff
-
molasses reacted to Chasseur in Preussen by Chasseur - BOTTLE - barque
Yesterday and today I had a break-through regarding painting oceans and colors. Also I have Jack Needham's book coming to me on an inter-library loan to further my study on ocean waves, direction and color. An excellent link for ocean color and painting is Water Recipe's Parts; one, two, and three on YouTube by non other than Marge Kinney.
Marge is a really nice lady and an excellent artist. Her style is impressionist based I. E. Vincent van Gogh etc.
Marge does an excellent job of explaining color pallet etc. especially for oceans and she gets it right!
https://www.youtube.com/watch?v=aucEi6YGc80
So this weekend into the Man Cave I go to practice some more carving and painting to... improve upon my technique until I get it right. Then I'll proceed with the final outcome!
Stay tuned ... Jeff
-
molasses got a reaction from IgorSky in ESMERALDA by molasses - 1/640 - BOTTLE - Chilean Navy Training Ship
Finished Ogallala and can now get back to work on Esmeralda. I hadn't intended to take this much time away from Esmeralda but Ogallala turned into a much more comprehensive project than I had originally planned. I did find some more, useful, photos of E for some details on deck and aloft and kept her in mind during my side journey. I learned a few things from O that I will apply to E and I have a bit of re-work to do and some details to add before I pick up where I left off. I'll post my progress soon.
I came across an interesting variation on a ship in a bottle with Esmeralda as the subject but the method is a bit too ephemeral for my taste.
Dave
-
molasses got a reaction from tadheus in ESMERALDA by molasses - 1/640 - BOTTLE - Chilean Navy Training Ship
Finished Ogallala and can now get back to work on Esmeralda. I hadn't intended to take this much time away from Esmeralda but Ogallala turned into a much more comprehensive project than I had originally planned. I did find some more, useful, photos of E for some details on deck and aloft and kept her in mind during my side journey. I learned a few things from O that I will apply to E and I have a bit of re-work to do and some details to add before I pick up where I left off. I'll post my progress soon.
I came across an interesting variation on a ship in a bottle with Esmeralda as the subject but the method is a bit too ephemeral for my taste.
Dave
-
molasses got a reaction from Chasseur in ESMERALDA by molasses - 1/640 - BOTTLE - Chilean Navy Training Ship
Finished Ogallala and can now get back to work on Esmeralda. I hadn't intended to take this much time away from Esmeralda but Ogallala turned into a much more comprehensive project than I had originally planned. I did find some more, useful, photos of E for some details on deck and aloft and kept her in mind during my side journey. I learned a few things from O that I will apply to E and I have a bit of re-work to do and some details to add before I pick up where I left off. I'll post my progress soon.
I came across an interesting variation on a ship in a bottle with Esmeralda as the subject but the method is a bit too ephemeral for my taste.
Dave
-
molasses got a reaction from hexnut in ESMERALDA by molasses - 1/640 - BOTTLE - Chilean Navy Training Ship
Finished Ogallala and can now get back to work on Esmeralda. I hadn't intended to take this much time away from Esmeralda but Ogallala turned into a much more comprehensive project than I had originally planned. I did find some more, useful, photos of E for some details on deck and aloft and kept her in mind during my side journey. I learned a few things from O that I will apply to E and I have a bit of re-work to do and some details to add before I pick up where I left off. I'll post my progress soon.
I came across an interesting variation on a ship in a bottle with Esmeralda as the subject but the method is a bit too ephemeral for my taste.
Dave