mgdawson
-
Posts
157 -
Joined
-
Last visited
Content Type
Profiles
Forums
Gallery
Events
Everything posted by mgdawson
-
Hi Sandor, I've seen several drawings similar to the one Nils posted although I don't think I've ever seen one of the tackles taking a turn around an axle. I've also seen the chocks between the axles rather than outside, more seaman like IMHO, less chance of being kicked/knocked out. Greg mentions guns turned side on to the bulwarks, I've seen several models and drawings with this arrangement mainly for signal guns or on expedition ships with reduced armament to make more room on deck, I would not expect to see this on any active warship. Unfortunately I don't remember how they were lashed. Little awkward getting to my reference library at the moment but if I get a chance I'll have a hunt for you. Mark D
-
When i did my ticket the examiner got me to do it backwards, in half points ! Mark
-
My First Attempt At Metal Blackening
mgdawson replied to Osmosis's topic in Metal Work, Soldering and Metal Fittings
Hi Art Perhaps try jewellery supply houses, I've also seen it at a casting/molding supply for theatrical props, masks etc. Mark -
Hi John Seamen are a practical bunch, today just as much as in the past, why not google up images of some active original or replica period ships and see what they're doing eg James Craig (Sydney), Enterprize (Melbourne), Duyfken (Fremantle), Endeavour, Bounty. Don't bother with static museum ships like Polly Woodside, Cutty Sark or Victory, on those sometimes low maintenance preservation has to take precedence over historic accuracy. By your location you're not far from Mystic, pop down and have a look at the Morgan, I believe they were making her seaworthy again a few years ago so her current rig should be practical. Mark
-
Revive thickened epoxy resin
mgdawson replied to vaddoc's topic in Modeling tools and Workshop Equipment
One problem I've found with using epoxy as a finish coat was bubbling. I later spoke to an expert demonstrating epoxy finish who explained the multiple errors I'd made. Basically there is air in the wood and any heating will expand that air forming bubbles in the finish. So what did I do wrong ? 1. I warmed the epoxy to the point where it was warmer than the wood so when I applied the epoxy it heated the air in the wood - bubbles. 2. I set the coated piece in the sun thinking as warmth thins epoxy it would flow more and give me an even finish - more bubbles. 3. I did the coating in the morning so it would have plenty of time to harden before evening, day warms up - even more bubbles. The recommendation was to have the wood initially 10C warmer than the epoxy thereby the epoxy will have a cooling effect and be sucked into the wood. Start coating when the day starts cooling. Keep in shade. He also suggested spraying the surface with methylated spirits to break the surface tension of any remaining bubbles. In the demonstration he was warming the wood to 40C & the epoxy to 30C, quick spray with the metho, glass finish. (I've not tried this yet, his recommendation to me for the job I had in hand was polyurethane ) Mark -
Please help! What to buy.
mgdawson replied to semorebutts's topic in Metal Work, Soldering and Metal Fittings
Hi Andrew mentioned keeping the tip of your soldering iron clean using a damp sponge. Wiping your iron on a damp sponge shock cools the tip and over time this can lead to the tip cracking and failure. This is really not a problem for occasional use except that if/when the tip does eventually fail your equipment may be of such an age that replacement tips are no longer available necessitating purchase of a whole new iron. (Yep, I've got a lovely mini-scope that I can't get a tip for.) A newer method of tip cleaning is a brass wire 'sponge' which wipes the excess solder off the iron without drawing off much heat. I've been using one now for some years and find it does as good if not better job of cleaning the tip, a quick poke into the wire does the job, no rotating the tip on the sponge, no waiting for the iron to reheat, no need to run into the kitchen to redamp the sponge and no need for periodic sponge replacement, just occasionally pull the wire out of its holder and shake out the little knobs of solder. https://www.jaycar.com.au/goot-soldering-iron-tip-cleaner/p/TS1510 http://www.altronics.com.au/p/t1330-solder-tip-cleaner-and-holder/ -
Metal work resourcnes
mgdawson replied to Kurt Johnson's topic in Metal Work, Soldering and Metal Fittings
Hi Kurt If you're looking for more in depth info on a specific subject you might try the Nexus Special Interests, 'Workshop Practice Series'. I see they're now up to book 49. Many model engineer suppliers as well as the usual online book sellers carry them. Mark -
Hi Richard Another option which may be more convenient to you is Jaycar Electronics, they've got a range of small drill bits. www.jaycar.com.au Mark D
-
Hi Pete Typically the helmsman is watching the luffs of the sails, particularly when beating so I imagine he would stand to the weather side of the wheel to give himself the best view possible, similar to the helmsman on a yacht today is most often seen on the weather side of the helm where they can watch the luff of the genoa. Occasionally you'll see a yachts helmsman to leeward but if you look carefully they're looking under the mainsail to see the luff of the genoa. Mark D
-
Hi Chuck Sounds like you have a dremel set up as a drill press. I'd suggest putting a block against a fence and drilling a hole through a block the size of your spar then turn it over keeping the same edge of the block against your fence and drill a cross hole the size you want to drill through the dowel. Using the fence this way will ensure the centres are aligned. Slip your dowel into the block, align it to the fence and when you drill the dowel, the block will stop the bit wandering as it starts into the dowel. Mark
-
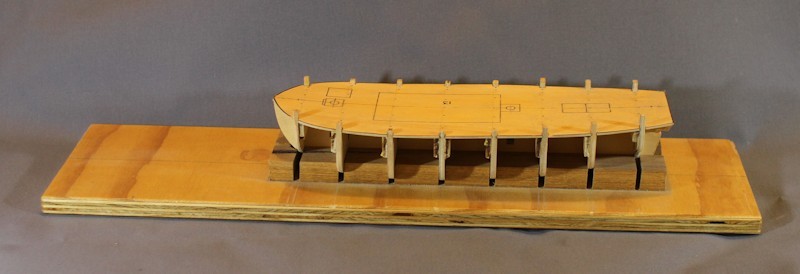
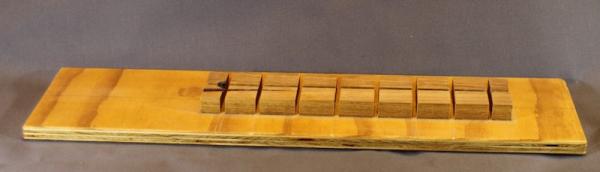
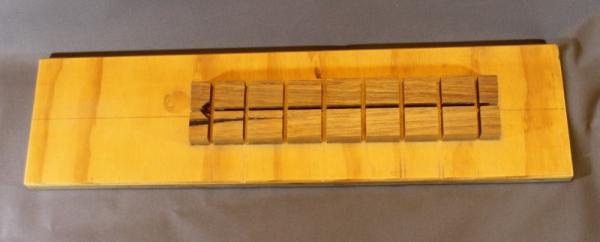
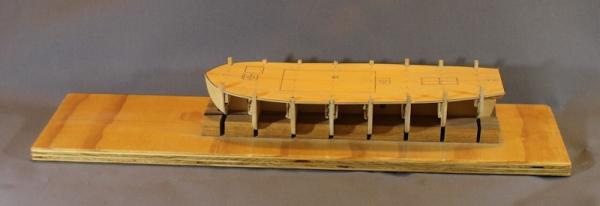
Hi Simon How about 2 strips on a base board to hold the keel with slots cut for the bulkheads as per the photos. I glued the 2 strips down and then cut the bulkhead slots with a tenon saw. Sizing between the bulkheads was taken from the bulkhead slots in the keel board. You can also see the reference centreline and the notches cut in the front 2 blocks for the bow filling pieces. The whole thing is a fairly snug tight fit so nothing moves. Mark
-
Good digital caliper length?
mgdawson replied to SgtSki in MI's topic in Modeling tools and Workshop Equipment
Hi Tom I use digital calipers in all sorts of applications and find that the vast majority of things I'm measuring are under 25mm (1") and very very few are over 75mm (3"). Generally the long arm on a 150mm caliper gets in the way more often than it's of any use, I prefer a set of 100mm (4") calipers but I do have a 150mm set available for that very rare occasion when I need something bigger. Mark -
Hi There was a brilliant modeller Young C Park, unfortunately passed away last year, who did cutaway aircraft in aluminium. There's a few pointers on working with aluminium on this page which may be useful to someone thinking of working in that material. http://www.craftsmanshipmuseum.com/park.htm Mark D
-
Top find Rob, thanks. Mark D
-
Hi All Saw this video a few weeks ago and thought it might give someone food for thought, perhaps for a base board. He uses paper bark pieces to lay down a montage. http://www.youtube.com/watch?v=eXvYR1Cx8A0 A search on youtube also turned up a video using sheet birch bark for draw fronts with a detailed explanation of how he flattened the bark. Mark D
-
Hi Gary Could they mean 'not compatible with airbrushes without thinning.' ? I'd email them and ask for clarification, will probably turn out to be a typo that they're not even aware of. Mark D
-
Diluting CA
mgdawson replied to jdiven's topic in Discussion for a Ship's Deck Furniture, Guns, boats and other Fittings
Hi jdivan, I've not heard of ca thinned in the way I think you mean, although I have heard of thinning aged ca which has thickened with fresh thin ca, presumably you could also use this method to thin down thick or medium viscosity ca's to get an intermediate viscosity. Mark D -
convertion fraction to mm
mgdawson replied to rafterrat_2005's topic in Modeling tools and Workshop Equipment
Hi All Some people might be interested in an app for iPhone called ShopCalc which appears to be designed for carpenters, among other things it converts between fractional inches, decimal inches and metric for length, area & volume as well as basic calculator functions + - / x in whatever units you're working with or converting to. Perhaps someone familiar with Anroid can check if there's something similar available for that environment. Mark -
painting the "Undersides"
mgdawson replied to geoff's topic in Painting, finishing and weathering products and techniques
Hi Geoff As I understand it, ships, prior to copper sheathing were not 'painted' as such, they were coated in various mixtures of tar, oil, resin, tallow and pitch to try and prevent the growth of barnacles and weed on the hull as well as trying to impede the attack of toredo worms. I'm not near my references at the moment but from memory the yellow tinged white was tallow with some sulphur added, a common mixture in the mid/late 18th century Royal Navy before they switched to copper. Perhaps someone more knowledgeable than me could pipe in here. Mark D -
Hi Ed Can't help with specific sizes but I have some photos that may help with perspective, I've sent you a PM. Mark D
-
Painting Brass
mgdawson replied to captainbob's topic in Painting, finishing and weathering products and techniques
Hi Bob, Can you please tell us what CLR is. Ta Mark D -
pledge problem
mgdawson replied to stevetuck56's topic in Painting, finishing and weathering products and techniques
Hi Steve I'd guess you're looking for the Future/Pledge acrylic floor polish much favored by plastics modelers, I remember reading, I think on fine scale modeler forums, that it's been replaced by another product with quite a different formulation. There was no comment on whether the new stuff was as useful to modelers as Pledge/Future. Mark -
Anyone Use True Oil?
mgdawson replied to Tyrnac's topic in Painting, finishing and weathering products and techniques
Hi Tyrnac I don't know what the gun laws in Thailand are like which might make it difficult to get True Oil but if you do manage to find somewhere that has woodworking finishes you may find China Wood Oil, this is an alteranative name for Tung Oil. Mark -
Display case wood
mgdawson replied to Senior ole salt's topic in Painting, finishing and weathering products and techniques
Where dat puddly tat ? -
Down under you can get acetone in hardware stores, paint section, 1/2 litre or larger, works out a lot cheaper than nail polish remover if you're going to use the volume. Mark D