MORE HANDBOOKS ARE ON THEIR WAY! We will let you know when they get here.
×


Bob Cleek
-
Posts
3,374 -
Joined
-
Last visited
Content Type
Profiles
Forums
Gallery
Events
Everything posted by Bob Cleek
-
The deck appears to be a veneer product made by Teak Decking Systems ("TDS" - World's Premier Teak Decking by Teakdecking Systems — Teakdecking Systems) The structural deck would be welded steel, TDS is laid out on a sheet of plywood and then the teak veneer is glued to the plywood in the configuration designed and shipped out of the factory as an exactly cut prefabricated sheet. (Note the absence of fastener plugs in the teak deck planks.) What you are looking at in the pictures is a modern "faux" laid teak deck, not a real one. I don't know how the original deck was laid out, exactly. It was probably much thicker (and wider) teak planking bolted to the deck beams or through the steel plate deck, then caulked and it was probably laid out to coincide with the bases of the deck furniture. The modern layout and narrow strakes of the restoration planking are an anachronism. Quality teak in sizes suitable for "old school" deck planking is virtually unobtainable today, which probably explains the decision not to replicate the original teak decking.
-
Thanks for the back story, Roger! I was unaware that McNeil had died. (I've yet to get to my copy of the latest WoodenBoat ) Looking at the photos and unaware of your post until I reached it, I kept wondering why Cangarda wasn't being properly maintained, at least considering what had been put into her restoration. (The Harken stainless steel and plastic racing blocks on the anchor cranes really blew my mind.) Somebody's going to have to put some bucks into refinishing a lot of that brightwork. Once the seams open up and water gets under the varnish, it's toast. It's a crime, really. The cost of regular routine maintenance was probably peanuts in the context of McNeil's overall estate.
-
She's hanging an anchor light in the above picture, but in the below much earlier picture she appears to be carrying a steaming light on the foremast. I presume this was a permanently mounted electric light. Note that on the flying bridge she is carrying a large electric spotlight.
-
I'm a "woodie," too. I also followed Gerald's build and was in awe of his jigs. He must have spent a tremendous amount of time conceiving, designing, and building them. That man was a genius, for sure. His Techniques of Ship Modeling is one of the best books on the subject that I've ever seen. I go back for a re-read every so often, along with Underhill's modeling technique books, just to refresh my memory. Looking back on his build log, though, I see where all of his links to his own website are now dead. Apparently, nobody maintained them after his passing and all of it is probably lost, including things like the plans for his jigs. Sigh.
-
Perhaps you can be more specific. I don't think there are many "sets of mini wood saws" available in the marketplace. Also, are you referring to hand saws or powered saws? Which model are you building? Your answers to these questions will get you responses that are more accurately tailored to your inquiry. Generally, it's not wise to buy "sets" of any tools because they load these "sets" up with a lot of stuff you will never use. Follow the maxim: "Only buy a tool when you need it and then buy the best you can afford." The most expensive tool is the one you have to buy twice! Much of the cutting done in modeling is done with scalpels and "hobby blades" which are readily available on hobby shops and on line. X-Acto and similar brands offer small saw blades that will fit their holders. A basic set runs around $25. In this case, the below "set" is an exception to the "avoid sets" rule. You probably will never use half the blades provided, but the price is worth it for the handles alone. There's a wide selection of bladees availabel separately. https://www.amazon.com/s?k=xacto+x5282+basic+knife+set&adgrpid=1333708177723075&hvadid=83356927325719&hvbmt=be&hvdev=c&hvlocphy=43893&hvnetw=o&hvqmt=e&hvtargid=kwd-83357125204862%3Aloc-190&hydadcr=24627_10488567&tag=mh0b-20&ref=pd_sl_1gynreog08_e (There are Chinese copies all over the place that look exactly like the X-Acto and Excel brands, but are pure junk. Don't buy them!) Another brand of hobby knife saw set showing the sort of saw blades available for the X-Acto sets. $11.00. https://www.amazon.com/LitKiwi-Modeling-Hacksaw-Handcrafted-Cutting/dp/B0BRKR9KQP/ref=sr_1_44?keywords=jewelers%2Bsaw%2Bkit&qid=1682128554&sr=8-44&th=1 Another option is a classic adjustable jeweler's saw, which will hold a variety of different sized blades suitable for cutting wood, plastics, and metals. You want the adjustable frame so you can reuse broken blades that are no longer full length. (And you will break blades!) Buy a decent quality one. There are cheaper ones that aren't worth the money and hugely expensive ones that IMHO are overkill unless you are a professional jeweler. See: https://www.ottofrei.com/products/classic-jewelers-adjustable-sawframes (Note that Otto Frei jeweler's supply house is an excellent tool source.) Buy a selection of saw blades while you are at it: https://www.ottofrei.com/collections/saw-blades For example, this looks like an acceptable starter set: https://www.amazon.com/Megacast-Professional-Jewelers-Blades-Wooden/dp/B089XSPBJL/ref=pd_vtp_h_pd_vtp_h_sccl_5/139-6146405-0707815?pd_rd_w=5bdn2&content-id=amzn1.sym.a5610dee-0db9-4ad9-a7a9-14285a430f83&pf_rd_p=a5610dee-0db9-4ad9-a7a9-14285a430f83&pf_rd_r=S6XHMSDNABQSEVP6TC18&pd_rd_wg=rM4x6&pd_rd_r=cd18a20a-775c-4dfe-9bea-d3a7d7d282bc&pd_rd_i=B089XSPBJL&psc=1 (The wooden piece clamps to the edge of your workbench and is used to saw shapes from thin flat sheet metal or whatever other small piece you need to hold to saw. It will save you from sawing up the edge of your workbench!) These saws pretty much cover the "mini" handsaw selection for modeling. There are more options for power saws, but for small, fine work, you will probably opt for handsaws anyway. You can spend hundreds of dollars on powered scroll saws, a Byrnes Model Machines table saw and attachments, and so on. Happy sawing!
-
That was Keith Black's question that I was answering, actually. Your answer raises another question: "Why plank the hull at all?" It's an iron ship, not a wooden one. A "bread and butter" hollowed out solid hull is entirely appropriate. It's your call, of course, but If I were building her and had your skills, I'd be thinking in terms of a metal hull. Carve a pattern and "tap, tap, tap" to get the plates shaped as laid out in the plating schedule, if you have the plans. The late Gerald Wingrove, MBE, undertook as his magnum opus an exact sectional model of the Falls of Clyde in brass (I believe.) (His website, which contained something of a log on his Falls of Clyde build, seems to be no more. The below photo is from https://www.modelengineeringwebsite.com/Gerald_Wingrove.html )
-
Being as Cangarda is blind-riveted, there would be little point in not painting it, would there? Then again, there were some pretty spectacular builder's models of early 1900's metal steamships which were built of wood and finished "bright" with all hardware of yellow metal (sometimes even gold-plated.) https://www.shipsnostalgia.com/media/cangarda-as-found.97579/ Or, build it all of copper and brass and leave unfinished:
-
One thing's for sure, they need to brush up on their flag etiquette and strike that yacht signal from the stern staff. That place of honor is reserved for the national ensign only. Then, later, here she is flying the British "Blue Duster" in Canadian waters. https://en.wikipedia.org/wiki/Blue_Ensign And in 2011 in Brockville, Canada, flying an outdated (of 1957-1965) Canadian ensign, the "Blue Duster" with Canadian of defacement. (As of 1965, the Canadian ensign is the red and white "maple leaf" national flag.) So, as for a home port, perhaps she has none and sails hither and yon under false "flags of convenience." (See: https://naylorlaw.com/blog/flag-of-convenience/) Might she be switching national registries to keep one step ahead of the taxman? That could arguably make her a pirate, raising the question of whether MSW would condone a build log for a model of a pirated ship or whether its prohibition only extends to pirated models of ships.
-
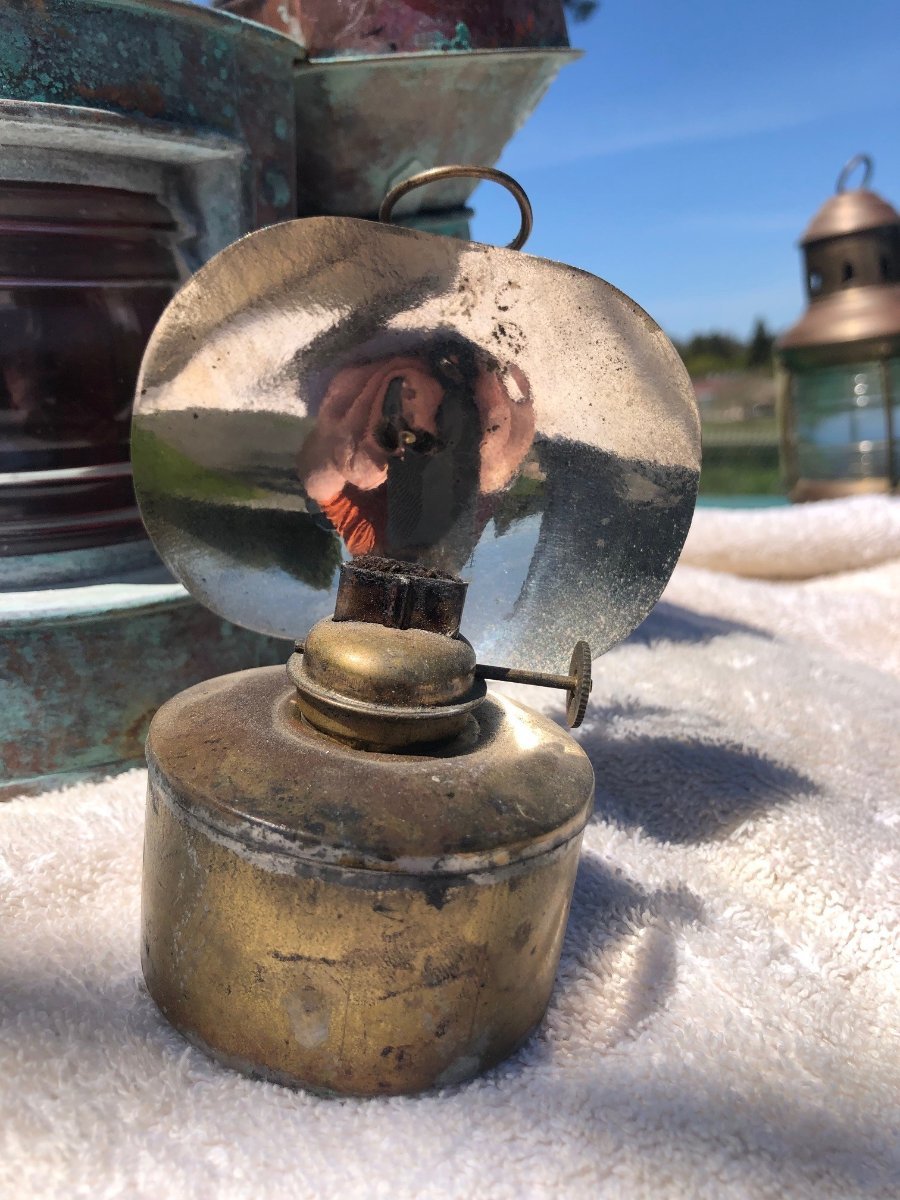
Actually, these lanterns don't really get hot. Warm, maybe, but not hot. The flame isn't much more than an inch wide at the burner and forms an equilateral triangle with its sides. A larger flame would only create a lot of black smoke and soot. Out in the sea air in even a light breeze, the lamp body doesn't have much of a chance to heat up.
-
Exactly so. Eberhard's photo of the tug at the NMM shows clearly how it was done with the lantern hung on a flat back plate which actually carries the jackstay rings. Other lanterns have the jackstay rings attached the lamp itself which would be less convenient than leaving the jackstays permanently rigged and slipping the lantern on and off a carrier plate. It should be remembered, however, that the jackstay and running light halyard arrangement might be a bit messy on a sailing ship with all the attendant rigging already running down to the base of the mast and for this reason steam powered vessels carrying auxiliary sails (or sailing vessels with auxiliary steam power) might opt for the "portable" rig whcih was struck down when not in use . The picture below, showing what appears to be more permanent jackline and bracket arrangement is on a steam tug which would not be bothered by additional rigging on and about the mast. Indeed, the backplate seems a bit crudely made and it's possible it was fabricated by the tug's bosun to achieve the convenience it affords in servicing and lighting. All the lanterns of this era were hung in the same fashion.... or at least all I've ever seen. The back of the lantern has a bent flat metal strap which slides over a "tongue" positioned as may be convenient, either on a flat plate as shown above, or on a light board port and starboard, or on a stern transom or rail as shown in another of Eberhard's photos below. (Interestingly, the stern light shown was originally an oil lamp; as indicated by the permanently mounted "tongue" and strap on the lantern, but the lantern has been electrified as seen by the power cord running into the back of the lantern next to the standing "tongue" bracket. In the photo below, a "tongue," rather than a strap, is attached to the back of this port running light to the right of the red curved glass inside the body of the lamp. (The back of the lamp body is a right angle so it will fit neatly into the corner of the light board. This tongue would slide into a strap permanently attached to the light board in order to "hang" the lamp on the board.

-
I've had a good look at that vessel in the flesh, as it were, an while I am not any sort of expert on that period, I'd caution against relying upon it for much of any sort of historically accurate data. Those aren't wedges. I can't tell exactly what they are, but it appears they are simply laminated planks used to build up the mast.
-
Back when her restoration was completed, she was reportedly going to be homeported at Mystic Seaport, CT. I didn't find her on a quick search of the USCG vessel information database, but I'd be quite surprised if she were not a US flagged vessel with USCG documentation. That would require a hailing port on the transom (or stern quarters) expressed as a city and state. That requirement isn't unique to the US, but rather is required by international law. A Liberian flagged vessel would, for example, carry the hailing port of "Monrovia." A British flagged vessel would carry a hailing port like "Liverpool," and so on. The hailing port has to be written in clear block lettering of no less than a 4" high font. It could be that she was pending transfer of ownership and the new owners intended to register her with a new hailing port. In the US, at least, a registered home port can expose the vessel owner to incurring sales and/or ongoing annual property taxes. (In California we see a lot of Oregon hailing ports on large yachts because, unlike California, Oregon has no sales tax. Just a guess, though.)
-
A great subject to model in the old "builder's model" style of her time. It will be interesting to see what you do with this one! BTW, does anyone know why she doesn't have a hailing port on her transom?
-
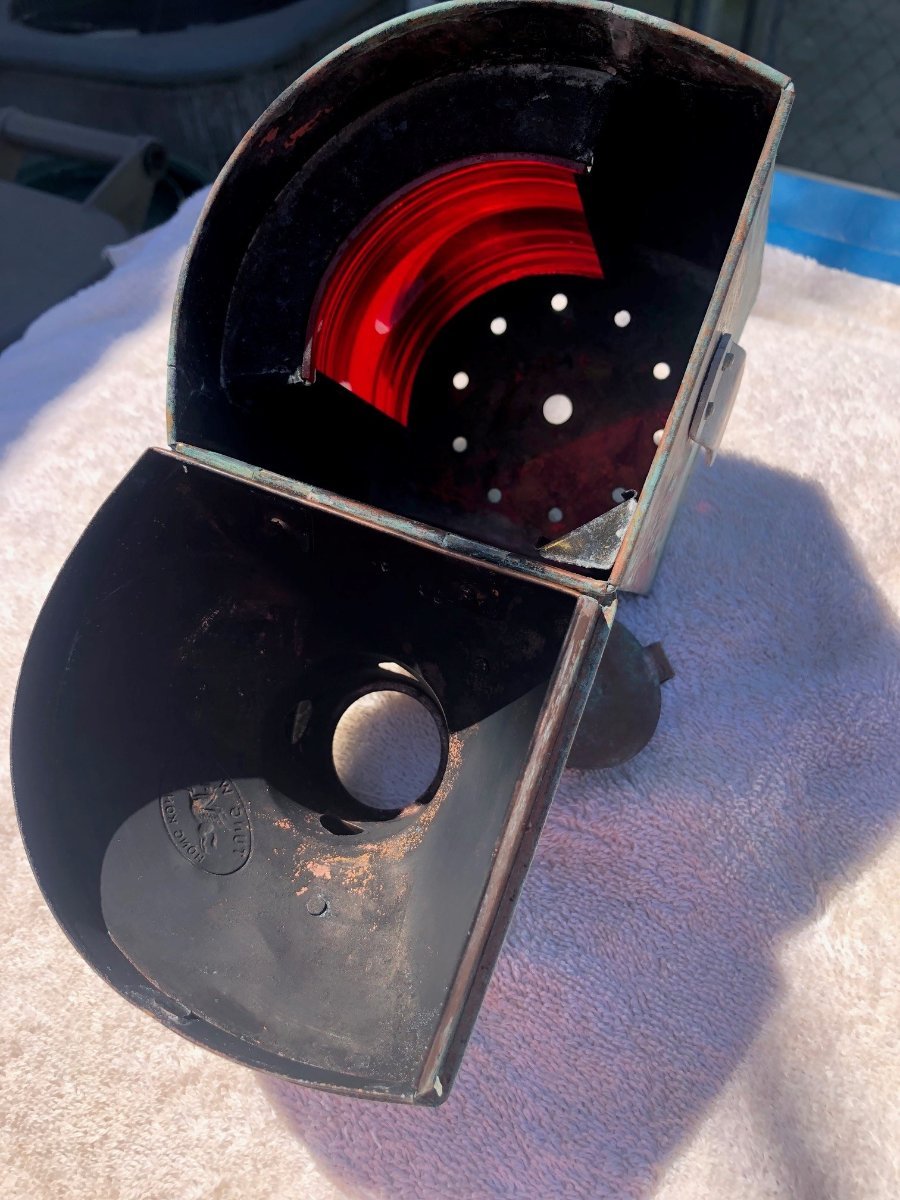
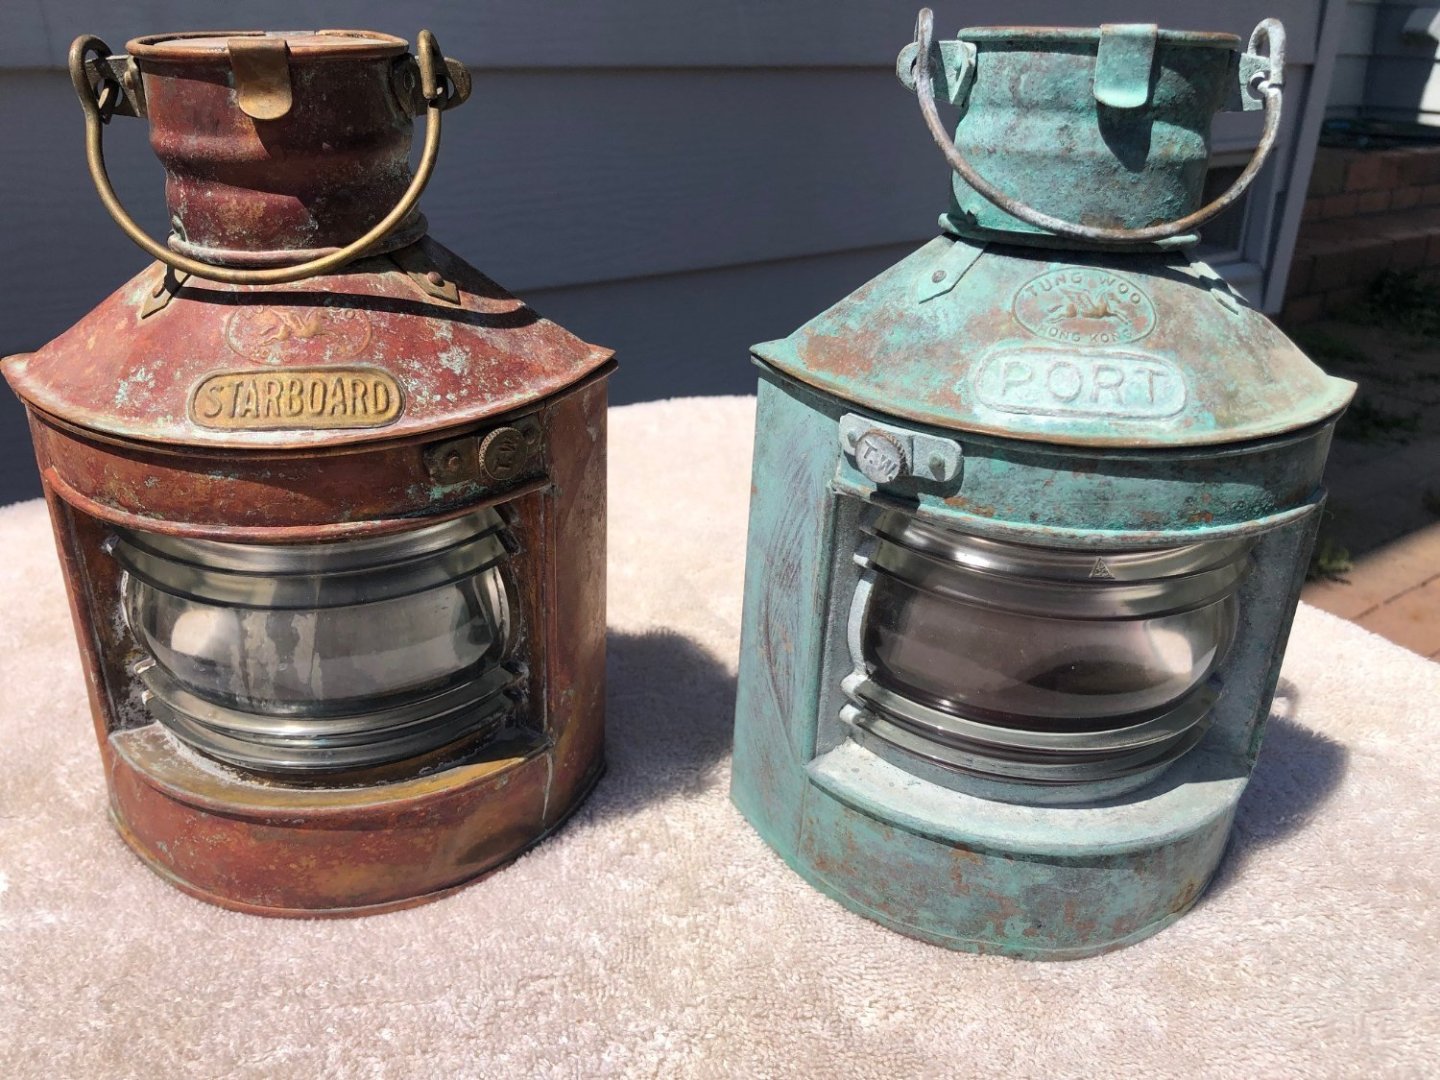
Actually, in the Tung Woo lights, there are curved pieces of colored glass, one red, as shown, and the other blue, in brackets inside the lamp behind the Fresnel lens. The Fresnel lenses are both clear and from certain angles in certain light appear clear from the outside when the lamps aren't burning. I believe the thin curved colored glass panes behind the larger clear Fresnel lenses would have been a manufacturing economy. There is a lot more glass in the Fresnel lenses than in the color panes behind them. Glass is colored with metal oxides. Only the colors created with metals maintain their color intensity without fading in all situations including direct sunlight. A prime example where the capacity to hold color and not fade is critical would be in a running light. Red is the most expensive color of glass because oxidized gold is used to achieve its color. The larger quantity of clear glass used to cast the Fresnel lenses was the least expensive glass of all. If you look closely, you can see the narrow top edge of the curved pane of glass that slides down the side slots and forms a curved "box" between the glass pane and the back of the Fresnel lens. I've always noted that the green light is actually blue with a yellow flame showing green through it, but I can't remember ever seeing a model in a museum that showed a blue starboard oil-burning running light, and I've looked. They all seem to be colored green. Properly, the light board might be painted green, but an oil lamp lens should be blue, or "bluish clear," I suppose. Maybe nobody notices this sort of thing but me. I'm the sort of guy who "clocks" his screws when they show. That's good for extra points on the concours circuit.
-
Not to worry. No two wooden boats are ever exactly built to plan, even those built to be exactly the same for class racing under exacting measurement rules. There are always small discrepancies, not only from boat to boat, but also from side to side of the same boat. It is not unusual for a boat to have a "faster tack," because the slight differences between the port and starboard sides affect the speed of the boat when on that tack. As noted, nobody will notice. It's a major accomplishment just to finish a kit. I don't know if there are any verifiable statistics, but if the ratio of started to finished build logs are any indication, you've already beat the odds against you. Nice work!
-
The torch will do fine to anneal small brass items, as will a gas stove burner. Get a pair, or better yet, a set, of long locking soldering tweezers for such purposes. They will come in handy for soldering, as well. Amazon.com: Fiber Grip Tweezers Jewelry Hobby Craft Soldering Fiber Grip Cross Locking Set Bent and Straight Tip 5 PCS By JTS : Tools & Home Improvement (I picked this set because it shows a variety of soldering tweezers. I don't know what the quality may be, but the price seemed quite reasonable.) While you're at it, in the soldering department, and for a lot of other tasks, especially rigging, I'd highly recommend acquiring a Quad Hands "helping hands" device. There are many cheaper Asian copies on the market now, but the original is still the professional industry standard and worth the few additional bucks. (Better materials, stronger magnets, and better clips.) They come in many sizes and configurations. Suit yourself. QuadHands® - Helping Hands Tool See: https://www.amazon.com/vdp/4c85a9f99b434f8c86151188ebcdf63b?ref=dp_vse_ibvc0
-
Excellent photos! I'd bet these are the only photographic evidence of the rigging of early steaming lights available on the internet, or anywhere else for that matter. It speaks well of your "eye" for critical details. A picture is worth a thousand words. If I were judging a model that portrayed such a detail, I'd certainly give it high points and "extra credit" for that!
-
Very thin veneer for non-structural planking is hard to source in my experience, at least and there's always the difficulty of working with the grain of wood that has been peeled from the log rather than sawn from it.. It's one thing if the plank is going to define and support the shape of the hull, but on a solid hull, that's not necessary and, consequently, the planking stock can be paper thin and cut with scissors, even, if one wishes. That will permit "planking" in scales well below 1:48 in size. The way it's done is to take a nice heavy plane, a #5 and better a #7 if you are lucky enough to have one, (or make do with what you've got.) Sharpen the iron well and set it properly to take a paper-thin shaving and then run it down the length of a nice clear plank edge (with the grain, not against it) and plane yourself a nice even curl of wood. Then take those curls, unroll them, and iron them flat with a clothes iron and cut your planks out from those flat ribbons of nice wood with the grain all running in the right direction with a scissors or a scalpel blade and a straight edge. Then glue those "planks" to your solid hull and nobody will ever be the wiser that you didn't spend a lot of time assembling frames and bulkheads and fairing plank edges and so on. I learned this trick reading the late Gerald Wingrove's book, The Techniques of Ship Modeling. He was working in quite small scale and he even devised a way to stack up razor blades separated by washers bolted together to create a cutter that could be run down the edge of a plank of wood so that a number of evenly spaced razor cuts would be made in the face of the edge of the plank. They he would plane the edge of the plank and the shavings would be simultaneously cut at the same time and all of the same width with one stroke of the plane.
-
I've had the same experience exactly and my 12 year old grandson "doesn't feel comfortable" in my workshop building "because it's dusty and full of spider webs." (I think the kid needs to do some time in "Grandpa's Boot Camp!") The schools now have what they call "Maker's Spaces," which are sort of shop classrooms where they are supposedly able to "make things," but I haven't seen anything being "made" nor any manual arts skills being taught. They also have "robotics shop," which is perhaps more technologically up with the times, but seems to only be about assembling prefabricated LEGO subassemblies and playing with radio-controlled cars in a different context. What's more disturbing to me is that kids my grandson's age don't seem to have any desire or interest to build anything. No "forts" or treehouses. No coasters. No working on their bicycles. Just no creative drive. Their interest is consumed by computer games (perhaps as our hobbies now compete with our own screen time... touche'.) "Reality" doesn't have to be "virtual," but it seems for them, it is. If they want something, their instinct seems to be to find out on line where to buy it. But then again, I had a father-in-law who used to call the Yellow Pages his "tool box" because he was "manually illiterate" and always hired somebody to everything. Who's going to teach them "righty tighty, lefty loosey?" How will they ever learn to sharpen an edge? (I gave my grandson a small pocket knife and my daughter had a conniption fit and took it away from him because it was "dangerous." Don't ask me. I still haven't figured out how to gracefully mention to someone in a wooden ship modeling forum that they are pushing their chisel against the grain!
-
Okay, the Sheldon Cooper reference sent me to Google. (I don't watch TV sitcoms.) This is what Wikipedia says (in part) about Sheldon Cooper: Sheldon Lee Cooper, Ph.D., Sc.D, is a fictional character in the CBS television series The Big Bang Theory and its spinoff series Young Sheldon. The adult Sheldon is a senior theoretical physicist at The California Institute of Technology (Caltech), ... He has a genius-level IQ of 187. (In The Big Bang Theory, ... In Young Sheldon, his mother says that he has the same IQ as Albert Einstein and Stephen Hawking, though neither is known to have taken an IQ test.) However, he displays a fundamental lack of social skills, a tenuous understanding of humor, and difficulty recognizing irony and sarcasm in other people, although he himself often employs them. He exhibits highly idiosyncratic behavior and a general lack of humility, empathy, and tolerance. These characteristics provide the majority of the humor involving him, which are credited with making him the show's breakout character.[10][11][12][13] Some viewers have asserted that Sheldon's personality is consistent with autism spectrum disorder (or what used to be classified as Asperger's Syndrome.)[12][14] Co-creator Bill Prady has stated that Sheldon's character was neither conceived nor developed with regard to Asperger's,[14] although Parsons has said that in his opinion, Sheldon "couldn't display more traits" of Asperger's. ... Sheldon is characterized as being highly intelligent, but he tends to display childish qualities, such as extreme stubbornness and meanness. It is claimed by Bernadette that the reason Sheldon is sometimes mean is because the part of his brain that tells him it is wrong to be mean is "getting a wedgie from the rest of his brain".[29] However, in season 8's "The Space Probe Disintegration", Sheldon tearfully admits to Leonard that he is aware of how his behavior comes across. Sheldon frequently states that he possesses an eidetic memory (although his powers of autobiographical recall are more like hyperthymesia) and an IQ of 187,[32] although he claims his IQ cannot be accurately measured by normal tests.[33] He originally claimed to have a master's degree and two doctoral degrees, but this list has increased.[34][35] Sheldon possesses a mastery (and extensive knowledge) of various subjects ... (he is a well-known railfan and a fancier of model trains) ... Although his friends have similar intellects to him, his eccentricities, stubbornness, and narcissism frequently frustrate them. ... He dislikes gifts, because the "social convention" in his view creates either a debt or burden on the receiver of the gift which will not stop until one of the two involved in the "gift-relationship" dies leaving the other either in debt or with an undue surplus.[56] Sheldon also does not take drugs, not even legal ones such as caffeine, due to a promise to his mother, and is hypersensitive when he accidentally consumes them.[57][43] However, it has been shown that alcohol often causes Sheldon to loosen up significantly,[6] although it will also cloud his judgment on occasion. After drinking alcoholic drinks (both deliberately and accidentally), he has done things that he would never do while sober, such as singing out loud,[58] mooning an audience full of people,[27] confronting Wil Wheaton,[59] leaving wildly inappropriate voicemails after "drunk dialling" Stephen Hawking, and affectionately slapping Amy's rear.[60] After consuming caffeine in the form of coffee or energy drinks, typically on the rare occasions that he has to work beyond his normal working hours to meet a deadline, he acts in a hyperactive, erratic manner. In response to criticism from his friends that he is mentally ill, Sheldon often retorts, "I'm not crazy; my mother had me tested"; which his mother has confirmed to be true, once while wishing she had gone through with a follow-up examination. Both the character and Parsons' portrayal have received widespread acclaim, and is often cited as the main reason for the program's success by both critics and fans.[87][88][89] James Chamberlin of IGN wrote: "It's hard to imagine what The Big Bang Theory would be if it weren't for Jim Parsons' great portrayal of Sheldon Cooper".[90] Matt Roush of TV Guide stated that "there's a spark of divine inspiration in Jim Parsons' uproarious Sheldon Cooper".[91] Ken Tucker of Entertainment Weekly wrote that: "Parsons is doing something rare on network TV: making intellectualism admirable, even heroic". https://en.wikipedia.org/wiki/Sheldon_Cooper If there was any intention of comparing me to Sheldon Cooper, that would be grossly unfair and I would have to strenuously object. I only have one doctoral degree.
-
You're welcome. It was a pleasure to share something of interest to me that I would not have thought anybody else would have cared about. Writing the above got me to thinking and doing a bit of googling. With respect to your question about how oil lamps were set at the masthead, I found a matching Tung Woo masthead light, which would be used for powered vessels, for sale for only $500, reduced from $600! (A little rich for my blood. I'll pass on completing my set at the moment!) These have round fairleads on the sides through which lines are run that enable them to be set with a halyard and turning block at the masthead. The lines through the double fairleads keep the lamp from twisting around when it is set aloft. https://www.nauticallights.com/copper-masthead-lantern-tung-woo-small/ This requires a bit of convoluted rigging: a permanent messenger halyard to haul up the lamp and the bight of the double ended "side control lines" running through the fair leads to the masthead aloft. The two falls from the fair leads would then be hauled and belayed port and starboard, at the rails, probably, to keep the light in place. This would, however, eliminate the need for anybody to go aloft to deal with the lamp. I also found a matching Tung Woo stern light, which sold on an auction site I've never heard of, for only $38. Now, I would have liked to have found that deal so that I have the sailing light "trifecta" in my "collection." (The prices of this stuff is all over the place.) At least the next time my wife starts in on "my collections of junk around the house," I can now show her the $500 asking price for one of these running lights and assure her that she will be able to get rich selling all "my collections of junk" when they finally slide me under the main brace.
-
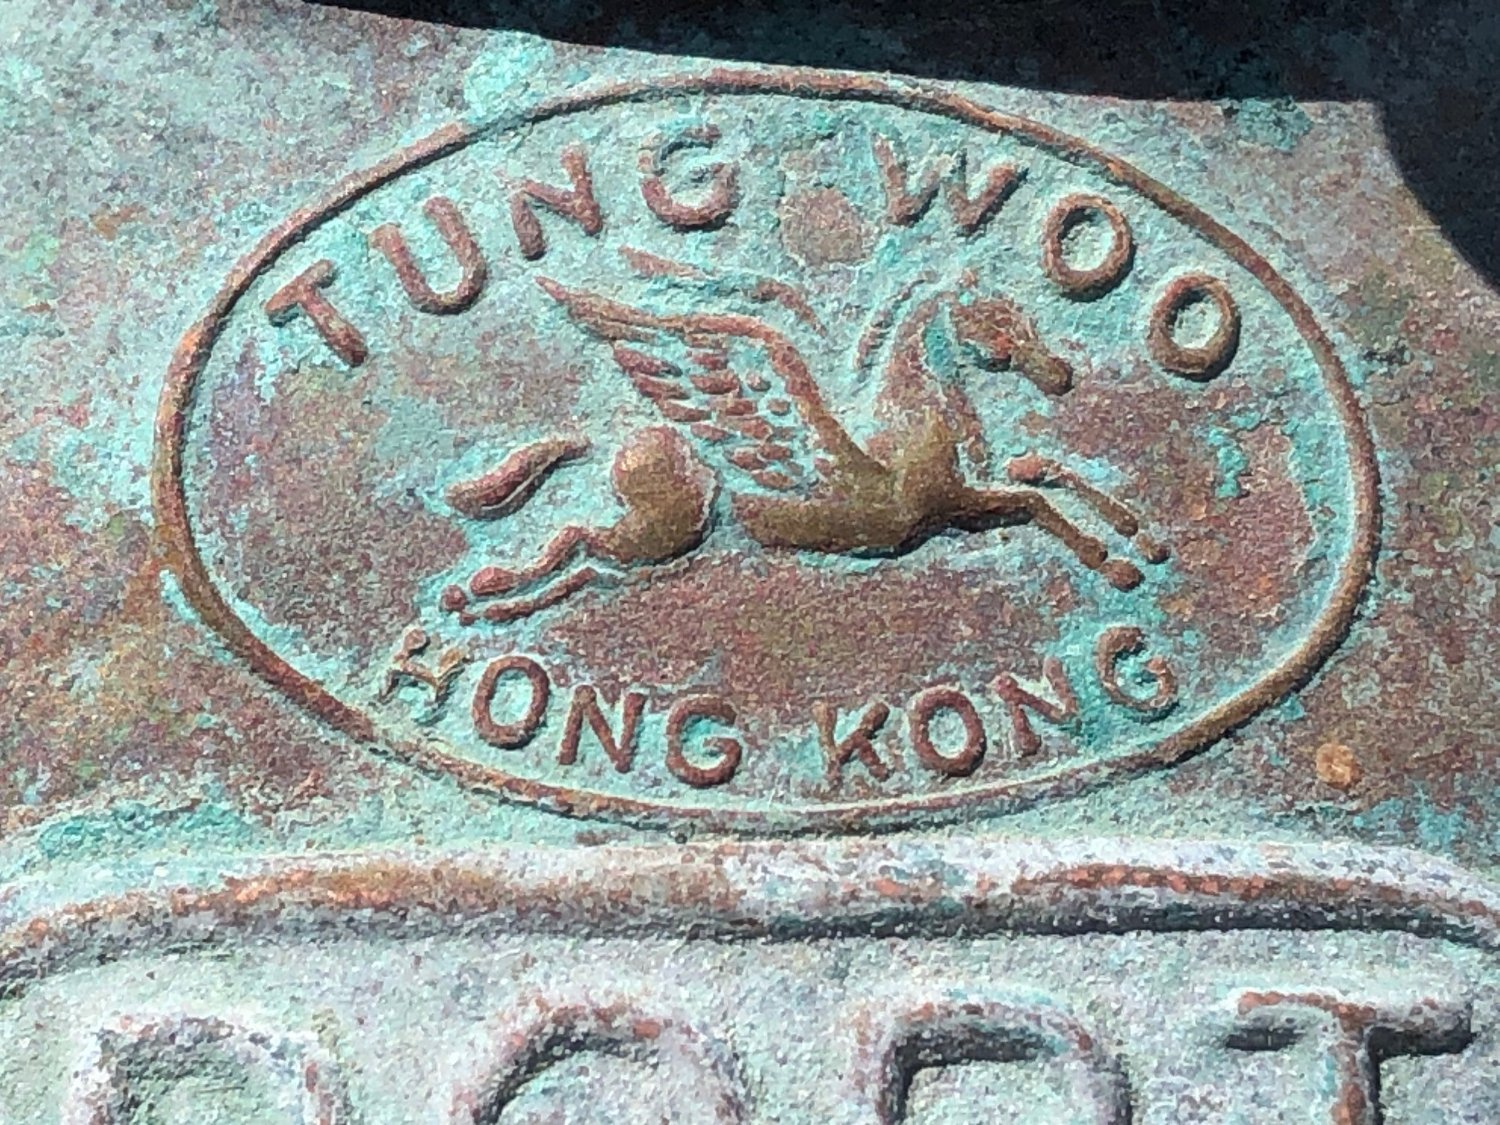
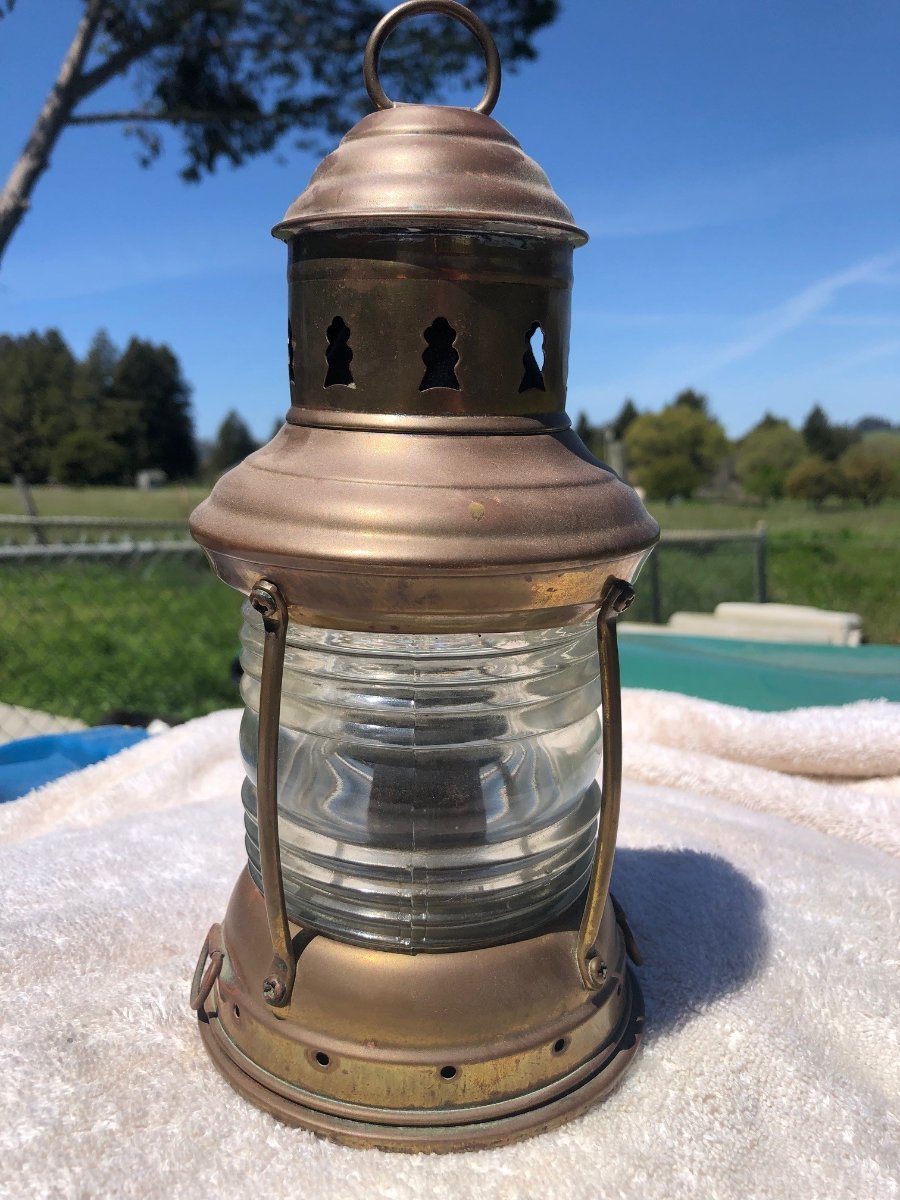
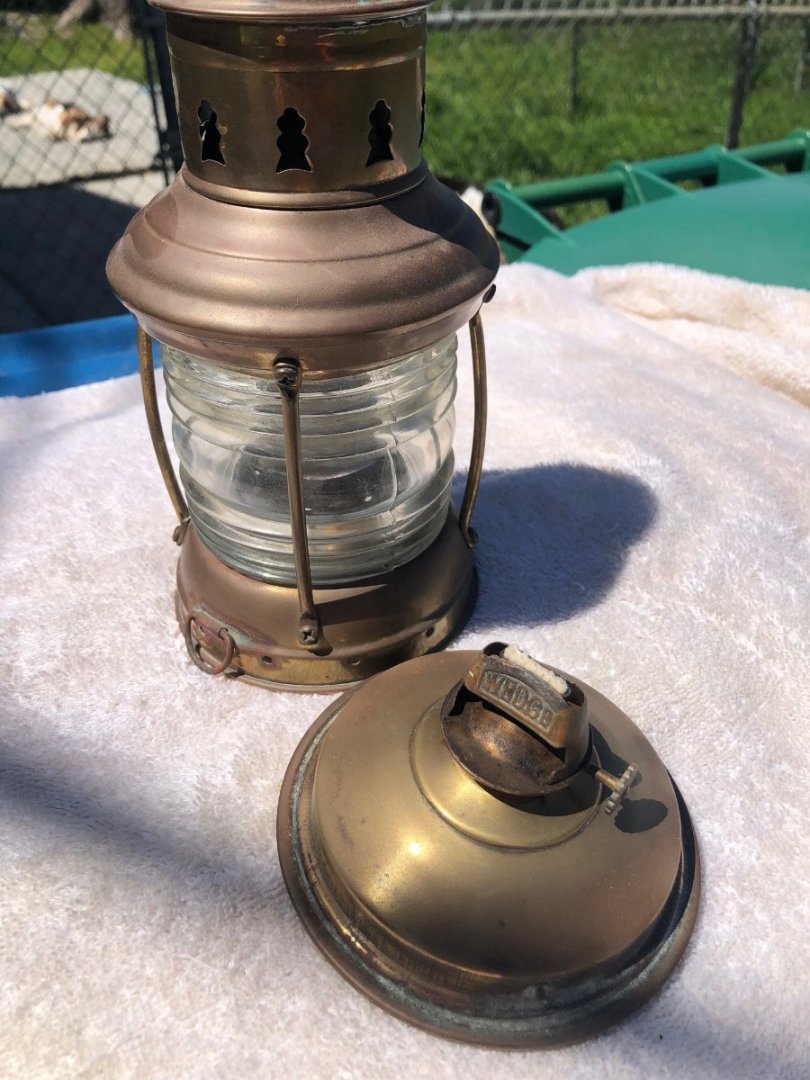
I probably should have put "collection" in quotation marks. It's not like "my collection" is all that impressive from any historical standpoint. It's just that after a lifetime of sailing, I've got a lot of "artifacts" in my shop and around the house. Whenever my wife starts grousing about my "old stuff you're never going to use again," I always tell her it's part of one of "my collections." Indeed, I do have real collections, and then there's just "stuff that I don't want to part with." Forty years ago, I lived like an Ewok in a California coast redwood forest and we'd lose our power a half dozen times a winter, sometimes for a few days, so we'd always have oil lamps throughout the house, most not being nautical and what my ex-wife didn't take with her are still around. My marine oil lamp "collection" presently serves as bookends on my library shelves and at my age isn't likely to ever see sea duty again. I acquired the running lights back in the 1970's when I worked as a salesman for the premier classic yacht brokerage on San Francisco Bay. We brokered the sale of an Alden schooner and they were at the bottom of a pile of junk in the lazarette. The buyer didn't want them and they were on their way to the boatyard dumpster, so... Thank you very much! Picking up goodies like these was one of the perks of the job. A few years back, I was puttering around and had a batch of "CLR" (Calcium-Lime-Rust remover - good stuff!) mixed up to clean out some showerheads, I impulsively tossed the starboard light into the bucket to see how it would do removing the rough copper patina built up on it. Obviously, it worked, but I never got around to doing the port one because I couldn't make up my mind whether I wanted to put the starboard one out to weather to a more even verdigris patina, or clean it up to match the "old penny" finish of the starboard light. The lamp bodies are made of copper. The bails, the "port" and "starboard" badges, and the lamp are made of brass. Tung Woo - Hong Kong running lights: The chimney tops open to access the oil lamp: The reflector slides off the lamp burner for ease of polishing: Below is my anchor lamp made in the US by Perkins Lamp Co. (Later "Perko.") It has a Wedge burner, which was a common off-the-self wick burner. These were manufactured and sold by Perko, (which is still in business,) until, I believe, around 1975 or so. There's one on eBay at the moment that they want $300 bucks for. Some idiot drilled a hole through the oil font in order to electrify it, which ruined it for use as an oil lamp unless the font is patched. Unfortunately, a lot of nice brass and bronze marine lamps were turned into decorator table lamps over the years and you'll pay hell to find the right ones for a classic yacht restoration job these days. https://www.ebay.com/itm/374442771684?mkevt=1&mkcid=1&mkrid=711-53200-19255-0&campid=5338678874&toolid=20006%26customid%3Ds%3AGS%3Bgc%3A81e12fb7ba20160d1a064b8bd197e985%3Bpt%3A1%3Bchoc%3A1&customid=s%3AGS%3Bgc%3A81e12fb7ba20160d1a064b8bd197e985%3Bpt%3A1%3Bchoc%3A2&msclkid=81e12fb7ba20160d1a064b8bd197e985 There's no doubt that an LED lamp will put out more light than a oil lamp and you don't have to fiddle with cleaning, filling, and trimming the wicks, but it's quite remarkable how much light a correctly trimmed oil lamp can put out and I believe they still meet current navigational signal regulations. I always enjoyed the ritual of lighting my oil anchor lamp as the sun went down when I was spending the night "on the hook." I bought this lamp in the early seventies from a now-long gone chandlery that had then been in business on San Francisco's Fisherman's Wharf (before the wharf became a total tourist trap) for over a hundred years. A friend was the manager there and it was "new old stock" they wanted to get rid of. I think he gave it to me for around fifty bucks, which was at a good discount, but that was still real money in those days, for a kid like me, at least. I kept it and the saloon overhead trawler lamp when I passed my Giles Vertue to a new owner after having her for over 40 years. It's more of a "memento," than part of a "collection." This is a 360 degree light hung in the forward rigging. On the bottom edge (clearly seen in the lower picture) were two bails for attaching a downhaul line. This lamp would be run up on the forestay with the headsail halyard. The downhaul line would be secured so that the lamp would remain vertical and not swing in the wind and also be used to pull the lamp and attached halyard back down to the deck when removing the lamp. The oil font holds enough oil to feed the flame for a night's worth of light while the boat was at anchor. It's about eight or nine inches tall and made entirely of brass. It's quite stunning when polished up, which I haven't done in years, obviously. It was always my practice to remove any lacquer that was applied to quality marine yellow metal to keep it bright and then to polish it regularly. There's quite a difference in appearance and the lacquer degrades after a time and tarnished spots and scratches appear all of the piece. A regular quick rubbing with Nev-R-Dull or Brasso keeps bare brass looking sharp.


-
Do the instructions say anything about bending those planks? They can be heated up with a clothes iron or hair dryer on high and then quickly (while still hot) bent and held in place for a minute or three. They will hold the bend when they cool. That should save a lot of hassle with rubber bands and tape if ever the occasion might arise again.