
HOLIDAY DONATION DRIVE - SUPPORT MSW - DO YOUR PART TO KEEP THIS GREAT FORUM GOING! (Only 13 donations so far - C'mon guys!)
×


Bob Cleek
-
Posts
3,374 -
Joined
-
Last visited
Content Type
Profiles
Forums
Gallery
Events
Everything posted by Bob Cleek
-
Good point about the sanding grit getting in the saw's innards. The sanding disk is a fairly common practice with full-size table saws, though, and I've not heard of any problems there. I expect the use of an attached vacuum would be highly advisable if you were sanding. Switching between blade and sanding disk would definitely be a pain, which is why buying both a saw and sander from Byrnes makes the most sense. If you're in need of a disk sander and short on cash, the lucky thing is that a disk sander is about the easiest power tool to make yourself.
-
Stuart 10v powered vessel possibility, ideas?
Bob Cleek replied to SomethingIsFishy's topic in RC Kits & Scratch building
Heck yeah! What's the point of a steam engine sitting on the shelf with no work to do? I love live steam models. There's a small, but rather active subset of live steam modelers. Parts and even some model kits are available on line (although sometimes rather pricey.) The San Francisco Model Yacht Club has a fair number of them and an annual "steam show" on Spreckles Lake, their model yacht lake in S.F.'s Golden Gate Park. SFMYC – San Francisco Model Yacht Club A stuart 10v would be an excellent engine for a model Victorian steam launch. It's basically a six-inch tall miniature of single cylinder steam launch engines of the period, so you can build a very detailed model and show off the engine at the same time. As you probably know, marine steam engineering poses a bit of a learning curve, but the information is readily available in a few reprinted classic texts. I cut my teeth on the subject when I restored an old steam-powered turn-of-the-last century steam yacht model. If you have questions, ask away and I'd be glad to answer those I can or refer you to the proper textbooks. (There are a lot of photos of model steam launches on the SFMYC website linked above. Look under "Special Events" and "Event Gallery" in the home page heading. I tried posting a few of the photos, but they didn't link. The SFMYC was founded in 1898 and is the oldest model yacht club in the country. It looks like their website template is close to the oldest in the country, too! ) -
It appears to be a main staysail. This sail is a fore-and-aft rigged sail attached to the main-mast. It's the same as a mizzen staysail, but on the mainmast.
-
Mahogany should work, but keep in mind that most of your frames will likely have to be built up of pieces with their grain orientation going the right way and not simply cut whole from a single piece of sheet stock. Since frames are curved, it's usually impossible to cut a frame from a single piece of wood without grain run-out at some point. This will create very fragile spots in single-thickness frames, the degree of weakness depending upon the grain structure of the wood species used. With the amount of grain run-out you usually get cutting from sheet stock, you'll find yourself busting frames right and left when you try to fair frame faces or even just handle the hull when working on it. Cutting frames from sheet stock can also produce an inordinate amount of waste off-cuts. It's best to make frames of at least doubled pieces so that one half of the doubled frame can bridge the butted ends of the other half so as to reinforce the butts necessary to keep the grain running where it needs to be. I'm not sure that "it's more work to derive waterlines from plans." If you have the shapes of the frames on a "body plan," you've got the waterlines right there in front of you. At each frame you have the distance from the centerline to the inside or outside of the planking (depending upon how the lines were drawn) and you know the distance between the frames. Those points off the centerline and a batten will give you all the waterlines you want, wherever you want. A "bread and butter" hull is a lot easier and faster to make, particularly in larger sizes. Just sayin'. Unless you expect to be spilling a lot of solvent fuel in the bilges, there's no reason to coat the inside of the hull with resin. In the case of a "bread and butter" built hull, there's no reason to sheath the exterior of the hull with glass fabric and resin, either. A good sealer and paint will do just fine to keep the water out. As a practical matter, unless you intend to build an overly thick resin and glass cloth (or mat) sheathing, you aren't going to realize much, if any increase in structural strength adding resin and fabric sheathing to your hull. Sheathing and fairing a good sized hull with resin and cloth is a substantial job with more than a few pitfalls possible along the way. All and all, just my opinions in response to your questions. It's your boat, so do as you please. I'm sure with sufficient care, it will turn out fine however you proceed. Good luck with it!
-
I have the Byrnes "trifecta" which I acquired used for a good price. If it were me, I'd buy the table saw first. Even if you don't anticipate scratch-building, the saw will be useful and permit you to get out your own plank stock at a great savings when you are ready to step up to improving a kit model with higher quality planking wood or get sick of trying to plank everything with just a handful of quarter-inch wide strip wood. Besides, if you have the table saw, it's an easy thing to just take a thin saw-blade-sized disk of plywood, plastic, or metal, attach a piece of sandpaper to it with some disk adhesive, and mount it on the saw arbor instead of a blade. Crank it all the way up and you've got a disk sander with a very accurate miter gauge and flat table! Not a replacement for the real thing from Byrnes, but it comes close. A vacuum attached to the saw will take the misery of dust out of the sanding operations, too.
-
So what were you drinking before you peed in the cup? The resident chemists can probably give a better suggestion, but I'd be interested to see if a similar result might not be achieved using a solution of water, amonia, and table salt. If so, that would avoid the chance that your living room or wherever you display the model won't acquire the aroma of a dirty gas station mens' room. You might also consider bringing a urine sample to your urologist. The reddish tinge to that in the cup pictured is concerning! Thanks for having the courage to share a very interesting technique. Great photos, too.
-
Gluing on planks
Bob Cleek replied to rudybob's topic in Building, Framing, Planking and plating a ships hull and deck
I'll mention further that if you have a small clothes iron or electric plank bender, or even a hair drier, you can apply heat to the outside of the plank (taking care not to scorch it) while holding it in place. The heat will substantially accelerate the drying time of the PVA. -
Holding small parts for soldering
Bob Cleek replied to BETAQDAVE's topic in Metal Work, Soldering and Metal Fittings
This new product may have come on the market since the inception of this post. It's really the best all-purpose holding system I've ever seen. Very strong and rigid holding ability. Heavy steel base. Arms attach with rare-earth magnets. Flexible arms stay put. Not like those "third hand" holding gizmos that have been around forever and never stay where you want them. High quality alligator clips, too. Reasonably priced. QuadHands® - Helping Hands Tool -
Gluing on planks
Bob Cleek replied to rudybob's topic in Building, Framing, Planking and plating a ships hull and deck
Slower glue or faster fingers? Seriously, thouigh, a bit of either or both would probably lessen the problem. The only other thing to do is work one bulkhead at a time, rather than trying to put glue on them all at once. -
Acetone will sure do that to styrene and many other plastics. No bout a doubt it. Lacquer thinners, tolulene, xylene, and similar solvents will melt many plastics also. Most all "hot" solvent-based modeling paints are designed for use on wood and metal surfaces. Applications on many plastics will require a suitable primer. Thanks on the review of Tru-Color paints, too!
-
No. What I'm talking about is exactly the opposite: layers cut to the shape of each waterline shape, stacked on top of one another. i.e. each one a cross section through the horizontal plane. Conseqently, there's a whole lot fewer layers to loft and cut. (In your case, one "lift" for each deck. Not as many as indicated in the video below which is provided for illustrative purposes.) The deck shapes are all you need, together with the distance between each deck. The "bread and butter" lift method is described in detail in this article: Building a Bread-and-Butter Solid Hull Ship Model – The Model Shipwright This method is favored for larger models for a variety of reasons and the interiors of hulls constructed in this fashion are easily hollowed out for R/C purposes by cutting away waste wood before assembly of the lifts. A picture is worth a thousand words department:
-
I hear you on that score, but I think that's just because we're used to dancing with the girl we brought. I was just thinking that this guy is planning to build an R/C model and an old school "bread and butter" lifts hull would probably be a lot easier and stronger than anything else. If the waterlines are cut carefully, it's quite easy to fair up the hull by simply "knocking off the corners" using a chisel, plane, spokeshave, and/or a disk sander and sanding board.
-
In which case, it would be much easier to slice "lifts" the shape of the waterlines horizontally from the "loaf" instead of vertically. A lot less cutting to do and probably a stronger hull structure than planks on frames. Much faster because much less work. No?
-
Excellent! Stories like yours serve to encourage others to keep an eye out for bargains on the used tool market. It's often quite amazing what can be found.
-
Foredom models have changed over the years. They once had a model 320, I believe, but their current model line uses another system of identifying models. The operation and maintenance of the motors and handpieces haven't changed much at all though. Their present owner's manual should be helpful to you. If you haven't got it already, it's available online at TX_Manual.pdf (foredom.net)
-
While I'm sure there are sail drawings online, the odds of finding ones that match the sails you need for a particular model aren't good. Add to size and shape the the vagaries of period sailmaking and my guess is you'll spend more time looking than you would drawing the sails you need yourself and then copying your drawings onto your Silkspan as you contemplate. Of course, in that case, it would be easier still to draw the details you require directly onto the sails themselves. Tom Lauria has a fairly good Silkspan sailmaking tutorial on YouTube. Check it out if you haven't already.
-
Yes on both counts. Shellac is dissolved in alcohol. When the alcohol dissolves, the hardened shellac is left behind. Two-pound cut is perfect for our uses. It soaks into fabric with the viscosity of water. It's invisible when it dries. However, remember also that repeated coats of shellac will build upon one another and create a glossy finish which isn't desirable for modeling.
-
I wrote: "I find it hard to believe that shellac's solvent, alcohol, would "melt" oil paint." I was not as clear as I could have been. I'm no chemist by a long shot, but I do know that there's a somewhat significant difference between what is called "grain alcohol," which you can drink, "denatured alcohol," (sometimes called "methylated spirits,") which is used as the solvent in shellac (and which you can't drink,) and isopropyl alcohol, which you can't drink, isn't used for thinning shellac, and will dissolve oil paint. I could be mistaken, but I believe it is the isopropyl which is added to the alcohol to form isopropyl alcohol (sometimes called "isopropanol") that dissolves many oils, alkaloids, and natural resins and not the alcohol itself. My bad for not being more specific. As for oil paint film "aging," or perhaps more accurately put, "polymerizing." tubed artists' oil paint is intentionally compounded so that it will remain "wet" for a protracted period (i.e. polymerize slowly) so that artists using it, particularly to paint pictures on stretched canvas and wooden panels, can easily work with the undried paint over a longer period of time using established techniques for applying and mixing colors directly on the painted surface. To accomplish this, artist's oils are made with raw linseed oil which polymerizes very slowly. When using artists' oil colors to paint models, heavy metal salts like cobalt and manganese which accelerate the polymerization of the linseed or other vegetable oil carrier in the artists' oil colors are added to speed up the "drying time." (Linseed oil with driers added is commonly sold as "boiled linseed oil, although it's not boiled at all.) This accelerator is called "Japan drier." * Adding the proper amount of Japan drier to a raw oil-based paint will speed up the "drying" of the paint to as little as an hour. (There are corresponding "drying" conditioners sold for tubed acrylic artists' colors.) When using tubed artists' colors, be they oil-based or acrylic-based, they have to be thought of as simply pigment mixed with a carrier, oil or acrylic base. While classical oil painting artists use artists' colors straight out of the tube, modelers who use them for brush or airbrush application need to condition the tubed paint, which requires thinning and adding dryers to achieve the desired consistency and drying time. * "Japan drier" is so called from the practice of "Japanning," an enamel paint finishing technique, especially for metal, which was popular in earlier times to mimic the Japanese finishing technique of building up a thick coating of high gloss lacquer coats. "Japanning" required applying multiple coats of oil-based high gloss paint which had to dry thoroughly between coats. That would have required a very long manufacturing process allowing for the drying time without the addition of "Japanning driers" to the enamel paint.
-
That's a new one on me! I find it hard to believe that shellac's solvent, alcohol, would "melt" oil paint. The highly volatile solvents in lacquer would certainly have that effect, I'd expect, but not shellac. On the other hand, alcohol will thin (i.e. "mellt") most water-based acrylic paints.
-
The trick with coils, etc. is to make them off the model and then glue them down on the model when they are finished. By running the bitter end of a line beneath the pre-made coil, it can be made to appear to be part of the separately attached coil. In very small scales, for uniform coils, such as on pin rails, some will drive a couple of nails or pins a sufficient distance apart and wrap a suitable length of line around the pins to form the coil. For faking mooring lines, a similar approach is used. What I generally do is to take a piece of scrap styrofoam packing sheet stock (always a good idea to keep a few pieces around) and I wrap it in kitchen plastic wrap. (If I want a number of uniform sized coils or fakes, draw a pattern and place the pattern on the piece of styrofoam beneath the plastic wrap.) The plastic wrap will make it easier to remove the finished shaped line from the block when it's dry. Following the pattern seen through the plastic wrap (or not if you don't use a pattern,) I use sewing pins pushed into the styrofoam block to hold the line in place as I want it to look when attached to the model. You can put pins on either side of the line or through the line, however best suits the occasion. After the line is pinned to the block, take a paintbrush and saturate the line with clear ("white") shellac. ("Orange" or "amber" shellac, which is also available, has an amber color and will work the same as "clear" shellac, but for most modeling applications, you don't want the color.) The shellac, right out of the can, is the consistency of water and will soak right into the fabric of the line. Only one application is required. Just a touch with a loaded small brush and the line will soak up the shellac. Let it soak in well but don't overdo it. Now, let the shellac dry. As the shellac dries, the saturated line will gradually stiffen and you will be able to shape the line further as you may wish, using tweezers or the pins, whatever works for you. (Fingers aren't such a good idea because the shellacked lines will readily stick to your fingers and you may end up with a "tar baby" of string on your fingers.) If, after the shellac hardens, you want to further adjust the coil or fake, you need only apply some alcohol and shellac will soften again until the added alcohol evaporates. When the shellac is completely dry, which will be within a matter of minutes because its alcohol solvent evaporates very quickly, your line will appear as it did before, since the shellac becomes invisible, but it will be stiff and "cemented" into the position you shaped it to. (Blow on to speed up the process, if you want.) You can then remove the pins and carefully peel the line off the plastic wrap, which shouldn't stick too much to the line. and you can then attach the finished coil or fake to the model with glue or a bit more shellac.. This technique can also be used to secure the ends of rigging thread from unraveling and to shape catenaries in things like footropes, or to stiffen rows of reef points so they hang naturally against a sail. Somewhere along the way, many folks have come to use PVA adhesive for similar purposes, but I became familiar with using shellac in the days before PVA became popular and never found watered down PVA to be much use for anything as an alternative to shellac, mainly because I found shellac easier to handle, it has better adhesive properties, and the drying speed of its alcohol solvent is far greater than that of water. Shellac is a perfect sealer for model work. Its archival properties are well-proven, it is readily cleaned up alcohol, and is is completely safe for man or beast in all respects. I buy white ("clear") shellac (de-waxed if I can get it) by the quart and denatured alcohol by the gallon can (from which I decant it into plastic squirt bottles,) at any paint or hardware store. It's relatively inexpensive, has a relatively infinite shelf-life and a myriad of uses in modeling. It is also completely compatible with all other oil or acrylic coatings which might be applied over it.
-
Forming a rabbet
Bob Cleek replied to DaveBaxt's topic in Building, Framing, Planking and plating a ships hull and deck
Sorry to hear that Mihail is suffering from the sanctions imposed on Russia. At least it sounds like he's not drafted and freezing his butt off in a foxhole in Ukraine. It saddens me to see that sanctions designed to twist the arms of governments too often hurt the little people who have no say in what their governments do. Micro-carving tools are easily made from tool steel or even broken drill bits. You won't need a lot of expensive tools. Just a propane torch, a hacksaw, and some small files and sandpaper. (If you have a woodturning lathe, you can get fancy with handles, but any old piece of dowel will work.) YouTube has many tutorial videos on making micro-chisels and carving tools. Search YouTube for "how to make micro-chisels" and you'll find lots of these. Below is one of the best. -
Don't forget the San Francisco Maritime Museum, which has some impressive ship models and the J. Porter Shaw Library nearby at Fort Mason, a valuable resource for ship modelers looking for plans and photographs, all part of the Golden Gate National Recreation Area which incorporates all the waterfront from the Hyde Street Pier to the Golden Gate Bridge. There's also a resident ship model club aboard the ferry Eureka that has an interesting website that's worth checking out. See: Hyde Street Pier Model Shipwrights (hspms.org) Additionally, the San Francisco Model Yacht Club, devoted to sailing models has its own clubhouse and pond yacht lake in Golden Gate Park. They were founded in 1898 and are the oldest model yacht club in the country. See:: SFMYC – San Francisco Model Yacht Club Those SFMYC guys are really serious about sailing models! (Photos from SFMYC website.)
-
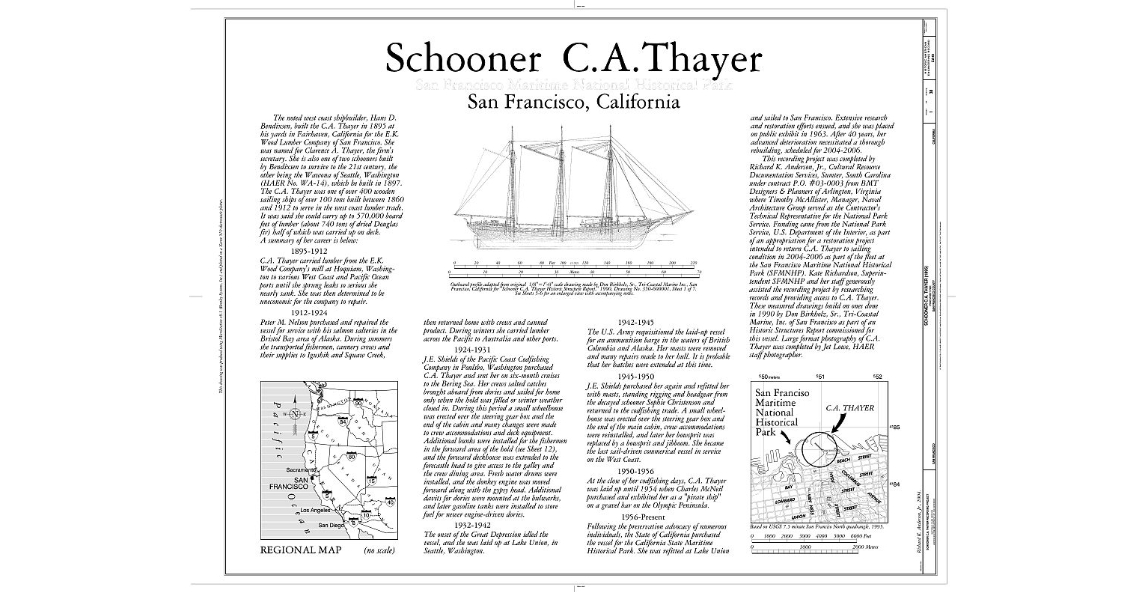
Time to come over to the dark side, guys! She wouldn't be a daunting task to scratch-build a model of her. Why wait for a kit? You can do it. The complete plans are available on line for free, even in TIFF format, so they can be enlarged for modeling use. These plans were made as part of the Historic American Engineering Record ("HAER") Available from the Library of Congress on line.: Title Sheet - Schooner C.A. THAYER, Hyde Street Pier, San Francisco, San Francisco County, CA | Library of Congress (loc.gov) T
-
As you probably know, artists' oil paints are formulated to provide the maximum drying time in order to provide the artist with a paint they can work with, moving it around on the canvas for as long as it might take them to complete a painting. Artists oils generally use raw linseed oil (also called "flax seed oil" under which name it can be found in any health food store.) ("Boiled" linseed oil is raw linseed oil to which driers have already been added to speed up the drying process.) The proprietary driers you are using, such as Liquin, do speed up drying time, but nowhere near as much as would be desired for regular painting rather than artists' oil paints. You want the more powerful stuff, generally sold in hardware and paint stores as "Japan drier." Follow the mixing instructions on the Japan drier container. Think of your artists' oils as "concentrated paint, just pigment and linseed oil, which should be considerably thinned with turpentine, mineral spirits, or acetone, (depending on the user's preference... like a barbecue sauce recipe) and Japan drier to speed the polymerization of the linseed oil base. By adding the correct amount of Japan drier, one can accelerate the drying time of an oil paint as much as is desired. It appears from the manufacturer's literature that Liquin is only intended to modify the artists' oil paints within in the much narrower spectrum of drying times required for classic artists' oil painting techniques, rather than for fast drying times appropriate for modeling.
-
At scale model viewing distances, wood grain isn't going to be apparent. I'd suggest you also try putting a coat of shellac over your oil paint wood color, let it dry well, and then hand-rub it for a very smooth surface. The tests will be the best proof, but I think that the alcohol solvent in shellac will have no effect on the oil paint beneath it, while the mineral spirits in even a traditional varnish may soften the oil paint beneath it unless the oil paint if well-cured.

