


Bob Cleek
-
Posts
3,374 -
Joined
-
Last visited
Content Type
Profiles
Forums
Gallery
Events
Everything posted by Bob Cleek
-
"Running lights were an innovation that came first with steam boats, which ran fast and silently, causing collisions with sailing vessels. "In 1838 the United States passed an act requiring steamboats running between sunset and sunrise to carry one or more signal lights; colour, visibility and location were not specified. In 1846 the United Kingdom passed legislation enabling the Lord High Admiral to publish regulations requiring all sea-going steam vessels to carry lights. The admiralty exercised these powers in 1848 and required steam vessels to display red and green sidelights as well as a white masthead light whilst under way and a single white light when at anchor. In 1849 the U.S. Congress extended the light requirements to sailing vessels. In 1889 the United States convened the first International Maritime Conference to consider regulations for preventing collisions. The resulting Washington Conference Rules were adopted by the U.S. in 1890 and became effective internationally in 1897. Within these rules was the requirement for steamships to carry a second mast head light. The international 1948 Safety of Life at Sea Conference recommended a mandatory second masthead light solely for power-driven vessels over 150 feet (46 m) in length and a fixed stern light for almost all vessels. The regulations have changed little since then." https://en.wikipedia.org/wiki/Navigation_light Directional port and starboard running lights were customarily carried in the forwardmost mast shrouds just above the deadeyes or turnbuckles where they would not be obscured by overlapping sails. The white stern light was placed on the centerline above the rail. In earlier times, as early as the mid-seventeenth century, naval vessels sailing in convoy would show stern lights so the following vessels would be able to know where they were. At anchor, a 360 degree white light was hung in the rigging forward of the foreward-most mast, usually run up a stay using the headsail halyard. RMS Campagnia and Lucania, Cunard sisterships launched in 1892 and 1893, were the first fully-electrified transatlantic steamships. They were required to carry duplicate sets of running lights, one above the other, one electric and one oil burning, because the authorities did not trust the electric lights! Curiously, the Hong Kong port authorities required oil lamps to be carried and shown by all vessels in the harbor well into the 20th Century and these were required to be those made by a Hong Kong family of coppersmiths. When you arrived in Hong Kong, if you weren't carrying a set of these lights, you had to purchase a set from the customs officers. I have port and starboard examples of these lights in my collection.
-
Not to mention polishing the brass, especially on a naval vessel. In fact, in my own personal experience with marine oil lamps, it isn't generally possible to light an oil lamp outdoors if there's any kind of breeze. They weren't carrying Bic lighters in those days, either. They'd have to take the light from a source with a taper and then light the wick with that.
-
It would seem to me to be a lot more cost effective and save a labor to simply paint with a higher quality paint and forget about additional clear coatings. The more coatings you apply to a model, the more detail you destroy. Your mileage may vary, I suppose.
-
Scroll saw versus band saw
Bob Cleek replied to Juddson's topic in Modeling tools and Workshop Equipment
This is another example proving that there is a direct correlation between weight (mass) and accuracy in stationary power tools. This is what often makes buying used "old 'arn" power tools a wise investment. -
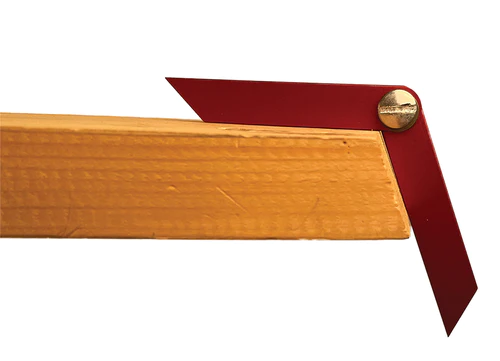
I forgot to mention that you will also need a shipwright's or planker's bevel gauge. This a small, flat gauge for taking up and transferring bevels in boatbuilding and planking. They're about 3" long for full-size boat building and will probably benefit by being somewhat smaller for modeling. Their small size make them suitable for taking up bevels in tight spaces. This 3" one is sold by the WoodenBoat (magazine) Store for ten bucks. It's the only "store boughten" one I know of. A 3" Bevel Gauge - Small Boats Magazine (smallboatsmonthly.com) Most "boatyard mechanics" simply make their own from a piece of strip shim brass or even an old hacksaw blade (which has the convenience of a hole already drilled at either end) riveted together. If you want to get really fancy, you can make one that has two outside faces between which the "blade" swings like a pocket knife, and can be pocketed when not in use without the pointed edges snagging on your shop overalls.
-
I don't have the plans available to me, so I can't be positive, but I believe they are referring to the "rolling" bevel of the lapstrake plank "lands." (The plank "lands" are the "faying surfaces" or faces where two adjacent lapped planks touch and, when wet, swell to make the hull watertight. For this reason, they must be very accurately fitted against one another without gaps... in real boat construction, at least.) By "the gain seating nicely" they probably mean that the plank bevels fit perfectly against each other to form their "lands" against each other. The term "gain" is not used in the instructions you quote as I've heard it (properly) used before, but it seems they are using it to refer to the plank lap bevels generally. If so, this wouldn't be the first time model kit instructions exhibited a certain lack of nautical illiteracy. Properly, a lapstrake plank "gain" is a rabbet of progressive inclining depth cut at the hood end or ends of a run of lapped plank so that the hood edge of the plank overlap is progressively reduced so that it no longer stands proud at the hood end(s.) (Always on a "sharp" bow and sometimes on a transom stern.) On this model, from the pictures I've seen, at least, since it has a transom bow and stern, the gains are omitted at both the bow and stern transoms which may have been an attempt to simplify construction for modeling purposes at the expense of a more elegant, and actually less complicated, construction detail. Perhaps somebody who's built this model and is familiar with the instructions will chime in and give you a more certain answer. Maybe they instruct the builder to just run the plank ends to the transom edges, cut them flush, and fill the voids between the plank lands and the transom edges with putty or something. Laying out the bevels in the transom edges to accommodate the lapped planks without gains would seem to me to be a lot more work and difficulty. Lapstrake planking showing riveted laps and plank lands. Note that only one plank per overlap is beveled. Here's a picture of a lapstrake plank with what is properly called a "gain" cut at the hood end (on the right hand edge below) to reduce the plank overlap edges (and on the left hand side is a regular land bevel.) The gains are cut in both plank faces to a maximum depth at the end of the bevel equal to one half the plank thickness so that when the two planks are fastened at the lap with the gains the planks total only the thickness of one plank . A couple of photos of correctly planked sharp-bowed lapstrake planked boats. Note how the gains (which are relatively short in one instance and long in the other) cause the lap edges to progressively reduce to nothing at the hood ends in the stem rabbet. It's a subtle, but essential, detail in sharp-bowed clinker-built boats. Now, this YouTube video on lapstrake planking is probably going to cause you to glaze over, or become completely intimidated, but to the degree you can wrap your head around it you will find planking your model much less difficult. There are many shortcuts between building a full-sized boat and a model and putty and sandpaper can cover a multitude of fitting errors, but to the extent these can be minimized, your model will benefit. See: Ep 18 - Planking (part 2): Bevels + Gains - Bing video Yes, that's exactly what it means. If your plank land bevels aren't accurate, the planks are going to have that much more width to the total overlap and they are going to spread amidships. This means also that as the overall length of the curve segment of the hull is thereby lengthened, the presumably correctly shaped laser-cut kit planks are going to be too short to span the entire length of the boat (unless they left you some extra length at either end to cut flush to the transom faces.) Building a lapstrake planked model at 1:12 scale well demands good accuracy in cutting all the bevels. Moreover, errors in shape and bevel of parts tend to be cumulative and only more bedeviling as the build progresses. One maxim in modeling, as in real boatbuilding, is that it is always better to rip it apart and do it over again correctly than it is to try to ignore measurement and fitting errors. In the case of a kit build, it should be no problem to go to the hobby or craft store and buy a piece of thin sheet stock and cut a new plank that will fit correctly and well worth the investment in time. If parts aren't fitting, and particularly so with planking, you have to ascertain the cause of the problem, be it errors in lofting or in fitting the parts that have been done before. When working in smaller scales, it is possible to slap on a lot of putty, spackle, or plastic wood and sand a hull fair and when it's painted up well, nobody will be the wiser, but at 1:12, particularly with a "clinker-built" (lapstrake) hull, such errors are much harder to cover up. For planing beveled lands and for many other modeling tasks, you will find a small plane of great value. If you are really flush and want to treat yoursef, you can buy the top-of-the-line Lie Nielsen #101 bronze violin maker's plane, which is their version of the old Stanley #101 "modelmaker's plane" for $125.00 (Lie-Nielsen No. 101 Bronze Violin Maker's Plane (highlandwoodworking.com) Or you can buy an original cast iron Stanley #101 on eBay if you can find one for not too much money. (They are now collectables but can be had for $20.00 to or $30.00.) There are also decent copies of the cast iron Stanley #101 made by Kunz for around $29.00: Amazon.com: KUNZ POCKET PLANE COMPACT BLOCK PLANE WOOD CARVING WORKING No.101 by Kunz : Tools & Home Improvement and even a Kunz copy of the otherwise super-rare old Stanley #100 "Squirrel tail pocket plane" that is the #101 with a handle which permits pushing the plane with the palm of hand for $26.00. (I have no idea why it costs less than the "tail-less" model! I love mine.) (Amazon.com: ROBERT LARSON 580-2200 Kunz Pocket Plane Raised Handle : Everything Else) If not that, the current Stanley sheet metal framed model #12-101 "trimming plane" can be had retail on Amazon for $12.00 and on eBay for $5.00. (stanley 12-101 plane - Bing - Shopping and Vintage STANLEY 12-101 Trimming Plane New Old Stock - Original Package | eBay)' This all may be more than you ever wanted to know about planking or planing, but, if so, perhaps it may be of interest to some other novices who come across it. Have fun with your build!
-
Nicely done and in record time! Now on to the next one... a scratch-build? Something from one of John Gardner's small craft building books? It's just my opinion, I think there is an overabundance of large Seventeenth and Eighteenth century ships of the line models and a dearth of simple small working craft models in this world. The small craft models look a lot better on a home bookshelf, as well. You will build better models in the future as your skills develop, as have we all to one degree or another, but this one will always have a special place in your heart, I'm sure.
- 23 replies
-
- 2
-

-
- boston whitehall tender
- rowboat
- (and 3 more)
-
I second Druxey's suggestion. There's never any certainty with any of this, so experiments off the model are recommended, as always. Natural cordage shrinks when it gets wet because the moisture causes the natural fibers to swell which tightens the lay. The line becomes slack after being wet because the moisture causes the rope to tighten and stretch. Afterwards, it stays stretched until re-wetted. You should test a section of your laid up rigging line to see if simply applying the shellac before trying to first soak the line in hot water will alone shrink it sufficiently. The shellac soaking into the twisted line may be tighten the line sufficiently on its own and, if so, when the alcohol evaporates, whether the shellac will have sealed your rigging from further moisture and will have cemented the twisted fibers tightly together and sealed out further moisture being absorbed. If that doesn't cause the line to shrink sufficiently, I'd test it with an application of boiling hot water and see if that shrinks the cordage tighter. If so, I'd put the model somewhere the humidity was low for a day or three and then apply a generous amount of boiling hot water and let it soak into the rigging. Cotton should shrink in hot water, even if the cotton has been "pre-shrunk." Your twisting up the rope should cause it to tighten in any event because as the cotton fibers soak up the water, they will expand and your twist will tighten as the fibers become larger. Let the water dry (a hair dryer should speed things up if you are careful) and then apply thinned clear ("white") shellac (most canned shellac can be applied right out of the can.) The shellac should soak into the rigging and "set" the cordage, also sealing it so it will not absorb moisture in the future. The shellac should not change the color any nor should it be visible when dry. When attempting to shrink rigging, and particularly standing rigging, work on each side alternately rather than both sides simultaneously. This will permit one side's taking up before the other and should prevent a sudden over-shortening on both sides that could cause the rigging to over-tighten and pull loose or break if too tight. And again, experiment with these techniques before you attack the model's finished work with any of them. We're just making it up as we go and free advice on the internet is often worth less than what you pay for it. Let us know how it works!
-
Scroll saw versus band saw
Bob Cleek replied to Juddson's topic in Modeling tools and Workshop Equipment
That's not at all surprising. You've definitely got what Jaager calls "a serious model scroll saw!" The DeWalt DW788 has consistently been ranked a "best buy" in the annual tool reviews. I'd say it's at "the bottom of the top" in quality and features and "at the top of the bottom" in price. In other words, it's a fairly priced tool that does what it's supposed to do. It's definitely a quality tool. Nobody that I know of makes a less expensive double parallel-link arm scroll saw. I've never read a complaint about it in the reviews. That said, it retails for close to $400, so I wouldn't put it at all in the same class as the $100 to $200 "Big Box Store Specials" from the Bejing Patriotic Peoples' Export Power Tool Collective. DEWALT Scroll Saw, Variable-Speed, 1.3 Amp (DW788), Yellow, 20-Inch - Power Table Saws - Amazon.com -
Scroll saw versus band saw
Bob Cleek replied to Juddson's topic in Modeling tools and Workshop Equipment
Excellent point and I think an important one to emphasize. Many of the lower-end scroll saws are lightly built low-powered models designed for the "crafters' market" and aren't intended to hog through thick sections of hardwood. When selecting a scroll saw, I think it's important to spend a lot of time reading the reviews and being aware that there are definitely two distinct ends of the quality spectrum when it comes to scroll saws. If one is choosing a scroll saw model on the basis of price alone, you may well be buying an expensive door-stop. -
Scroll saw versus band saw
Bob Cleek replied to Juddson's topic in Modeling tools and Workshop Equipment
"Old 'arn?" Are you talking about the early 1950's cast iron King Seeley-built Craftsman "jigsaws" that ran off of a stock Craftsman cast iron capacitor-starting 1/2 or 3/4 HP motor? (This was in the days when these machines were called "jigsaws" and the hand-held gizmos were called "saber saws.") Definitely built to "take a lickin' and keep on tickin". I inherited one of these beasts from the original owner, my father, and I'd say they are quite workable for relatively heavy work, but are definitely "bucking broncos" that have to be seriously secured or they'll bounce all over the place. I bolt the stand of mine to a heavy solidly secured workbench and now only use it for detail work on a scale somewhere between my 14" Delta bandsaw clone and my 14" Sakura which had a list price of around $600 and I was able to purchase barely used from a fellow for $100. Note that ~75 year old cast iron Craftsman has a mechanism unseen in today's scroll saws. The blades' vertical movement is driven by a transmission below while the top of the blade is tensioned by an air piston spring-dampening mechanism to which the top of the blade is attached. The upper arm can be easily removed by unscrewing the crown nut at the rear of the upper arm. This then permits a single ended saber saw blade to be attached to the lower drive mechanism and the saw to be operated as a stationary saber saw. -
sanding sealer
Bob Cleek replied to CLovehitch's topic in Building, Framing, Planking and plating a ships hull and deck
Bare wood, especially softer woods like basswood, should be sealed before applying any other coating and particularly so when using water-based coatings which will raise the grain of the wood. The easiest sealer to use on models is plain old clear (sometimes called "white") shellac thinned to around a "two pound cut," (Which is the consistency of Zinsser's "Bullseye" brand canned shellac.) This dries very quickly, won't raise the grain, and sands easily. (It will eliminate the "fuzzies" that occur when trying to sand soft woods.) If painting, for minor imperfections and filling pores, use any good "sanding primer." As mentioned, there are several major brands. Interlux is a high-quality marine paint line with which I am quite familiar but there are other sanding primers on the market. This sanding primer, "basecoat," or "sealer, depending upon the manufacturer's nomenclature, contains additives which make sanding easy. The additive can be anything from "whiting" (chalk or talcum) to microspheres. ("micro-balloons.") (If you have microballoons on hand for mixing epoxy fairing compound, you might want to experiment with adding them to regular paint or shellac and see if that works for you. Always test any coating system on scrap wood before applying to finished work to make sure it will provide the results sought.) I have found using water-based acrylics are not as suitable for fine finishes because the water can raise the grain and the softer synthetic coatings are more difficult to sand. If one is seeking a matte clear wood finish, I'd simply use clear shellac which will fill fairly well if applied in multiple coats. A thick shellac coating will end up glossy, but the gloss will easily sand off in the end to as fine a finish as one might require using fine sandpaper (300 grit or finer) and/or hand-rubbing with rottenstone and pumice. https://www.bottompaintstore.com/interlux-prekote-quart-p-33277.html?campaignid=283850993&adgroupid=1258941293687119&creative=&matchtype=e&network=o&device=c&keyword=&msclkid=ac4ac711ef191c683eefa323e6f0a1be&utm_source=bing&utm_medium=cpc&utm_campaign=Google Shopping 2020 January- Bing&utm_term=4582283435435465&utm_content=Shopping-Catch ALL If you have some serious divots, surfacing putty is the necessary coating. It is a paste about the consistency of toothpaste that is thinned with acetone. It can be applied with a putty knife and can be thinned to a desired consistency. (It will harden in the can quickly if the lid is left off the can for appreciable periods. Adding a small amount of acetone to the can after use and storing the well-closed can upside down overnight will reconstitute the paste to a softer consistency without a lot of stirring. This material is sort of like drywall "mud." It hardens very quickly and can be sanded easily in a half hour or so. If a surfacing putty is used, the surfacing putty should be overcoated with the primer after it's been used. It's somewhat porous and if a gloss finish is applied directly over it, there is the tendency to create a 'flat spot" where the gloss topcoat was unevenly absorbed by the surfacing putty. https://www.amazon.com/s?k=interlux+surfacing+putty&adgrpid=1342504259915083&hvadid=83906731284955&hvbmt=be&hvdev=c&hvlocphy=43893&hvnetw=o&hvqmt=e&hvtargid=kwd-83906856471787%3Aloc-190&hydadcr=4123_13164389&tag=mh0b-20&ref=pd_sl_6qak90lgdy_e -
Oh yes, a "surface height gauge," as it seems to be called here on our side of the Pond, is a very handy thing to have, as your post has very well illustrated. In recent times, the simple "manual comparitor" models seems to have become less common. Most marketed now have the capacity to measure with a digital readout to a high level of tolerance and some even have provision for a cable connection for a CNC input. These guys cost two or three grand! The simple model you have is one of those things I'd love to snag at a garage sale, but I haven't seen one in a long time. Alternately, I use my dial indicator stand with a sharpened rod inserted in the hole for mounting the "clock" or I just take a suitably-sized block of wood and shim a sharp pencil on top of the block to the desired height and slap a piece of tape over it. Not what you'd call "highly accurate," but, as they say, "close enough for government work." (Beautiful photos on your post, by the way! I'm sure a lot of the newer modelers will find your information very helpful!
-
Very nice model and a very appropriate setting for it! Let's hope they get her in a case and out of that sunny window soon! (UV can fade paint and cause deterioration.) By the way, there isn't any type of membership charge for the Model Ship World forum. Welcome! Given the quality of the Fitzgerald model, I'm sure a lot of people here would be interested in seeing photos of your brother's other models. He was obviously a very skilled craftsman.
-
Growing up a kid's bike ride from Gjoa when she sat in her dry berth at San Francisco's Ocean Beach in Golden Gate Park, as shown in the postcard above, and with a father who worked in the maritime industry as an accountant for Dollar Steamship and American President Lines, I was quite familiar with her and her history and never passed up a chance to check her out up close. Even in the mid-fifties, she was sadly neglected and pretty well stripped bare, although they did get around to building a cast iron fence around her. As you know, when she reached San Francisco, the local Norwegian community, which was strongly connected with the sea (and known locally on the waterfront as "squareheads,") acquired her and dragged her up on the beach. This was in late 1906 and the devastated San Francisco was in the midst of rebuilding after the Earthquake and Fire in April of 1906, so that was quite a remarkable feat in terms of economic priorities. At that time, the area was sparsely populated sand dunes running a few miles inland. There she sat ashore, facing the setting sun and the Pacific Ocean a few dozen yards from the breakers. That exposed location was hard on the wooden boat and she got little care, but it seems they threw a coat of paint on her every so often, at least. Money was short and, as time passed, Amundsen's accomplishment came to be underappreciated. I'm sure that her boats were gone in a flash. They certainly weren't around when I was a kid, although I read somewhere that after the War in 1949, the year I was born, they'd done some major work on her. They'd built an iron fence around her, but the high school kids used to jump the fence and climb aboard with a few six packs, break in, and party on her, at least until the cops got wise to it and started chasing them off! I was out of town when they hauled her off to Norway in the early seventies, so I missed watching them move her. I was glad she was brought home to where she and her crew would be more appreciated. It seems they've done a complete restoration on her, as she certainly deserved. It looks like you have a good handle on modeling her. I look forward to following your scratch build!
-
Plastic or Wood models? Your Favorite?
Bob Cleek replied to Bill97's topic in Modeling tools and Workshop Equipment
Traditional scale model ship building using traditional materials, primarily wood, scale rigging cordage, and non-ferrous metal fittings is an artistic discipline in and of itself which goes back at least as far as the Pharaohs. Those traditional materials have archival qualities that enable them to last for hundreds, if not thousands, of years. Few of us will ever build a model that will survive that long, but as a goal, it's something to strive for. Styrene and most other plastics, on the other hand, often deteriorate in a matter of decades, at best. Building a plastic kit model yields a model that will be virtually identical to how many others there are in the same production run, save for the painting and weathering skills of the modeler. A scratch-built model is unique and can be the only model ever built of a particular vessel, thereby having the potential to be valued as a three-dimensional historical record of that particular vessel. Many find particular satisfaction in scratch-building for that reason. If one enjoys building models of any material or type they should pursue that hobby as long as it entertains them. It's really a matter of taste that dictates how any ship modeler choses to pursue the hobby. -
Dust masks and respirators.
Bob Cleek replied to Bill Hudson's topic in Modeling tools and Workshop Equipment
I consider safety protocols to be a matter of scale and commonsense. When I spend all day sanding the topsides of a yacht, I wear a common dust mask and if I'm spray painting one, I also wear a mask. (Were I spraying LPU, I'd be wearing a hazmat suit and a positive air supply system.) If I'm sanding a model I don't wear a mask at all. (I do relatively little sanding in model making without a vacuum hooked up to the sander.) If I'm spraying or airbrushing, I don't wear anything, but I always work in a well-ventilated space with a fan circulating the ambient air out a nearby window or open door. When modeling, the exposure to particulate pollution is so limited that I find it to be of little or no concern. This is not to suggest that safety protocols should be ignored, but only that there's no need to overdo it. Commonsense should be your guide. I've been doing this for over fifty years with no ill effects, but others' mileage may vary. -
Scroll saw versus band saw
Bob Cleek replied to Juddson's topic in Modeling tools and Workshop Equipment
While curves can be cut on a bandsaw, of course, I do think a good scroll saw is a much more versatile sawing tool for fine work such as is encountered in modeling. A scroll saw will permit you to stop the forward progress of a cut, rotate the workpiece without limitation, and start off in another direction without ever having to turn the saw off. Similarly, a scroll saw can cut a circle or any other shape inside the perimeter of a workpiece which is simply not possible with a bandsaw. The scroll saw will also accept a far wider variety of cutting blades including omnidirectional ones which, again, are simply not possible with a bandsaw. If you do decide on a bandsaw, and you have the room in your shop, you'd do well to get a standard Delta 14" bandsaw or one of the many Asian clones (I'm sure any patents expired ages ago.) (Jet and Grizzly are reliable retailers of these and there are many available on the used market.) Buyers have to be careful buying scroll saws. There is a very wide range of price and corresponding quality in scroll saws and you definitely get what you pay for. One should do a fair amount of online research before "pulling the pin" to avoid disappointment and a waste of money. (Small "mini scroll saws" sold in most of the ship modeling catalogs, e.g. Dremel, Proxxon, and MicroMark, are generally underpowered and overpriced in my opinion.) Scroll saws are a "gateway" power tool with a wide market base of hobbyists. A lot of them are bought by entry level hobbyists who later find themselves no longer interested in their hobby and little-used scroll saws can be found on the used market quite easily. This is great if you find one of the $750 to $2,000 top of the line scroll saws for $100, and not so great if you pay $100 for a scroll saw that was junk the day it rolled off the assembly line. At the bottom of the heap in the "big box" stores, Wen and DeWalt "swing arm" models in the $150 to $300 range often get reasonably good reviews but they are not even in the same zip code with the "parallel arm" models made by Hegner, Sakura, Excalibur, and King Industrial. The major price difference is between "swing arm" and "parallel link arm" scroll saws. The latter move the blade in an up and down motion perpendicular to the table (if the table is set flat) while the former "swing" the blade in an arc when sawing. The primary quality distinctions in scroll saws are 1. Type of arm, swing or parallel link, 2. motor power, and perhaps most importantly, 3. lack of vibration, all of which are directly related to the accuracy the saw is capable of delivering. At the inexpensive end of the scale are tools which vibrate so much, even when bolted down to a solid surface, that they are near useless for doing fine work. This isn't to say that one has to spend $750 and up to acquire a decent scroll saw. Even if one "pays retail" for a new saw, good work can be done with DeWalt's parallel link arm 20" scroll saw. DEWALT Scroll Saw, Variable-Speed, 1.3 Amp (DW788), Yellow, 20-Inch - Power Table Saws - Amazon.com It really isn't an "either or" question. If you want to cut pieces for built-up hull framing, a good scroll saw is the tool for the job. If you want to resaw billets for model work, a bandsaw is the tool for the job. You can use a bandsaw with a narrow blade to roughly cut curves within the limits of your blade's width and then "sand to the line," to achieve a sufficiently accurate result, but that's not really what the bandsaw is made for. You can also us a scroll saw to cut thick billets within the limits of its throat opening, but that's not what it's made for, either, and you'll probably break a lot of blades trying. So, as Mr. Natural says, -
Yes, you are correct! I wasn't absolutely sure and it niggled at me, so I checked myself as well and corrected that in my post. I was thinking of a cotton-wrapped polyester blend I'd read about when I first wrote that and then realized that might not have been Gutermann Mara. Mara is different from regular polyester thread, though. Its fibers are uniquely made "core spun microfilament polyester." (Whatever that means!) I expect this is what distinguishes it from the ordinary polyester thread on the market. It doesn't seem to have any of the shortcomings the others do. It's not "plastic-y" at all. At any rate, the stuff works very well.
-
Reading between the lines will get you in trouble quickly and on the internet, even reading the lines themselves is not to be trusted! The "finestkind" standard material for scale model rigging cordage used to be linen thread, but it's gotten practically unobtainable at this point, being replaced by various synthetics. The synthetics don't take dye as well, nor, being inherently slippery, are they very amenable to holding a knot. Chuck Passaro has done a lot of research on thread for use as rigging. He related that the conservators in a highly respected museums now specify an advanced polyester thread as a replacement for linen. Their decision was reportedly based on considerations of its archival properties and appearance. (Chuck has further perfected a method of "proofing" polyester scale rope after it's made by briefly heating it with a hair dryer. This causes the polyester fibers to take a set and prevents unraveling.) I believe the general consensus at present is that the preferred material for rigging is Gutermann's Mara polyester thread. It should be kept in mind that cotton fibers swell when wet with water and polyester fibers don't. Some have reported poor results trying to secure polyester rope knots with thinned PVA which contains water, as might be expected. Polyester scale cordage is probably best secured with shellac which is dissolved in alcohol. It may turn out that using a lacquer or nitrocellulose adhesive won't work so well if their acetone solvent dissolves the polyester thread. (I don't know if it will, but I do know what happens when you pour acetone into a syrofoam cup!) See: I have not noticed any issues with "fuzzies" in the use of Gutermann's Mara thread for scale model rigging. Should such arise, the cure is simply to "flame" the thread, by quickly passing the line over a flame (a laboratory alcohol lamp works well for this) and letting the flame singe the fuzz off.
-
Looks great! It also looks like you've moved ashore. I sure hope you still have your Buzzards Bay 25! Is she an original or a recent build? She's sure an eye-popper. How did a BB25 end up sailing upside down in New Zealand? Now that you're living on the hard and presumably have some space, and you've built the model, don't you think it's getting to be about time to start thinking about building a full-size "Buzzards Bay Boy's Boat" for that young man? If you get cracking on that, he should be just about ready to skipper his own boat when you get her built!
-
Mahl sticks are routinely used by sign painters. A skilled sign painter uses his mahl stick not only as a secure rest for the painter's hand, but also as a guide for the brush. By resting the heel of the brush hand on the mahl stick and moving the end of the stick in an arc, a true curve can be quickly and very accurately made. Similarly, the stick can be held in position and the brush in hand, or resting on the stick, can be moved across the painting using the mahl stick to yield a perfectly straight line. Actually, I've never seen a mahl stick used such that it rested on the painted surface of the piece. The padded end of the stick could smear the work unless one waited weeks, if not months, for the oil paint to solidify. I've only ever seen the padded end of the stick placed on the working surface at the edge or margin of the work surface. (Some mahl sticks have a "hook" at one end so it can be hooked over the top edge or side edge of the canvas.) On a larger painting, the sticks can get pretty long to accomplish their use without placing the end in wet paint. Some fancy ones are even telescoping for ease of storage.
-
Navy vessels make poor yachts. The Navy never has to worry much about fuel costs! Then again, neither does Elon Musk.
-
I've always envied the doll house miniatures modelers. They seem to have a strong market for their finished models. Unfortunately, with ship models, not so much. We used to have one of the largest "brick and mortar" doll house miniatures stores (with a big mail order business, as well,) in the town where I lived. I used to get a lot of ship modeling "miniature lumber" there. Sadly, they didn't survive the Pandemic and went out of business.
- 39 replies
-
- 2
-
-
- Lowell Grand Banks Dory
- Model Shipways
- (and 1 more)
-
It looks like they have much "hihger" demands for their modeling than they do for proofreading their advertising copy! An interesting line of modeling tools, DSPIAE, appears to be a subsidiary of Meng, a relatively new Chinese plastic model kit company. See:; DSPIAE.

