

UdoK
-
Posts
173 -
Joined
-
Last visited
Reputation Activity
-

 UdoK got a reaction from popeye the sailor in Duyfken by Robin Lous - Kolderstok - Scale 1:50
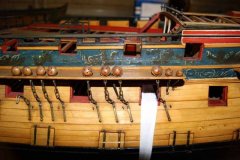
I' am probably a bit late to the Party, but here a Photo I took on the Batavia which shows the dimensions..
-
 UdoK got a reaction from CaptainSteve in Duyfken by Robin Lous - Kolderstok - Scale 1:50
I' am probably a bit late to the Party, but here a Photo I took on the Batavia which shows the dimensions..
-
 UdoK got a reaction from cog in Duyfken by Robin Lous - Kolderstok - Scale 1:50
I' am probably a bit late to the Party, but here a Photo I took on the Batavia which shows the dimensions..
-
 UdoK got a reaction from zappto in Duyfken by Robin Lous - Kolderstok - Scale 1:50
I' am probably a bit late to the Party, but here a Photo I took on the Batavia which shows the dimensions..
-
 UdoK reacted to Robin Lous in Duyfken by Robin Lous - Kolderstok - Scale 1:50
Well Carl, the only way I could think of to make the tree nails....
It is tedious, but only making the tree nails...the rest goes reasonably quick and easy.
Marking the place with a pencil, the drilling, placing (with a drop of PVA on the tip), cutting and sanding...all no problem at all.
Just sharpening those 1x1 mm walnut strips takes most of the time. I do a batch of about 40 in 30 minutes....just the sticks.
Where I am now...
By trial and error I learned it's far more easy to use longer punji sticks.
The cutting off with a cutter or a pair of decal scissors, filing and sanding is done in minutes.
It's all fine, because I think it is worth the effort and because it's 1/50 scale the 0,5 mm tree nails don't look too oversized.
A lot of it will be hidden underneath the foreccastle and the quarter deck, but well...I do those also.
138 done!
More soon,
Robin
-
UdoK reacted to *Hans* in Duyfken by Robin Lous - Kolderstok - Scale 1:50
Nicely done! What you can do is sand the upper planks back to a thickness of almost nothing and then you are close to the real ones.
-
UdoK reacted to Robin Lous in Duyfken by Robin Lous - Kolderstok - Scale 1:50
And the grating...
Made of 1x1mm walnut strips. This also helps me with the "no staining policy".
A dry fit...
I think I'll somewhat reduce the width of the cap planks...a tad bit too massive to my liking now.
More soon, planking the deck.
Robin
-
UdoK reacted to Robin Lous in Duyfken by Robin Lous - Kolderstok - Scale 1:50
It's been a busy day on the shipyard...
I finished the hatches.
The forward and cargo hatch are made of planks sitting on the deck...curved when needed, planks lining the hole inside the hull and capping planks.
The rear hatch a bit simpler, because it will get a lid.
And a change of plan...a less sophisticated grating, like the one on the replica Duyfken.
After all, it's a humble ship and discovering a wasteland called Australiosomething...or something like that... doesn't give her the right to show off with fancy gratings.
So I'll scratchbuild the grating. I can do the deck planking now.
More soon,
Robin
-
UdoK reacted to CaptainSteve in VOC Retourship BATAVIA by UdoK - 1/72 kit
UdoK,
I found the following news article about the Batavia this morning. Thought that you might find this interesting.
Nice work so far.
-
 UdoK got a reaction from PeterB010 in VOC Retourship BATAVIA by UdoK - 1/72 kit
The positions of the gunports has been determined and the boxes have been glued in place. To add more strenght to the boxes and create a bigger lip for the surrounding planks some extra strips have been installed.
In order to determine the run of the wales and position of the gunports all the bulkheads come with laser marks for each wale. Basically a good idea, but due to my decision to close the hull with plywood not many of the marks are still visible. So I had to take the dimensions off the drawings and transfer it to the hull.
Before starting the installation of the wales I did plank the concave area above the transom with basswod strips 1x4 and sanded them to shape. After one coat of sanding sealer and intermediate sanding several coats of a acrylic paint (Ivory) were applied.
Finally I have prepared the transom wales from a walnut strip 1,5 x 5 and glued them into position.
-
UdoK got a reaction from PeterB010 in VOC Retourship BATAVIA by UdoK - 1/72 kit
Thank you for your Likes, construction continues!
After planking the stern and closing the gun ports with walnut strips the last remaining bulkheads got filled with plywood and sanded to create the largest possible surface to fix the single planking.
Unfortunately a few of the very fragile bulkhead stubs broke off during sanding the hull, but not major issue, will be a easy fix.
The lasercut parts for the keel are cleaned up and glued together along with a basswood strip to form the false keel. As the hull below the waterline will be painted the keel is made from basswood, the upper stem and stern parts are walnut.
While waiting on the glue to set I have constructed already the gunport boxes for the canon dummis from the lasercut parts.
-
UdoK got a reaction from PeterB010 in VOC Retourship BATAVIA by UdoK - 1/72 kit
Thank you Piet and Robin.
In the museum shop of the Batavia warf I had the opportunity to inspect the kit of the Duyfken, it is also a very interesting ship.
I am already very excited about the Kolderstok kit of the Zeven Provincien which is supposed to be released at the end of the year.
The pictures show the model of the Zeven provincien at a scale of 1/10 in the warf Workshop, it's huge!
-
UdoK got a reaction from cog in VOC Retourship BATAVIA by UdoK - 1/72 kit
The positions of the gunports has been determined and the boxes have been glued in place. To add more strenght to the boxes and create a bigger lip for the surrounding planks some extra strips have been installed.
In order to determine the run of the wales and position of the gunports all the bulkheads come with laser marks for each wale. Basically a good idea, but due to my decision to close the hull with plywood not many of the marks are still visible. So I had to take the dimensions off the drawings and transfer it to the hull.
Before starting the installation of the wales I did plank the concave area above the transom with basswod strips 1x4 and sanded them to shape. After one coat of sanding sealer and intermediate sanding several coats of a acrylic paint (Ivory) were applied.
Finally I have prepared the transom wales from a walnut strip 1,5 x 5 and glued them into position.
-
UdoK reacted to md1400cs in Wasa by md1400cs - FINISHED - Corel - 1:75
Hi Mates,
Thanks for your very kind thoughts and likes.
Section work in progress update:
Moving to the foremast area. This area having so many more shrouds and ropes in areas that are harder to access behind the ratlines has resulted in needing a few more stress “time outs”
Also working from three diff. plan sheets that show specific (and diff.) pin and rope attaching locations has increased the workload. Not a complaint = just an observation.
Also when I first installed the rails and drilled the pin holes on the upper railings (using Corel instructions way back when) that kit not having running rigging did NOT include the extra needed pinholes. Now needed to drill more rail holes behind ratlines. Will need the same fix when I reach the mainmast.
But it will all sort itself out Here are a few in-progress updated views.
None of the lines have been fixed or adjusted – just sorting out where they "should" go.
Regards,
-
UdoK reacted to Robin Lous in Duyfken by Robin Lous - Kolderstok - Scale 1:50
Thanks for the information Patrick!
I noticed there's no deck between fame 1 and 2 and since this will be visible I asked Hans (from Kolderstok) about it.
There should be a deck and newer versions of the kit have this. So I made a support frame and the deck.
This is of course still a base deck...planking goes on it.
I must now do the grating and the 2 hatches...
It was tempting to order grating matching the size, but the thickness of the wood and size of the holes would be way to small,
So I had to order oversized gratings to get this right.
I'm not sure about this, but I think it's better to do the grating and hatches before planking, instead of on top of the planking.
And I finally got myself a plank bender!
It almost feels like I'm a wooden ship model builder now.
Well, more soon,
Robin
-
UdoK reacted to Robin Lous in Duyfken by Robin Lous - Kolderstok - Scale 1:50
Sunday we had dinner guests, so we had to cook and entertain...
It was an enjoyable evening, but it limited my shipyard time.
Yesterday and today I spend my time planking the stern...
A time consuming, but rewarding task. The horizontal planks are slightly curved, top section 45 degrees, bottom section 60 degrees.
And my second modification...the gun ports.
The manual and plan show 8 mm x 8 mm ports...glued on top of the planking.
The replica ship has rectangular gun ports there. I made the outside measurements 9 mm x 11 mm.
The lids will be 8 mm x 10 mm...flush with the planking and a small gap of 0,5 mm all around, so you can see they're there!
I'll also make the "rope holes" next to the gun ports from a 4 mm drilled open ebony dowel. Rounded edges.
The shipyard received new supplies today!
A wooden ship's boat to replace the unsuitable (and likely frowned upon) resin ship's boat I already have. The gratings and a supply of walnut.
Still busy with the stern...it's a painstaking job to work around the gun ports, but I did that to myself.
Edit: Finished manual step #2
I now continue with the gun ports and the cabin wall.
More soon, slow but steady!
Robin
-
UdoK reacted to ken3335 in Royal William by ken3335 - FINISHED - Euromodel - Scale 1:72
Hello Everyone,
Again thanks for your likes.
Two things happened today, I finished the backstays and it stopped raining, so plenty of photos.
The first picture shows the attachment on the hull of the bowsprit stay, the picture inset shows how I made it, the black strip is just black card cut up, easy to do and you can't tell that its not metal.
The rest went pretty well to plan, the only difficulty for me were the 3mm dead eyes for the upper stays, they were too small for me to hold. I got my wife to assist with these, between us we managed. I wonder what she'd be like with making spars!
Michael, Pete's right, this kit is only as difficult as you want it to be, the difficulty would be in the fine accurate detail which it gives you the opportunity to do, I've seen your work and it's here that you would excel, I'd love to see you do a version. I'm making mine as simple a version as I can so that at least I'll be able to complete it. It's the style of ship and the quality of the kit that makes it look so good, I'll only take a small part of the credit.
Ken
-
UdoK reacted to ken3335 in Royal William by ken3335 - FINISHED - Euromodel - Scale 1:72
Hello Everyone.
Thanks very much for your likes and kind comments about my photos, I think that you've guessed by now that photography is another of my hobbies. I do make quite an effort to get good pictures so I appreciate you liking them, that's all an amateur photographer wants.
Zappto, I use a cheap unbranded cyno de bonder, when applied it just softens the hardened glue enough to work parts free, you then need to wipe the goo away after, for that I use acetone. I bought it initially to get the stuff off my fingers, it works great for that but I don't think that it would work on white wood glue though. If your wood glue isn't waterproof try soaking the part, if you can't immerse it wrap it in a piece of wet cloth I find that this usually works.
I have now finished all the ratlines, all the forward stays and all standing rigging of the bowsprit. I had no idea how the fore preventer stay was attached to the knighthead. The plan showed it as the fixing point but does not show how, this is .75mm thick black cord, I couldn't imagine this just being tied off, as hard as I looked for images of this I couldn't find any, not even searching online. I did see that on the Victory it was fastened using double pulley blocks so that was how I decided to fit mine, they look ok and functional. No doubt someone will tell me they are wrong but they are done and are staying that way, if they were good enough for Nelson then they're good enough for me.
I decided to refine the supplied blocks a bit so I made up my version of a block sander. Using a small round container I lined it with 150 grit sandpaper then using a length of dowel I glued sandpaper flaps into slots that I'd cut then glued a nail as a shaft through its centre. A hole was drilled into the base and lid to take the shaft.
In use I put in some blocks fastened the shaft to my drill and spun it for about 20 seconds. When done I saw that all the small surface roughness had been removed and the edges were slightly less square, I think that if I spin them a little longer the edges would get rounder. This only took about five minutes to make and it worked so I think it was worth the effort.
I tried to photograph the rigging but because of the current bad weather it is so dark indoors I've only managed to get one acceptable picture of the rigging so the rest will have to wait until another post.
Of the standing rigging I have the back stays to do, I'll need to do the snaking on the main and fore stays and the crowsfeet then I'll be able to move on to the spars.
Ken
-
UdoK reacted to ken3335 in Royal William by ken3335 - FINISHED - Euromodel - Scale 1:72
Hello Everyone,
Again thanks for your likes and kind comments.
Yes Zappto I spend quite a bit of time building my Royal William, followers think that I'm making very rapid progress but I spend at least four hours, sometimes much more each day on it so actual building time has been quite long. It's become a bit like a drug habit, I have to keep at it to get my fix, often I do a part over again many times until I get it how I want, sometimes I hate it and want to weep with frustration, it's been some journey so far but I can't remember a project that I have enjoyed as much, this really is some build and will be a difficult act to follow.
I feel that I've made progress since my last update but it's been hard going, I've finished the main ratlines, fitted the catharpins, I had great difficulty and frustration around this area so I've now just made them up simply, more of a token than of anything realistic. The futtock shrouds and ratlines are in place and most of the stays are fitted. The shrouds deadeyes and most of the lanyards for the upper masts have also been done. When all of this was done I thought that the railings that I'd made up and fitted into the tops looked too out of scale, too big, so I've removed them for now.
It all sounds easy now that I've written it down but it was far from it, at least half of the deadeye lanyards were done twice to get the height and tension right. I can't believe how many times that you can make different mistakes on the same length of rigging, the mainstay I had to redo twice and the front section that attaches it to the bowsprit I did four times. I must have made every error in the modellers handbook and one that I think must be a first ever, so strange that you couldn't make it up, I'll explain.
I had fitted the futtock staves then went on to do the catharpins, I only wanted to put in a simple version so I fitted two pairs into each mast. When I looked at them the next day I saw that the thread that I'd used was too thick and looked out of scale so I decided to change it for a thinner one. I'd seized the knots with a touch of Cyno and they were difficult to undo, I didn't want to go near that area with a scalpel, ( another lesson I'd learned ) so I put a drop of de bonder on the knots and left it soak, the Cyno started to soften but not enough, I put more de bonder on and left it for about an hour. When I returned to my consternation I saw that the de bonder had wicked down the shrouds, it had taken on the black dye which then leached into the white ratlines turning them black. I was obliged to take away and remake the upper staves and four or five rungs of the ratlines, this repair took me about five hours of extra work. I have to ask myself yet again just what I have done to offend the Modelling Gods!
Ken
Here's one for you Pete.
-
UdoK reacted to Robin Lous in Duyfken by Robin Lous - Kolderstok - Scale 1:50
Thanks Hans and Steven!
I can't complete the fairing without adding the cabin wall and the stern, so I do them now...and do the balsa on the other side...on the side as well.
Manual stage #59 deals with the rudder hole and the gun ports, I think it's a good idea to do both at stage #2 already.
With it my first minor modifications.
I copy the larger hole seen on the replica.
On this photo covered with leather or fabric.
I have close up photo's also, but those I can't show, because of copyright.
Made the larger hole, lined the inside with walnut strips. The outside planks will cover the edges.
I'm now bending the slightly curved horizontal planks. Reminds me...I still need to buy a plank bender.
More soon,
Robin
-
 UdoK got a reaction from Piet in VOC Retourship BATAVIA by UdoK - 1/72 kit
Thank you Robin and Michael for the link,
although I have collected a whole bunch of photos I didn't know this one, awesome Pictures!
-
 UdoK got a reaction from prutser in VOC Retourship BATAVIA by UdoK - 1/72 kit
The positions of the gunports has been determined and the boxes have been glued in place. To add more strenght to the boxes and create a bigger lip for the surrounding planks some extra strips have been installed.
In order to determine the run of the wales and position of the gunports all the bulkheads come with laser marks for each wale. Basically a good idea, but due to my decision to close the hull with plywood not many of the marks are still visible. So I had to take the dimensions off the drawings and transfer it to the hull.
Before starting the installation of the wales I did plank the concave area above the transom with basswod strips 1x4 and sanded them to shape. After one coat of sanding sealer and intermediate sanding several coats of a acrylic paint (Ivory) were applied.
Finally I have prepared the transom wales from a walnut strip 1,5 x 5 and glued them into position.
-
UdoK got a reaction from CaptainSteve in VOC Retourship BATAVIA by UdoK - 1/72 kit
The positions of the gunports has been determined and the boxes have been glued in place. To add more strenght to the boxes and create a bigger lip for the surrounding planks some extra strips have been installed.
In order to determine the run of the wales and position of the gunports all the bulkheads come with laser marks for each wale. Basically a good idea, but due to my decision to close the hull with plywood not many of the marks are still visible. So I had to take the dimensions off the drawings and transfer it to the hull.
Before starting the installation of the wales I did plank the concave area above the transom with basswod strips 1x4 and sanded them to shape. After one coat of sanding sealer and intermediate sanding several coats of a acrylic paint (Ivory) were applied.
Finally I have prepared the transom wales from a walnut strip 1,5 x 5 and glued them into position.
-
UdoK got a reaction from Piet in VOC Retourship BATAVIA by UdoK - 1/72 kit
The positions of the gunports has been determined and the boxes have been glued in place. To add more strenght to the boxes and create a bigger lip for the surrounding planks some extra strips have been installed.
In order to determine the run of the wales and position of the gunports all the bulkheads come with laser marks for each wale. Basically a good idea, but due to my decision to close the hull with plywood not many of the marks are still visible. So I had to take the dimensions off the drawings and transfer it to the hull.
Before starting the installation of the wales I did plank the concave area above the transom with basswod strips 1x4 and sanded them to shape. After one coat of sanding sealer and intermediate sanding several coats of a acrylic paint (Ivory) were applied.
Finally I have prepared the transom wales from a walnut strip 1,5 x 5 and glued them into position.
-
UdoK reacted to drobinson02199 in King of the Mississippi by drobinson02199 - FINISHED -- Artesania Latina - 1:80
For the engine room doors, the kit calls for acetate windows, scored then painted and wiped off (so I assume the black paint stays in the scored lines but wipes off the rest).
Acetate for model windows and I have never gotten along well. I seem to get it scratched or smudged or dirty, and then over time it collects dust.
So instead, I used some leftover wire from an earlier model to make barred windows. Back and front shown below. It turned out as I had hoped, and I like the look. I know that the wires aren't perfectly straight (hard to get that from an old coil), but from a normal viewing distance I think it will be OK.
Regards,
David