


Jean-Pierre
-
Posts
268 -
Joined
-
Last visited
Content Type
Profiles
Forums
Gallery
Events
Posts posted by Jean-Pierre
-
-
My congratulations for this excellent build, which is by far the best Santa Maria build I've seen so far.
I have myself since quite a bit of time been interested in the Colombus ships, and have been very impressed by the approach by Wolfram zu Mondfeld, which matches most of your own research by the way. And I am pleased to see that you made her with a round "bum", a feature that has been omitted in all kits, with the exception of the plastic kits (Revell, Heller, Imaï) which are all based on the Guillen Y Tato reconstruction. But this ship had a particularly small draught and indeed would have been a very bad sailing ship. This reconstruction was moored for a long period of time in front of the Naval Museum of Barcelona, and when I last spotted her in the 1980's I think, she was being transformed to add a forecastle, which the original Guillen Y Tato model (and any of the plastic kits) did miss.
Now there is one point on which I still do not agree with most of the authors and that is the rake of the fore mast on carracks. Virtually ALL drawings or paintings of the peariod show 3 absolutely vertical masts. Only on one painting from the early 1500's did I see a forward raking mast as shown on all models. But the Santa Maria was built around 1450 if I remember well! Now I know that even the best researchers tend to think that evidence should match their conclusions i.o. the contrary, but still...
As an example of this, take the Mataro ship, now in Rotterdam. The large model show a very wide and comparatively short model. I have inspected the original quite thoroughly, and noticed that the model is very well detailed indeed, so it must have been built with loving care. But researchers claim that it was built out of proportion and would be unstearable with only one mast. Now on the oldest photograph of this model that I saw, shsa had three masts. Then on later pictures she had lost her fore mast, and now she has lost her mizzen as well. Of course I do not pretend to know better than the people who made those statements or who made those changes, but I personally prefer to believe what I see than what people tell me I should see.
So I think I would build a
-
I may have missed something, but it is not clear to me whether bulkhead 3 sits too low or bulkhead 4 sits too high. How does bulkhead 5 align with nr4? My first impression is that nr 3 sits too low. As no deck rests on it, it should not be a problem to pad up its slot to have its lower side lign up with the other bulkheads...
-
Quite frankly, I do not underqstand why he stopped this beautiful build: the choices he made in modifying the kit are quite pertinent and the build was going to produce a superb model indeed.
So Arjan was put off by the hull planking. Now he is right to say that the kit does not provide the material to plank the hull as it should be: While a good modeller like Arjan (and a not so good one like me) will want the planks to run in a sweep from stem to stern, Sergal suggest that the planking would start with a horizontal plank at deck level! And as they did not want to make the kit too difficult, they provide for the two plank layers wood strips of 6mm wide. As such, these strips are impossible to bend laterally to get the hull "sweep".
Now as Arjan claims to be a scratch builder, he could easily have built the first layer like he wished with the kit strips. For the second layer however, he might have chosen to buy some 4mm wide strips. Or as I did, he may have split the 6 mm planks in two, which would give full size planks of 15cm wide (at the claimed scale of 1/50) or 18 cm of course (at the kit announced scale of 1/60). A little narrow, I admit, but still perfectly acceptable.
So I regret that such an promising project has been abandonned (at a cost of 300 € kit price);
Of course I regret that decision as I think that starting a build log implies that you will bring your readers to the end of the project. A build log is therefore an incentive to go on building. But the hobby has to remain funny, and who am I to write this while I still have a 3/4 finished Flying Fish on my desk? My compliments also to Dragon65 who made what have to be the final models of the Charles W.Morgan, and of trhe Chaperon steamer, none of which were able to sustain his interest to the end. Too bad! So I'll definitely have to restart the Flying Fish when my own Dutch Whaler is completed.
-
Chris,
You are right that pictures only are not a good solution. Some plastic kit manufacturers like Airfix are often criticised for their pictorial approach. But my personal experience with professional translators is that when you get into a specialised translation, in this case maritime terms and wood modellers techniques, translators, even professional ones, are of little help indeed. An Italian ship modeller with a good knowledge of the english language is what you really need. A good example of this is this British modeller who re-wrote the Italian booklets of Euromodel of Como.
There are quite a few good Italian modellers on this and other sites who -maybe- would gladly help you (maybe a pre-run example of this beautiful kit would help convince them

JP
-
Hello Arjan. It's been some time now. Any progress in sight? I hope to make some more progress next week. Still on the hull. Good luck and I hope to read more from you
-
I suppose Pamir and Preussen were the best known winbdjammers, and therefore were the only ones that woul -maybe- be a commercially viable project.
Do not forget that to make a good kit of those ships, you need to reproduce many iron bits at a scale that is still manageable (1/100 or 1/96). And that can only either mean metal mouldings and/or etchings, both meaning (very) expensive kits. I wonder what the new Warrior kit by Billings will be. Of course, this manufacturer usually uses plastic parts for those difficult wood items.
-
Alistair, I do hope that some day, you will restart your excellent build.
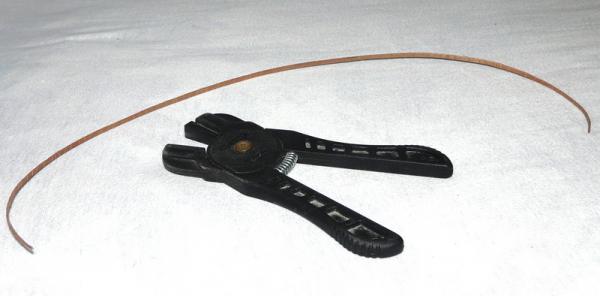
Indeed, the plank nipper is simple as fast to use (no soaking, no drying), it is cheap and you cannot get burnt by using it. The only issue is convex shapes, as can be seen at the stern, or on the inner bulwark on the fore deck. Now on this model, I took the risk, and after some careful sanding, filling, varnishing, the grooves of the nipper can hardly be seen, I dare say.
I forgot to mention that while doing the upper part of the second planking, I felt iut necessary to do the inner bulwarks.
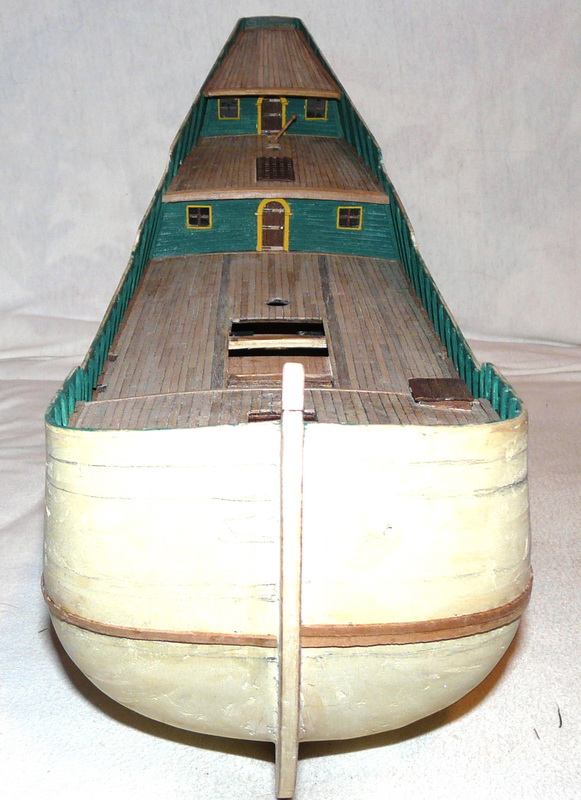
Inner bulwarks
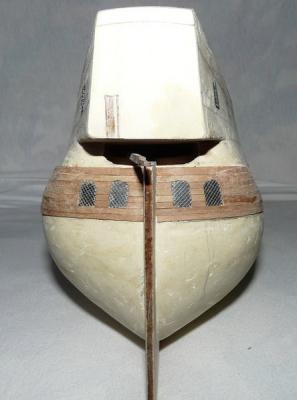
The original vessel was built as cheaply as possible, and therefore were single skinned. Sergal suggests to make the inner planking with the same planks as the second planking which would have made a triple skinned vessel at that level. Of course, no one would notice, but the overall thickness of the bulwarks would be too much: indeed, a single skinned vessel would most surely show the ends of frames, and I wanted this feature on my model. So I used for the inner bulwark layer the battens left over from the deck, and added planks 3x1mm to simulate the ribs. Everything was painted a nice green colour, but later on, a forum member mentioned that the bulwarks were indeed painted black, or grey, or left dark wood. So I later repainted the whole area black.
Here are the following pics of the second planking:


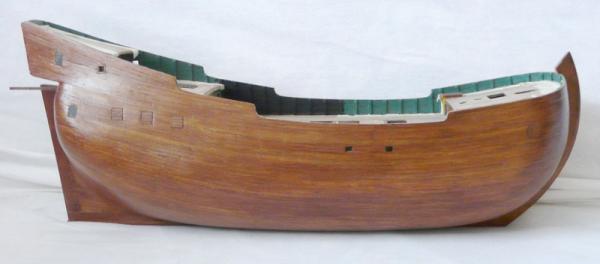

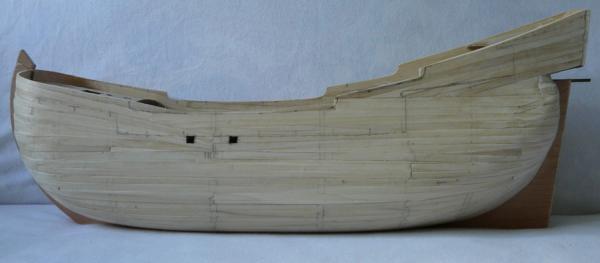
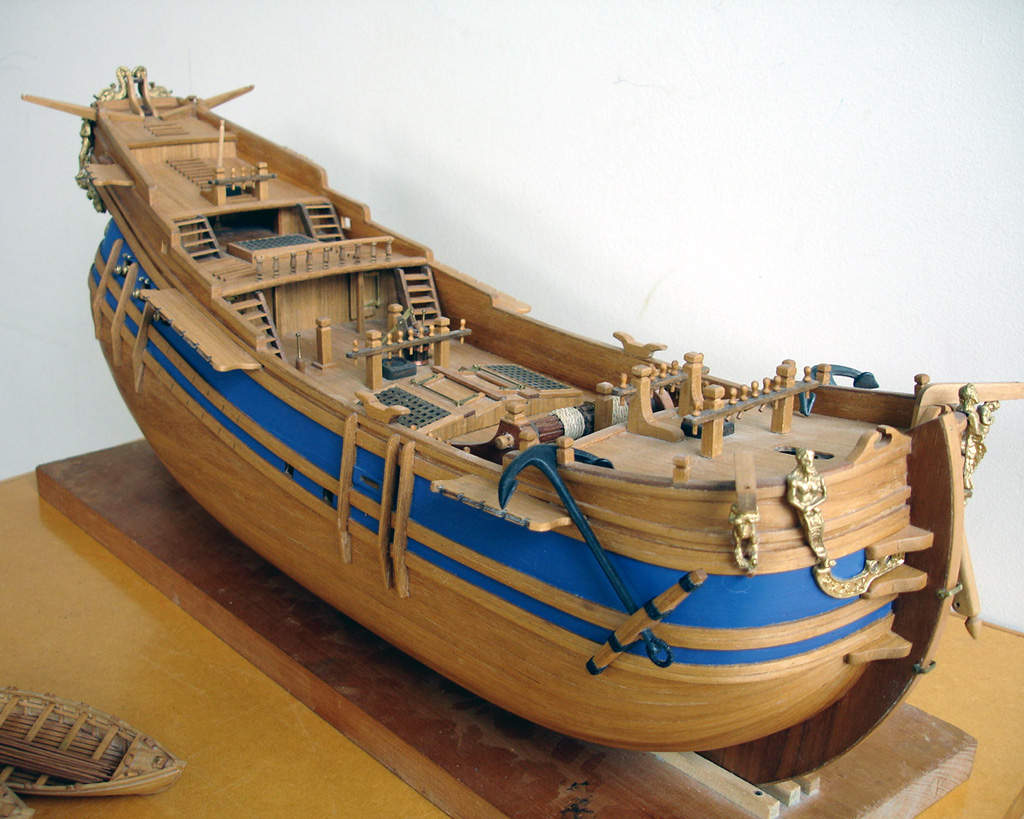
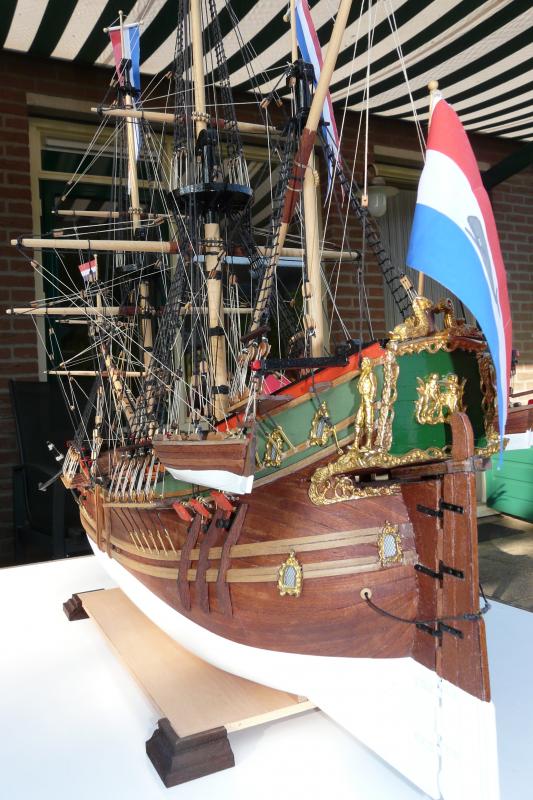
So that s how the project looks like now. Present job is to add the garboard strakes or whatever they are named, then a second layer tinting varnish will be applied to the hull, then a layer of matt varnish, as the hull is way too glossy for my taste.
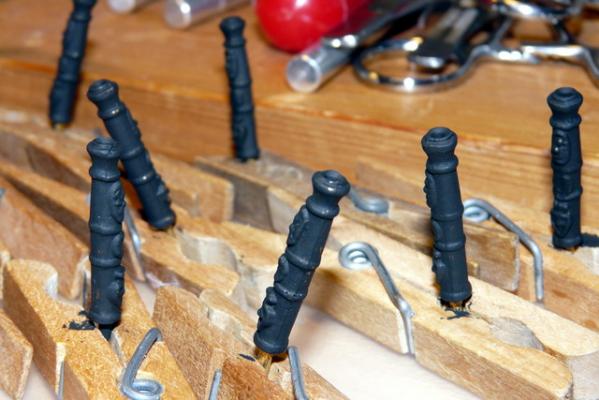
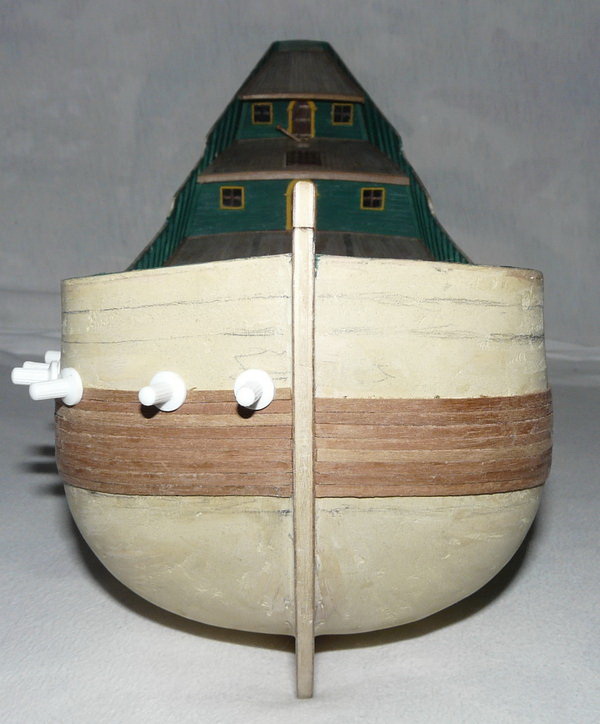
And then...Mmmmm: the ornaments, window frames, gunport and rudder hinges.
-
Thank you for your kind comments.
Alistair, as you can see, the windows still have to be glued onto the hull. I think I'll wait until all the reinforcement planks (what's their name again? Garboard strakes, planksheer?) are in place. Then I'll cut out these planks where necessary.
Steve, you are *#!!!@**%$^%%%$ right, although I'm not sure the spelling of this word is right

The shape of this ship indeed is what I like about it. There is only one comparable model on the market, and it's Euromodel of Como's Derflinger, but this does not have the looks of this one. Maybe the Endeavour is what comes the closest.
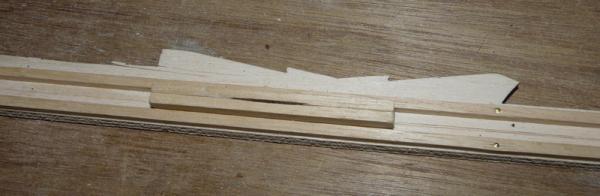
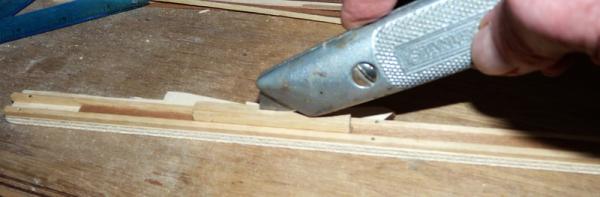
Just a few comments on the first planking. I did not follow the strong recommendation of some modellers to insert blocks fore and aft. Instead, I added 4 extra bulkheads lengthwise. A former experience with a galiot proved that it worked. And it did here as well.
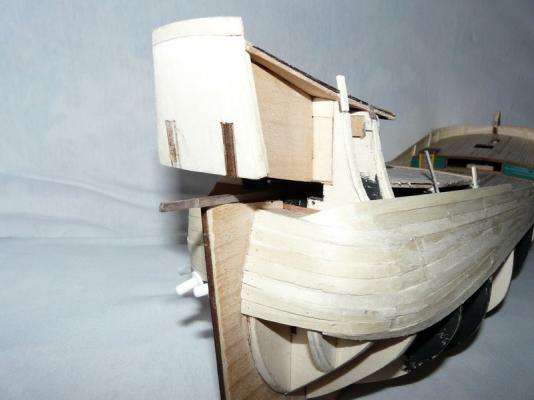
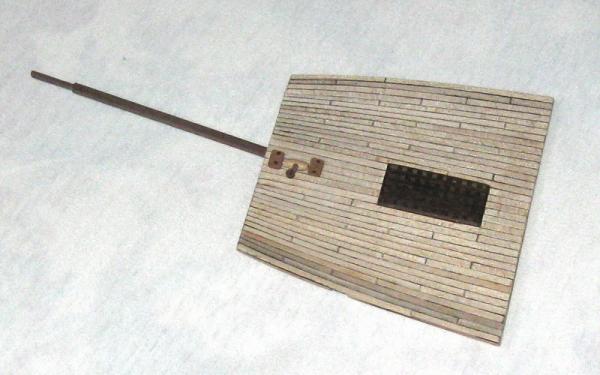
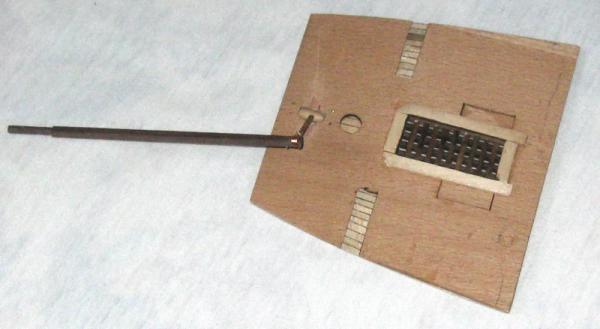
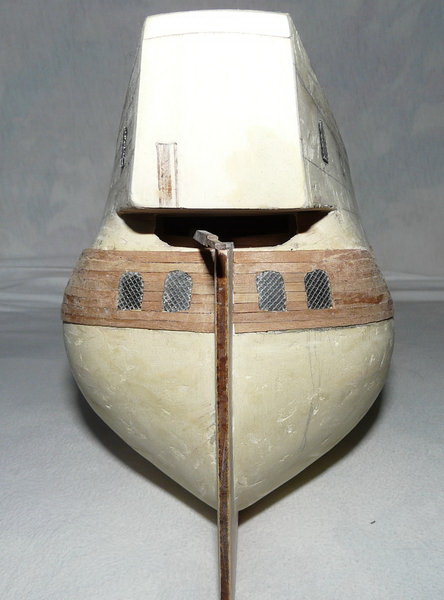
As can be seen, I added a rear platform under the rudder, and finished this area that, if built as described in the instructions, would have been a gaping hole in the hull.
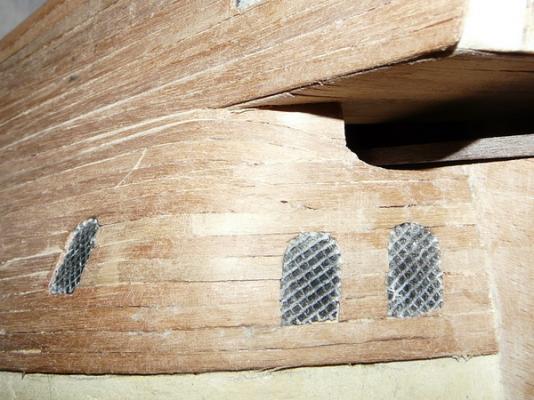
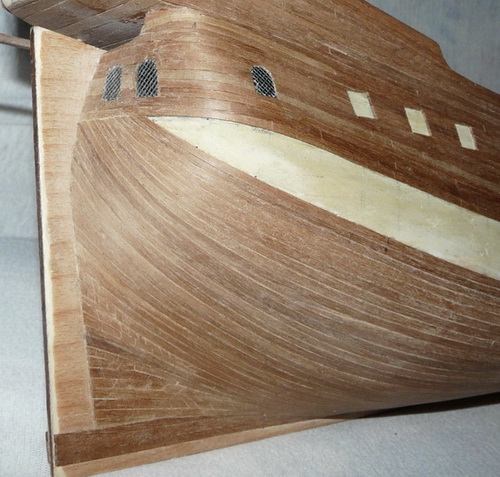
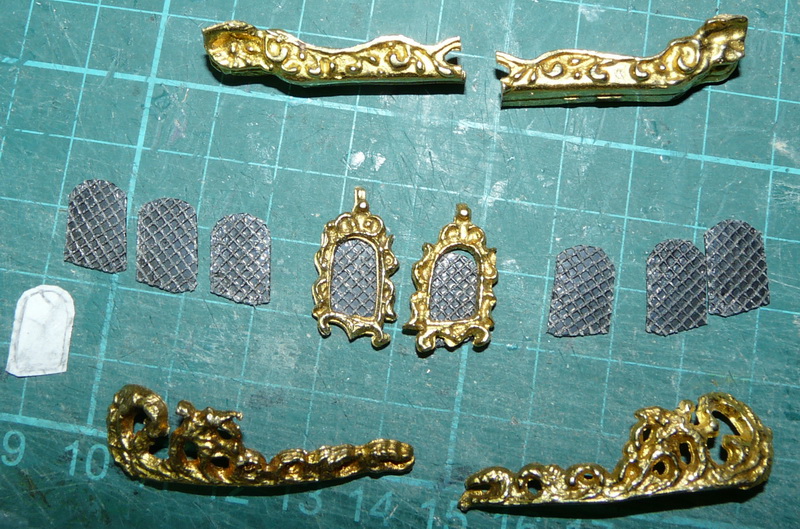
Before starting the second planking, I made some window glazing (blister transparent plastic painted black on the rear, and covered with pieces of window curtain material painted gunmetal, and glued with PVA glue. This glazing will eventually come flush with the second planking. On the next picture you see some window frames, the glazing and the lower taferel metal piece which had been cut to remove 8mm in its center. You will notice that the port half is not symmetrical to the starboard part: it droops down rather heavily. I later cut a groove in the top of this part so it could be bent more or less in the right position. As I intend to paint all the gold parts anyway, a little filler made the cut invisible. The two pieces underneath the picture had to be bent quite sharply (luckily the metal did not break) and they will ornate the hull under the rudder hole

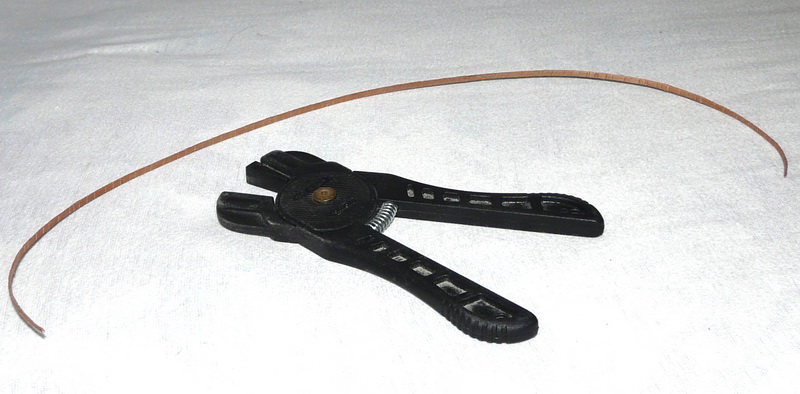
Then I wanted to add a little picture of my planking friend, the Amati nipper, with next to it, a batten for the second planking ready to go on board. Please note that no planks were wettened in the process.
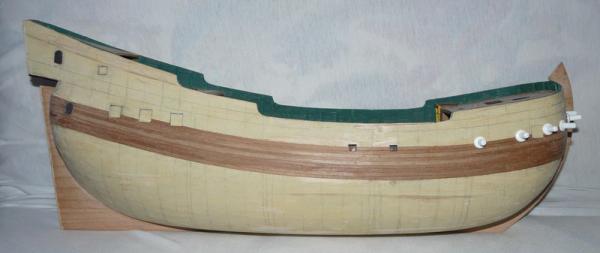
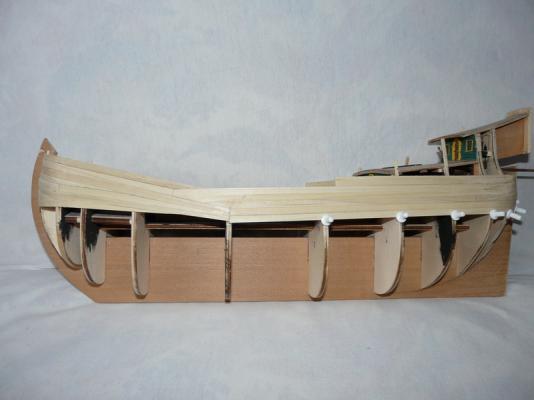
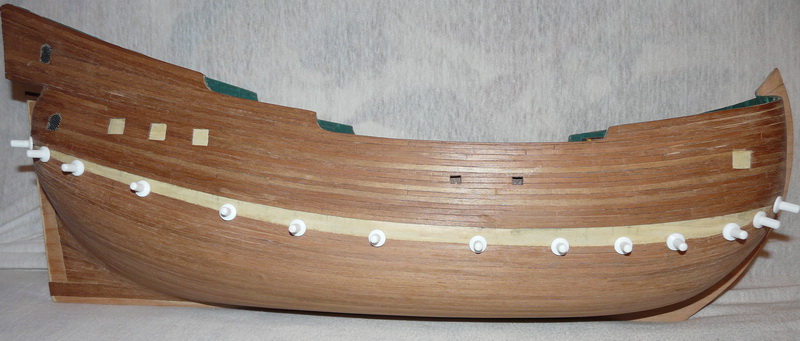
Second planking
For the second planking, I tried to follow as much as possible the original way of planking. I first glued the plank that will limit the upper planking and planked upoward.
Now the planks in the kit were 6 x .5mm of stiff wood. An ideal plank width would have been 4 x .5mm. Being cautious with the family budget, instead of buying a whole new set, I designed a simple jig to cut all planks in two (= 3 x .5mm), using the kit planks. This proved harder than I thought, as the grain of this stiff wood tended to deviate the cut. All planks needed some lateral bending too, plus beveling etc… I was rather satisfied with the end result.

-
Thanks for the positive reactions, gentlemen.
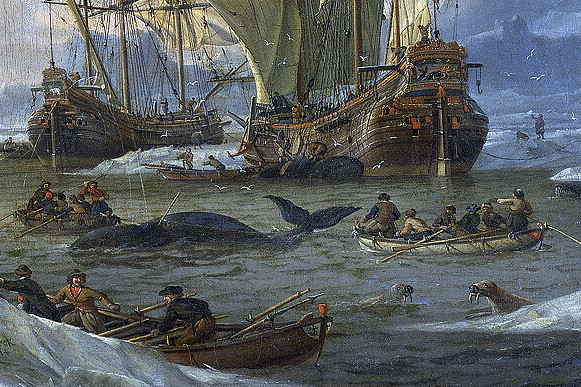
I also hate whale hunting, and truly admire those fantastic animals, but as a matter of fact, it is the bulky aspect of the ship and the challenge of reproducing her lines that attracts me.
About the rudder mechanism, this is exactly the mechanism that can be found on Batavia for instance, and I am sure, on almost every large ship of the 16th and 17th century. Usually there would be some covered up cockpit from which the ship would be steered, but on some ships (ex. frigate Berlin) the crew would steer on deck. But I found that it would have been cruel even in those days, to let the man fully exposed on deck on a ship that would sail in ice cold waters, hence the little deck overhang: nice but not sure it was a correct layout. Also, I read that flutes often did not even have a steering stick: they would just move the rudder with a system of pulleys. So my steering mechanism might be a little luxury.
The guns will remain in the box, they are just too ugly. Even carefully painted, they look ridiculous for me.
-
And with just a little bit of wood filler (and a huge amount of dust):

-
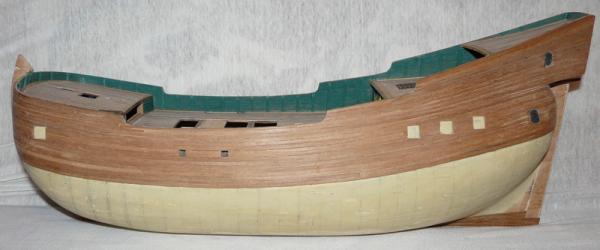
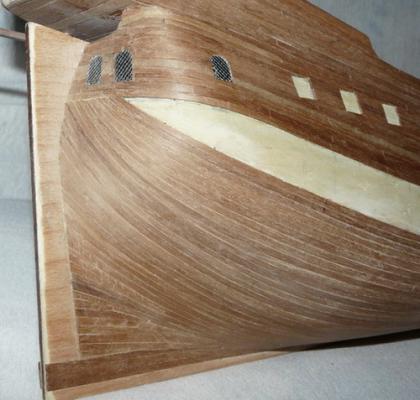
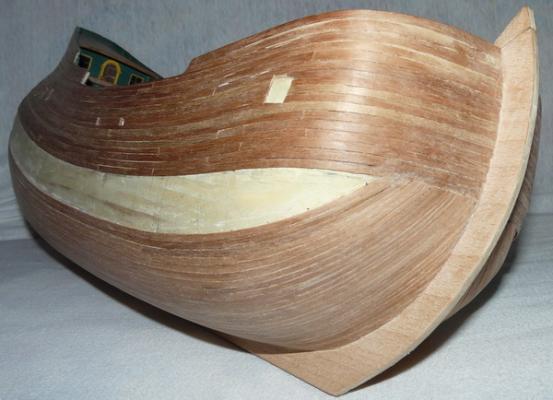
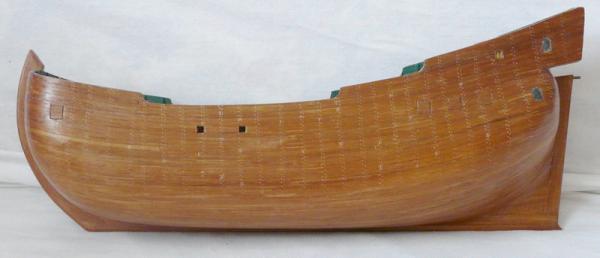
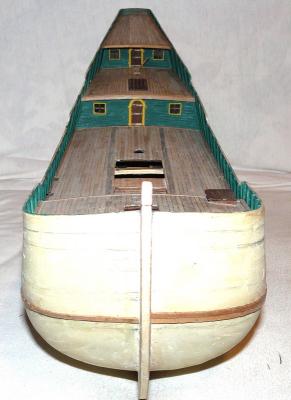
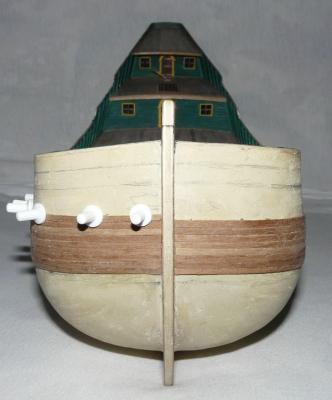
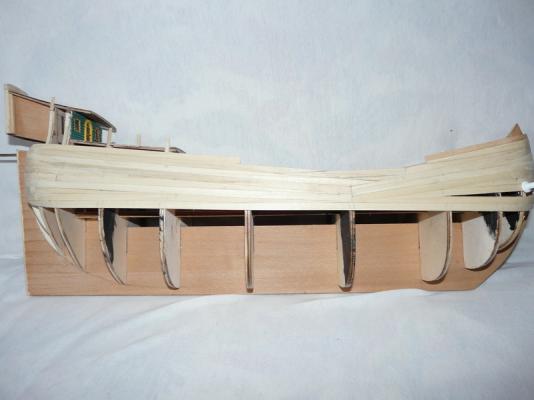
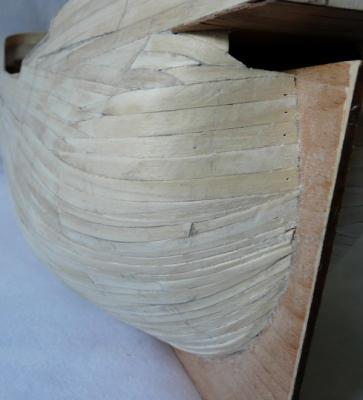
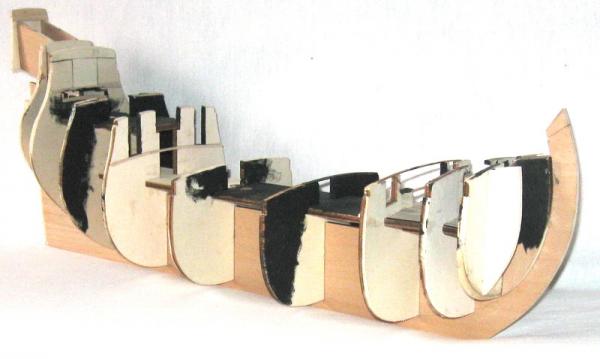
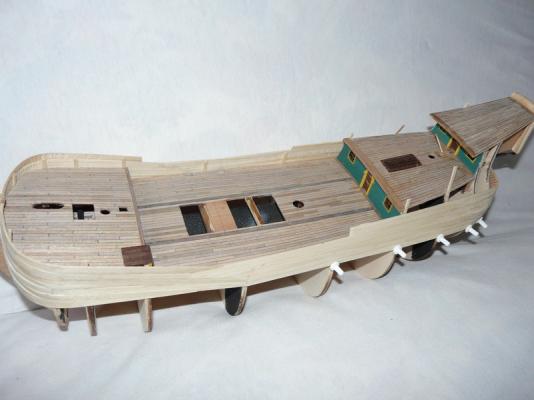
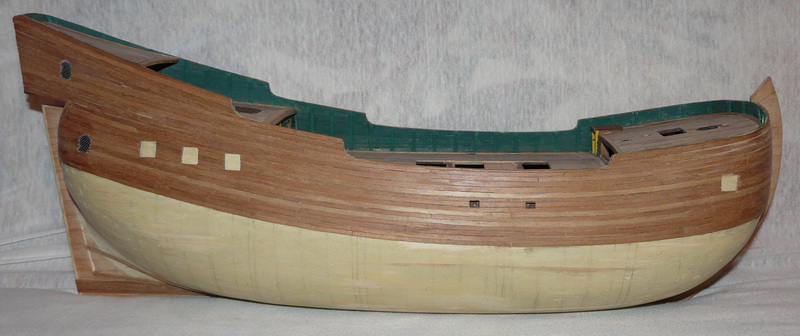
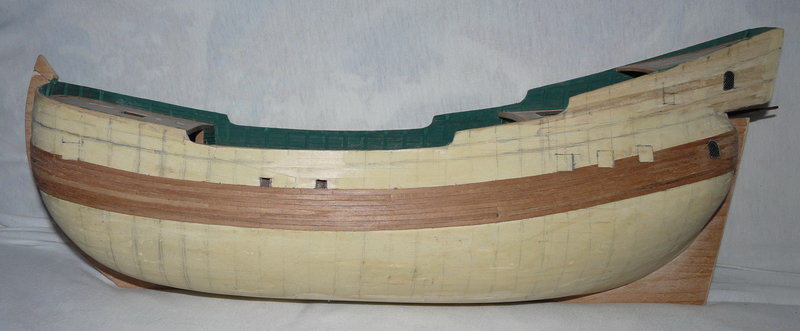
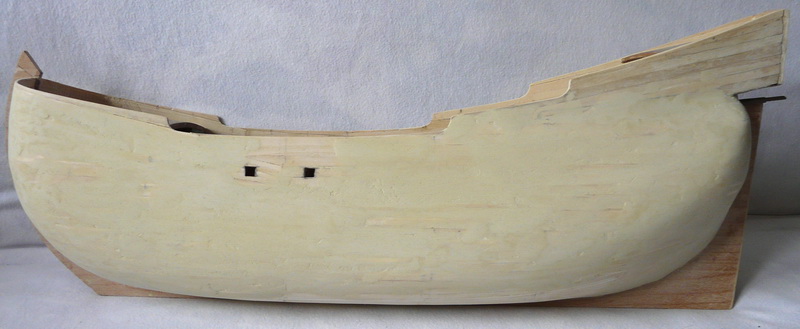
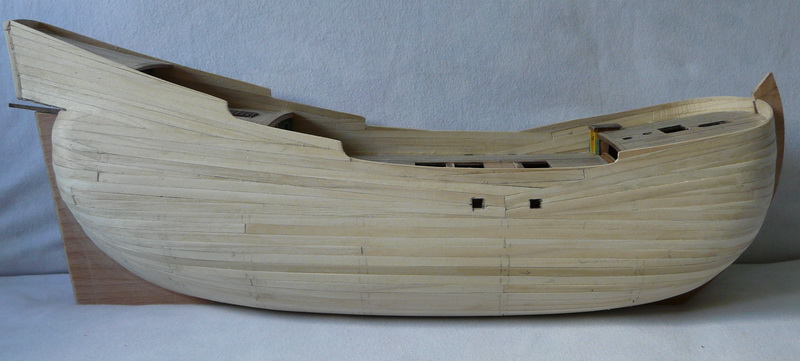
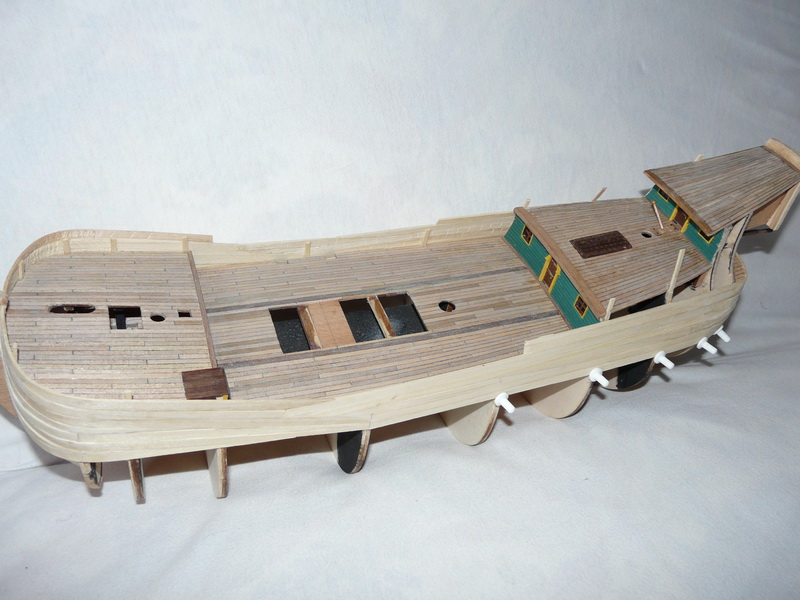
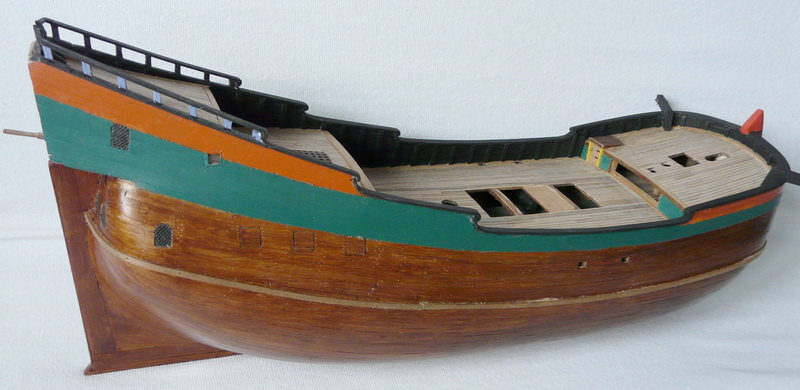
Hull planking:
This is probably the trickiest hull to plank of any kits on the market, and it is also one of the reason why I so much wanted to build her. Furthermore, I am not a fanatic of adding wood blocks between the bulkheads, so I didn’t. But maybe I should have, especially at the rear.
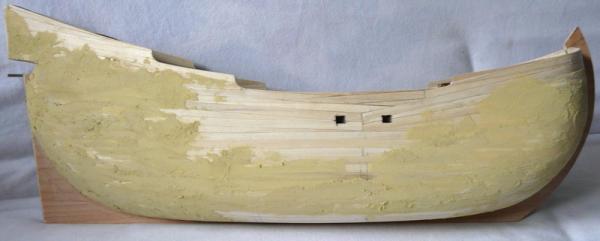
This is (luckily) a double planking. My first layer was a little too creative to be recommended, but actually the job got done.
I reckon I had to add full layer of wood filler to get the smooth under layer I wanted for the second planking. The planks for the first layer are 1 x 6mm section, almost impossible to bend laterally, but I did my best with the caring help of my Amati plank nipper (without which the whole hull planking would have been a real pain.
The instructions want you to stop both plank layers where the planks meet the hull, but that would leaver a larger triangle of un-planked keel at the rear. While there are in fact a few examples of flute hulls with the hull finishing at an angle with the keel, I wanted a more traditional planking there, and took as an example the beautiful model of Zeehaen I found on the net.. T do this, and while I was applying wood filler to the first planking, I covered up the seam between keel and hull at the stern.


-
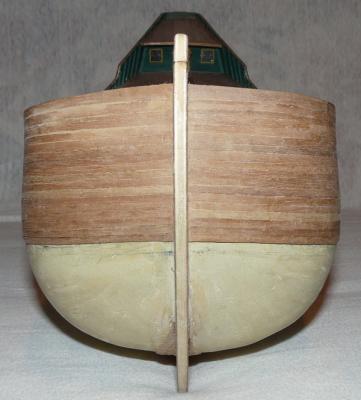
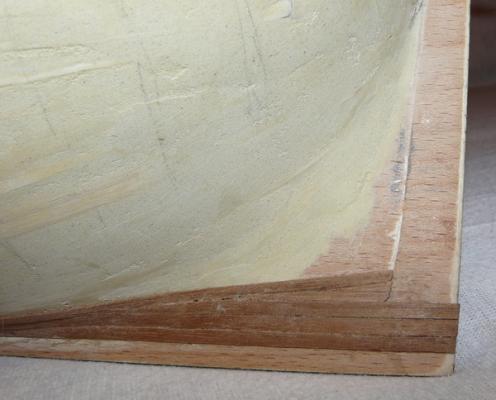
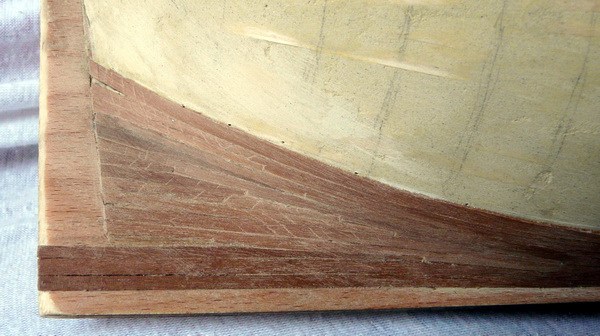
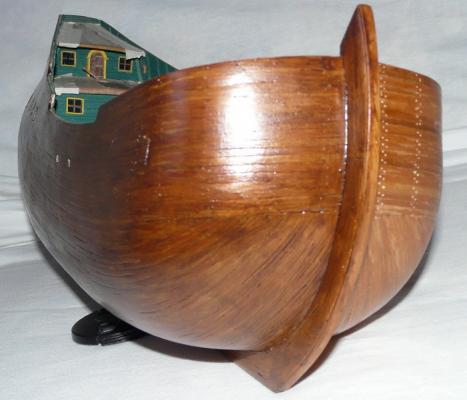
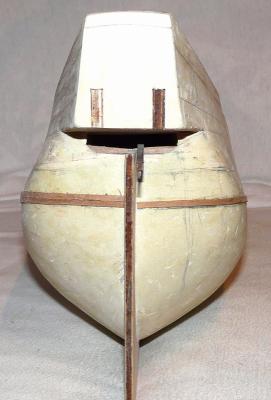
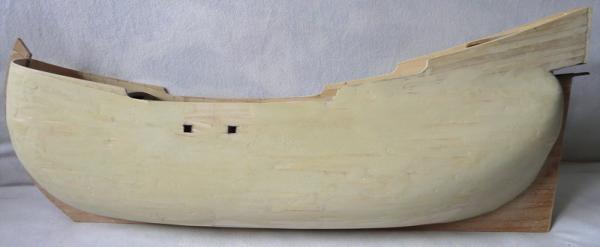
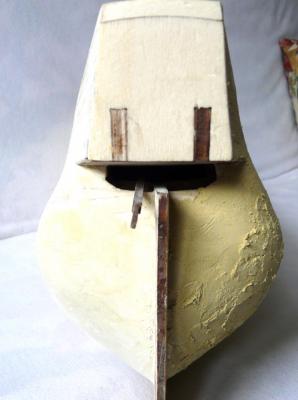
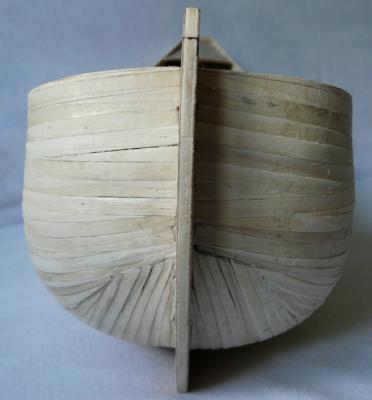
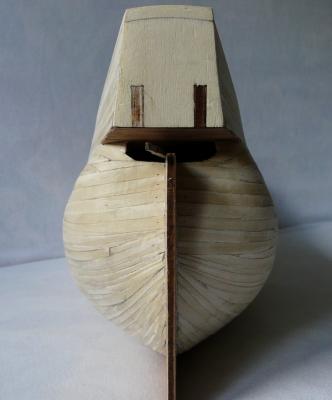
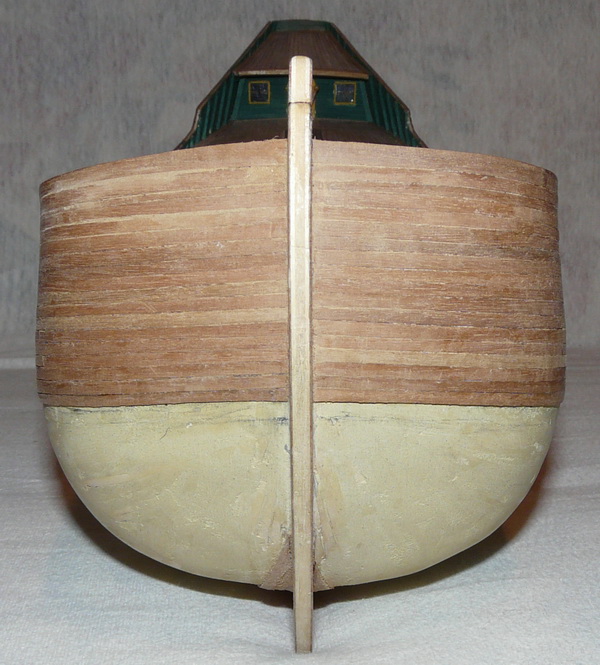
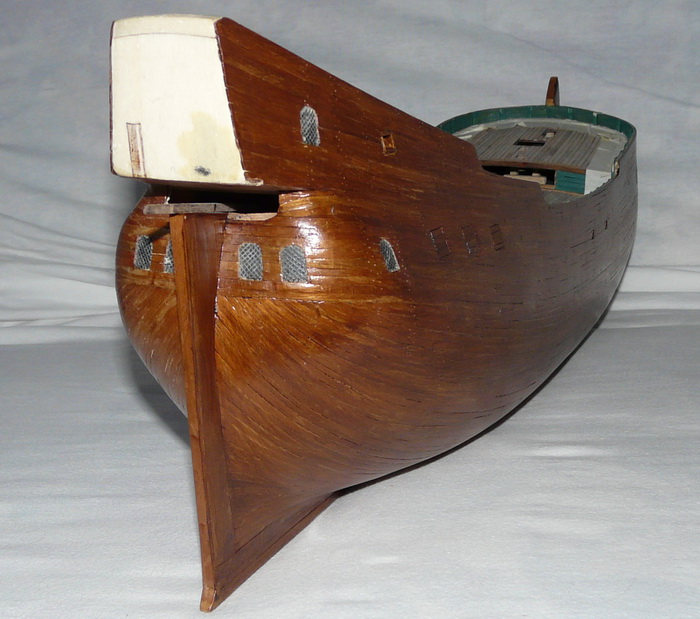
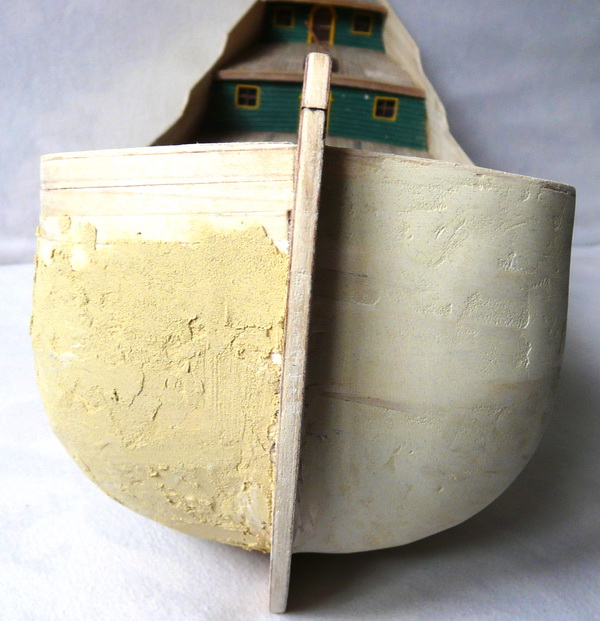
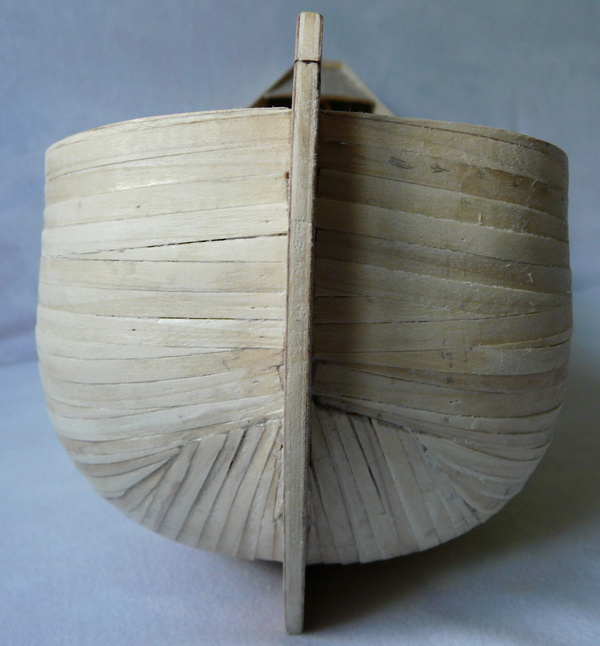
False keel:
I sawed 2mm from the (too prominent) bow, except at the angle with the keel, so that this angle becomes more pronounced, as visible on almost any ship of that period. I also filed off some of the keel thickness at bow and even more at the stern, as the keel has to be planked over. I also cut off some of the seating of the lower fore deck, that I wanted to sit lower (for the anchor cables). I also added a piece of wood to the stem piece will not rest on it, but be offset to starboard. Finally, a triangular pice was added to the stern to protect the rudder.
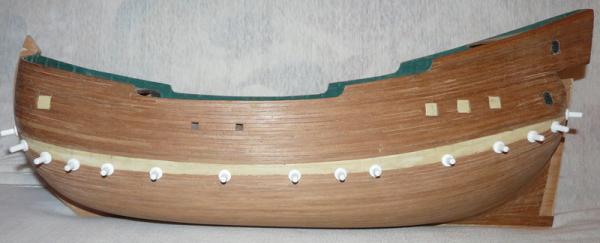
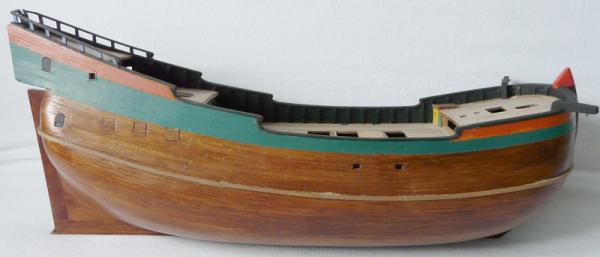
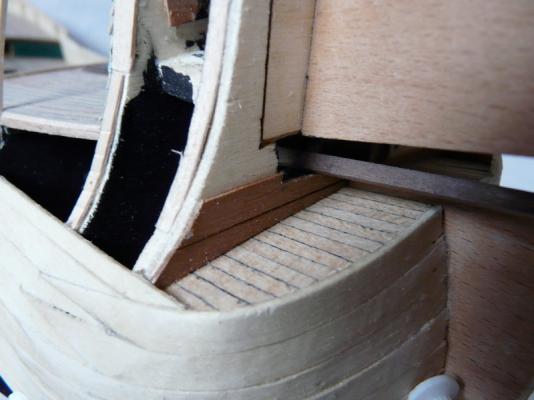
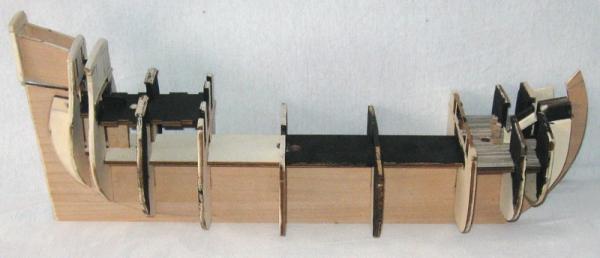
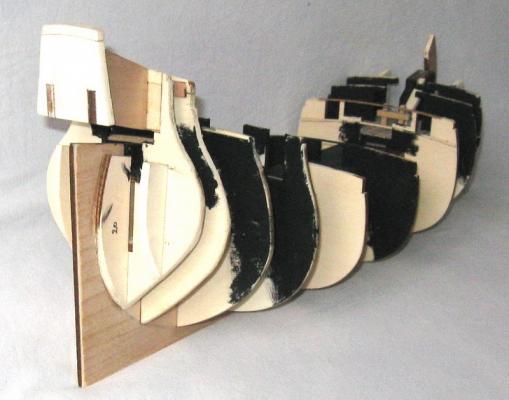
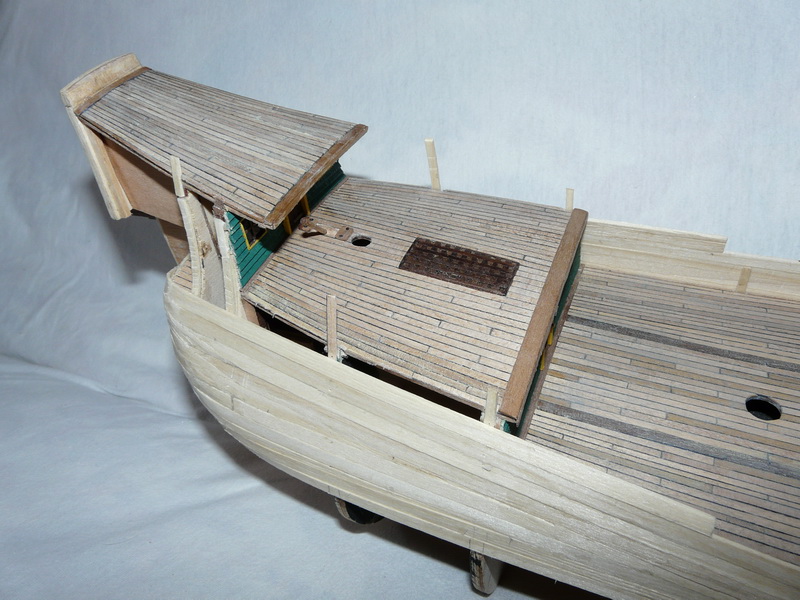
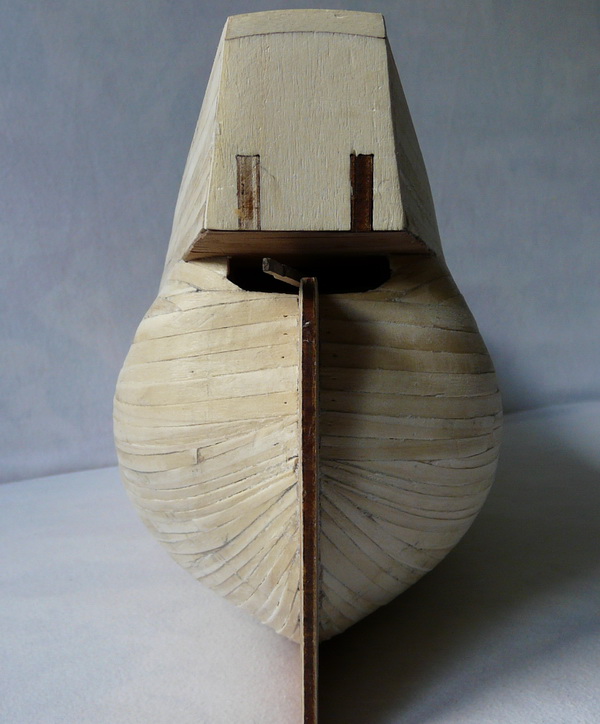
Bulkheads and taferel:
All bulkheads needed adjustments (filing or padding up). Nr3 was opened up and its upper camber reduced. Battens were glued to support the main deck and the lower fore deck.
I chose to remove the “steering?” deck as this cannot be seen on any ship model or painting (except the Rotterdam model). The quarter deck was extended to the next bulkhead and the poop deck was extended forward using the material saved from the removed portion. 4mm material was removed from both sides of the taferel and the 23 last bulkheads were reduced to accommodate this reduction of the ship width astern. The gilded ornaments on top and bottom of the taferel had their central piece removed (-8mm). Also, an 8mm wood piece was added on top op it. More about that later
A false lower deck is provided in the kit and is a nice feature to keep the bulkheads at the right angle to the keel.
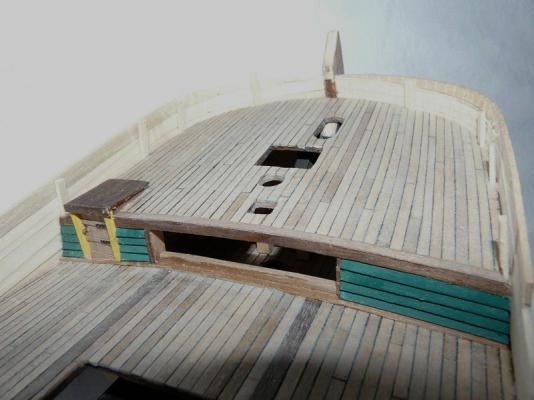
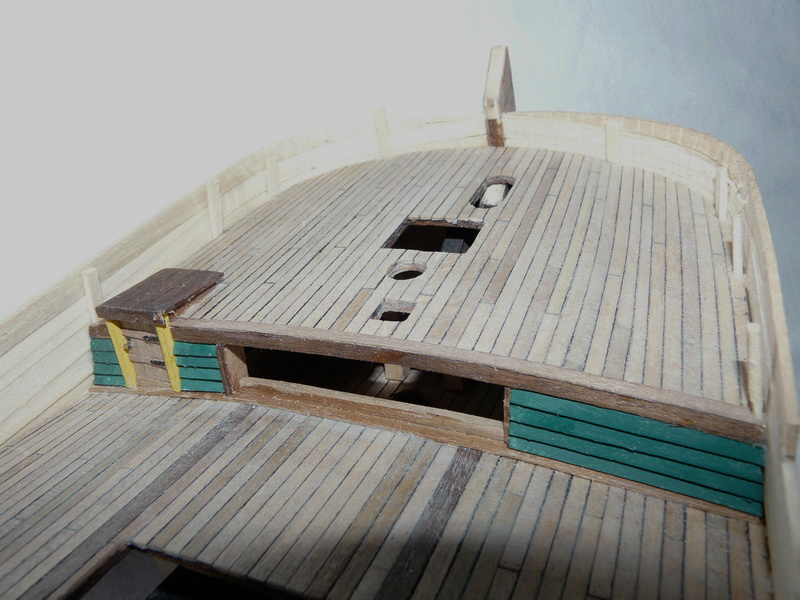
Decks
The decks, especially the main deck, need some camber BOTH side- and lengthwise. The plywood for the false deck is just the right thickness to allow this. I wetted the deck and added some nails to allow a nice drying without anything coming loose, and added some weight to the sides to avoid any wave effect.
I modified the hole for the jib, completely modified the hold aperture, and modified the aperture in the quarter deck, so that this is central on the deck

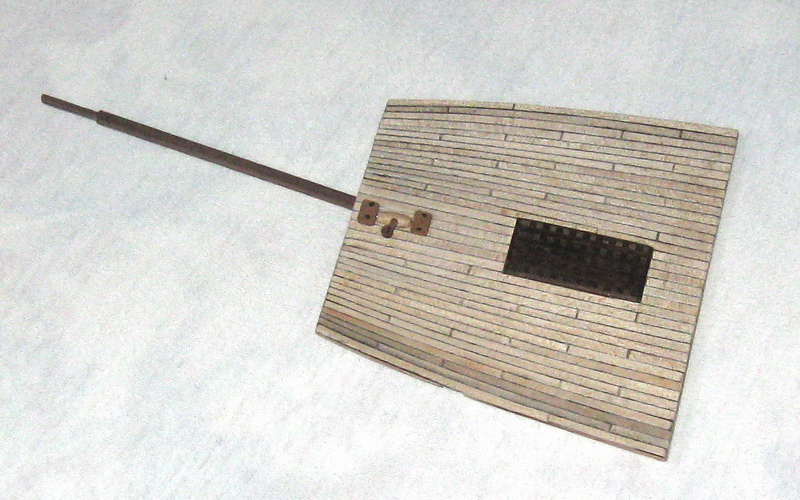
IFor some childish reasons, I decided I wanted a workable rudder, so I made the necessary assembly at this stage, while I can still reach it, and I also made some minor changes to the rear bulkheads to allow everything to move more or less freely.
I found the deck battens to be too dark and bought some replacement material which proved to be too light. I suspect such a ship had very dirty decks, and saw a few fishing trawlers (after my decks had been planked of course) with quite dark wood decks. Anyway, I wanted to have a plank pattern with planks that follow the ship lines (like on the Wasa, built by Dutch designers). When the decks were finished, I used some washes to darken the whole decks.
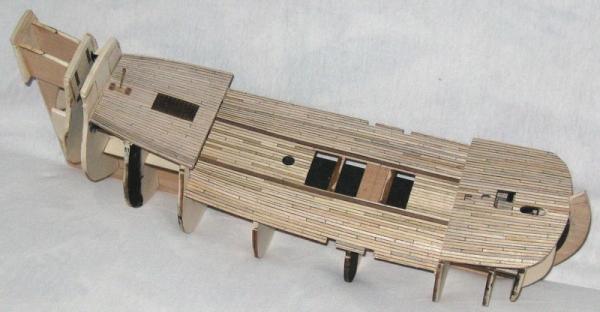
The bulkheads were completely changed, with one door i.o 2 at the rear of the main and quarter deck, where I also added two windows. All bulkheads were covered with clinker planking as on the plans of the Rotterdam museum. The fore bilkhead on the main deck is on my ship quite conjectural: using the winch to hoist up the anchors would be impossible without some opening in this bulkhead. Also the small doors on the kit plans seem to me impossible to use by anyone but a dwarf (which the Dutch are/were not, believe me). My solution was to make an entrance at port and a stair to the upper deck will later be added at starboard. Here is a pic with the first planking already started.
-
Thanks for your nice comment, Nils. I suppose I'kk use the modern spelling: anyway the name will hardly be visible.
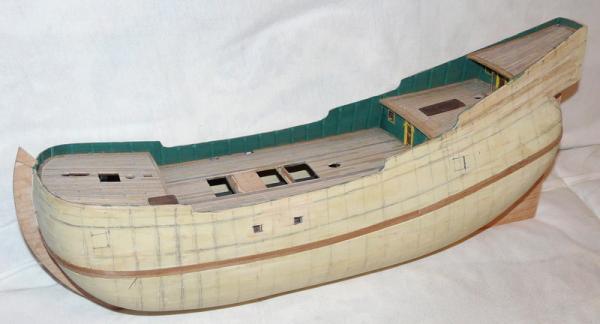
Here is a first slice of the build so far
The build
I chose to modify the kit to look as much as what I think a ship of this kind may have looked like. I used as many references as I could get without lifting my butt from my computer seat, so I literally plundered the net to find:
- pictures of built ships (or partly built). Of particular interest were the pictures of the very nice -although half built- model of member Aliluke, which I found very inspiring.

Another model was presented as a build log by Ad Brouwer, I think, on this (former) site, and also on a Dutch forum. The chosen colour scheme I found very interesting. This model turned out to be one of the best finished models built from this kit.

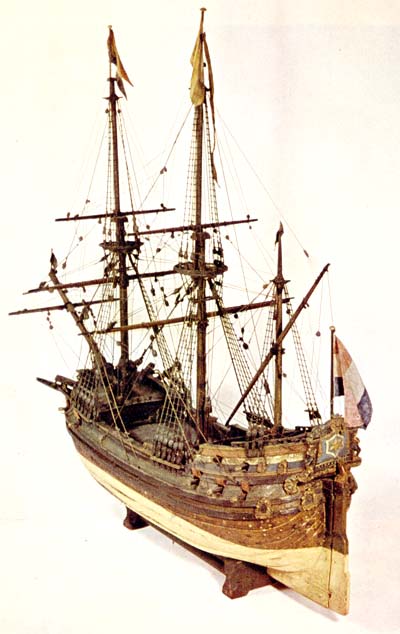
- Then there is the original model of which a series of very poorly lighted pictures are available on the Rotterdam museum site. This depicts an armed flute ship, not a whaler. I shows rather simplified features, but a (too) colourful hull, with a complete set of Dutch national colours.

Plans of this model should be available through the museum, and a splendid wood model was built from these plans by a French gentleman, Mr Maillère. The same plans were presumably used with some modifications by Sergal to design their kit
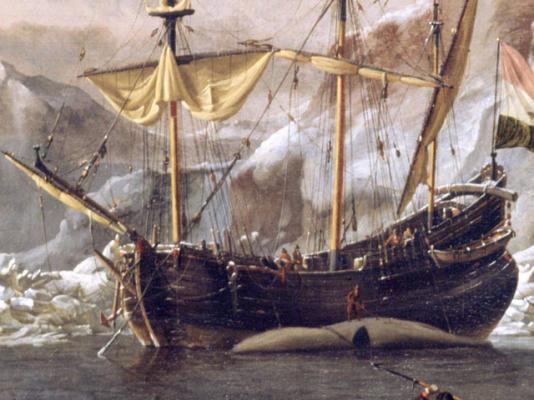
- the two paintings by Abraham Storck showing Dutch whalers at work around the Arctic circle.
-
The ship
Flutes, or « fluitschepen » in Dutch, were a success story of the Dutch (and North European) merchant navies in the 17th and 18th centuries. Not only were they used as pure merchantmen, but also as warships and as warship escorts, and yes, as whalers at the end of the 17th and the beginning of the 18th century.
Their characteristic round belly allowed maximum freights for a limited draught, and their narrow deck were designed to limit taxes (which were then calculated on the deck surface). They were also built as cheap as possible, and were therefore mostly single skinned. Their fairly simplified rigging (two sails per mast) could be handled by a reduced crew, which would limit the running costs of course
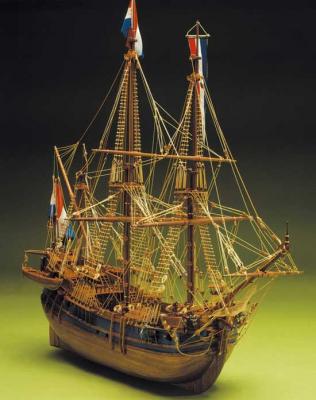
This is a very important ship type, and it is strange that there are only two kits available of a flute. The first one is by Euromodel of Como and represents the German ship Derflinger. The other one, Baleinera Olandese (Dutch Whaler), is by Sergal and is freely based on a ship model in the Rotterdam maritime museum.
Here are 2 paintings from Abraham Storch which are as is usual with Dutch painters of the time, packed with interesting and authentic details, and to which I will try and modify the kit.
The Sergal kit
This dates back at least to the early seventies.
The promising box art initially showed a very promising model with a more than adequate display board which was not included in the kit,
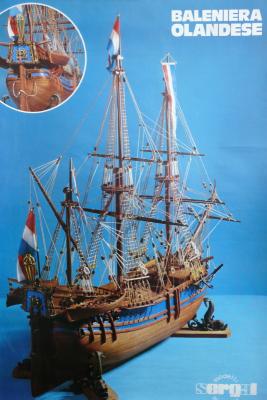
hence their decision to create another, more honest box art
Anyone interested in the contents of the kitcan go to the site of modeller Mr Martijn Onderwater, who made a very interesting pictorial build log at https://plus.google.com/photos/104230149111754248634/albums/5215002936048254657?banner=pwa.
The kit allows a pretty good model to be built: everything is there except the display stand (and the sails). The wood is of a good quality and there is more than enough of it. All pieces except the battens and the masts of course are pre-cut in plywood. Of course, plywood has the big advantage not to break easily, but is ugly to use for items that are to be left natural wood. The deck furniture is an example of this. I choose either to paint them or to replace these items
The metal parts are of poor quality and they have to be modified or bent in many cases to fit the hull.
-
I had started some build log in the former edition of this forum, and for a number of reasons I did not rewrite it in the new version. Some of the reasons (excuses):
- A lot of work involved
- Not familiar with the new procedures to insert pics
- Long term inactivity on the project
- Moderate interest from other members…
I have now restarted the build and will re-post some of the previously sent pictures, if I manage to tackle the pictures insertion. Anyway this is the model as it looks now.

Any critical or better, constructive meaning is more than welcome, bearing in mind that not a lot can be changed to what is already done.
Question. I want to give the ship a name. For a number of reasons I will explain later, this will be “The Pole Star” or rather in Dutch “De Poolster”. Problem is that Dutch spelling of the 17th century is not something I am familiar with, so the name could also have been written Poolsterre or stern or sterne. Any idea from the Dutch colleagues?
-
I think that there was another use for these chains, as on ships like the Victory and others, these chains were obviously meant to replace the rudder mechanism should this be broken.. Then the chains could be manoeuvred from the deck.
Also to be noted is that in the 18th century (at least) the rudder was prevented to be dislodged by a simple system of a wooden block.
Also, the Dutch Whaler (17th century) I am building does not show any chains at all. But at least two models of Dutch ships of around that time show corresponding holes in the stern post and the rudder. On one of them (dated 1730) there is a chain passing through these holes, to the same effect as the preventer chains. On the other model only the holes can be seen. Well detailed paintings of similar ships clearly omit the chains. I therefore think that they w<ere not as universal as one may think.
-
I suppose you don't want the false keel to be apparent on the finished model, and would like to cover it up with veneer. I would make a rabbet groove so that the first planking would be flush wiuth the false keel. I would also sand down the rear part of the false keel so that it would be thinner at the edge, and thinner in its lower part that at its top? I would finally, as said cover with the second planking. This is what I did with my Dutch Whaler from the Sergal kit, and it looks good (to me, at least
JP
-
This looks morfe like a (very friendly) chat room rather than a build log.
So am I right to think that Sjors is facing some major difficulty with his chain plates? He thinks that the nice thing to do is unglue them from the hull and placing them higher up? But he fears that this would leave a rather obvious scar on the hull.
So am I right to think that the real problem is that the shrouds would not run freely from the plates to the mast top? If that is the case, wouldn't it be feasable to just glue a strip on the chain plate, just to make it larger and keep the shrouds away from the hull?
Maybe I am completely wrong, but this idea came up as I am just facing the opposite problem on my model (Dutch Whaler), wher the chain plates are too wide to my taste, and too high on the hull. Luckily nothing is glued yet in my case.
I hope I helped to bring this build log a little on target
JP
-
I love your build. Maybe it's your first ship, but I assume not your first build.
2 remarks :
The grating under your ship may be a little oversize for your deck.
Seriously now, I have noticed that for chains (for your rudder) definitely you have to count the links to have exactly the same number on each side. Otherwise you have one side opf the chain hanging lower than the other side. I just mention it because it is quite easy to correct if wished so.
About the gratings, yours show how this very prominent feature should look like on a model, and I am sure Caldercraft delivers battens of the right thickness. This is unfortunately not the case with other makers like Artesania, Occre and I think Corel, who offer too small items, which when assembled show very large openings that would make it impossible for the crew to walk on.
Happy building
-
Hi Mick, like Grant, I built George Stephenson's Rocket. If you are interested, the link to my built log is in my signature.
Have fun,
John
Excellent build of what looks like a very interesting -and colourful- subject. And a very well presented build log. Maybe some day I'll buy one as well. In the meantime, I'll download it (with your permission of course)
-
In a set of 4 excellent pliers I bought from Micromark, there is a "flat nose plier" which I use for this kind of job (example: photo etchings). Works pretty well for me.
-
Tss tss.. you forgot the tea cups and the cookies.
Superb!
- slagoon and CaptainSteve
-
 2
2
-
This is a text that was published by Gerald Spalgo on the former forum. He is one of the very best "weatherers" I know, next to an excellent model builder.
Weathering With Pastels:
I still haven’t got this all figured out yet, but I thought I’d share what I have learned so far so anyone interested can have a place to start from.
I’m going to repeat something that I’ve said before, to start this out. Ship Modeling is just an ongoing learning process that one has to be persistent with. You can't learn any other way, than to just do it. You are your on best teacher, and critic. No amount of reading will give you the same type of know-how that first hand experience will give you. I guess what I'm trying to say is, if you have an idea or if there is a technique that you see some one else using that you would really like to try, then try it. I know ship model kits are expensive and no one wants to miss them up, but it's just wood, its forgiving to mistakes and it can be replaced if need be. After all you had no idea, just like me, how to even build a ship model until we tried it. So know that we know or are at least learning, it's time to up the skills needed to build even better models, and failures & successes will come, but hey , that's the fun in it. If your not having fun at it anymore, then it has become a job instead of a hobby. Making mistakes is not something that I'm afraid of, cause I know for a fact that I'm going to make them, but when I put a picture on this forum or in the gallery I want it to look the best that I'm capable of doing. Once you learn this, the better you will allow yourself to be.
The pastels that I’m using right now are Earth Tone-Soft Pastels. There are many shades of colors that can be used. I do not have all of them yet, but I will later on. There are also weathering powders that could be used, but I haven’t tried them so I don’t know how well they will work yet. These powders can be bought through Micro-Mark, and are called Doc O’Brien’s Weathering Powders. I also use three old paintbrushes to apply it with. Two of the brushes are a size 3, 1 soft & 1 stiff; the other is a small 3/0 size brush. Plus a soft-bristled toothbrush and a 1/8” round deer-foot paintbrush (for spots to small for the toothbrush. As far as the clear coat that I use, it is “Krylon’s” Clear Matte Finish. It works very well for this.
First off, try to imagine what something would truly look like if you were standing right there next to it. Now keep in mind how old these ships are. Some of you will have an advantage in this, as you have actually been aboard a ship or two. The rest of us will have to rely on photos and imagination. My deck on the Charles Morgan was first stained with Drift-Wood Stain and allowed to dry, 2 light coats, and then lightly steel-wooled. I used a medium shade of brown to cover the whole deck, then brushed it out with the toothbrush until it was even through out. I then used a shade that is almost orange and applied it down the middle length of each plank; then again I used the toothbrush and lightly blended the two together. Careful, blend only enough to get a smooth contrasting flow from one color to the next, too much and it will disappear into one color. Then I used a dark shade of brown and applied it to all the edges (of everything), and blended this the same way. I then sprayed two light coats of the matte finish on the surface to keep it from smudging. Now as I add more structures and pieces to the deck I continue to add the dark brown pastel to the edges of them. When finished I will need to give everything another coat of spray. That is how I did the deck.
Metal parts I paint flat black first, then I use the dark red shades to simulate rust, blow the excess off then use black pastel to soften the rusty look. The black pastel will leave a flatter, darker black than the paint is.
The top of the workbench, and the sideboards of the tryworks were painted primer gray, then black pastel applied over the primer.
Points to remember are for one never allow the unprotected pastel to get wet, it’ll turn into a wash and soak into the wood, so be very careful especially when blowing off the excess pastel dust (you know what I mean). Secondly, I’m only weathering used and working parts right now; I think too much will end up ruining the ship instead of making it look better. So, what ever is painted is the way those will stay. This is what I know so far. One thing I am going to try, is to get that greenish-blue effect on the top few rows of copper plates, but that will come later. The tryworks was weathered differently, so I won’t put that in this post, as it is long enough as is, and I used something other than pastels to do this.
Practice, and if you achieve something that I haven’t yet then post it along with the rest of this, so we can put together our own weathering techniques._________________
Gerald Spargo -
Isn't there an upgrade kit available from Amati? Chris Watton announced that some time ago!


Santa Maria by Moonbug - FINISHED - Artesania Latina - Bashed
in - Kit subjects built Up to and including 1500 AD
Posted
whoop I've sent without my permission
I said I would personally build my model with a foremast seated as forward as possible but quite vertical.
Happy modelling to you.
JP