HOLIDAY DONATION DRIVE - SUPPORT MSW - DO YOUR PART TO KEEP THIS GREAT FORUM GOING! (Only 36 donations so far out of 49,000 members - C'mon guys!)
×


Glenn-UK
-
Posts
3,156 -
Joined
-
Last visited
Content Type
Profiles
Forums
Gallery
Events
Everything posted by Glenn-UK
-
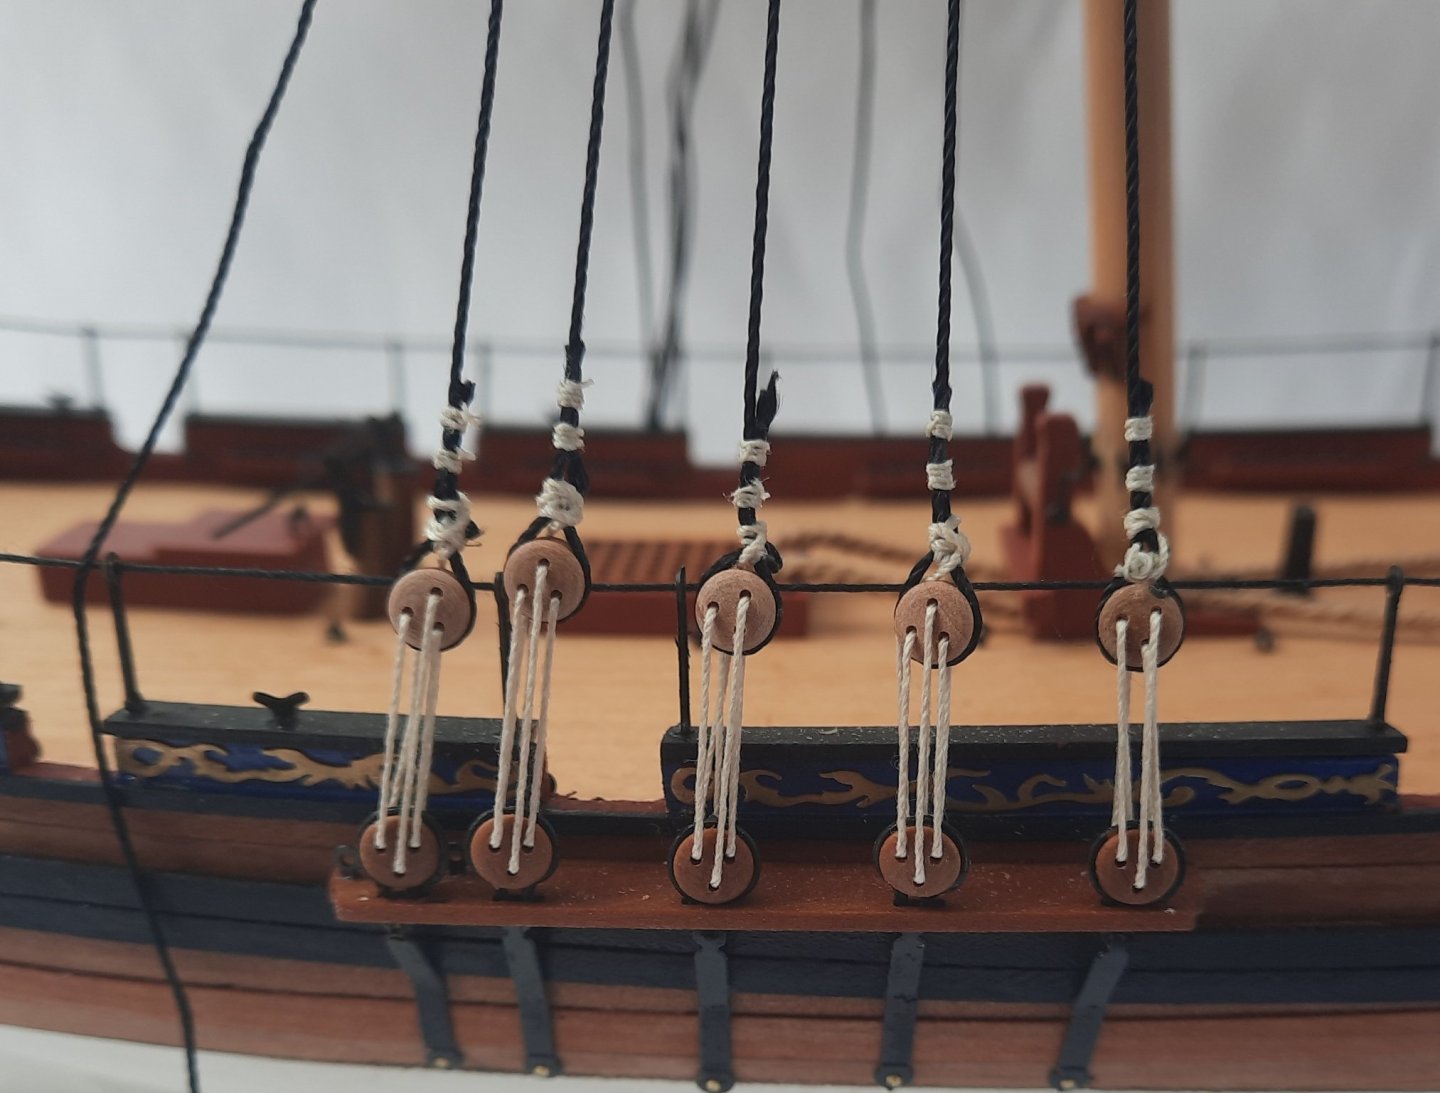
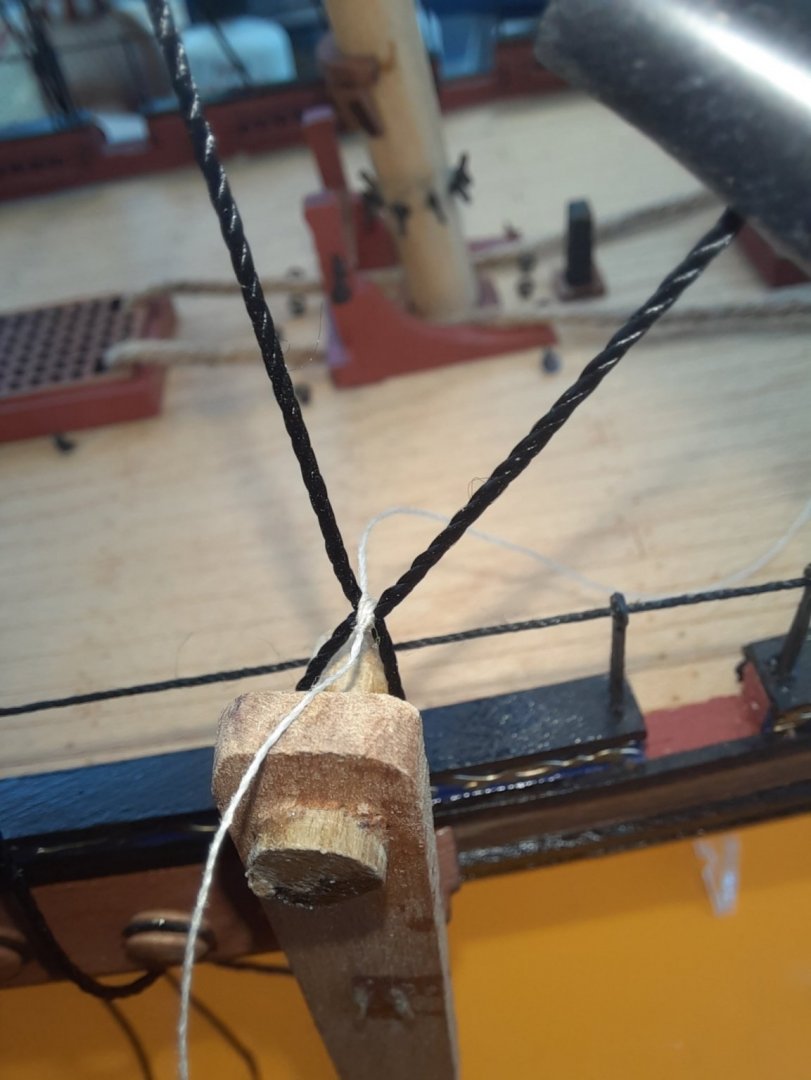
 After much pondering I decided to leave the badly rigged starboard side shroud deadeyes. I have now added the lanyards to the starboard side backstay deadeyes. The final task was to add the shroud cleats to the first four leading shroud lines which was a little bit fiddly. Thankfully it did not take too long to complete the task. I found it best to tie the upper part of the cleat to the shroud first before tying the low part of the cleat to the shroud. I am now currently working on the port side shrouds and expect to complete in the next day or two. My time has been limited recently due to my mother being taken in to hospital. Once the port side shrouds has been completed I can move to to adding the ratlines. I discovered, when working on the Duchess of Kingston, I quite like the routine of adding the ratlines.
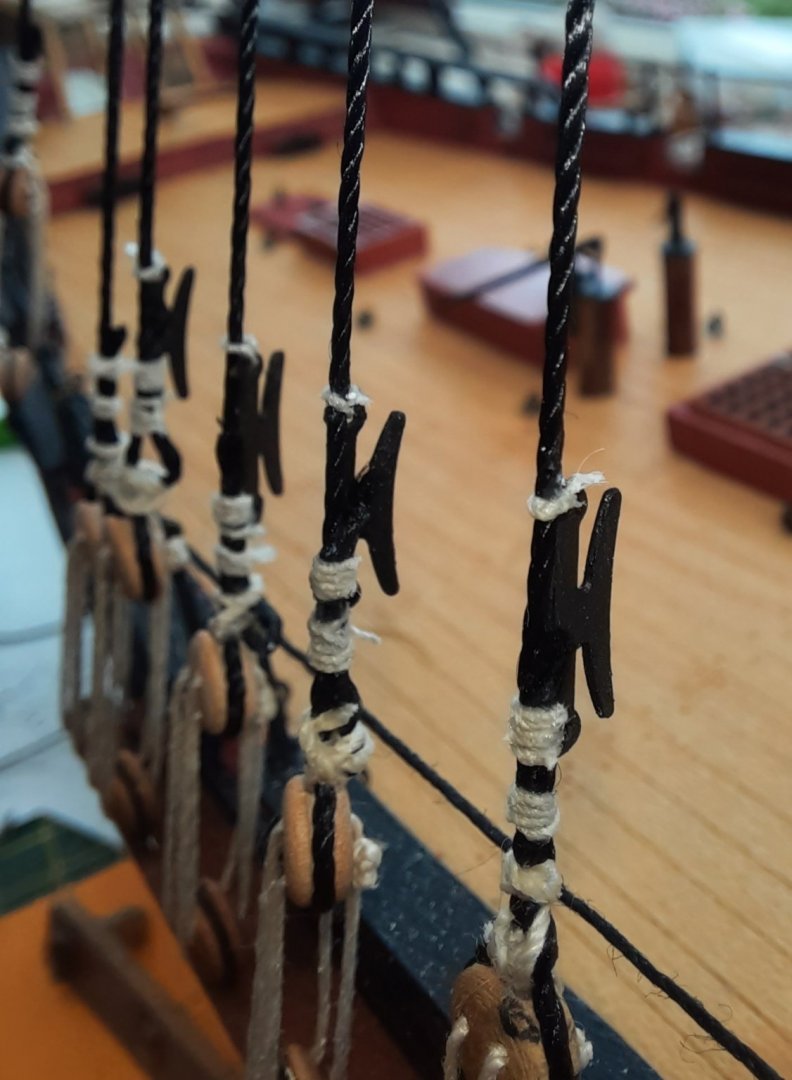
- 160 replies
-
- 5
-

-
- Alert
- vanguard models
- (and 1 more)
-
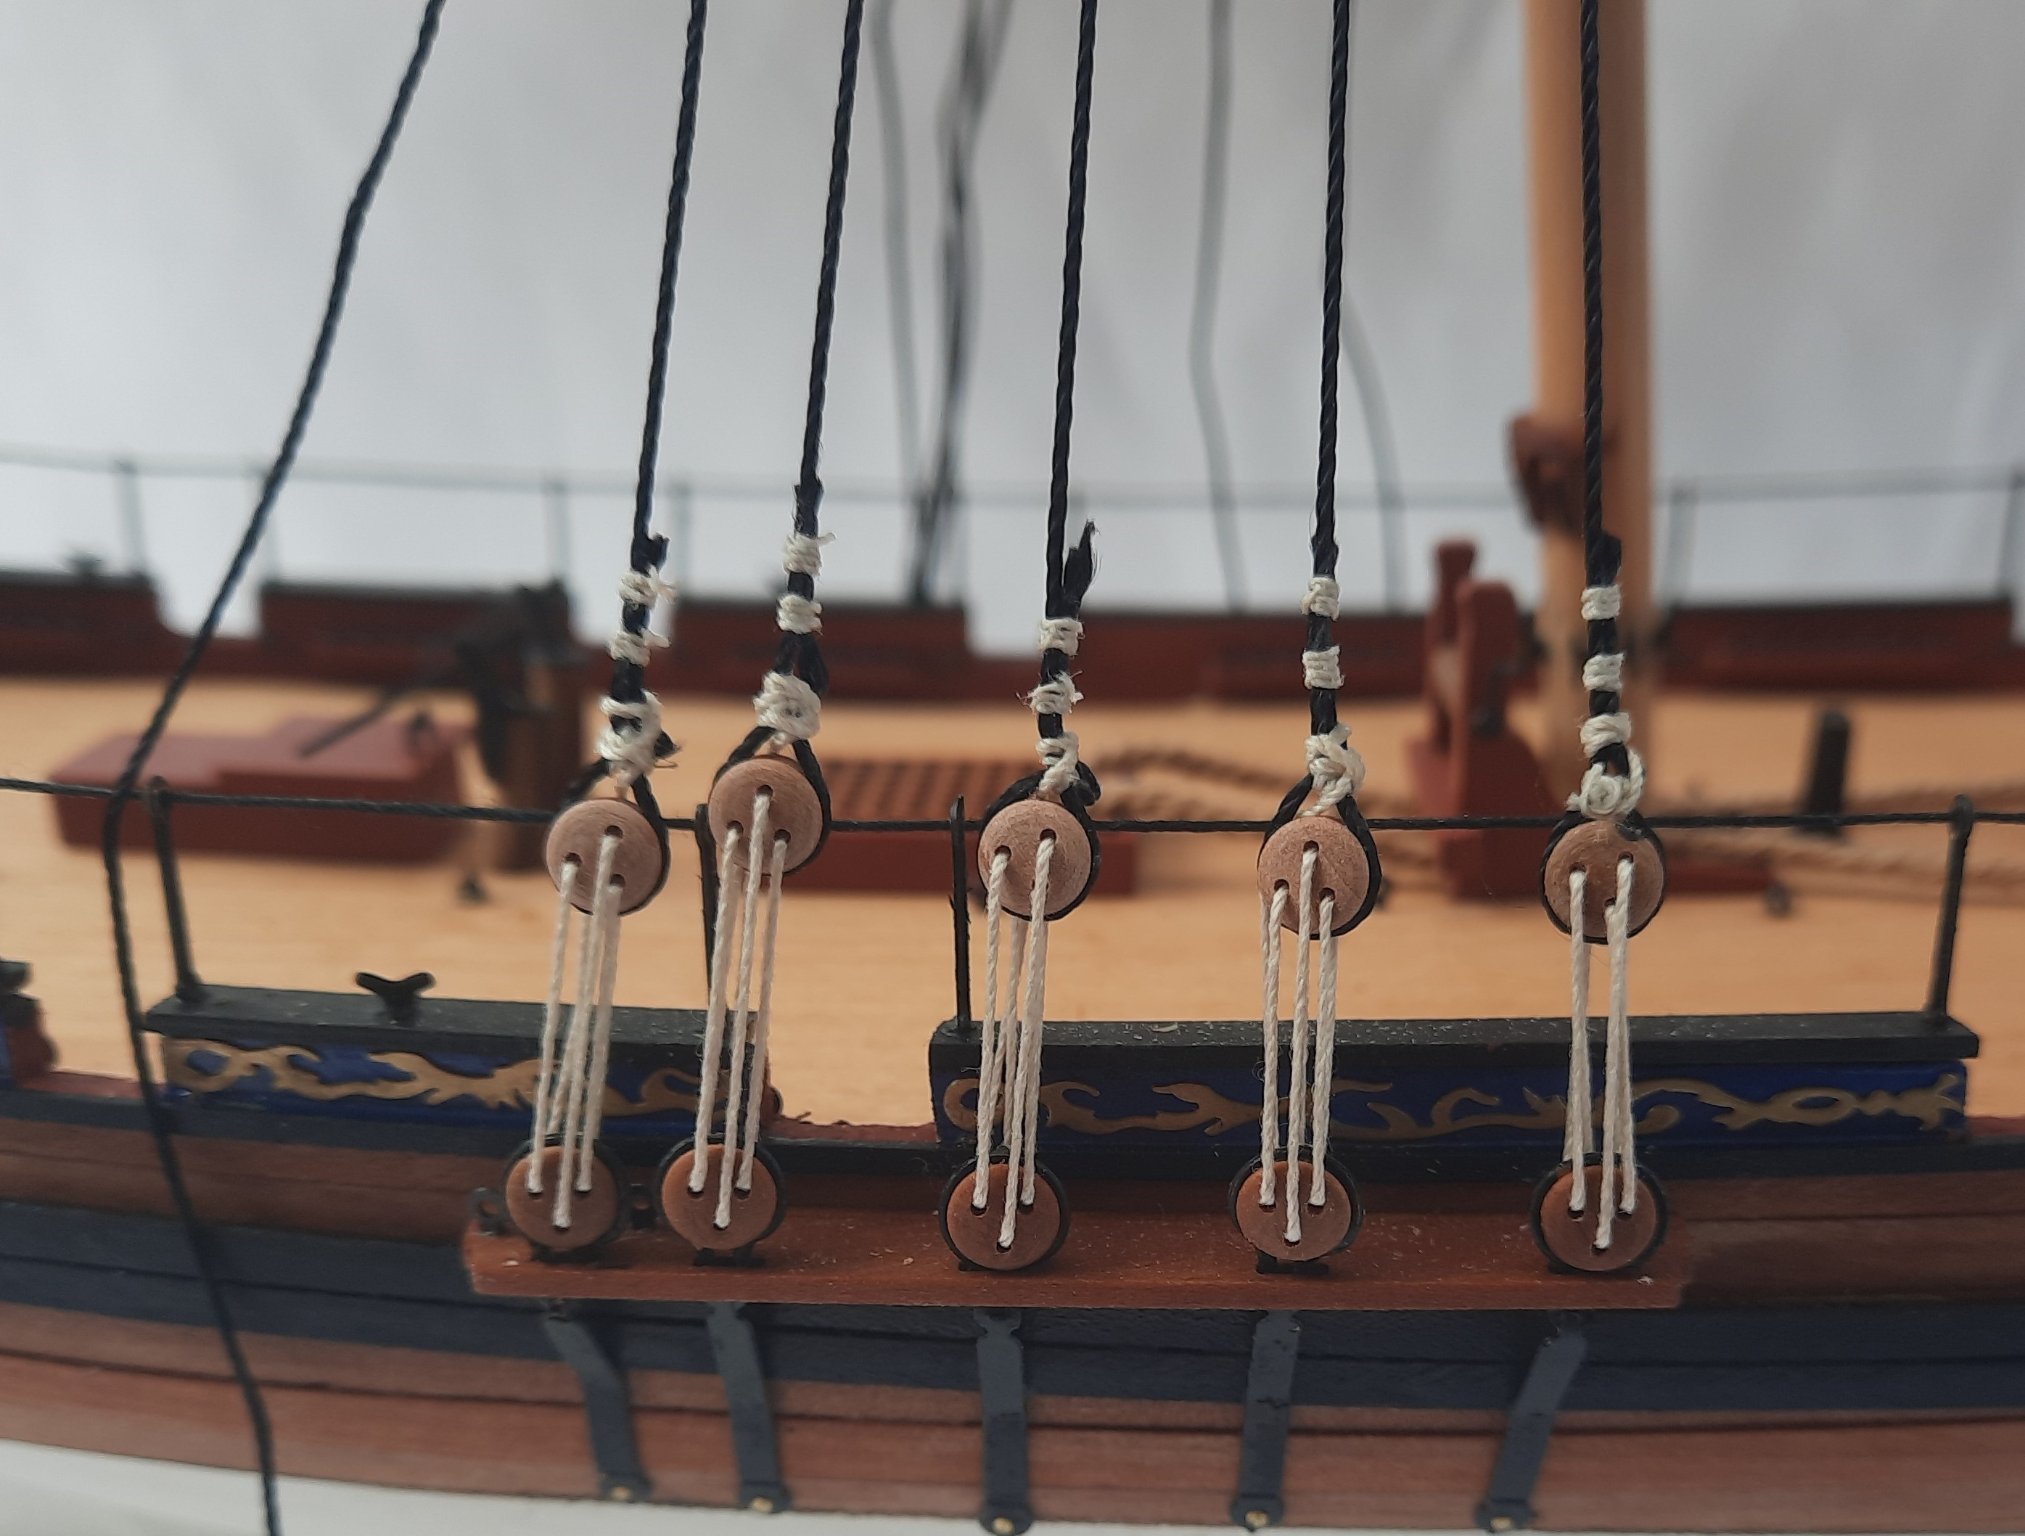
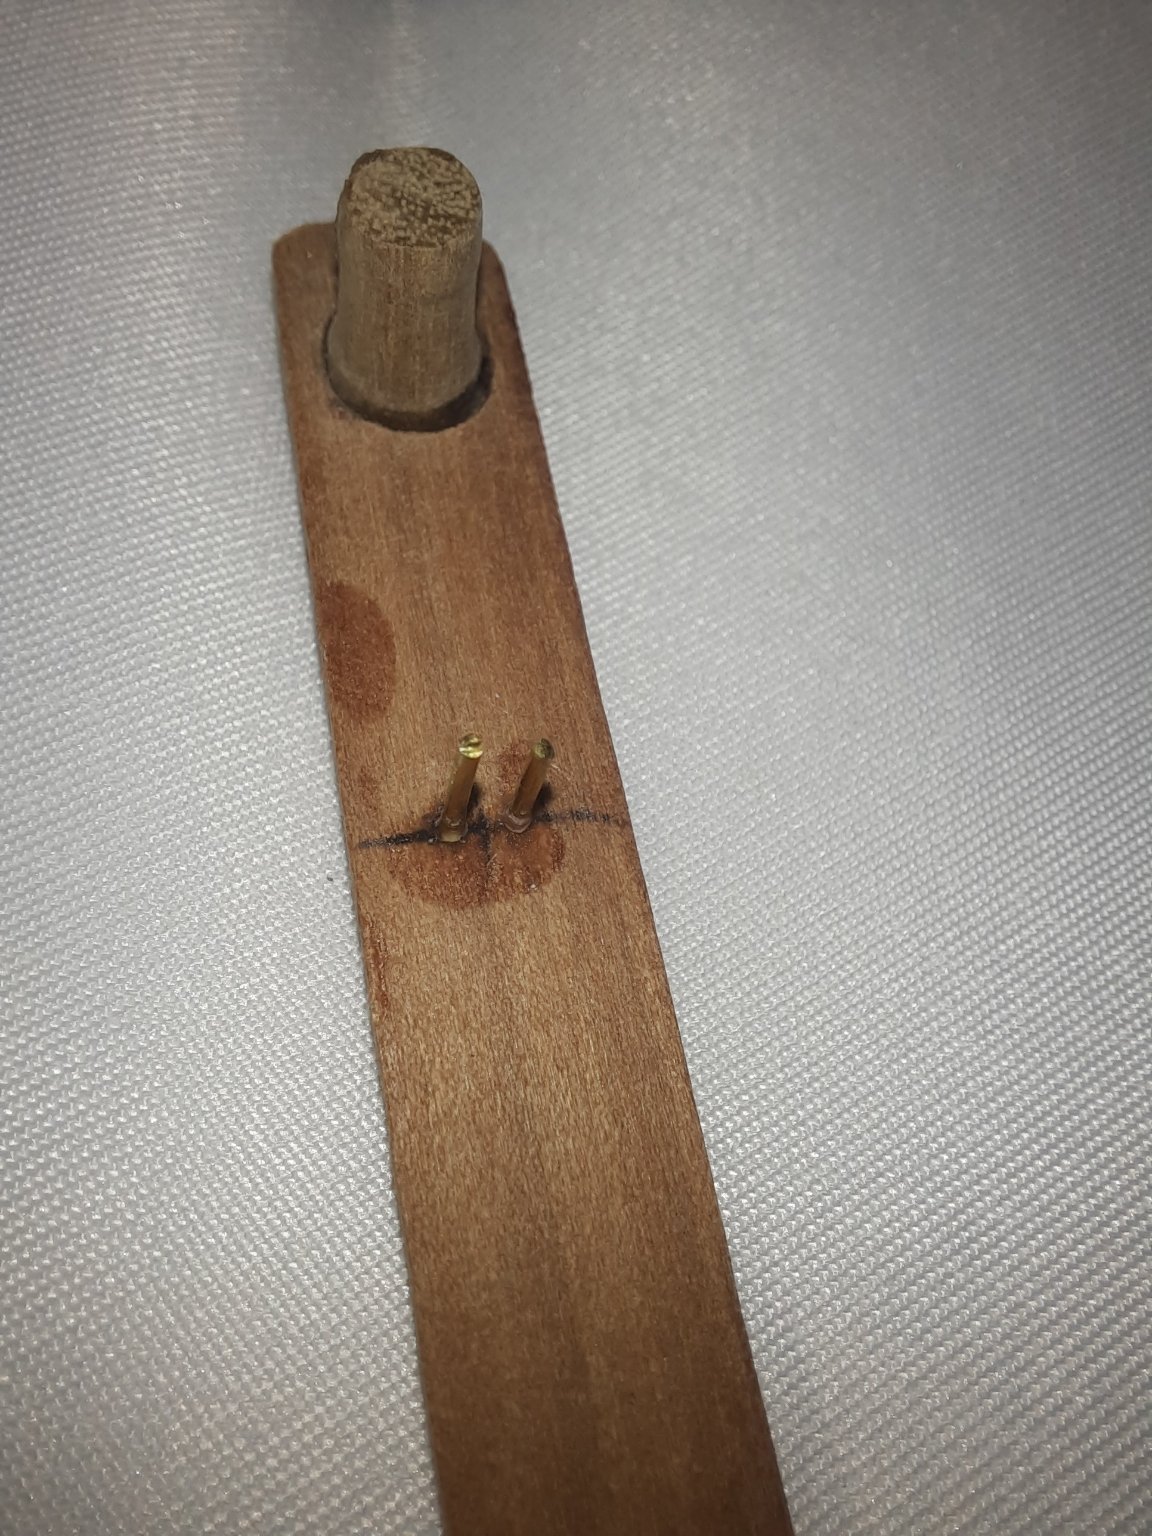
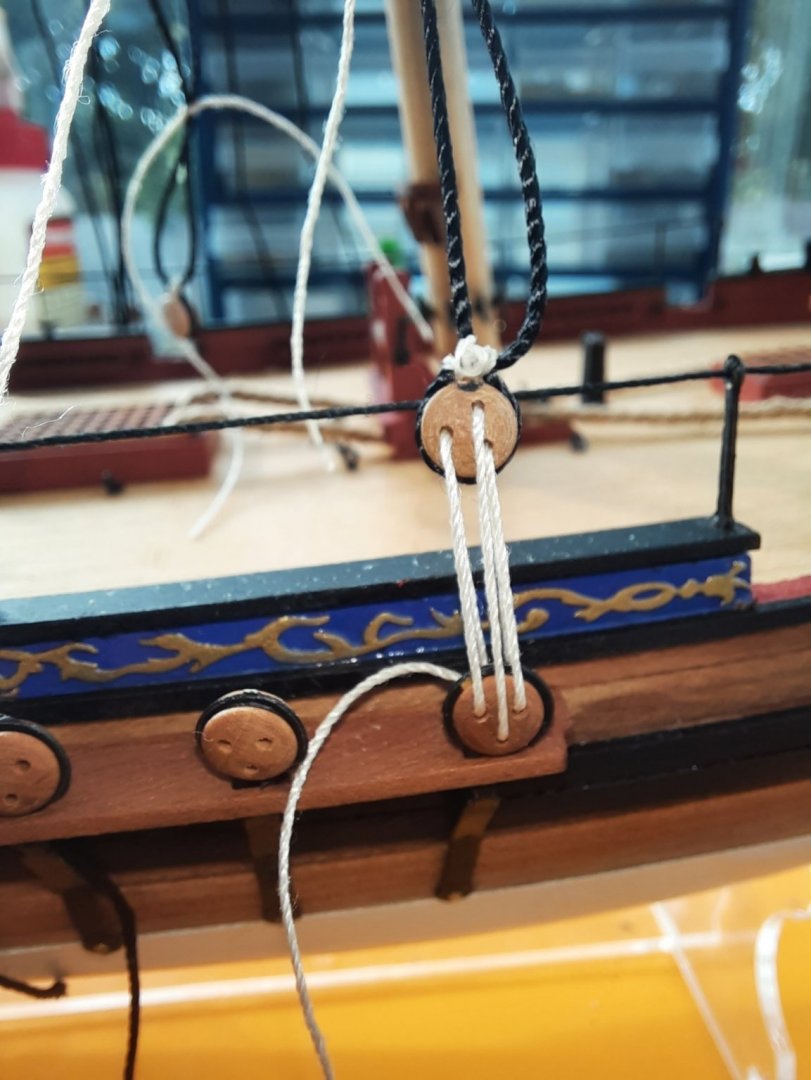
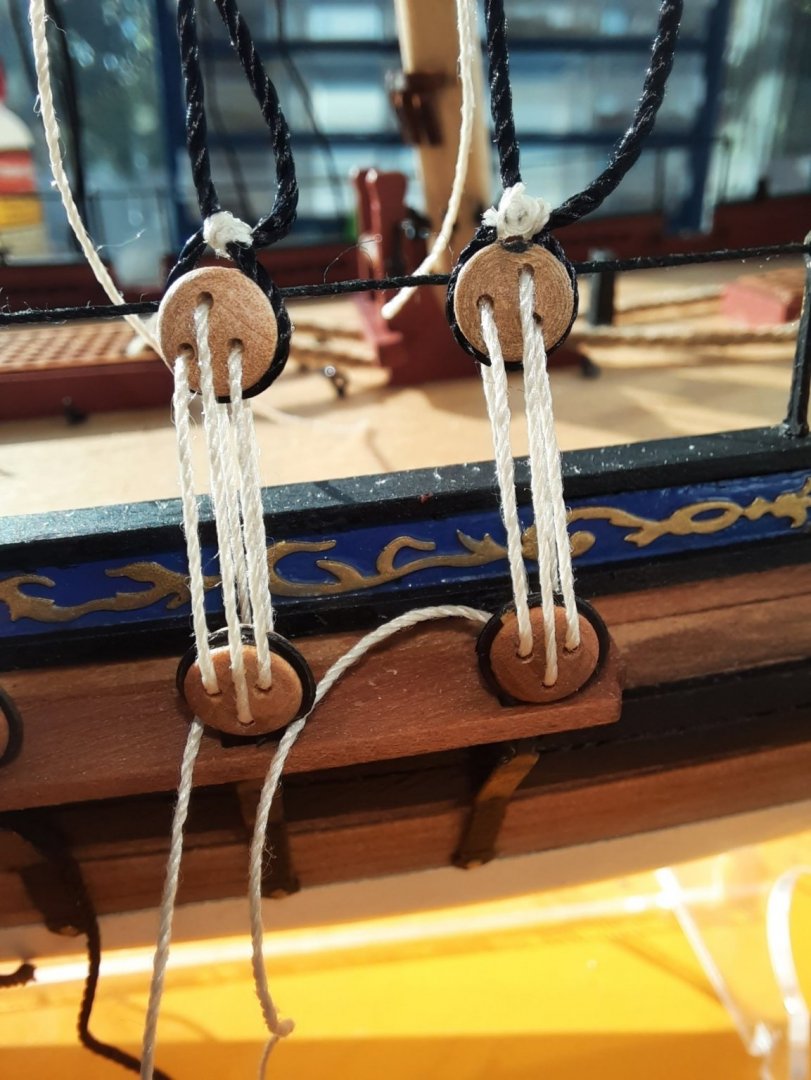
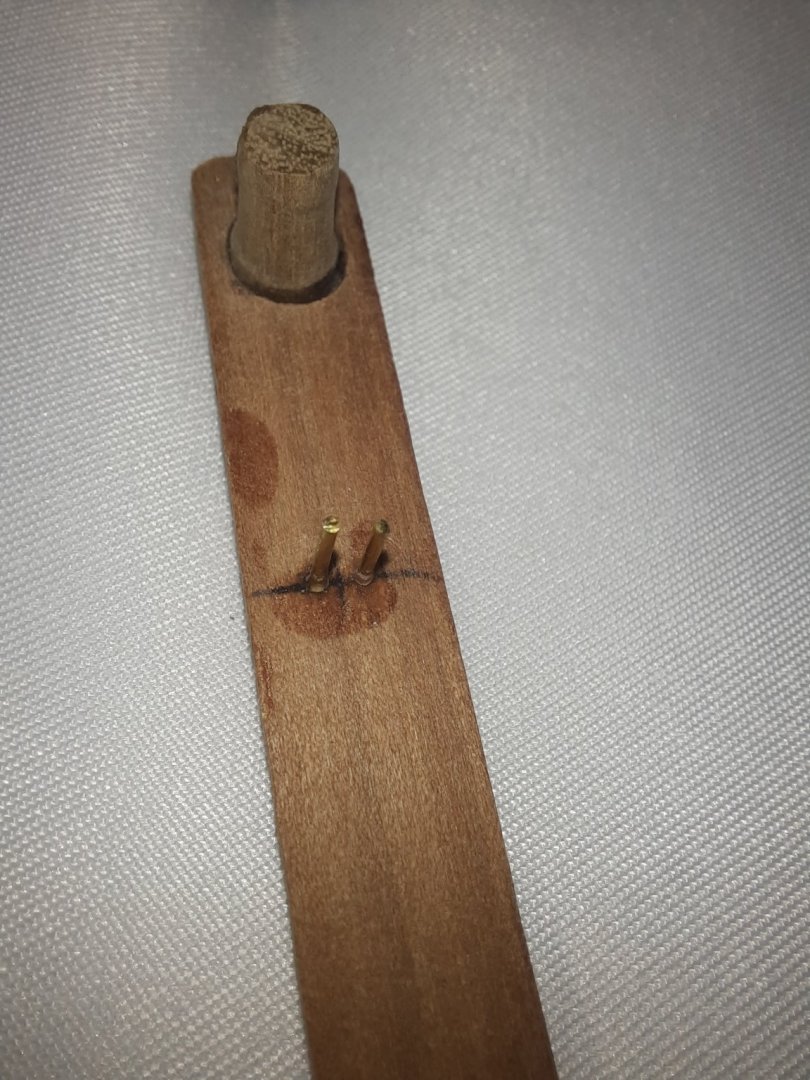
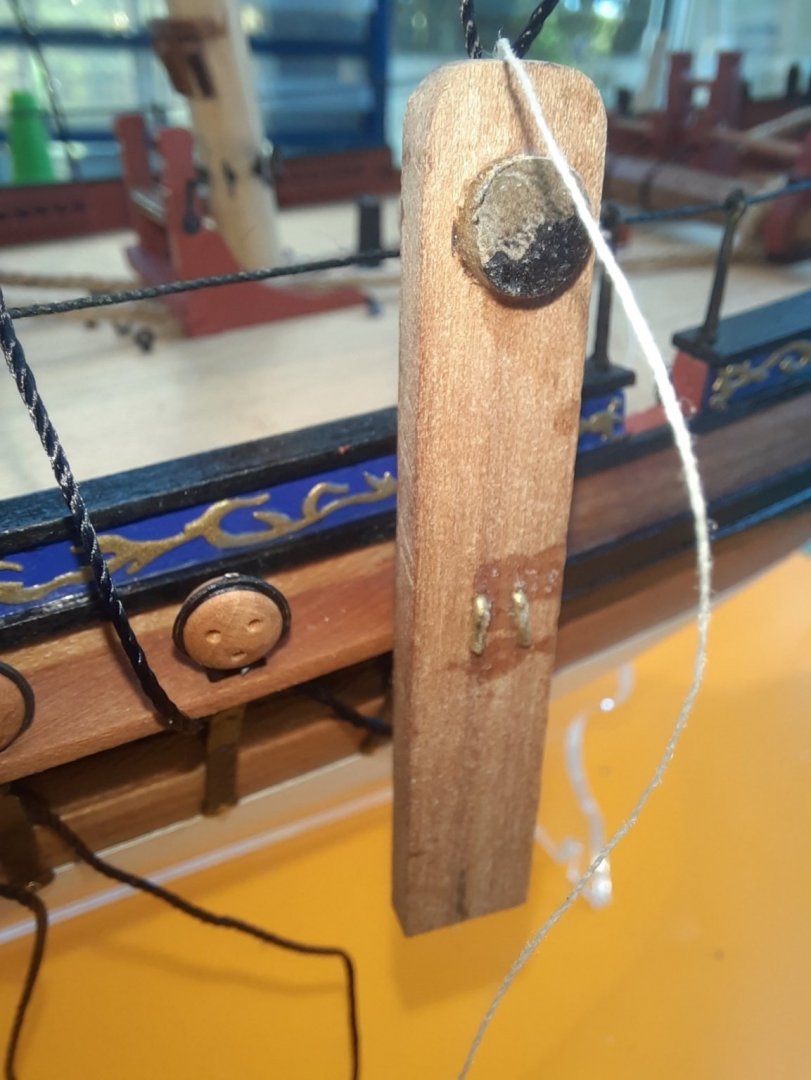
I have started to add the deadeyes and lanyards to the main mast shroud lines. I have never been very good at adding deadeyes to shrouds and then applying the correct tension to the lanyards. I am slowly improving but my technique still needs a lot more work to get nice looking results as will be evident when you look at the photos below. I have a lot of things to ponder before moving on, as I will detail later on in this post. When rigging the Duchess of Kingston I made a jig to help set the position of the deadeye. It is simply a piece of 5mm dowel which is used to represent the shroud deadeye position and two pins which locates the jig to channel deadeye. I have attached a photo of my jig. The next photo shows the jig in position with the first channel deadeye The shroud is then wrapped around the dowel, and the seizing is applied using a 20mm length of 0.1mm natural thread. Once the seizing is completed the loose shroud end is pulled which then tightens the loop around the dowel. A touch a ca gel is then applied to the seizing and the seizing thread ends trimmed. Next the deadeye is added to the loop, ensuring the holes are correctly positioned. Next I cut a 25cm length of 0.25mm natural thread for the lanyard which threaded through the deadeyes as shown in the photo below The process was the repeated for the next shroud line Now come the dilemma. As can been in the photo below seen the two right sided deadeyes and possibly the one on the far left are just about acceptable. The other two are not very good with regards to the position and / or seizing. a) Do I accept the bad workmanship knowing it will probably look Ok when fully rigged and when displayed this side will not be on show. b) Do I remove (some or all of) the shrouds and start again. This would be the right thing to do if I was building a model for display / commission. If I do decide to redo, do just replace the two very bad shrouds or do I start again and redo all of them which will given a chance to try to improve my technique. I am currently undecided. I decided to build the Cutter Alert to continue my support of @chris watton with his Vanguard Models venture and to fill a building void after completing the Duchess Of Kingston until the release of The Sphinx which will be my next major build project. I am enjoying the build and ideally I would like to build the kit to help showcase Chris excellent design work and kit quality. On the other hand I want to get the model built before The Sphinx becomes available and to have a couple of weeks break. I think I will need another 6 weeks to complete the rigging which seems ideal with the forecast Sphinx release date. Also I am not sure what I will do with the Cutter Alert, once it is complete. It will probably stay in the conservatory (which is my shipyard) so this side can be hidden from view. I think I should have enough spare 0.75mm black thread left should I decide to rework the shrouds. I have added the backstay deadeye to the small chain plate and is now ready to be rigged.

- 160 replies
-
- 3
-
-
- Alert
- vanguard models
- (and 1 more)
-
Make that 38 with 2 required for the two Glenn's. 😀
- 355 replies
-
- 5
-
-
- vanguard models
- Sphinx
- (and 1 more)
-
I will be buying one of these kits when the order goes live.
- 355 replies
-
- 3
-
-
- vanguard models
- Sphinx
- (and 1 more)
-
@James H it looks amazing, excellent building skills and I'm sure the manual will be epic.
- 355 replies
-
- 3
-
-
- vanguard models
- Sphinx
- (and 1 more)
-
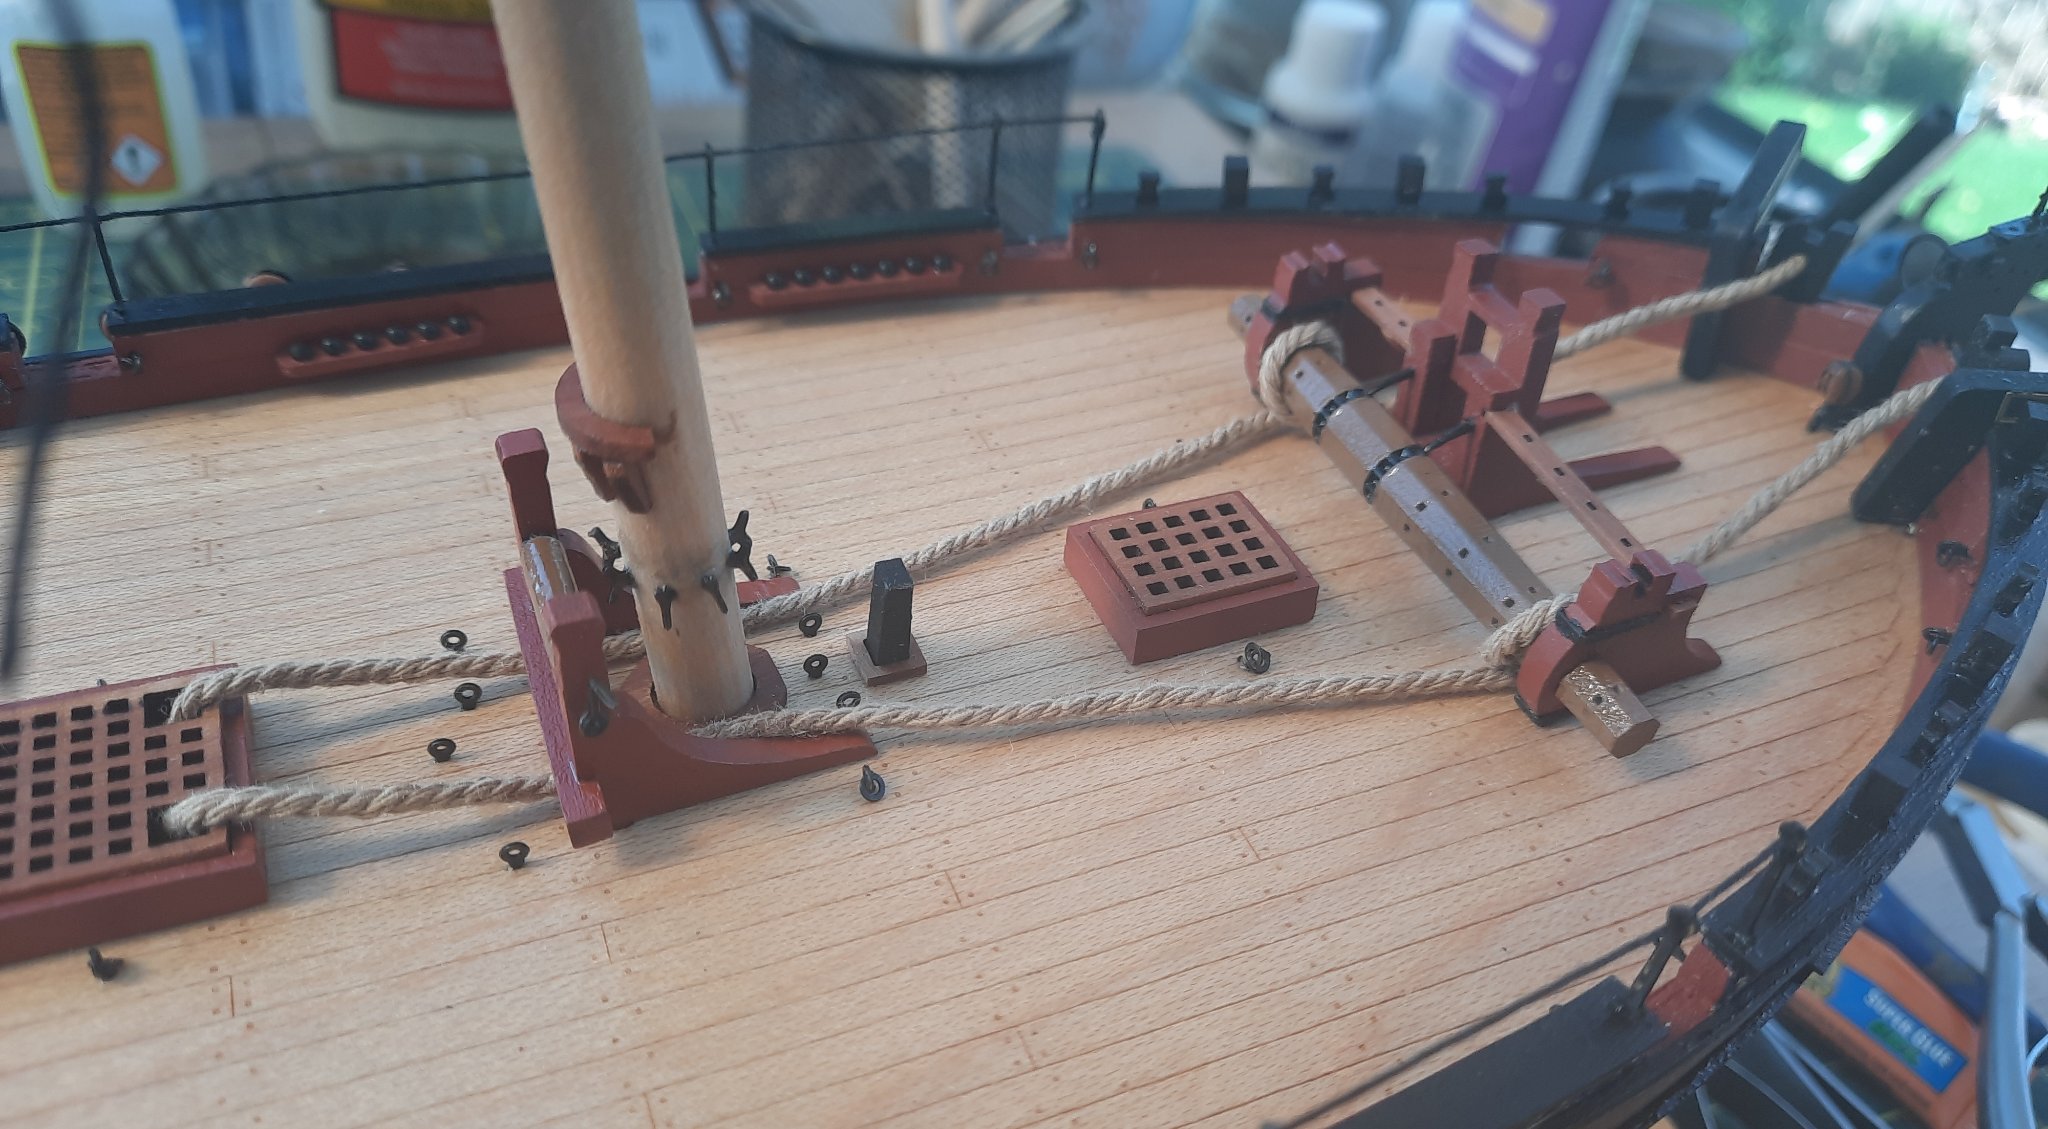
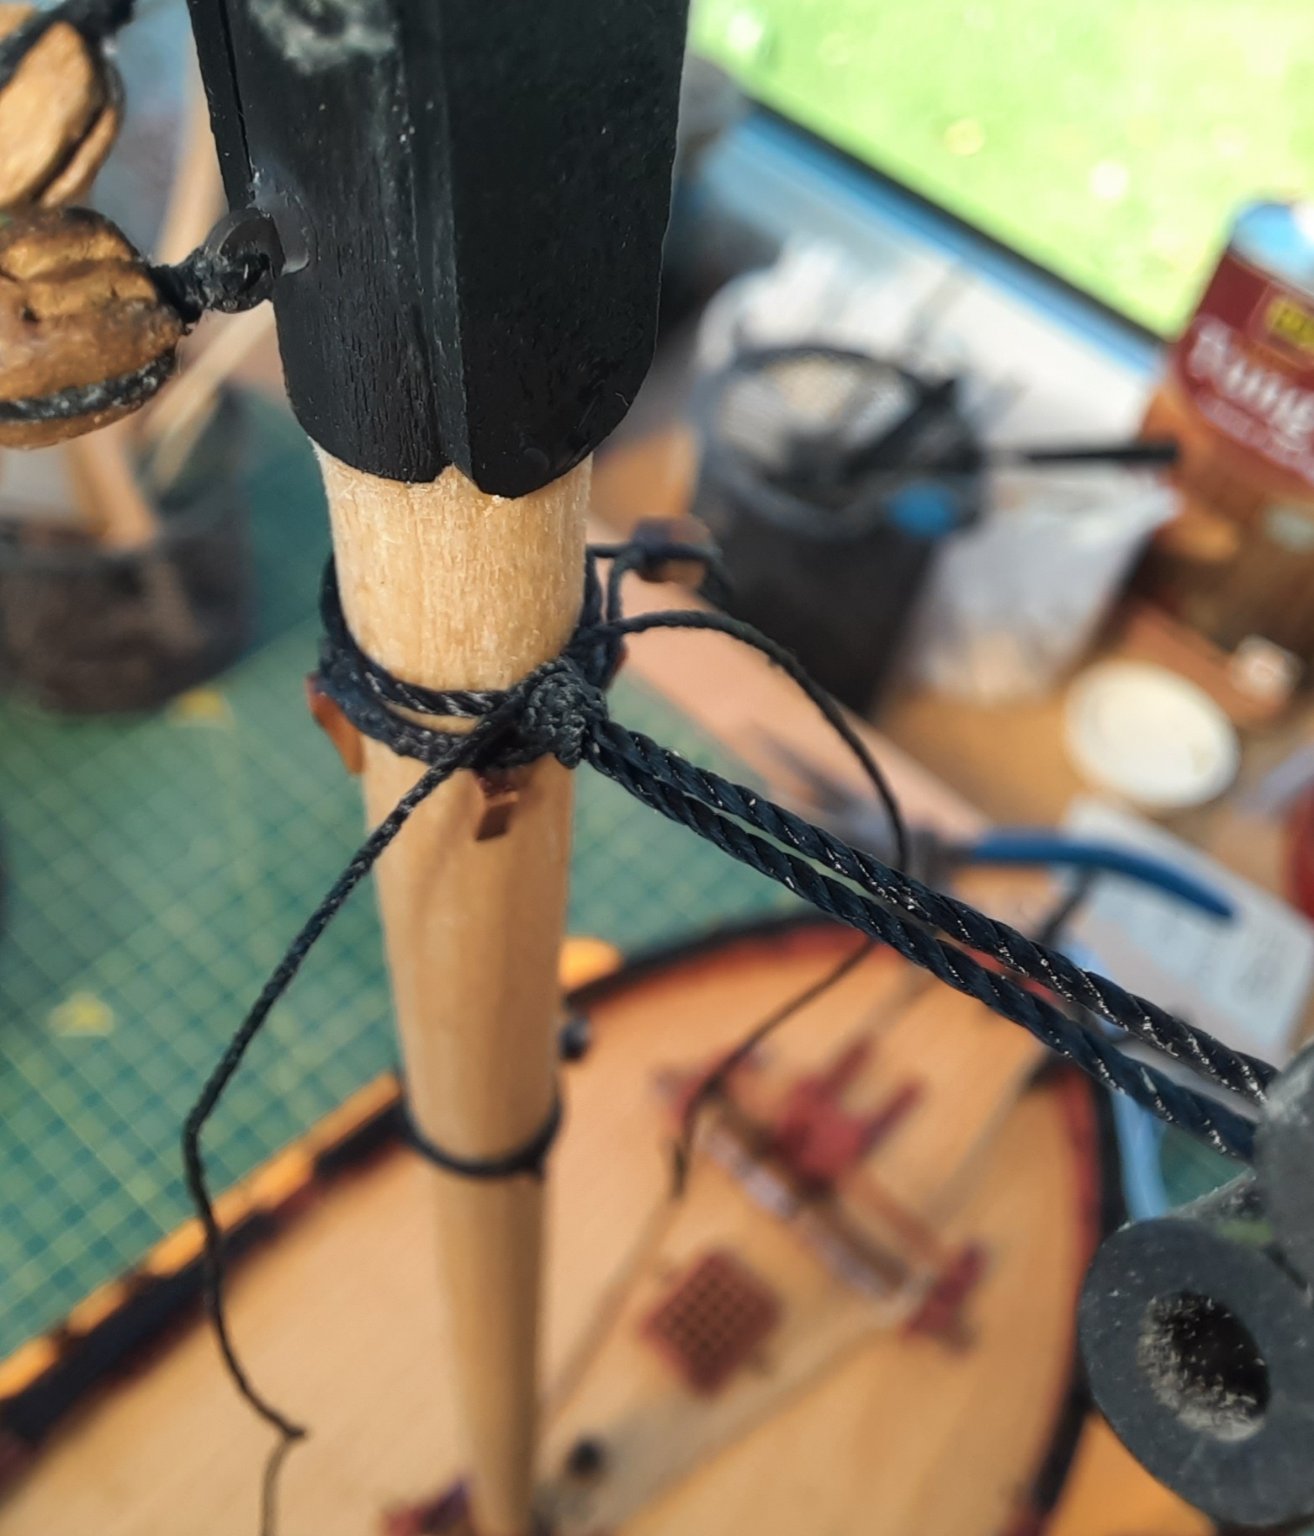
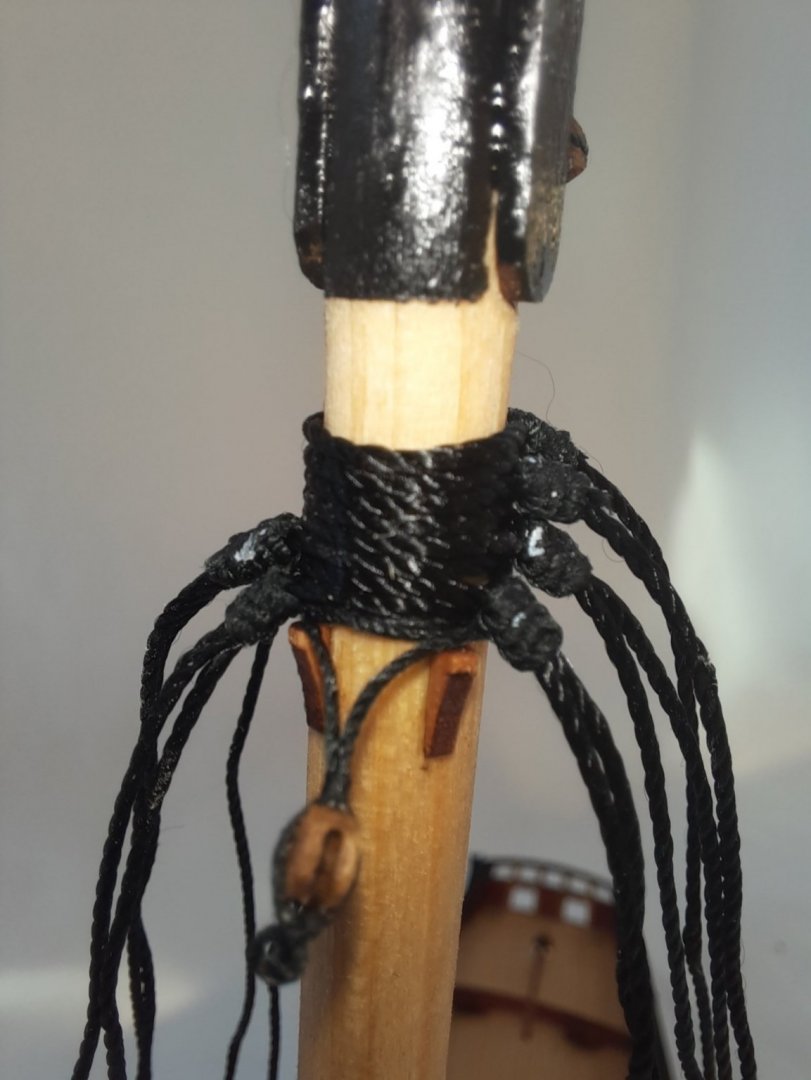
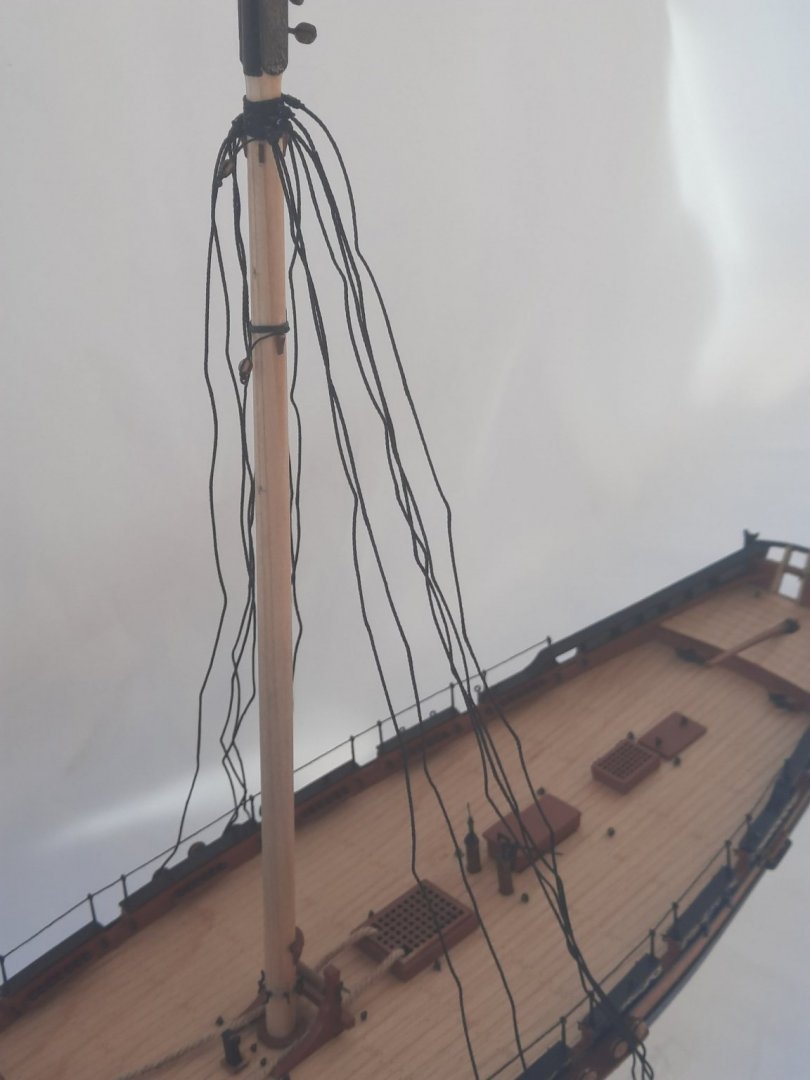
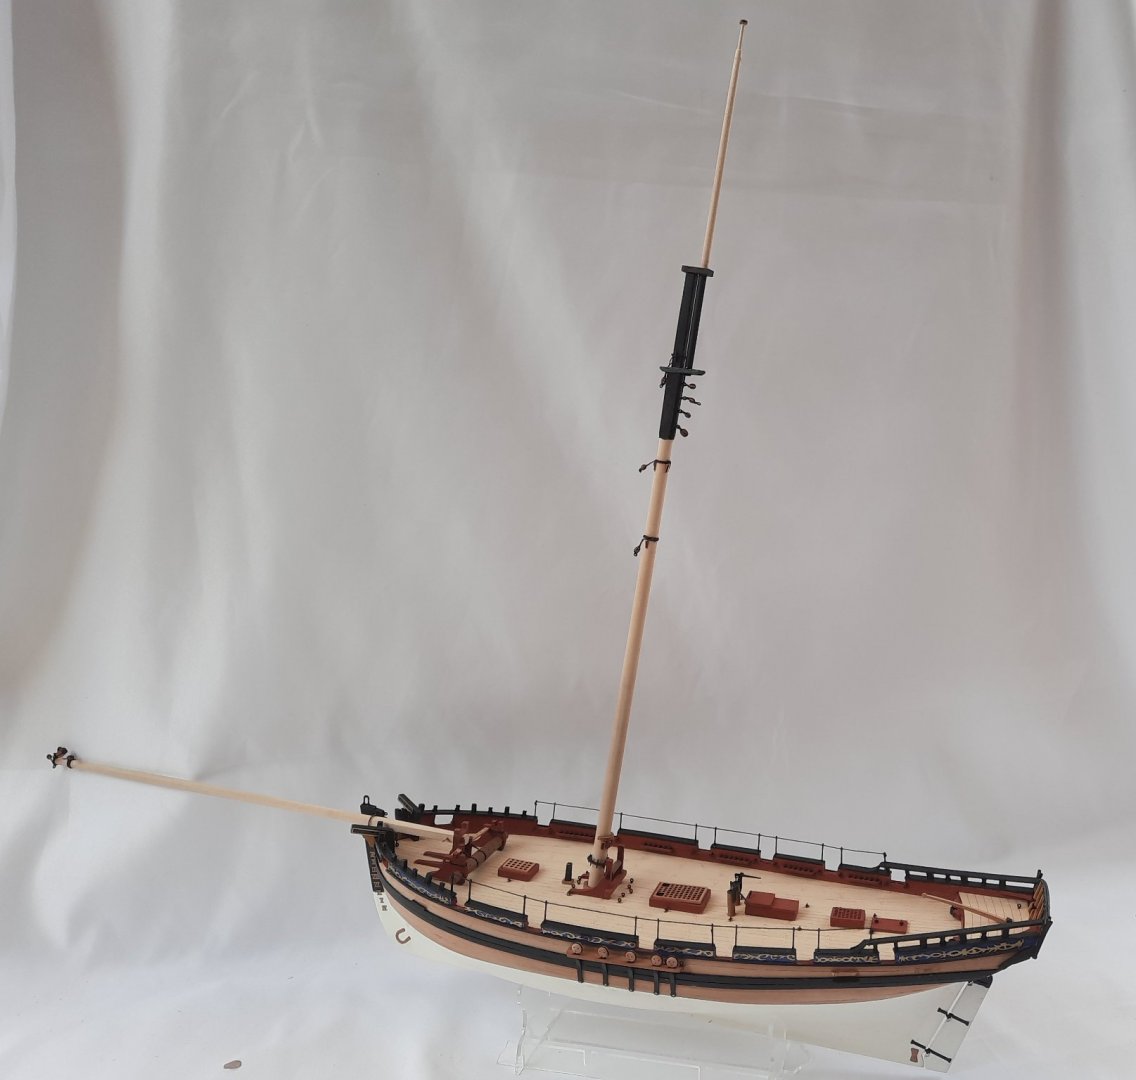
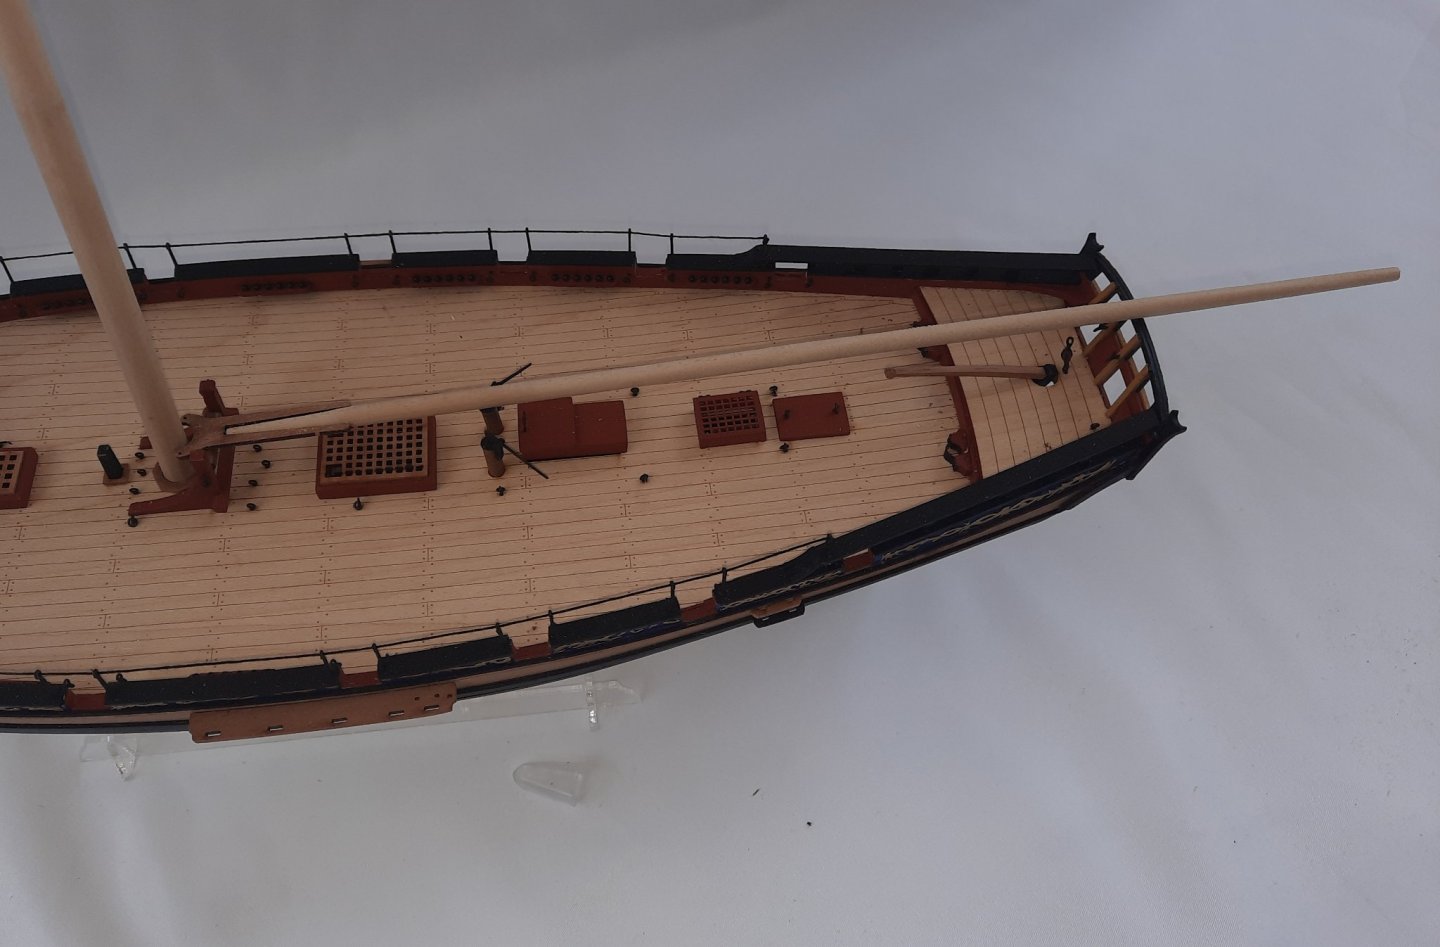
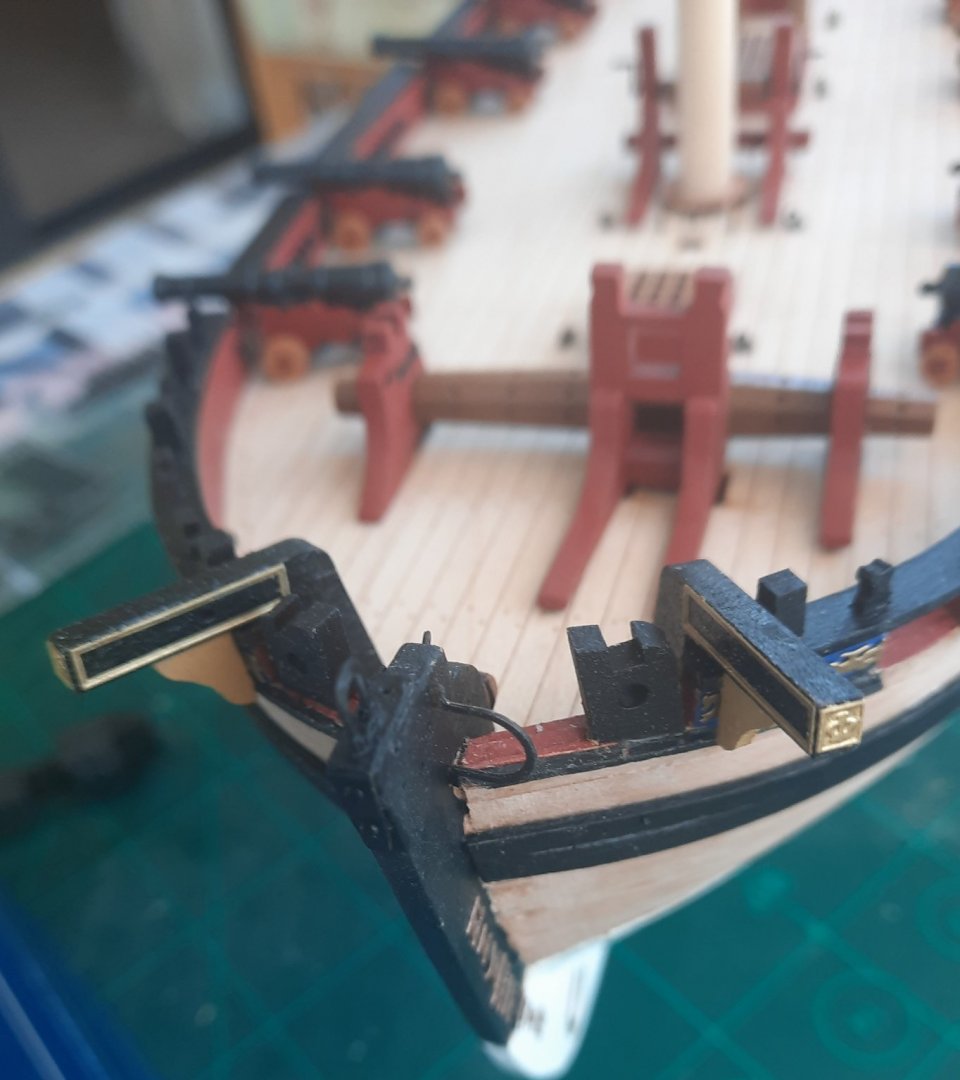
A little bit more progress. I started by applying a couple of coats of Tung Oil to the wooden areas. I really like the finish. Next I added the anchor cable. This is a length of 1.6mm diameter natural thread. I applied a touch of CA gel to one end and cut a taper. I was then able to thread the cable through the hawse hole, then around the deck items and finally back out through the other hawse hole. As can be seen in this photo I also replaced the main mast belay pin rack with cleats. Next I moved on to rigging the Cutter Alert. Using my quad hands I started the process by adding the shroud lines to the main mast. I cut 4 x 60cm lengths of black thread for each of the "double" shrouds and 4 x 40cm lengths for each of the "single" shrouds. I used alternate top and bottom half hitch knots with 0.25mm black thread to seize the shrouds. This is a picture of the first double shroud. The two ends of the seizing thread is ready to cut trimmed. I applied a touch of CA gel before I cut the excess thread. For added security I then added a diluted PVA wash over the seizing. This picture was taken after all the shrouds had been added and looks reasonably neat and tidy. Finally a standard picture showing the shrouds before the deadeyes have been added, which will be the next task.


- 160 replies
-
- 6
-
-
- Alert
- vanguard models
- (and 1 more)
-
Moving forward I am getting very close to starting the rigging phase. Today I added the chain plates and deadeyes to the channels. Using my round nose pliers I opened the hole in the chain plates for the deadeyes. After the deadeye has been fitted in the chain plate I used my pliers to close up the hole around the deadeye. In the photo below you can see 2 completed assemblies, one with the enlarged hole and 2 waiting. I then added a couple of bends to the assembly before fitting to the channels. The photo below shows 5 bent chain plate assemblies ready to be installed in the channel. The next photo shows the chain plate assembly fitted tot he channel. I have also added the 3 eyebolts to the channel which are just visible at the right hand side. I had completed adding all the blocks to the main mast. I have also added the platform and mast cheeks and painted the area between the cheeks and cap black, as shown in the next photo. Finally the next picture shows the current build status. I have 7 x 3mm blocks/ eyebolt assemblies to add to the outside of the hull, 4 x cleats to the top of the rails and 6 x iron plate for backstay rigging. This will only take a day or two complete as my time is a bit limited at the moment. Once these items have been added I think I can start the rigging.
- 160 replies
-
- 1
-
-
- Alert
- vanguard models
- (and 1 more)
-
Thanks, I'm looking forward to starting the rigging later this week so I can be ready for the release of The Sphinx kit.
- 160 replies
-
- 1
-
-
- Alert
- vanguard models
- (and 1 more)
-
Moving forward I am getting very close to starting the rigging phase. Today I added the chain plates and deadeyes to the channels. Using my round nose pliers I opened the hole in the chain plates for the deadeyes. After the deadeye has been fitted in the chain plate I used my pliers to close up the hole around the deadeye. In the photo below you can see 2 completed assemblies, one with the enlarged hole and 2 waiting. I then added a couple of bends to the assembly before fitting to the channels. The photo below shows 5 bent chain plate assemblies ready to be installed in the channel. The next photo shows the chain plate assembly fitted to the channel. I have also added the 3 eyebolts to the channel which are just visible at the right hand side. I had completed adding all the blocks to the main mast. I have also added the platform and mast cheeks and painted the area between the cheeks and cap black, as shown in the next photo. Finally the next picture shows the current build status. I have 7 x 3mm blocks/ eyebolt assemblies to add to the outside of the hull, 4 x cleats to the top of the rails and 6 x iron plate for backstay rigging. This will only take a day or two complete as my time is a bit limited at the moment. Once these items have been added I think I can start the rigging.
- 160 replies
-
- 4
-
-
- Alert
- vanguard models
- (and 1 more)
-
Happy to pay the price, I will buy one as soon as the pre order sales are available.
- 355 replies
-
- 4
-
-
- vanguard models
- Sphinx
- (and 1 more)
-
My pleasure, I do like to share my methods. My point of reference is DELF build log for Speedy which helped me so much on my Duchess Of Kingston build
- 160 replies
-
- 1
-
-
- Alert
- vanguard models
- (and 1 more)
-
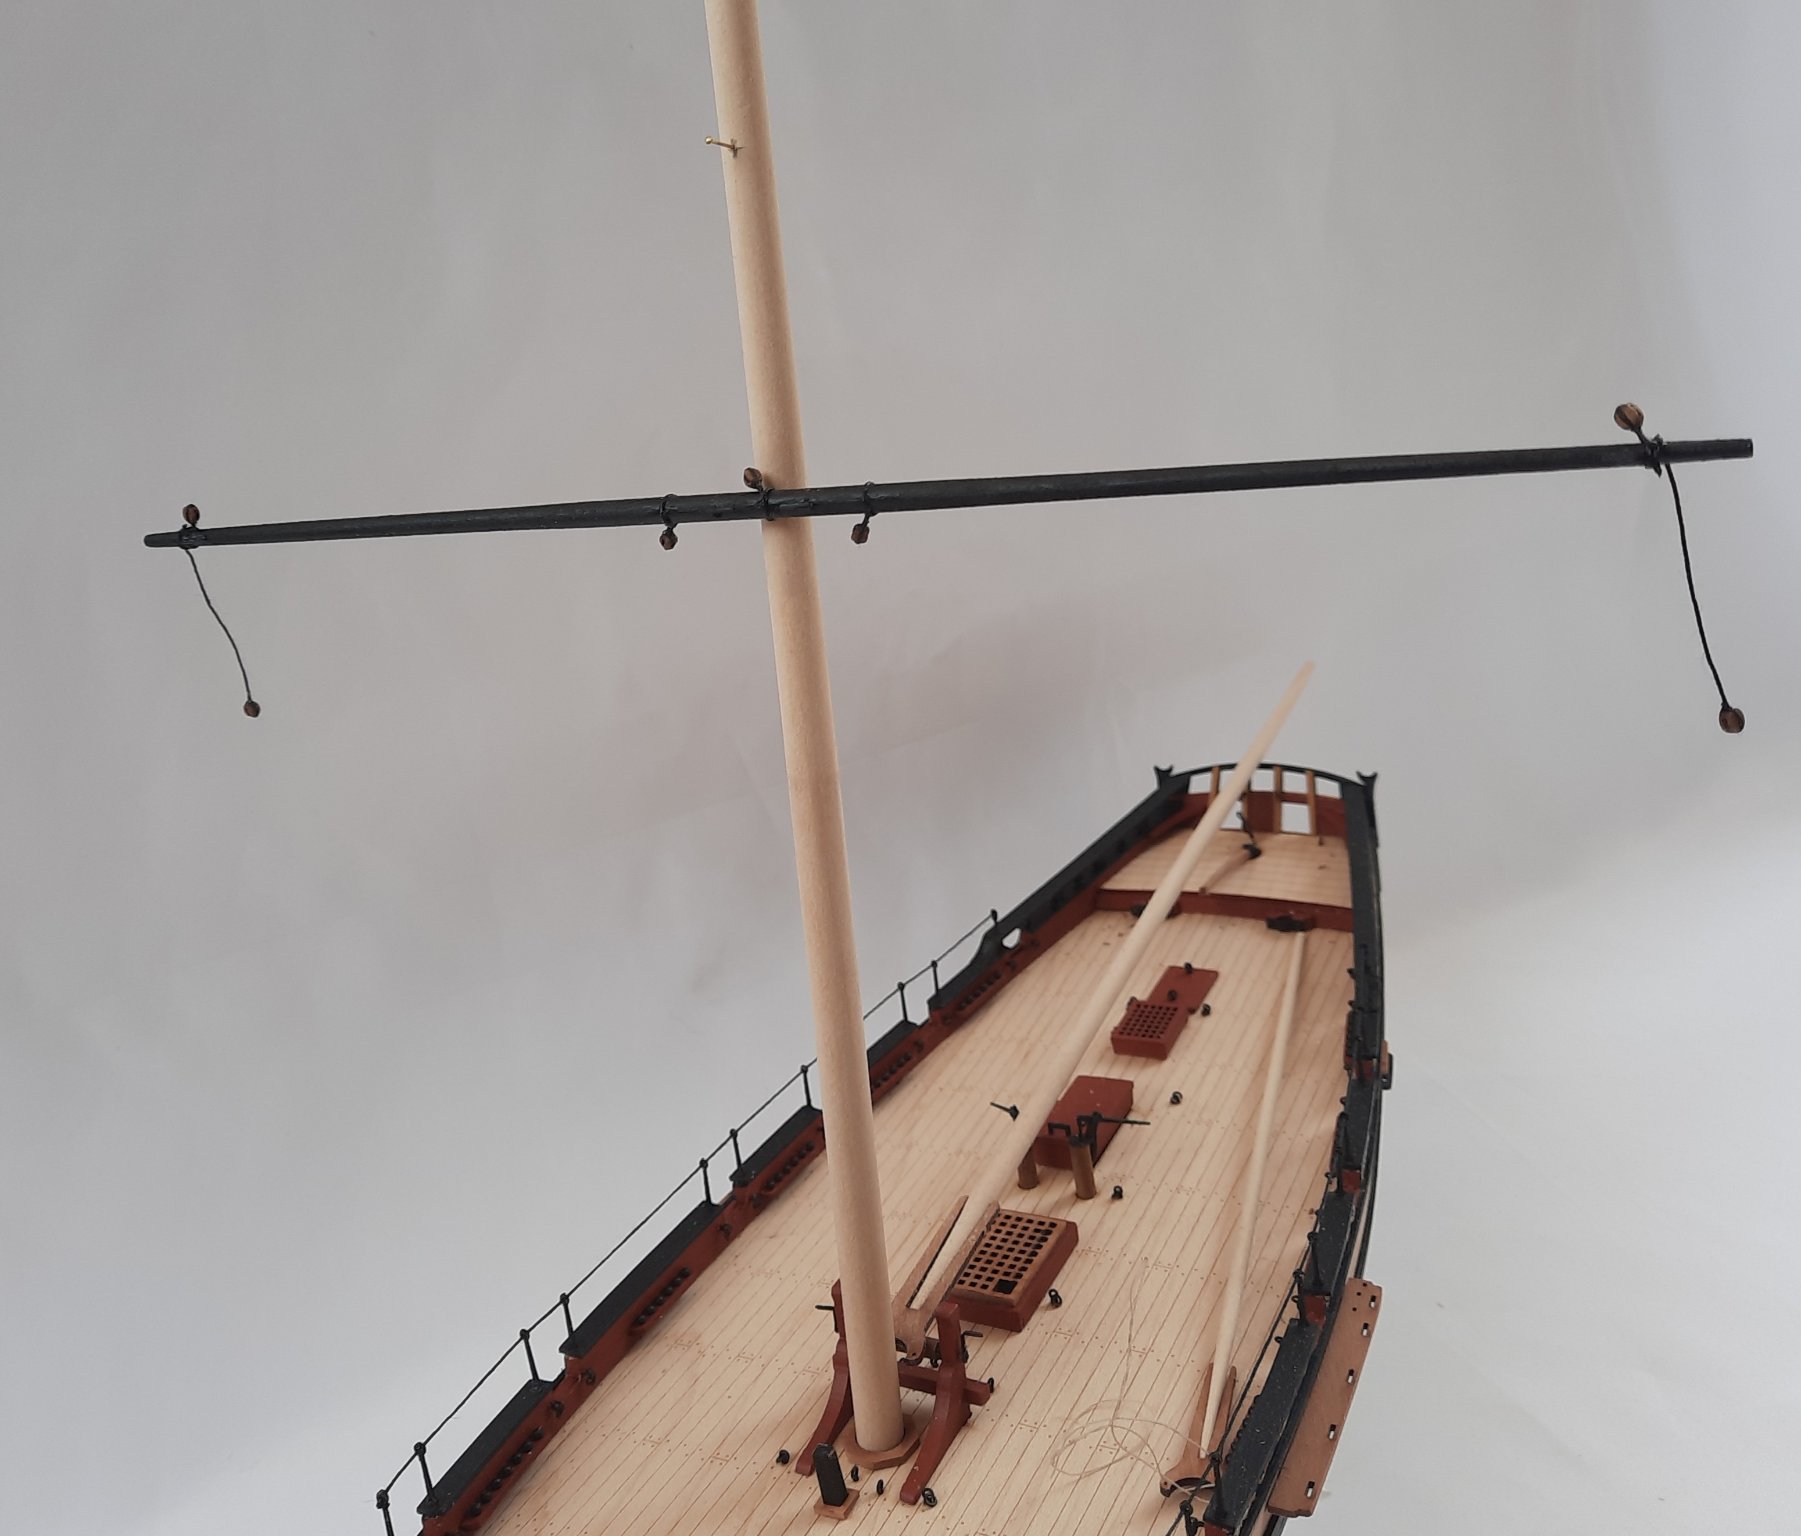
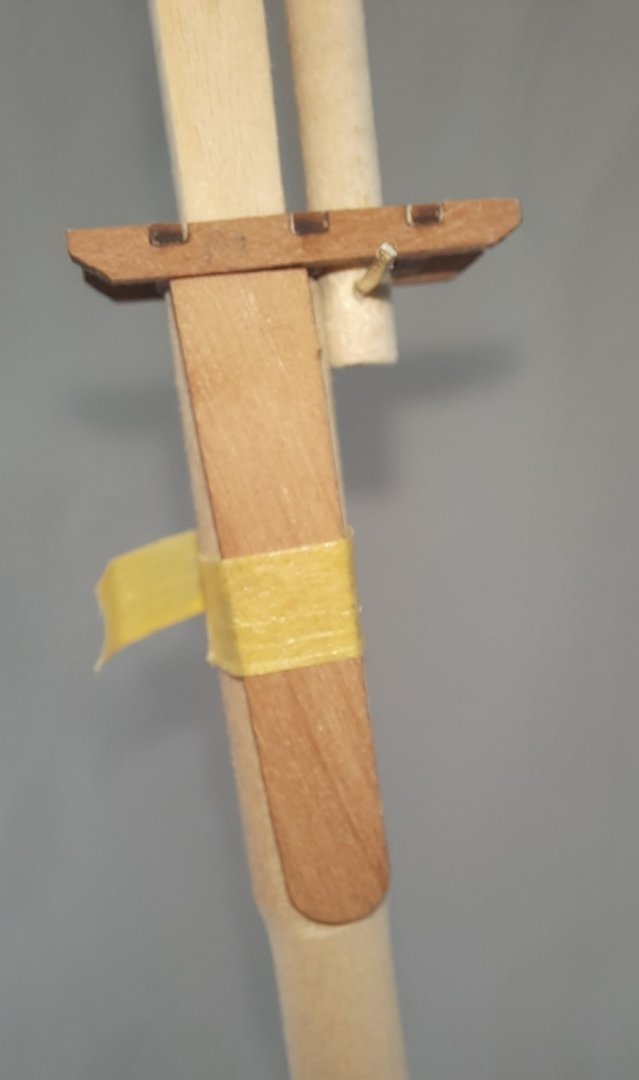
Work is still progressing on the Cutter Alert, but my time in the shipyard is reduced at the moment, but hopefully normal service will be resumed in the next week or two. As to progress I have completed making the 4 x yards and 2 x booms and they are ready to be added to the mast when required. I have also completed all the work on the bowsprit as can be seen in the next two photo's. Blocks have been added. 4 x 3mm single block and 1 x triple block. FID has been added. Moving on to the main mast I have added various items as shown in the photos below. Belay pin rack Cleats The eyebolts are only dry fitted at the moment as I may add the shrouds before adding these blocks and the cheeks. I only have 3 x yard lift block left to add to the main mast. After that I will add the deadeyes to the channels and commence the rigging phase.
- 160 replies
-
- 5
-
-
- Alert
- vanguard models
- (and 1 more)
-
Good news on your wifes recovery and a brave but well derserved move with regards to your business. I will continue to support Vanguard Models. I also echo your thanks to Jim Hatch.
-
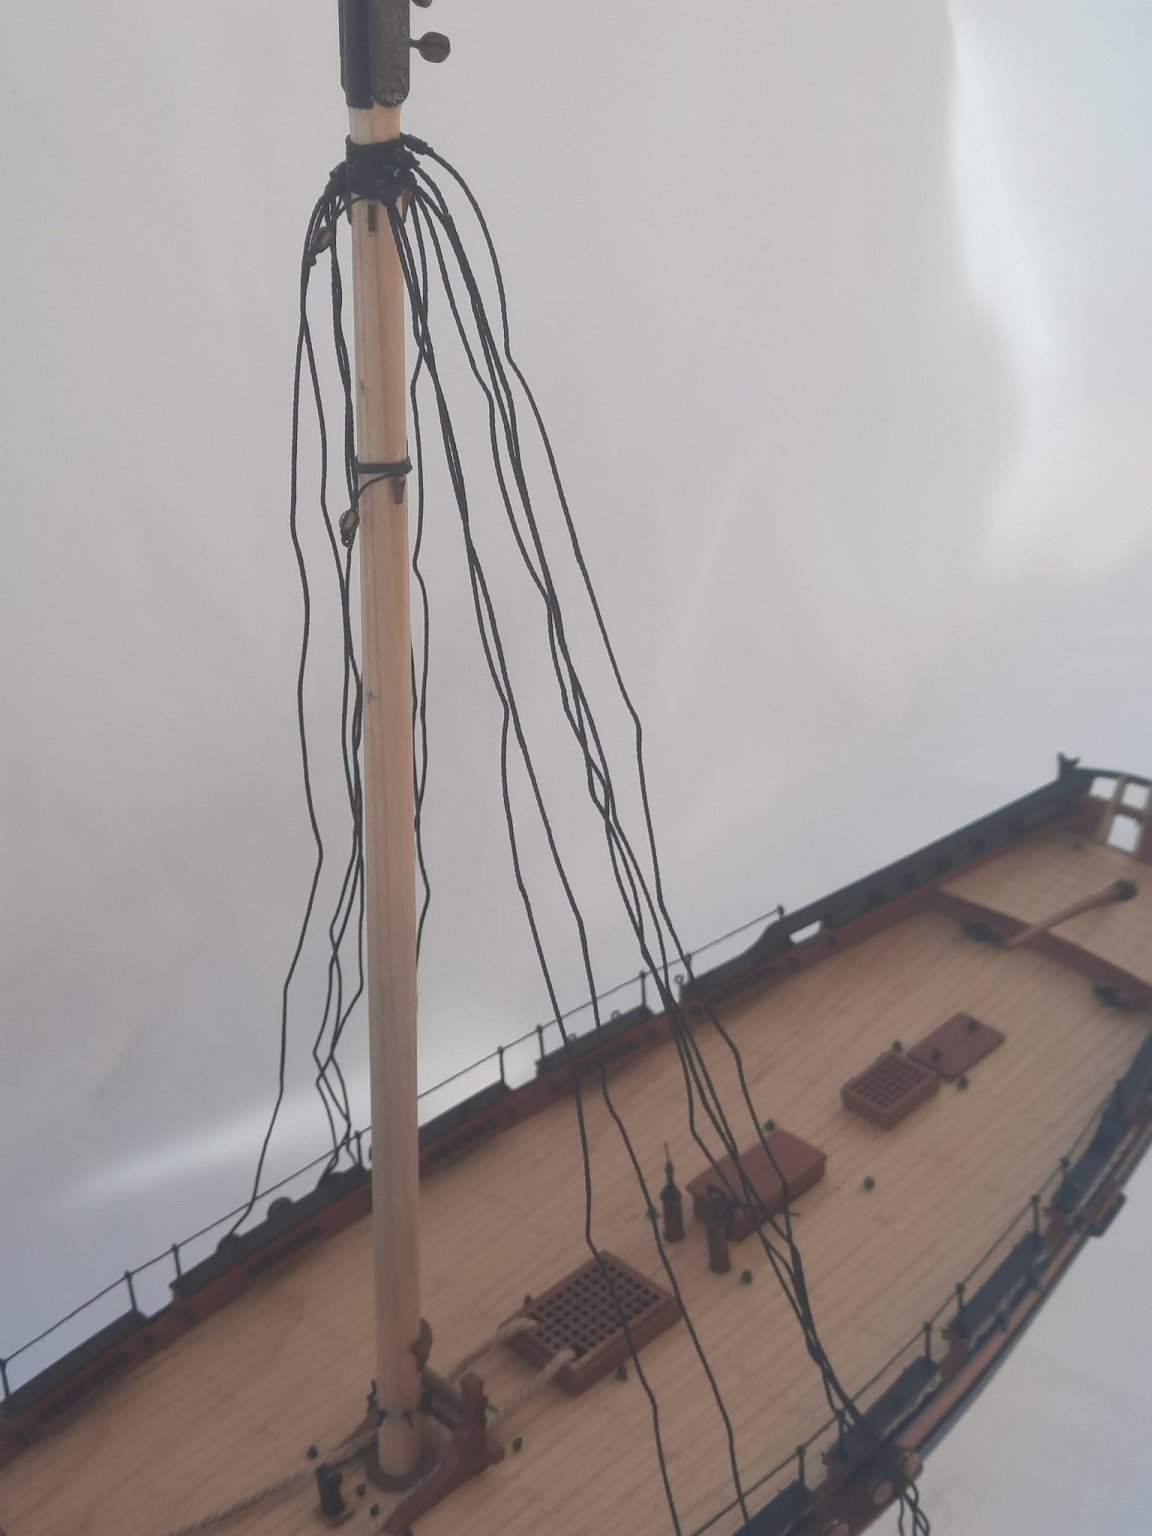
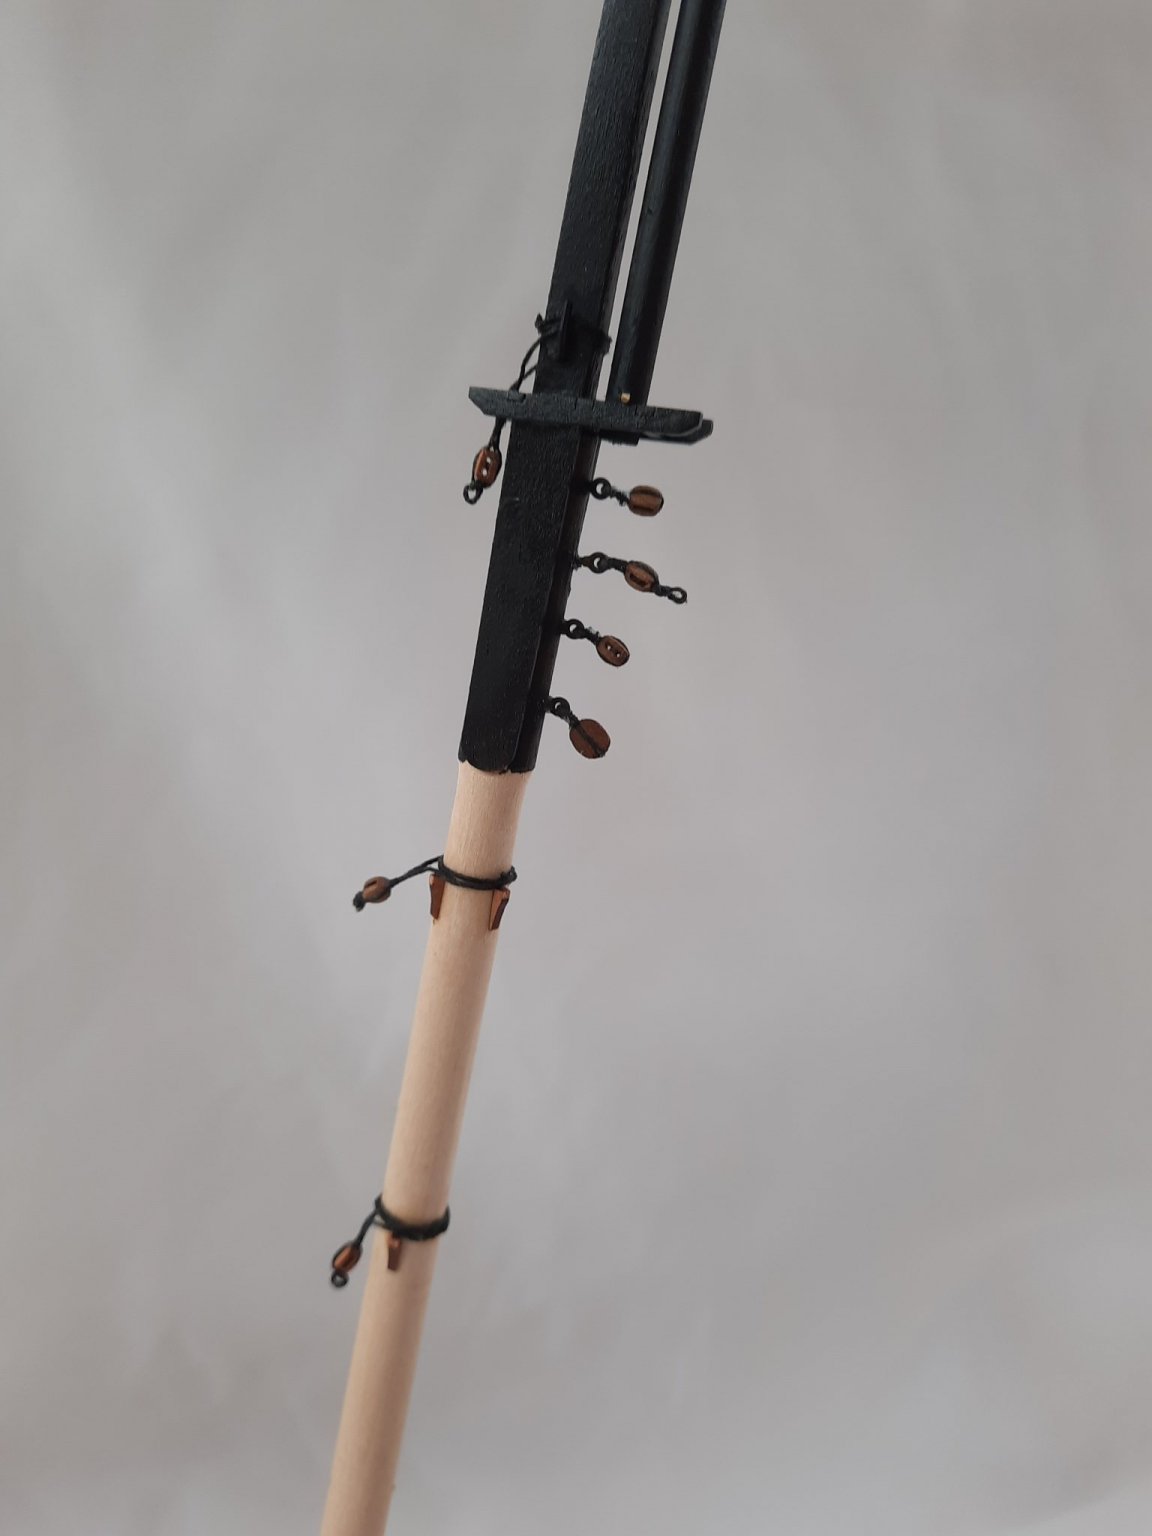
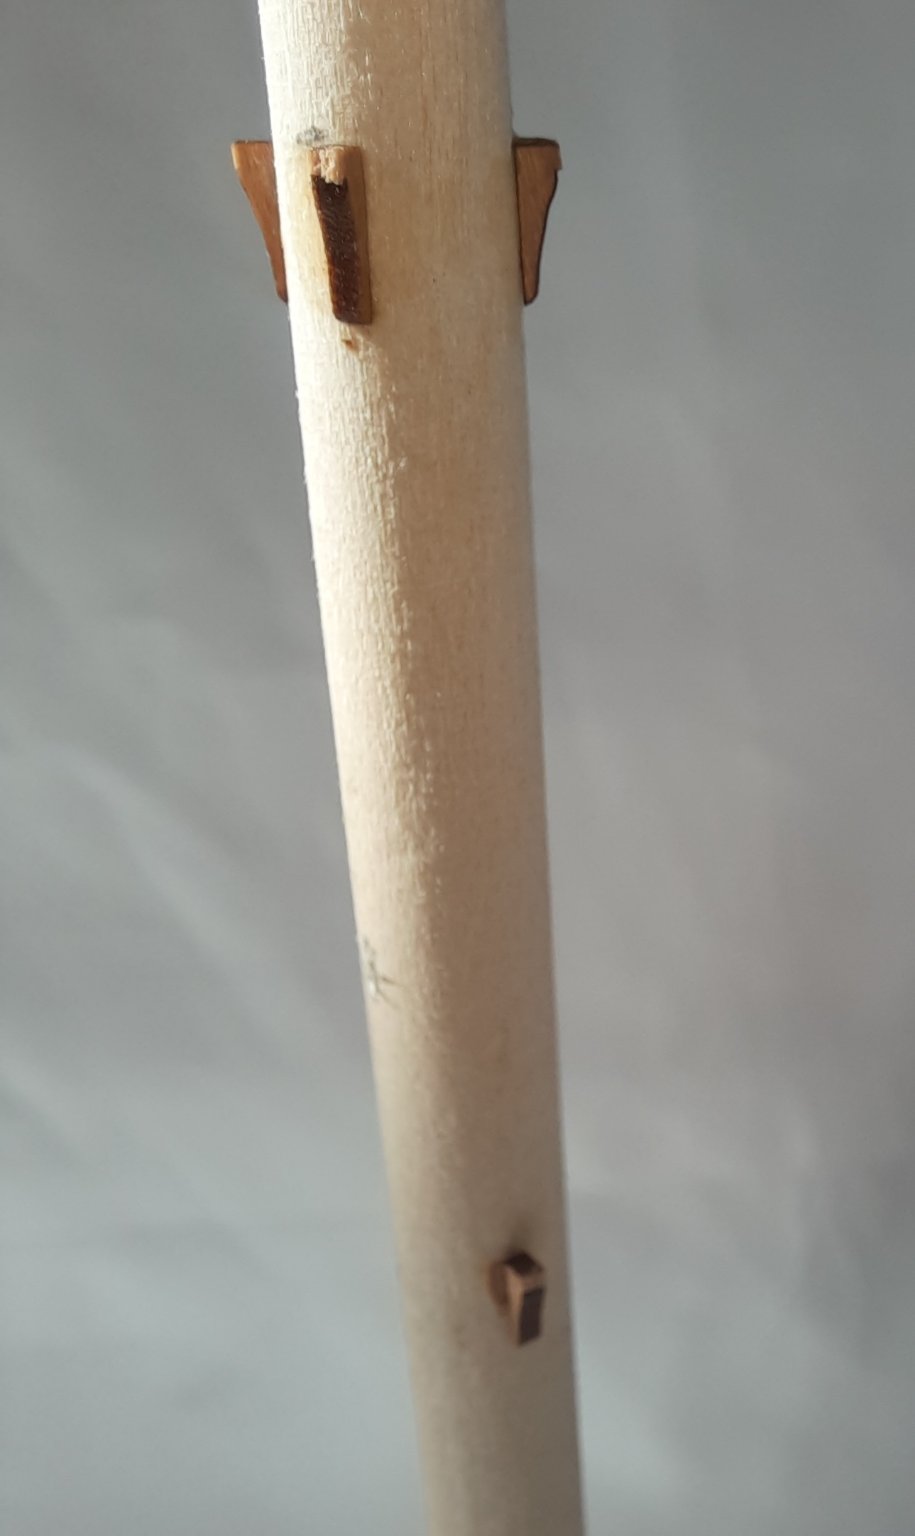
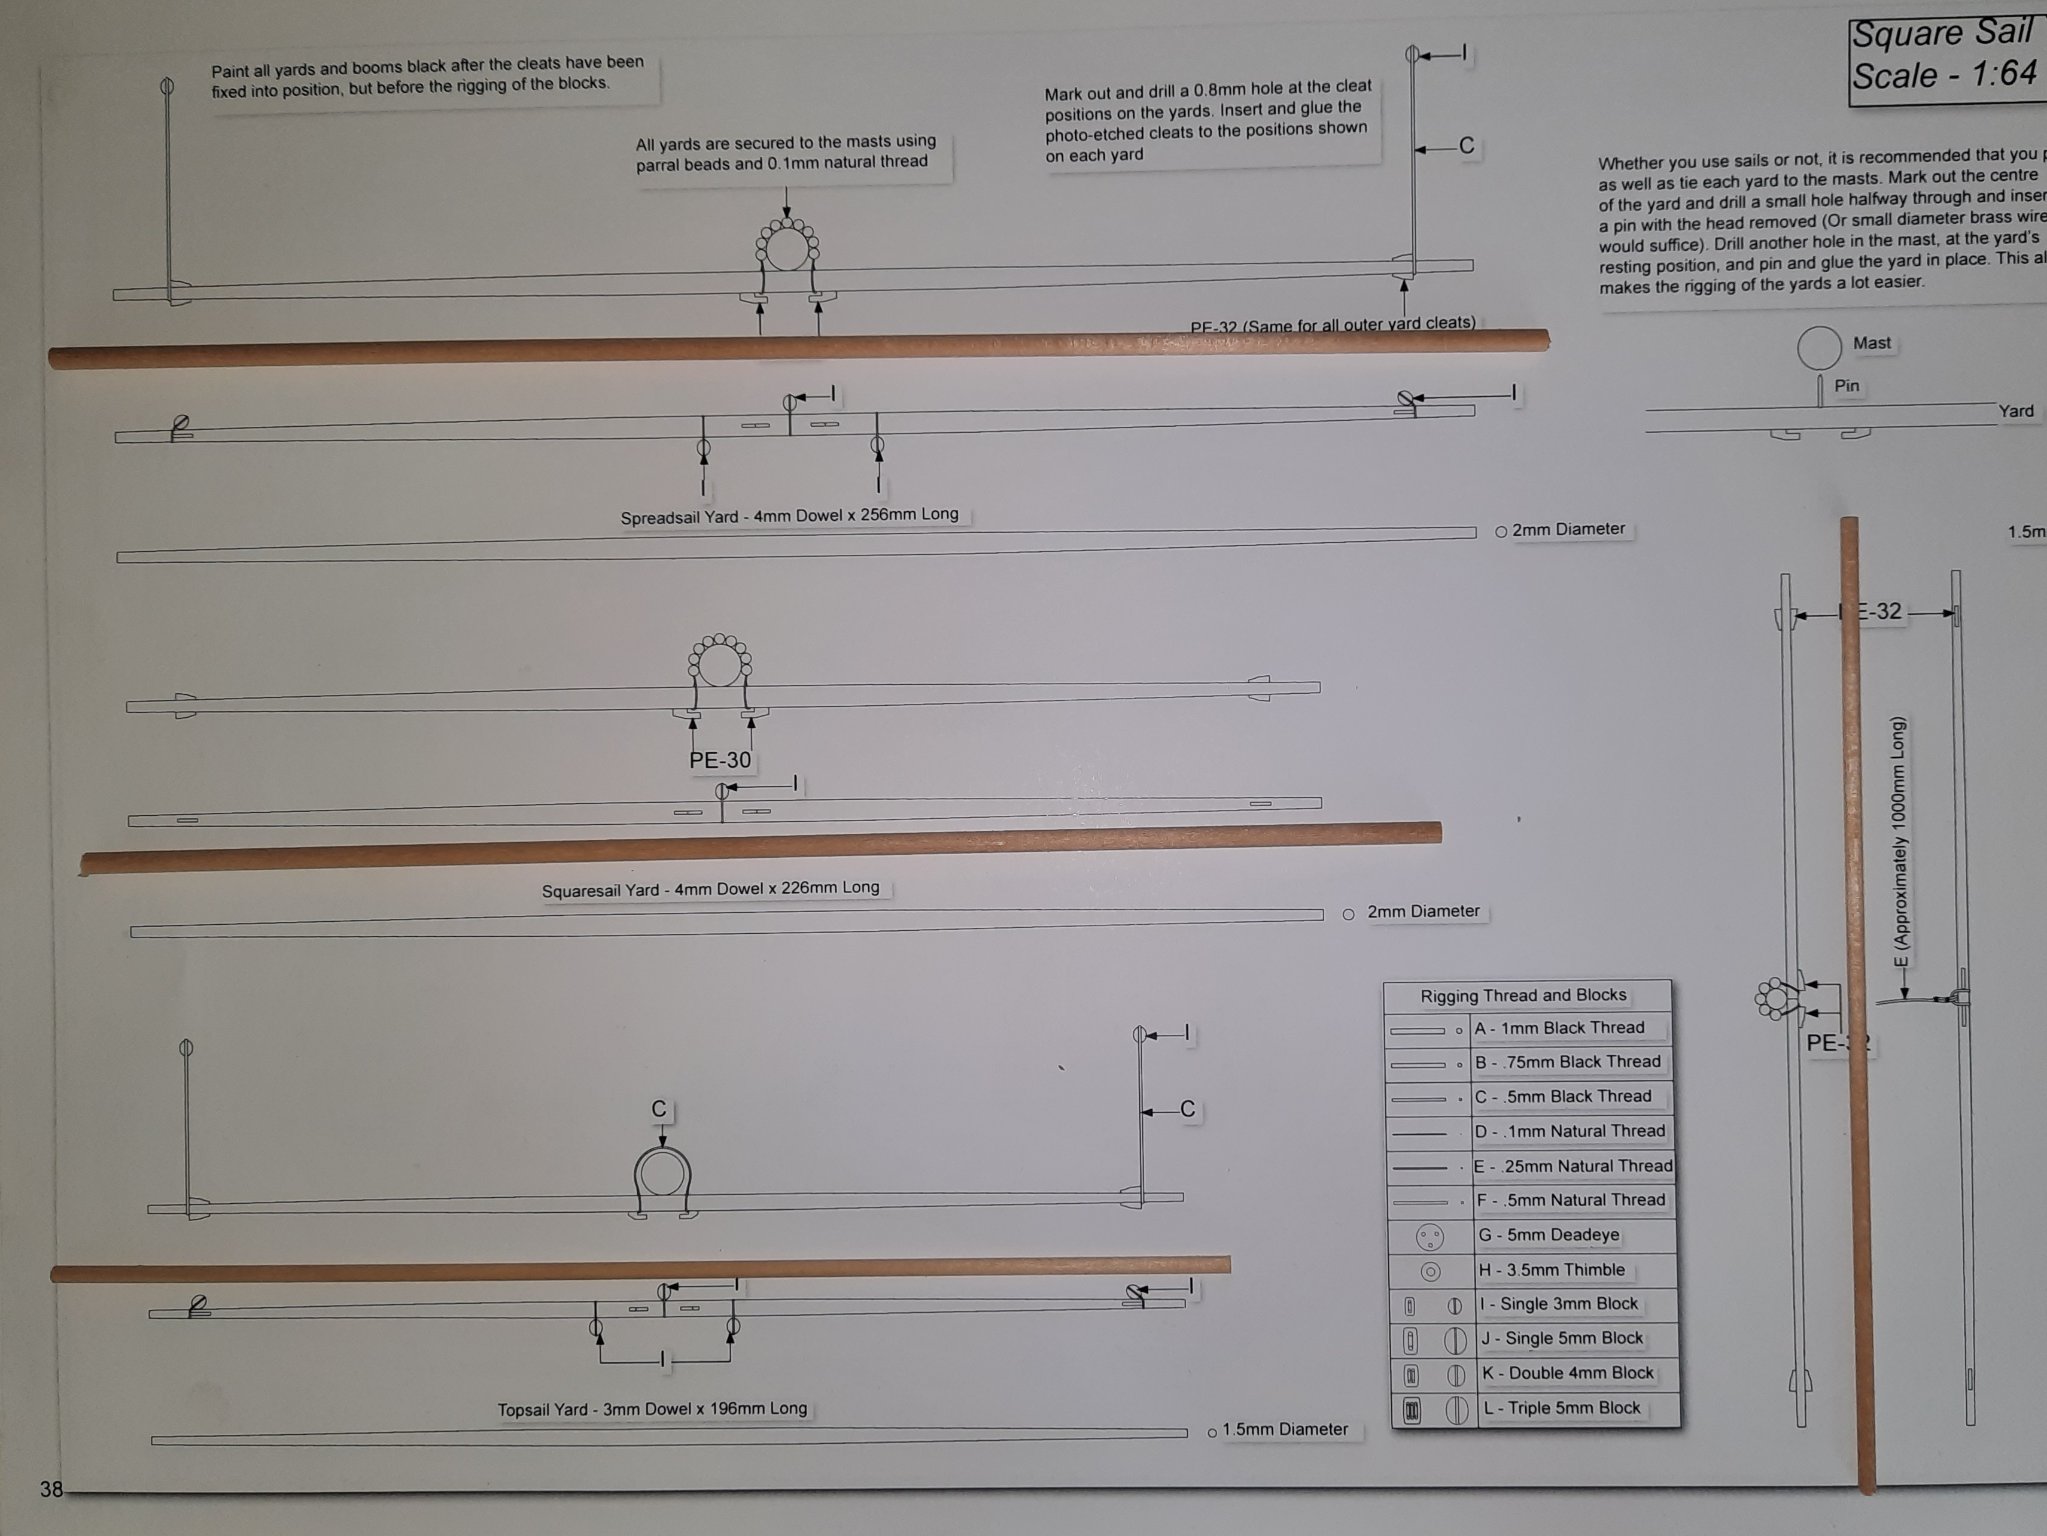
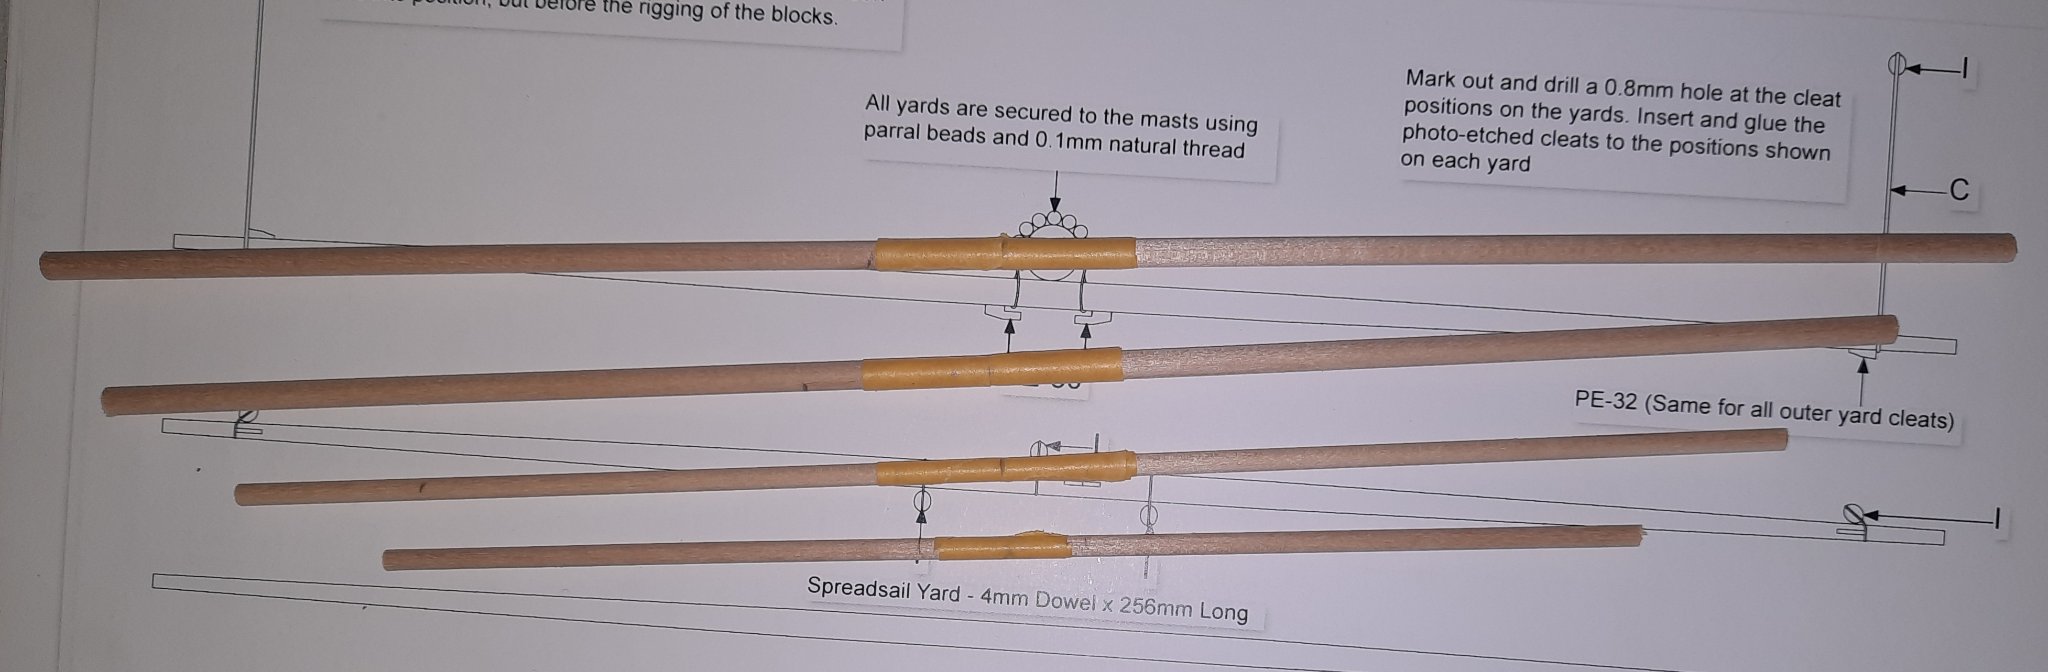
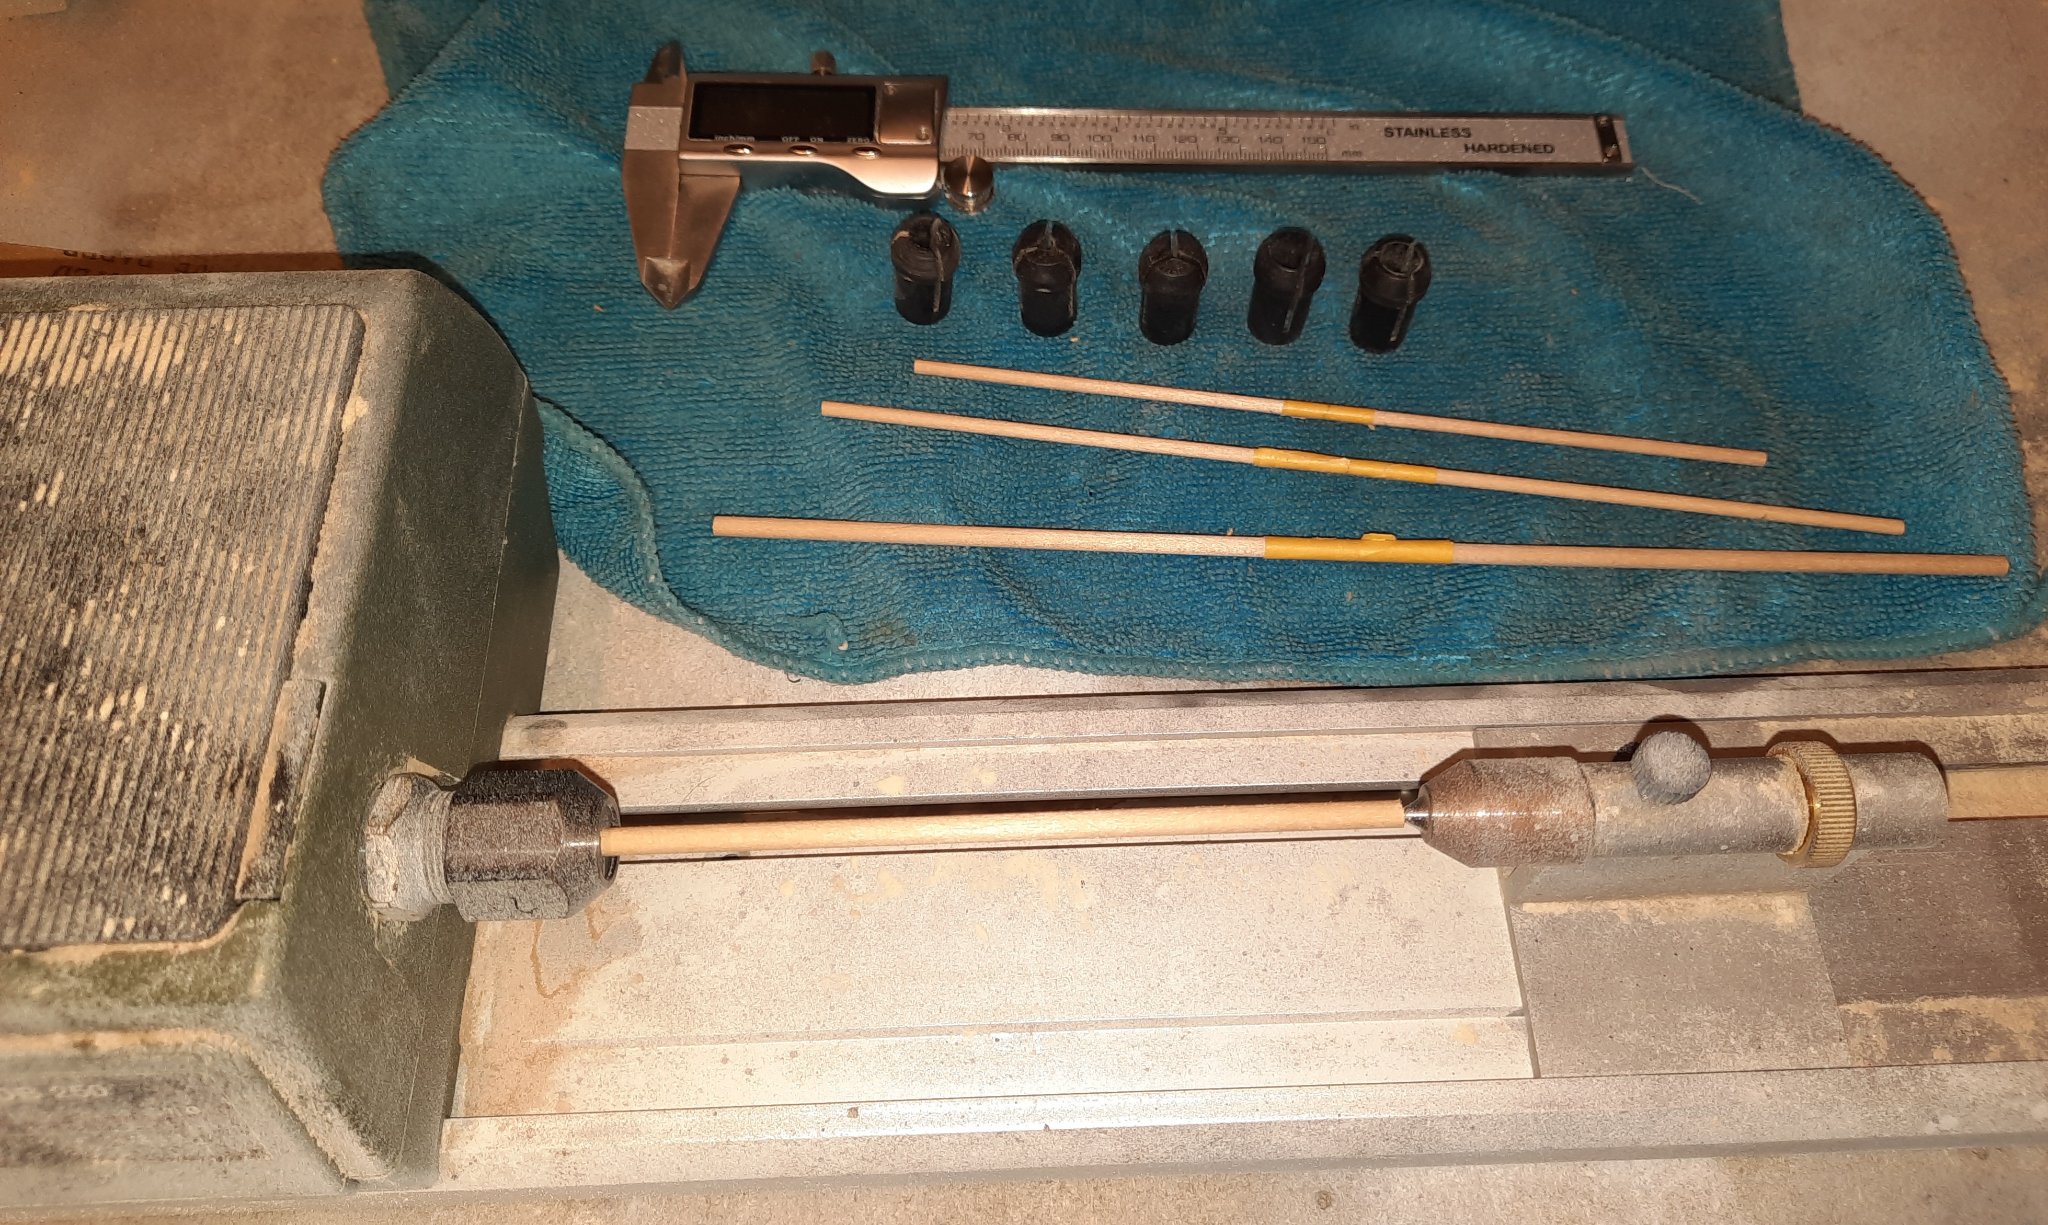
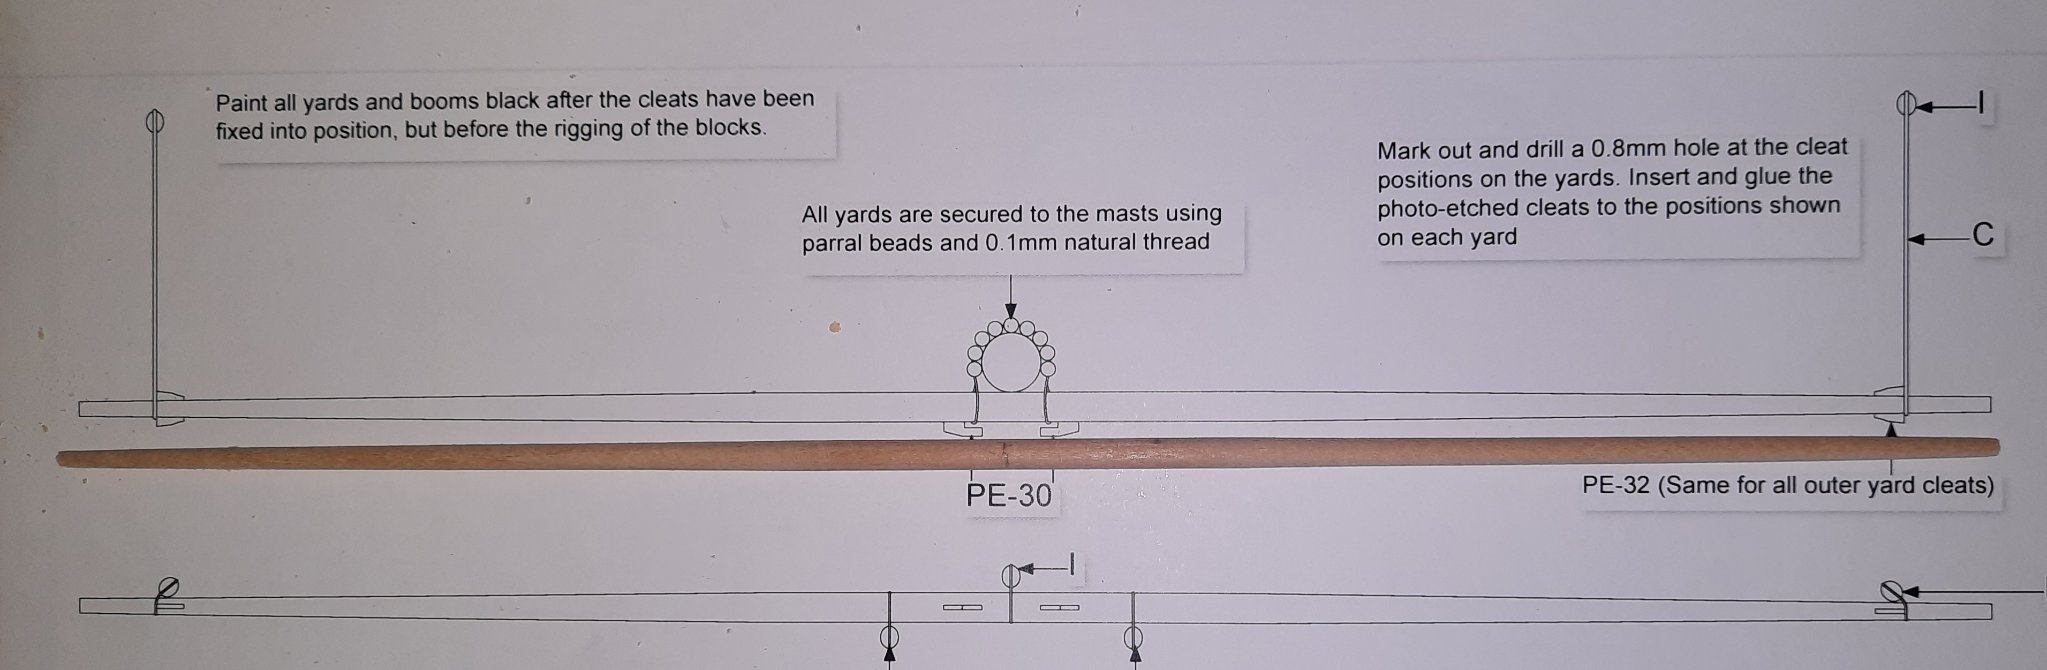
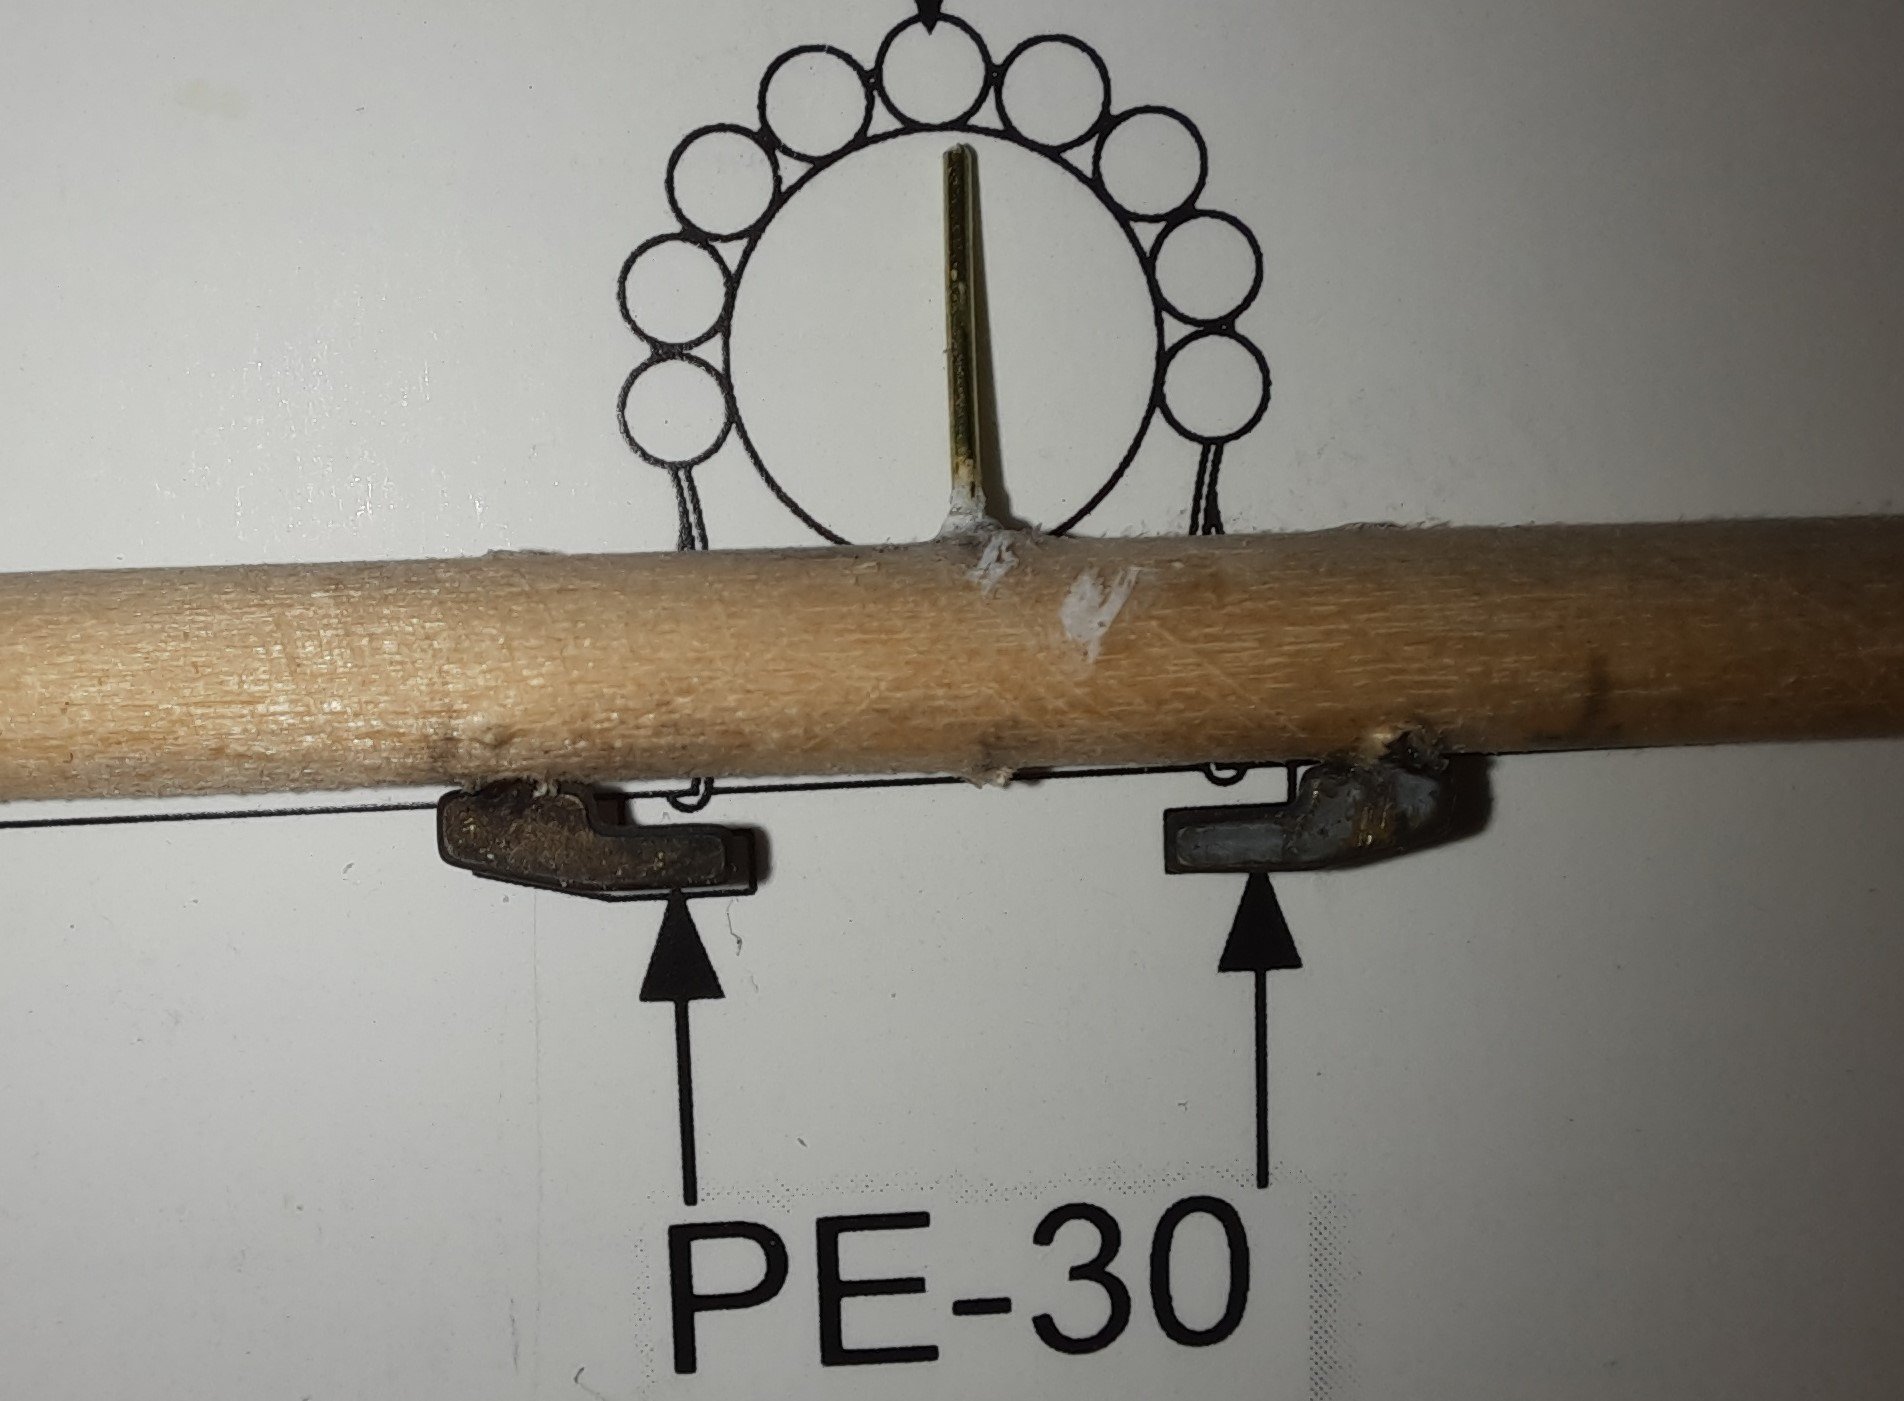
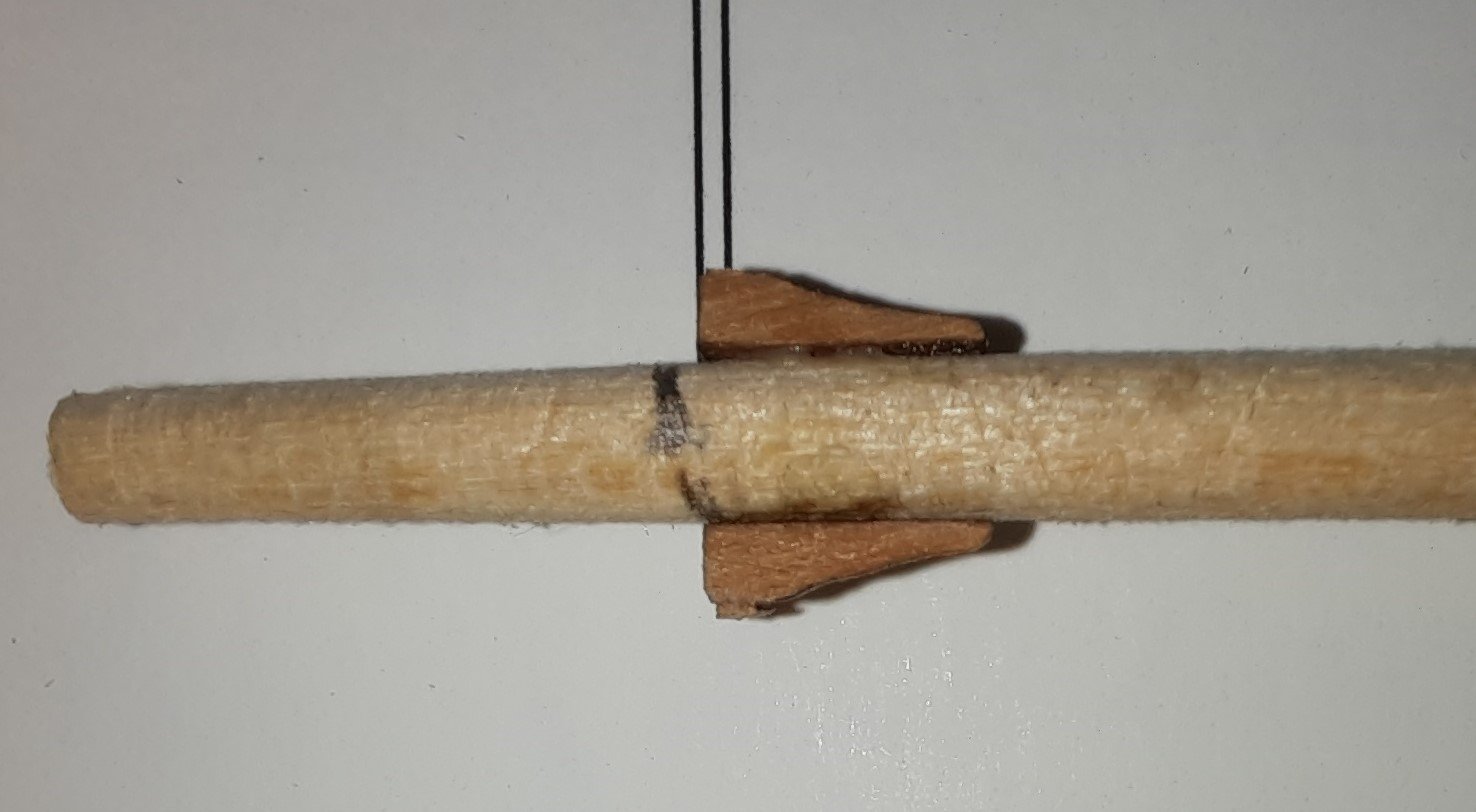
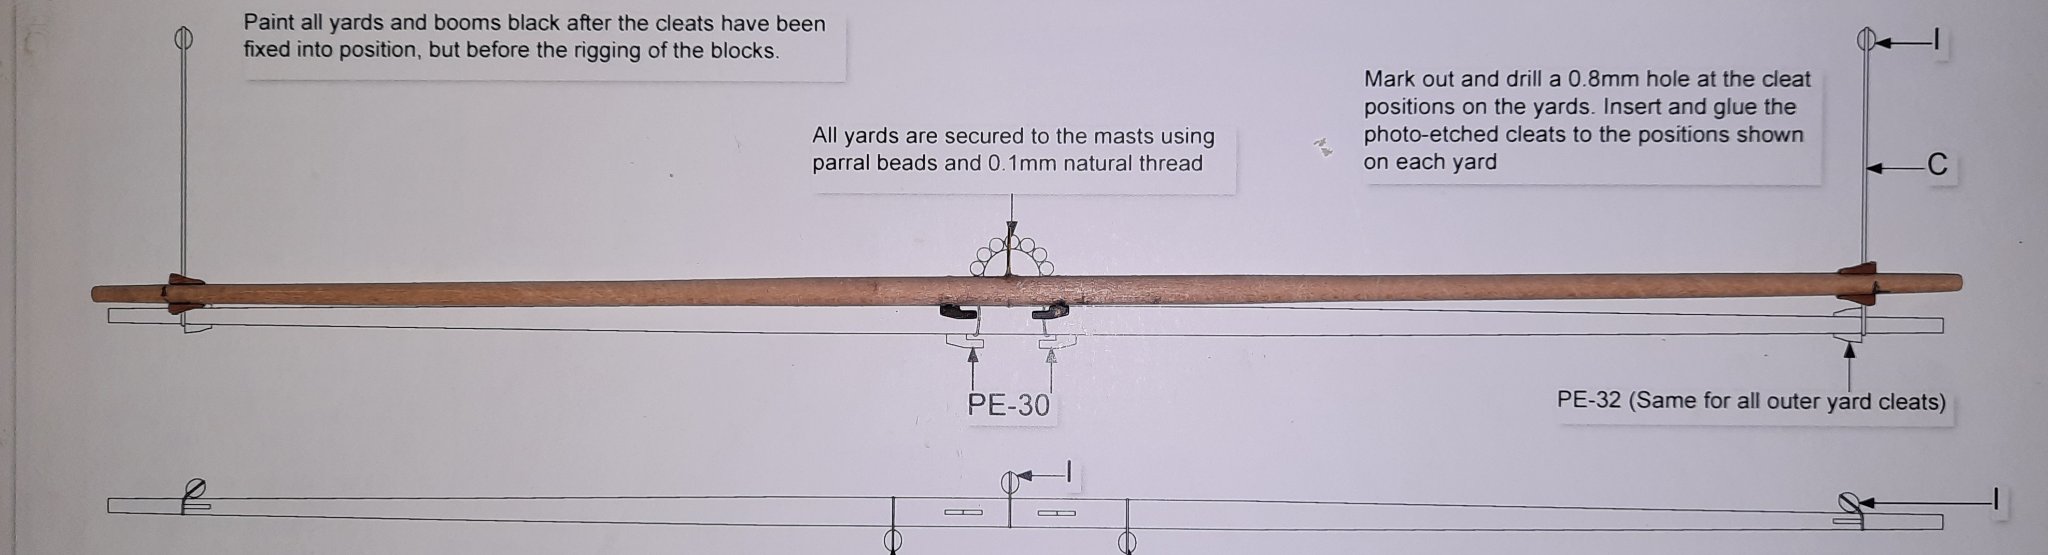
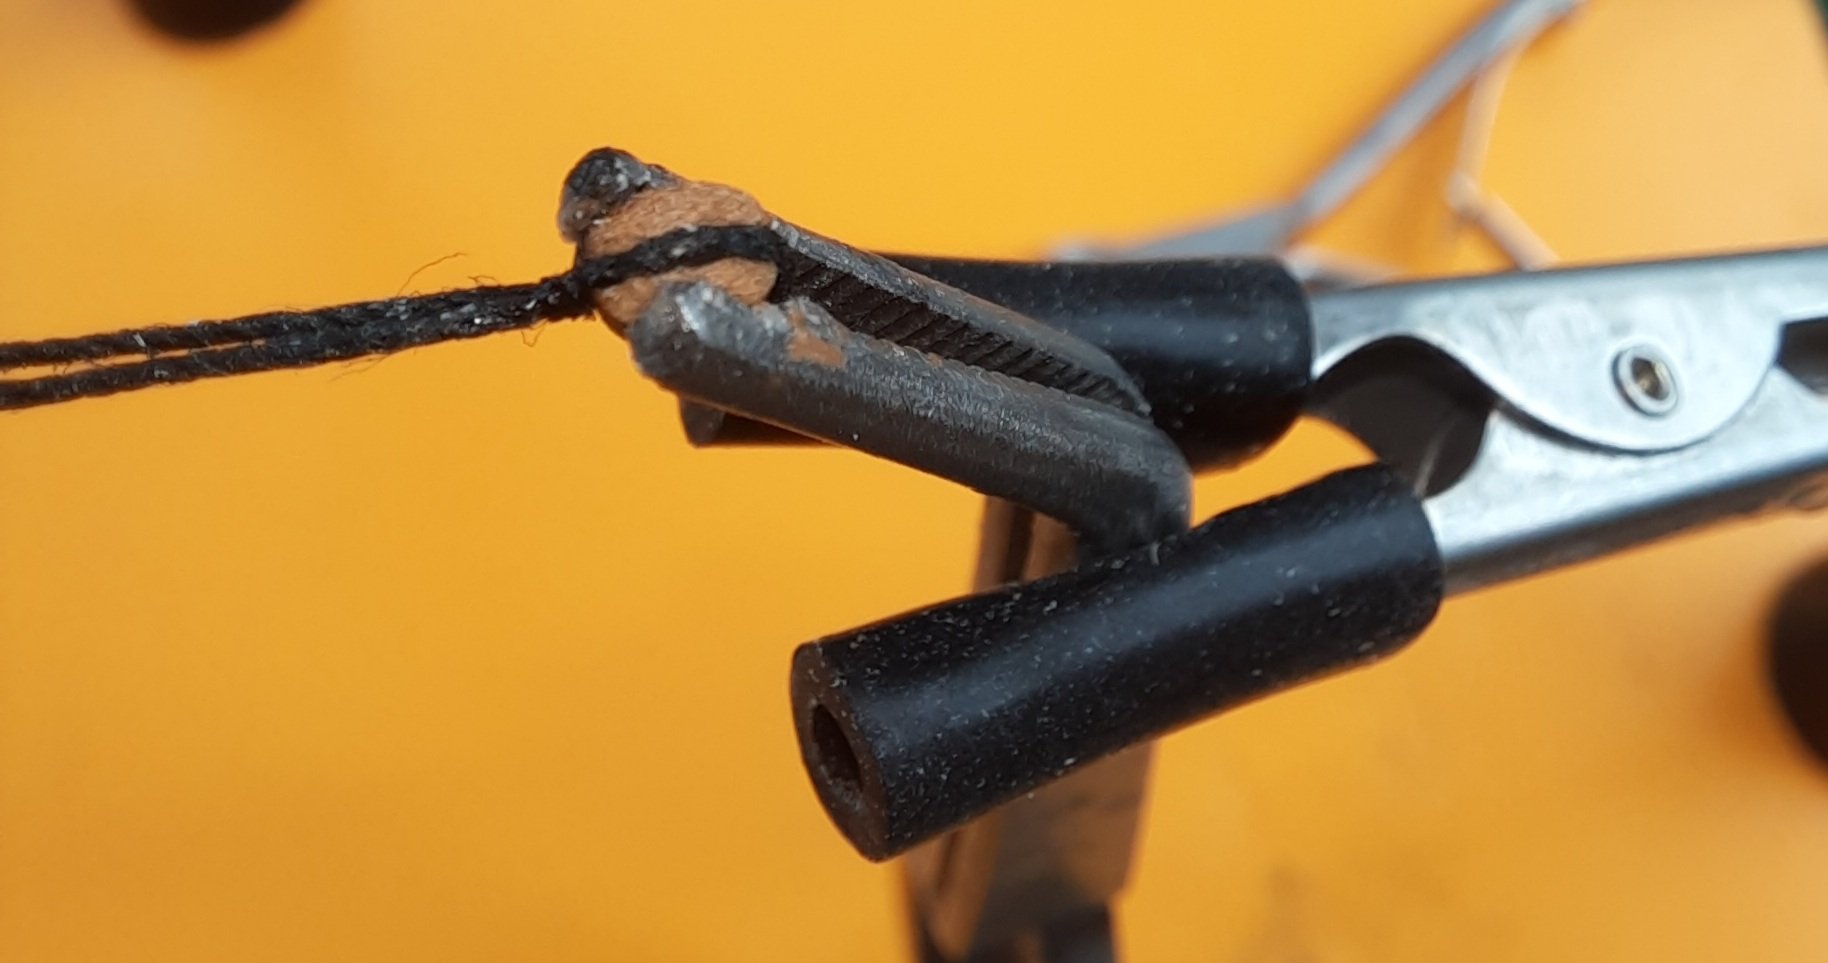
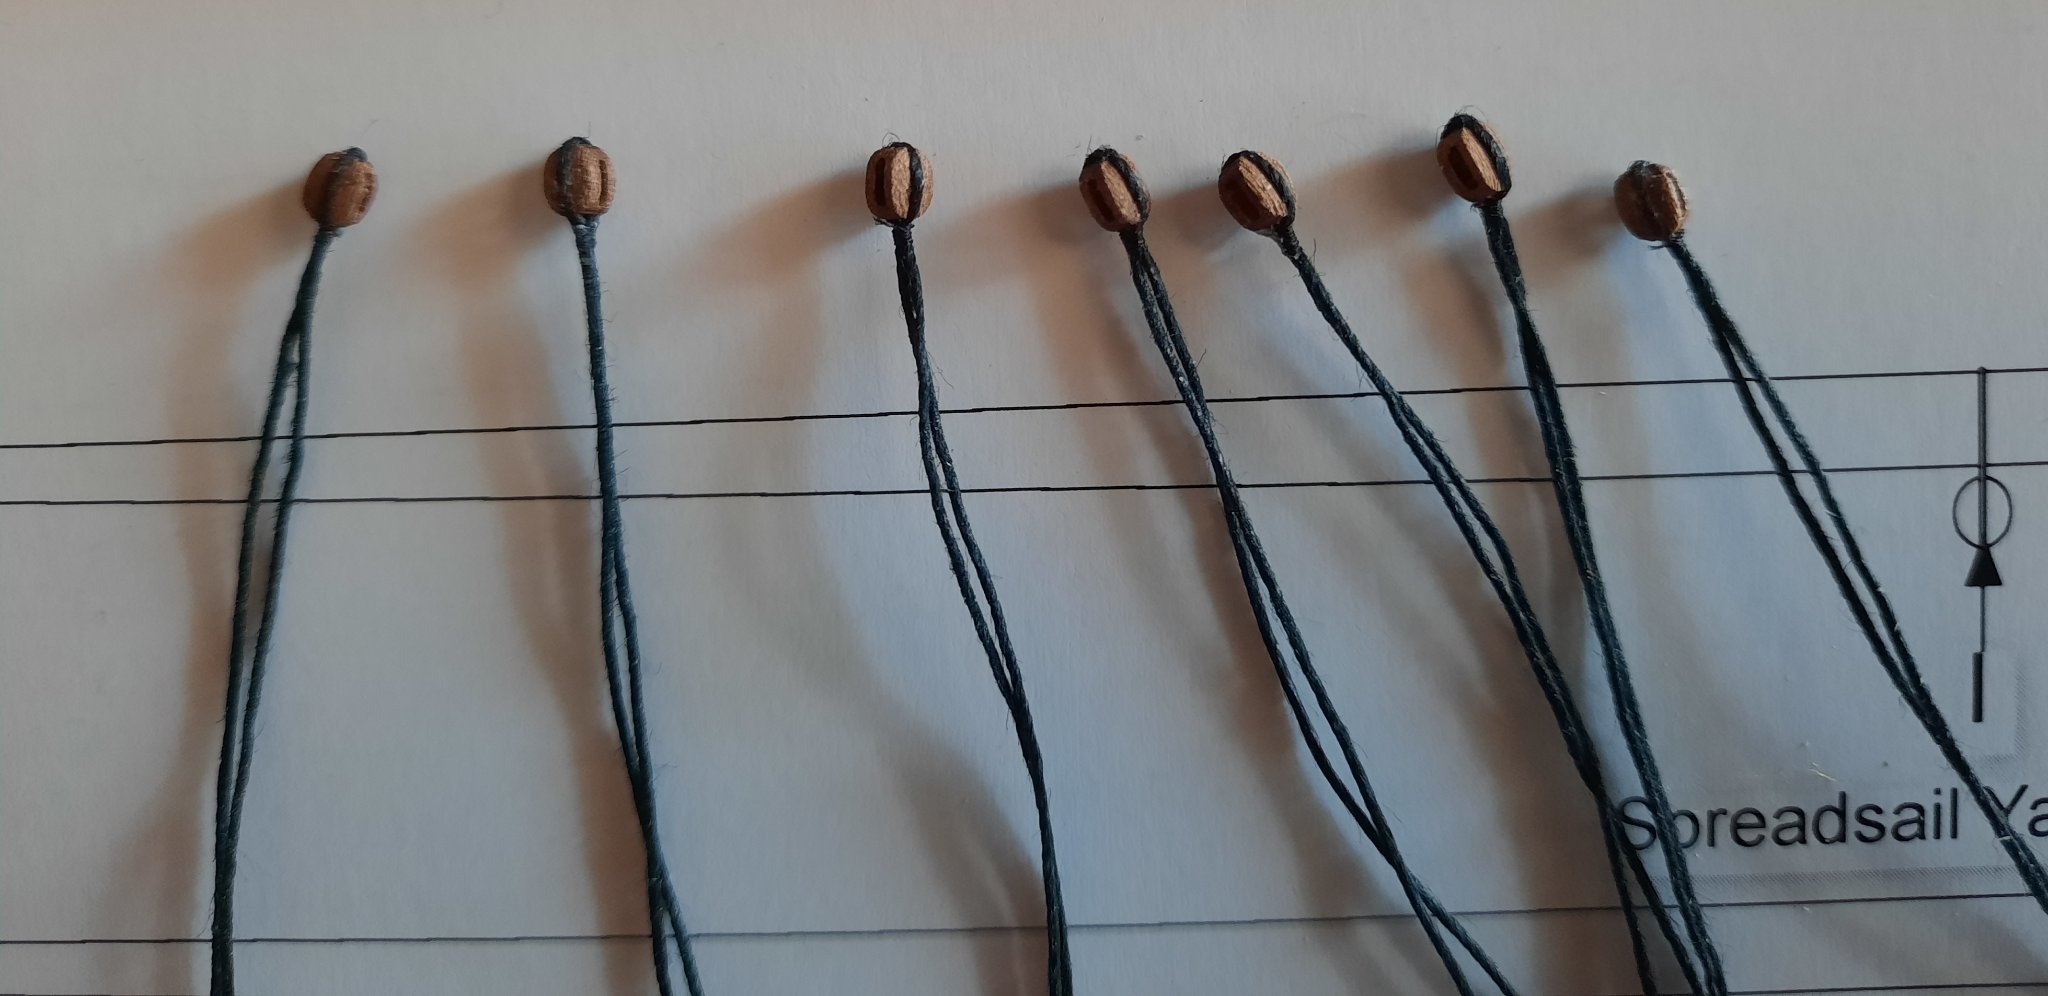
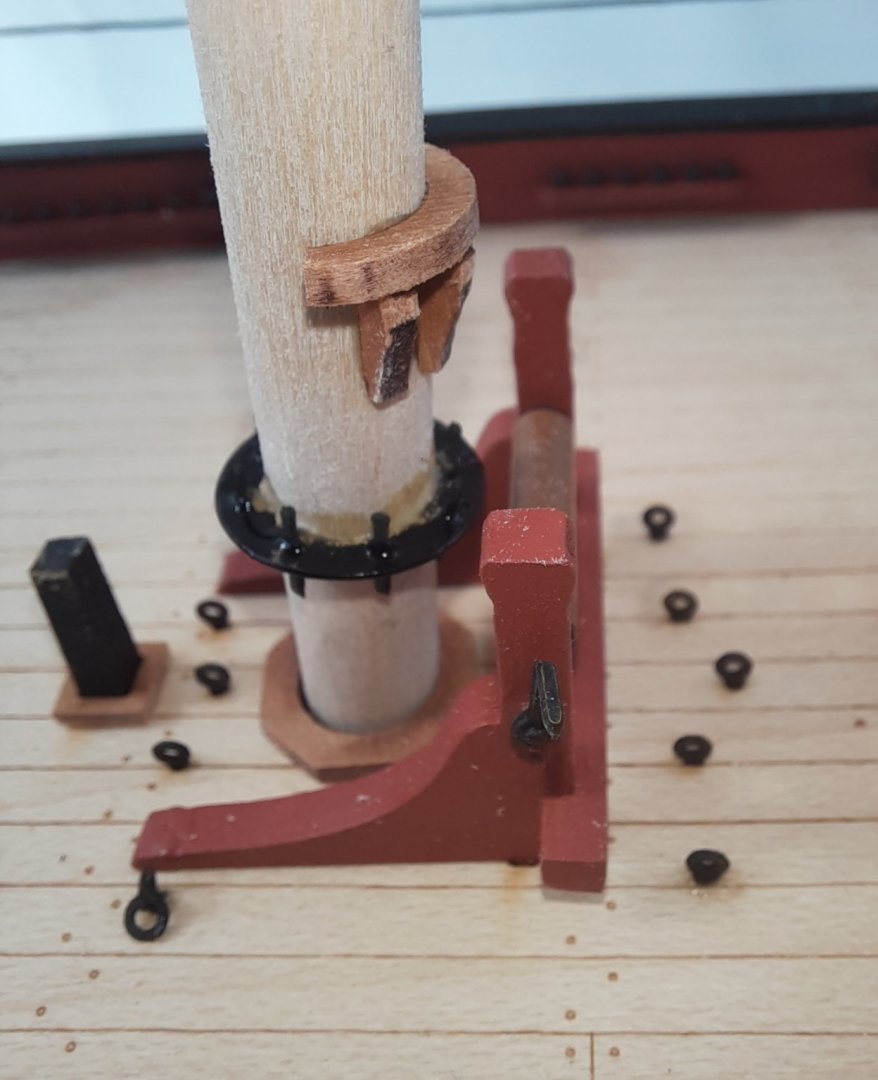
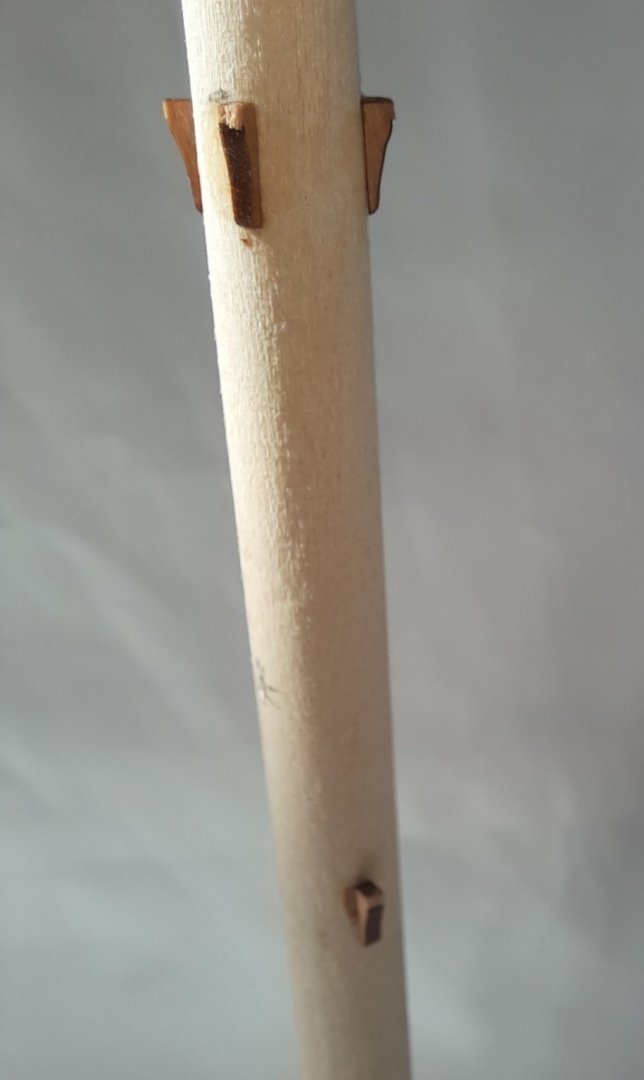
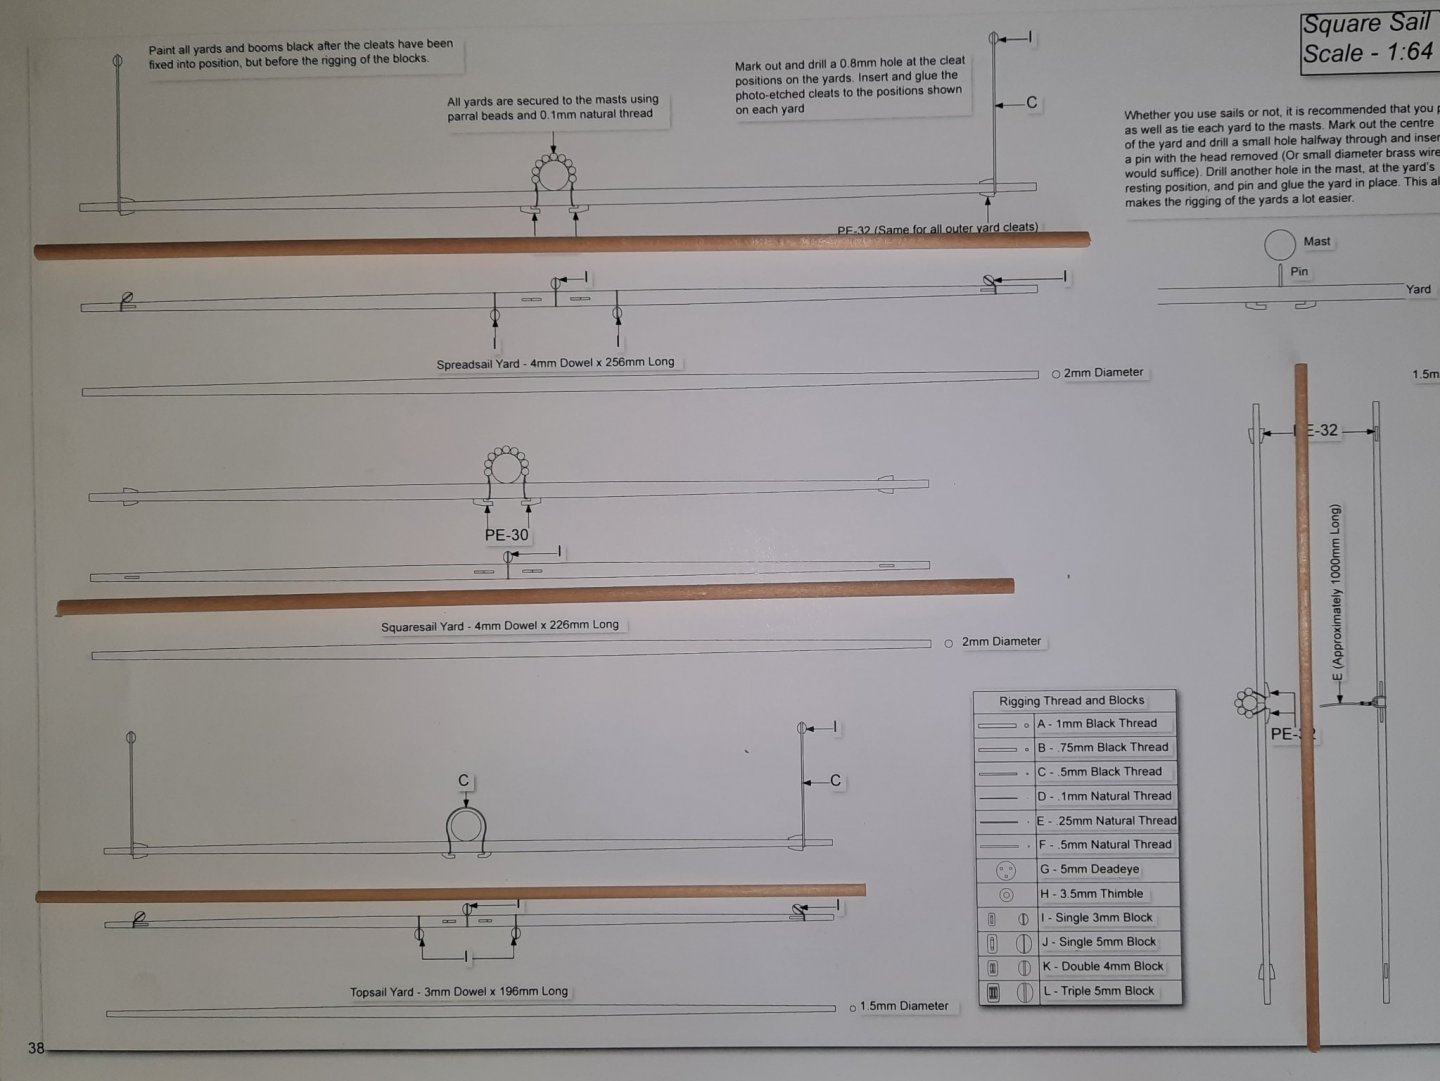
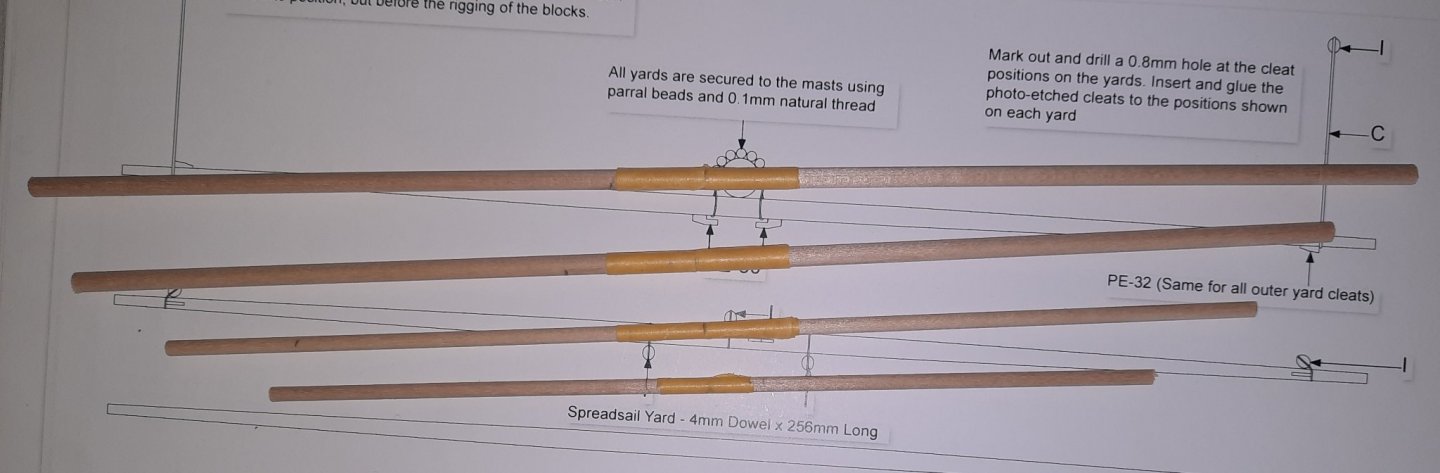
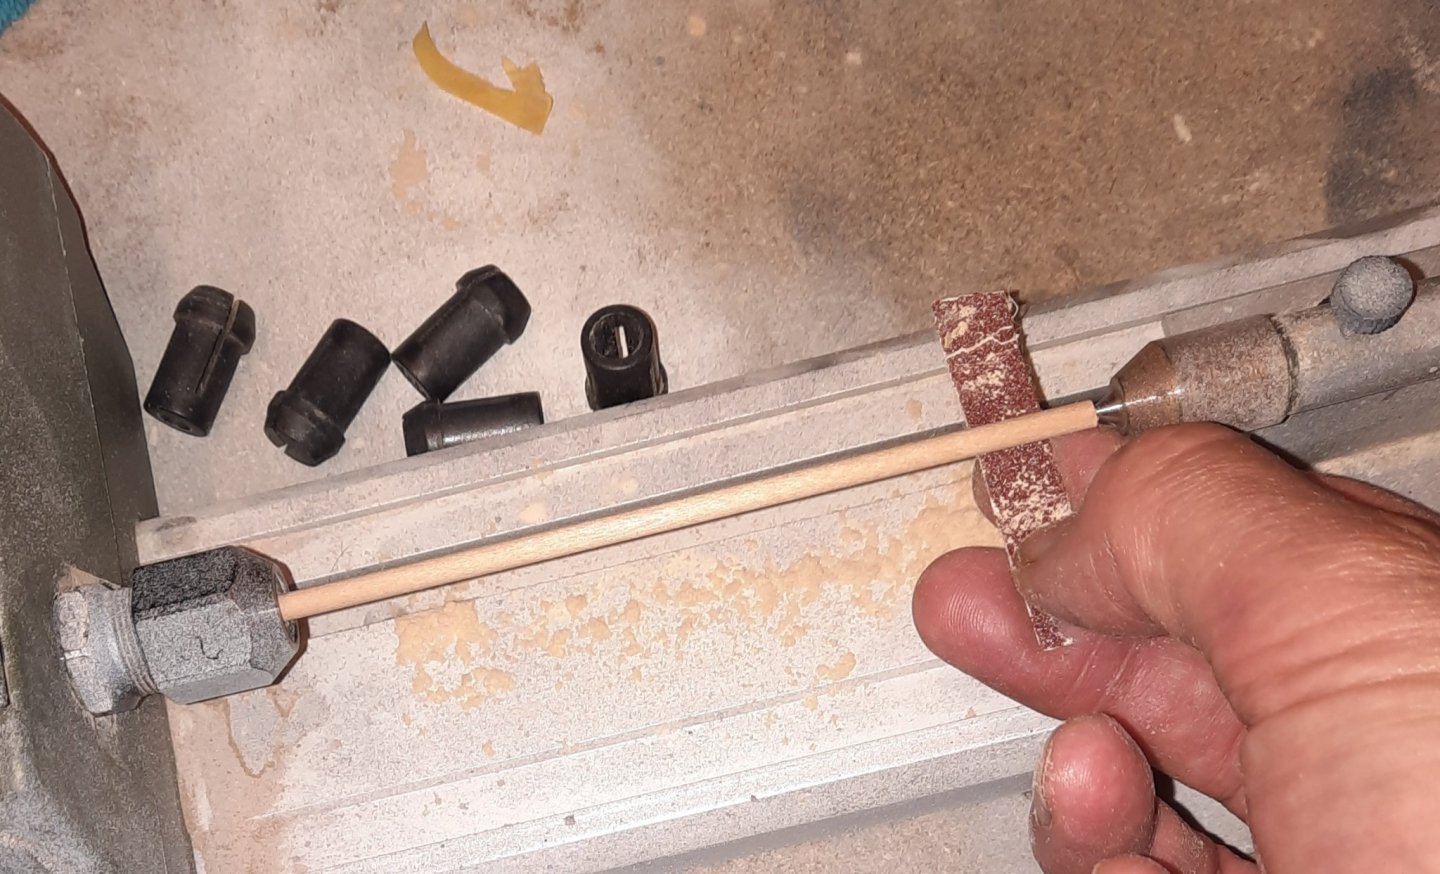
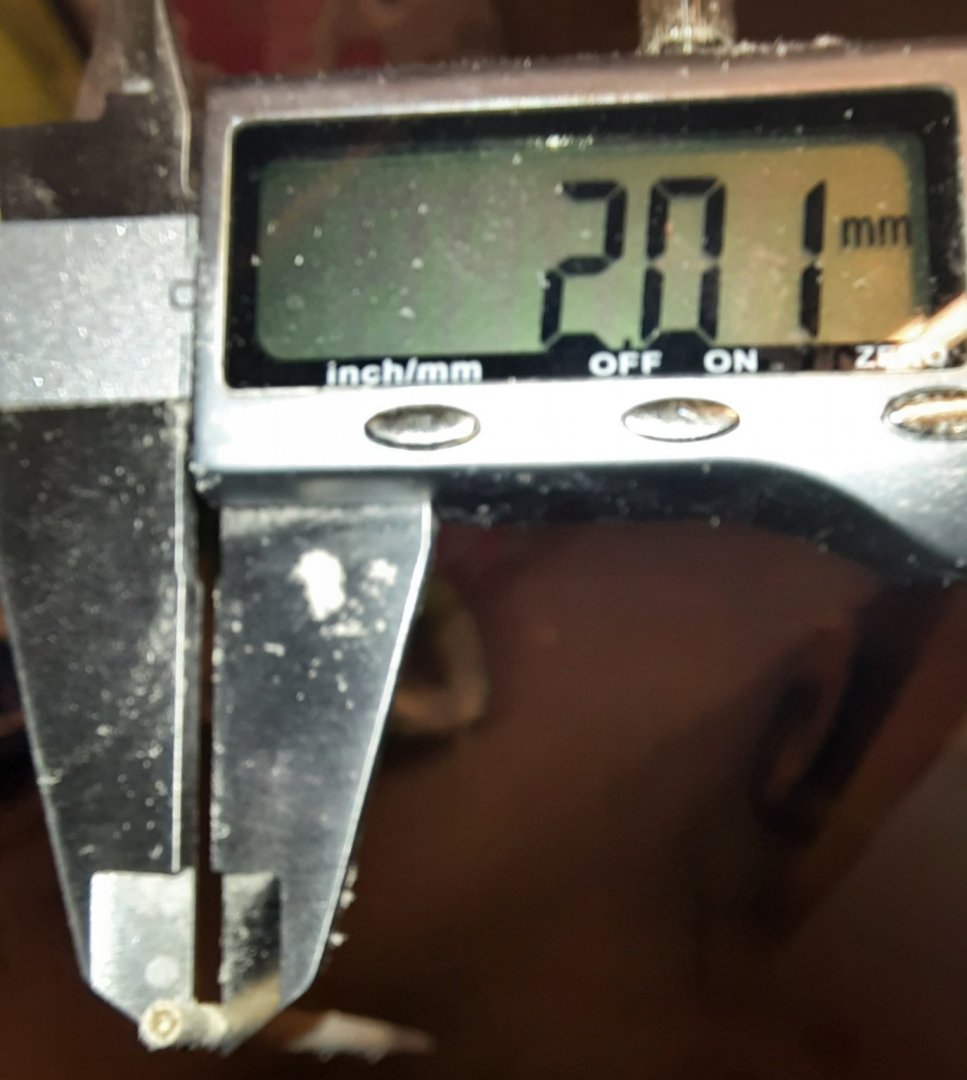
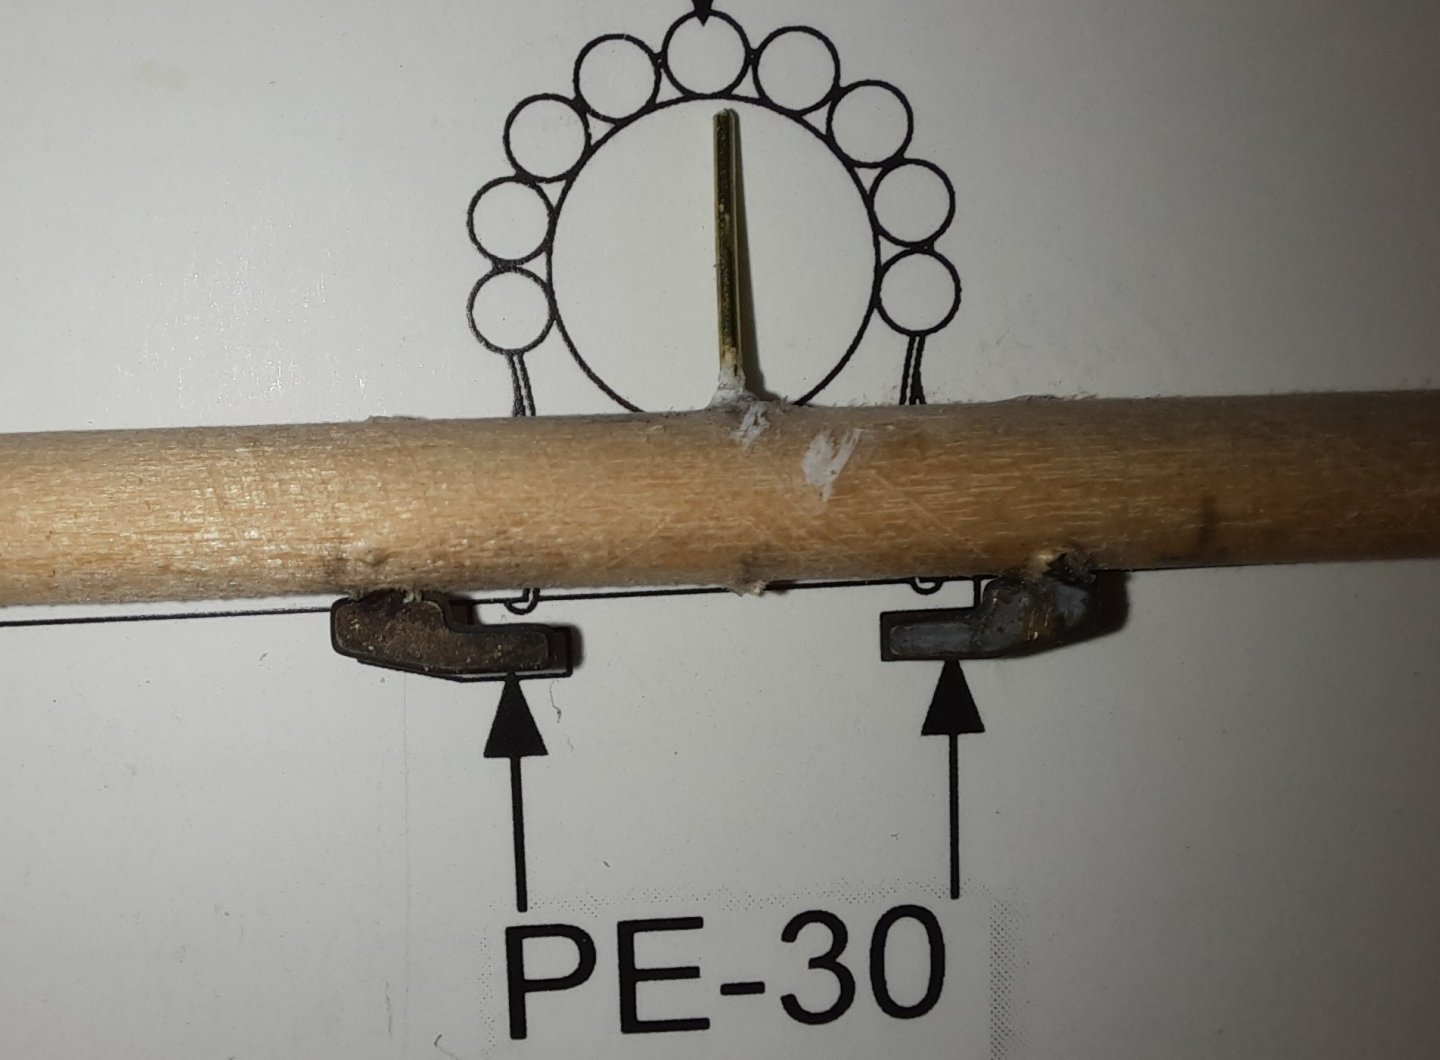
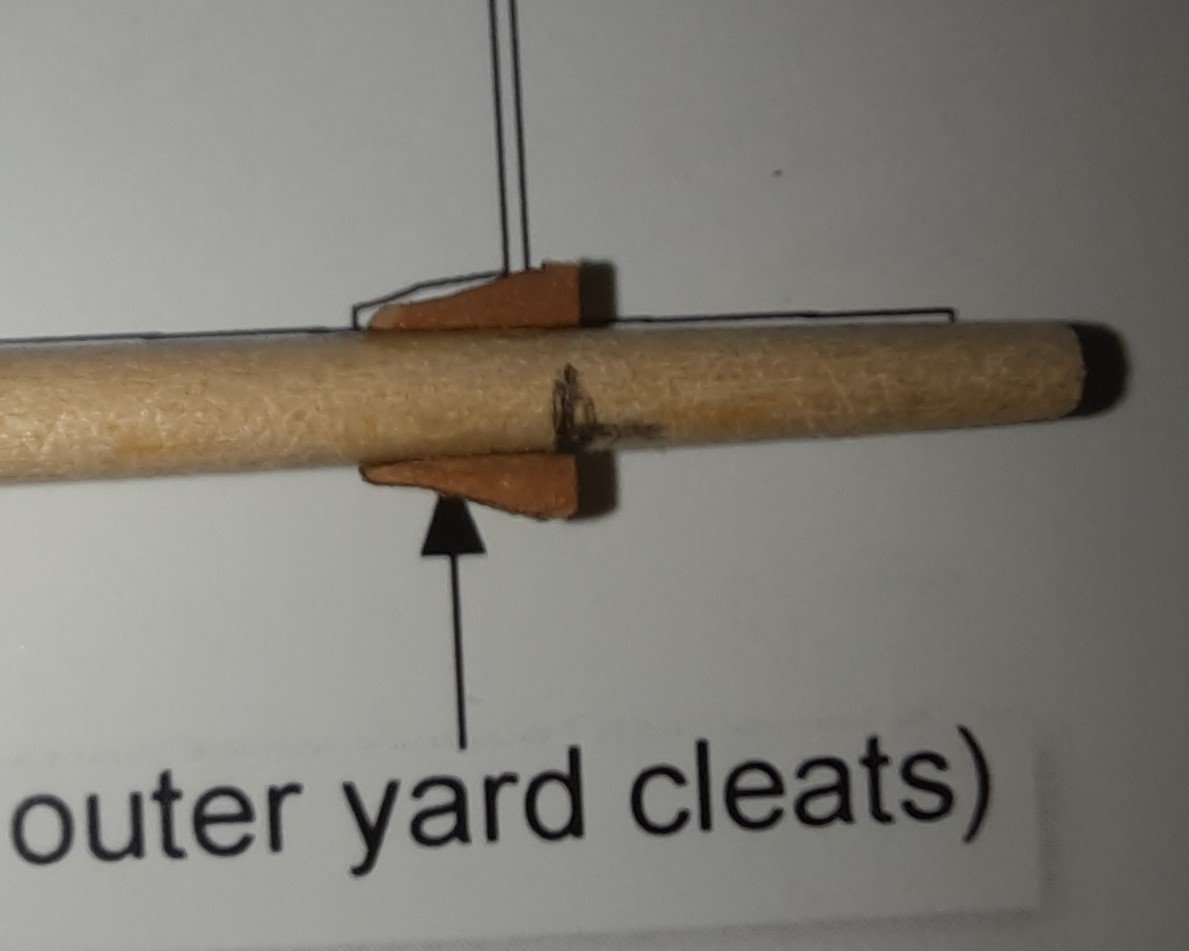
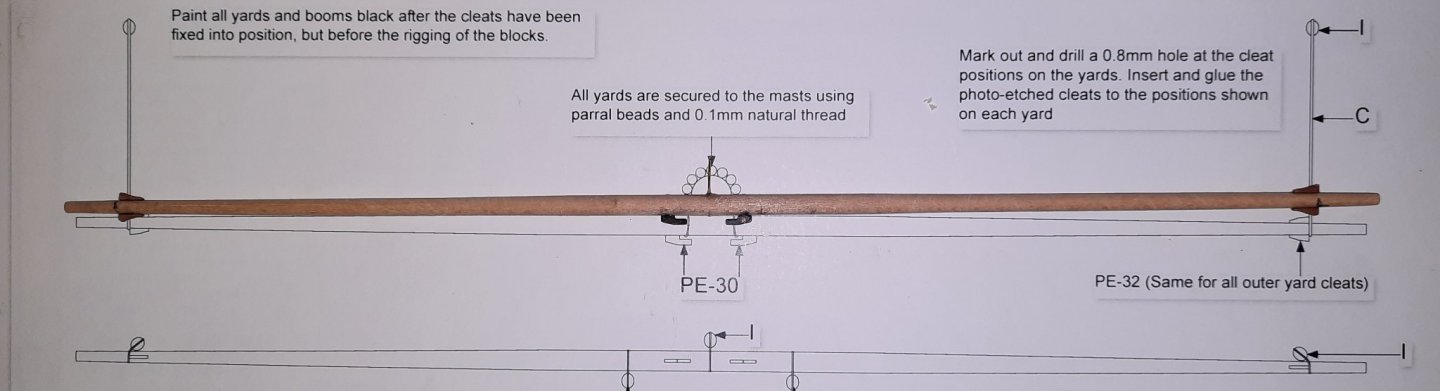
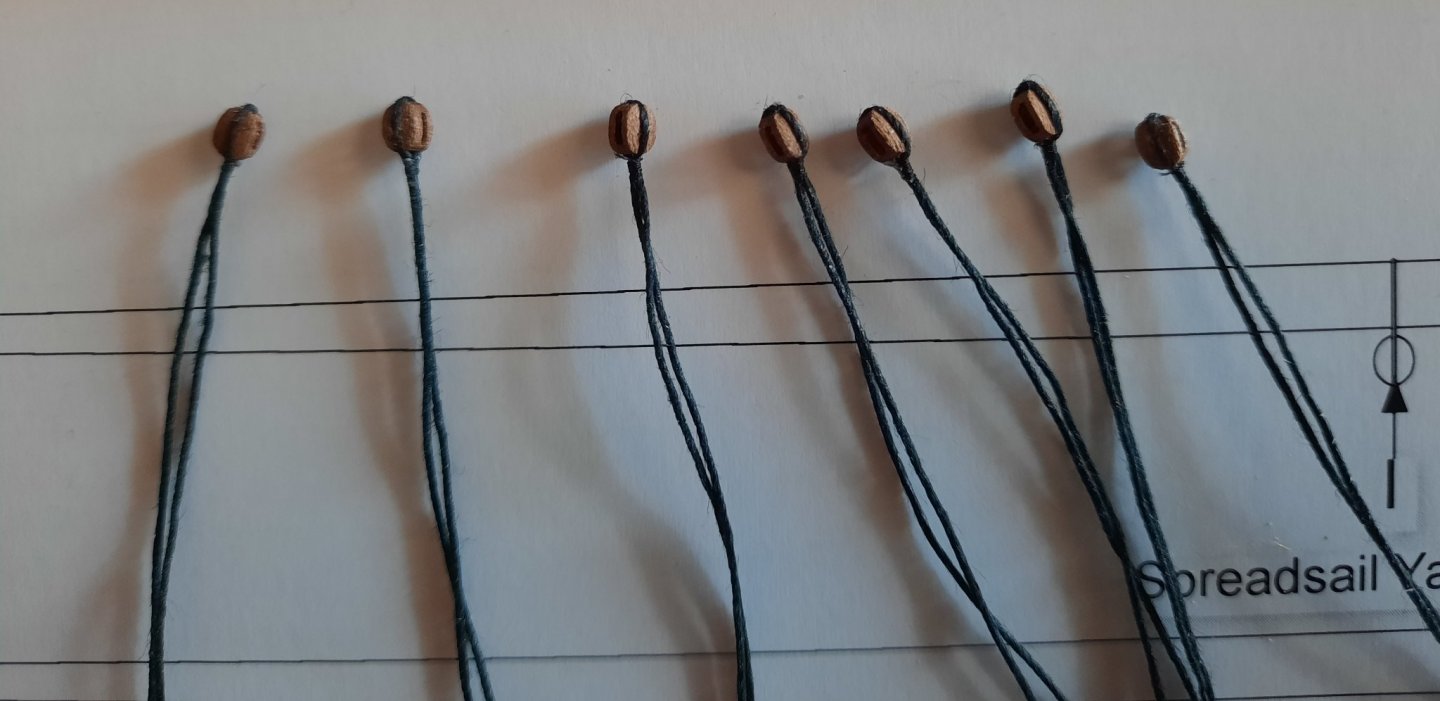
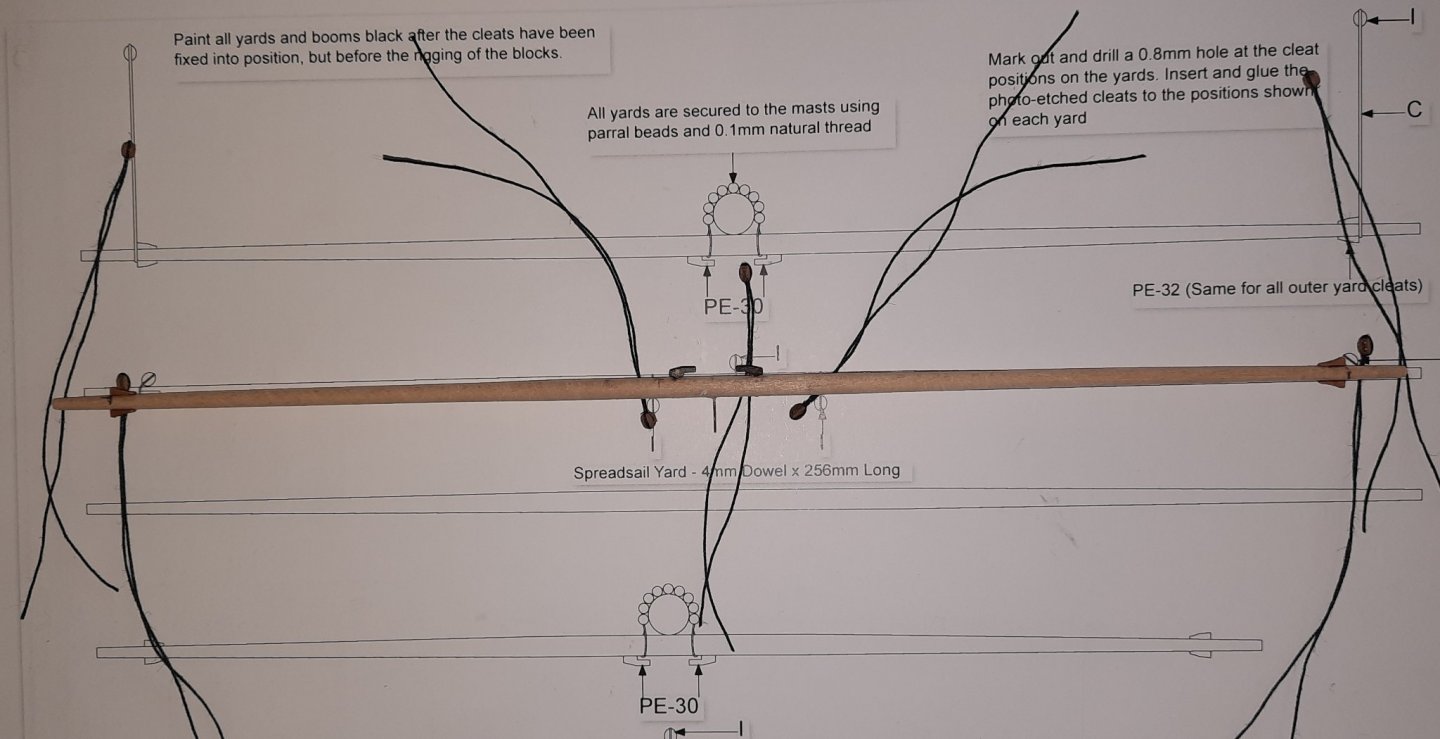
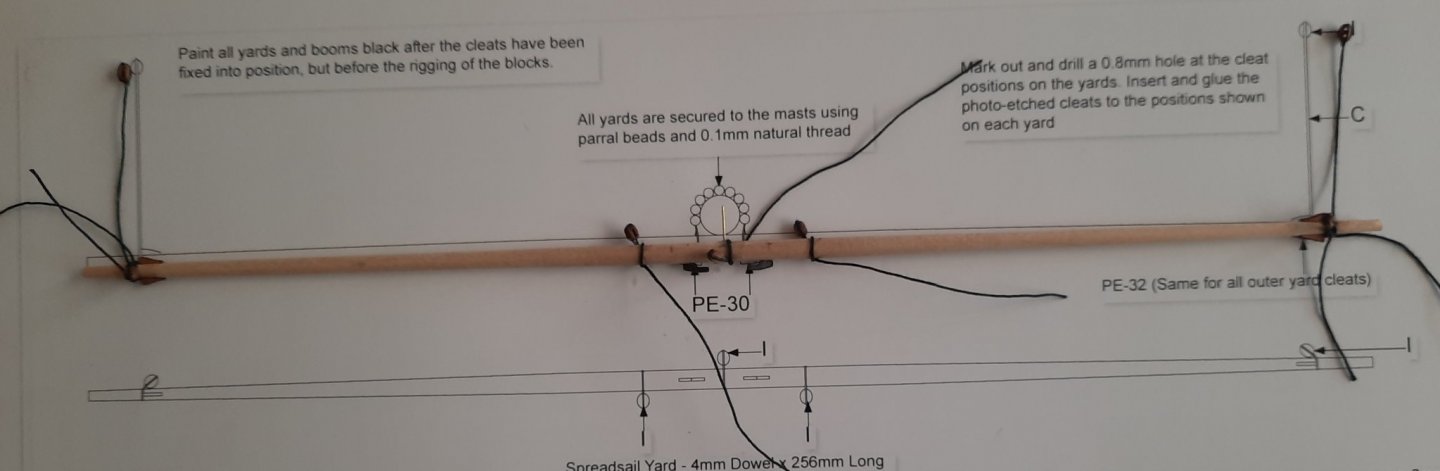
Yards There are 4 yards to make for the Cutter Alert, 2 made from 4 mm dowels and 2 made from 3mm dowels. I thought I would share my build process for the spreadsail yard. The first task is to cut the 4 lengths of dowel as shown in the picture below. I always cut the dowels longer than required. This is because they need to be tapered and as the ends will need a small hole when positioned in the lathe these can be removed once the taper is complete. With reference to the picture below I have added tape the middle section of the dowels, which will not be tapered. I have also added a pencil mark to indicate the central point on all the yards. The next picture shows the spreadsail yard positioned in the lathe ready for the tapering process. I ensured the end of the non-tapered section was at the chuck face. I like to use a thin strip of 120 grit sandpaper to perform the tapering process, as shown in the picture below. Using the thin strip of sandpaper, the taper was applied. I stopped the lathe at regular intervals to check the diameter of the dowel at various points along the length, especially at the end where the 4mm dowel had to be reduced to 2mm, as shown in the next photo. I then repeat the tapering process of the other side of the spreadsail yard. The tapered dowel was then given a light sanding, by hand, with 800 grit sandpaper. Once I was happy with how it looked the two ends were trimmed away so the spreadsail yard was the correct length, as shown in the next picture. Before painting the spreadsail yard black I prefer to add the yard items which are: a) 7 x 3mm single blocks b) 4 x yard cleats c) 2 x inner yard large cleats d) 1 x pin for fixing yard to mast which I have found does make the rigging much easier. Having carefully marked the position of the 2 off inner yard large cleats I used a 0.8 micro drill to make the holes for the two cleat pins. I then added a touch of ca gel to the cleats pins before they were added to the spreadsail yard. I also drilled and added the pin. As can be seen in the photo below they seem to be positioned correctly. Moving swiftly on the positions of the 4 off yard cleats were marked on the spreadsail yard. I used the pear wood yard cleats rather than the PE cleats and then used Titebond original glue as it allowed me a bit more time to adjust their positions. The next two photos show the yard cleats in place on the spreadsail yard. The spreadsail yard is now ready to have the 7 x 3mm single blocks added and to be painted black. I am using the same method to seize the 7 x 3mm single blocks for the spreadsail yard as detailed in my Duchess of Kingston build, which I copied from DELF. Each block is held in the quad hands and seized to a length of 0.5mm black thread using some thin black fly-tying thread secured with a series of alternate top and bottom half hitches. A touch of GA gel was then applied to the seizing. A completed seized block is shown in the photo below. It did not take too long to seize the 7 x 3 mm spreadsail yard blocks as shown in the next picture. The 7 x 3mm blocks have been placed in their approx. position on the spreadsail yard in the next photo. The 7 x 3mm blocks were then attached to the spreadsail yard using a simple clove hitch knot. I then applied a diluted coat of Titebond original to the thread to seal the clove hitch knot and to keep the blocks in the right position. Once the diluted Titebond original had dried the excess thread ends were trimmed and the spreadsail yard was painted black and then temporarily pinned to the main mast for the next photo. The above process will be repeated for the 3 other yards.


- 160 replies
-
- 6
-
-
- Alert
- vanguard models
- (and 1 more)
-
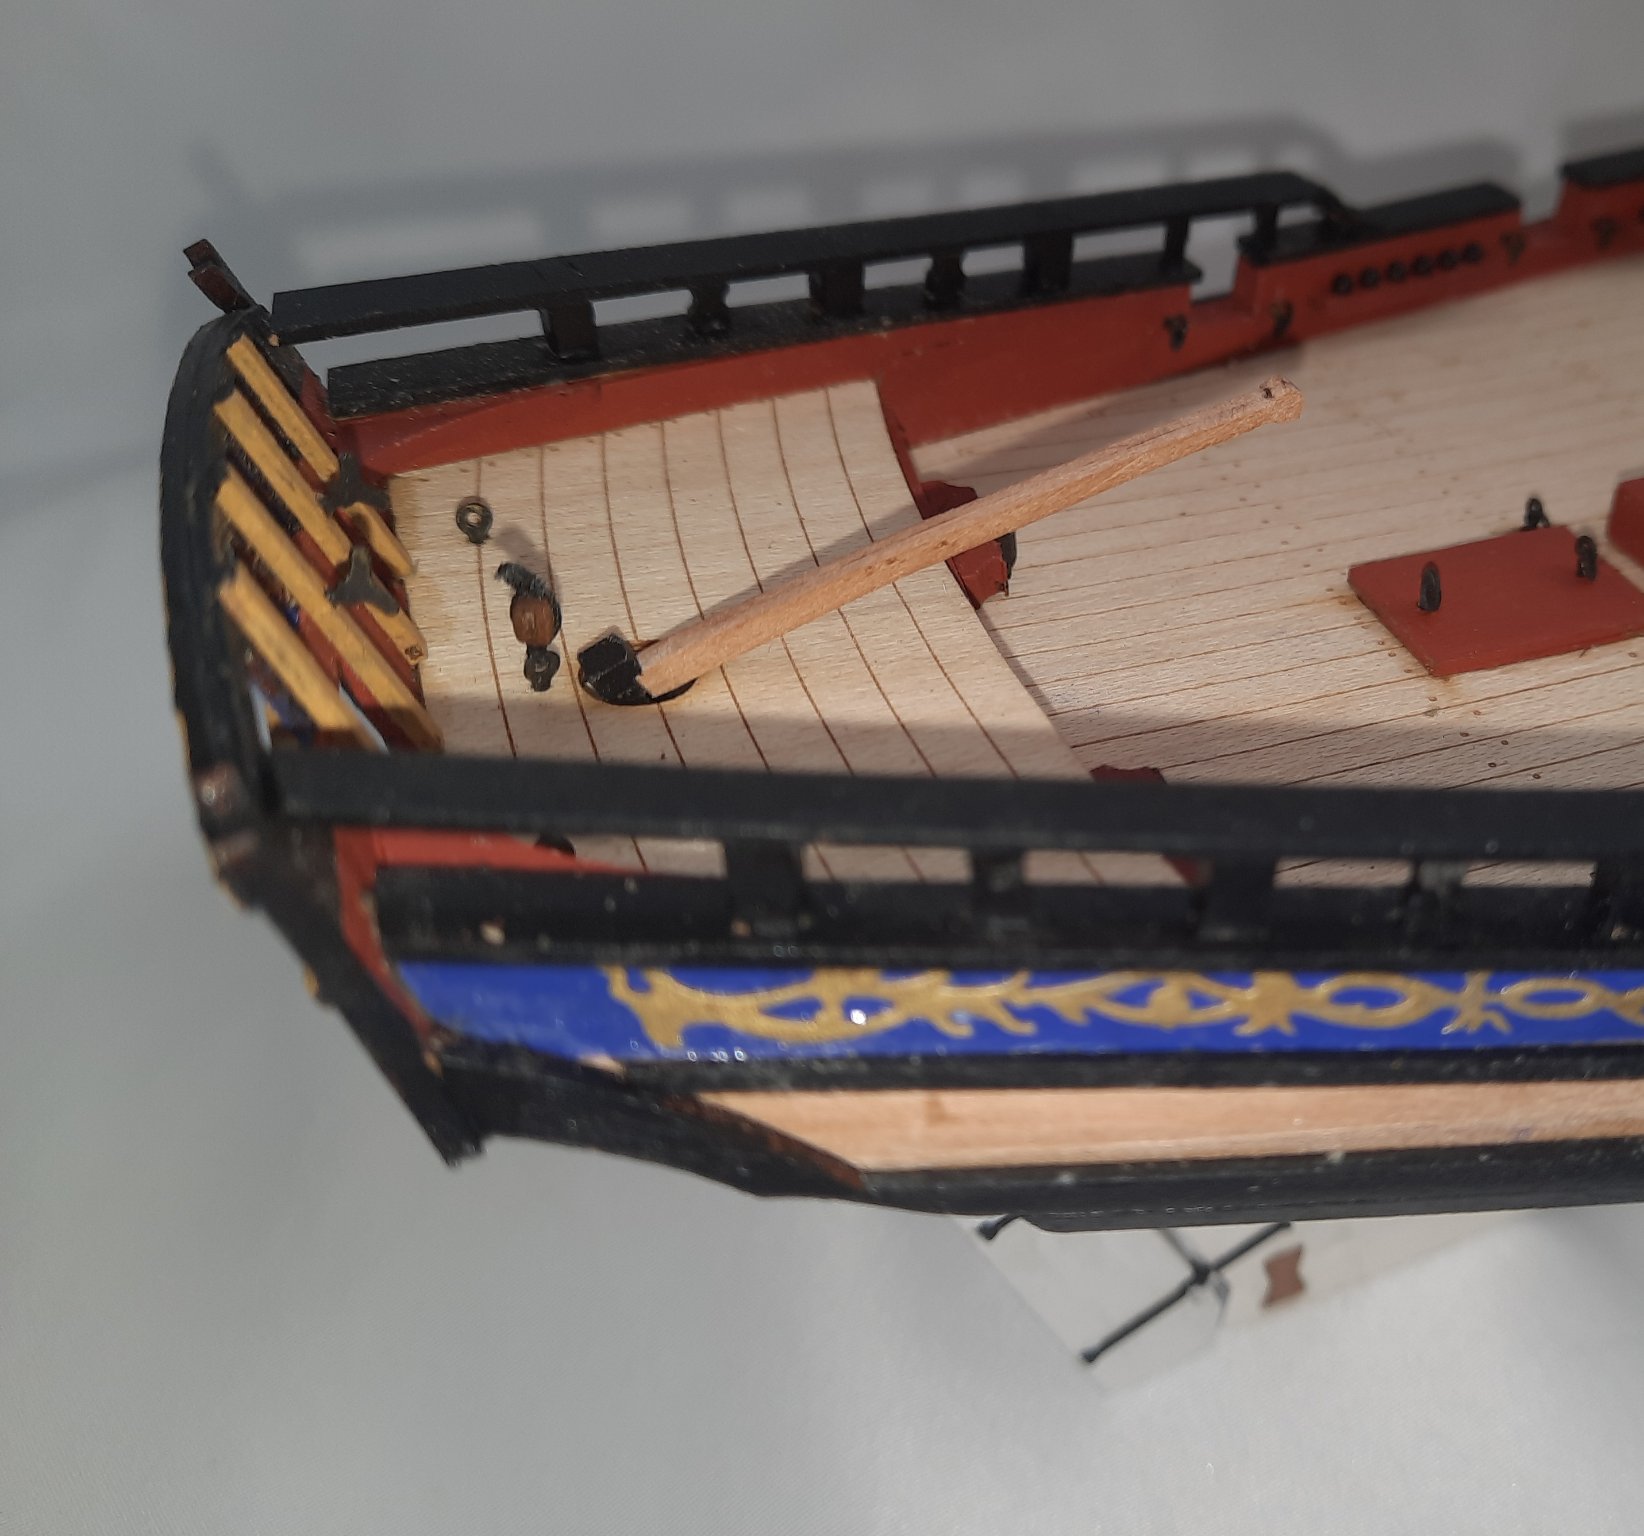
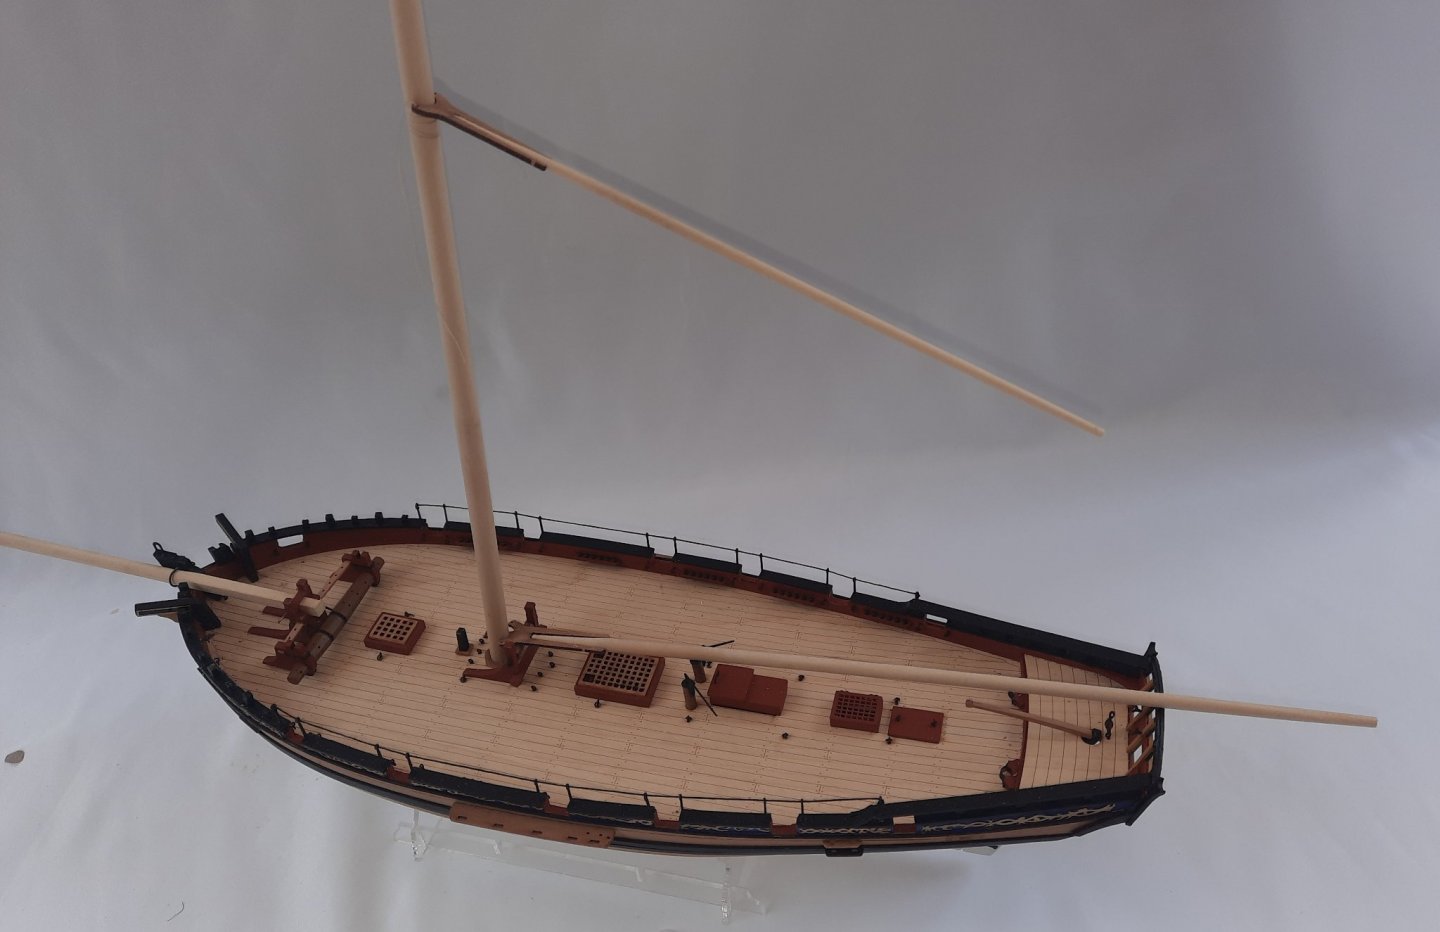
Work has been slow over the last couple of days due to an unexpected family emergency. I have now completed the shaping of the bowsprit and two booms (main and driver). They will require the various block and cleats to be added. The bowsprit was an interesting shaping task. The raw material is an 8mm dowel. It requires a square end which has to fit through the square hole in the pawl bitt head and bowsprit step post. The rest of the dowel is tapered 6mm (from the square post) to 4.5mm at the other end. I started the process my making the square post section. Using my mini bench saw I cut the basic square shape. It then required a bit of effort using a sanding stick before the part would fit through the pawl bitt head and bowsprit step post. The round section of the dowel was then tapered using my mini bench lathe. In retrospect I think it would have been easier to have done the taper first and then squared of the end section. The 2 x 1mm holes were drilled. I have inserted some copper wire in these holes for the time being. Bowsprit has been dry fitted. The Main Boom and Driver Boom were both quite easy to make. The Main Boom raw material was a 5mm dowel. I started by tapering the short section for the main boom jaws. Once I was happy with how the main boom jaws fitted I then tapered the the rest of the dowel from 5mm down to 3mm. Main Boom resting on main bitt rail I repeated the process for the driver boom, which was made from a length of 3mm dowel. Main and driver boom. I used a small length of 0,1mm thread to temporarily hold the driver boom for the photo shoot. Bowsprit, Main Boom and Driver Boom with main mast


- 160 replies
-
- 4
-
-
- Alert
- vanguard models
- (and 1 more)
-
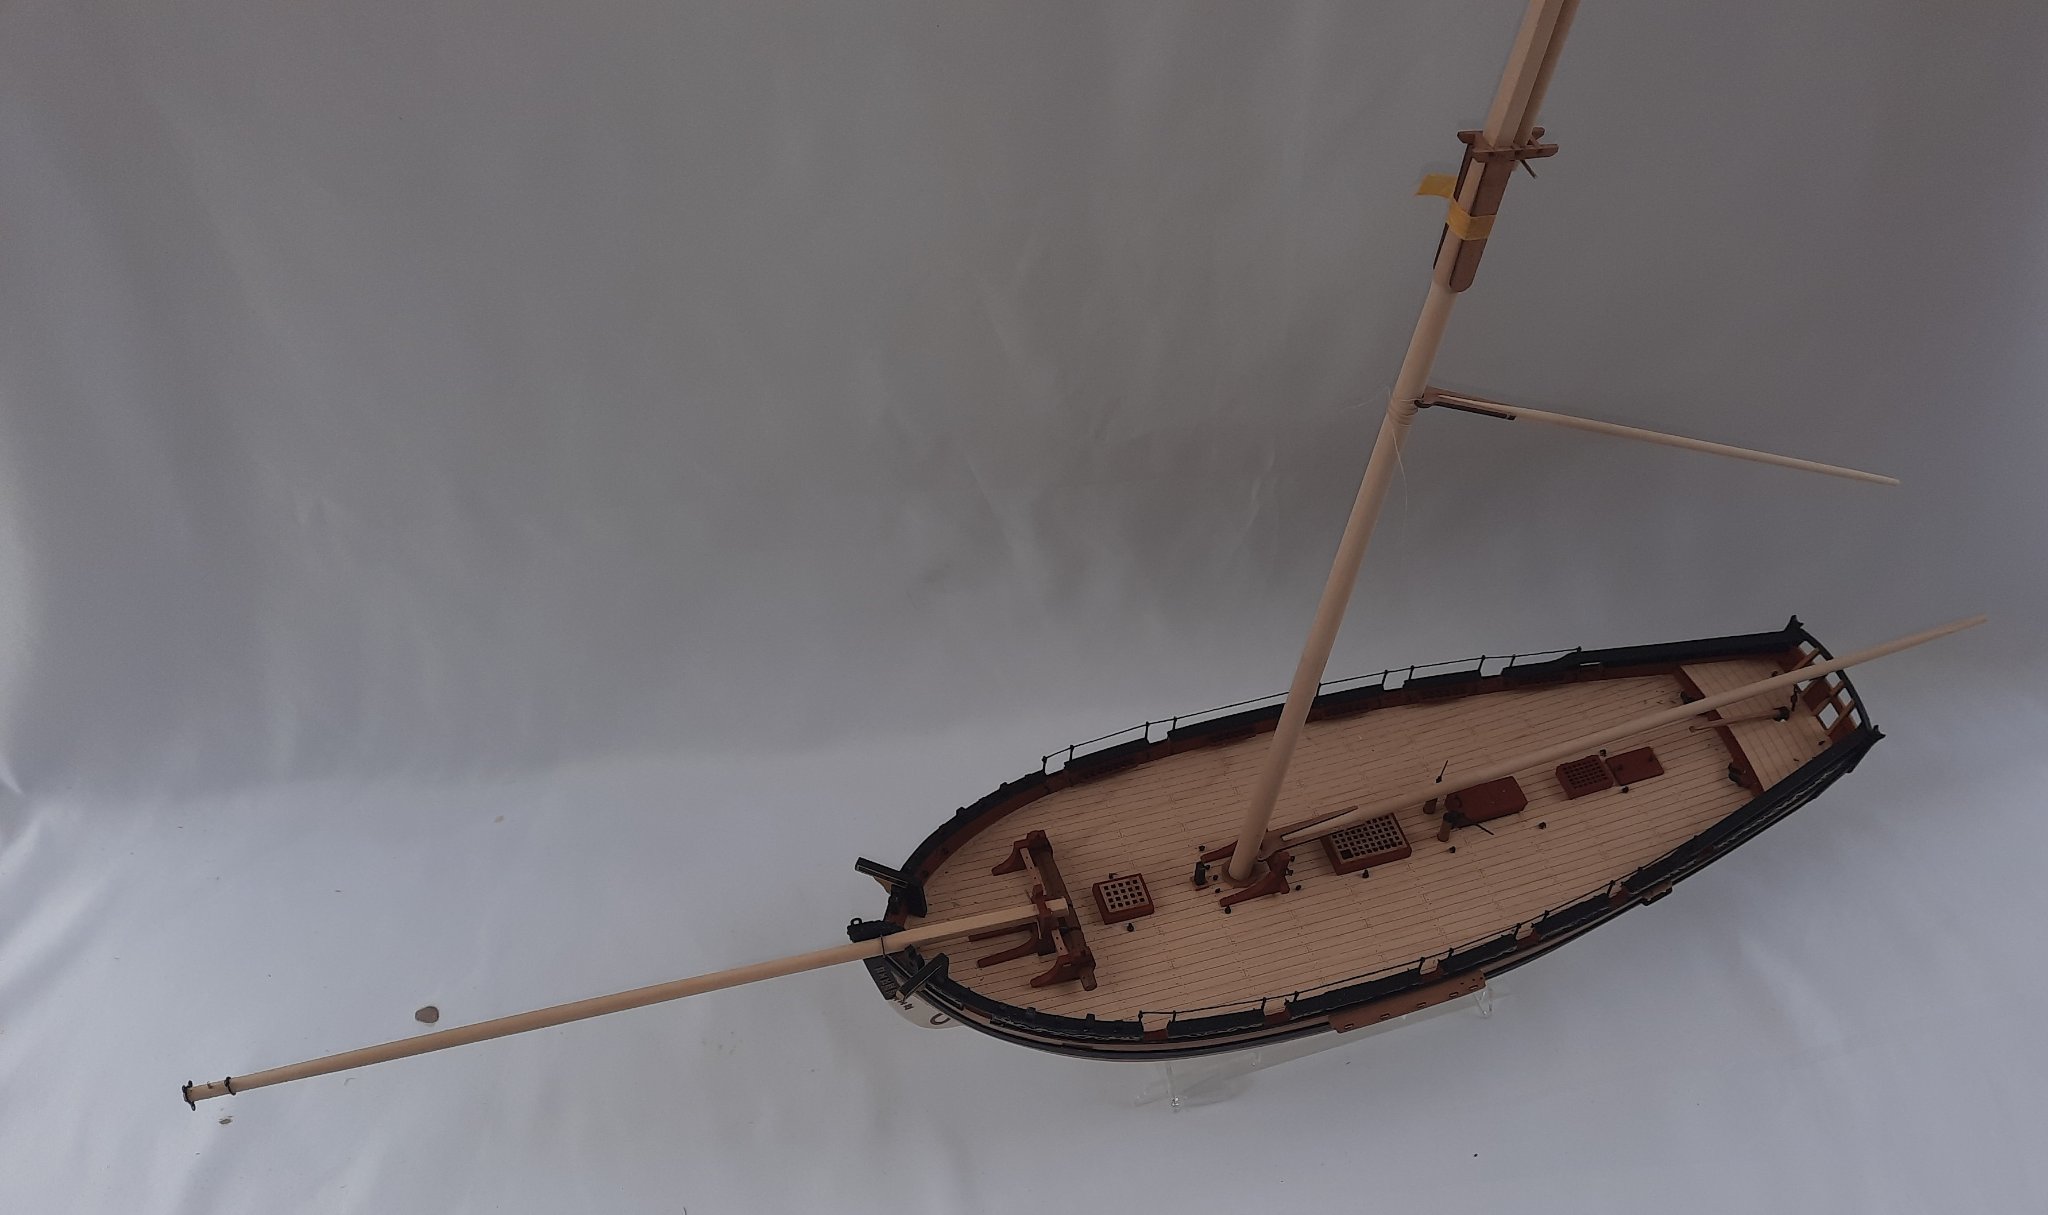
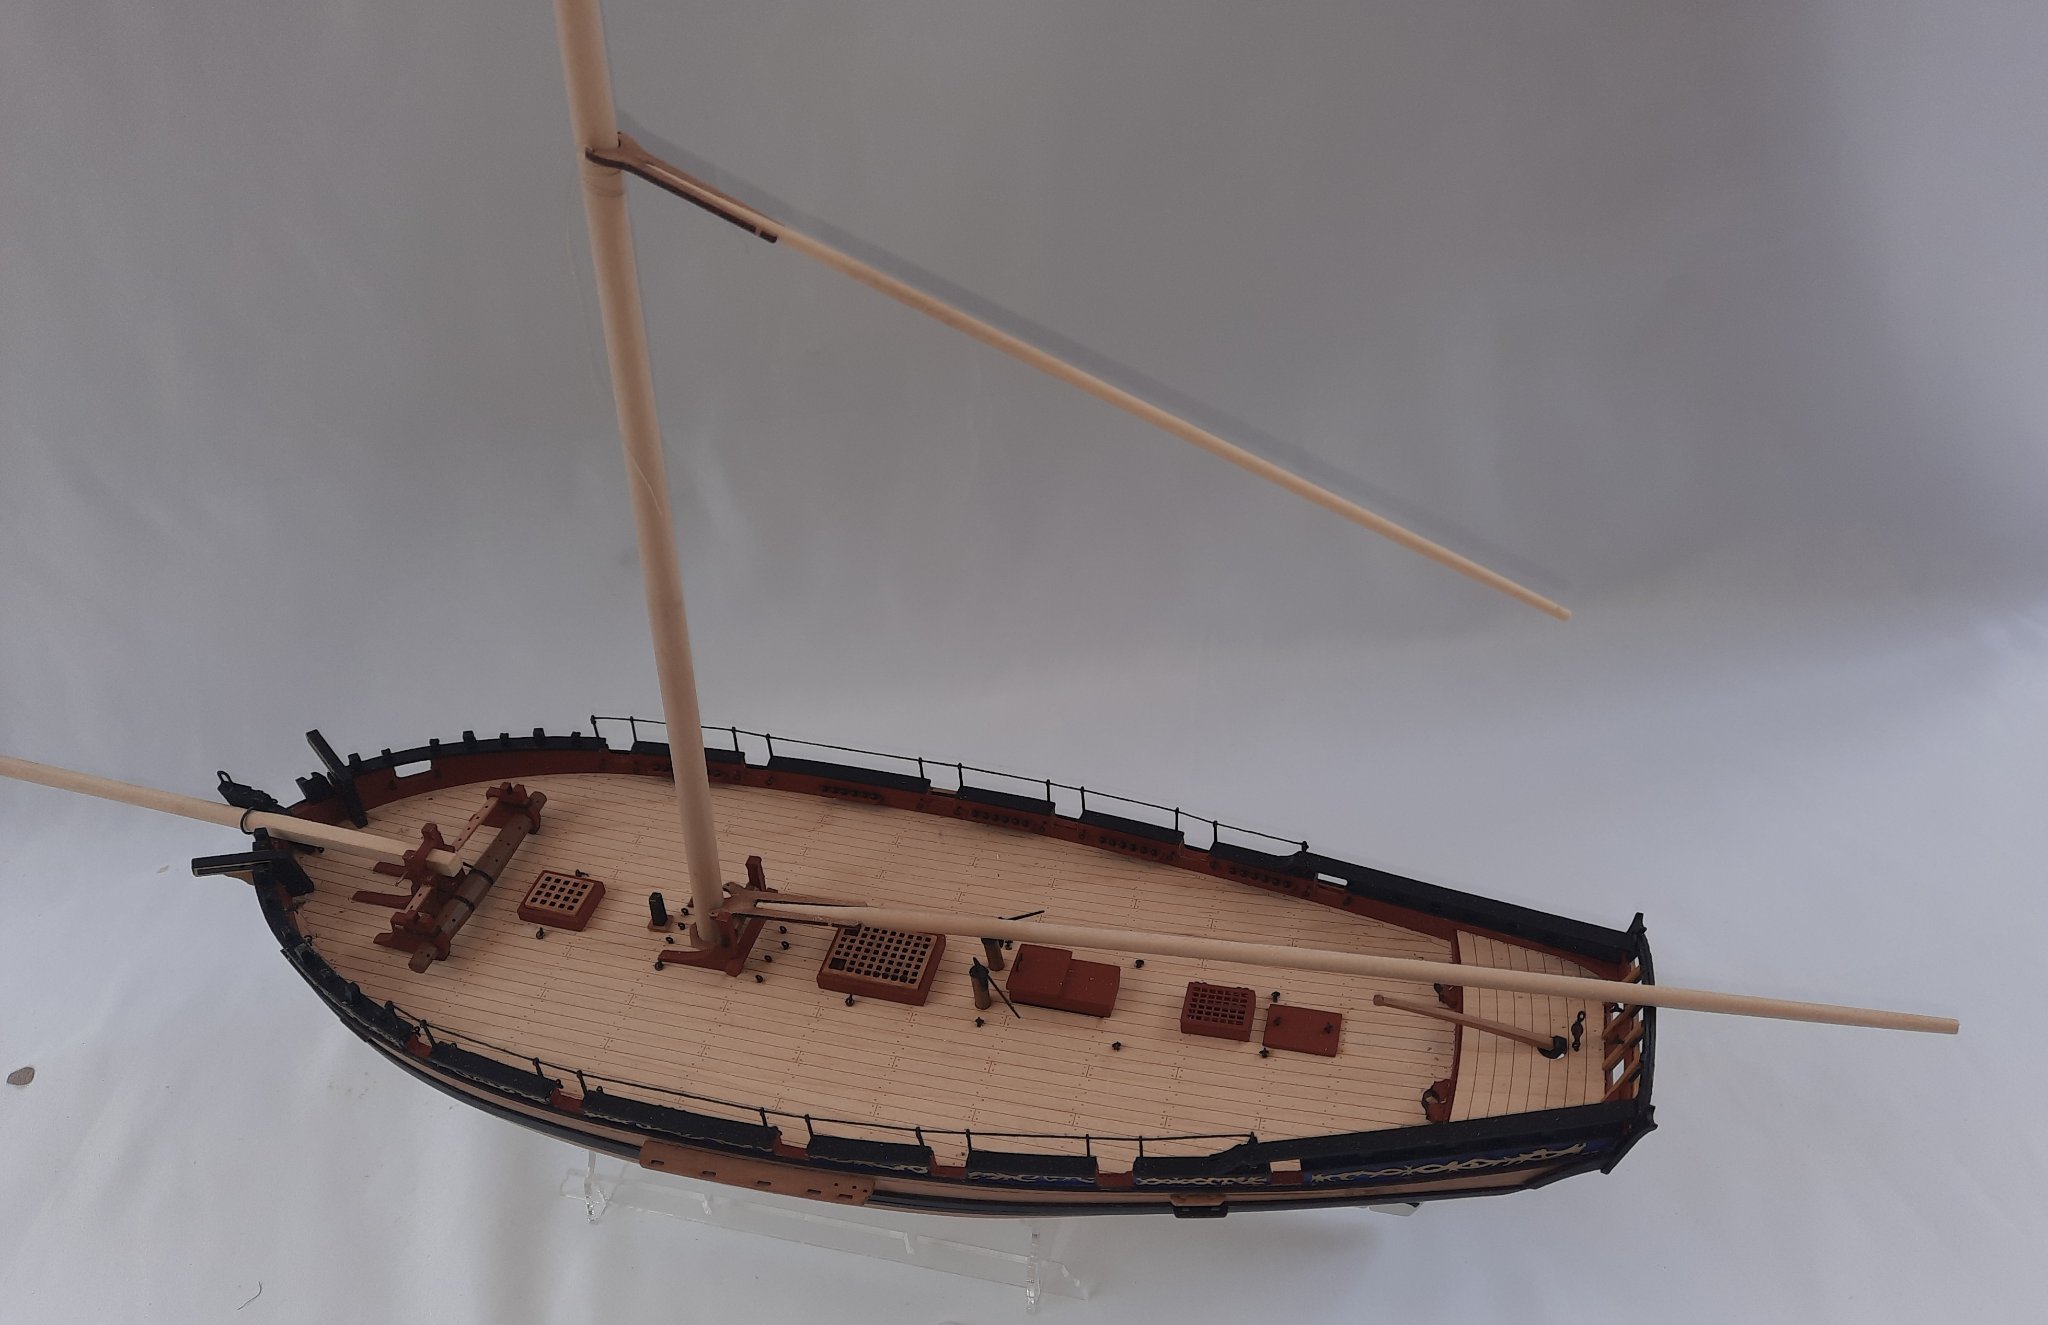
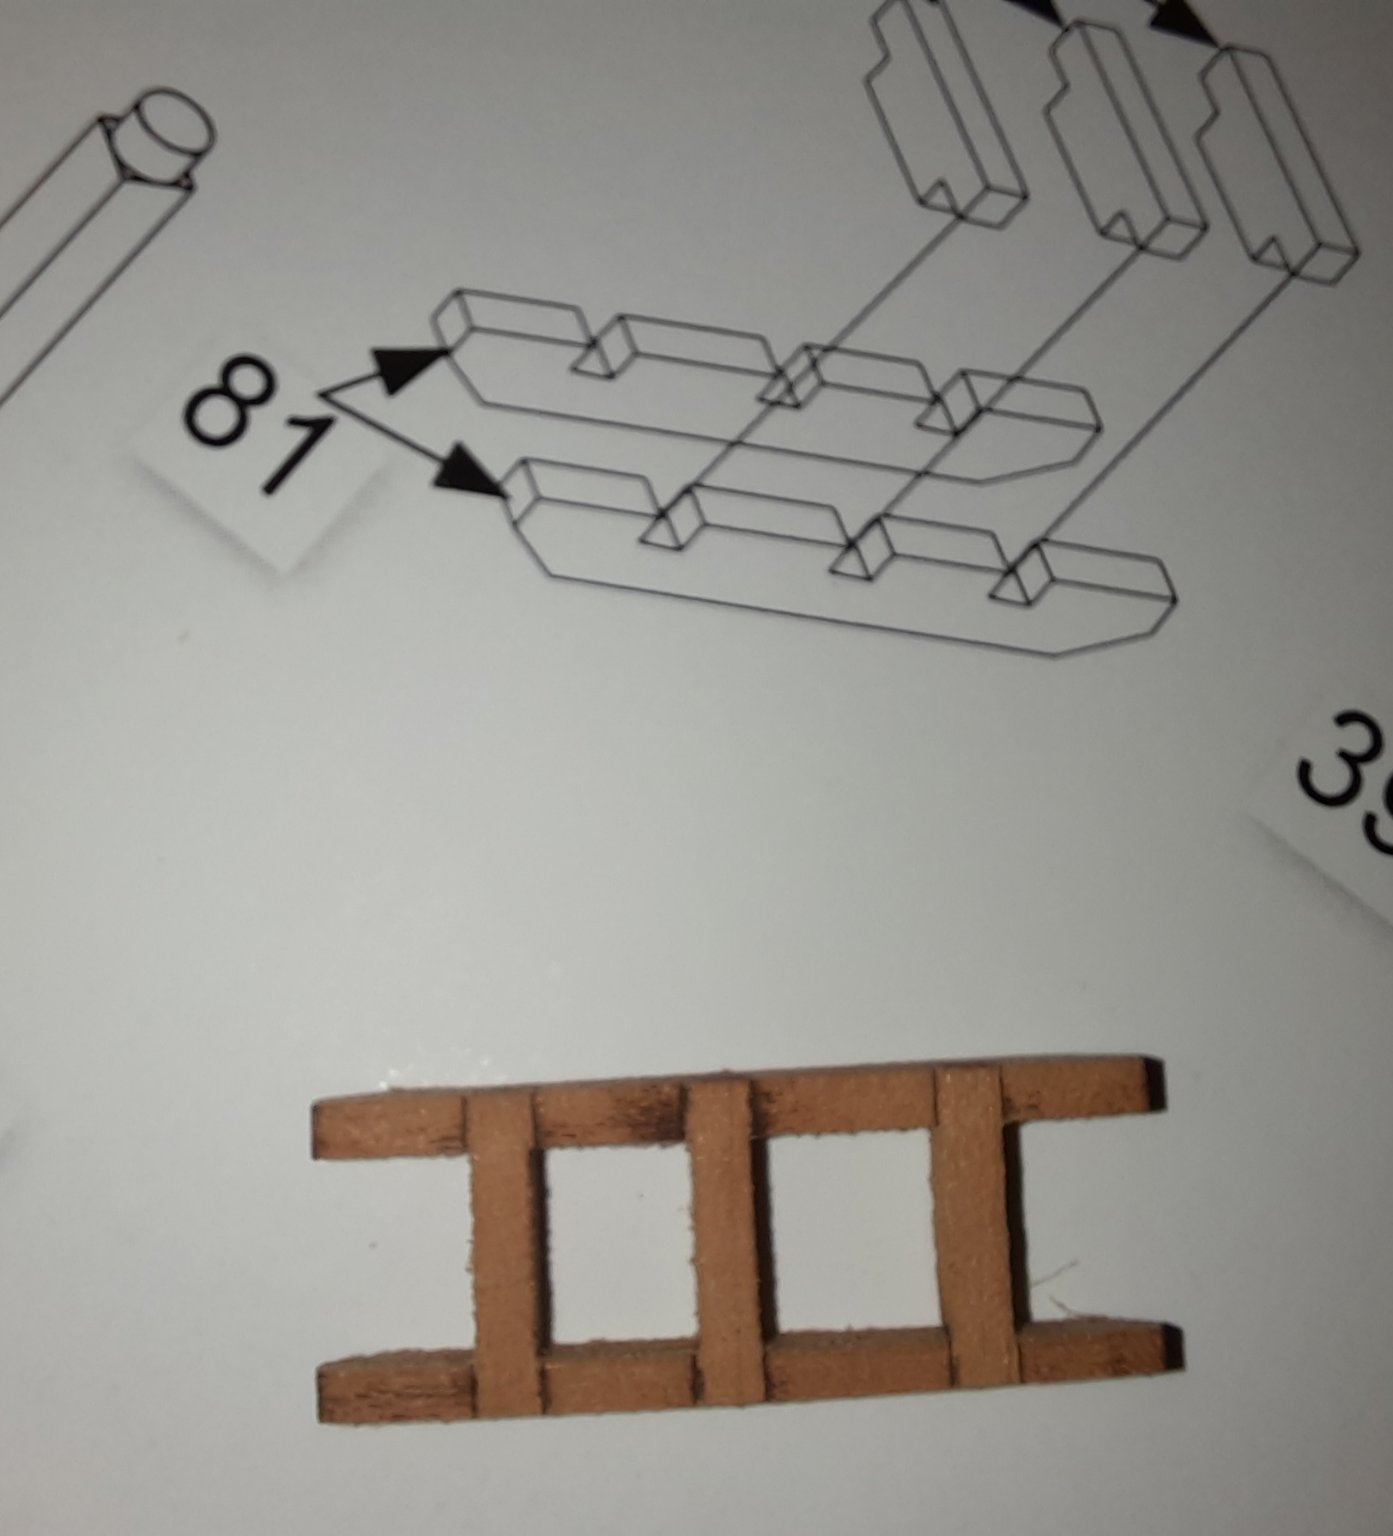
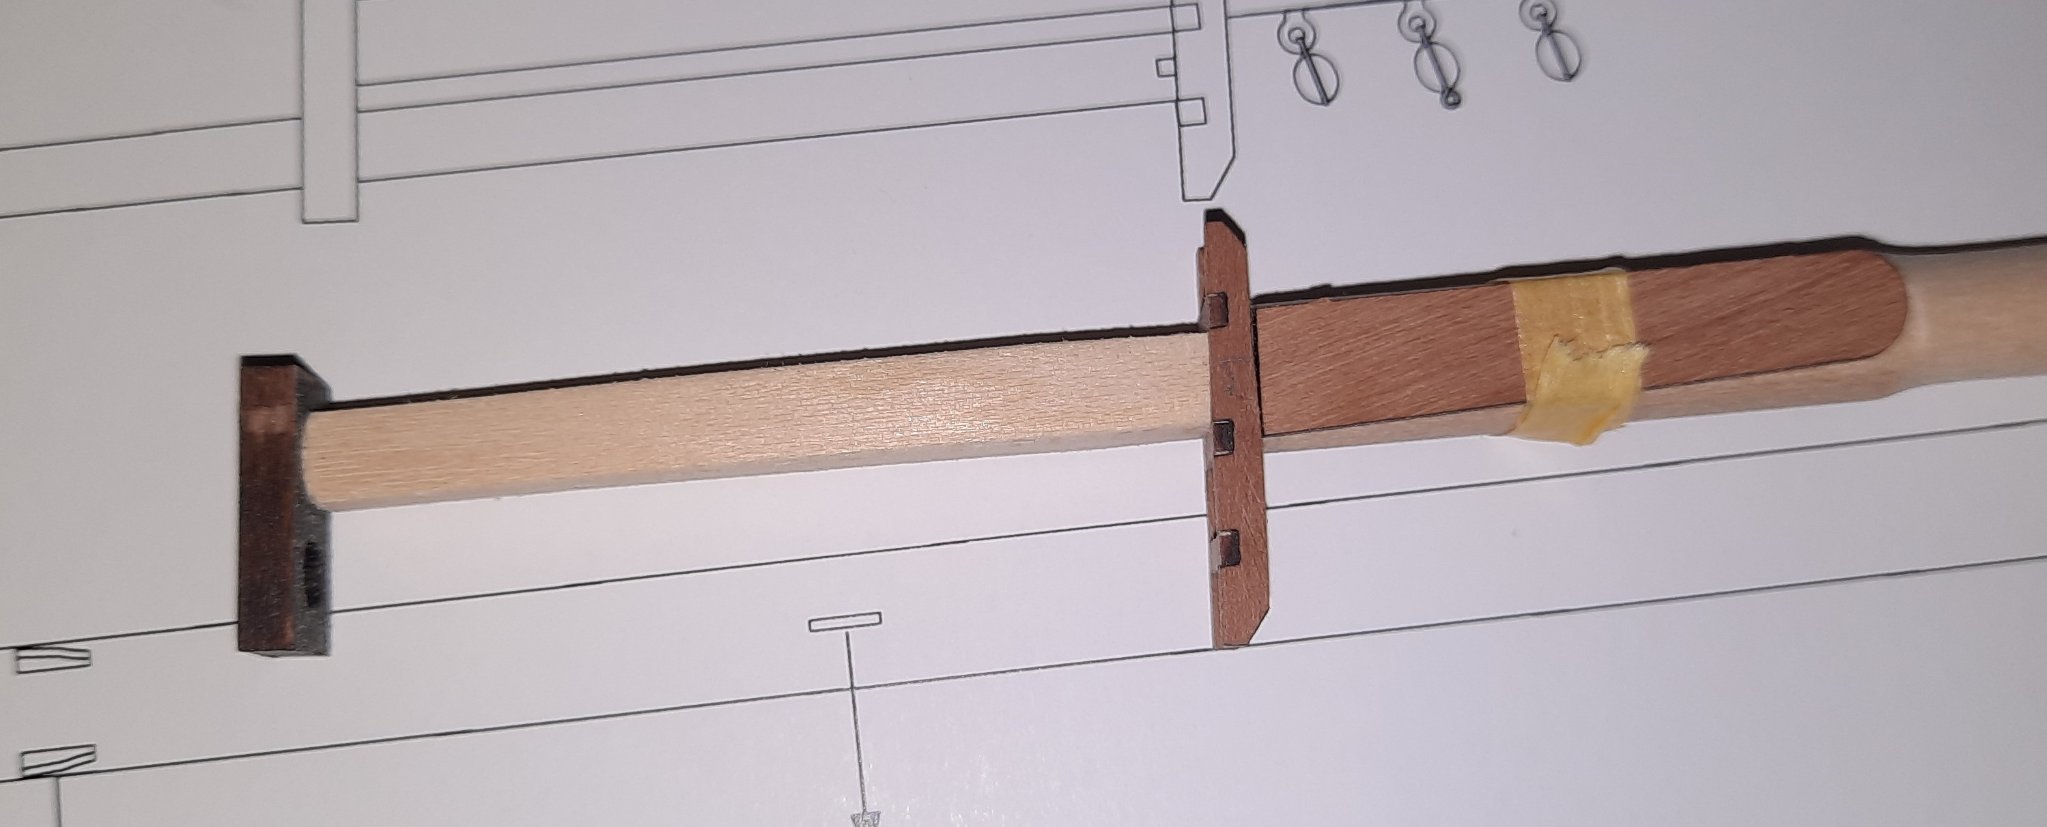
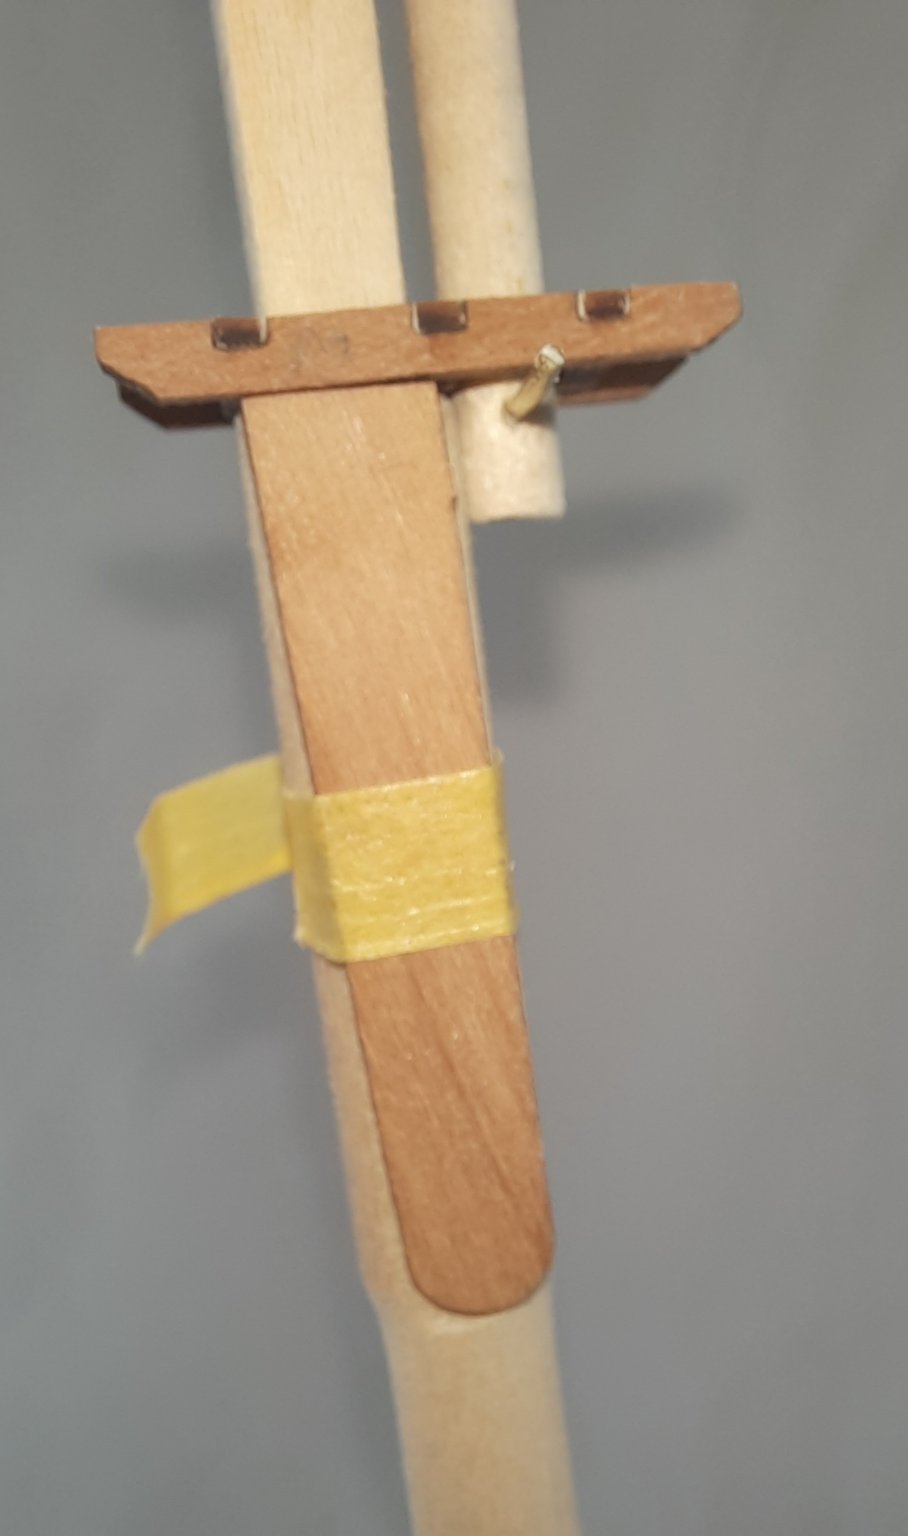
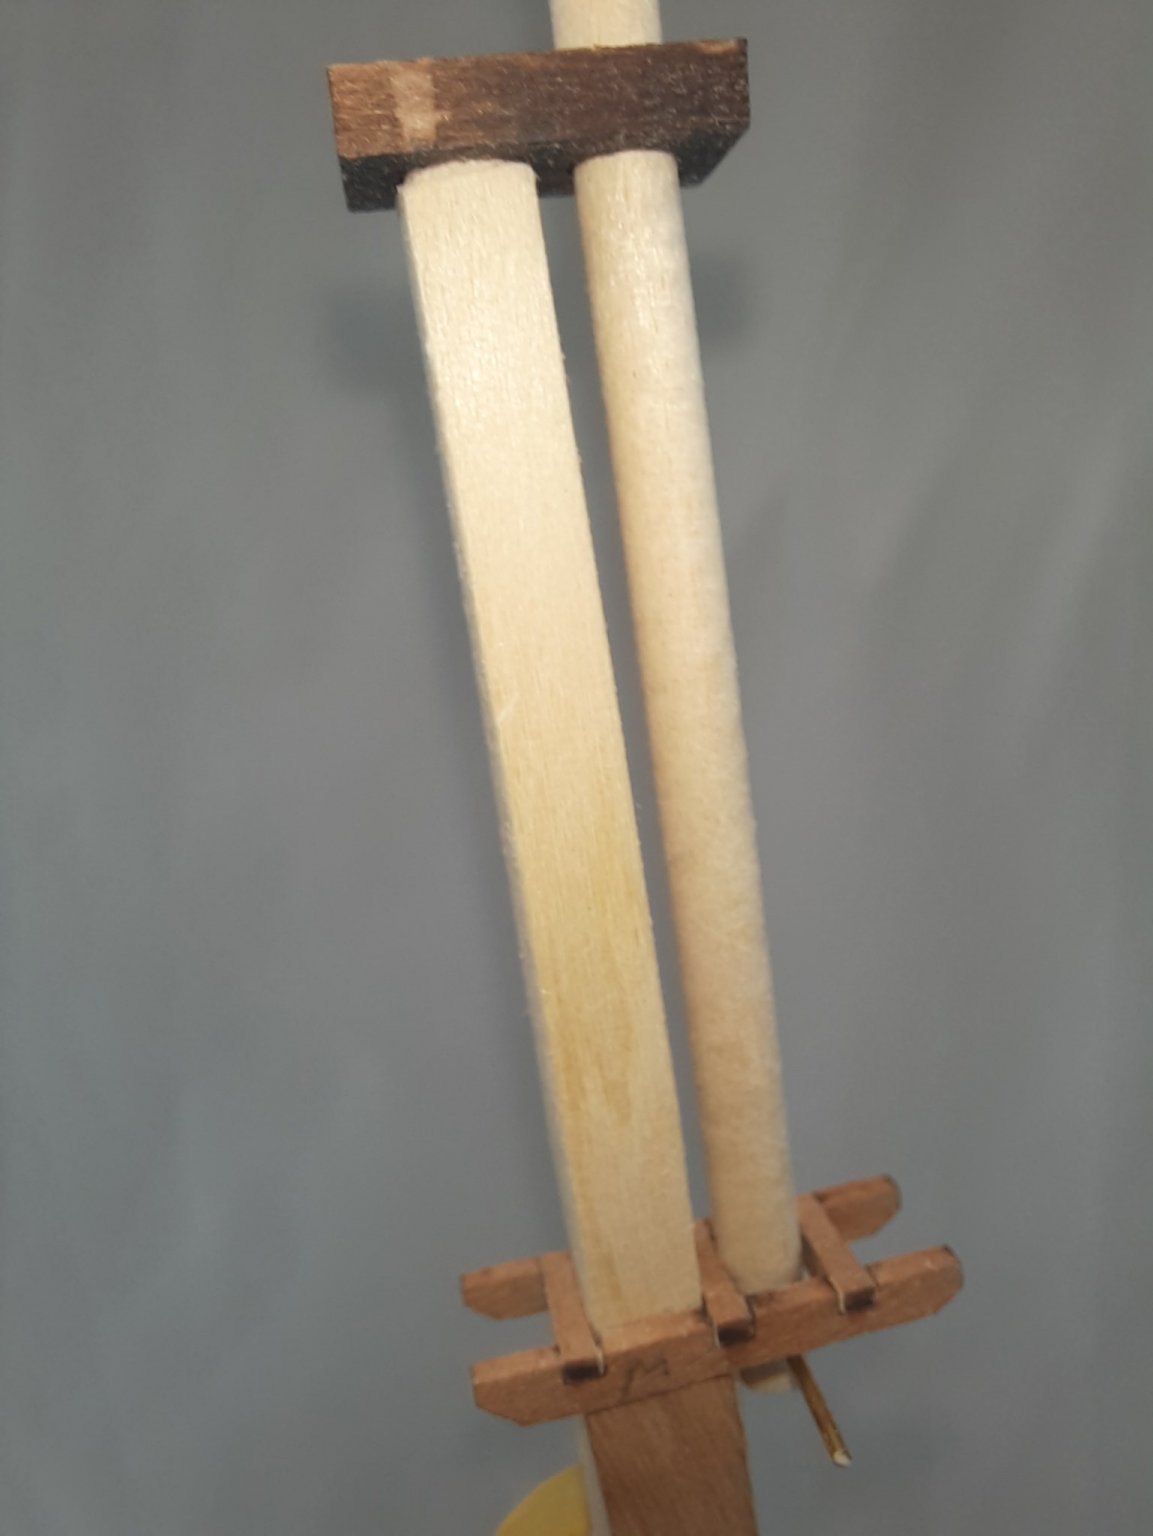
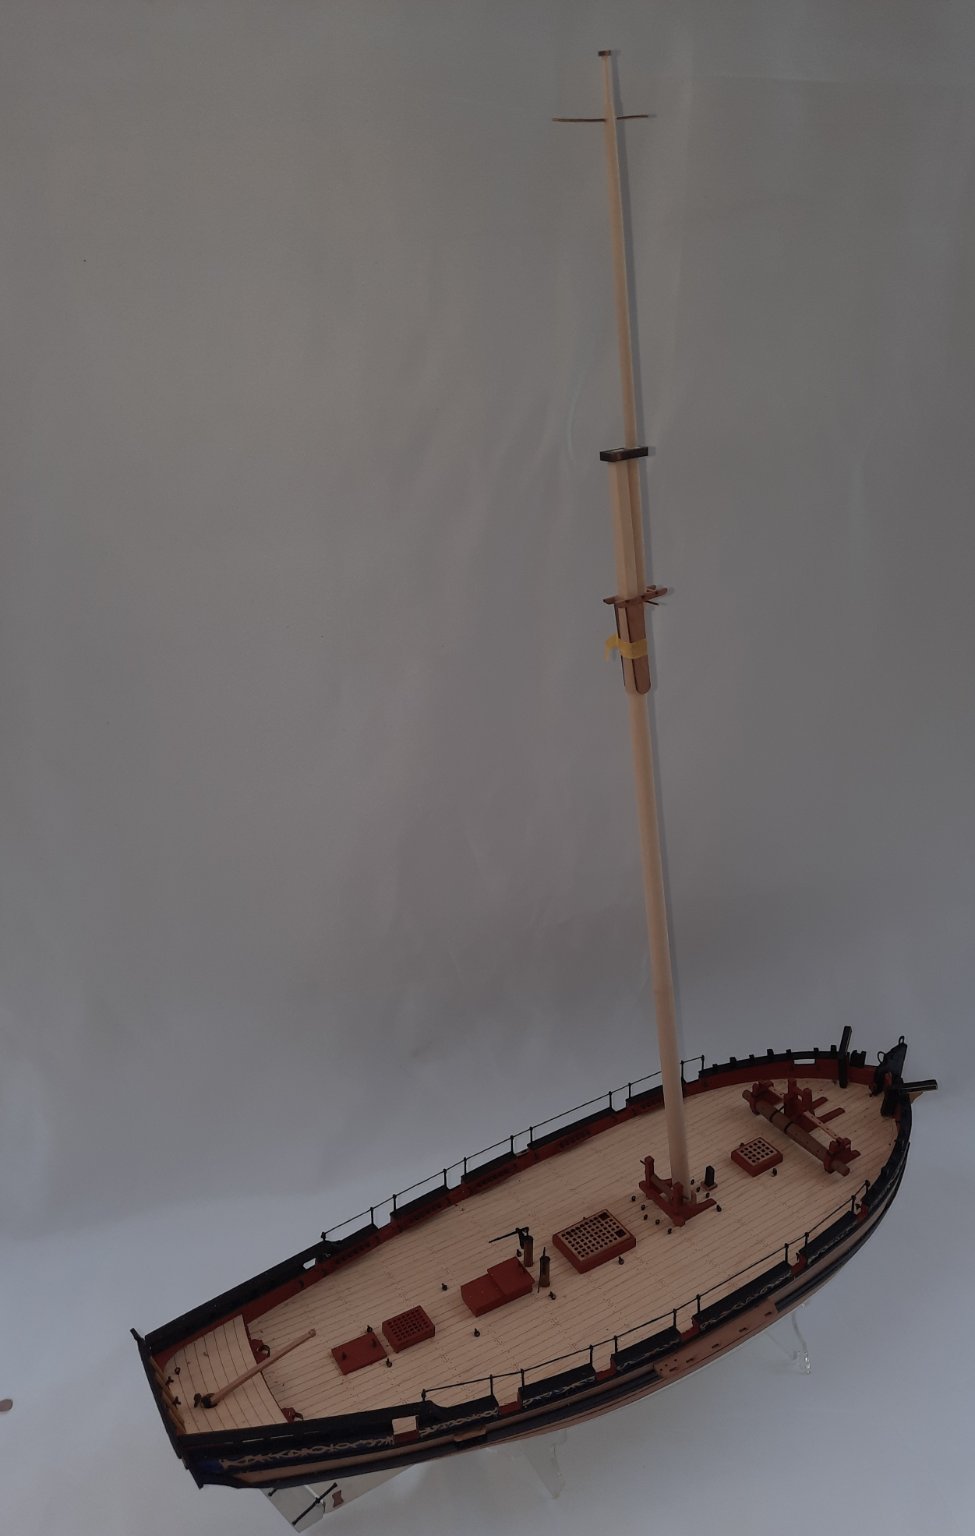
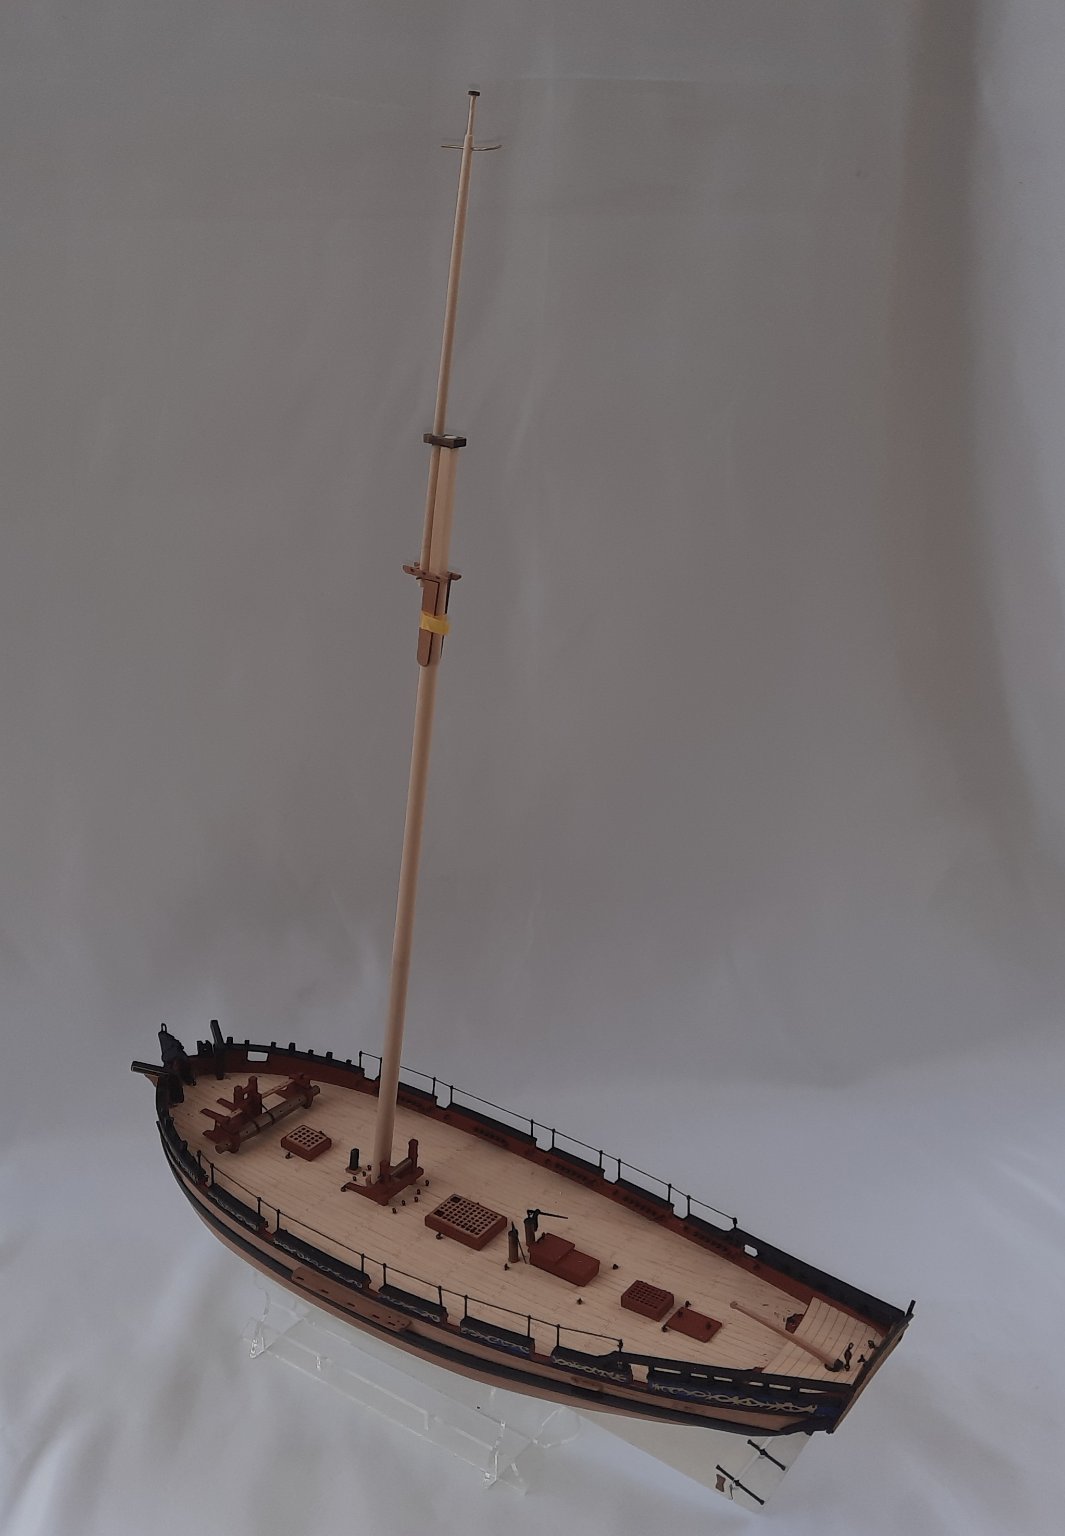
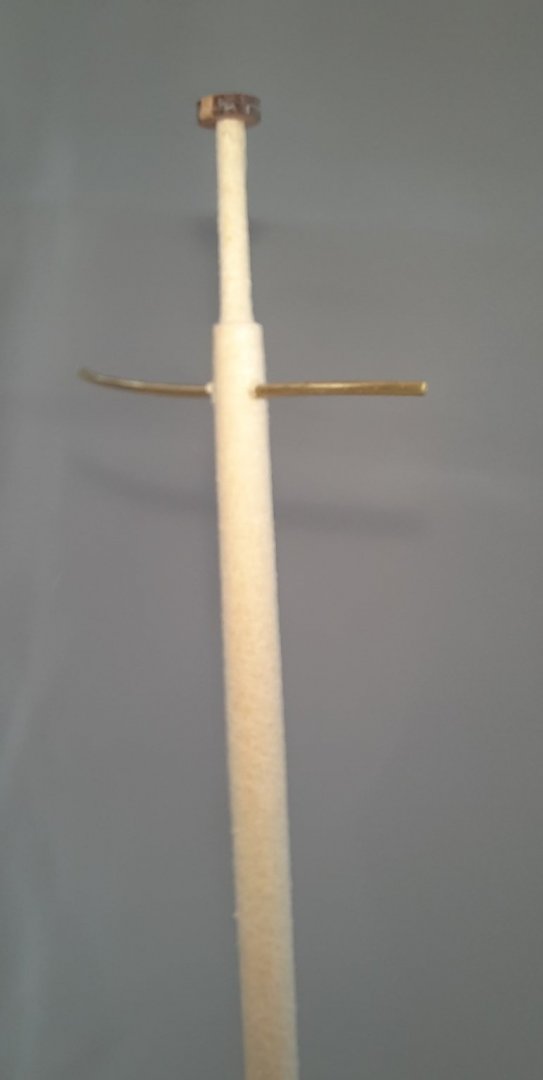
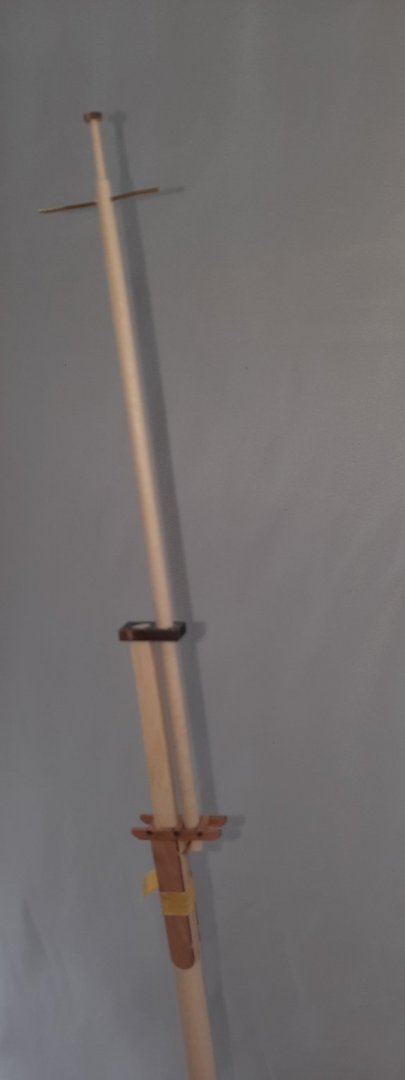
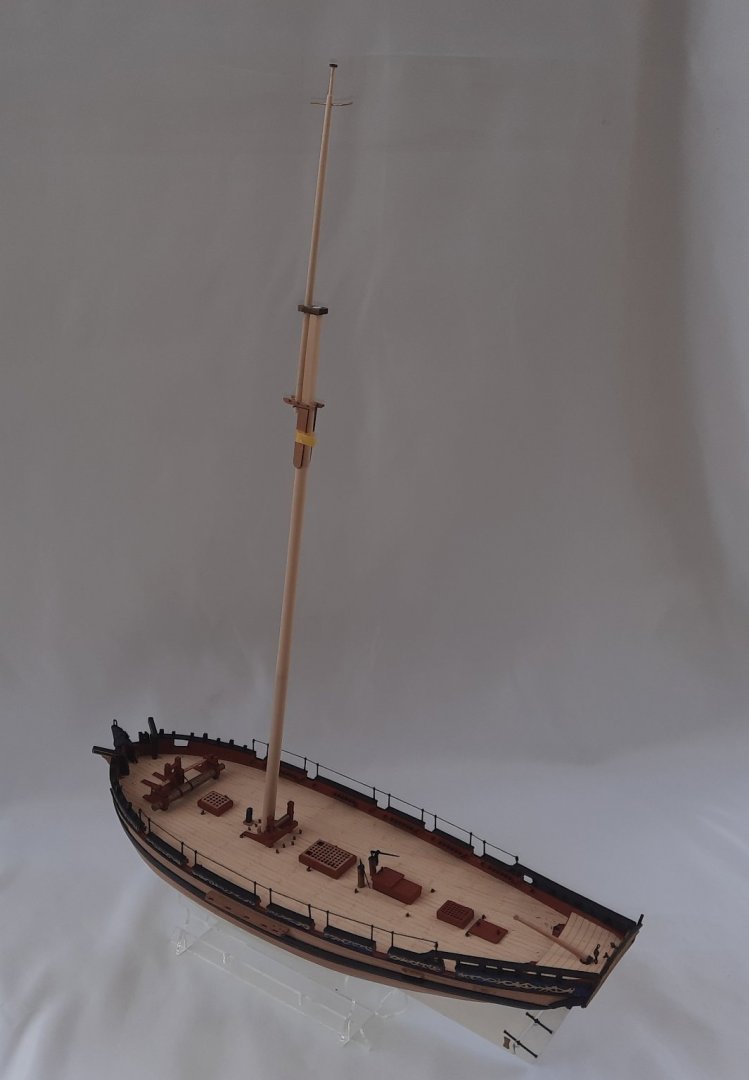
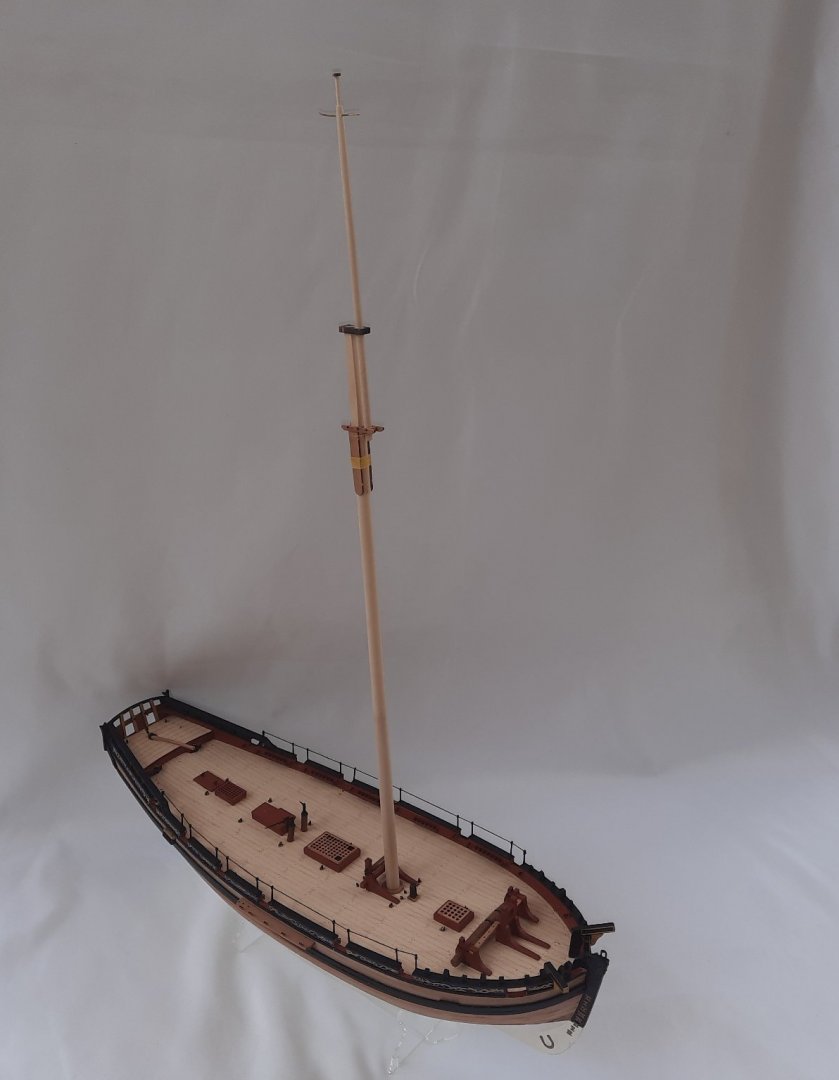
Today has been a good day, even though I did not spend a great deal of time in the shipyard. Adding the Stanchions The first task was to add the various stanchions to the top of the capping rail. Once they were in glued in place (CA Gel) I added the 0.5mm black thread. Main Mast I started work on the main mast with assembling the trestle tree and cross tree parts. The main mast is made from a length of 8mm dowel. I started by marking the position of bottom of the mast checks, the start of the mast taper and the section that is below the deck level. I cut the dowel slightly long which I find is useful when tapering the dowel using my mini lathe. Using my mini desk bench saw I trimmed the two edges for the 2 x mast cheeks so the width was 6mm. Using the bench saw again I then made the 5mm square section. I undercut the square section and then using a sanding stick I finished making the square section, checking at regular intervals to see if the trestle tree and cross tree assembly would fit. Once I was happy with the 5mm square section the top part was rounded off until the cap would fit. The final task was to add the taper from 8mm to 7mm along the above deck section, which was achieved using the mini lathe. The main mast is now ready for the cleats, belay pin rack and rigging blocks to be added. Top cap and trestle and cross tree assembly Mast checks are taped in position checking the angle of the trestle and cross trees is correct. 1mm copper wire used as a temporary FID. Yes I know the FID sits on top and not below. I had a senior moment, Topgallant Mast The topgallant mast was made from a length of 4mm dowel. Using my mini lathe I started by reducing the top section down from 4mm to 1.5mm. I made sure the topgallant mast truck would fit. With the dowel still in the mini lathe the 4mm to 3mm taper section was added. I finished off the work on the topgallant mast by adding the 2 x 1mm holes. Checking the fit of the main mast and topgallant mast through the cap and fid (copper wire for the time being and still below and not above) Rigging hole in the topgallant mast (copper wire inserted) Topgallant mast fitted Main and topgallant mast assembly dry fitted to the deck Main and topgallant mast assembly dry fitted to the deck Main and topgallant mast assembly dry fitted to the deck


- 160 replies
-
- 3
-
-
- Alert
- vanguard models
- (and 1 more)
-
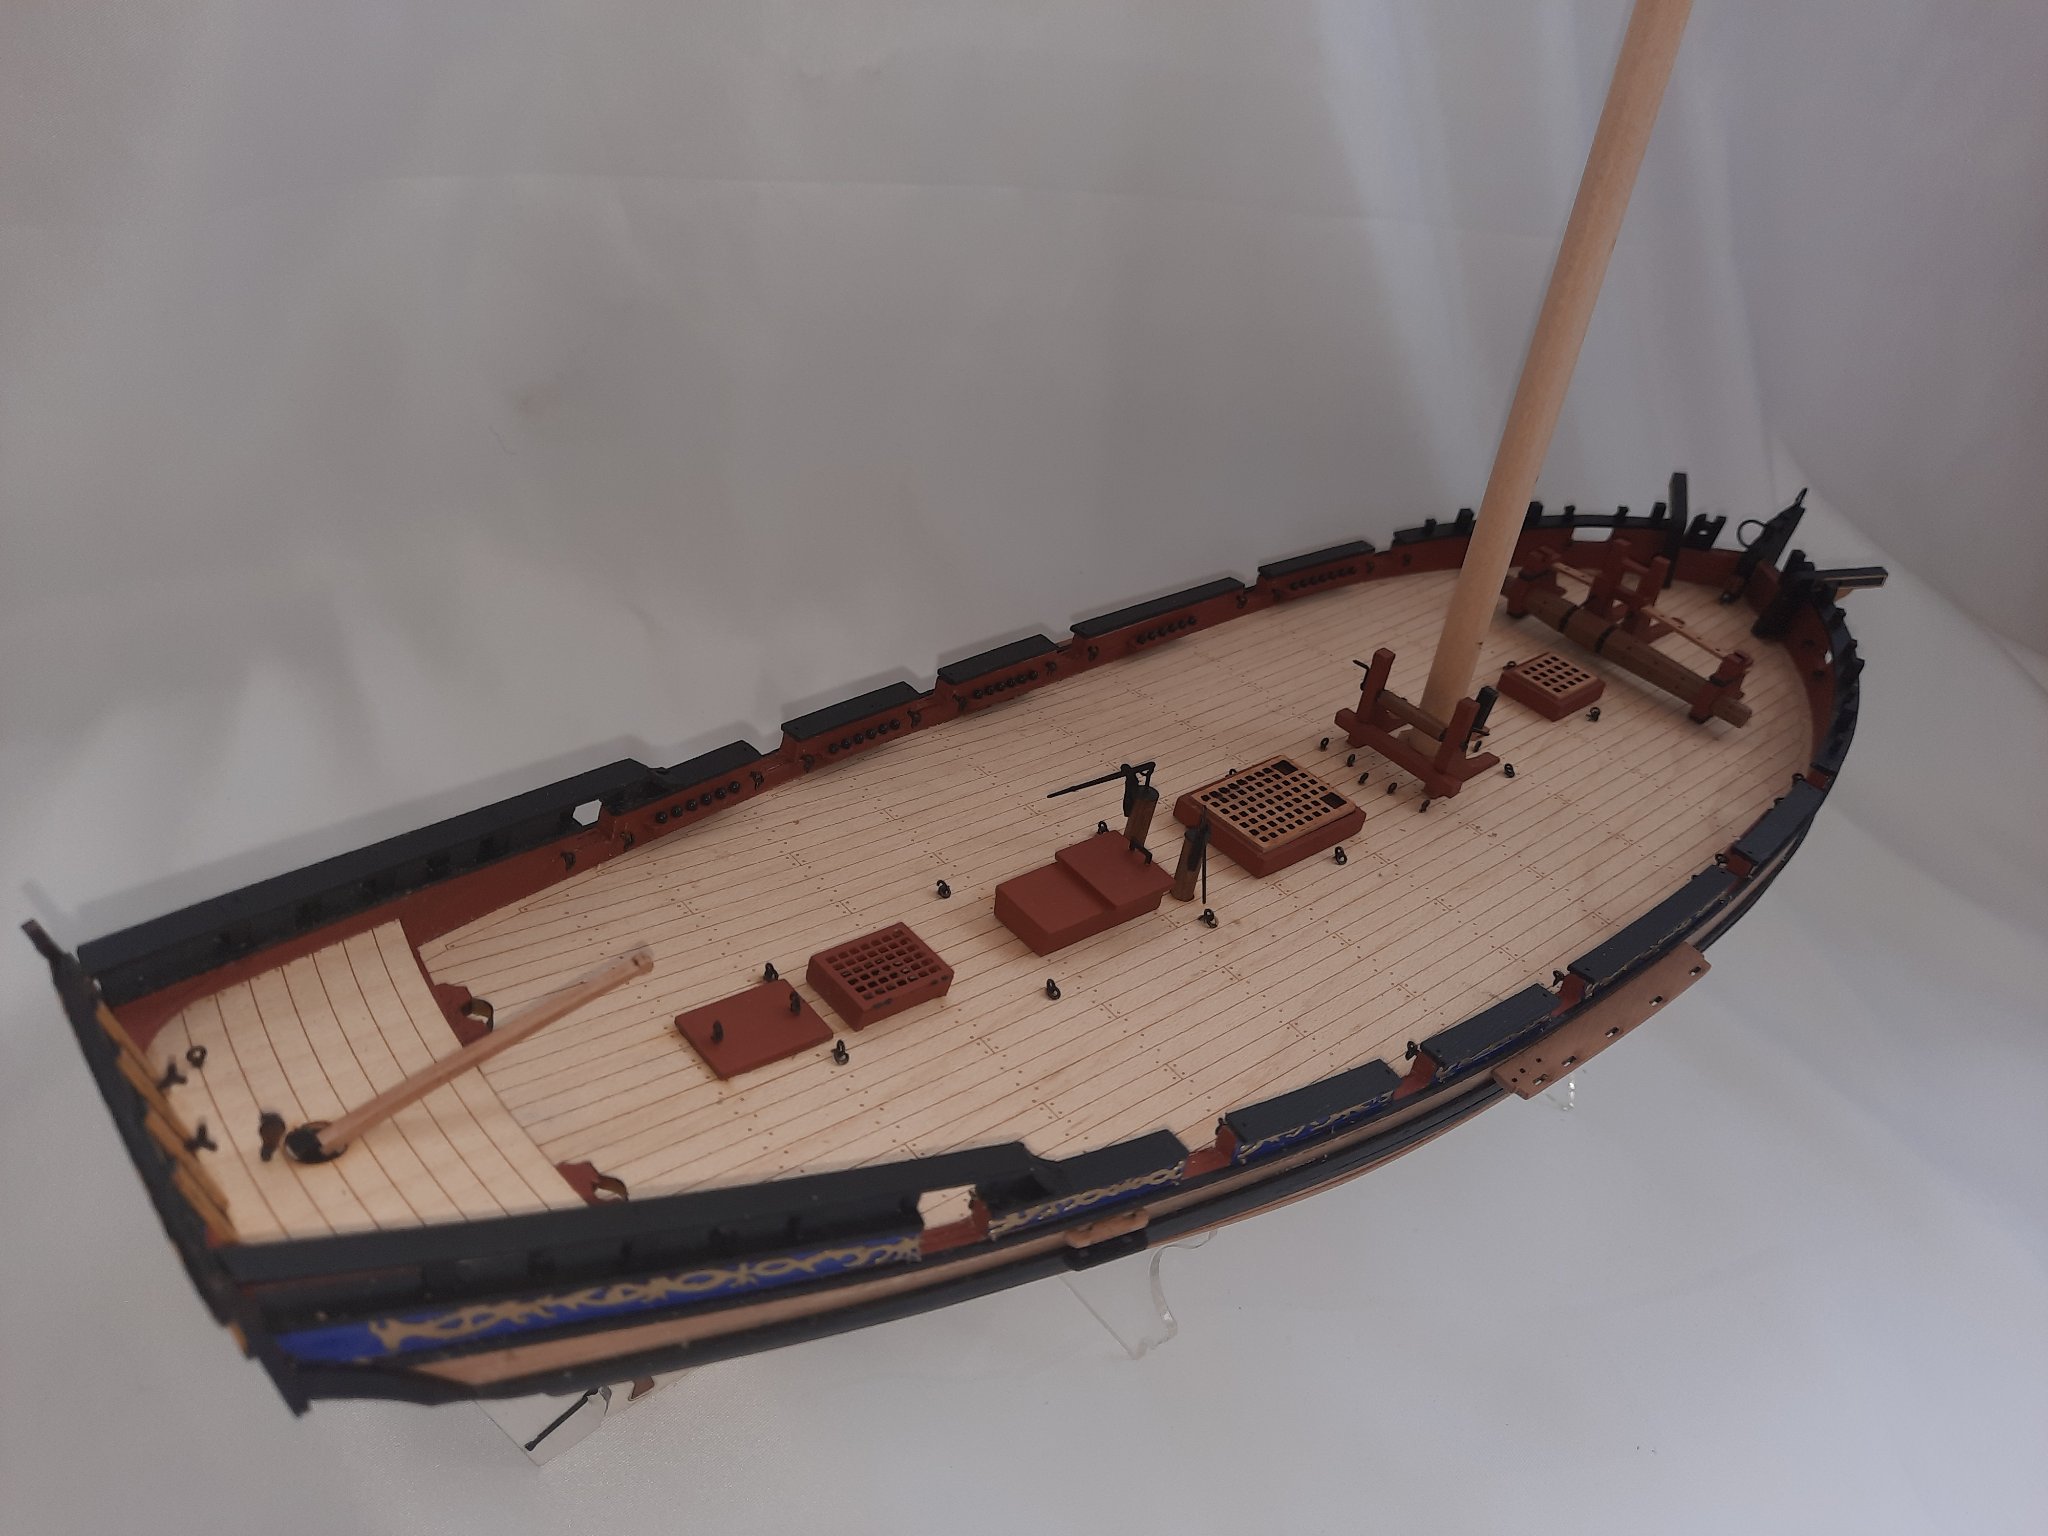
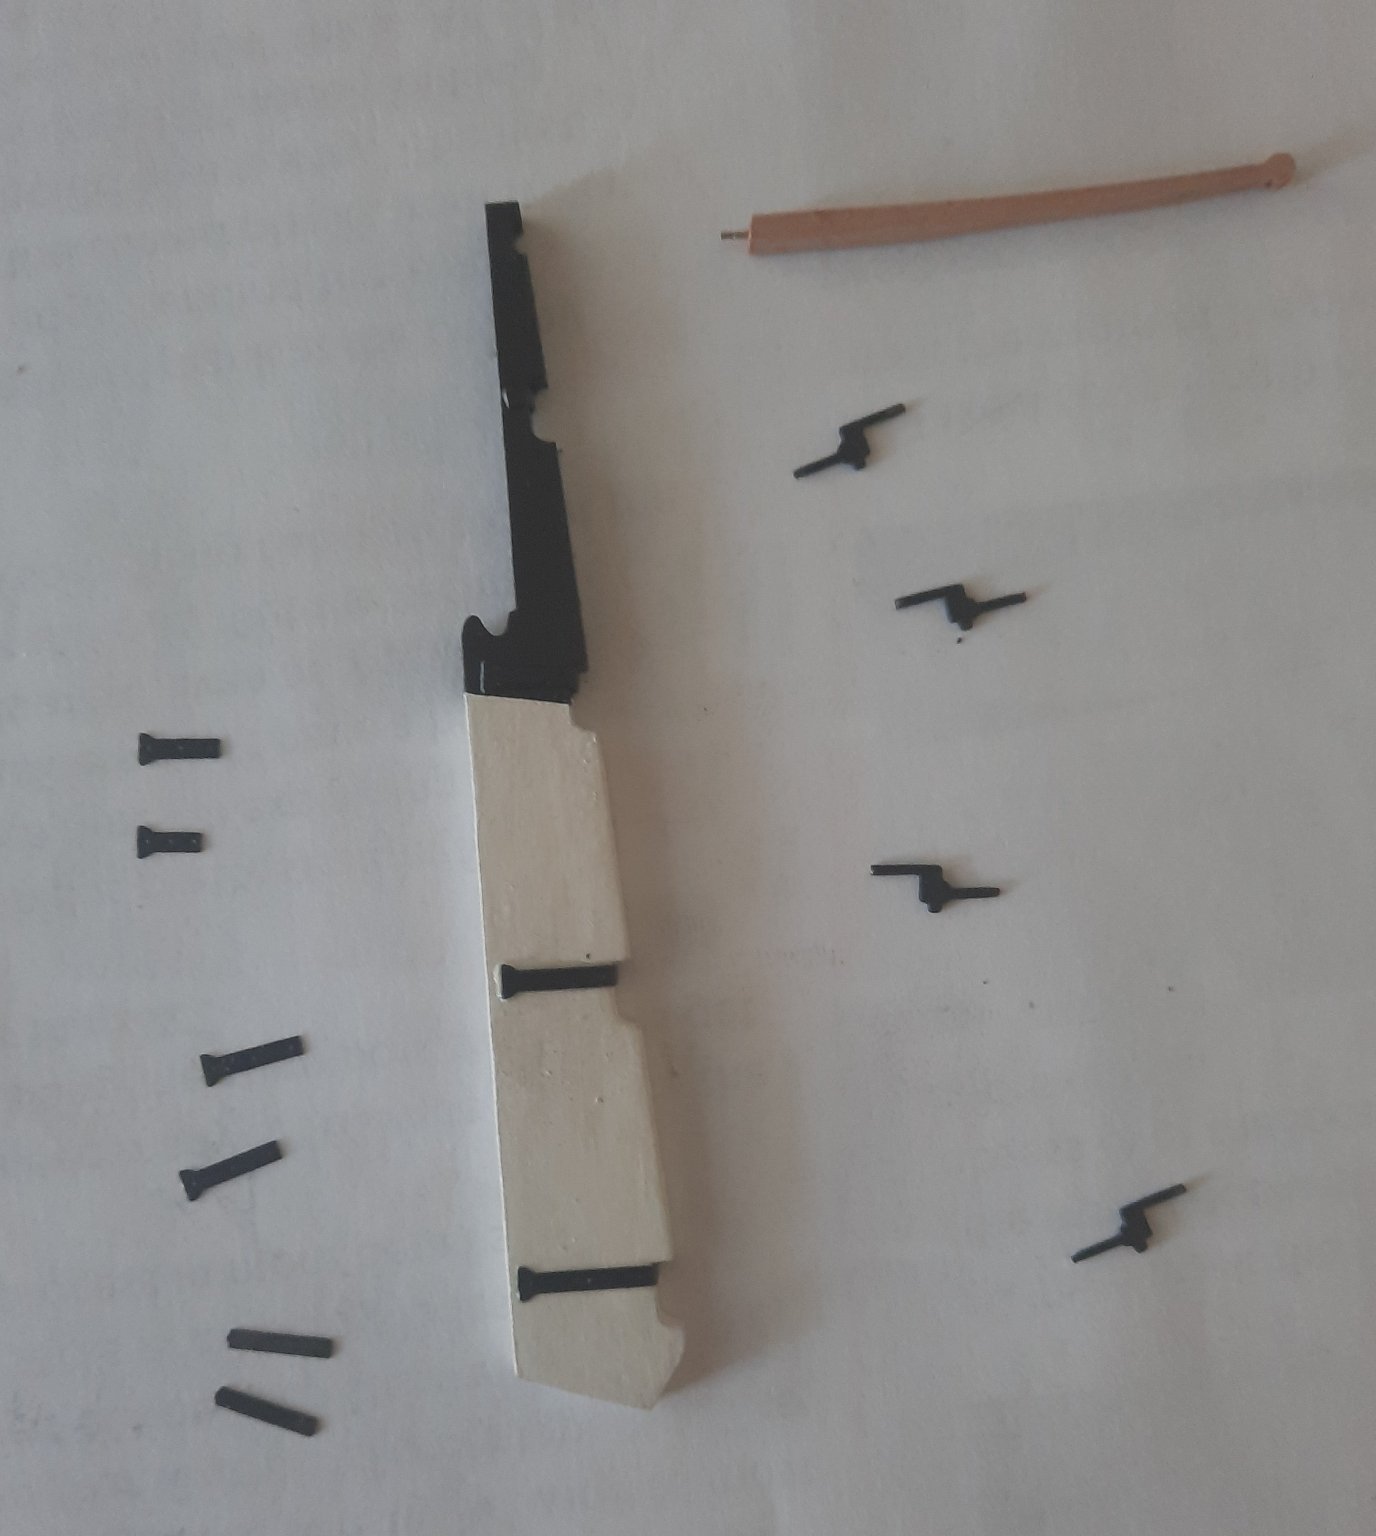
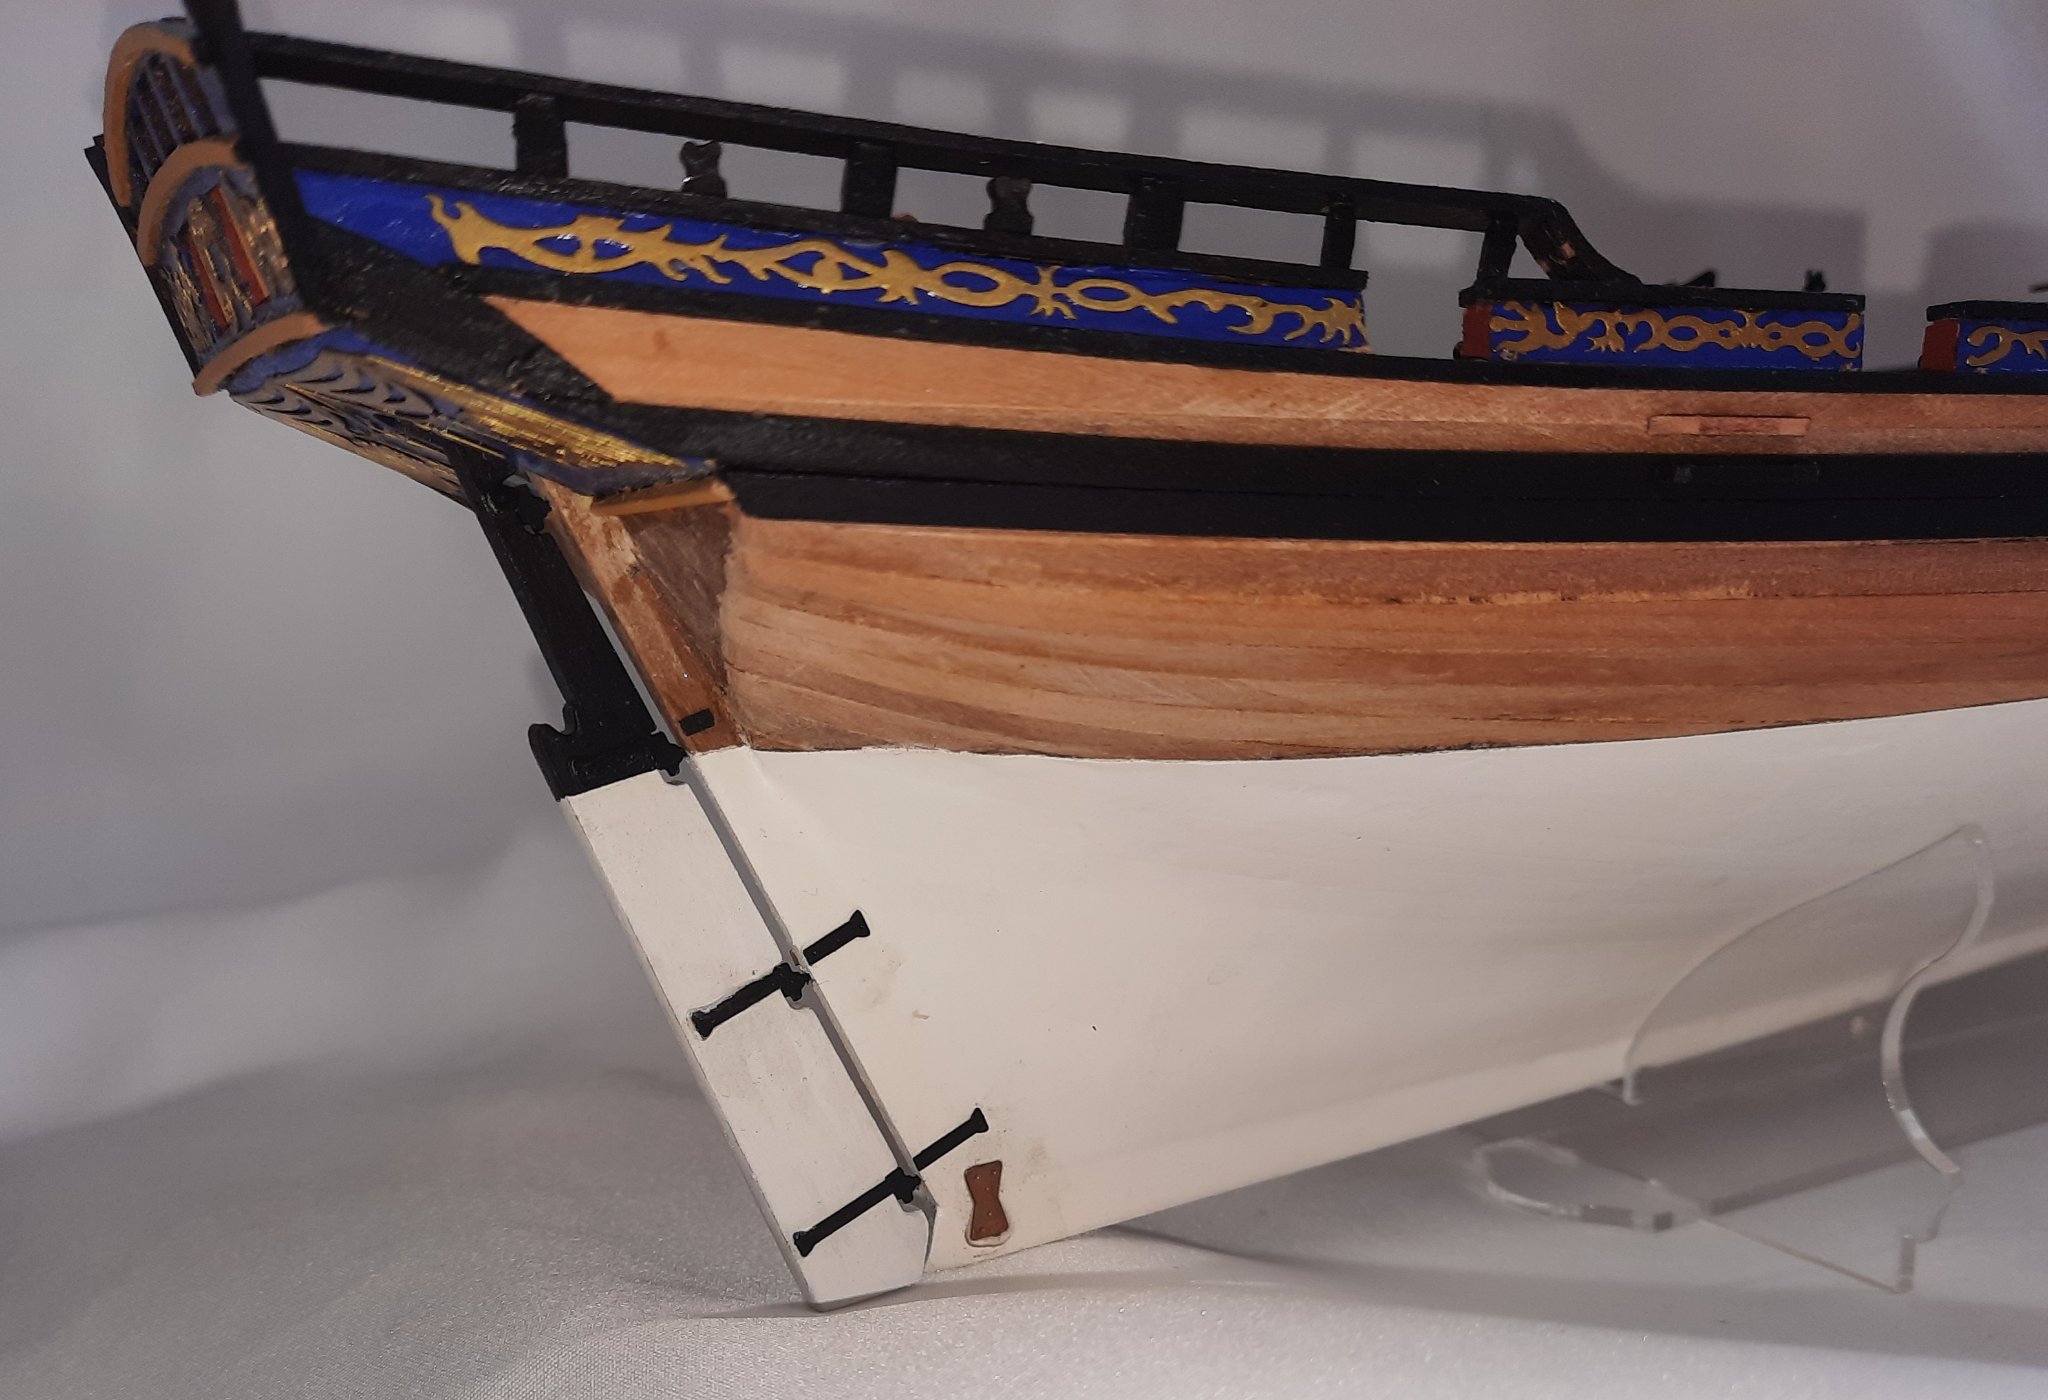
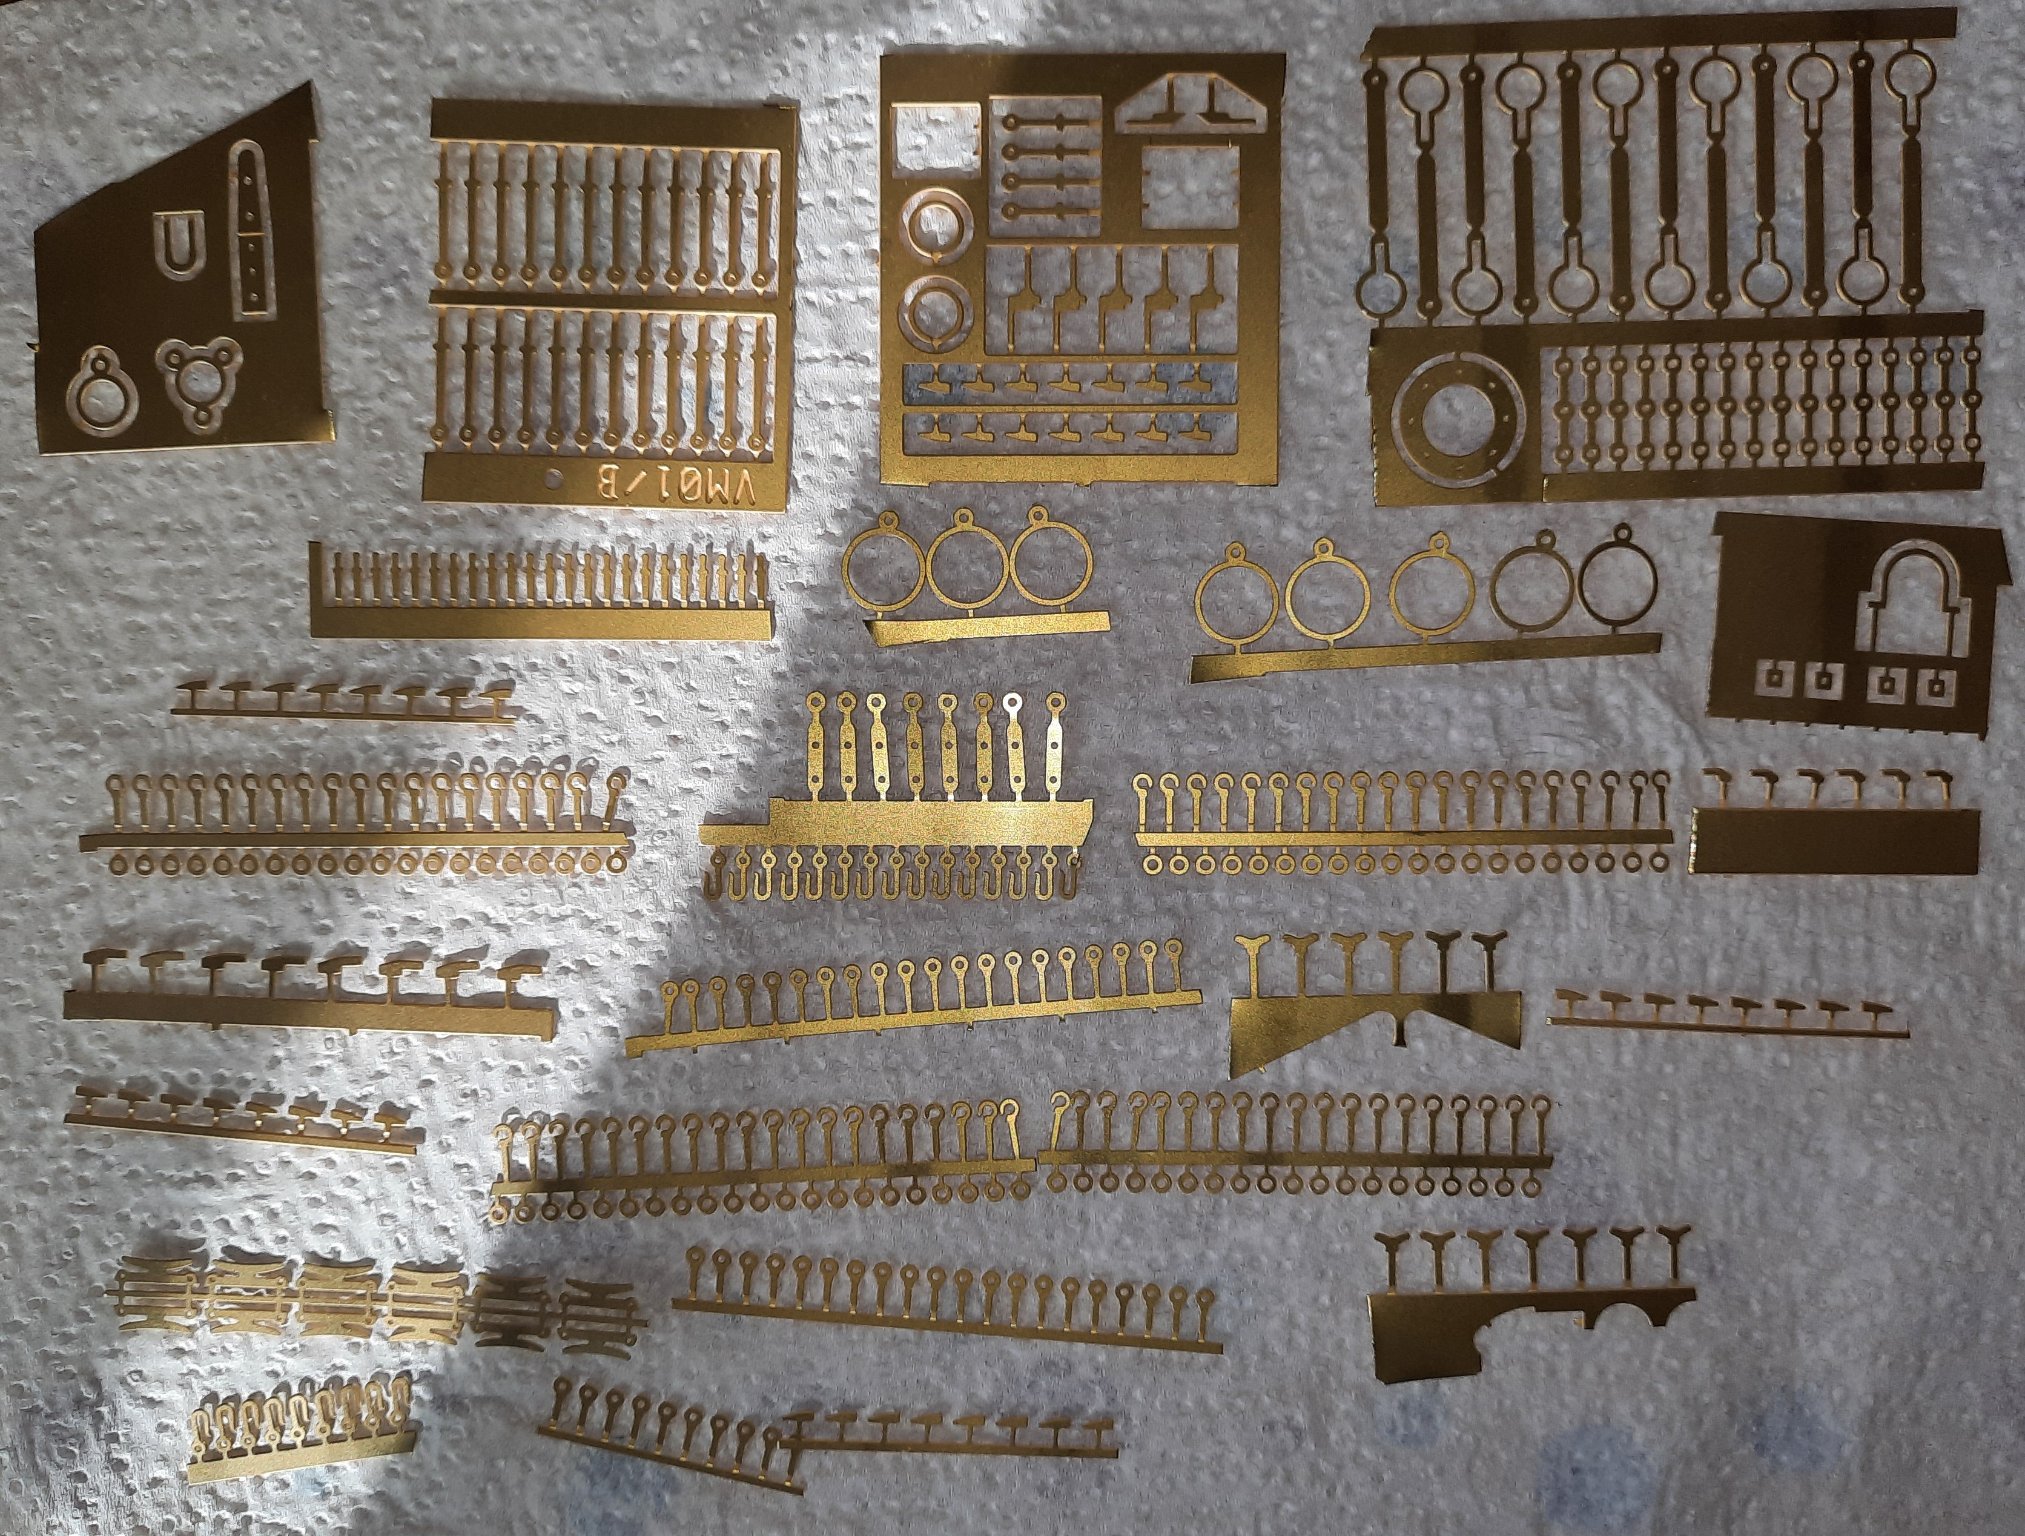
Rudder Assembly This was a relatively straight forward task. After coating the rudder with a very thin coat of polyurethane varnish I sprayed the lower part white, two coats with a light sand between the coats. The top part of the rudder was then painted black as was the rudder gudgeon pintle's and braces. The two parts of the tiller arm were glued together and the laser char was removed from the edges. All the rudder parts are ready to be assembled. The rudder gudgeon and pintle's and braces were bend and affixed to the rudder using the klear polish method. A 0.8mm micro drill was then used to drill the holes in the rudder and stern post for the rudder gudgeon pintle's. Once the pintles were secured in place the rudder was offered up and secured to the stern post. The tiller arm was then glued to the rudder. Bow Area PE Parts The stem post eyebolt strap and the bowsprit ‘Iron Hoop' PE parts were painted black and then added to the bow area. The square bolts were then fixed to the ends of bowsprit ‘Iron Hoop'. Deck Furniture All the deck items have now been glued in place. I just need to add and rig the stanchions before moving mast, yards and booms. I have decided to leave adding the cannons and swivel gun assembly for the time being. I will add the deadeye and chain plate assembly to the channels when I'm ready to start the rigging phase.


- 160 replies
-
- 3
-
-
- Alert
- vanguard models
- (and 1 more)
-
Hello Uwe Many thanks for your comments. I like to share my build experience and to try to help others along the way. I would normally like spend, on average, 3 to 4 hours per day, which is a benefit of being retired.
- 160 replies
-
- 2
-
-
- Alert
- vanguard models
- (and 1 more)
-
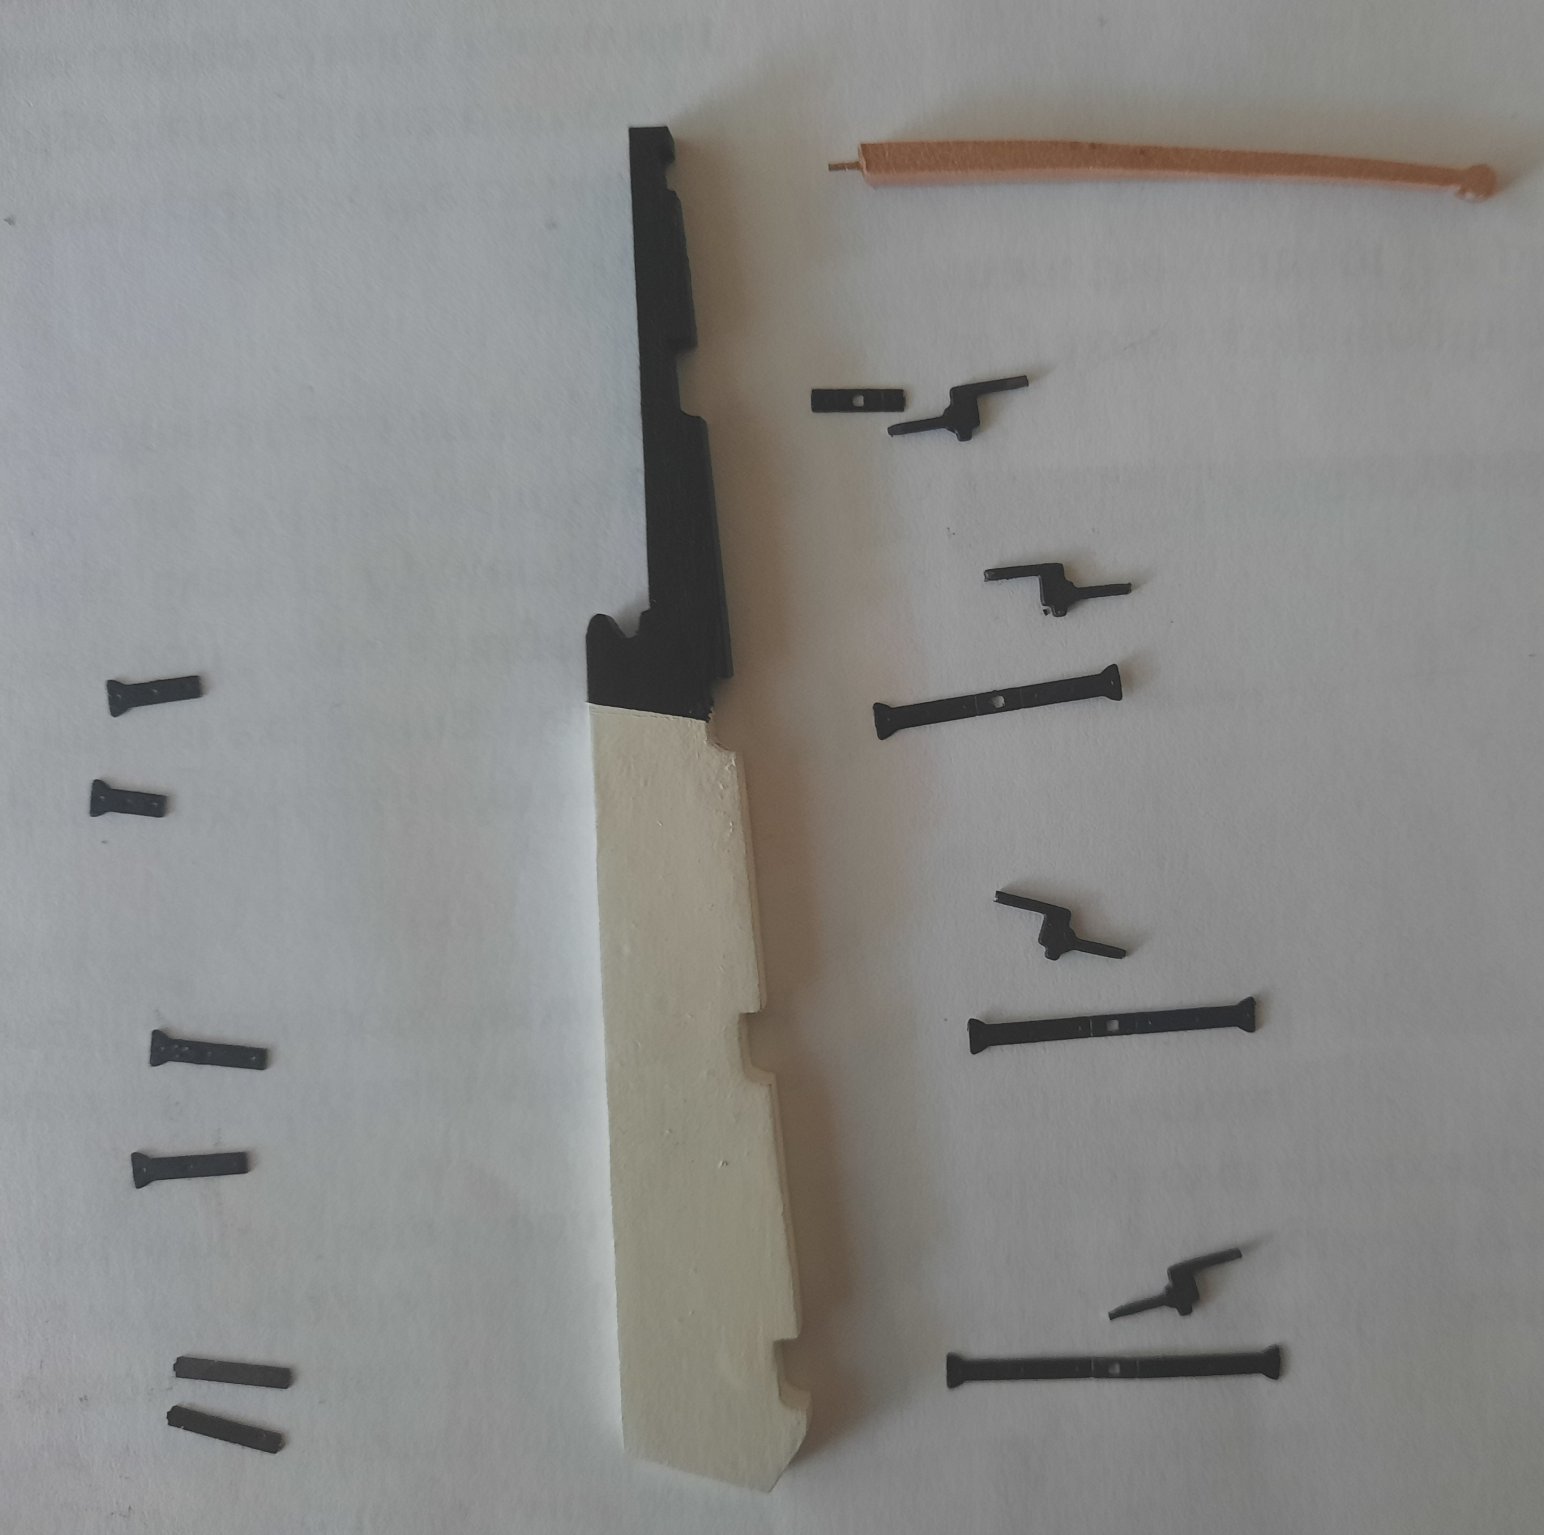
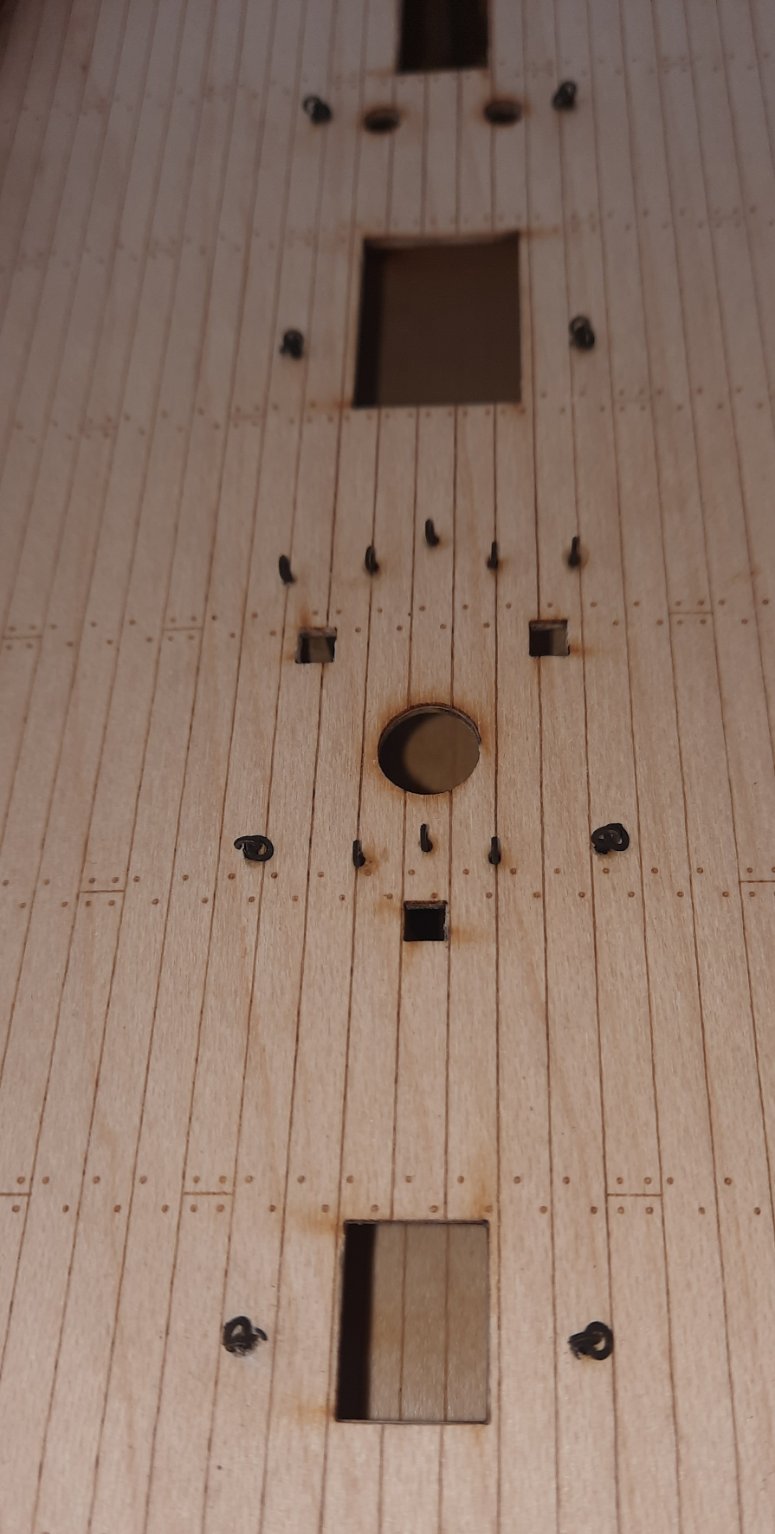
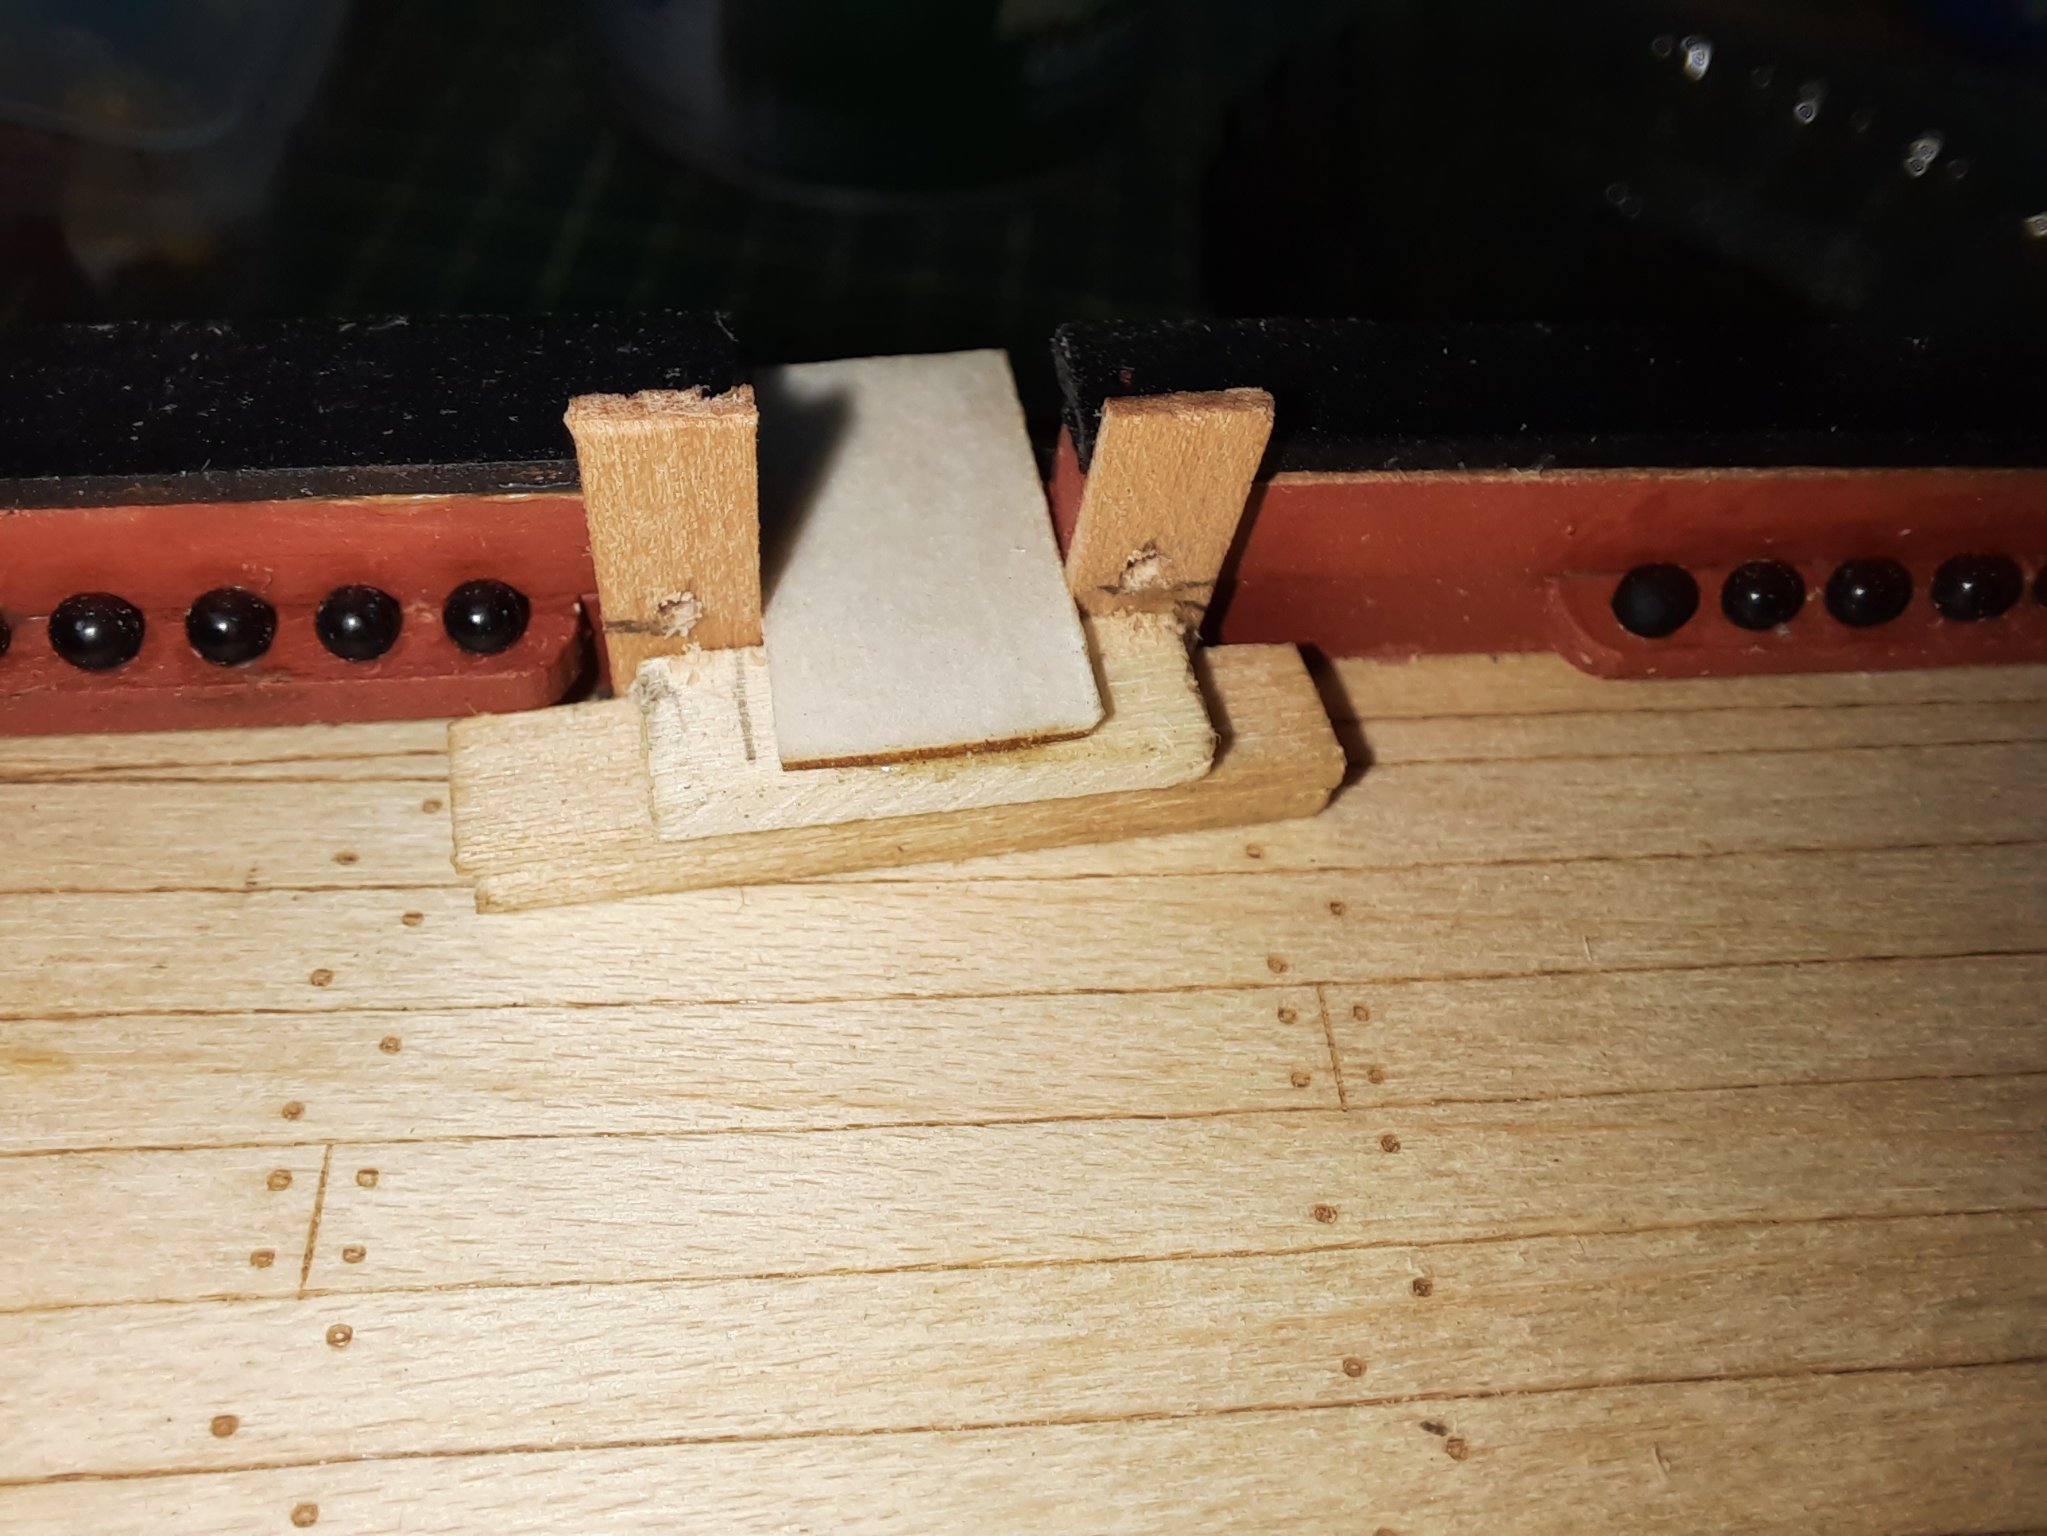
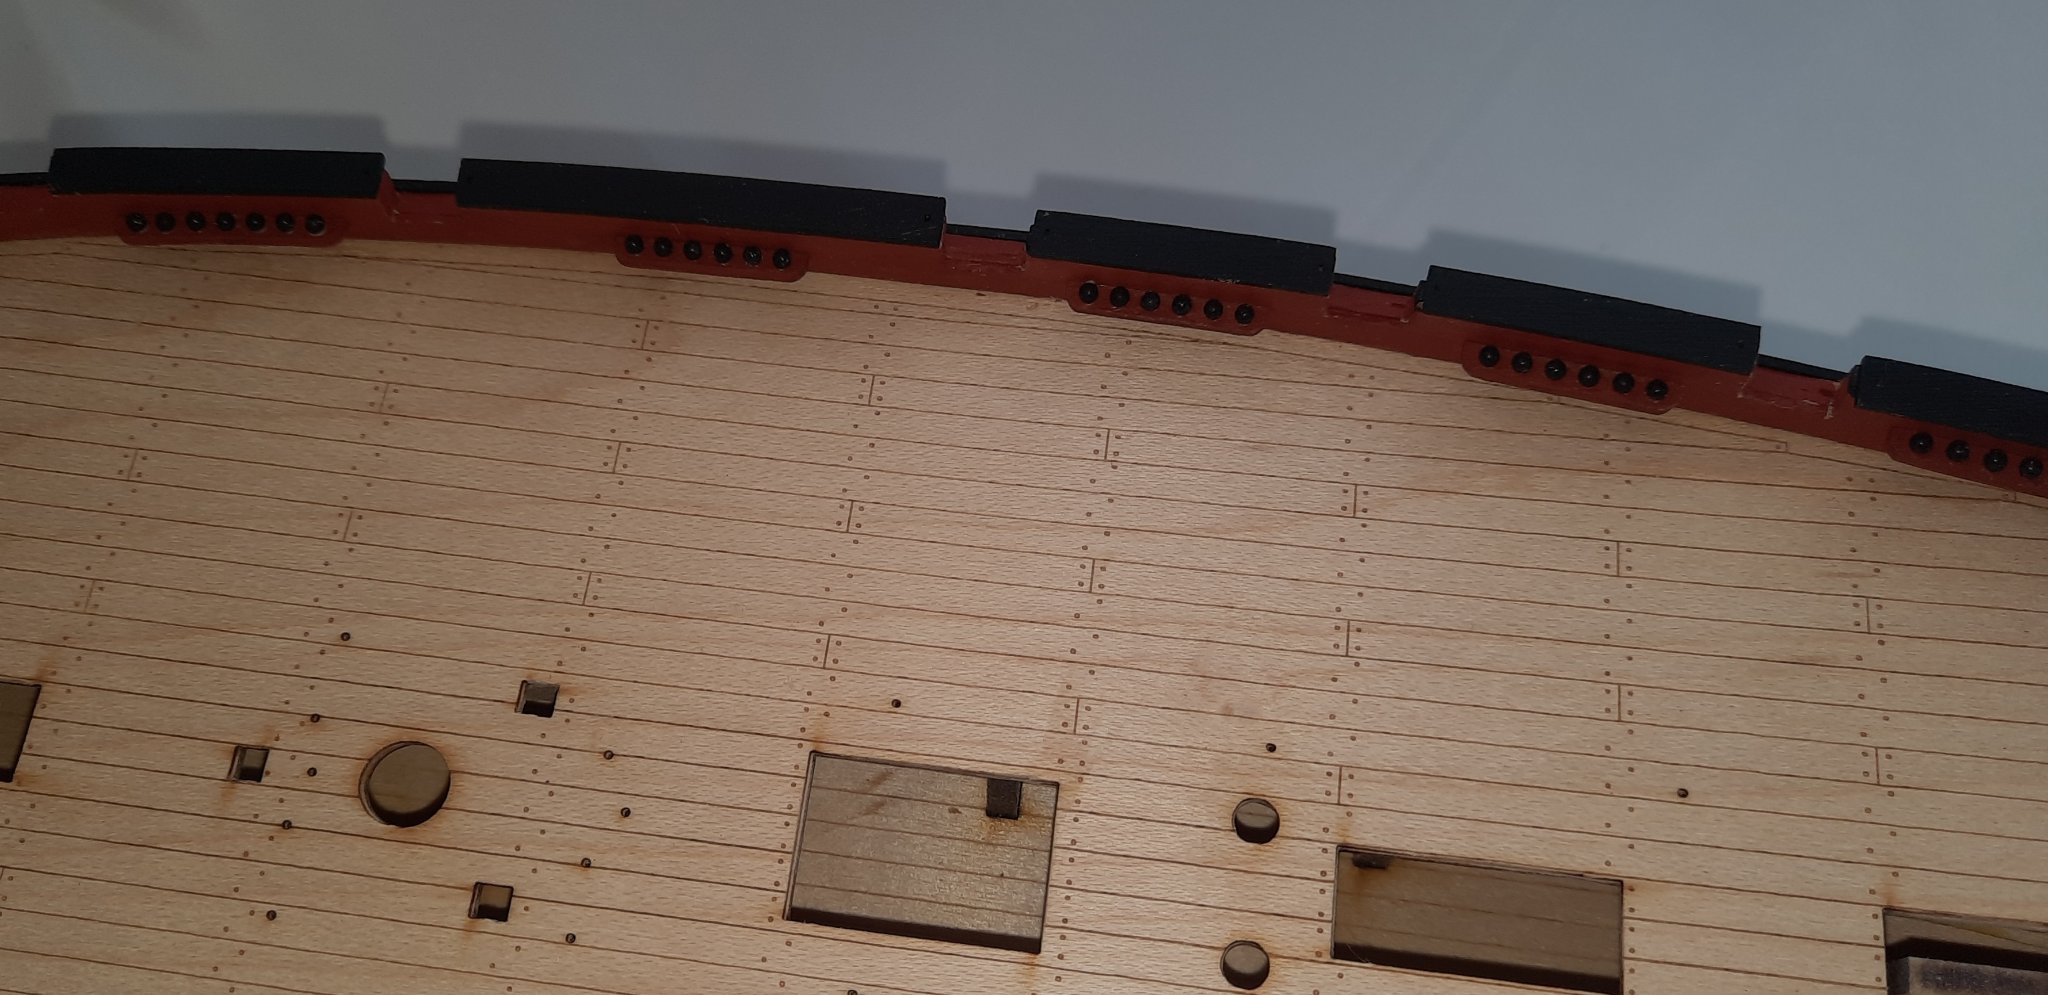
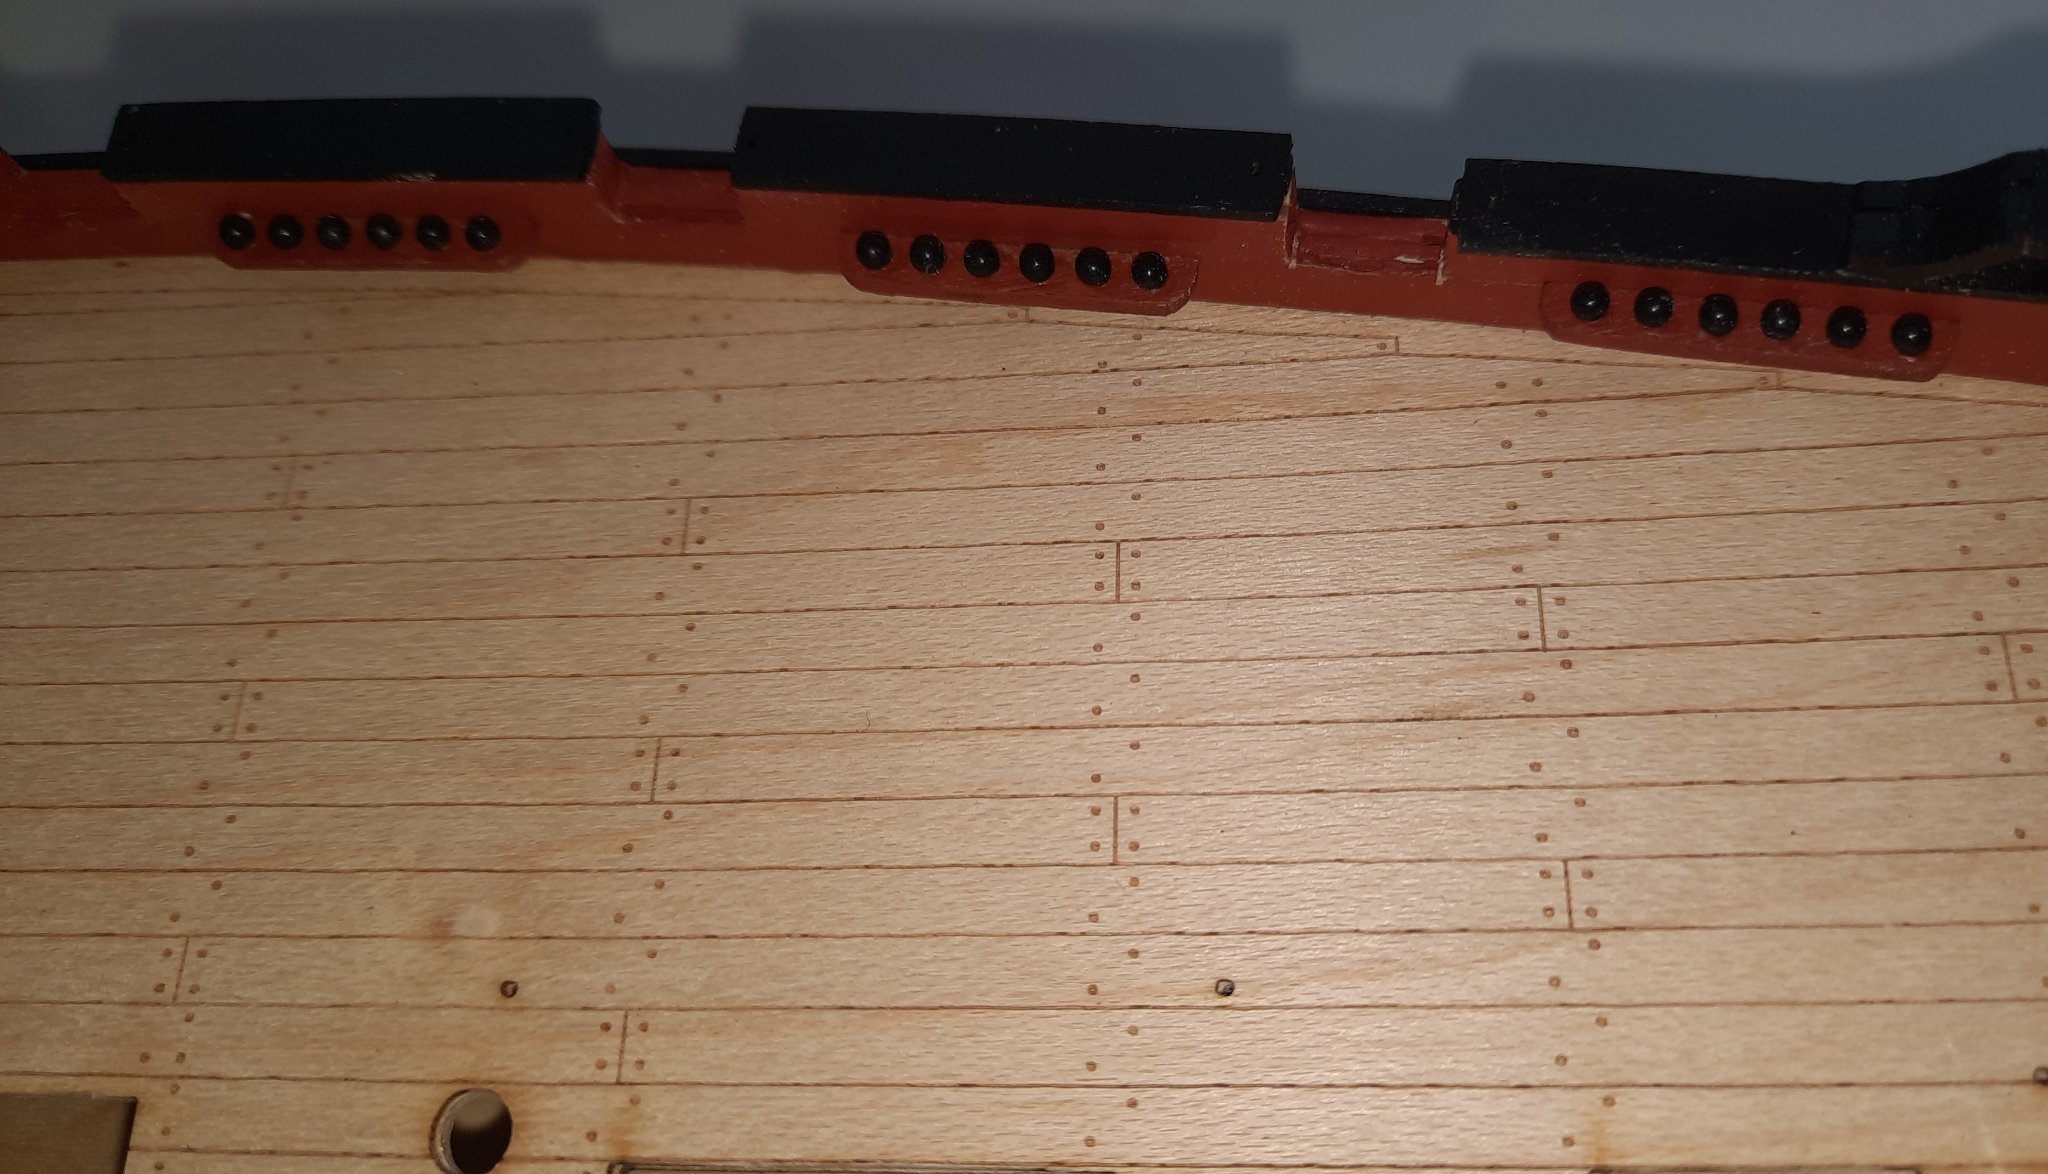
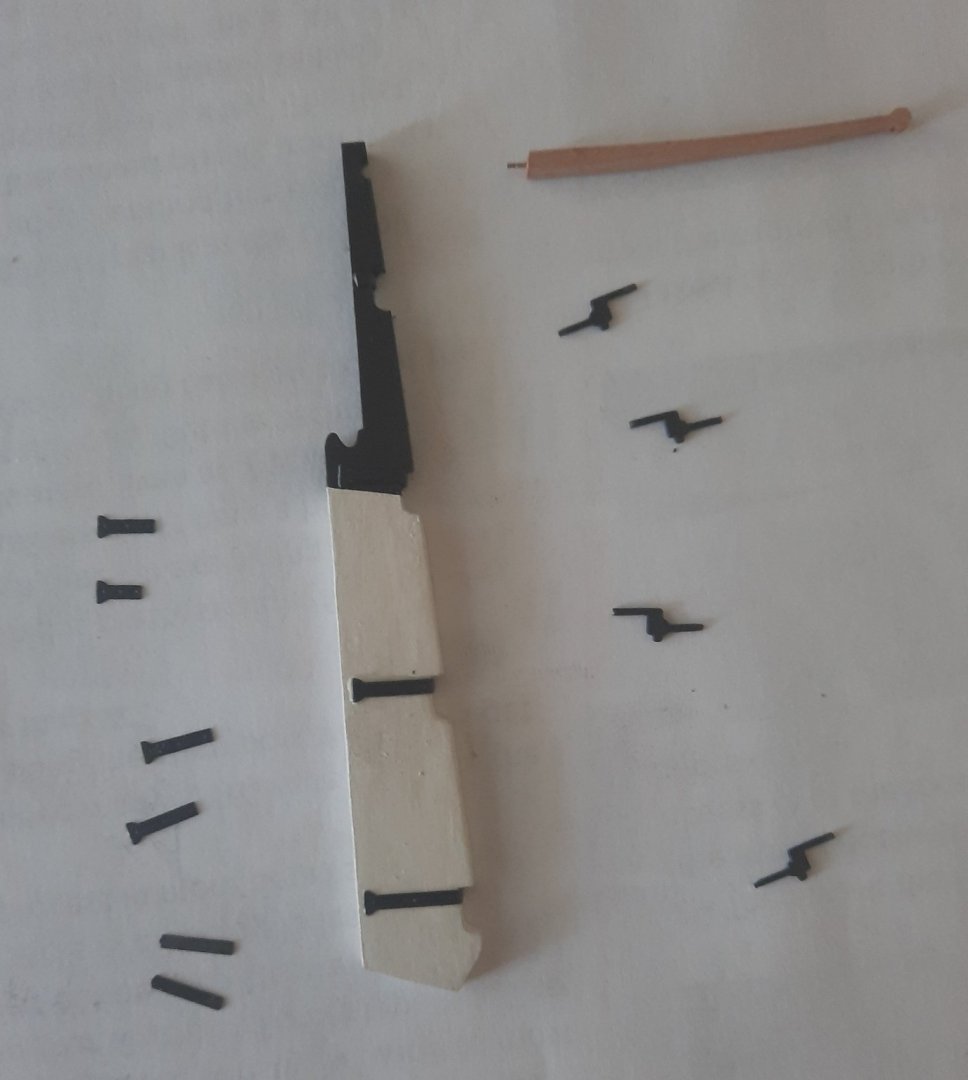
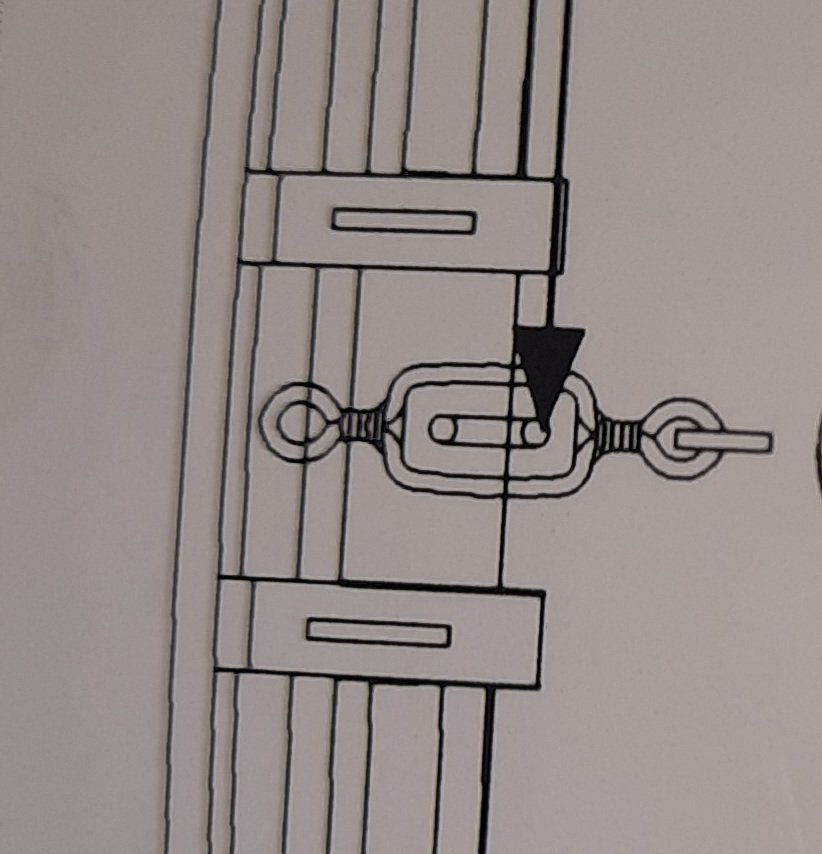
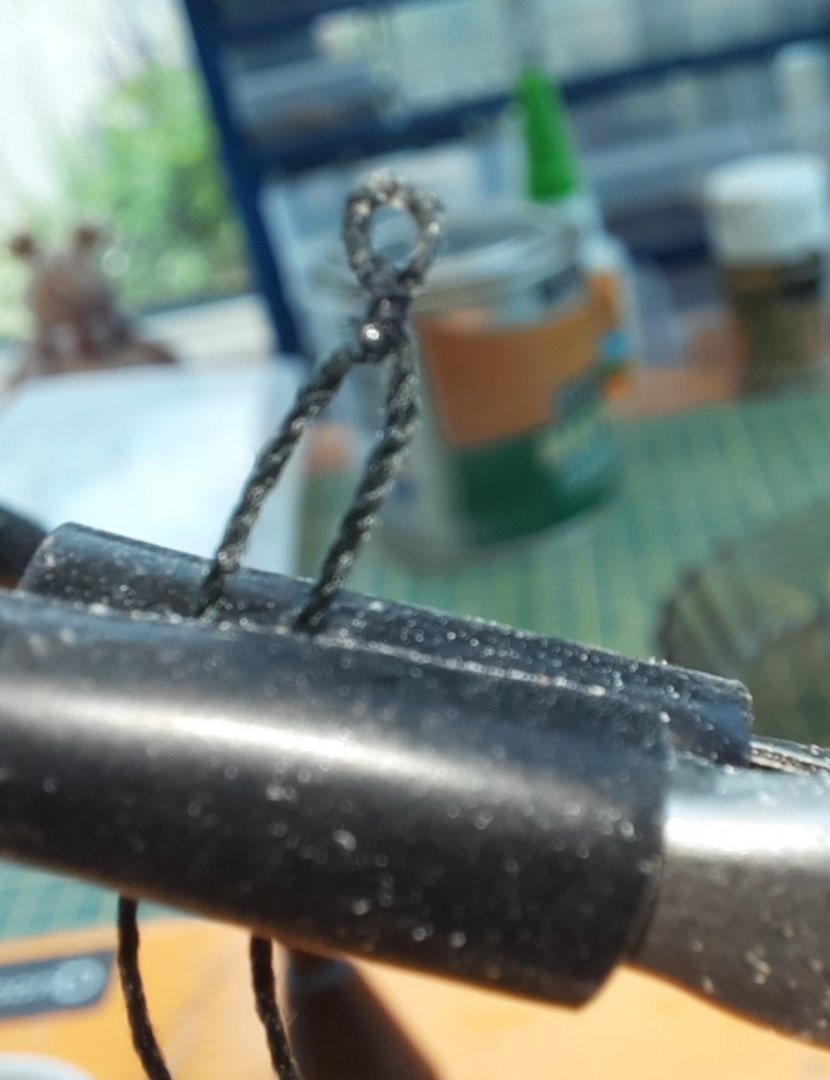
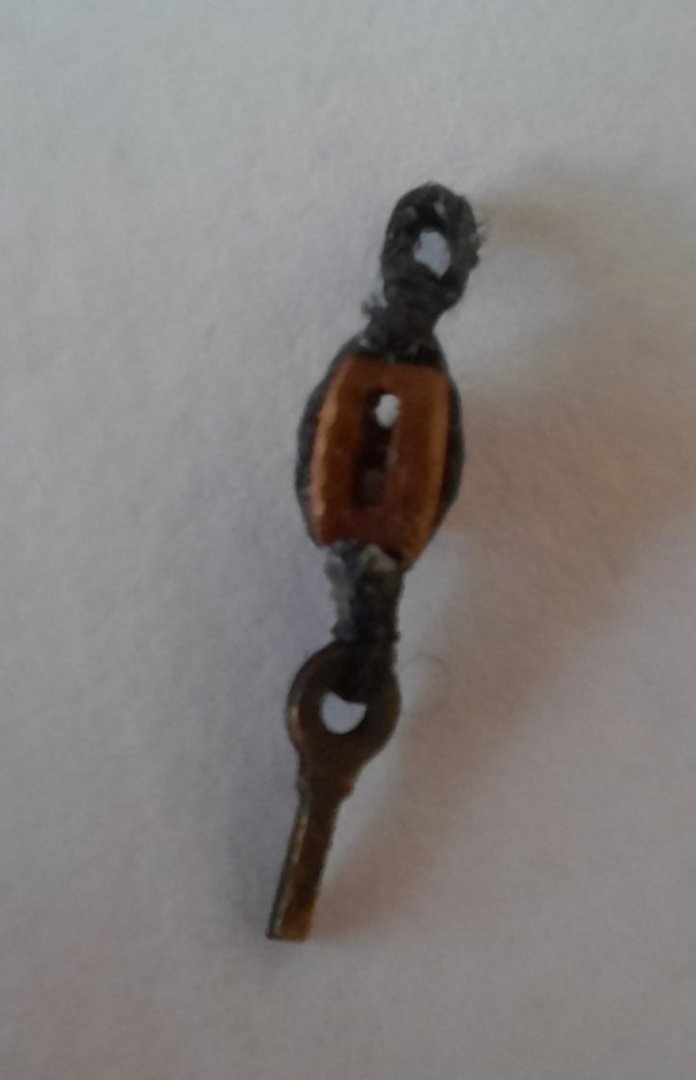
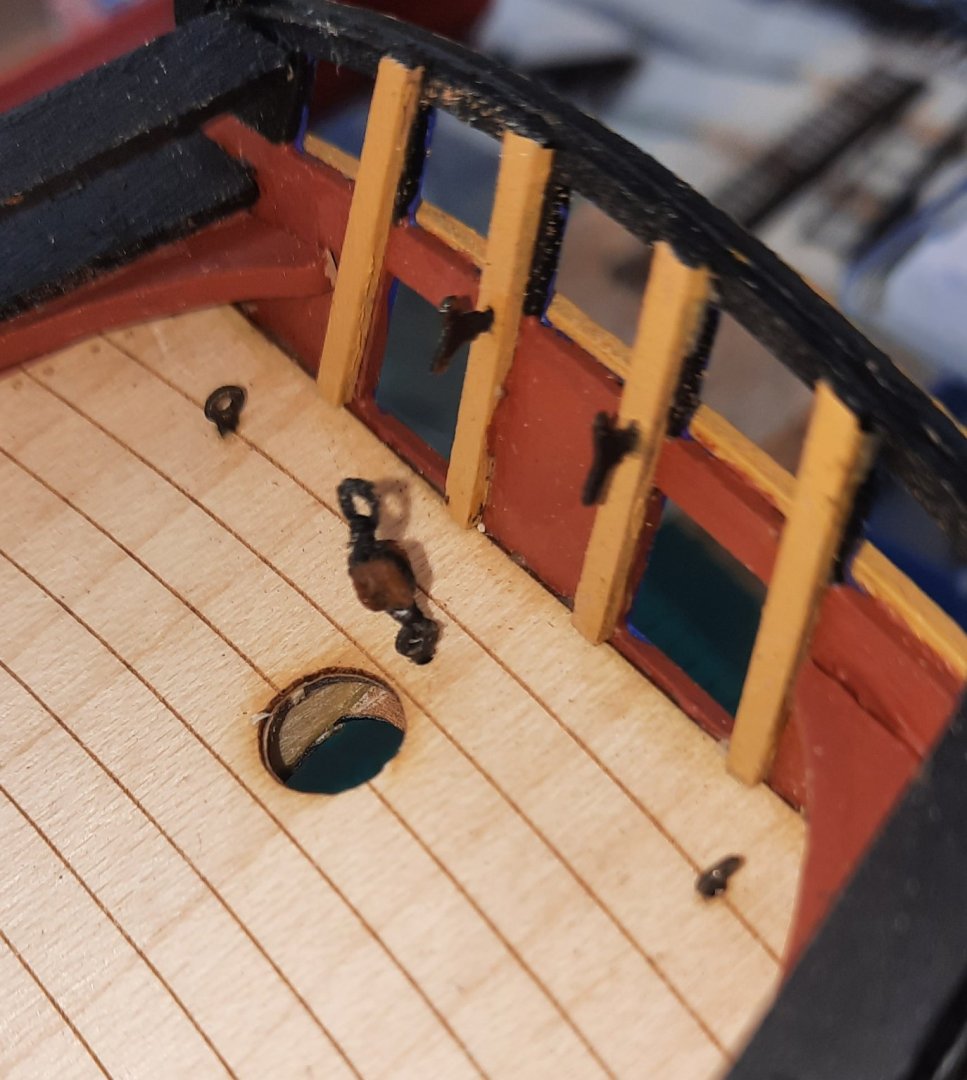
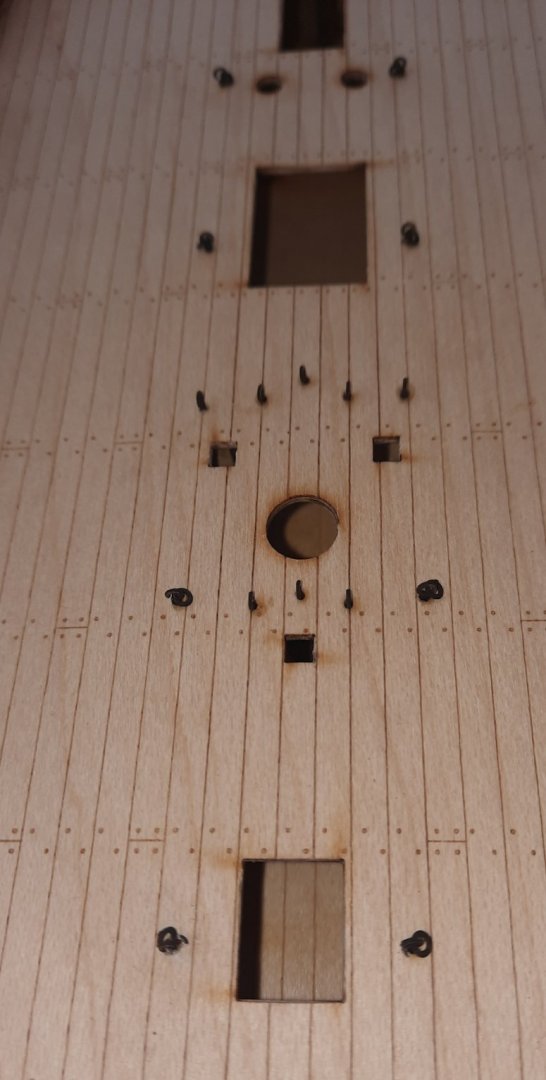
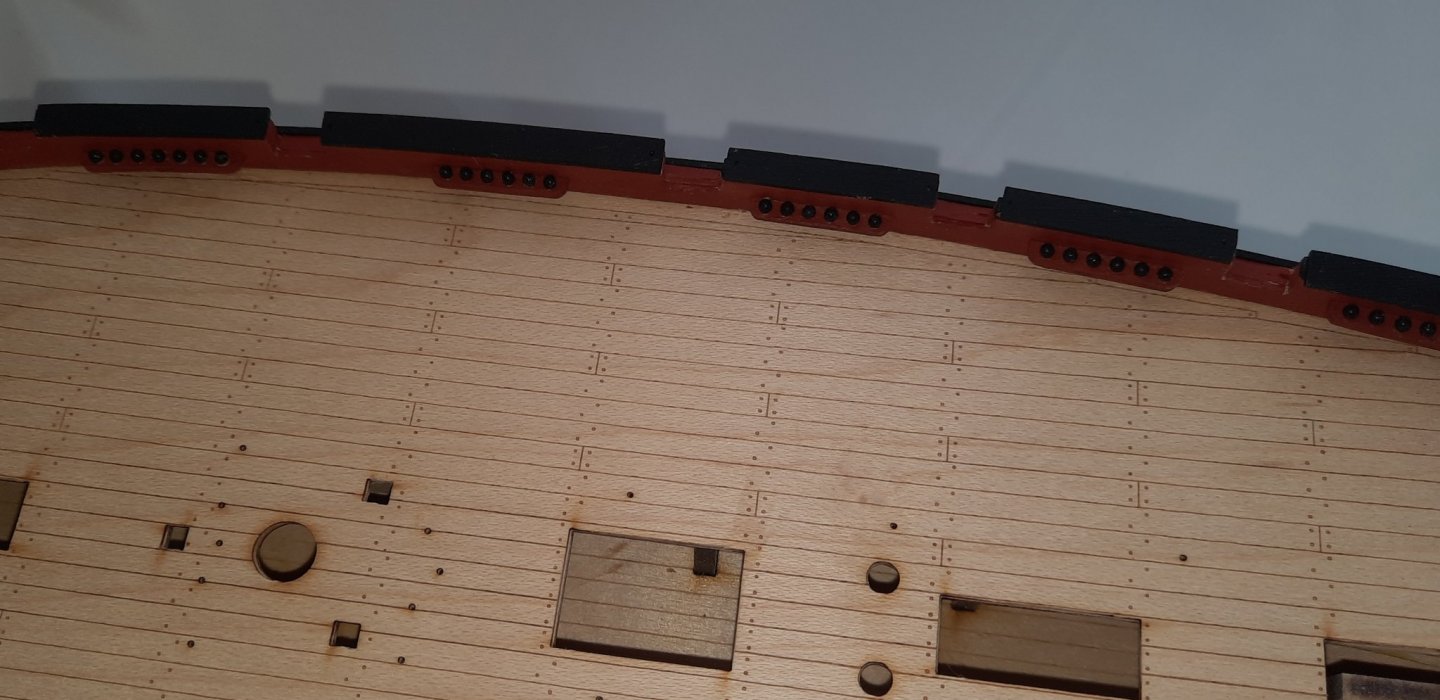
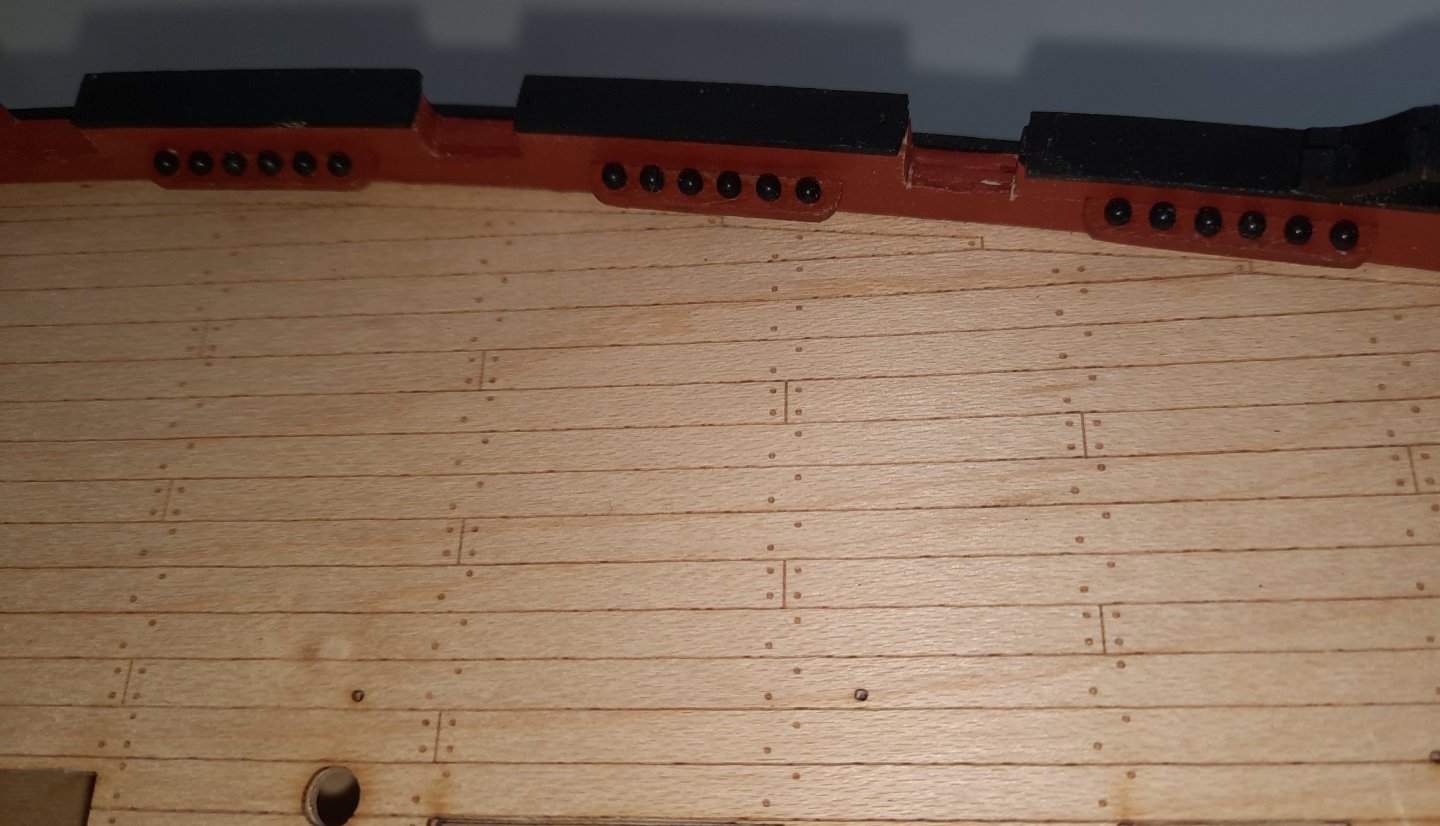
As I am making good progress I will continue with the daily updates for the time being. I started with adding the eyebolts and eyebolts with rings to the deck. This was a simple task as the deck is predrilled. I did end up running a 0.9mm micro drill bit through these holes as I did find the holes a tad tight initially. Before fitting the central stern eyebolt I had noted that it has a 3mm single block fitted. In my experience I have found it better to add these blocks to the eyebolt prior to fitting to the deck. I essentially used the same method as DELF (Derek) used on his Speedy, hyperlink to this post is DELF Block Rigging. I started by making the becket. I simply used a 1mm diameter shaft and wrapped the thread around it and tied it off with a reef knot. I added a seizing over the knot to make it look neater and for added support. For the seizing I used a fine fly tying thread, 18/0 black Semerfli. This is a picture of the completed becket The becket was then added to the 3mm single block and seized. I used fly tying thread for the seizing (18/0 black Semerfli). I then added the eyebolt to the 3mm block using the method outlined by DELF. In the photo below the eyebolt with the 3mm block has been added to the deck along with the two cleats. I need to repeat this process for an eyebolt located at the bow Next I added some pins to the channels. It was an easy job to mark the position of the pins on the hull and I was pleased that the after drilling the hull the channel pins aligned perfectly with the drilled holes. Moving quickly on I added the side steps and anchor chock. The bottom side step and anchor chock were painted black. Side Steps Anchor Chock One of the jobs I don't like doing is drilling the bulwarks for the cannon eyebolts and rings. I really appreciated Chris's design on the Duchess of Kingston with the pre drilled holes on the inner bulwarks for these rings. I decided the best way forward for the Cutter Alert would be to make a jig. Starting with one of the support blocks I used for positioning the cannon ball racks I added a gun port location plate. Then added two vertical slates which were pre drilled. It is then a simple task to position the jig in the gun port and then using a micro drill through the locating holes to mark the position for the eyebolts and rings. The jig is in position, ready for the micro drill to be run through the two holes. The completed gun ports with the eyebolts and rings added. The ring on the left hand side needs to be repositioned so it hangs down. It will take a couple more hours work to complete the adding the eyebolts and rings to the gun ports. Then I plan to move on to fitting the rudder assembly and tiller. I would like to think that towards the back end of this week I will have moved on making the mast, yards, bowsprit and booms.


- 160 replies
-
- 3
-
-
- Alert
- vanguard models
- (and 1 more)
-
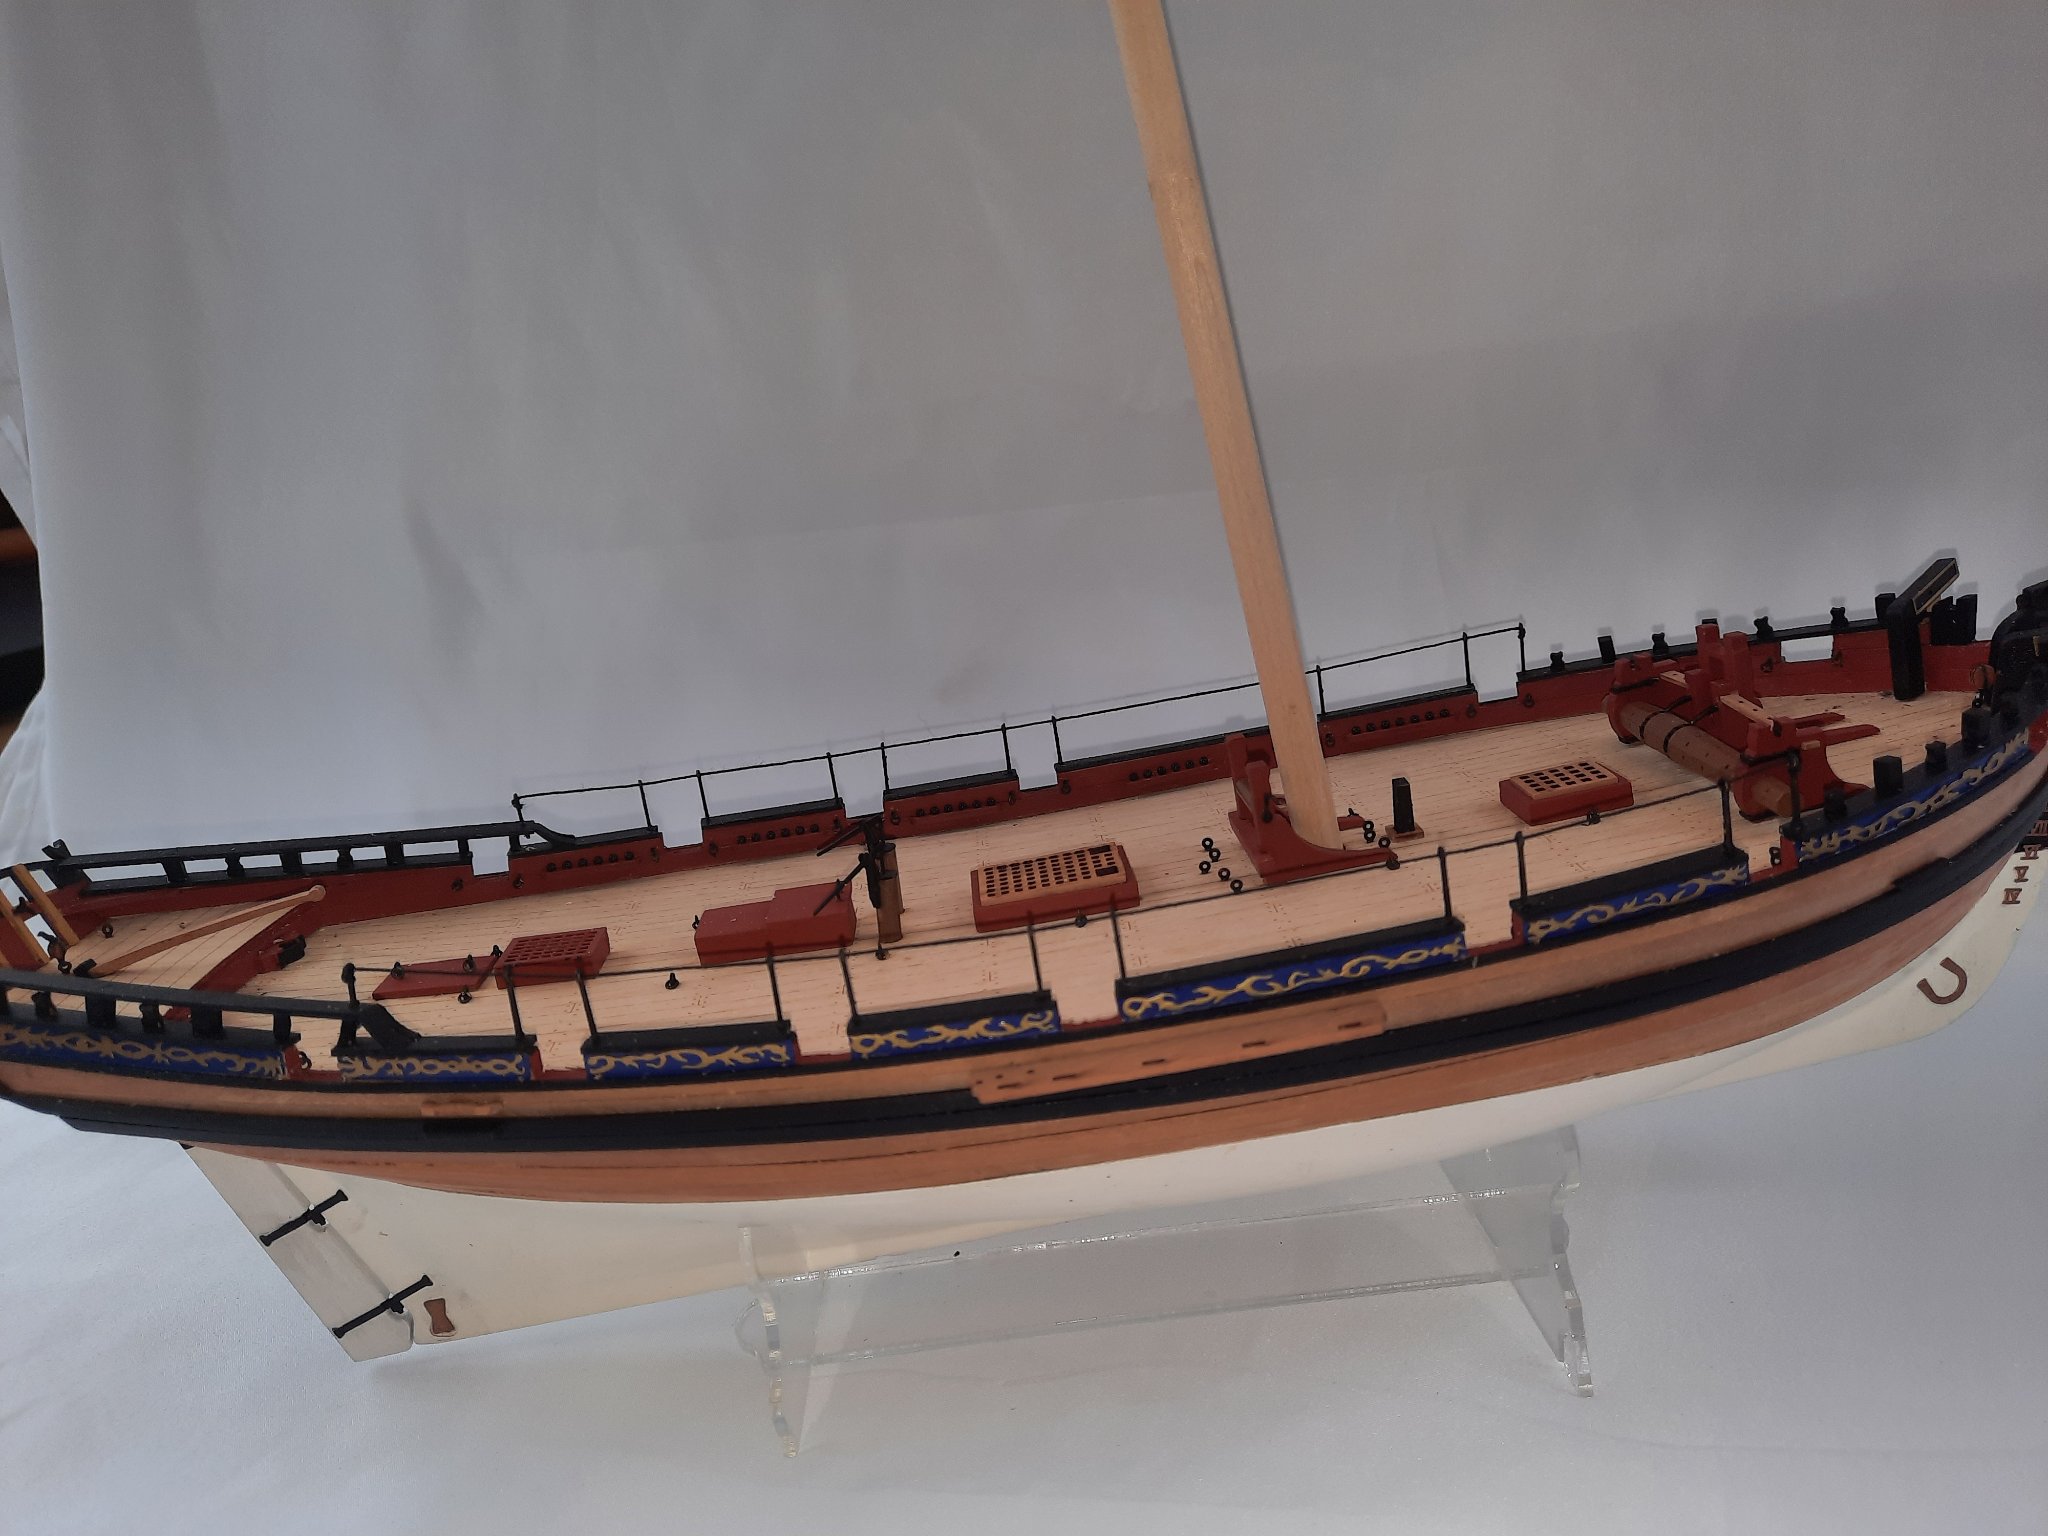
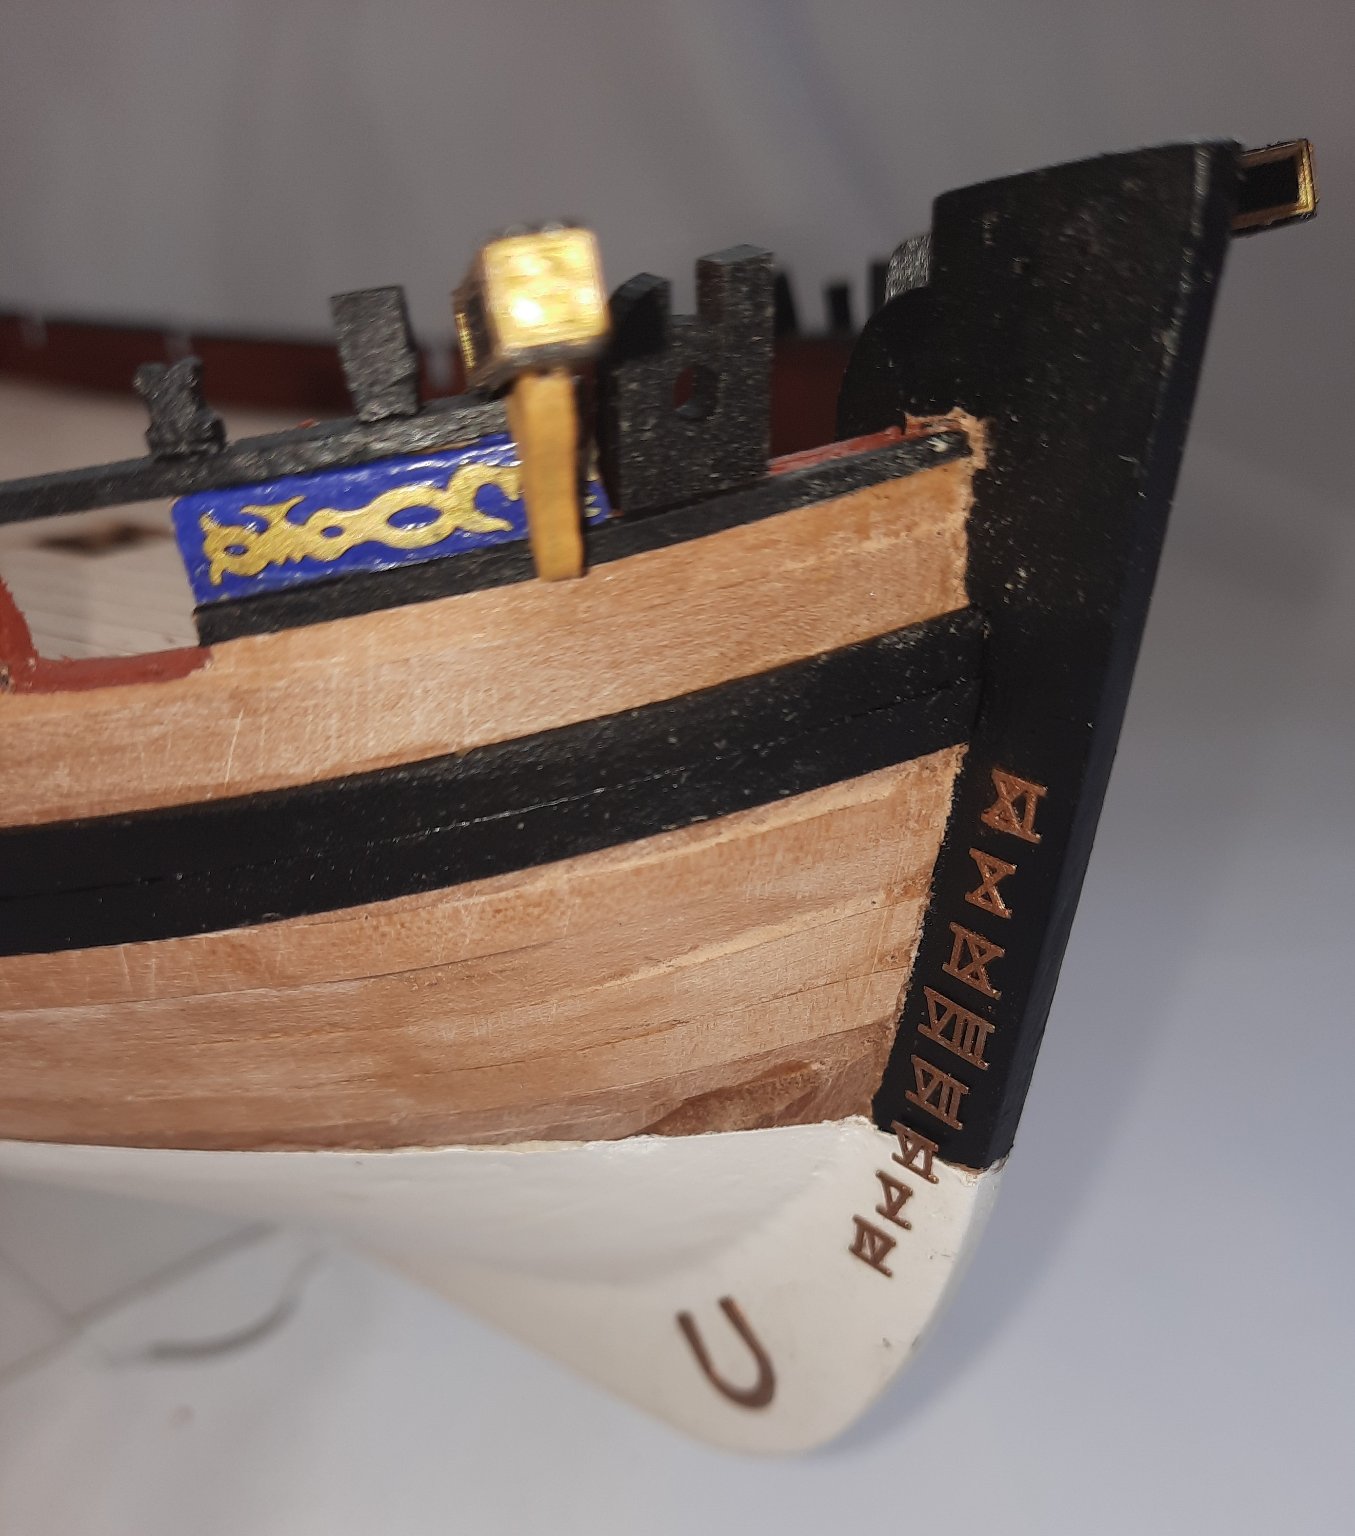
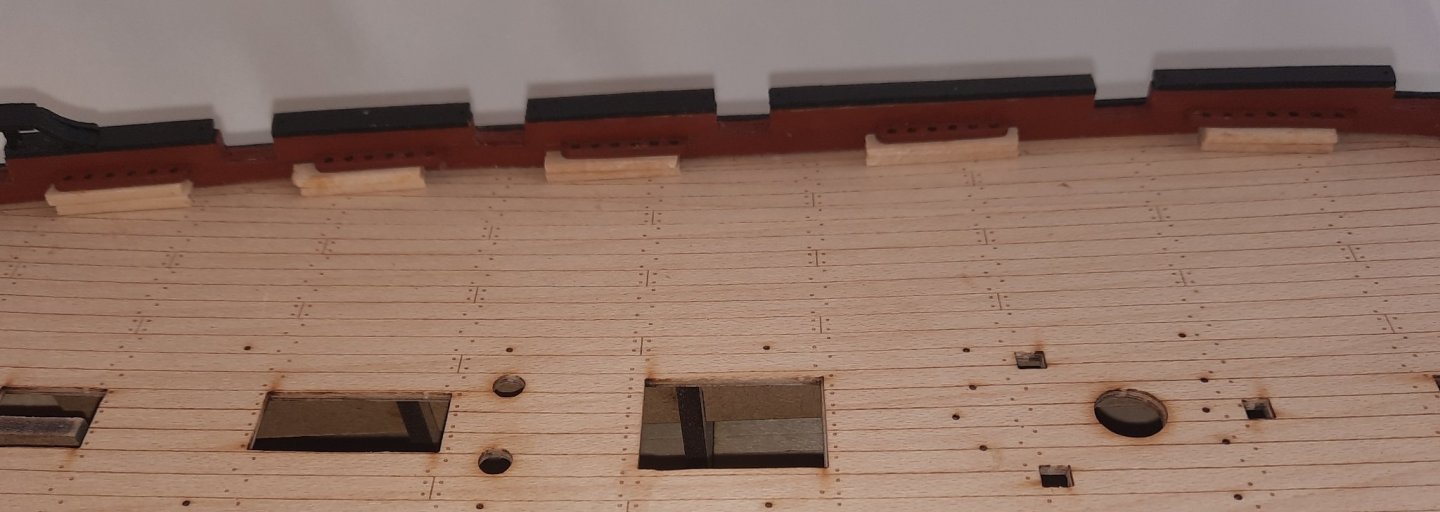
Today I started by adding the draught markings to the hull, using the klear polish method to secure the PE parts in place. I also painted the leading edge of the cathead knees ochre yellow. Next I moved on to the cannon ball racks. I gave each of the 10 x racks a thin coat of polyurethane varnish and then painted them ochre red. They need to be position 3mm above the deck so as the paint was drying I made some 3mm high support blocks. I applied a thin coating of Titebond original along the edge each cannon ball rack and using the support racks as a guide they were added to the bulwarks. Cannon ball racks have been glued in place and can be seen sitting on top of the support blocks. Empty cannon ball racks after the support blocks have been removed Next I placed a small drop of Titebond original in the cannon ball location holes and then using my small reverse action tweezers dropped the cannon balls in position. Completed cannon ball racks Close up of the cannon ball racks Finally I cleaned all the remaining PE parts in acetone and then soapy water and they are now ready to be blacked / painted as necessary. The remaining tasks to be completed include: a) Add channels, anchor chocks and step steps b) Add the deck deck eyebolts, rings, cleats and rigging eyebolts c) Add the mast base d) Assembly and fit the rudder, braces and tiller arm e) Fit the deck furniture, I have already assembled all these items f) Fit the bowsprit iron hoop g) assembly the anchors but they will not be fitted until after the rigging is complete Once the above tasks have been completed I can move on to making all the masts, bowsprit, yards and booms.


- 160 replies
-
- 2
-
-
- Alert
- vanguard models
- (and 1 more)
-
She looks stunning, can't wait for the official release of this kit.
- 355 replies
-
- 4
-
-
- vanguard models
- Sphinx
- (and 1 more)
-
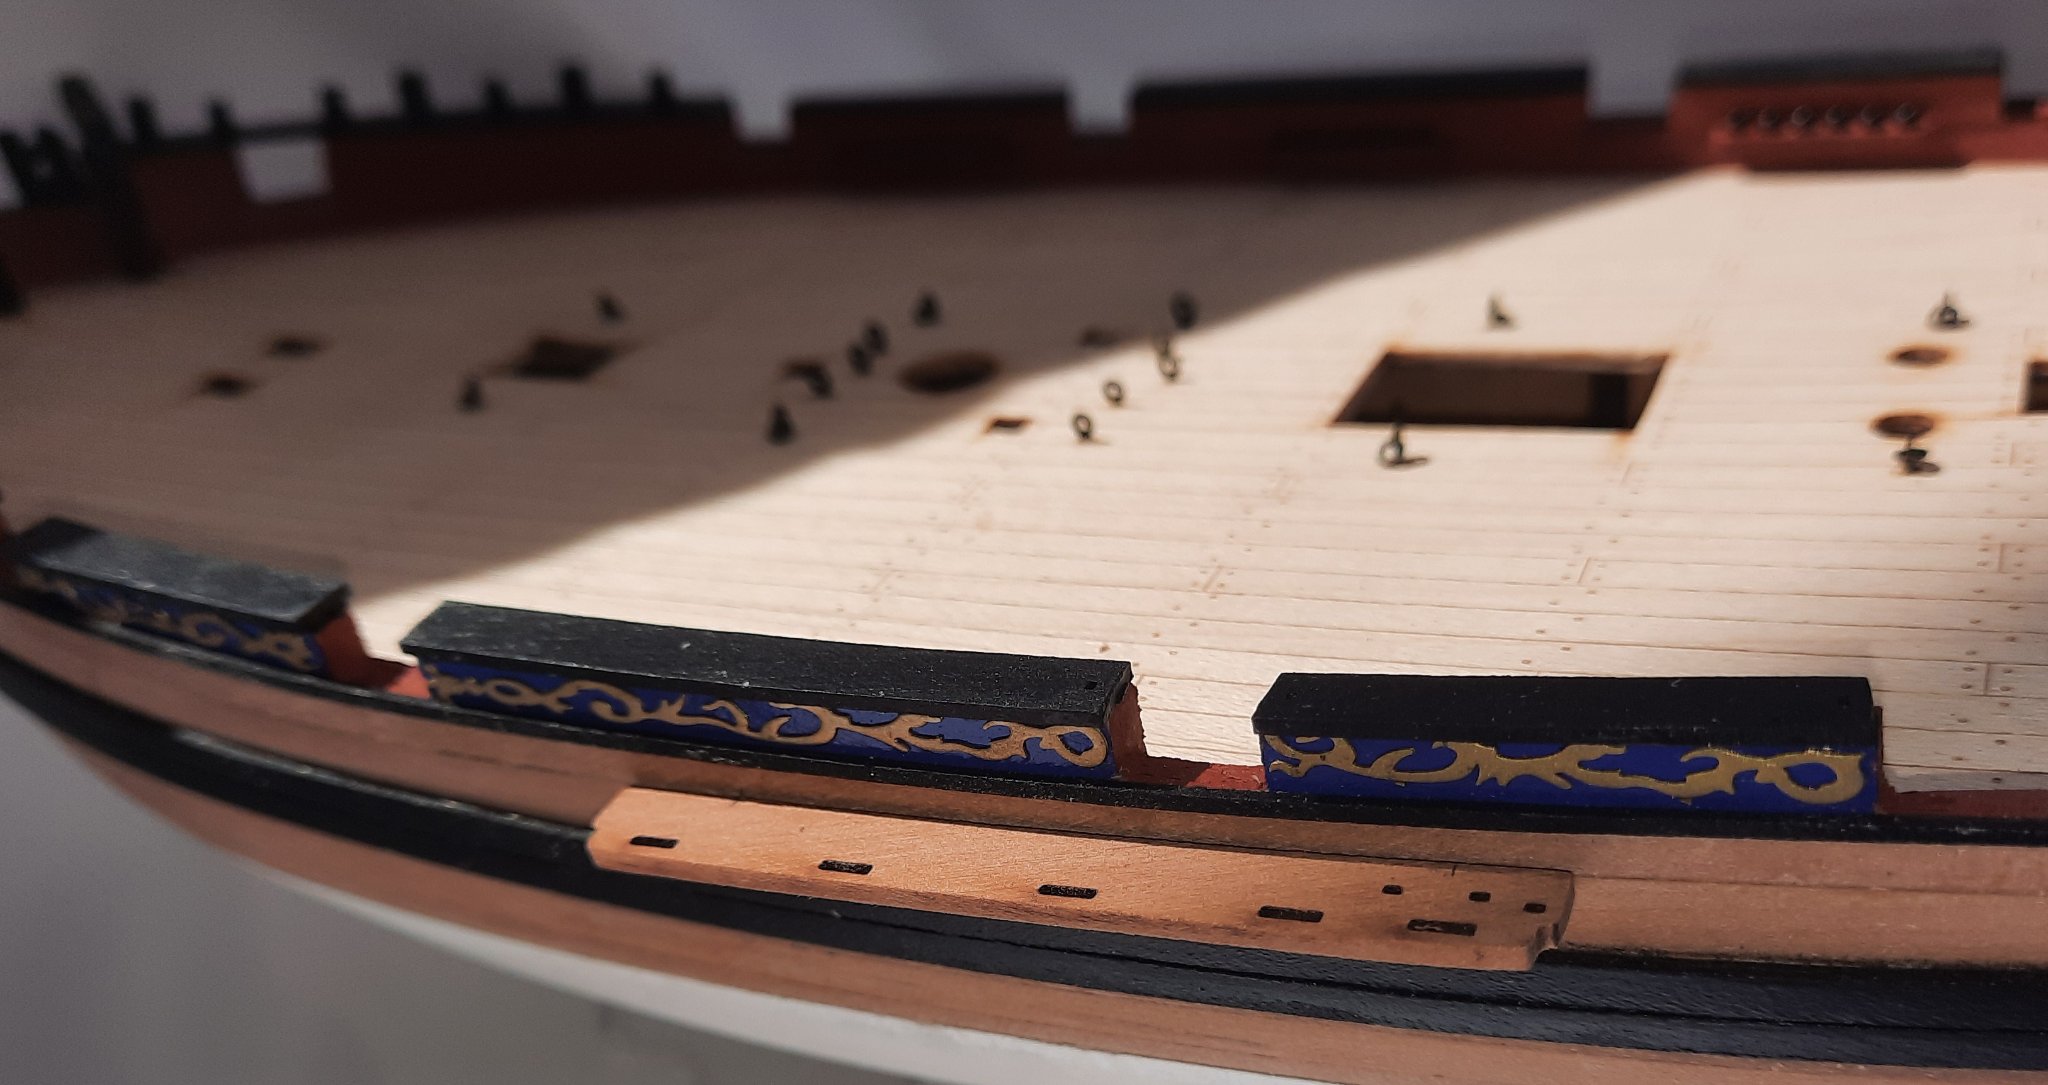
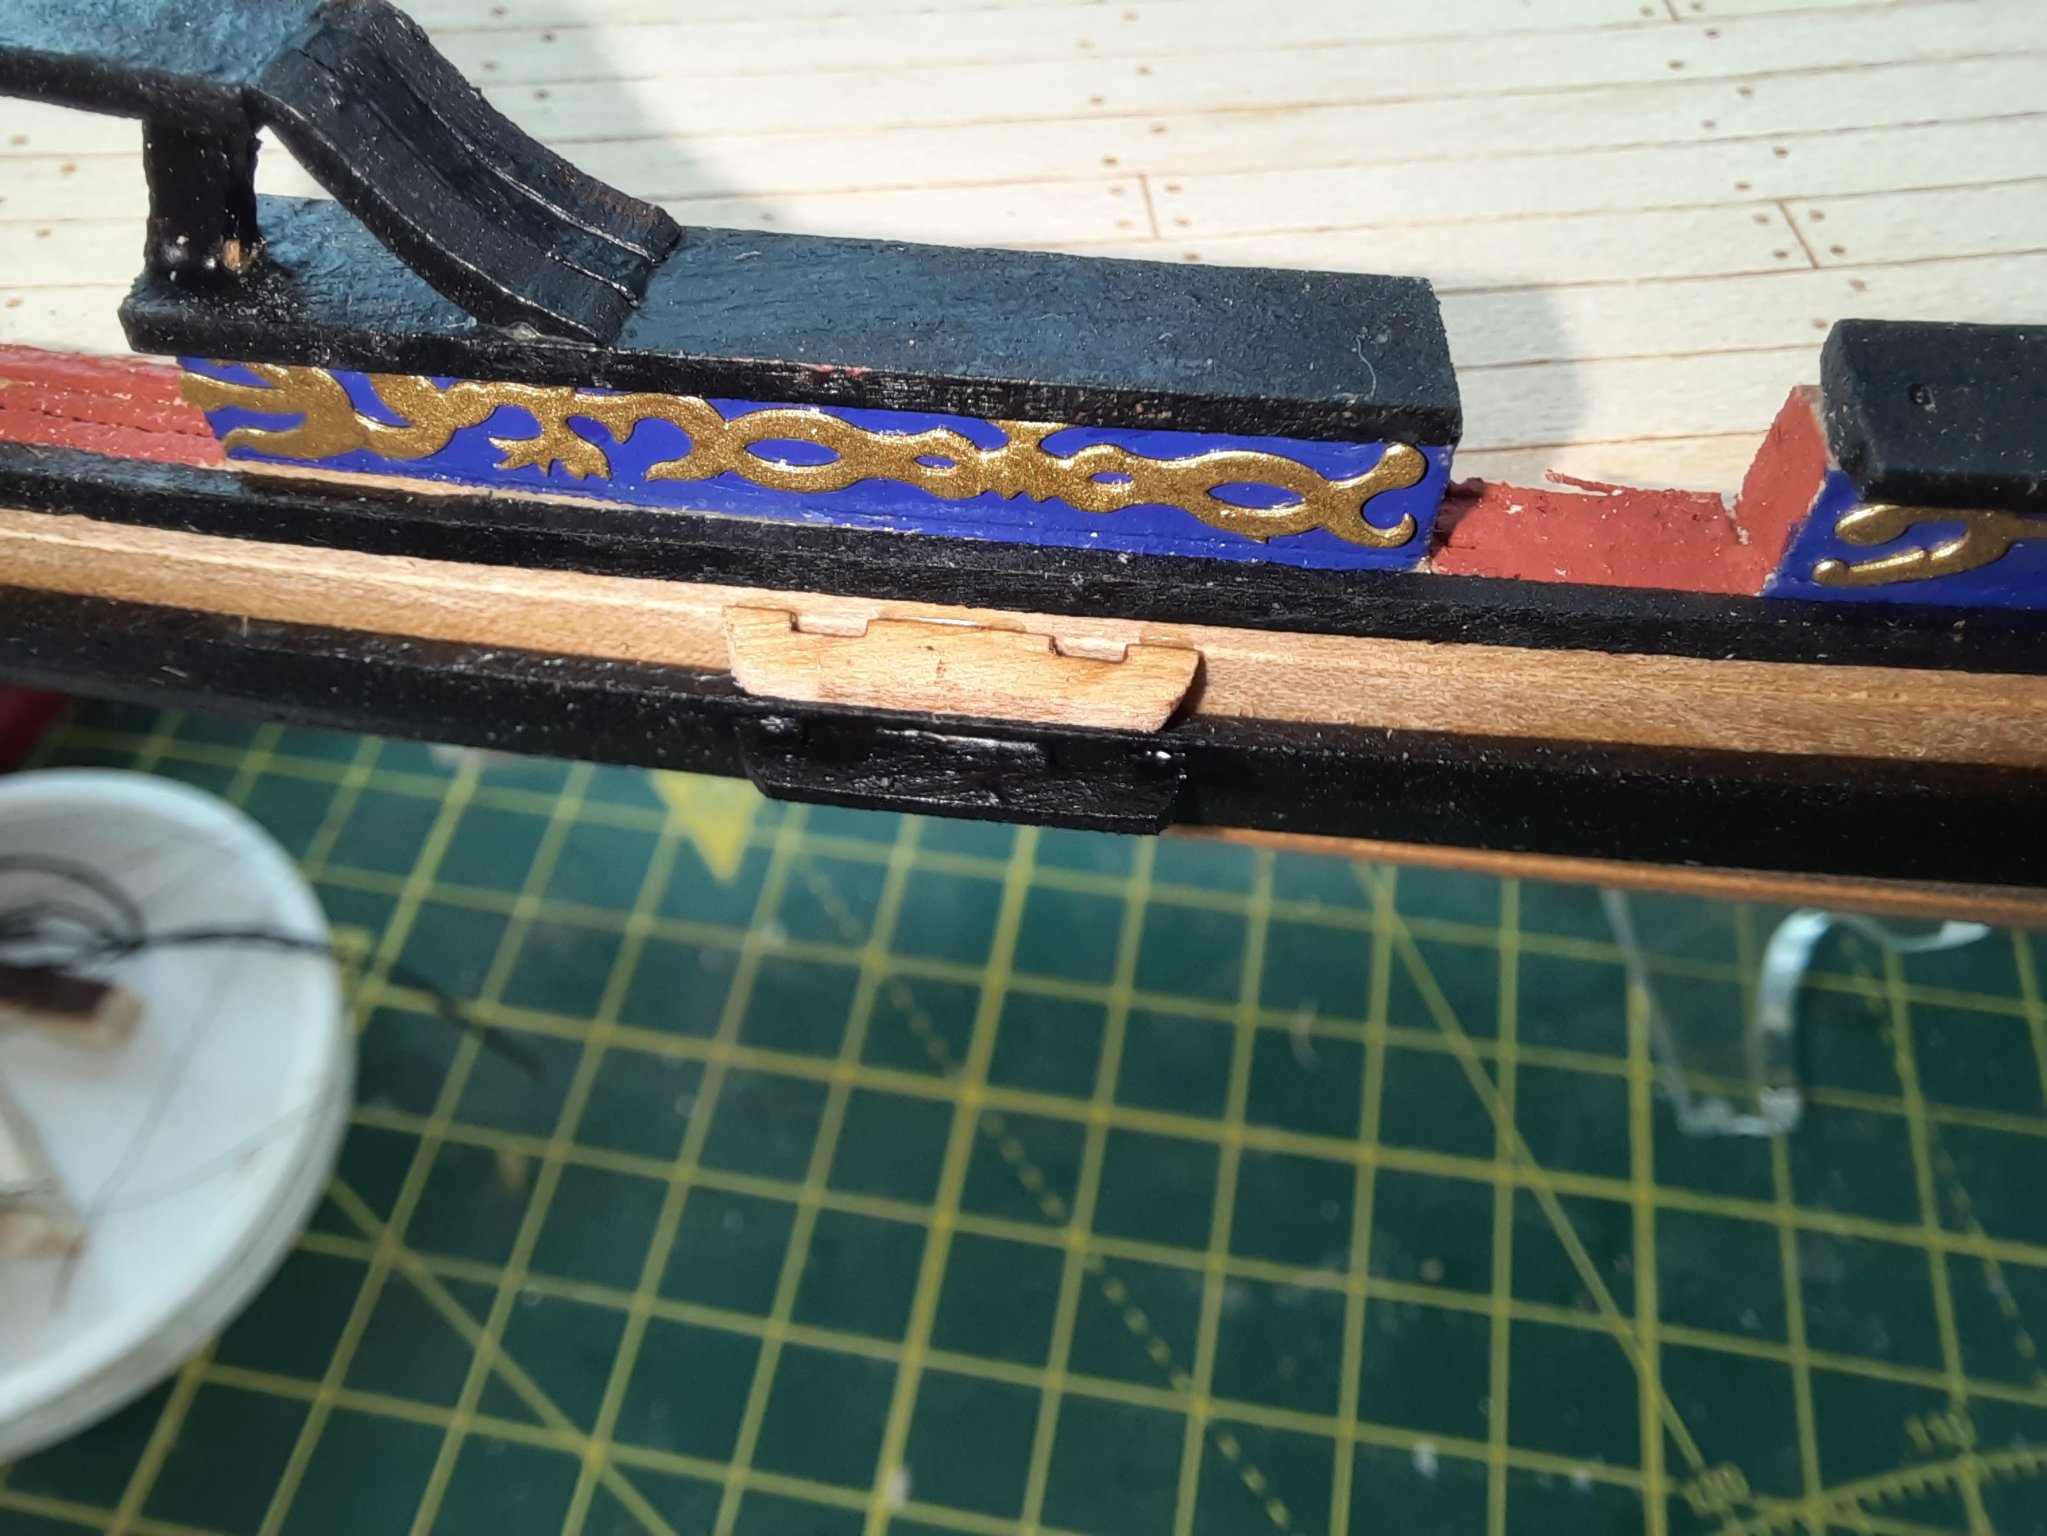
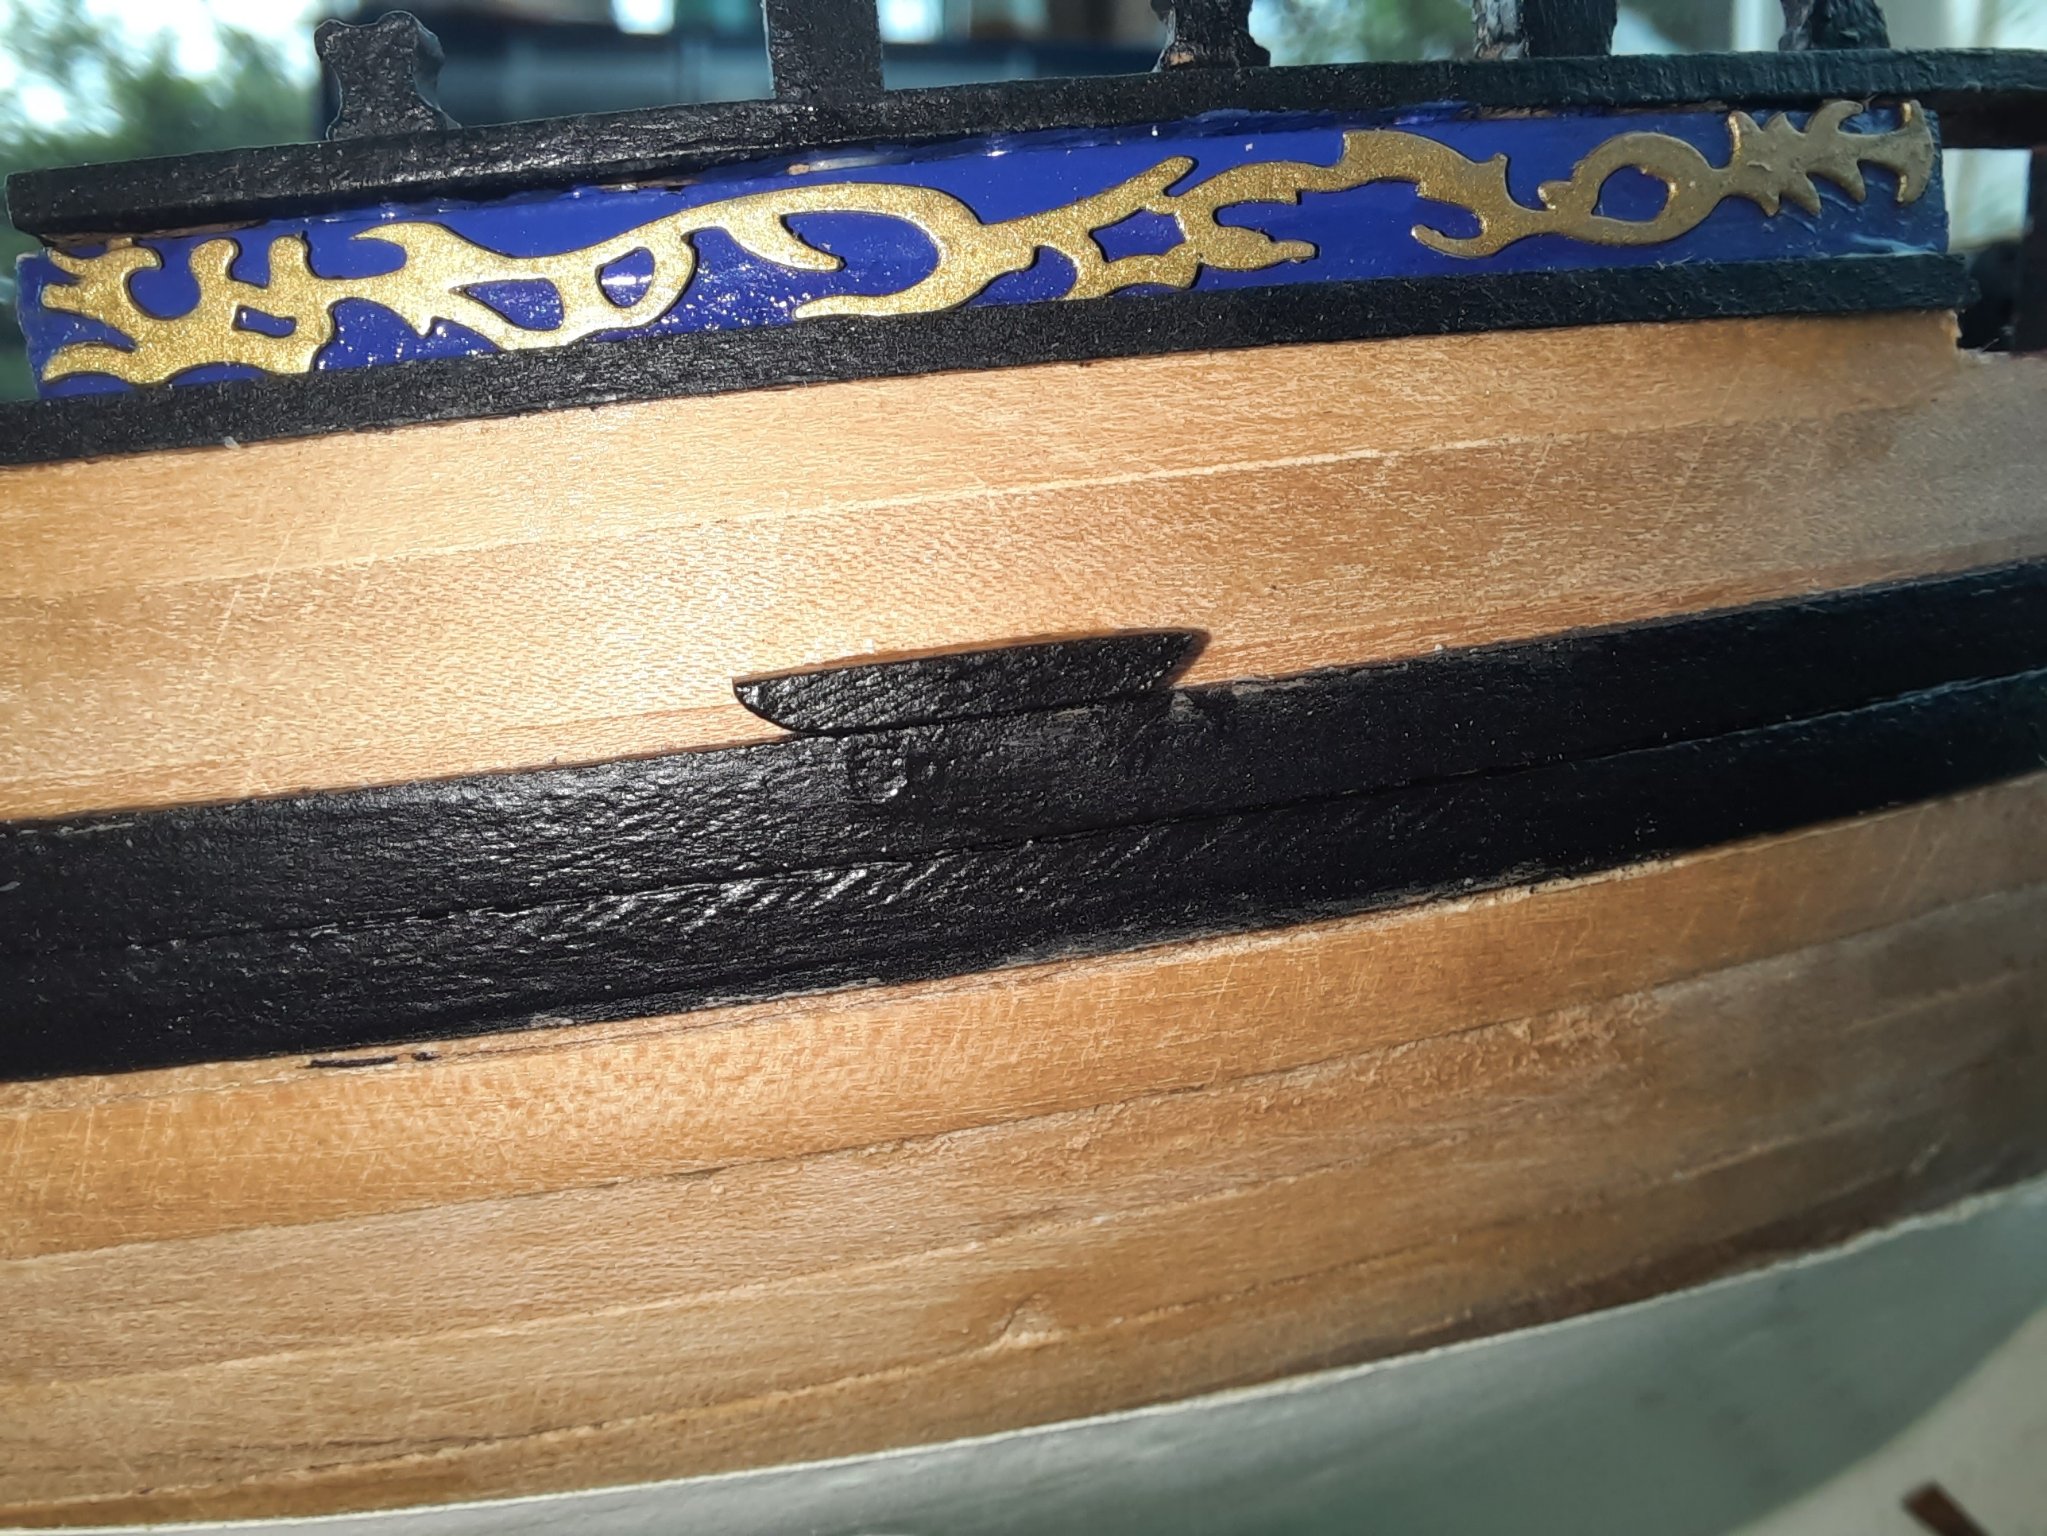
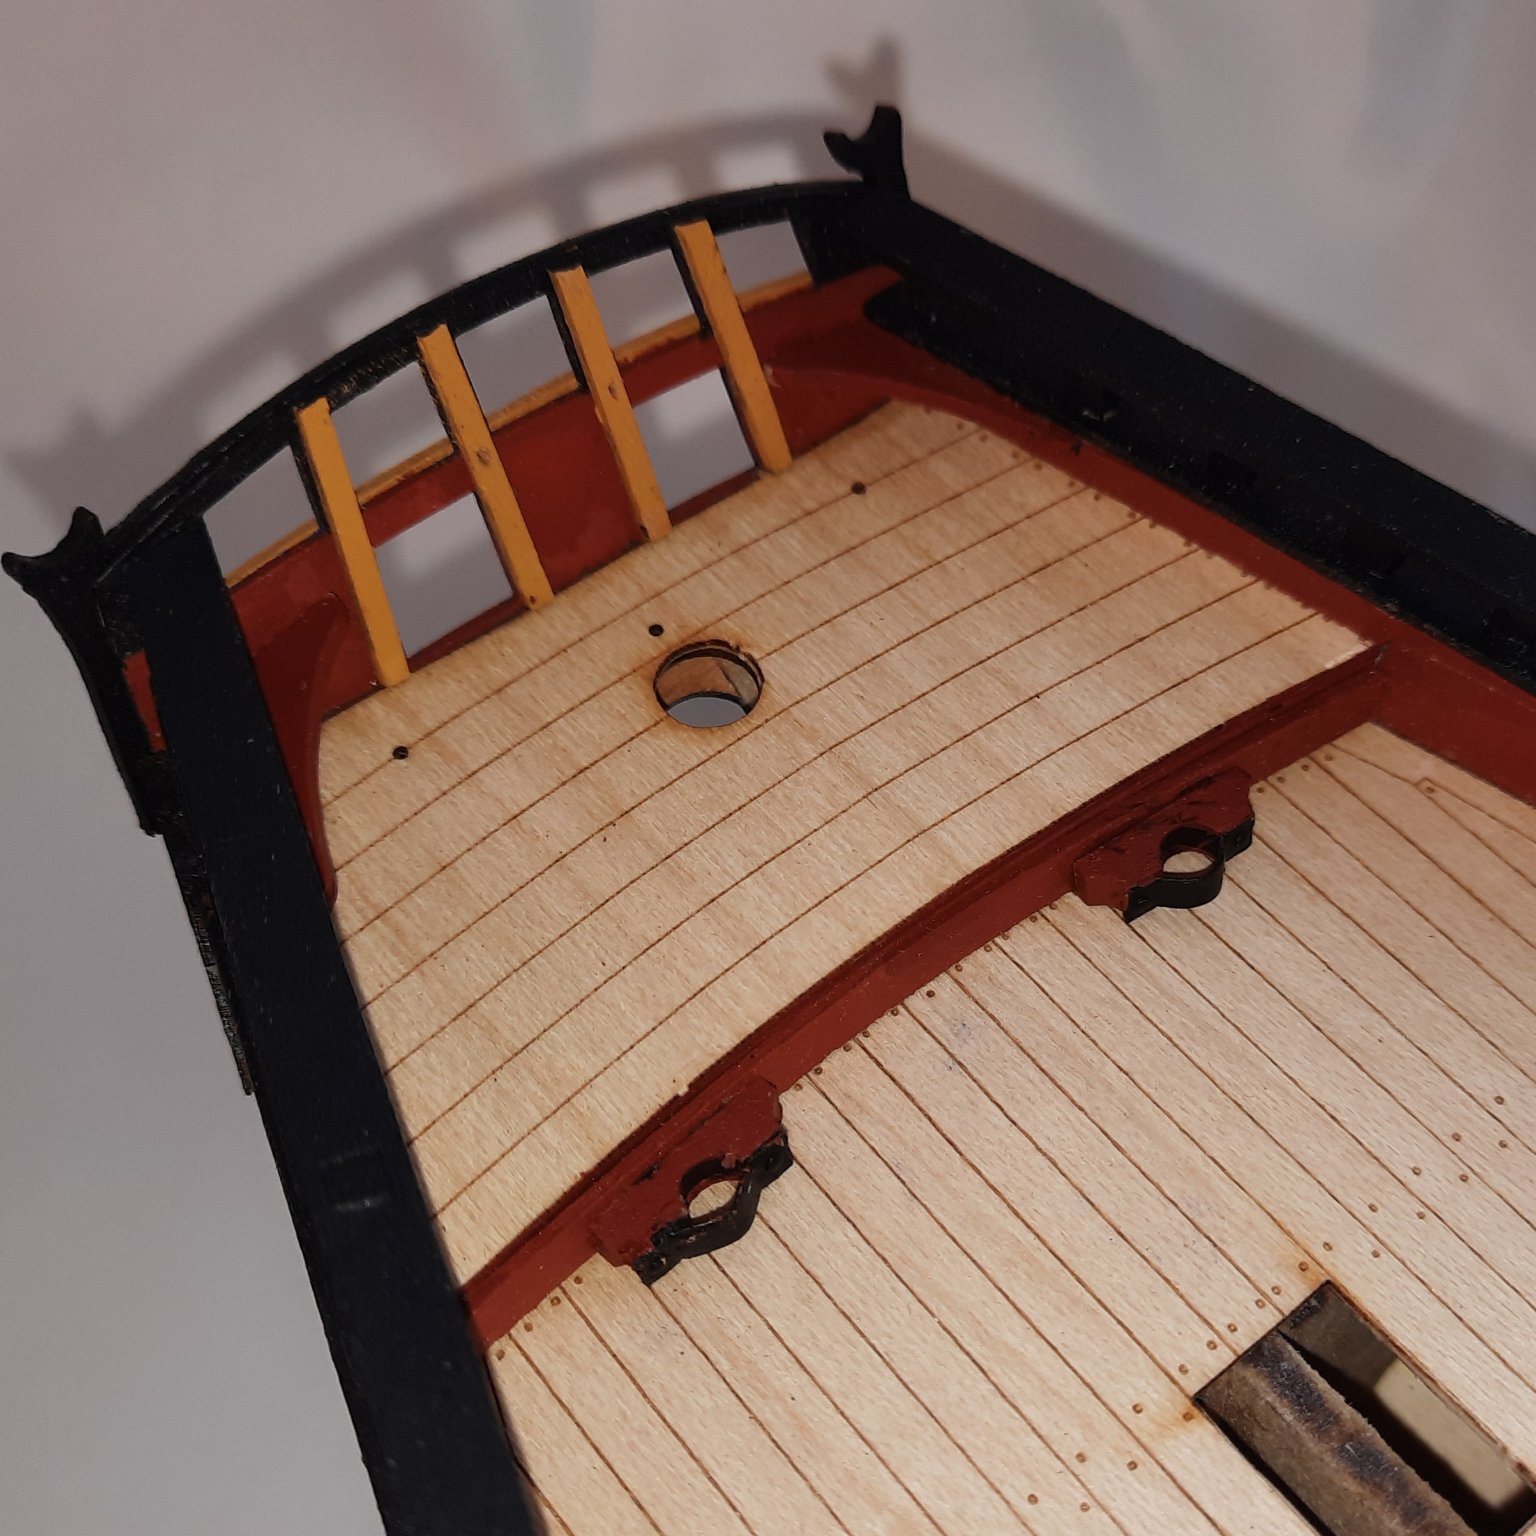
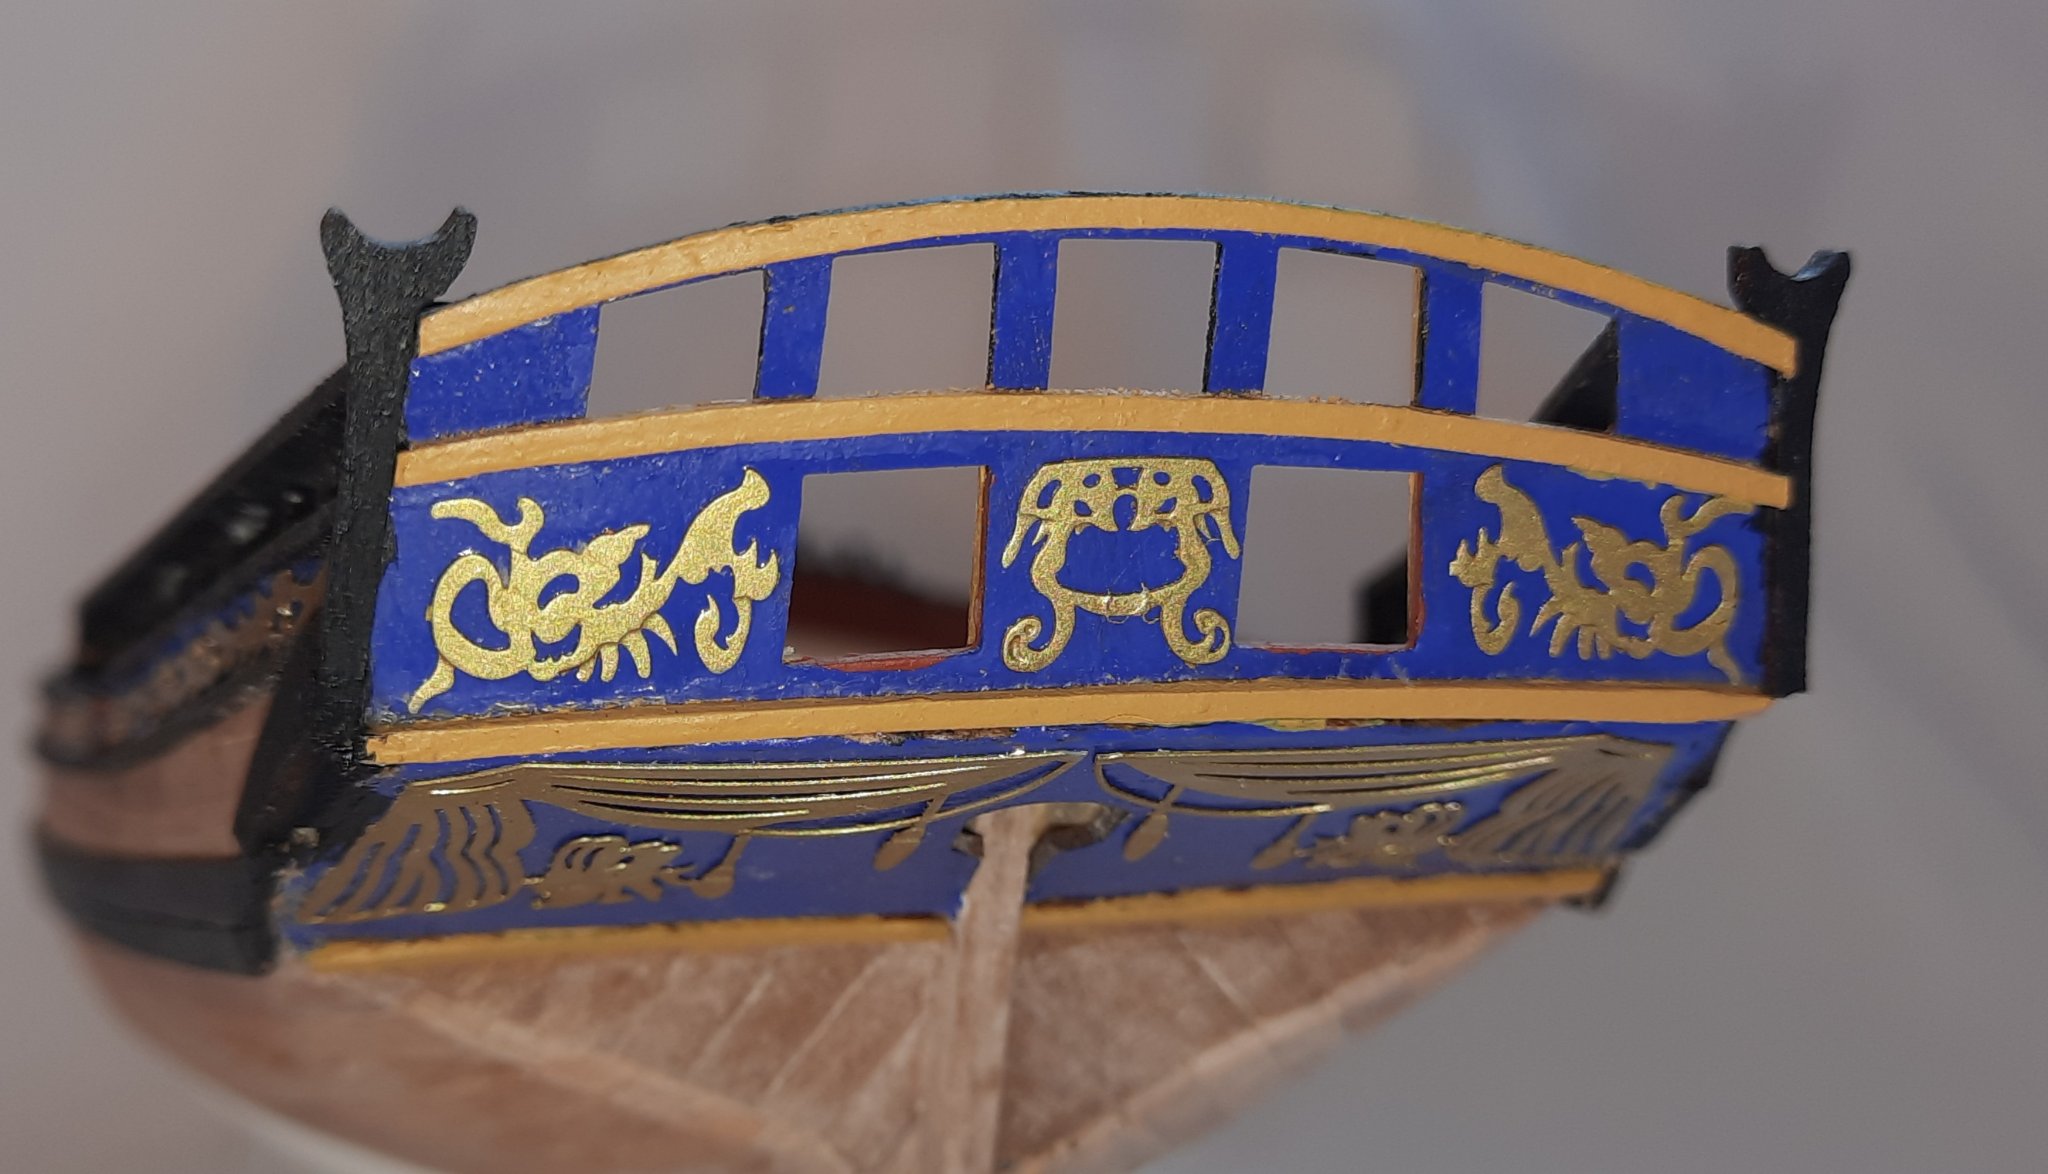
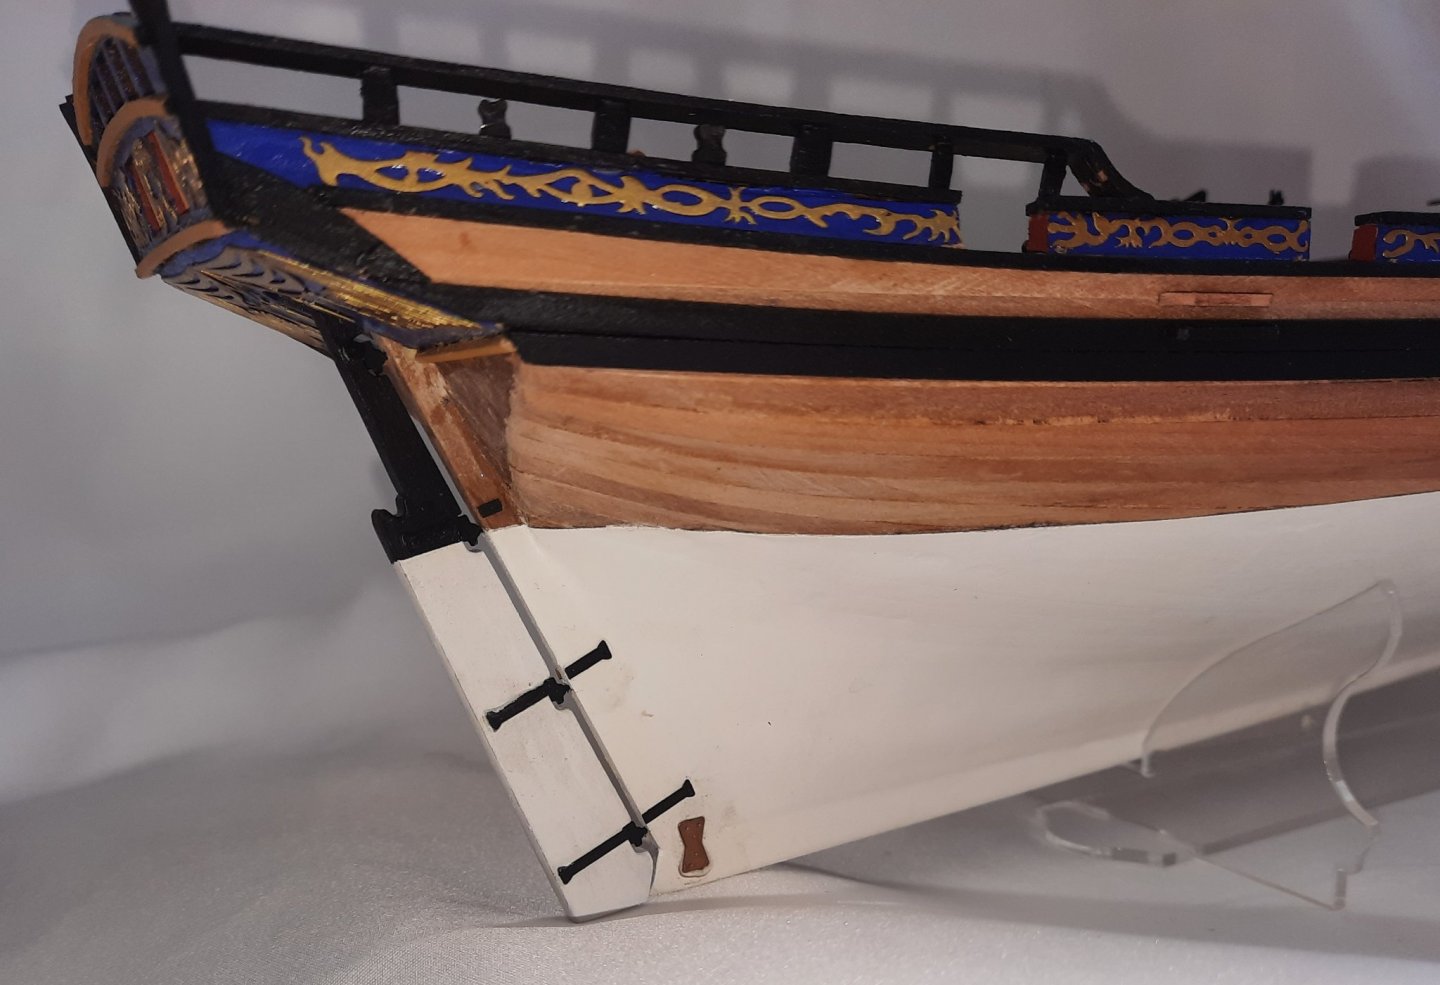
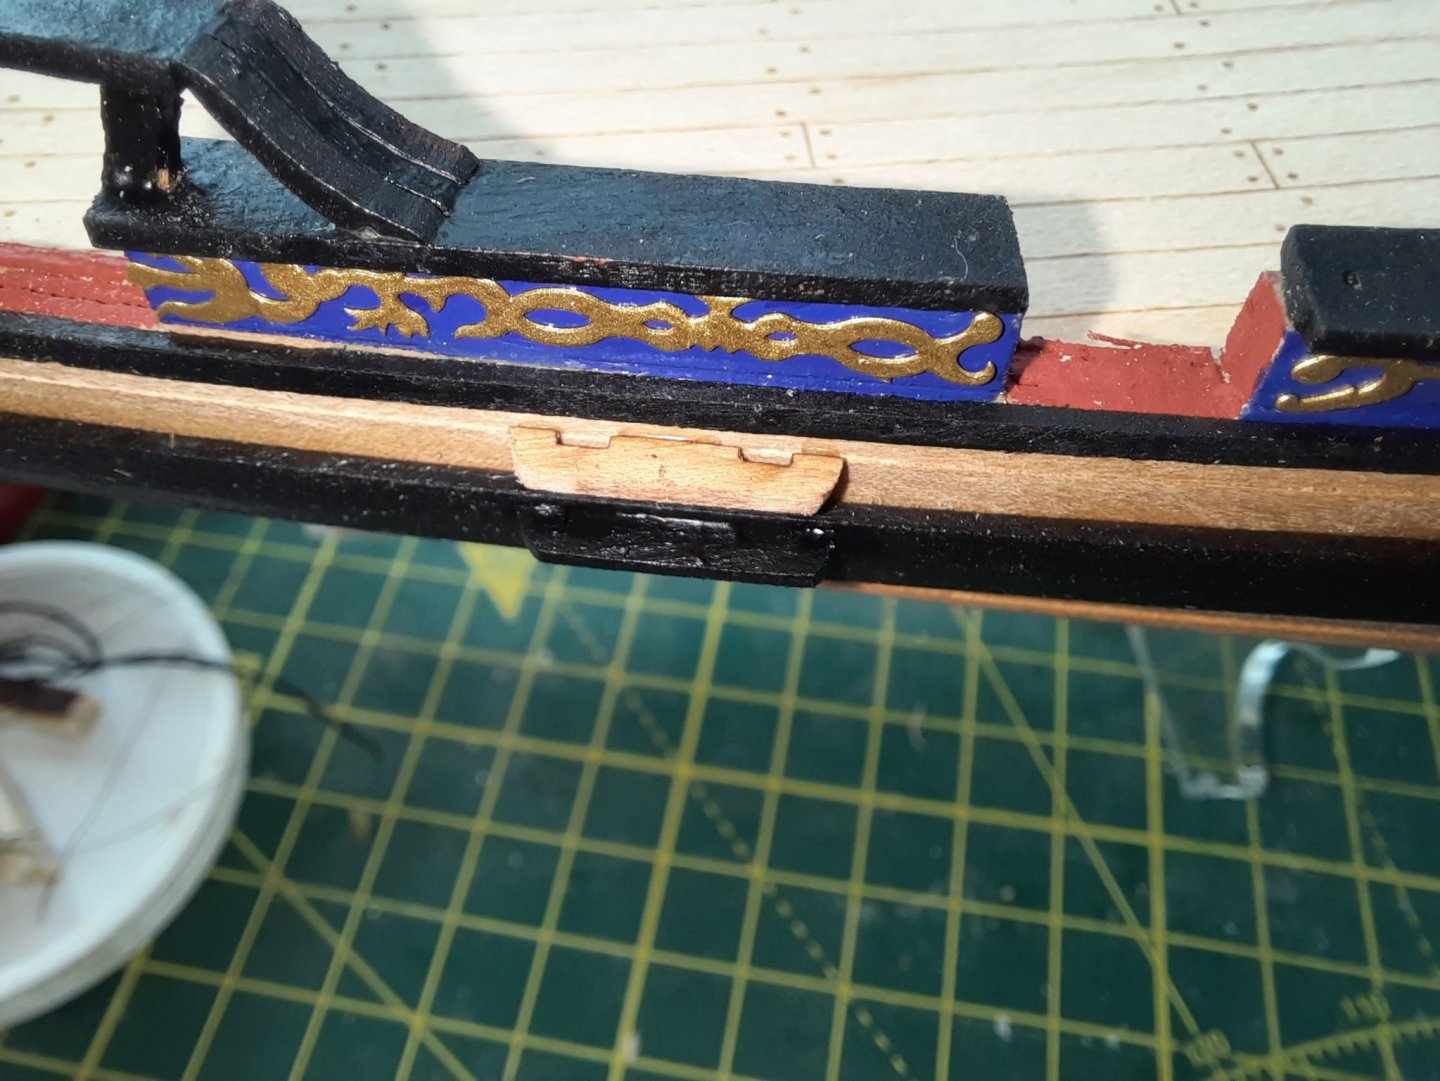
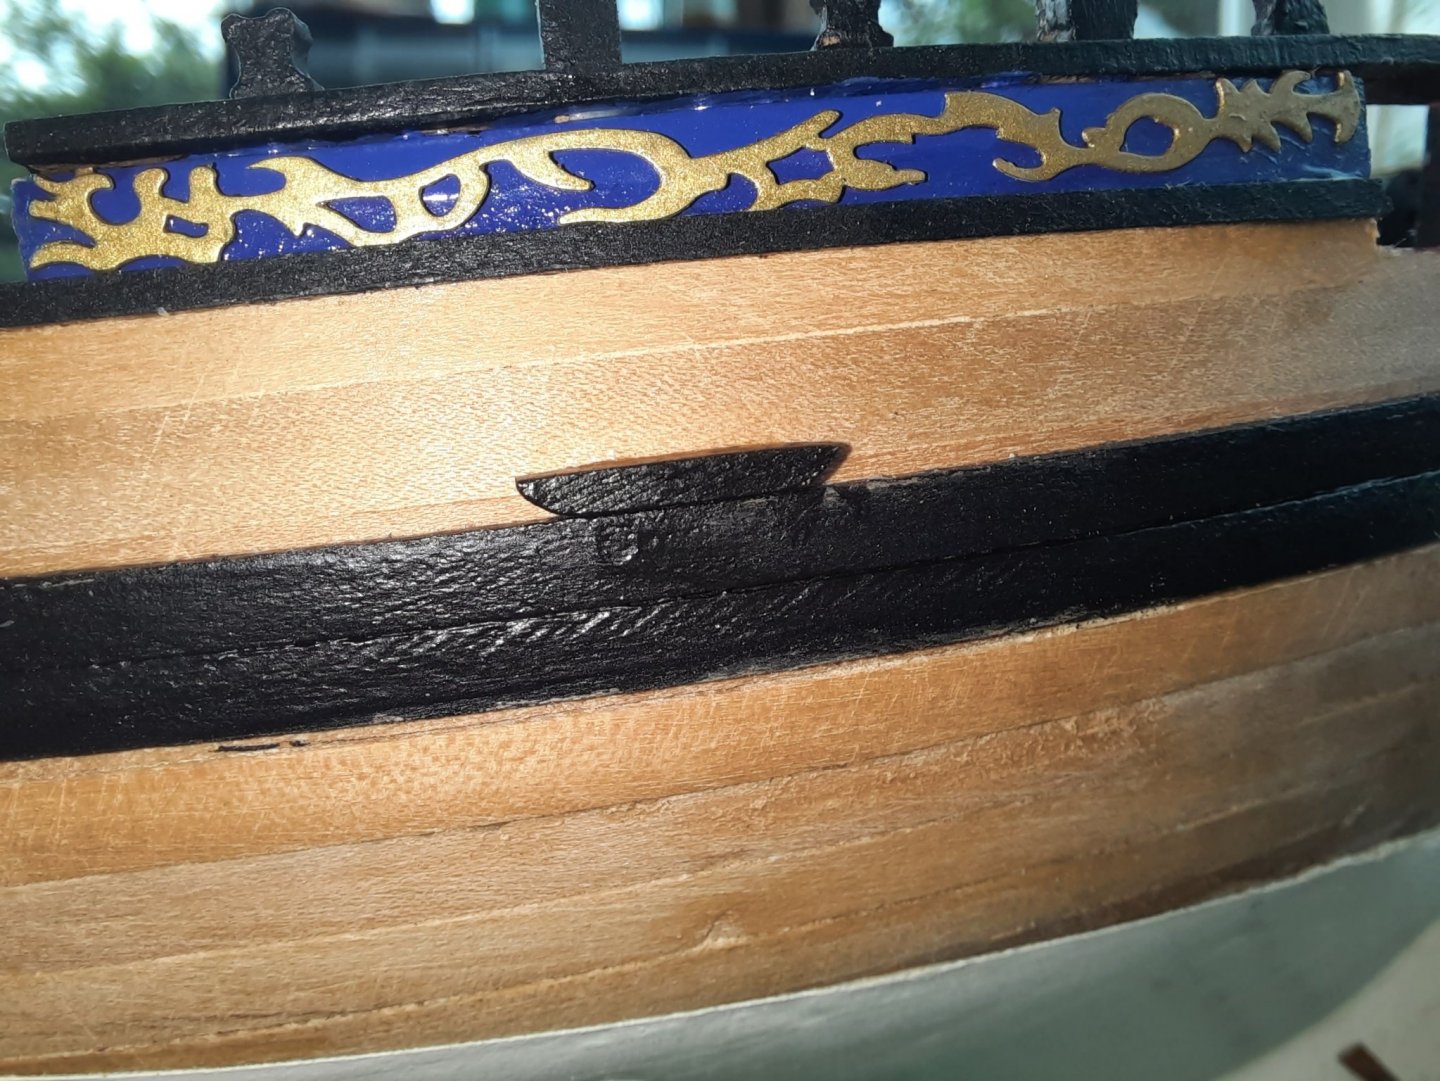
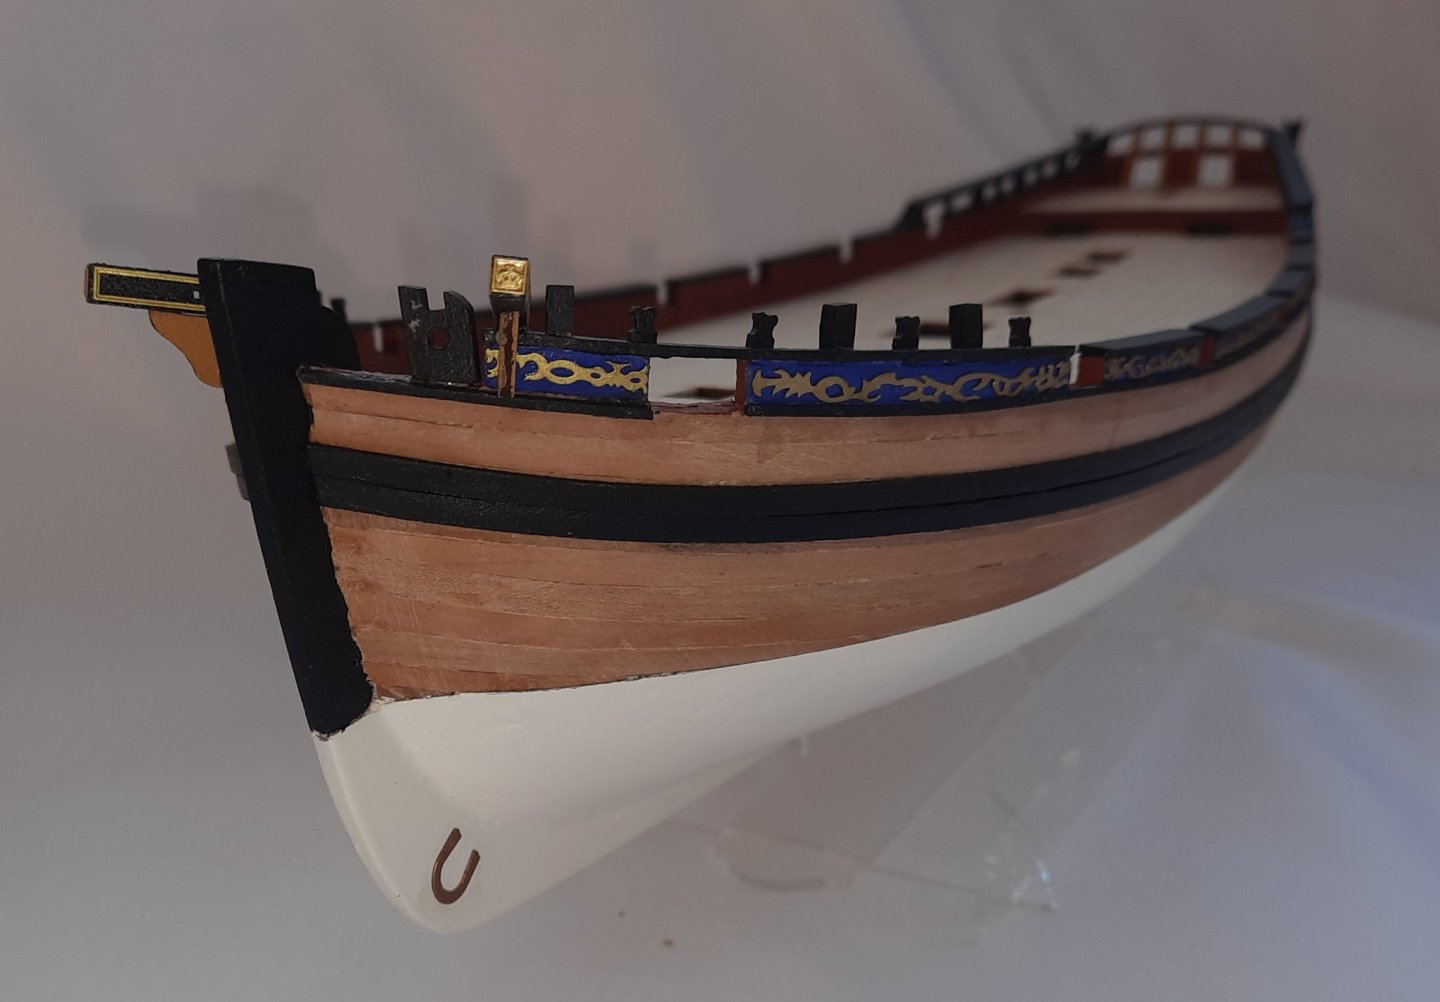
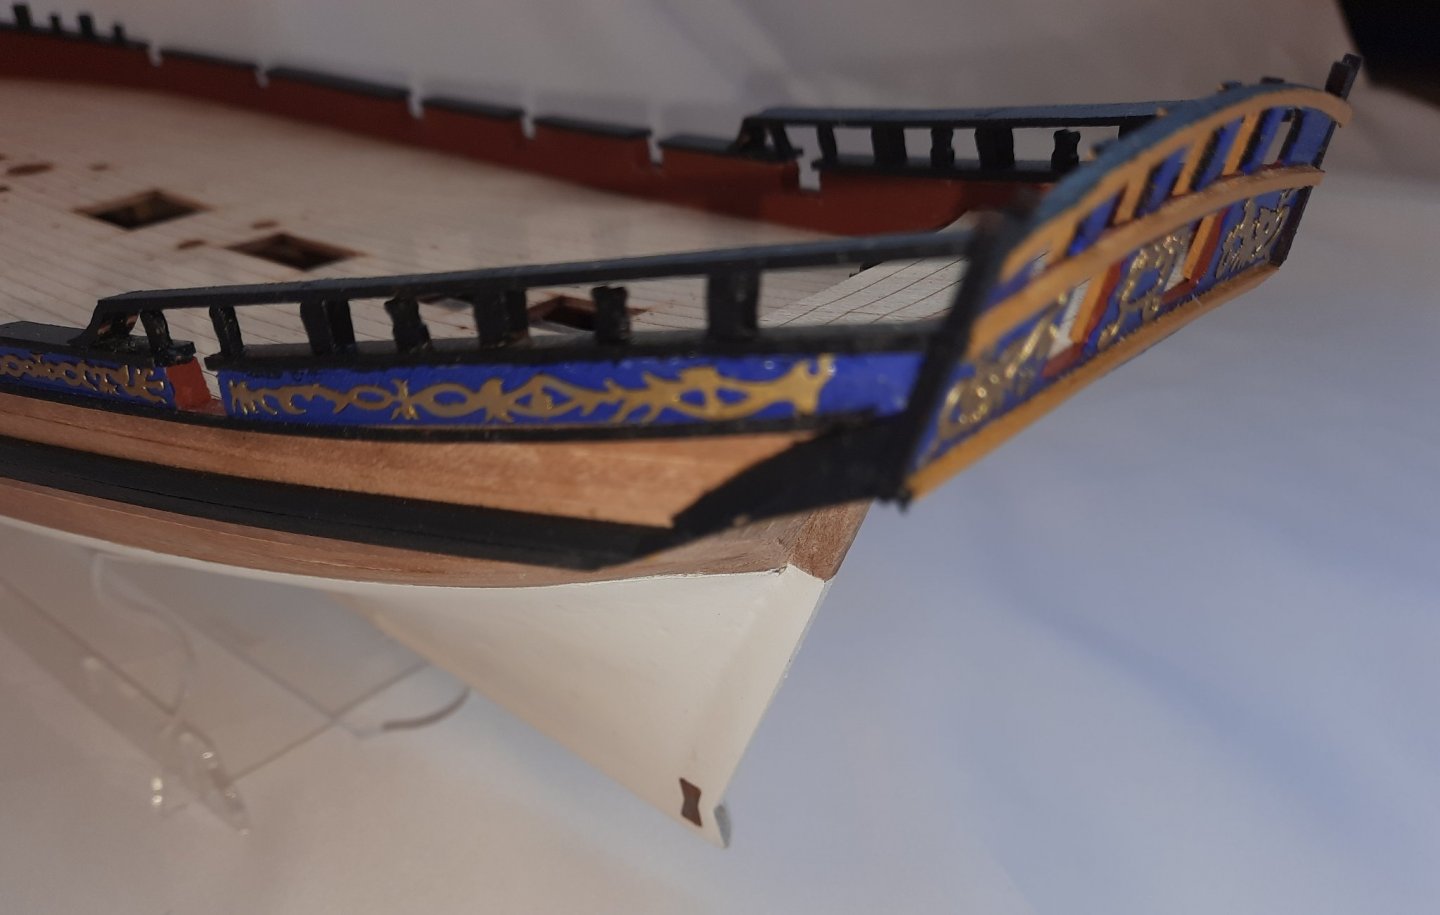
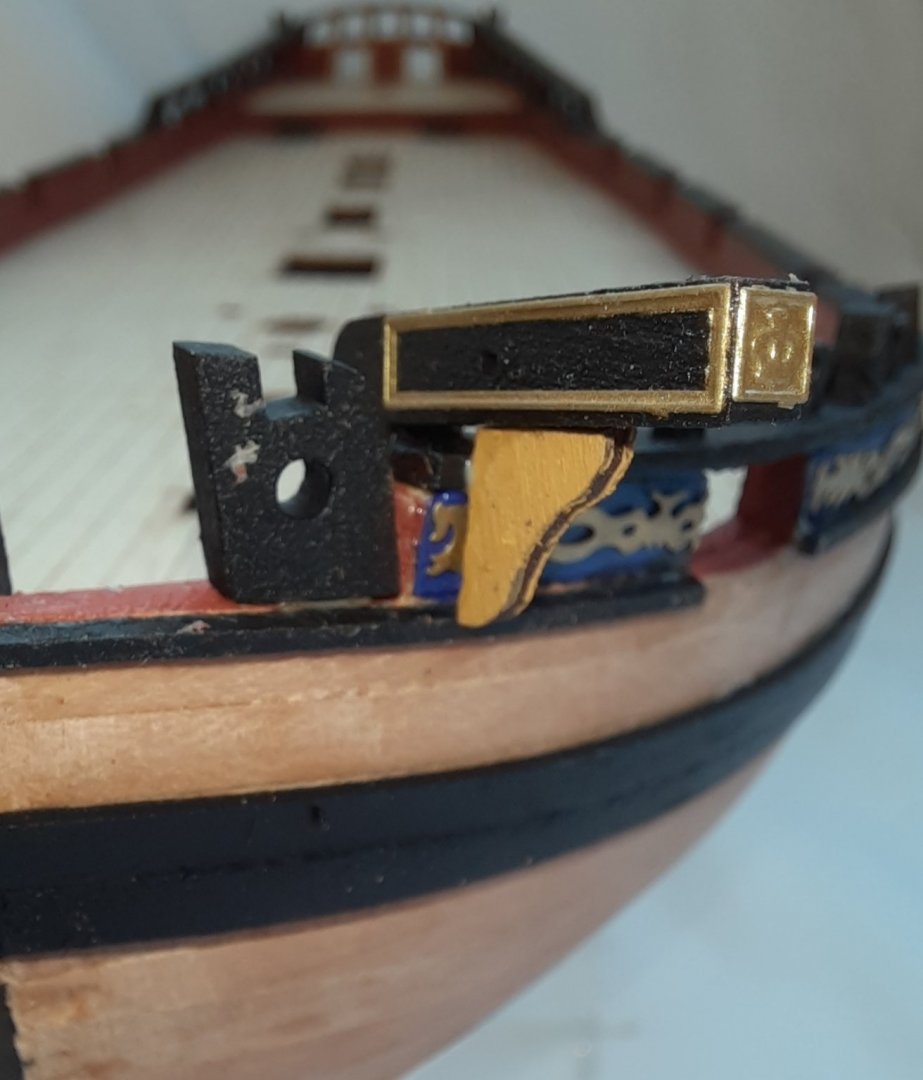
I have made some good progress over the last couple of days. Wales These consist of 2 x 3mm wide planks per side. I pre bent the planks so they followed the curve of the hull using my heated plank bender. I added a taped line along the hull to show the required position of the wale. The planks were painted black (2 coats). I was undecided weather to use ca gel or Titebond original to secure the planks to the hull, or a combination of both. In the end I opted for using the Titebond original. I gave the inner surface of the plank to be fitted a thin coating of the Titebond and placed it in position. The glue has a very quick grip action and within a minute or two I was happy the plank was attached to the hull. I repeated the process for the other wale planks. Once this was complete I painted the upper part of the stem post black and also added the 2 x horseshoe and 2 x fish plates using the Klear polish method. I have not, as yet, added the PE draught markings. Upper Stern Counter I added the inner details to the inner face of the upper stern counter namely the 2 x stern transom knees and the 4 x inner supports. I did ensure the cleat would fit in the slot provided on two of the inner supports prior to gluing them in place. I also fitted the 2 x step blocks for the mizzen mast. Rough Tree Rail The rough tree rail sits above the stern capping rail. There are slots in both the stern capping and rough tree rails for the supports and timber heads. I also fitted the stern counter timber. Main Sail Boom Cradles The 2 cradles were fitted either side of the upper stern counter pattern. Catheads and Hawse Hole Post I added the PE parts to the catheads, using the Klear polish method. The cappings were trimmed to allow both catheads top sit flush with the inner bulwarks. Once I was reasonably happy with the fit they were glued in place. I then glued the 2 x hawse hole post in place. Finally the cathead knees were added to the bottom of each cathead. The cathead knee leading edge needs painting yellow orche


- 160 replies
-
- 3
-
-
- Alert
- vanguard models
- (and 1 more)