Glenn-UK
-
Posts
3,169 -
Joined
-
Last visited
Content Type
Profiles
Forums
Gallery
Events
Everything posted by Glenn-UK
-
 Well done, looks very nice. I really enjoying making the masts and yards, which is still very much work in progress interspersed with fitting the deadeye and strops to the channels which is quite fiddly when drilling the holes in the hull for the pins.
 -
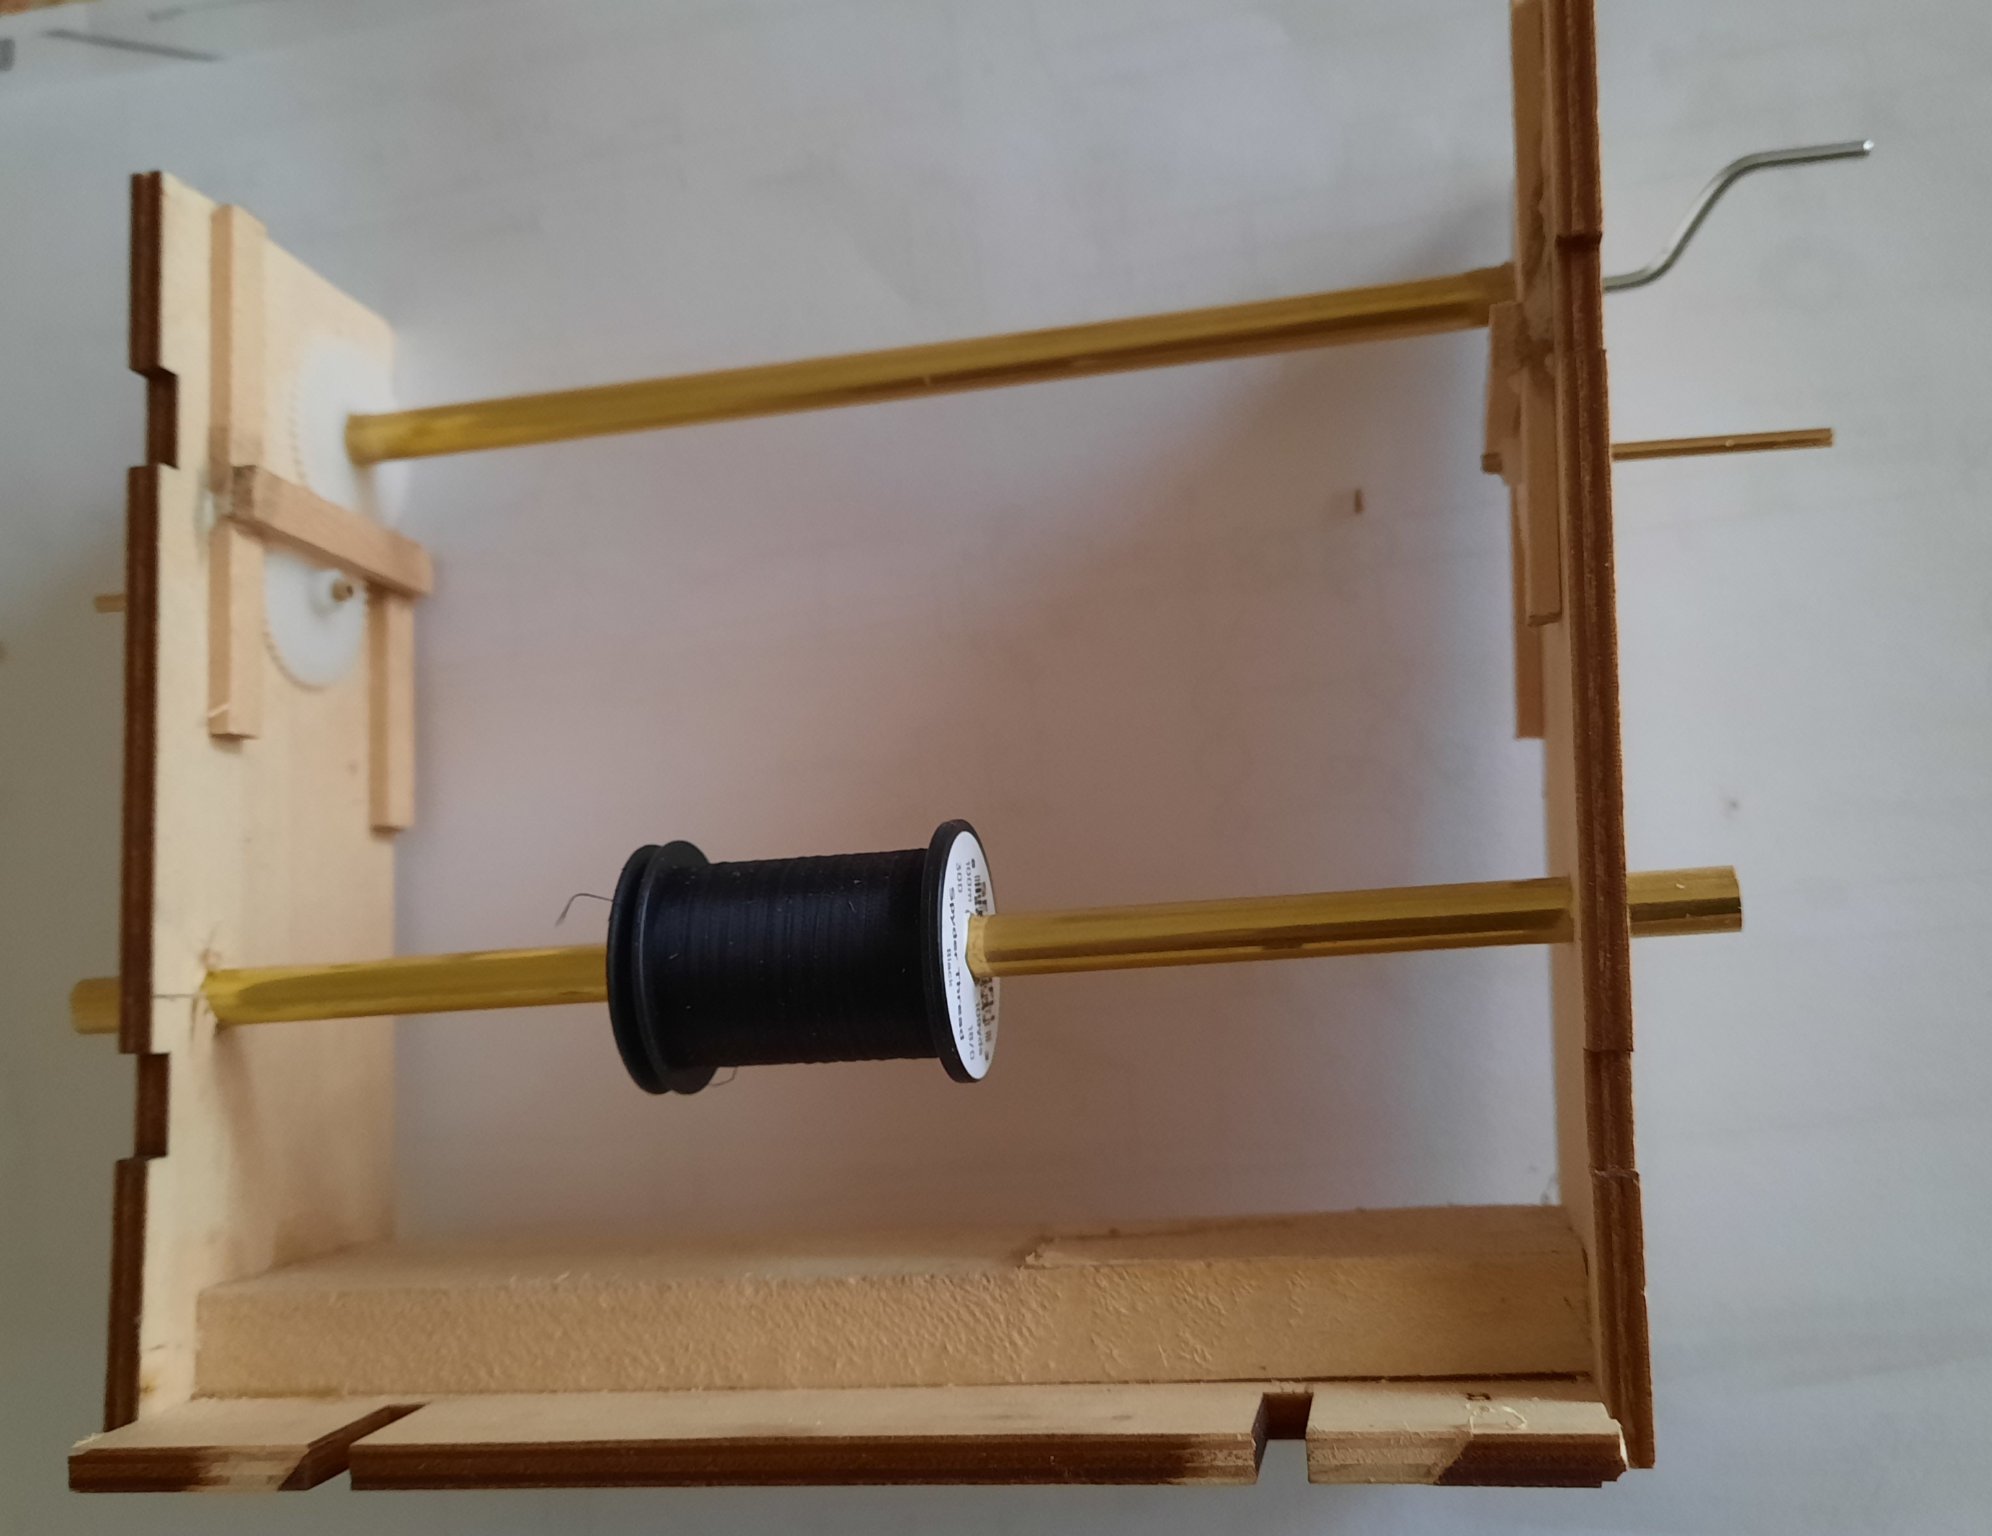
At an outrageous cost of £20.00 for materials and about 2 hours of my time and effort I have designed and built a bespoke serving machine. I have not tried it out as yet, but it was a fun project.

- 382 replies
-
- 7
-

-
- Vanguard Models
- Duchess of Kingston
- (and 1 more)
-
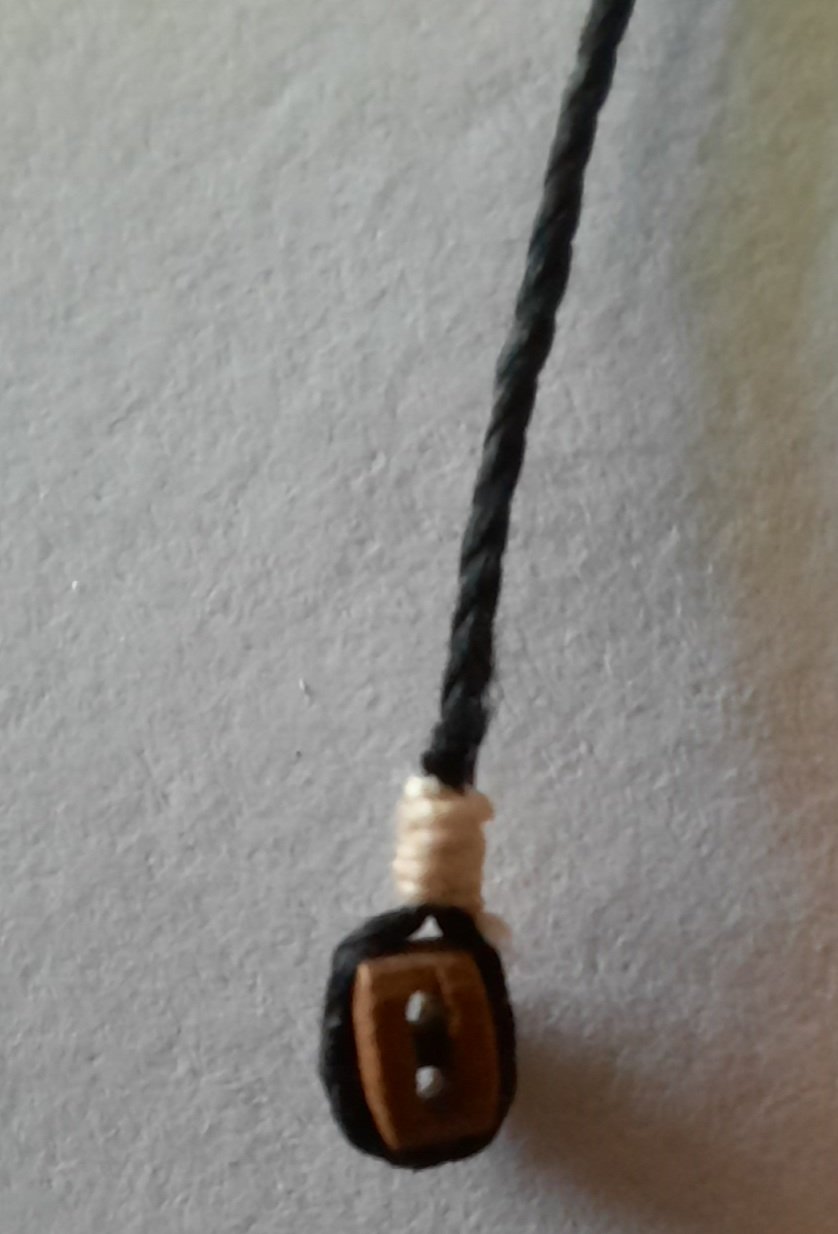
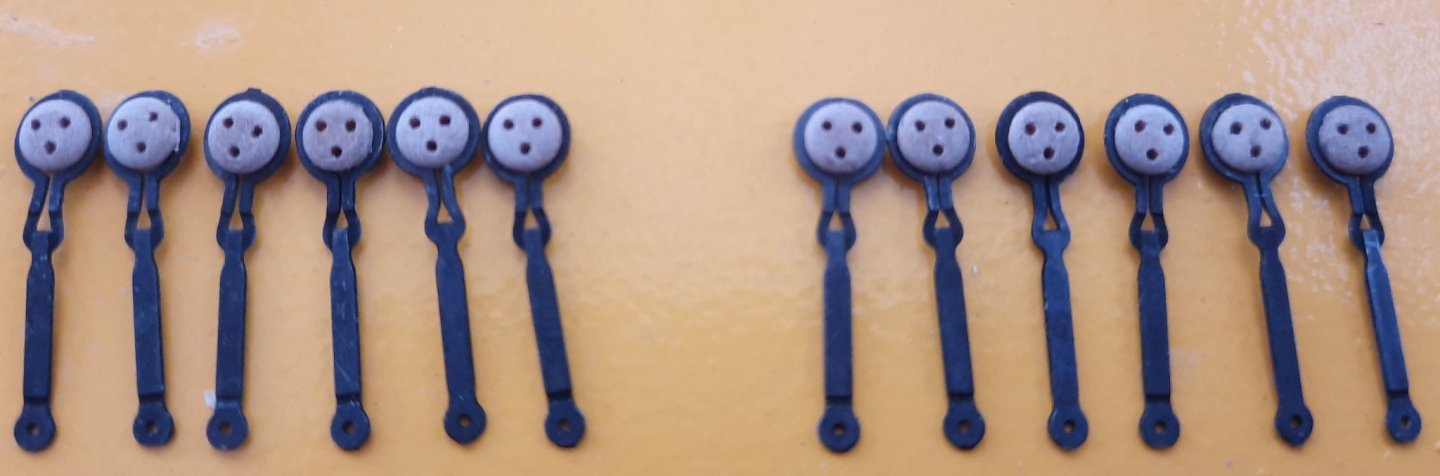
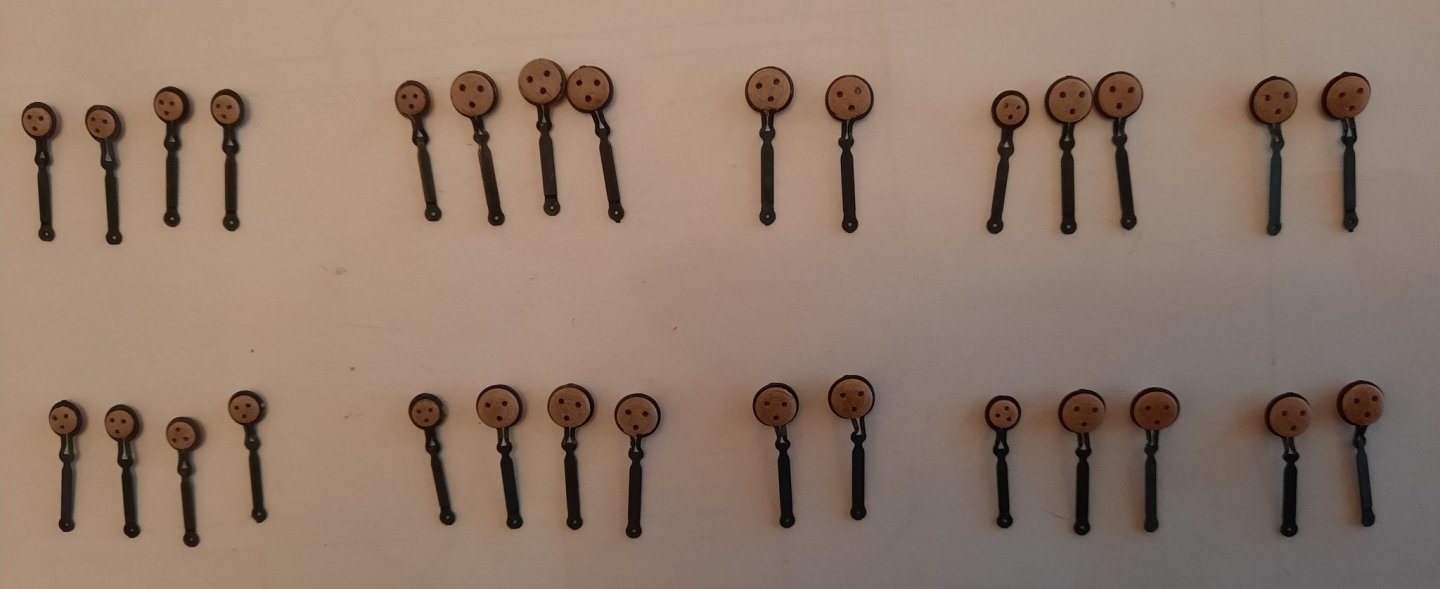
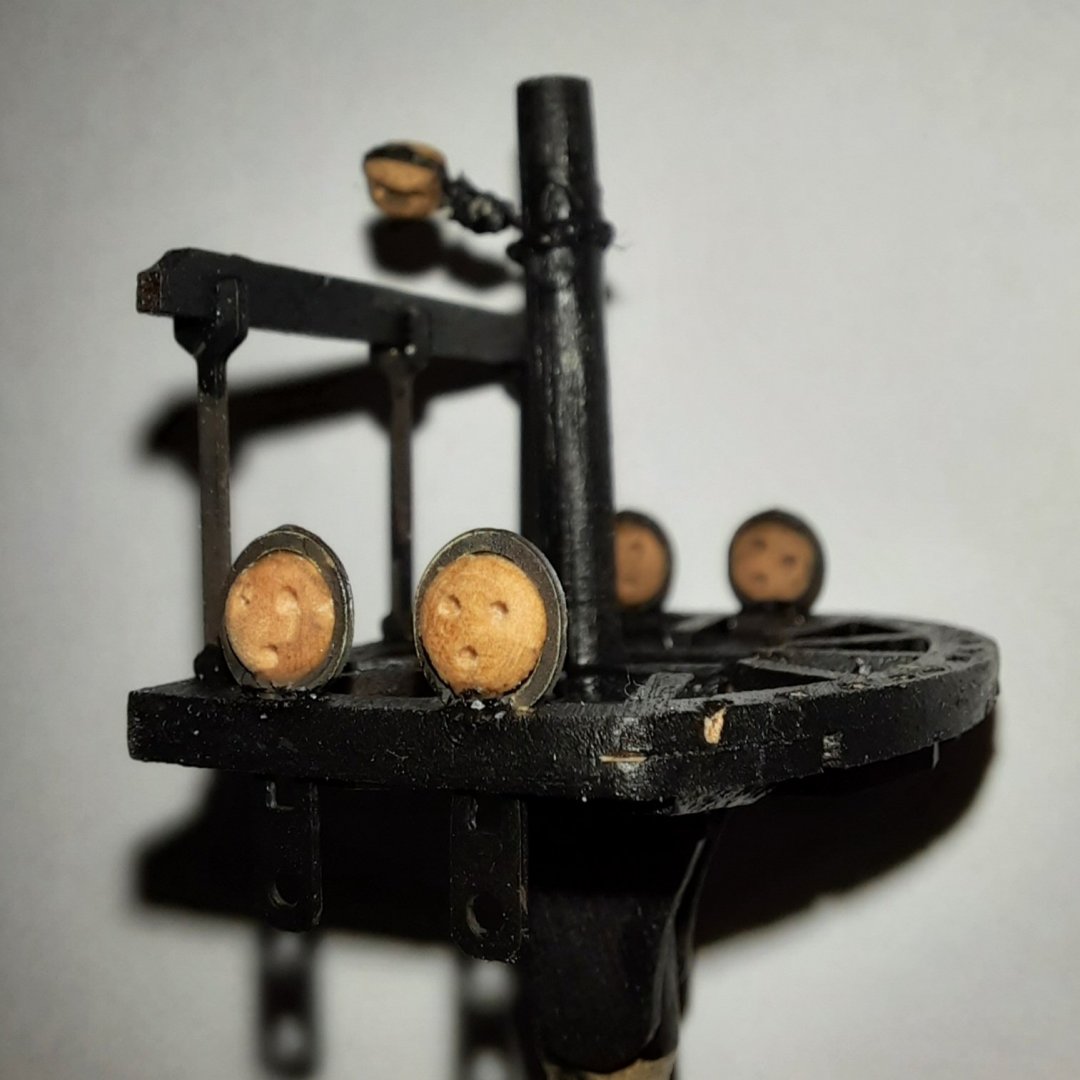
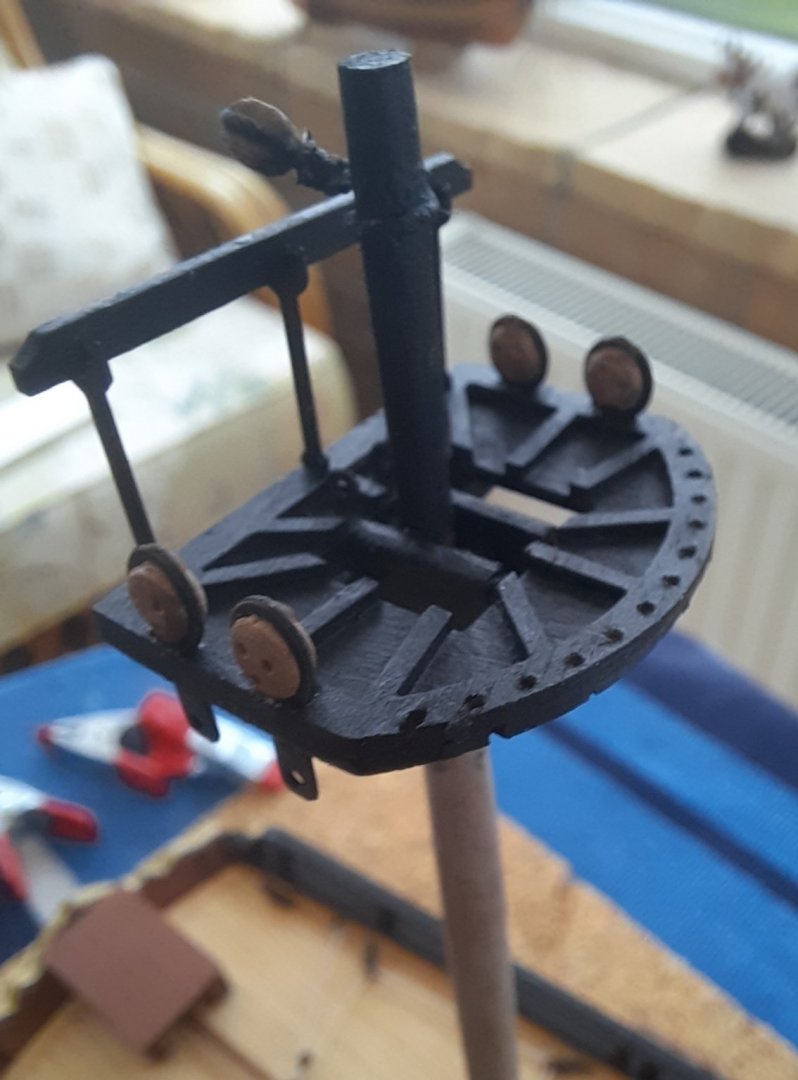
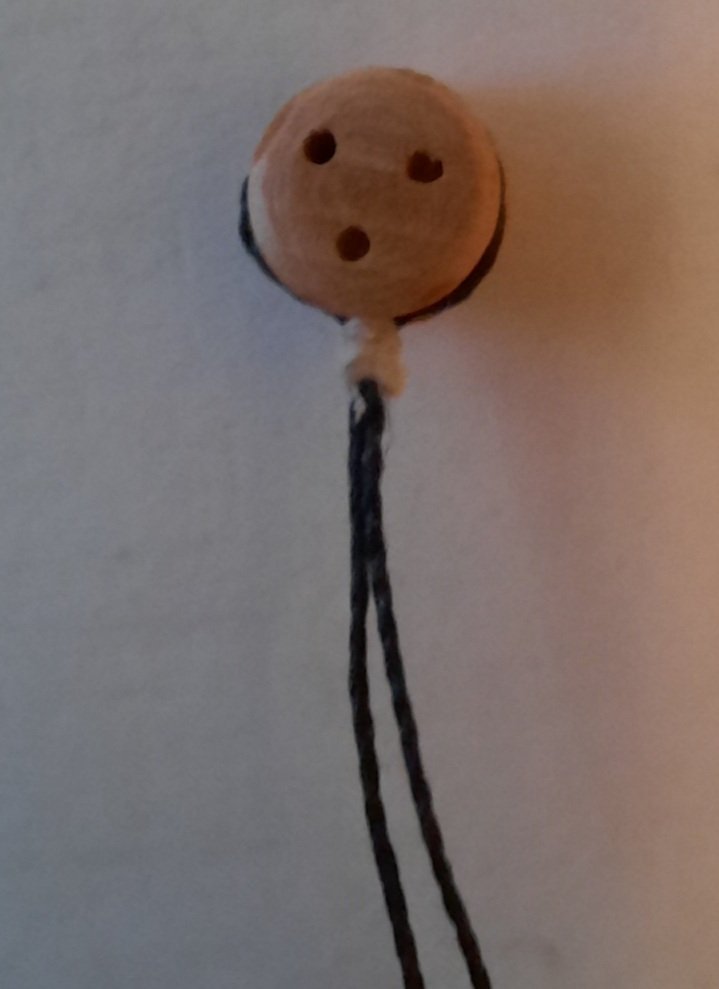
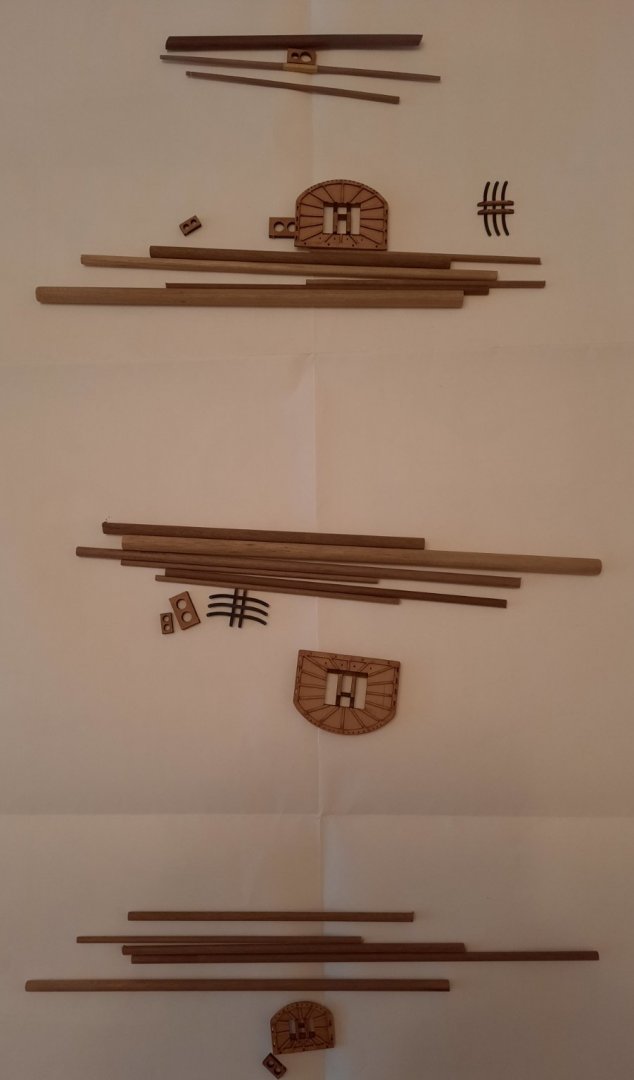
I have added all the cleats and footrope stirrup's to the mizzen yards. I was planning on adding the blocks and then moving on to the main and fore yards. However I got a bit side tracked as I have been thinking about serving the lanyards. Chuck is unable to ship his serving machine from the USA to the UK due to COVID so I have bought some gears and some brass tubing and I will now see if I can build one myself. Then I thought about the best way to add the lanyards, i.e.: a) with a full assembled mast installed add the lanyards, seizing them around the masts, as indicated in the manual b) add the lanyards prior to installation of the mast assembly c) Install the masts in turn, adding the lanyards before the mast cap is fitted, which is my normal method As I continue to ponder the lanyards I decided to complete platform assemblies. Mizzen mast platform installed I then added all the channels to the hull. This was a bit more time consuming than I first thought, as it was essential to ensure the channel support pins matched the holes provided in the hull. I used a 0.5mm drill to add the support pin holes in the channels. I also ran the 0.5mm drill through the hull holes to get a bit more depth for the support pins. Mizzen channel test fit The channels require a total of 12 x 3mm deadeyes and 18 x 5mm deadeyes. I drilled each 3mm deadeye lanyard hole with a 0.6mm drill and each 5mm deadeye lanyard hole with a 0.7mm drill which should aid the lanyard rigging. I used my round nose pliers to stretch the strops so the deadeyes could be fitted and then used them again to close the strop around the deadeye. 3mm deadeye and strop assembly 3mm & 5 deadeye and strop assembly, a couple of deadeyes need to realigned.

- 382 replies
-
- 6
-
-
- Vanguard Models
- Duchess of Kingston
- (and 1 more)
-
I took a quick picture this morning with the spritsail pinned in place, this will be removed and glued and lashed in place during the rigging phase. On with adding fixtures and fittings to all the yards and tapering. My fly tying thread has now been dispatched so I will also look at the rigging of the 6 off cannons when that arrives.

- 382 replies
-
- 8
-
-
- Vanguard Models
- Duchess of Kingston
- (and 1 more)
-
Thanks Rusty. I think I will fix in place and add the gammoning once the foremast lanyards / ratlines have been completed as I think, looking at the bowsprit rigging plans, will be easier.
- 382 replies
-
- 1
-
-
- Vanguard Models
- Duchess of Kingston
- (and 1 more)
-
Matt They are certainly are very small, but not too bad with the magnifier headset. The quad hands are also a very useful tool
-
Thanks Matt, it was all straightforward, apart from the deadeye ring assembly which did test my patience and eyesight.
-
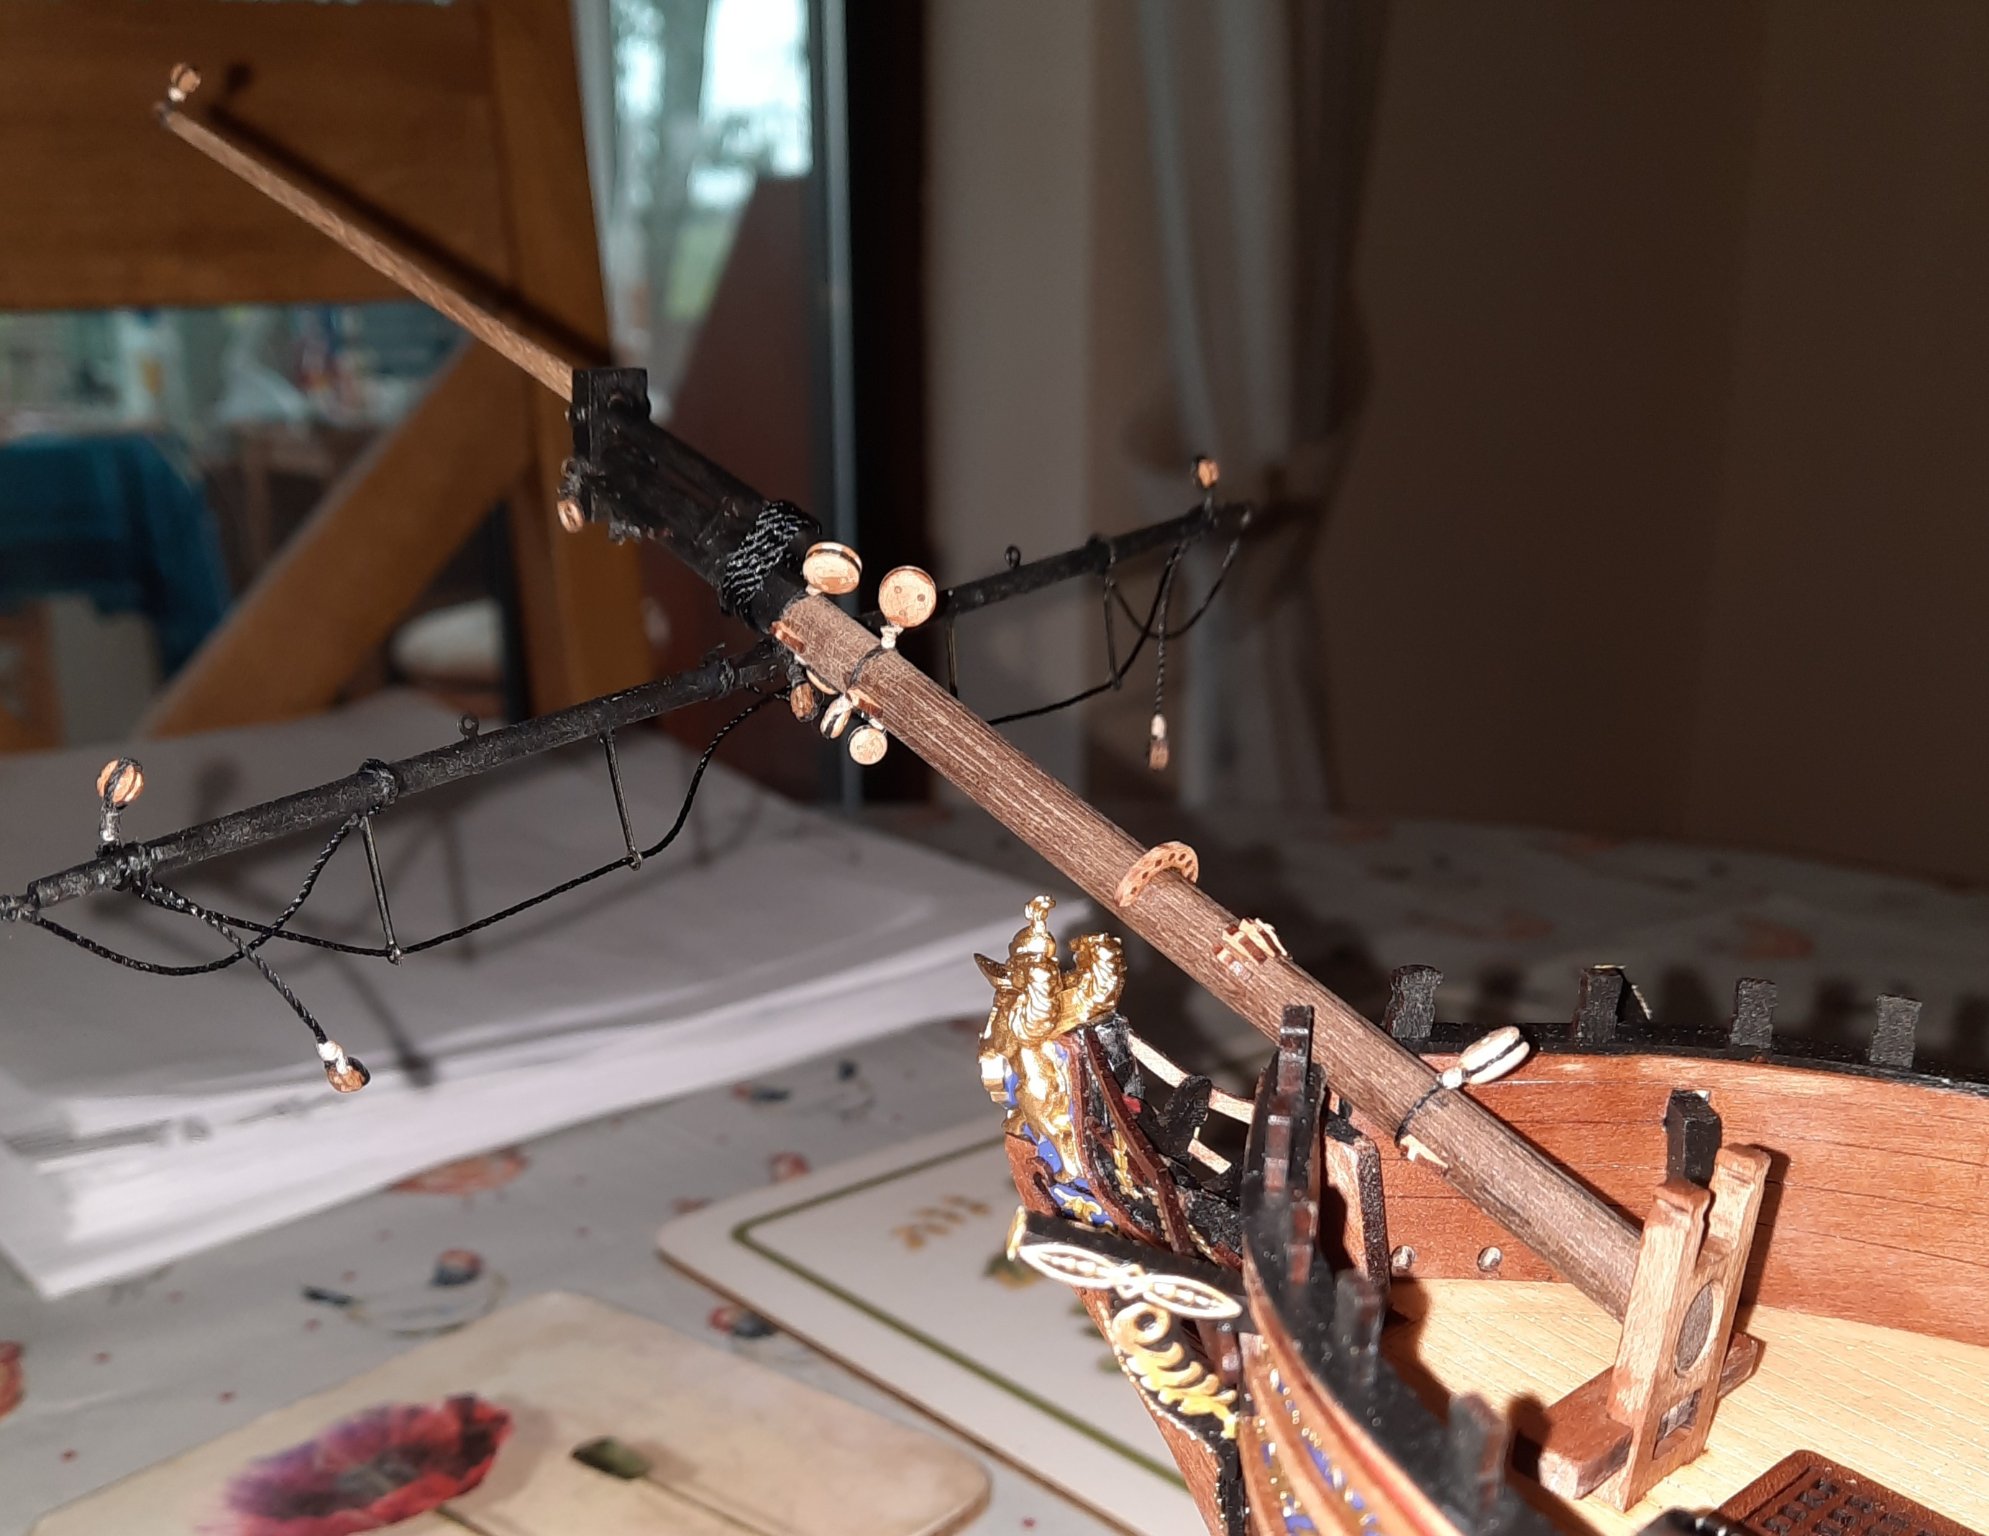
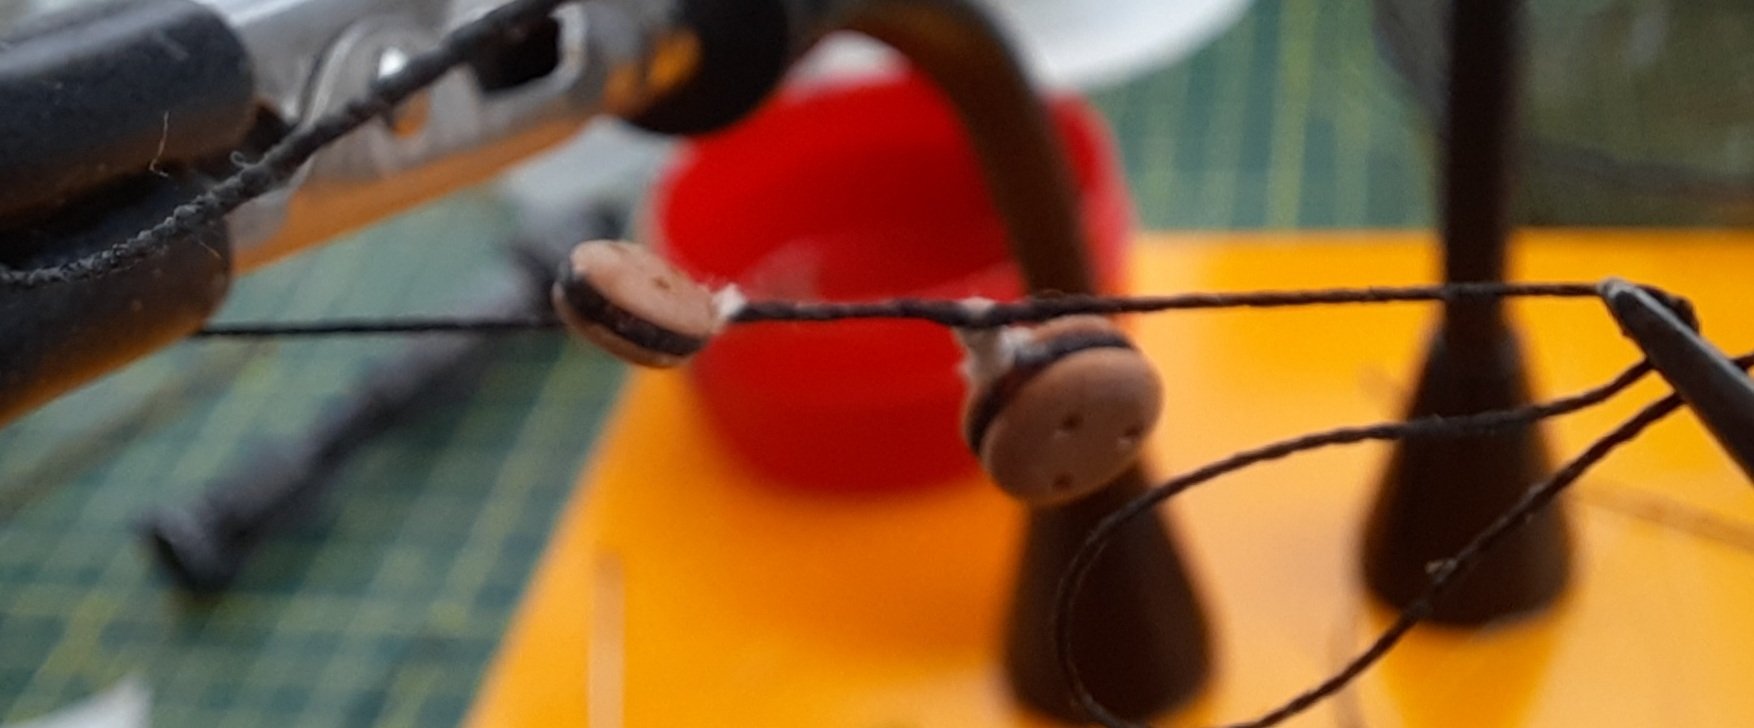
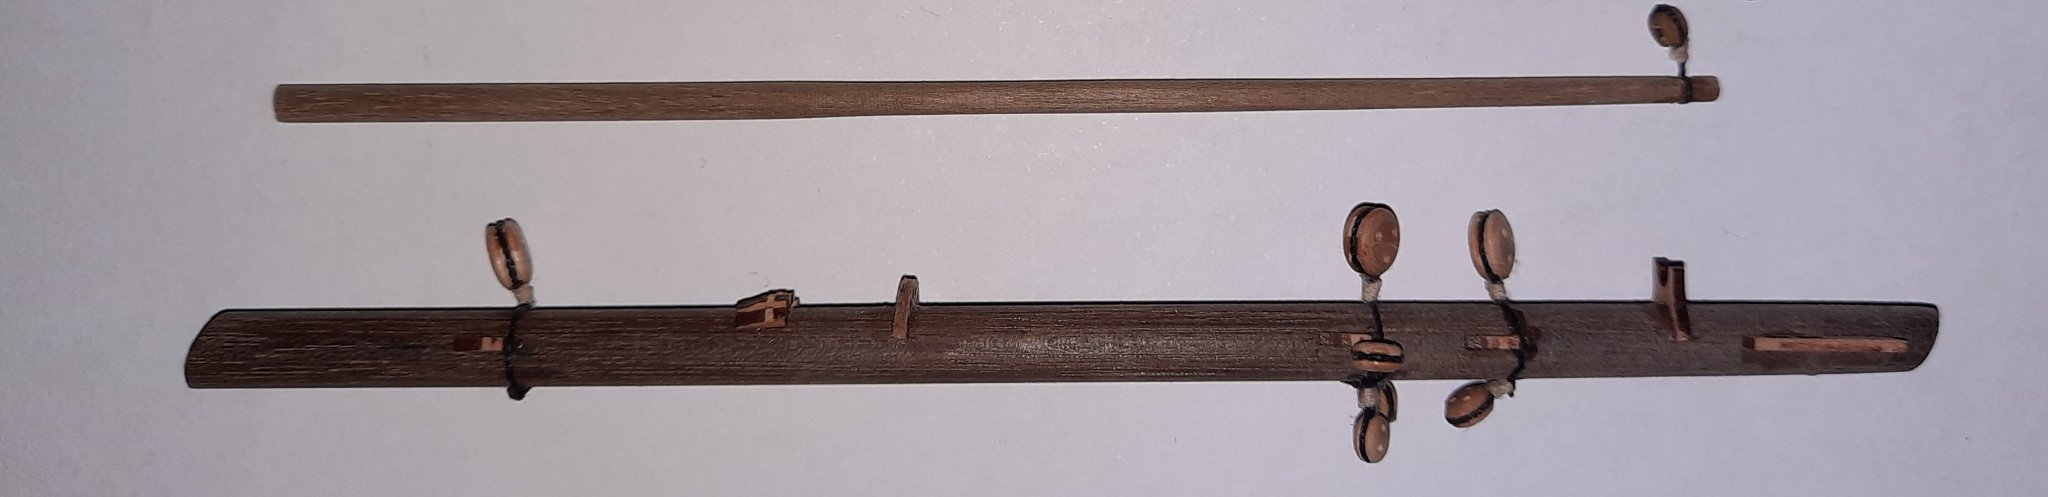
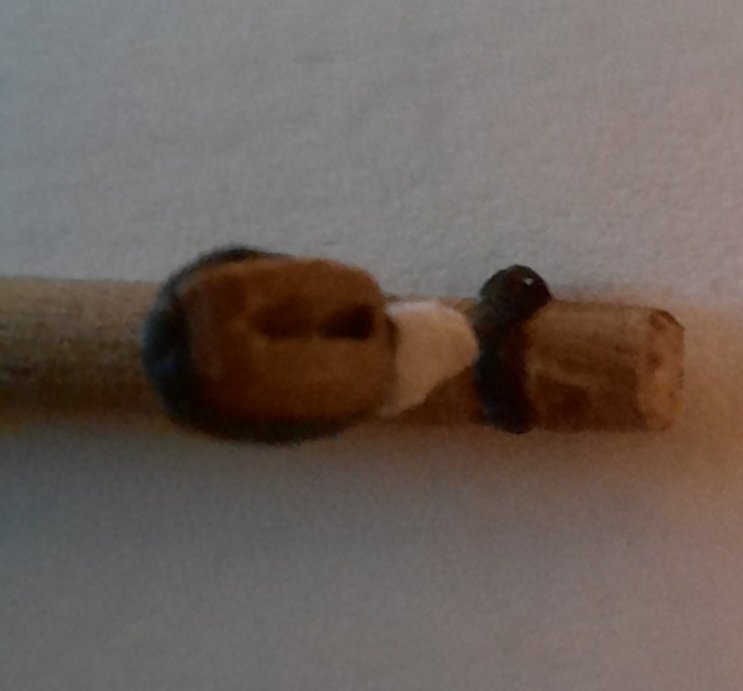
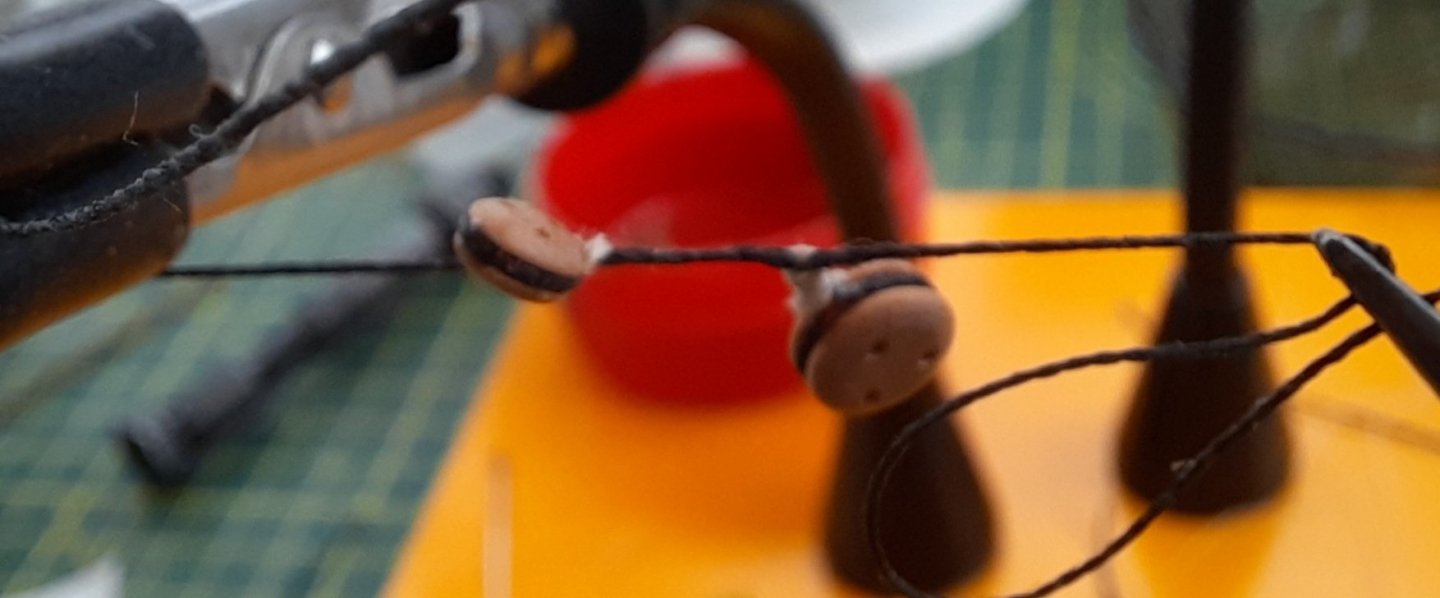
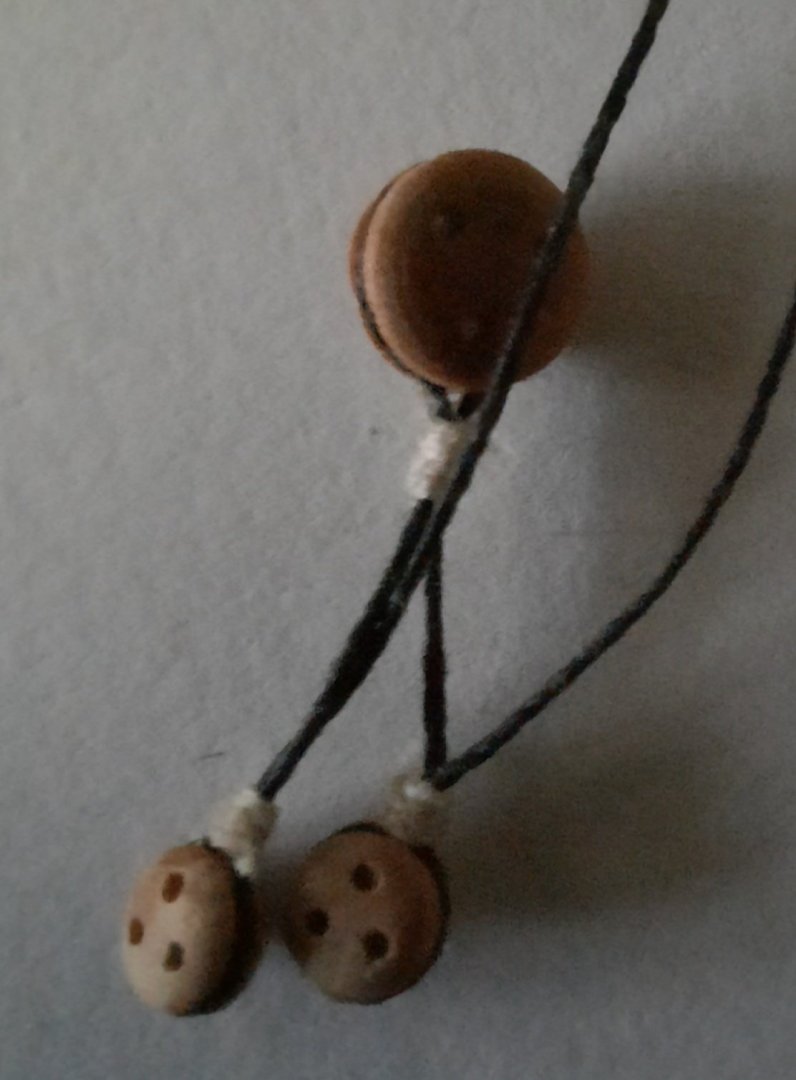
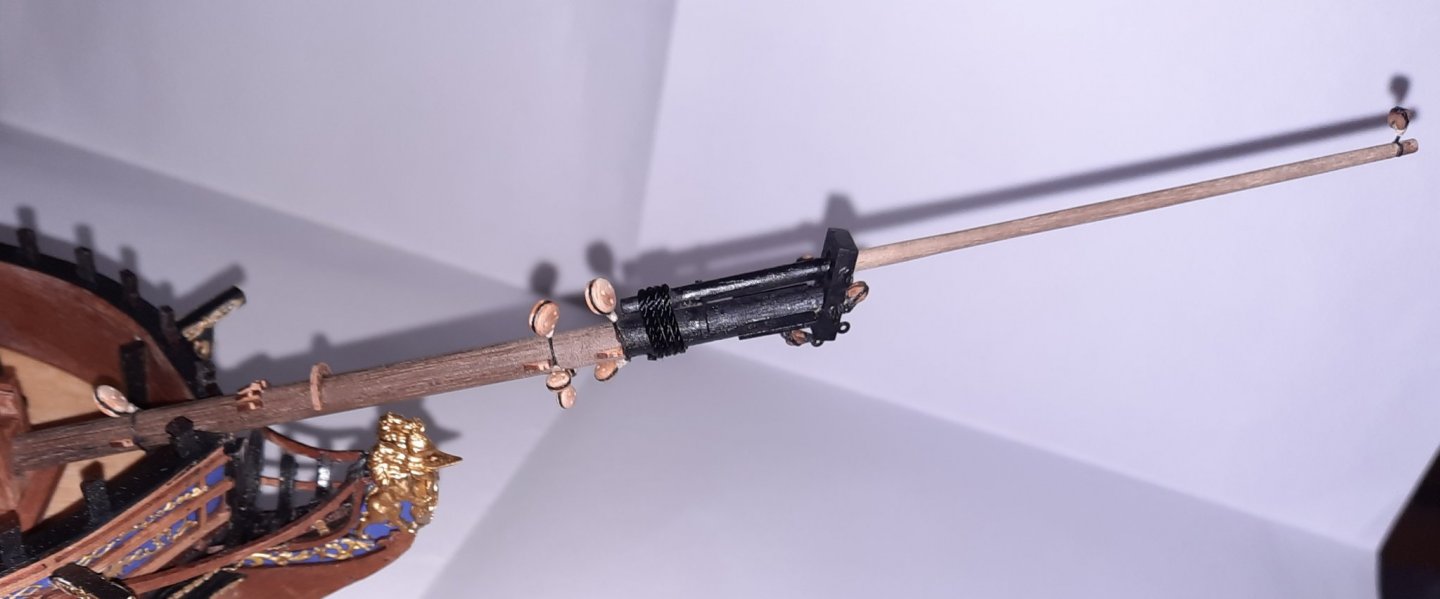
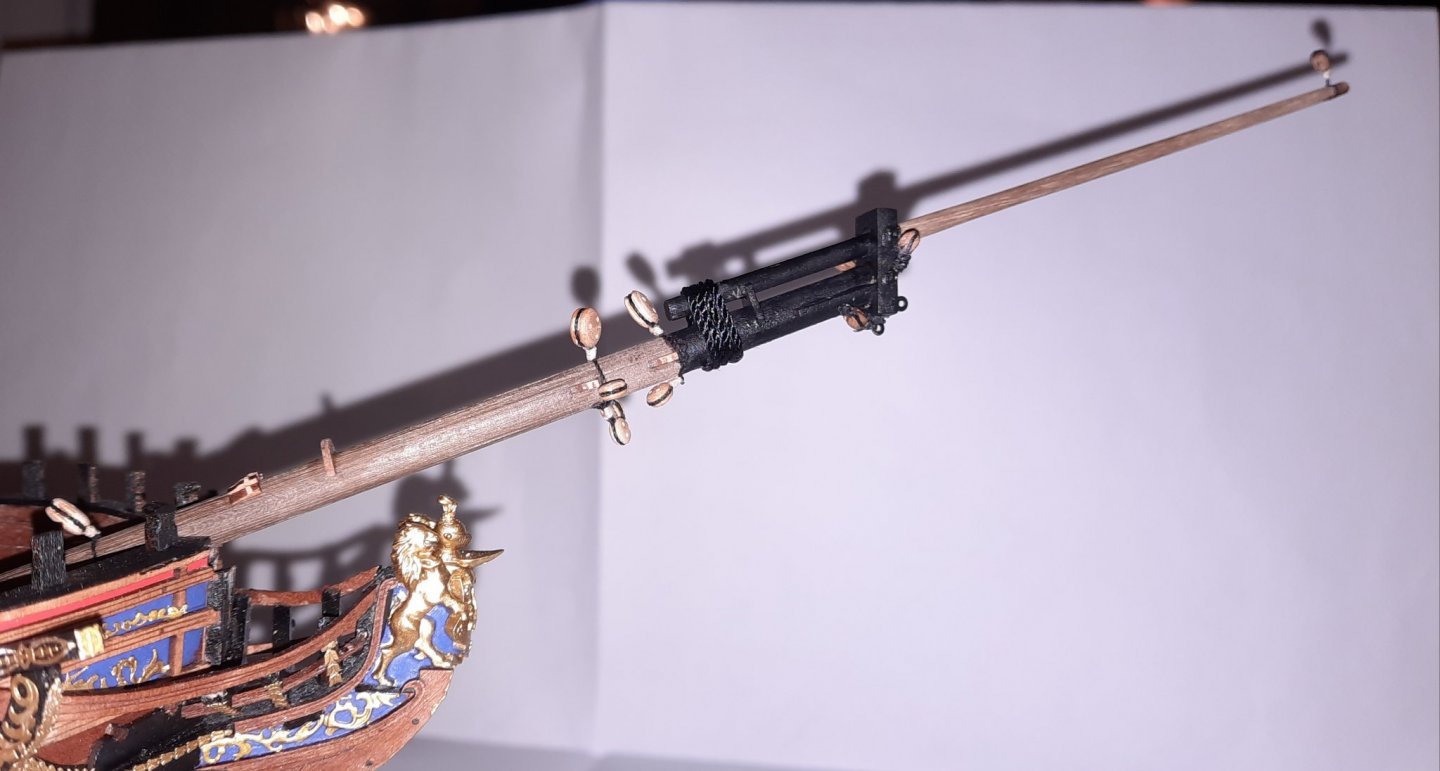
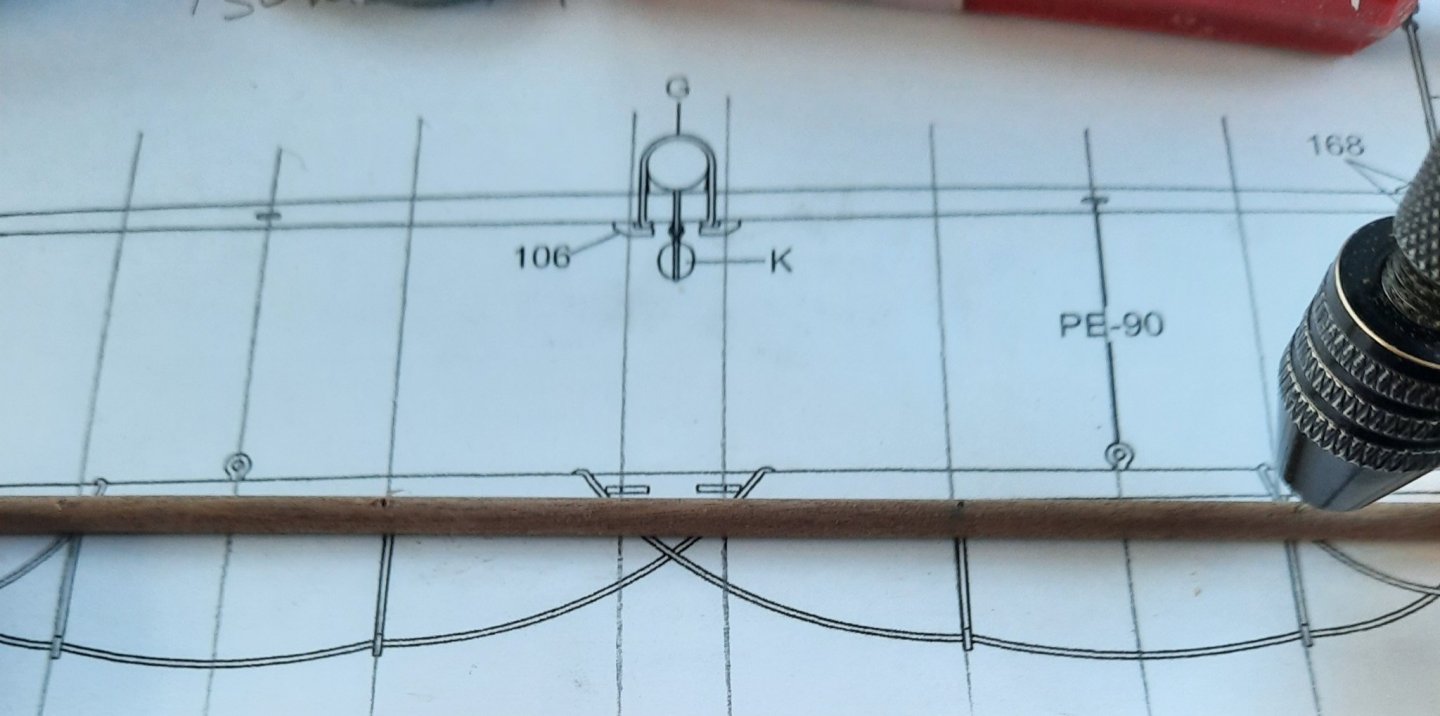
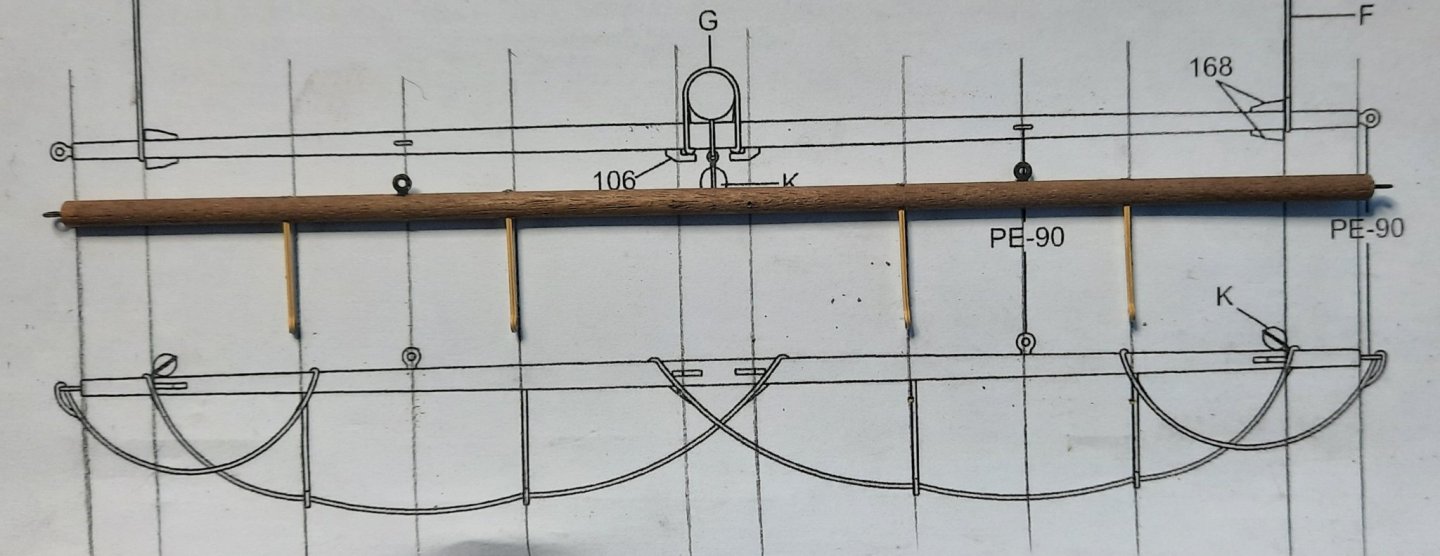
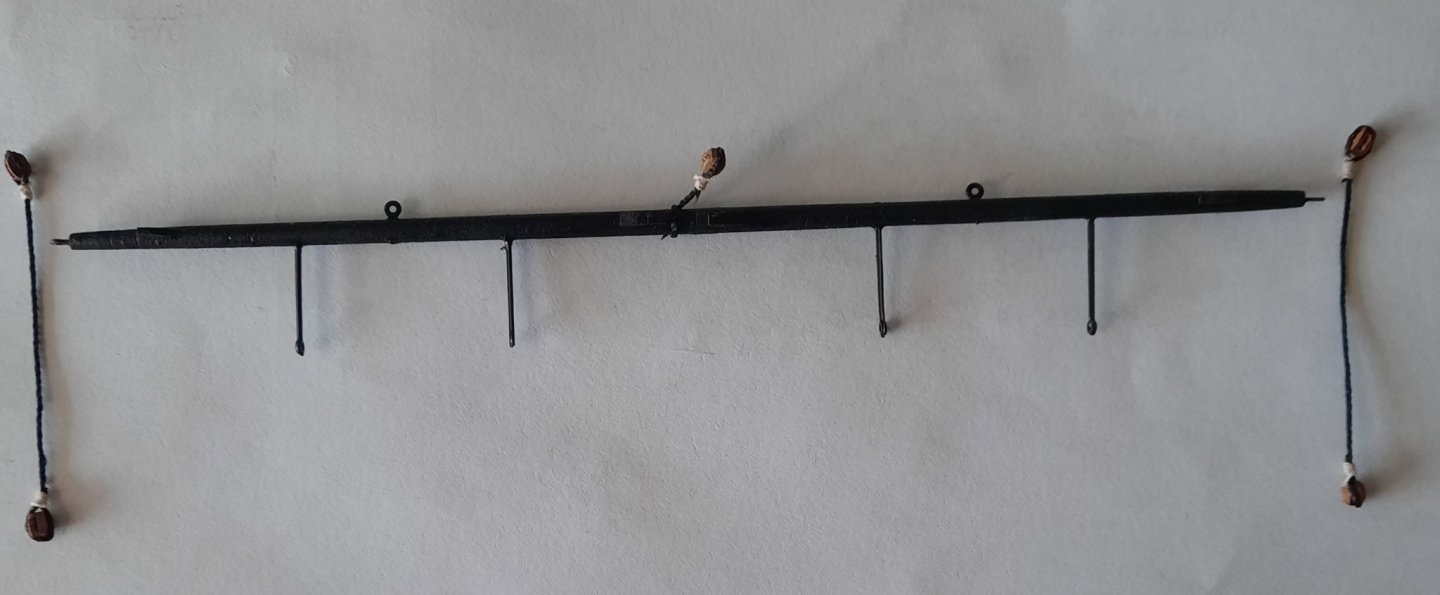
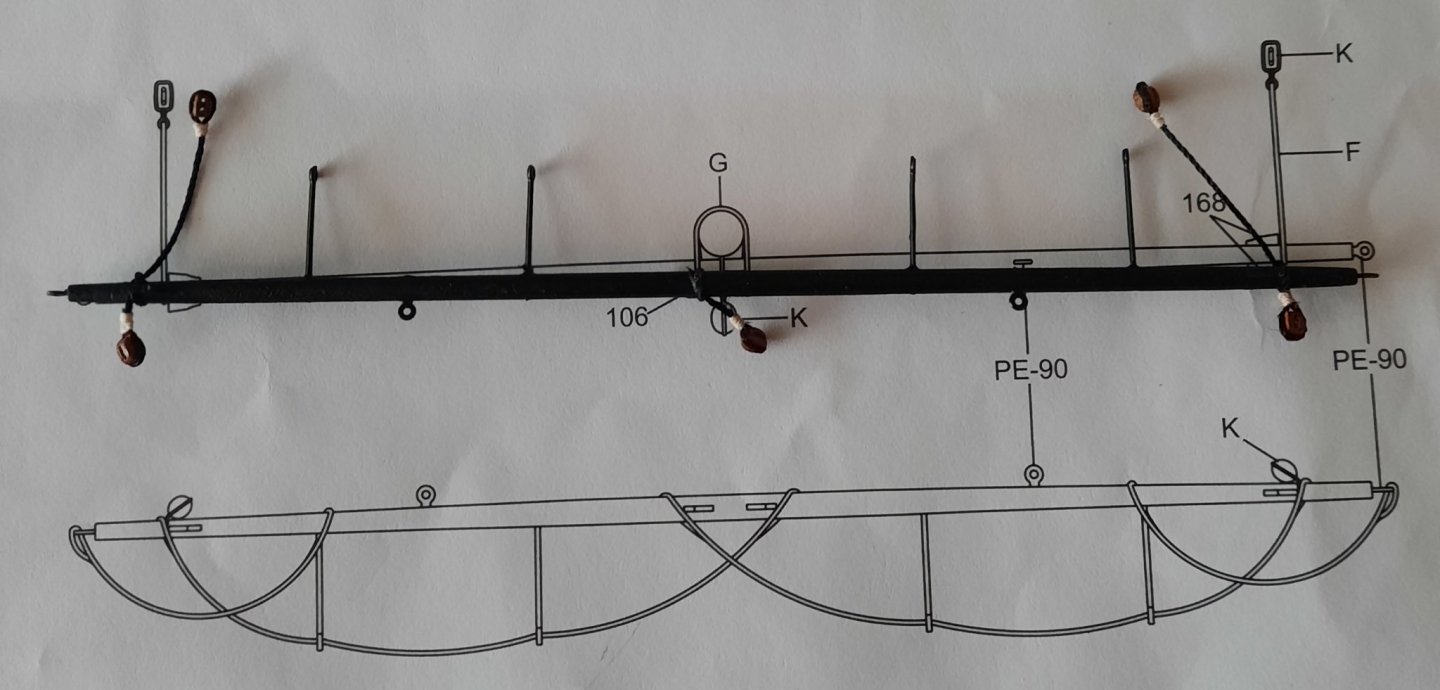
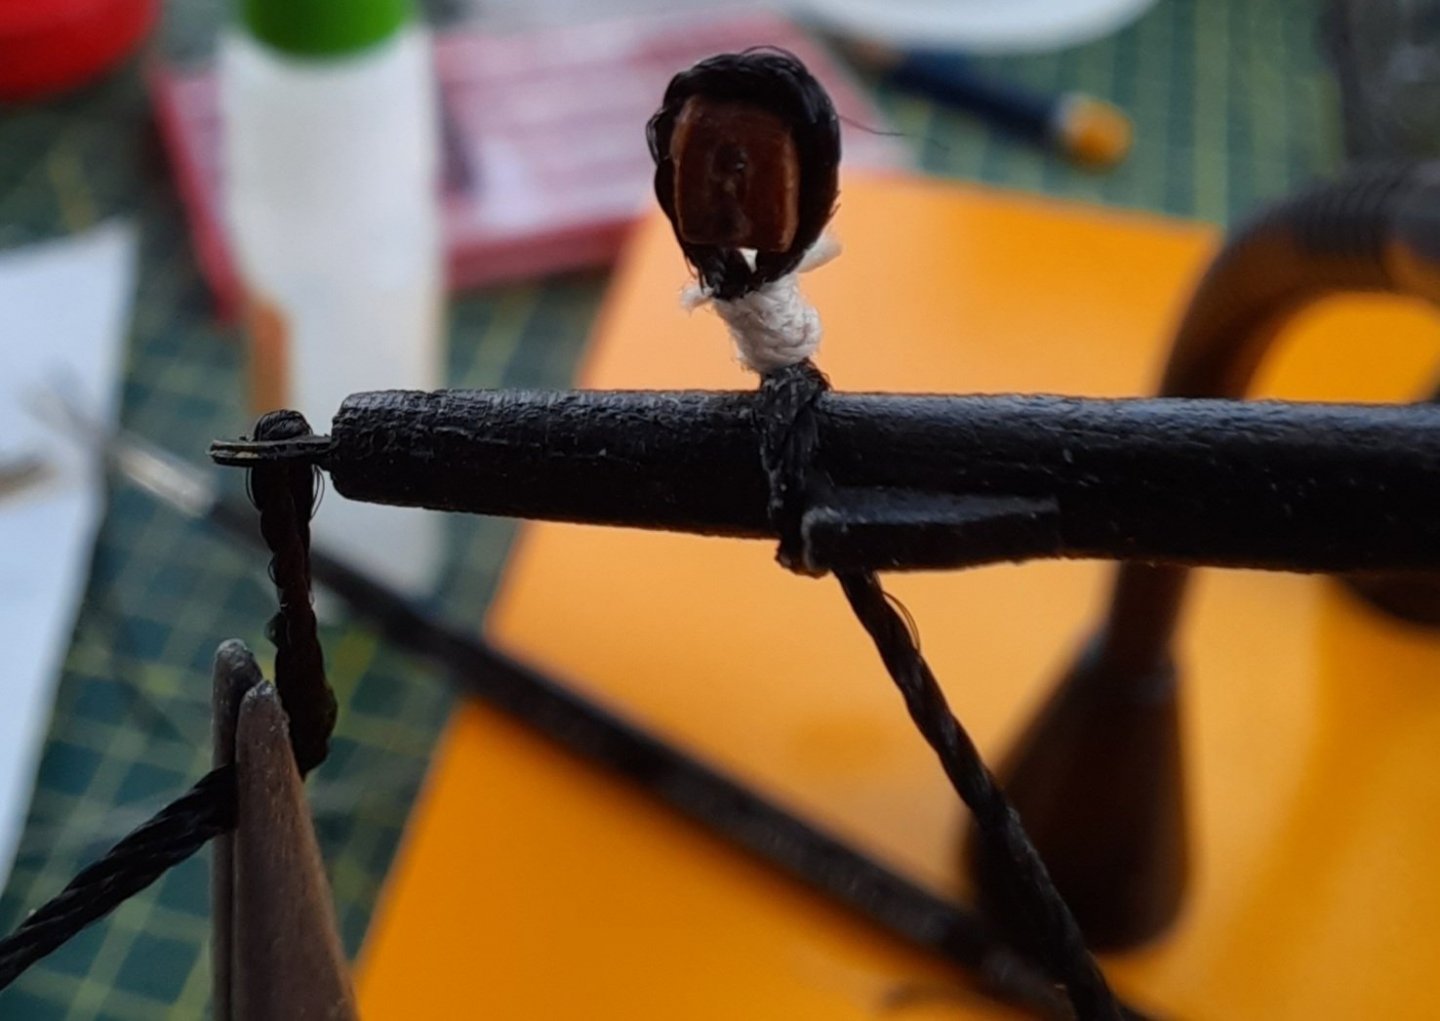
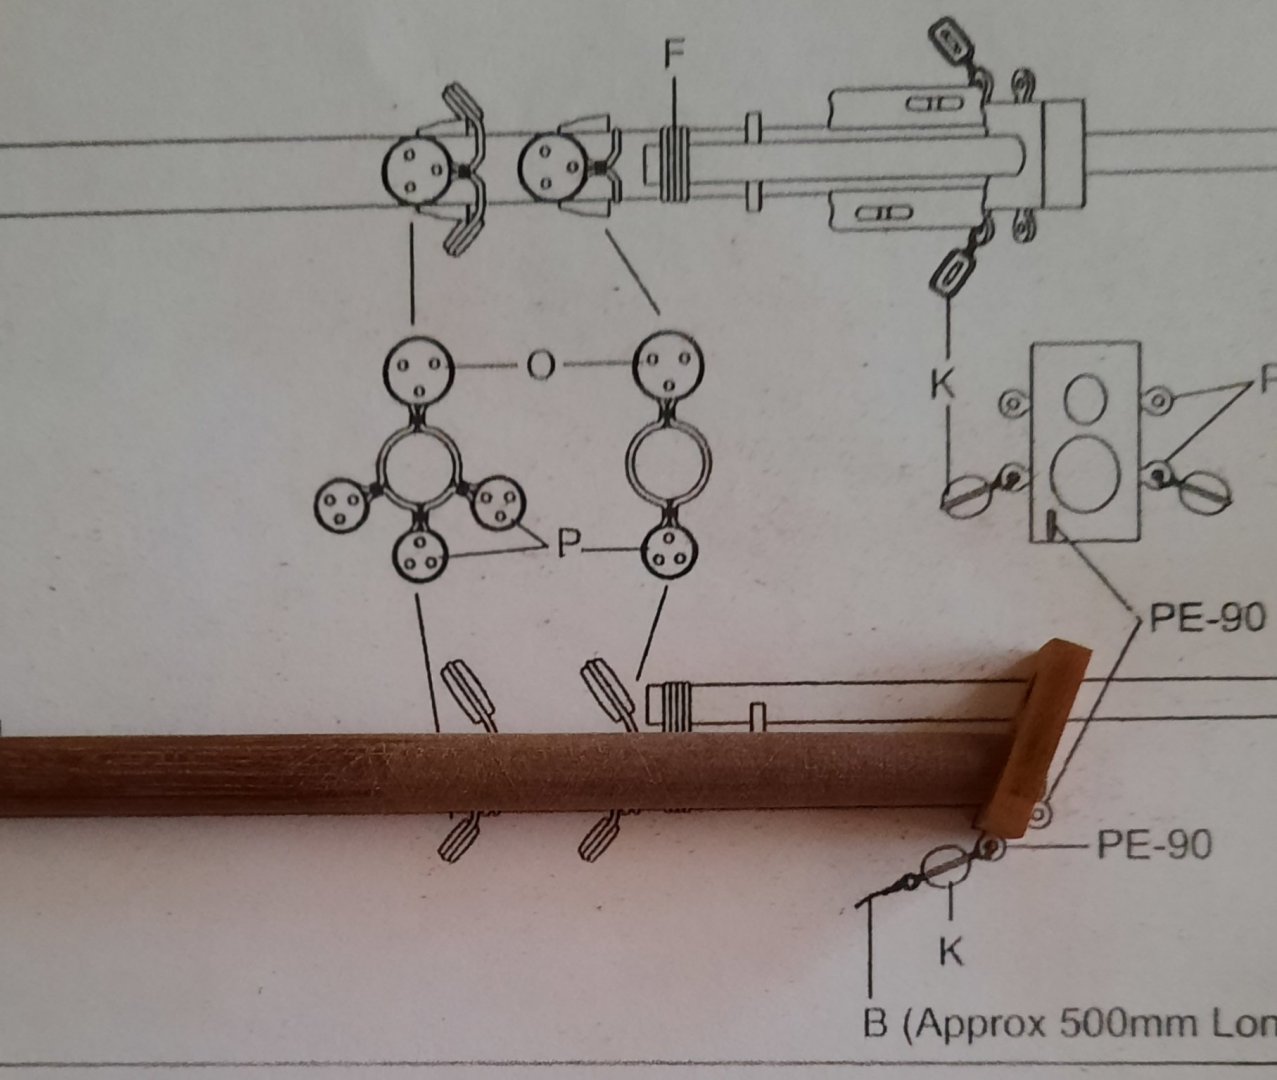
JIBBOOM The jibboom required a 3mm single block adding. I ran a 0.6mm drill through the 3mm block holes to help when the rigging is added. I seized a length of black thread to the 3mm block which was then attached to the jibboom. Seized block on Jibboom BOWSPRIT The bowsprit requires the following items to be fitted: a) 11 x cleats b) 1 x bowsprit fairlead c) 2 x bowsprit bees d) 1 x jibboom saddle e) 1 x 5mm deadeye f) 1 ring comprising 1 x 5mm deadeye and 3 x 3mm deadeyes. g) 1 ring comprising 1 x 5mm deadeye and 1 x 3mm deadeye. As indicated in a previous post one I had already added a centre line to the bowsprit dowel. The positions of the cleats, bowsprit fairlead, bowsprit bees and jibboom saddle were marked and then glued in place, using wood glue. Picture of Bowsprit with fittings added I seized the three 5mm deadeyes and attached the single one to the bowsprit. Picture of seized deadeye 3 x 5mm deadeyes seized, bowsprit and jibboom also shown I then moved on to making the ring of 4 deadeyes. I had marked a piece of tape with the approx. positions of the various deadeyes. I started by adding the 3mm deadeye in the 4 o’clock position. I used the method detailed by Derek (DELF) in his Speedy log. The 3mm block was seized but before any ca was applied and the ends trimmed. Following the method detailed by Derek I was able to adjust position of the deadeye, first by checking with the tape markings and then double checking with it position on the bowsprit. I applied a touch of ca and trimmed the seizing ends once I was happy with its position on the ring. I repeated the process to add the 3mm deadeye in the 8 o’clock position. Starting to make loop for 8 o'clock 3mm deadeye. Using quad hands 8 o'clock deadeye loop formed and ready for deadeye and adjustment to correct position Deadeyes now fitted and ready for final 6 o'clock deadeye I applied a small touch of ca gel to the two cleats and applied tension to the ring and pushed it into the cleats. I was able to add the final 3mm deadeye in the 6 o’clock position. The 3mm deadeye in the 6 o’clock position was seized on the same thread as the 5mm deadeye for the 2-deadeye ring. I checked it was in the right place, prior to securing to ca and trimming the excess thread, first by the marks on the tape and then by positioning it on the bowsprit. I applied a small touch of ca gel to the two cleats and applied tension to the ring thread and pushed it into the cleats. A reef knot was used to complete the process. I fitted the 6 off eyebolts to the bowsprit cap; a 0.7mm hole was drilled for each eyebolt. I did fit the 3 off 3mm blocks, two on the bottom pair of side eyebolts and one to the bottom eyebolt before they were added to the bowsprit cap. I included a loop on the bottom 3mm block. I used the same method for adding a loop to a block as detailed in Derek’s (DELF) Speedy build log. The bowsprit cap was then glued in place, again using wood glue. The ends of the bowsprit and jibboom were both then painted black, covering the area from the bowsprit cap to the first set of cleats. Finally, the jibboom was attached to the bowsprit, with wood glue applied to the jibboom saddle and bowsprit cap hole and finished off with the strapping. Bowsprit and Jibboom dry fitted - gammoning still to be added Bowsprit and Jibboom dry fitted - gammoning still to be added


- 382 replies
-
- 9
-
-
- Vanguard Models
- Duchess of Kingston
- (and 1 more)
-
Nice work Rusty. I am going to experiment with adding the rear tackle with custom made hooks. I am not adding the side tackle.
- 201 replies
-
- 1
-
-
- Duchess of Kingston
- Vanguard Models
- (and 1 more)
-
Thanks Rusty. I like to share my methods, even though they may not be the best way to do things. Hopefully they will provide some help.
- 382 replies
-
- 1
-
-
- Vanguard Models
- Duchess of Kingston
- (and 1 more)
-
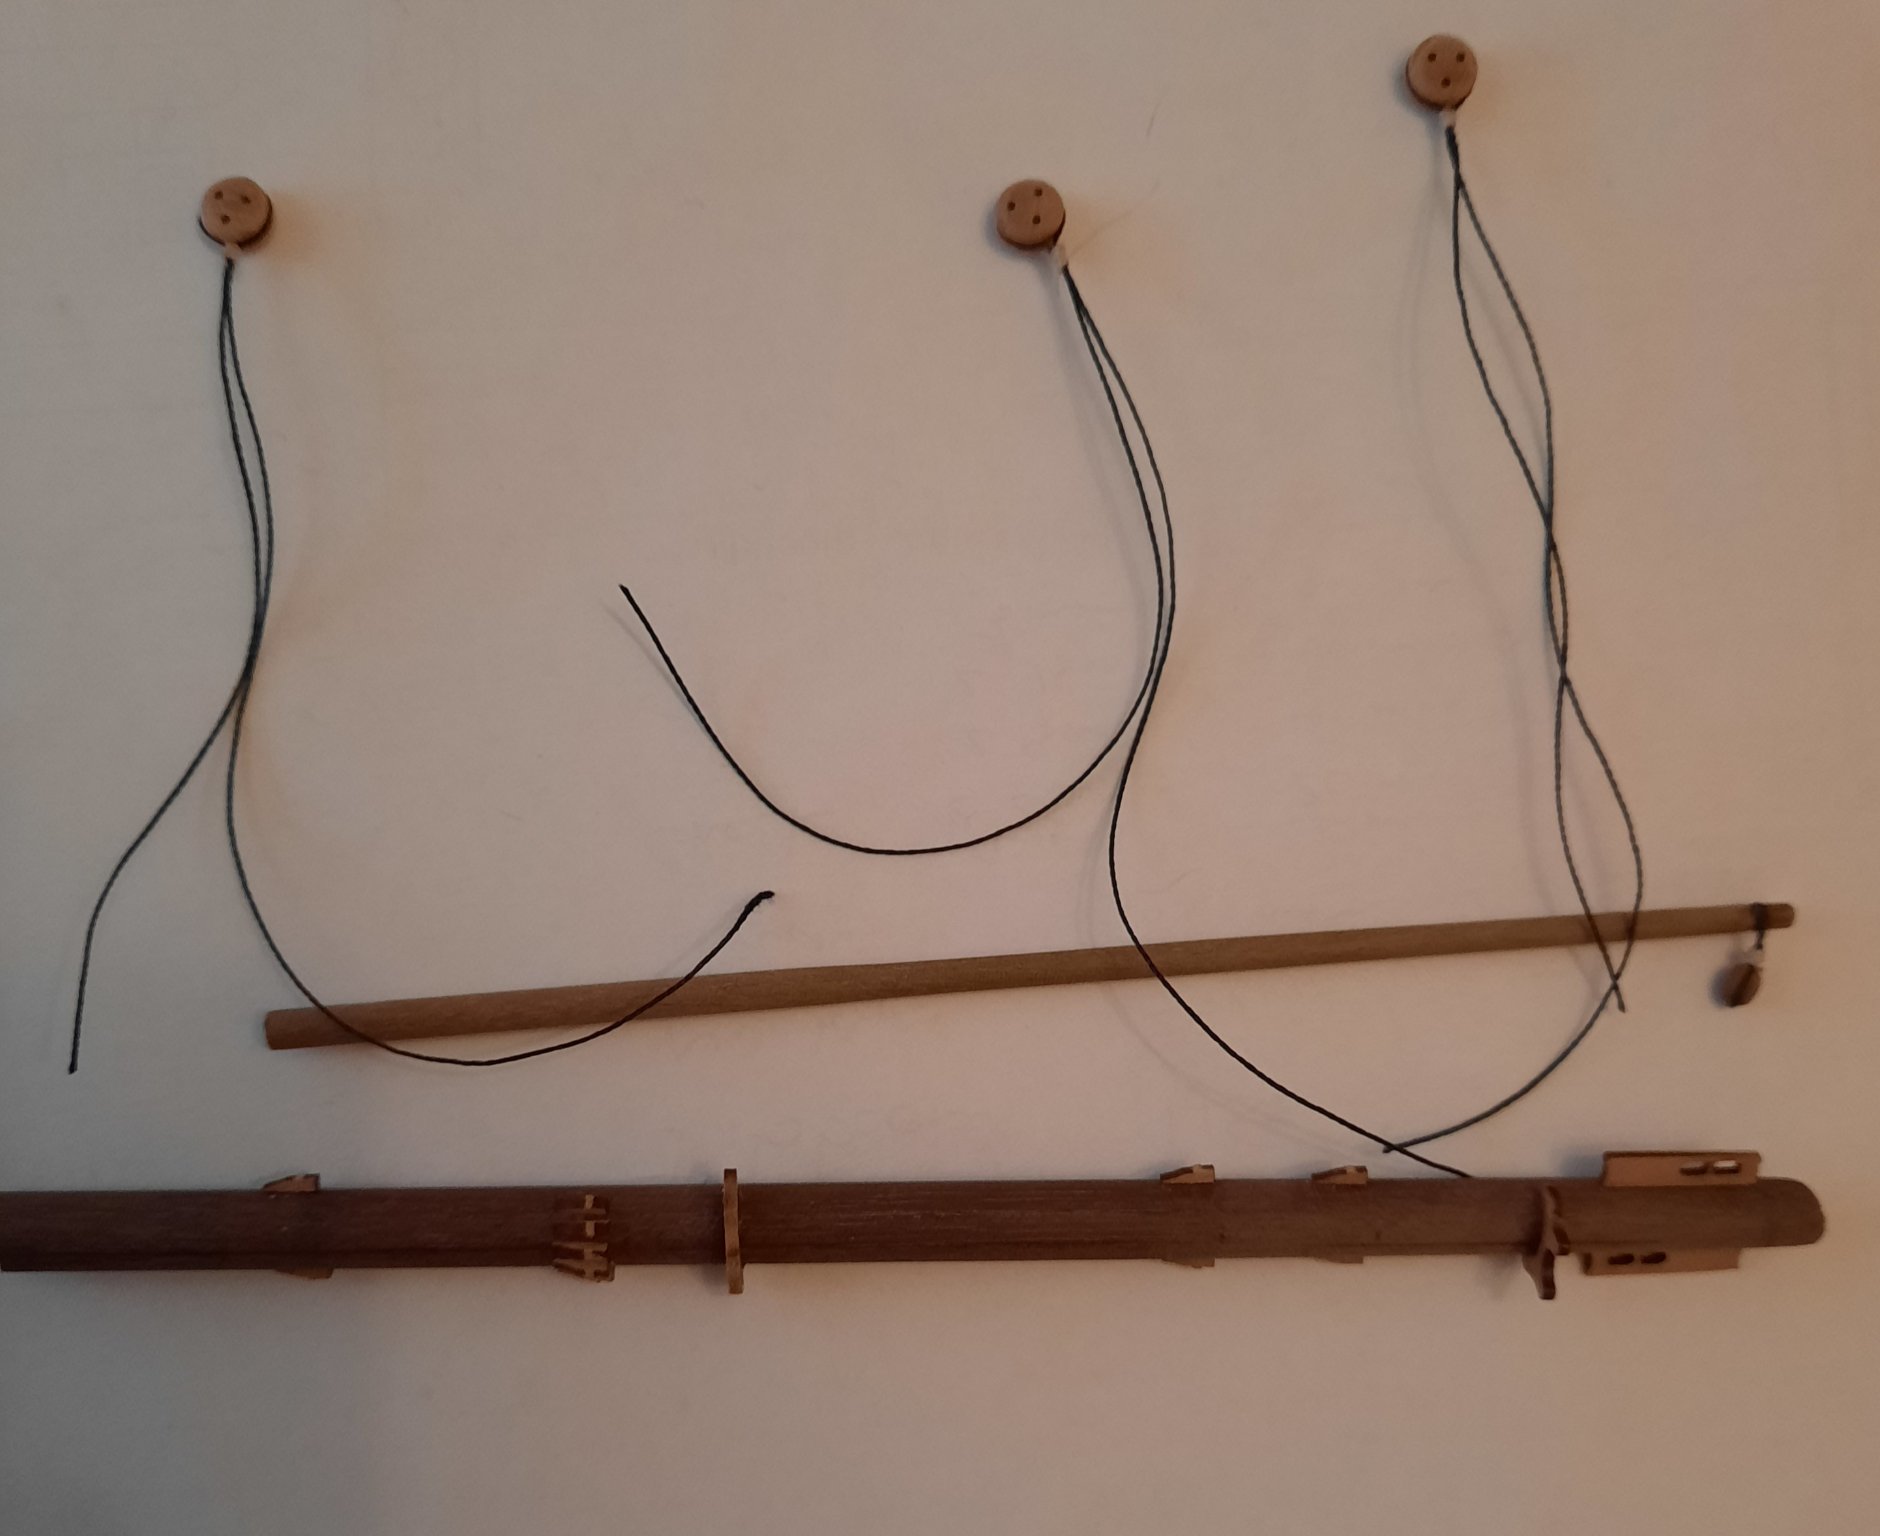
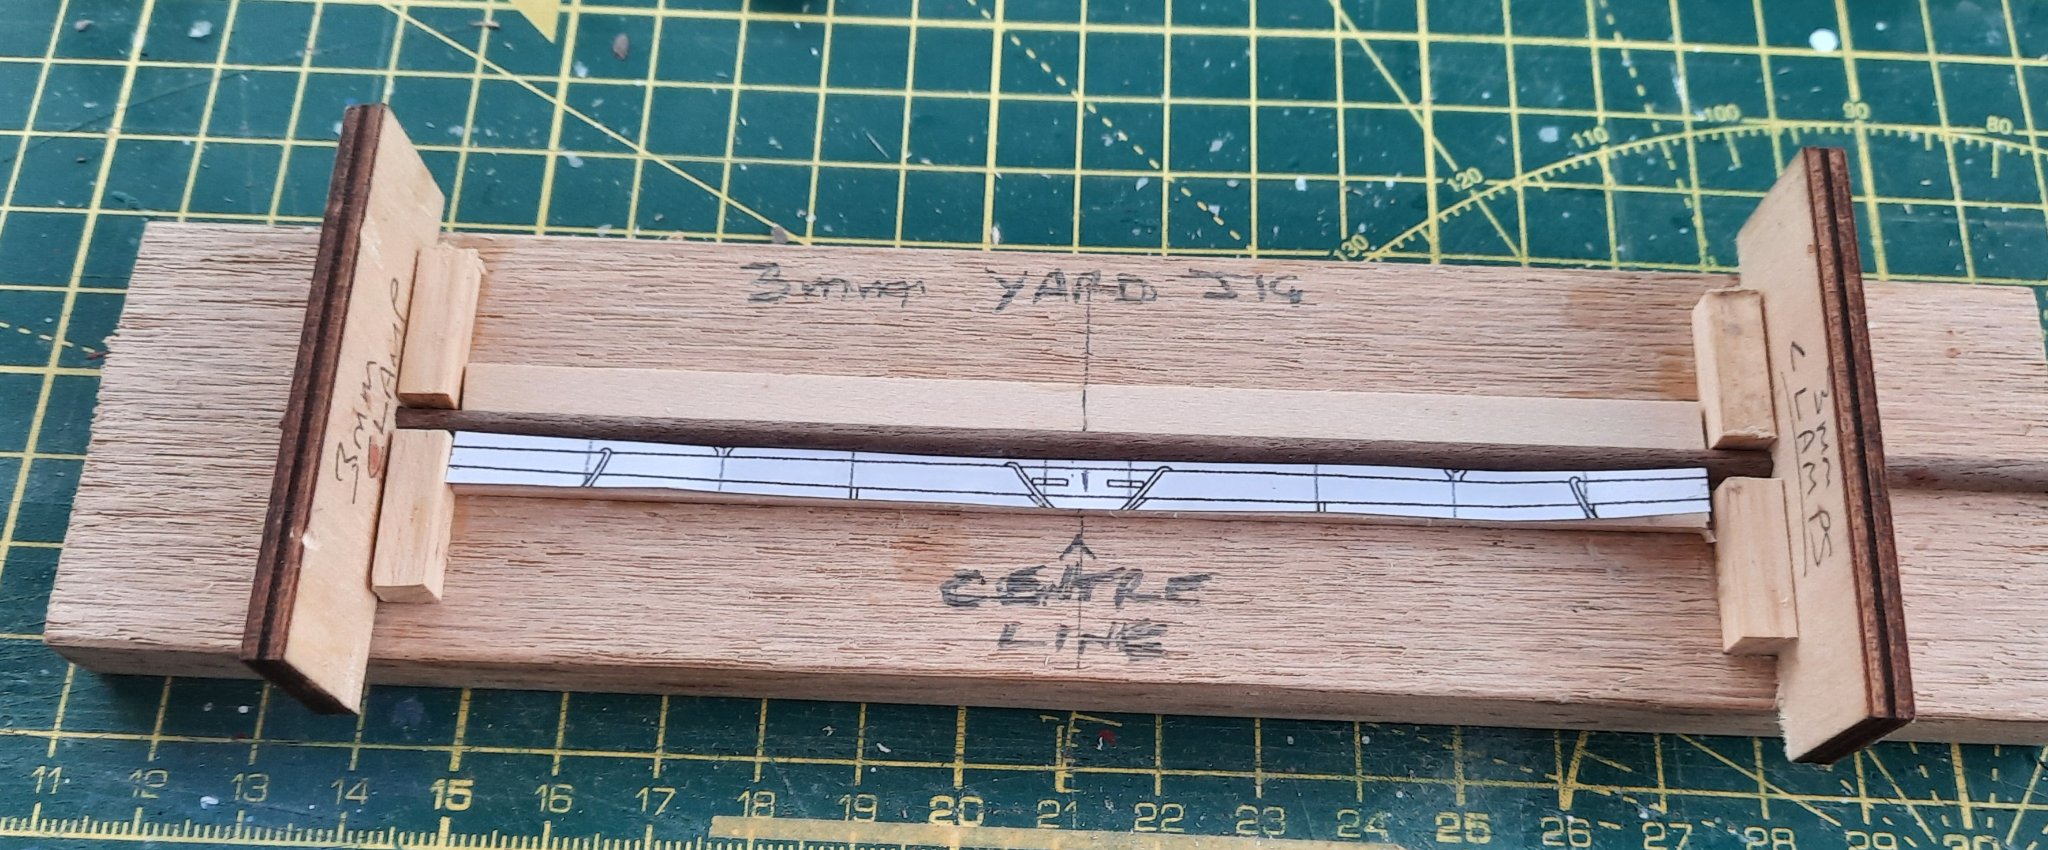
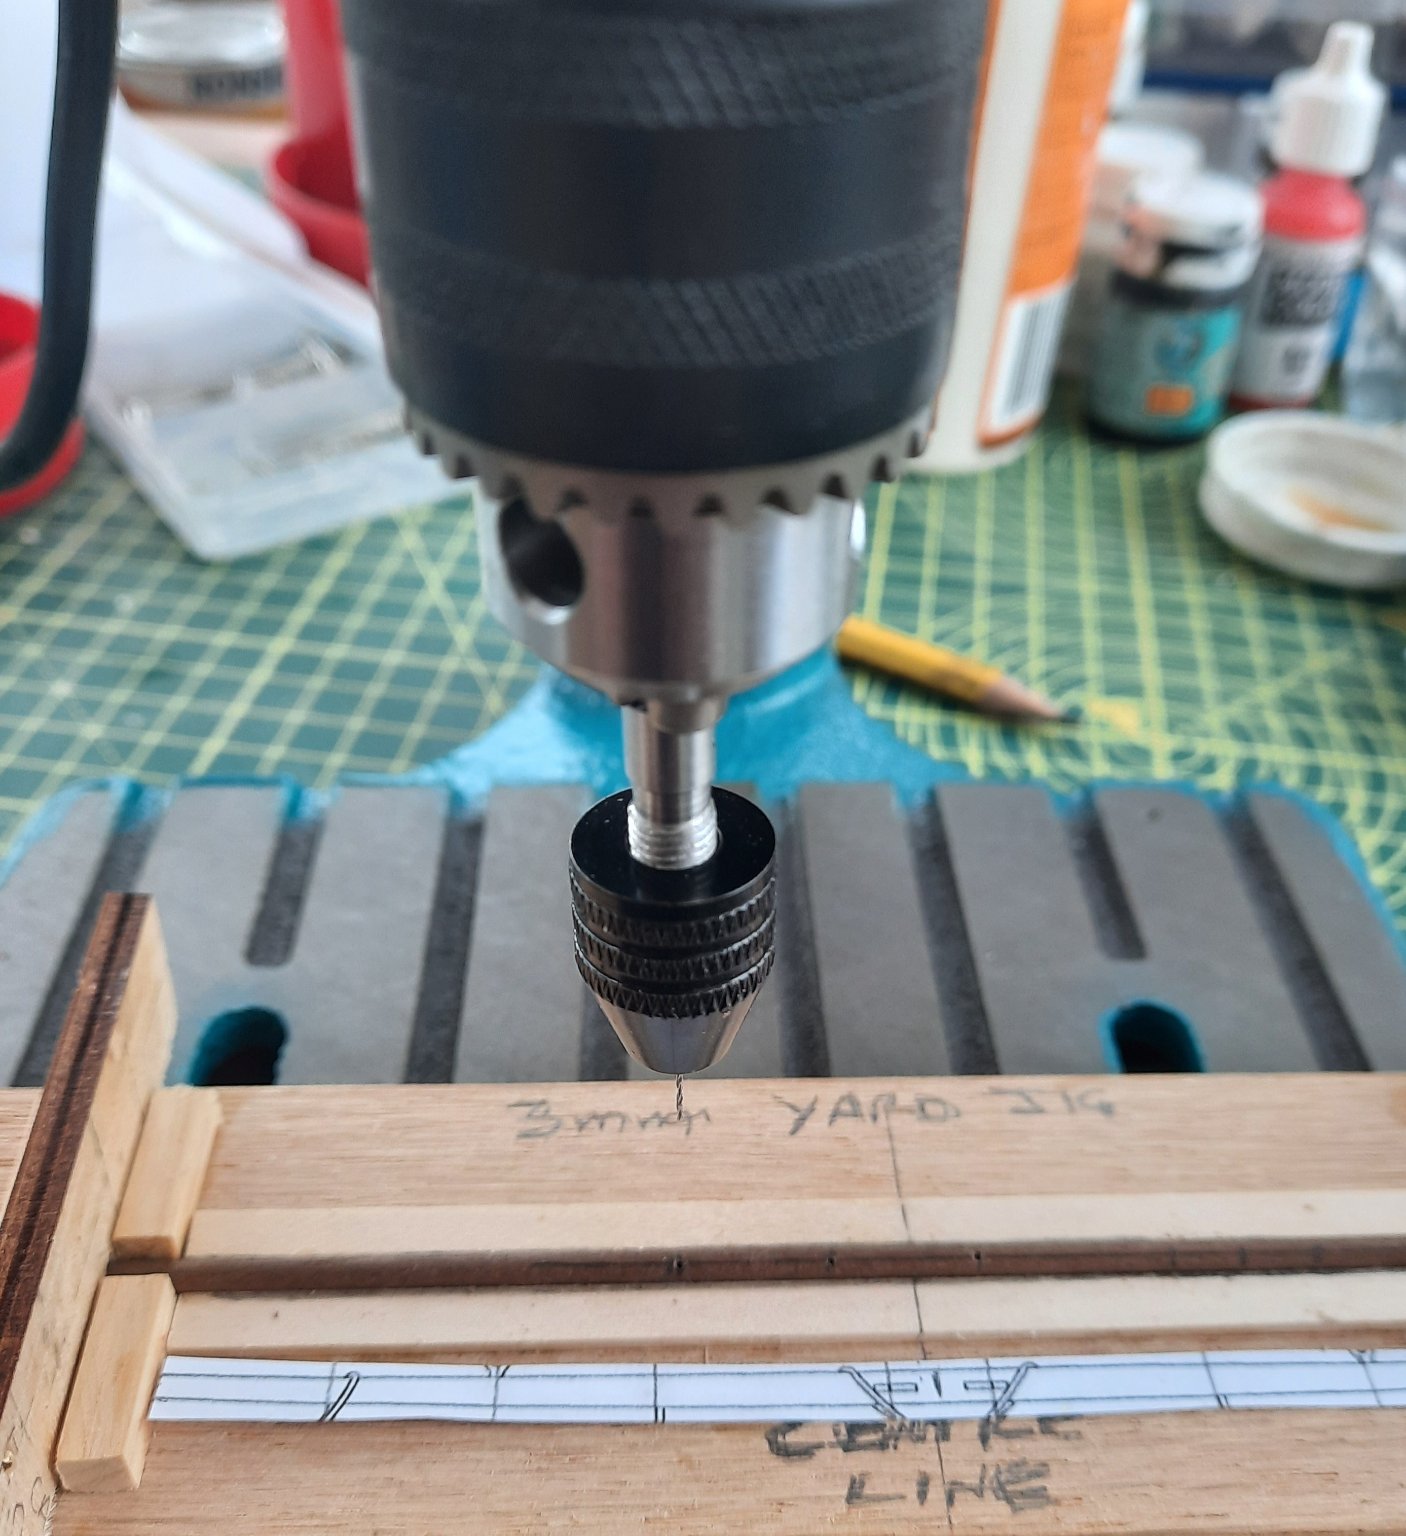
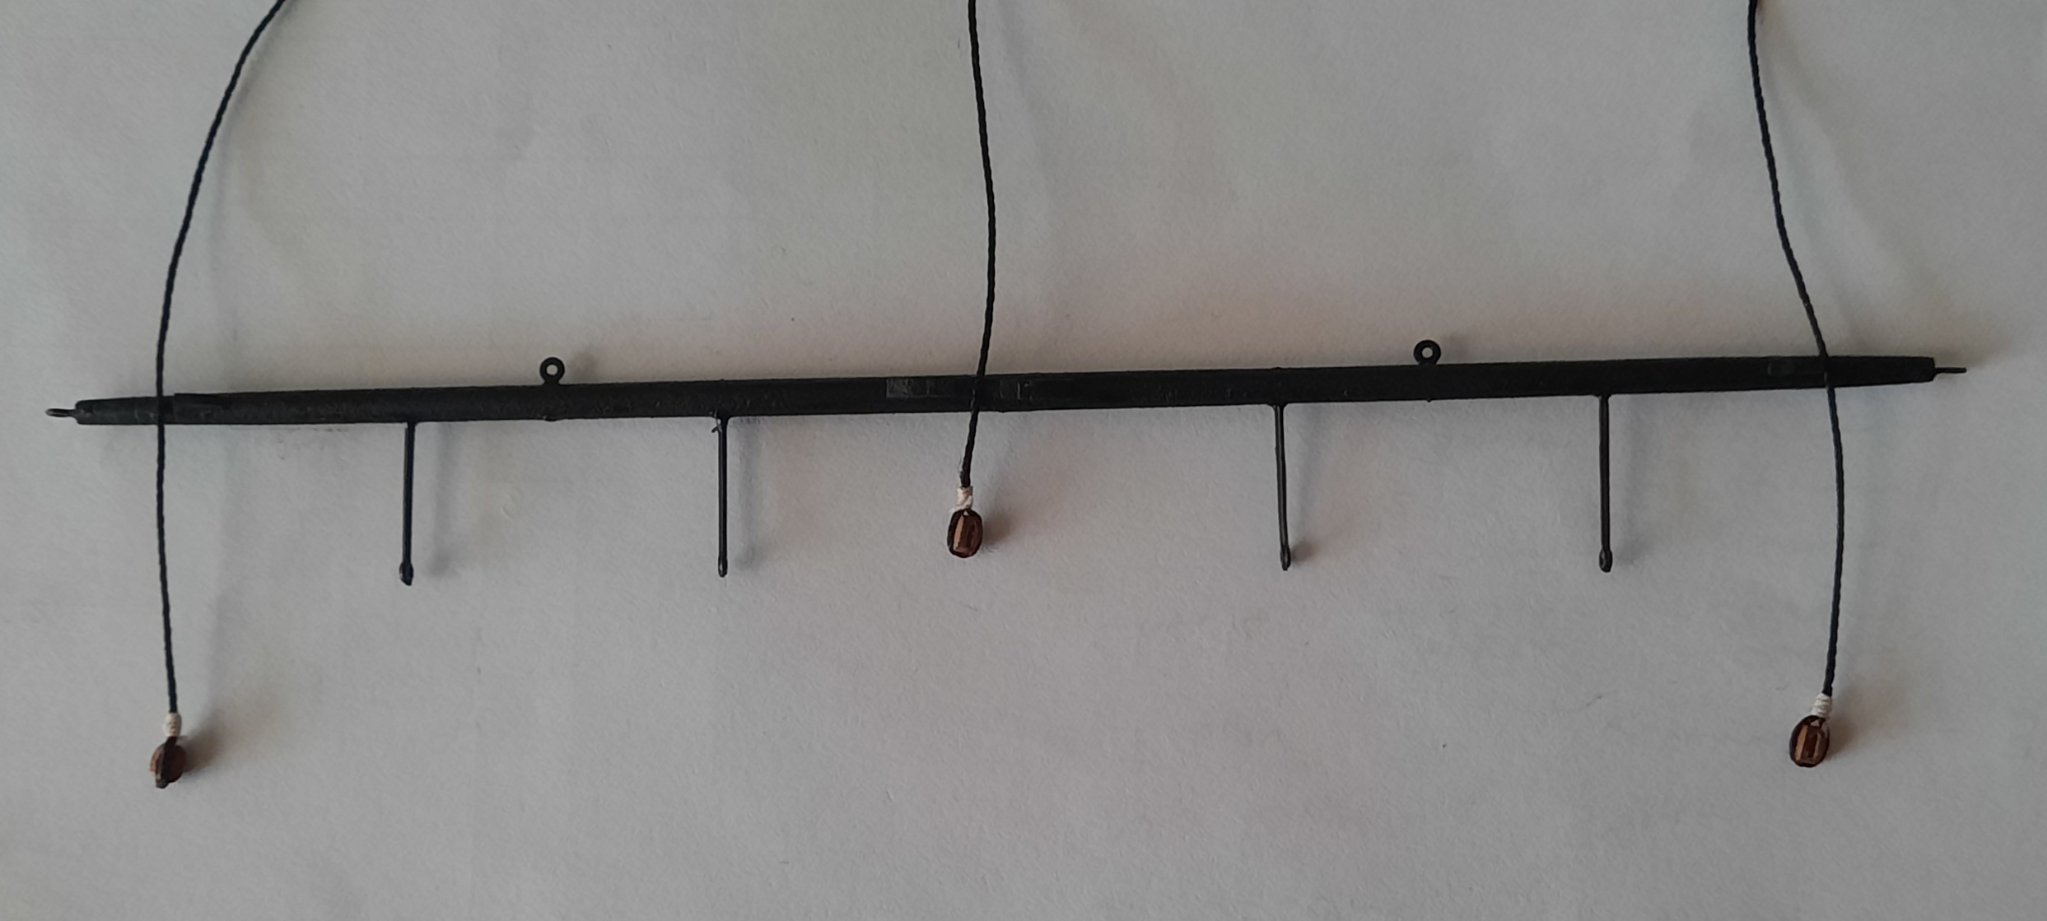
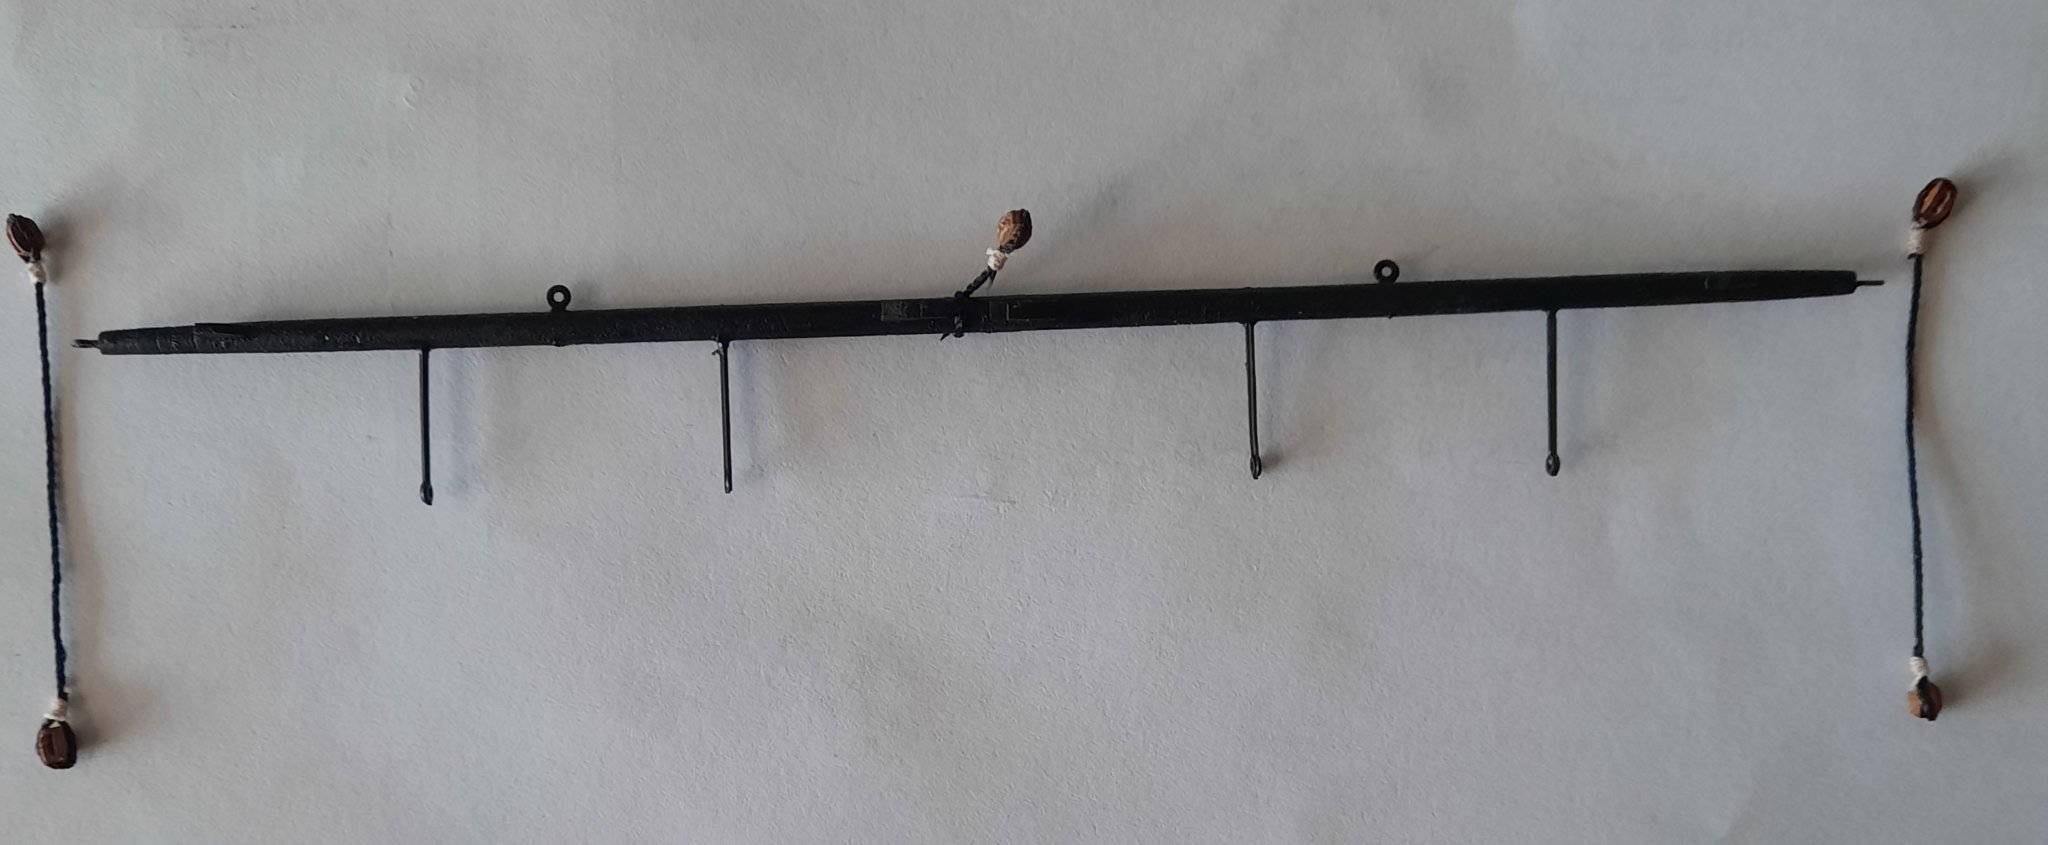
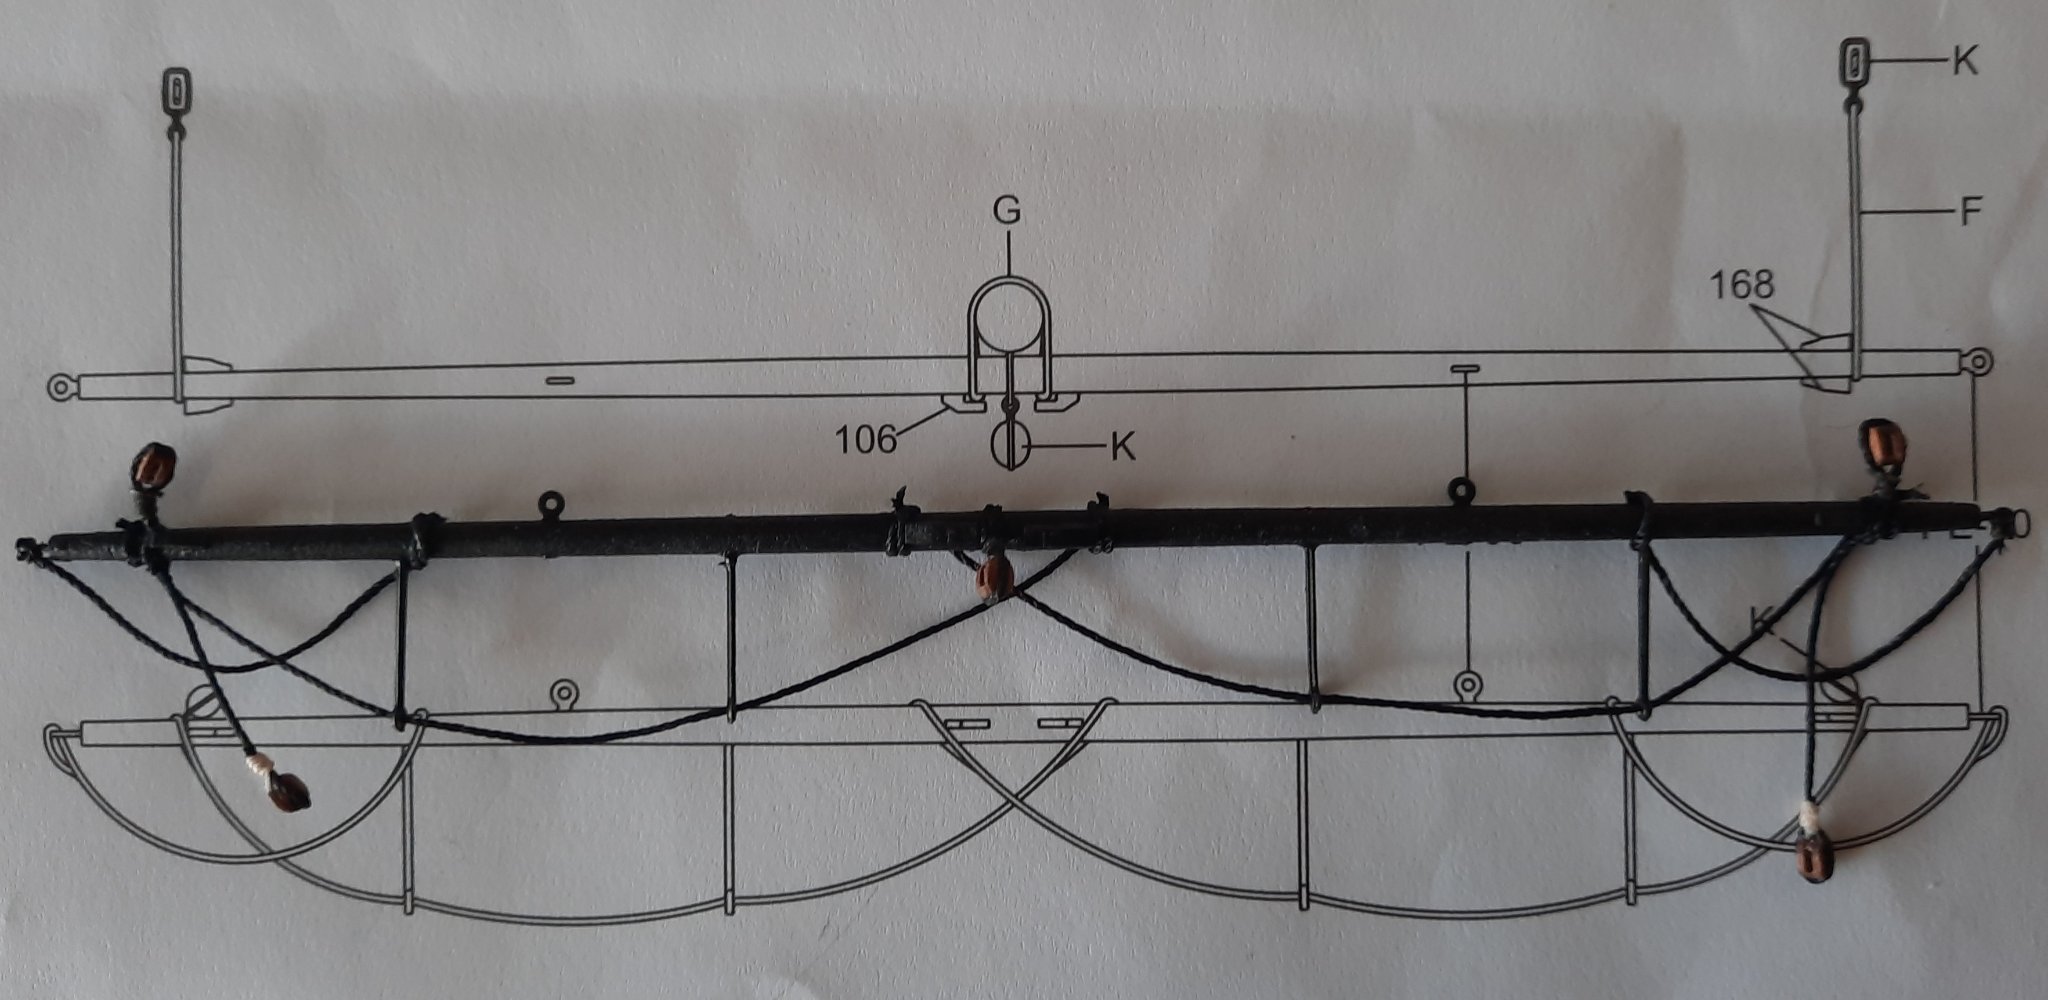
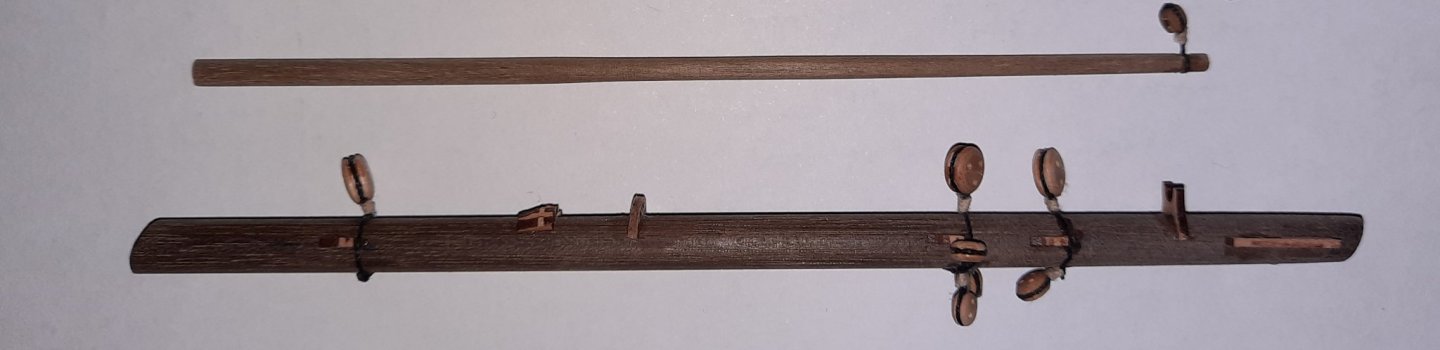
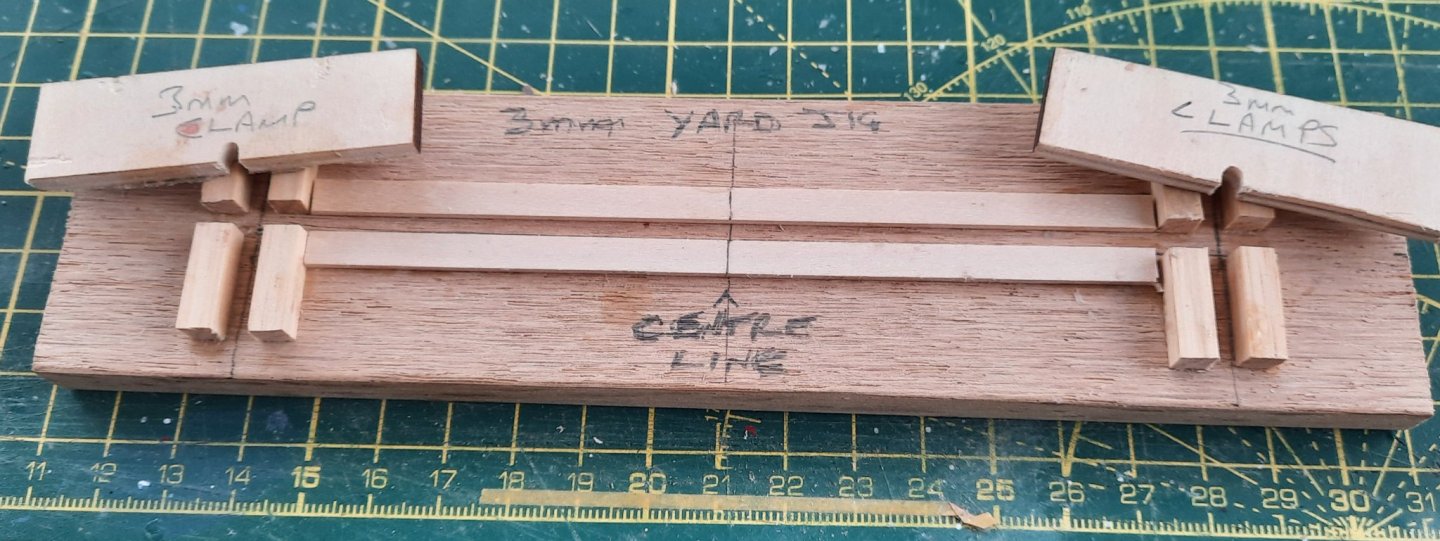
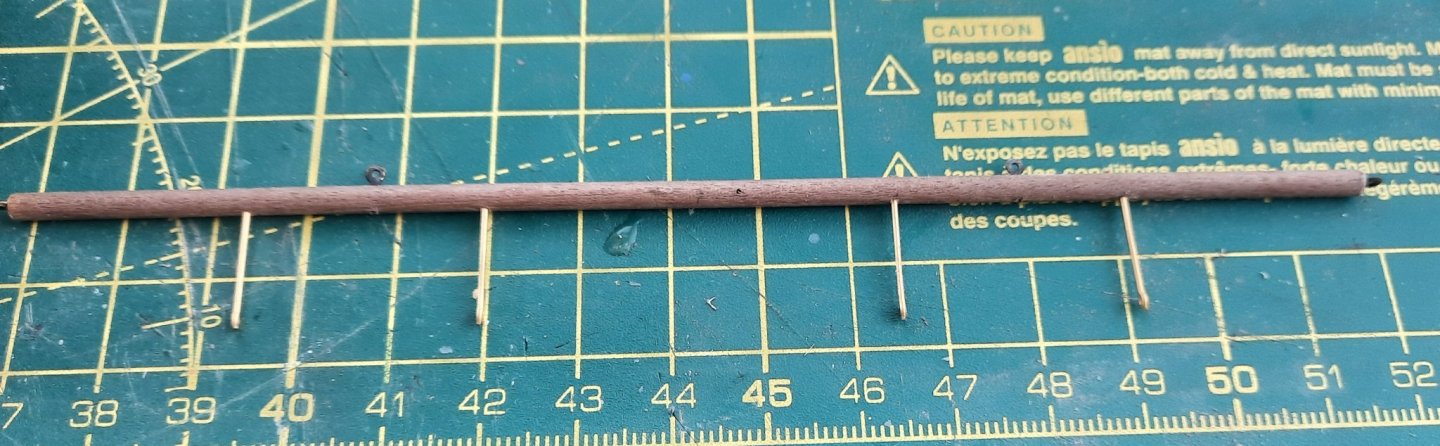
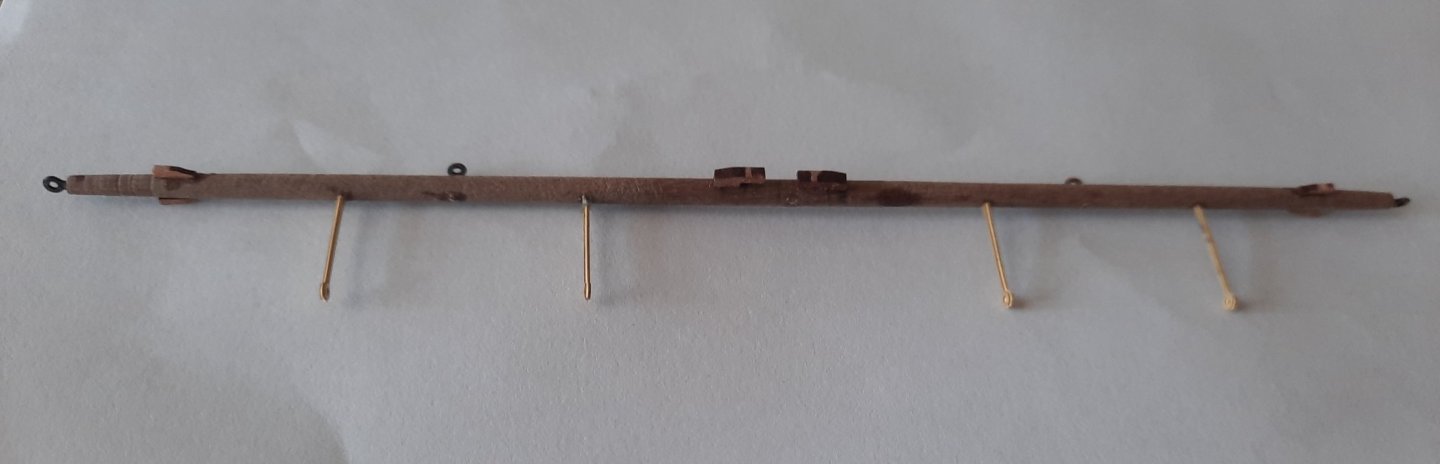
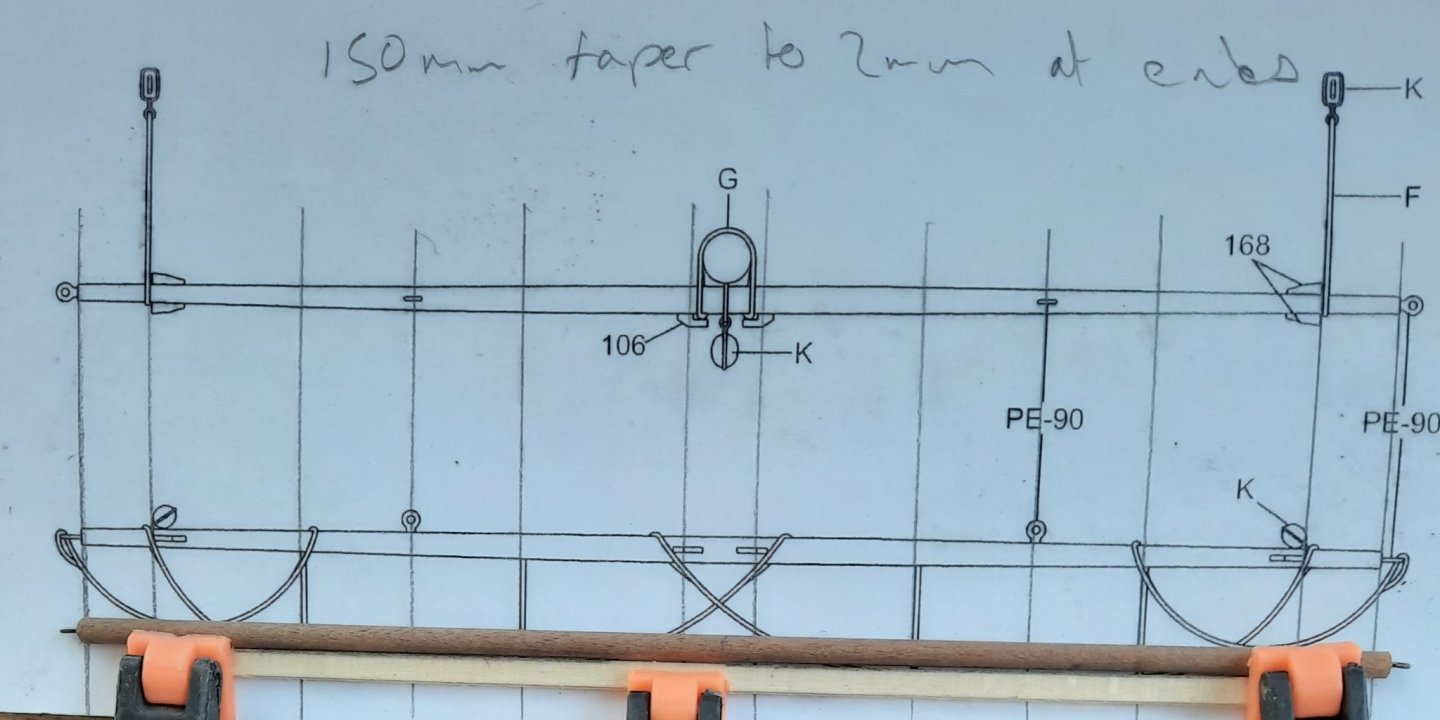
Following my recent posts on shaping the masts I thought I would detail my method(s) for completing the spritsail. The method outlined below will then be used to make the yards. The spritsail is made from a 150mm long length of 3mm dowel. It requires the following work to be undertaken: a) Fit 3 x eyebolts, 4 x footrope stirrups, 6 x cleats and 5 x 3mm single blocks to the dowel. b) Taper the dowel to 2mm at each end, with no taper on central section c) Add the footrope stirrup rigging. d) Add a small pin to secure the spritsail to the bowsprit. The footrope stirrups will point downwards but will also angled toward the bow. This arrangement is shown on page 69 of the build manual, reference instruction 235. Stage 1 – Preparing the Spritsail for the eyebolts and footrope stirrups. I tried two different methods both of which are detailed below. I found both methods had problems, but these problems could be eliminated by using a combination of both methods. Method 1 – No Power Tools Used A photocopy of the spritsail arrangement (from plan sheet 10) was made. With the 3mm dowel cut to the required length of 150mm a piece of 1.5mm plank (surplus from a previous build project) was clamped to the dowel so a centre line could be added. Please see the photo below. The position of the eyebolts and footrope stirrups were marked along the centre line. The holes were drilled using a hand drill with a 0.7mm drill bit. I drilled right through the dowel, knowing the holes would not be visible after painting. This also meant all the holes could be drilled without the need to rotate the dowel. The holes at either end of the dowel were also drilled with a 0.7mm drill. The eyebolts and footrope stirrups were then test fitted and their position was checked against the plan. Method 2 – With Jig and Power Tools I was a little bit concerned with being able to consistently drill through the dowel in a straight line by hand. Therefore, I made a jig which could be used with my bench drill to ensure I was able to drill true. The jig was quick and easy to make. The two guides are 1.5mm planks. I drilled 3mm holes in the two clamps and then (using my mini bench saw) trimmed the bottom edge away. Photo of Jig With the dowel positioned in the jig a centre line was drawn. The dowel was then rotated through 90 degrees, so the centre line was on top. A photocopy of the plan drawing was placed on the bottom guide and then hole positions were marked on the dowel. Using the Jig With a 0.7mm drilled fitted in the bench drill (I have an adapter for micro drills) the holes were added, and the spritsail was then fitted with the eyebolts and footrope stirrups. Ready to drill a hole The problem with this method was the positioning of the bench drill. A couple of the holes drilled seemed to straggle the centre line. In the end I opted to use a combination of both methods which produced the best results. I used the jig to mark the centre line and hole positions. I then used a hand micro drill to start each hole. With the dowel back in the jig I was able to drill through the dowel. Stage 2 – Tapering I used my bench lathe to taper, as detailed in previous a previous post. I did not taper the centre section of the dowel. Stage 3 – Adding Fixtures and Fittings Using ca gel, all the cleats, eyebolts and footrope stirrups were added. The mast painted was then painted black. Next task was to add the 5 off 3mm single blocks. I started by running a 0.6mm drill through the 3mm block holes for clearance. Next a length of 0.5mm black thread was seized to the first three blocks, using 0.1mm natural thread. The seizing method used is as described in detail by Derek (DELF) in his Speedy build log. It yields brilliant results as can be seen in the next photo. Seizing of a block 3 blocks seized There two blocks required for the spritsail lifts which are positioned at each end of the spritsail, positioned by the cleats. Two blocks are also required for the spritsail braces which are also positioned by the same two cleats as the spritsail lifts. The braces have longer tails which keeps them away from the spritsail. I decided to seize one lift block and one brace block to a single length of thread. This thread could then be tied to the spritsail, ensuring the blocks are correctly positioned. It reduces the thread clutter around the cleats noting there is a footrope stirrup thread to be seized by the same cleats on the spritsail. After a making a measurement the distance between the two blocks is approx. 40mm. Using the quad hands this turned out to be a relatively simple task to produce two (almost) identical seized blocks. Brace and Lift blocks All the blocks were tied to the spritsail. I used a simple knot with a touch of ca applied to the knot. The final task was adding the footrope stirrup rigging. I used 0.5mm black thread for this. I found it necessary to run a 0.7mm drill through the footrope stirrup eyelets. This was a straightforward task. As each rope was added I tried to ensure that it followed the shaping detailed in the plans. Start of the footrope rigging process The completed spritsail assembly, which looks a good match with the plan.


- 382 replies
-
- 9
-
-
- Vanguard Models
- Duchess of Kingston
- (and 1 more)
-
Good job Chris, a master craftsman at work.
-
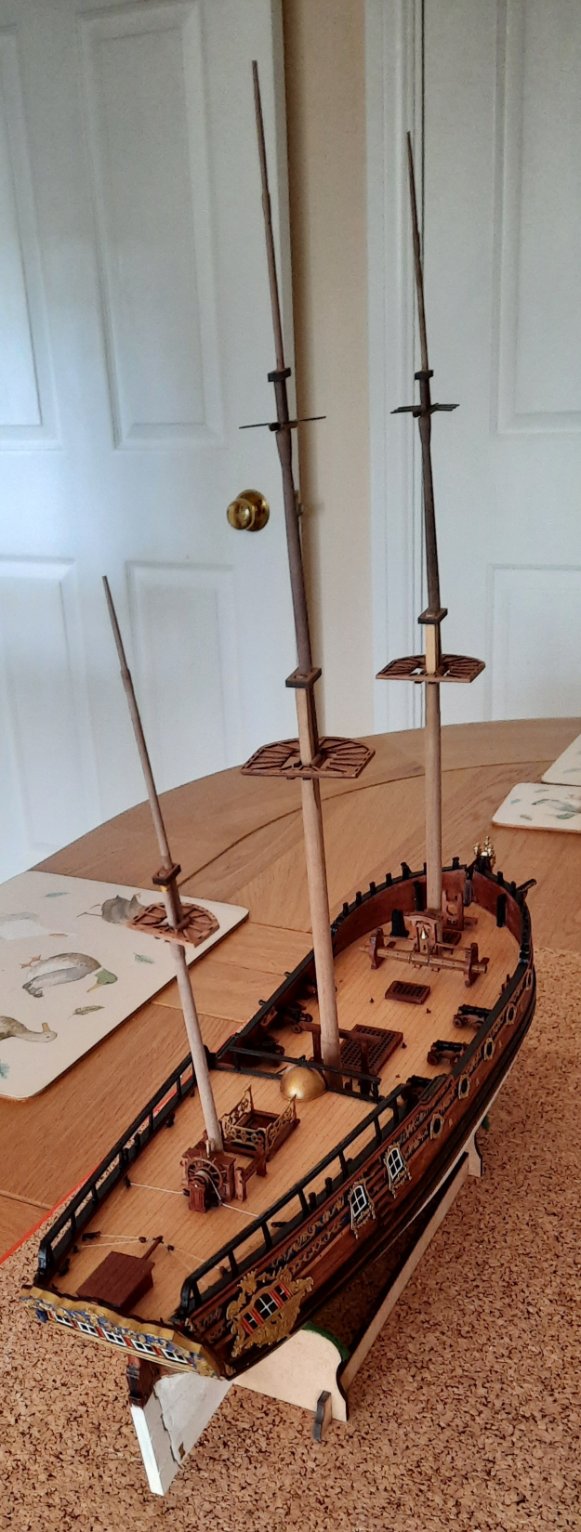
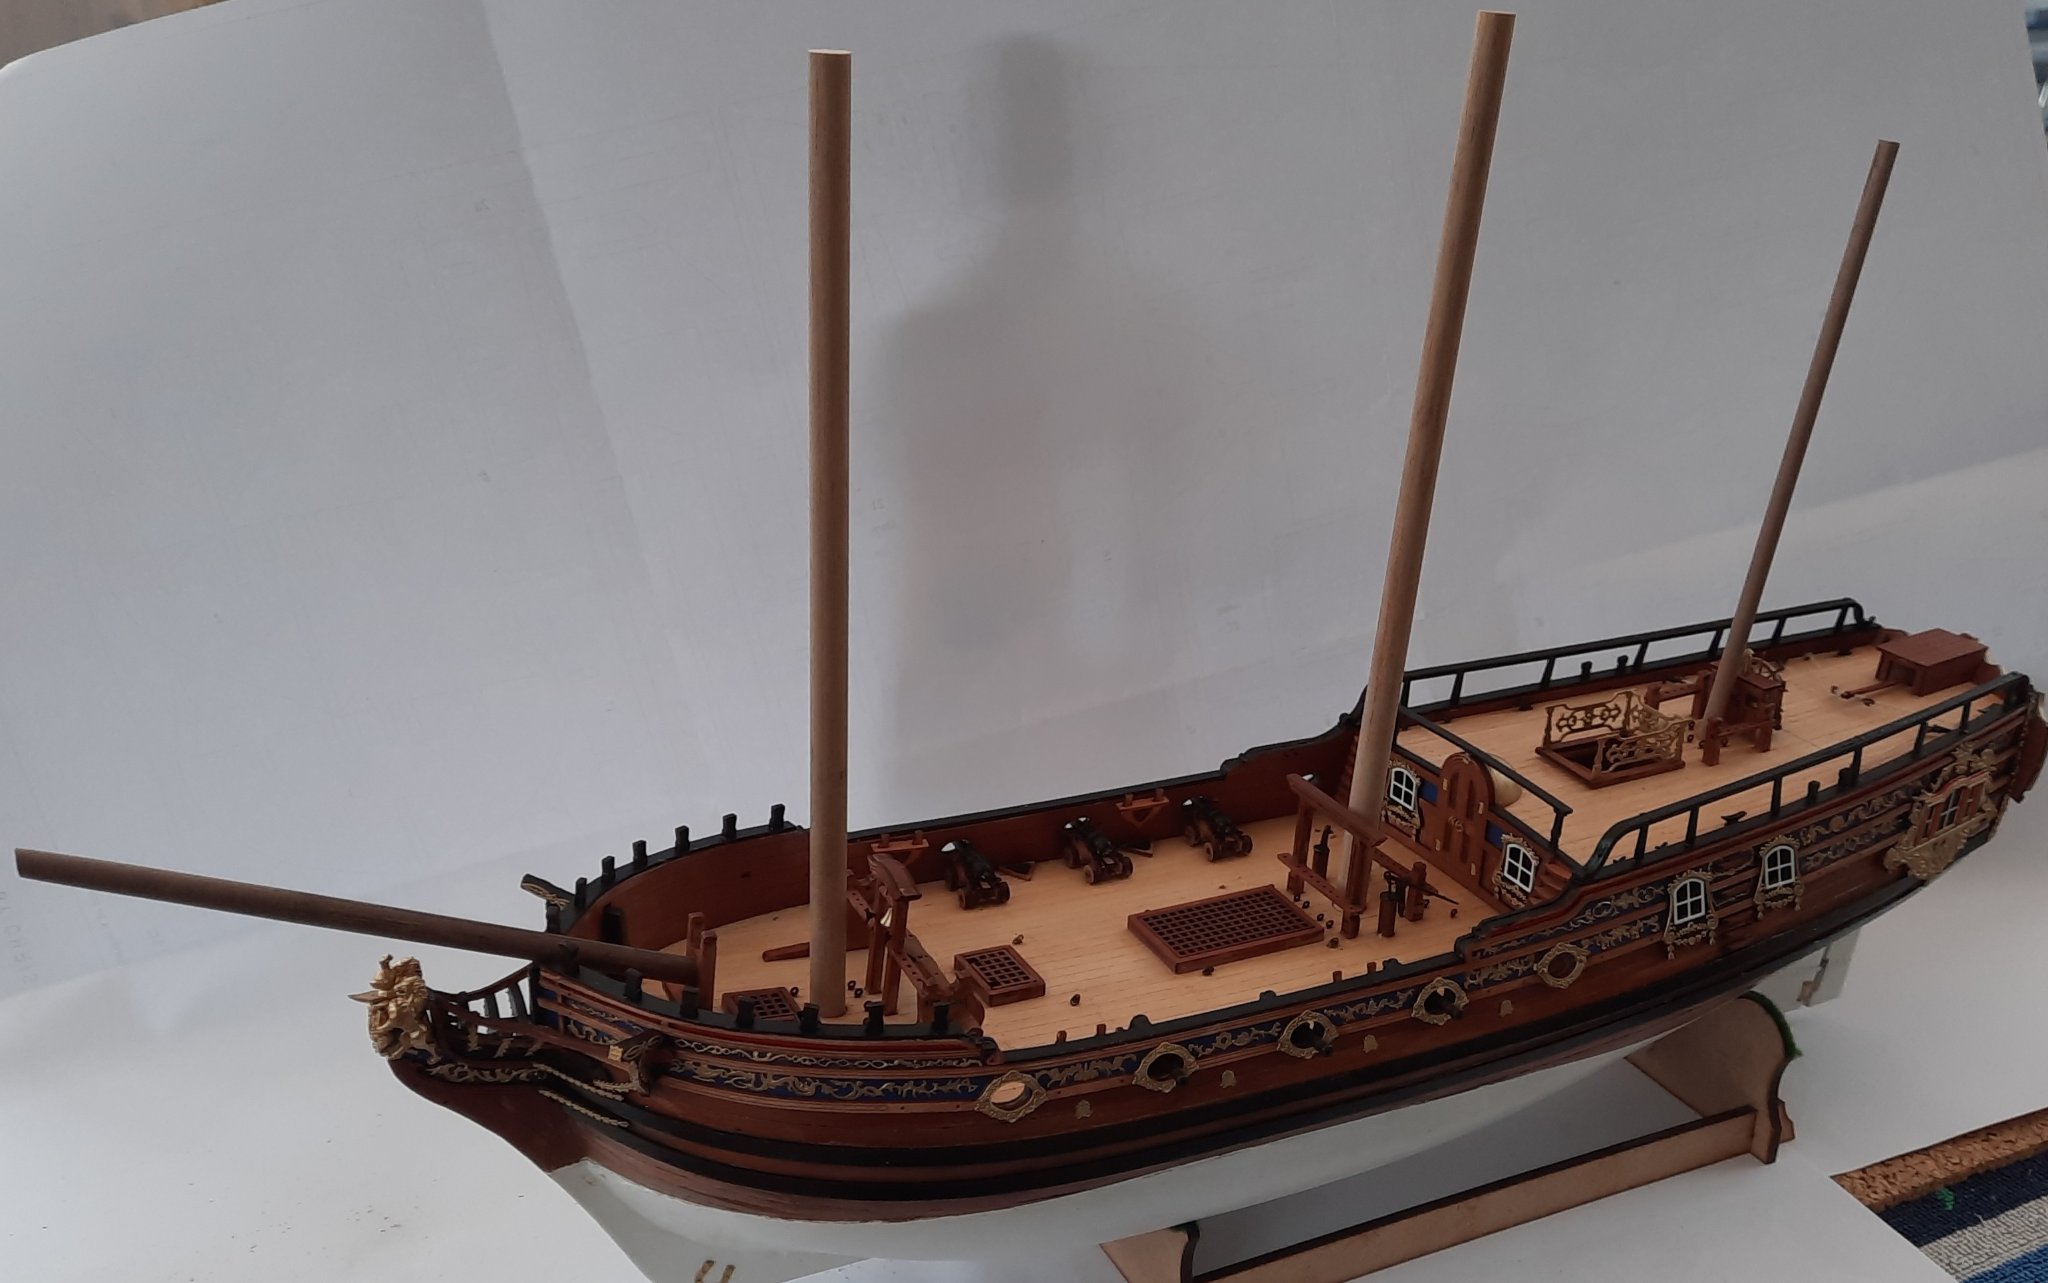
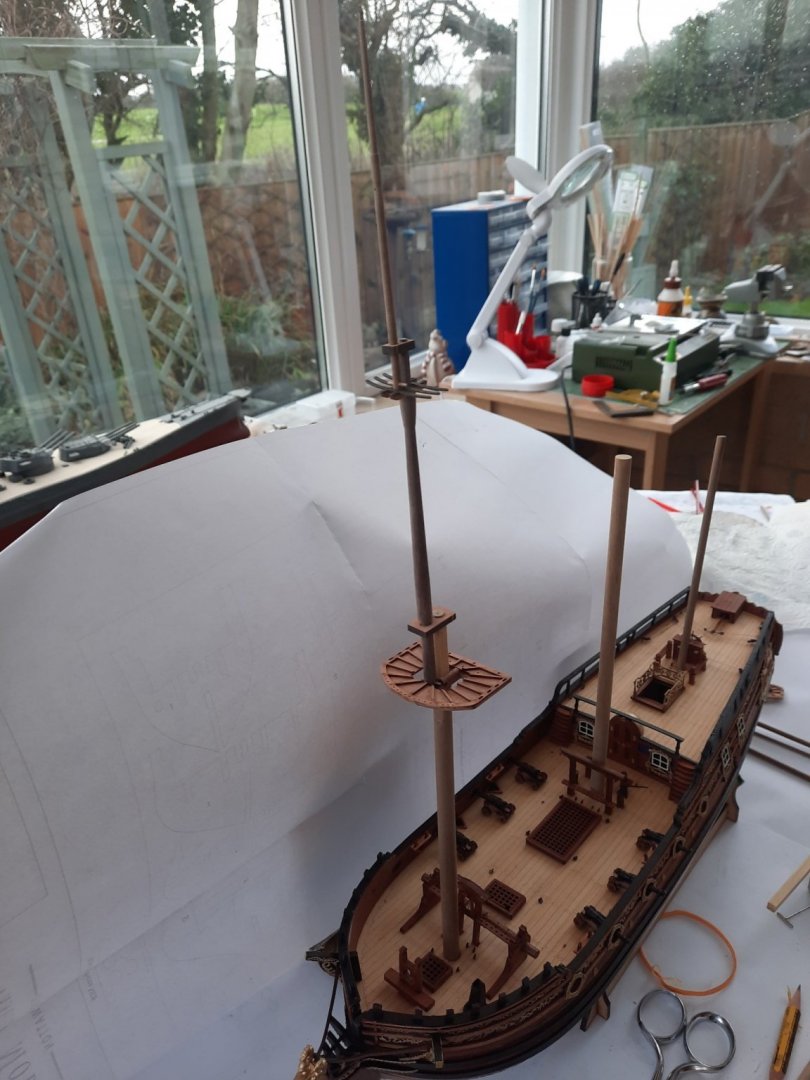
Just a quick update as I am excited about how the Duchess looks now all the masts have now been shaped. The mast assemblies are only dry fitted at this stage but everything fits together nicely and I am very pleased with how they look. Next on the agenda is tapering and adding all the fixtures and fittings to the 9 off yards. I also need to add the fixtures and fittings to the masts, bowsprit and platforms. This will keep me busy for the next few days.


- 382 replies
-
- 8
-
-
- Vanguard Models
- Duchess of Kingston
- (and 1 more)
-
Hello Matt All the parts were supplied with the kit. Many thanks for your comments.
- 382 replies
-
- 1
-
-
- Vanguard Models
- Duchess of Kingston
- (and 1 more)
-
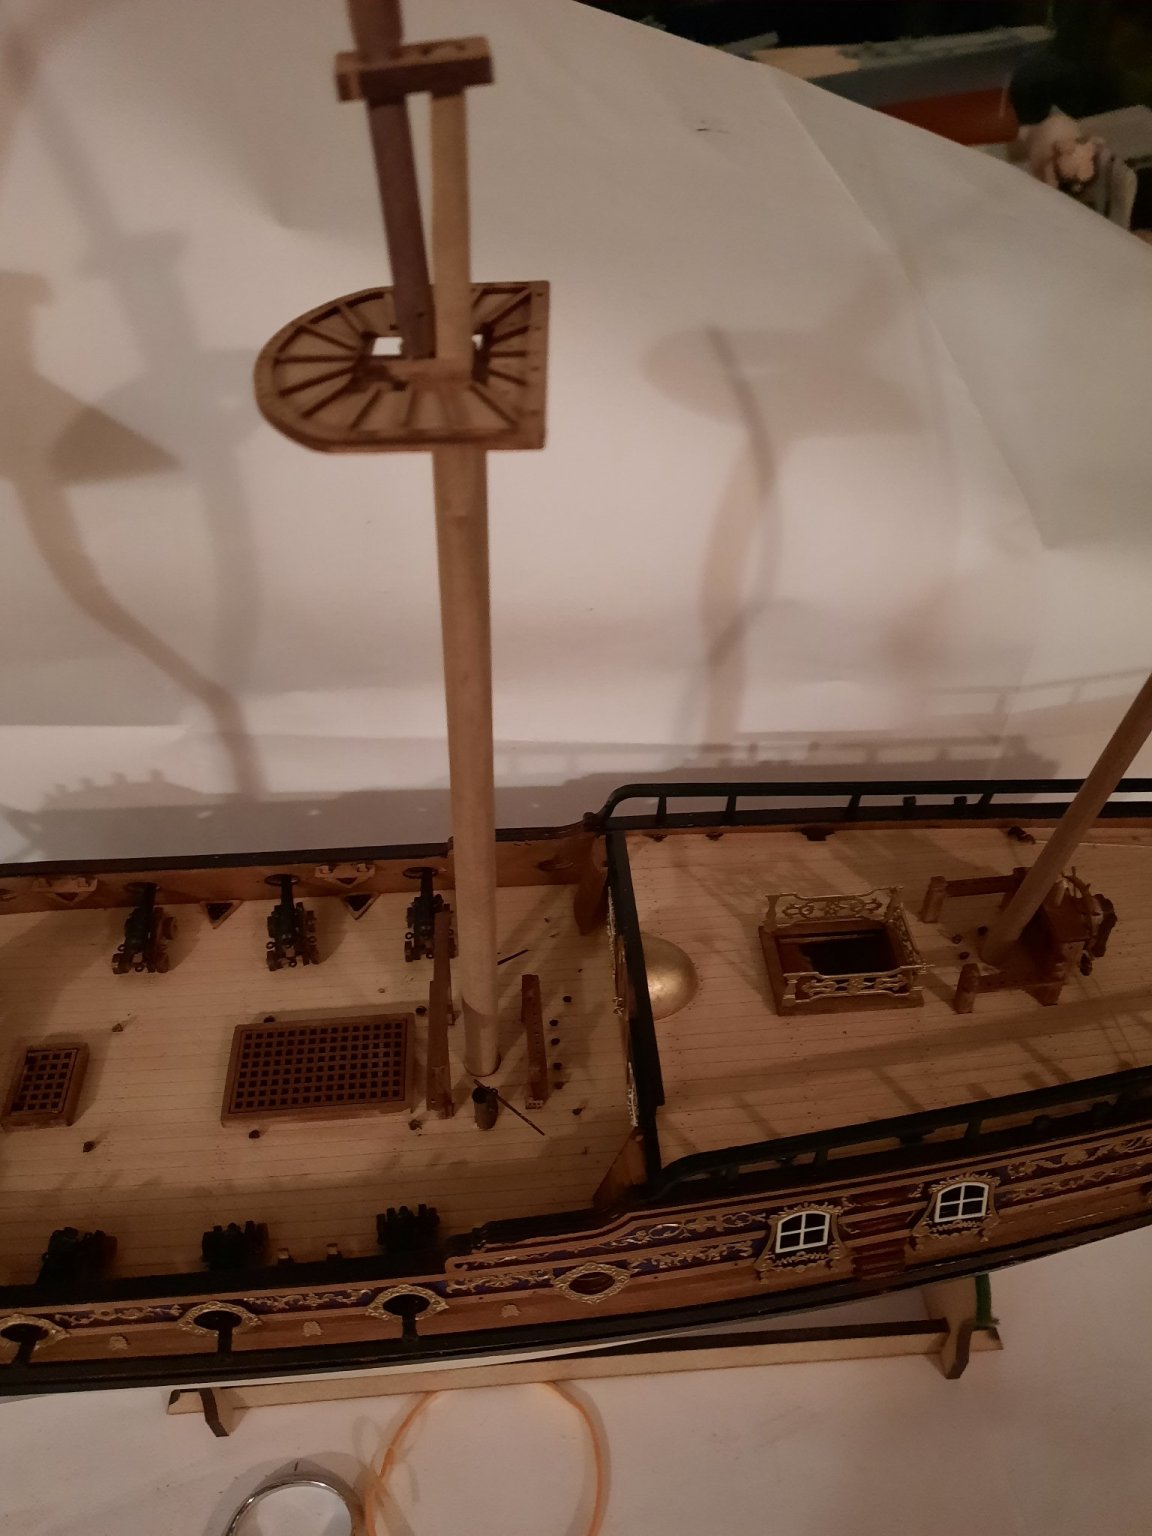
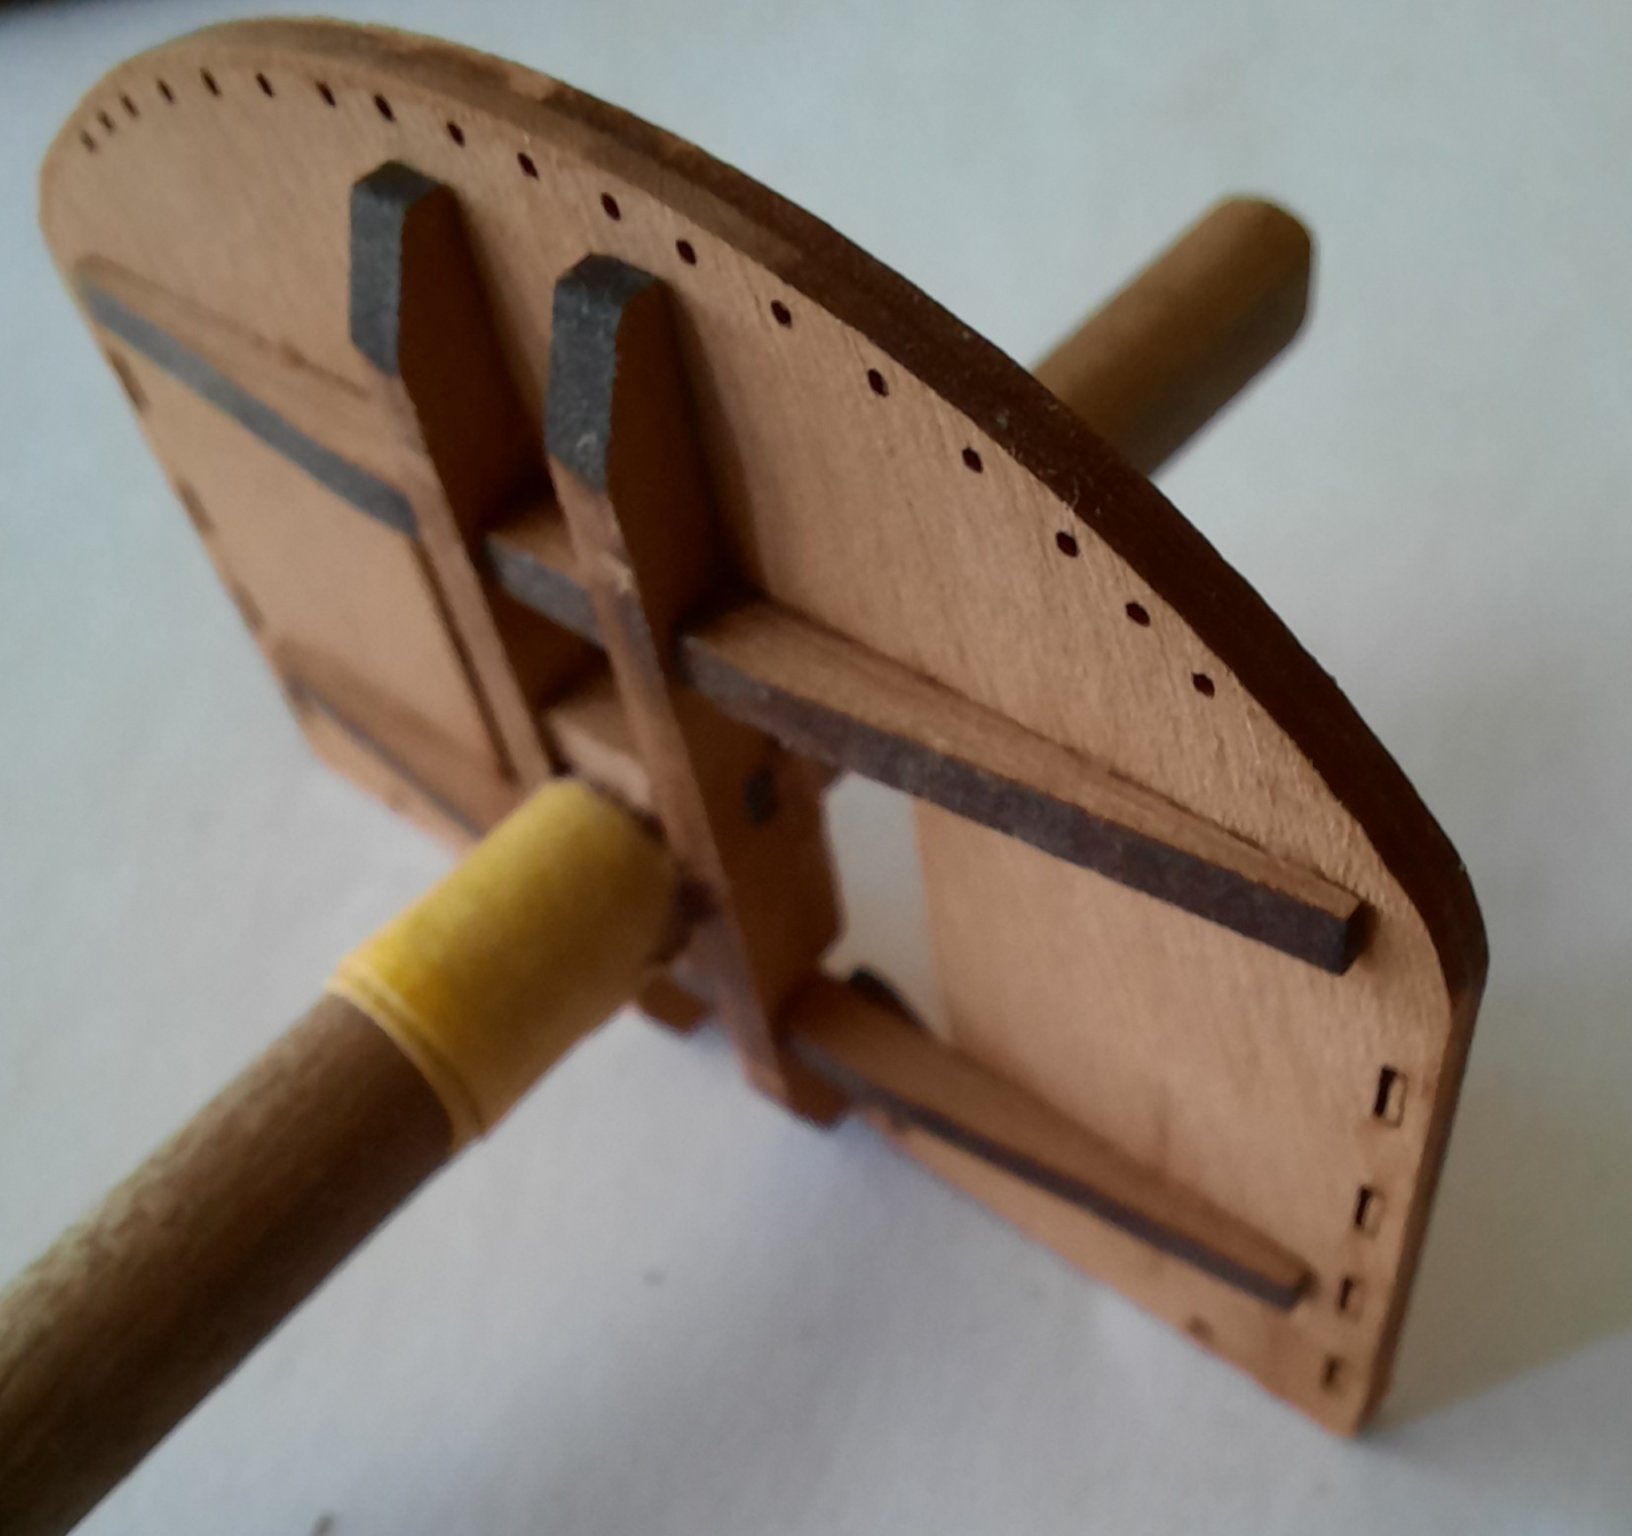
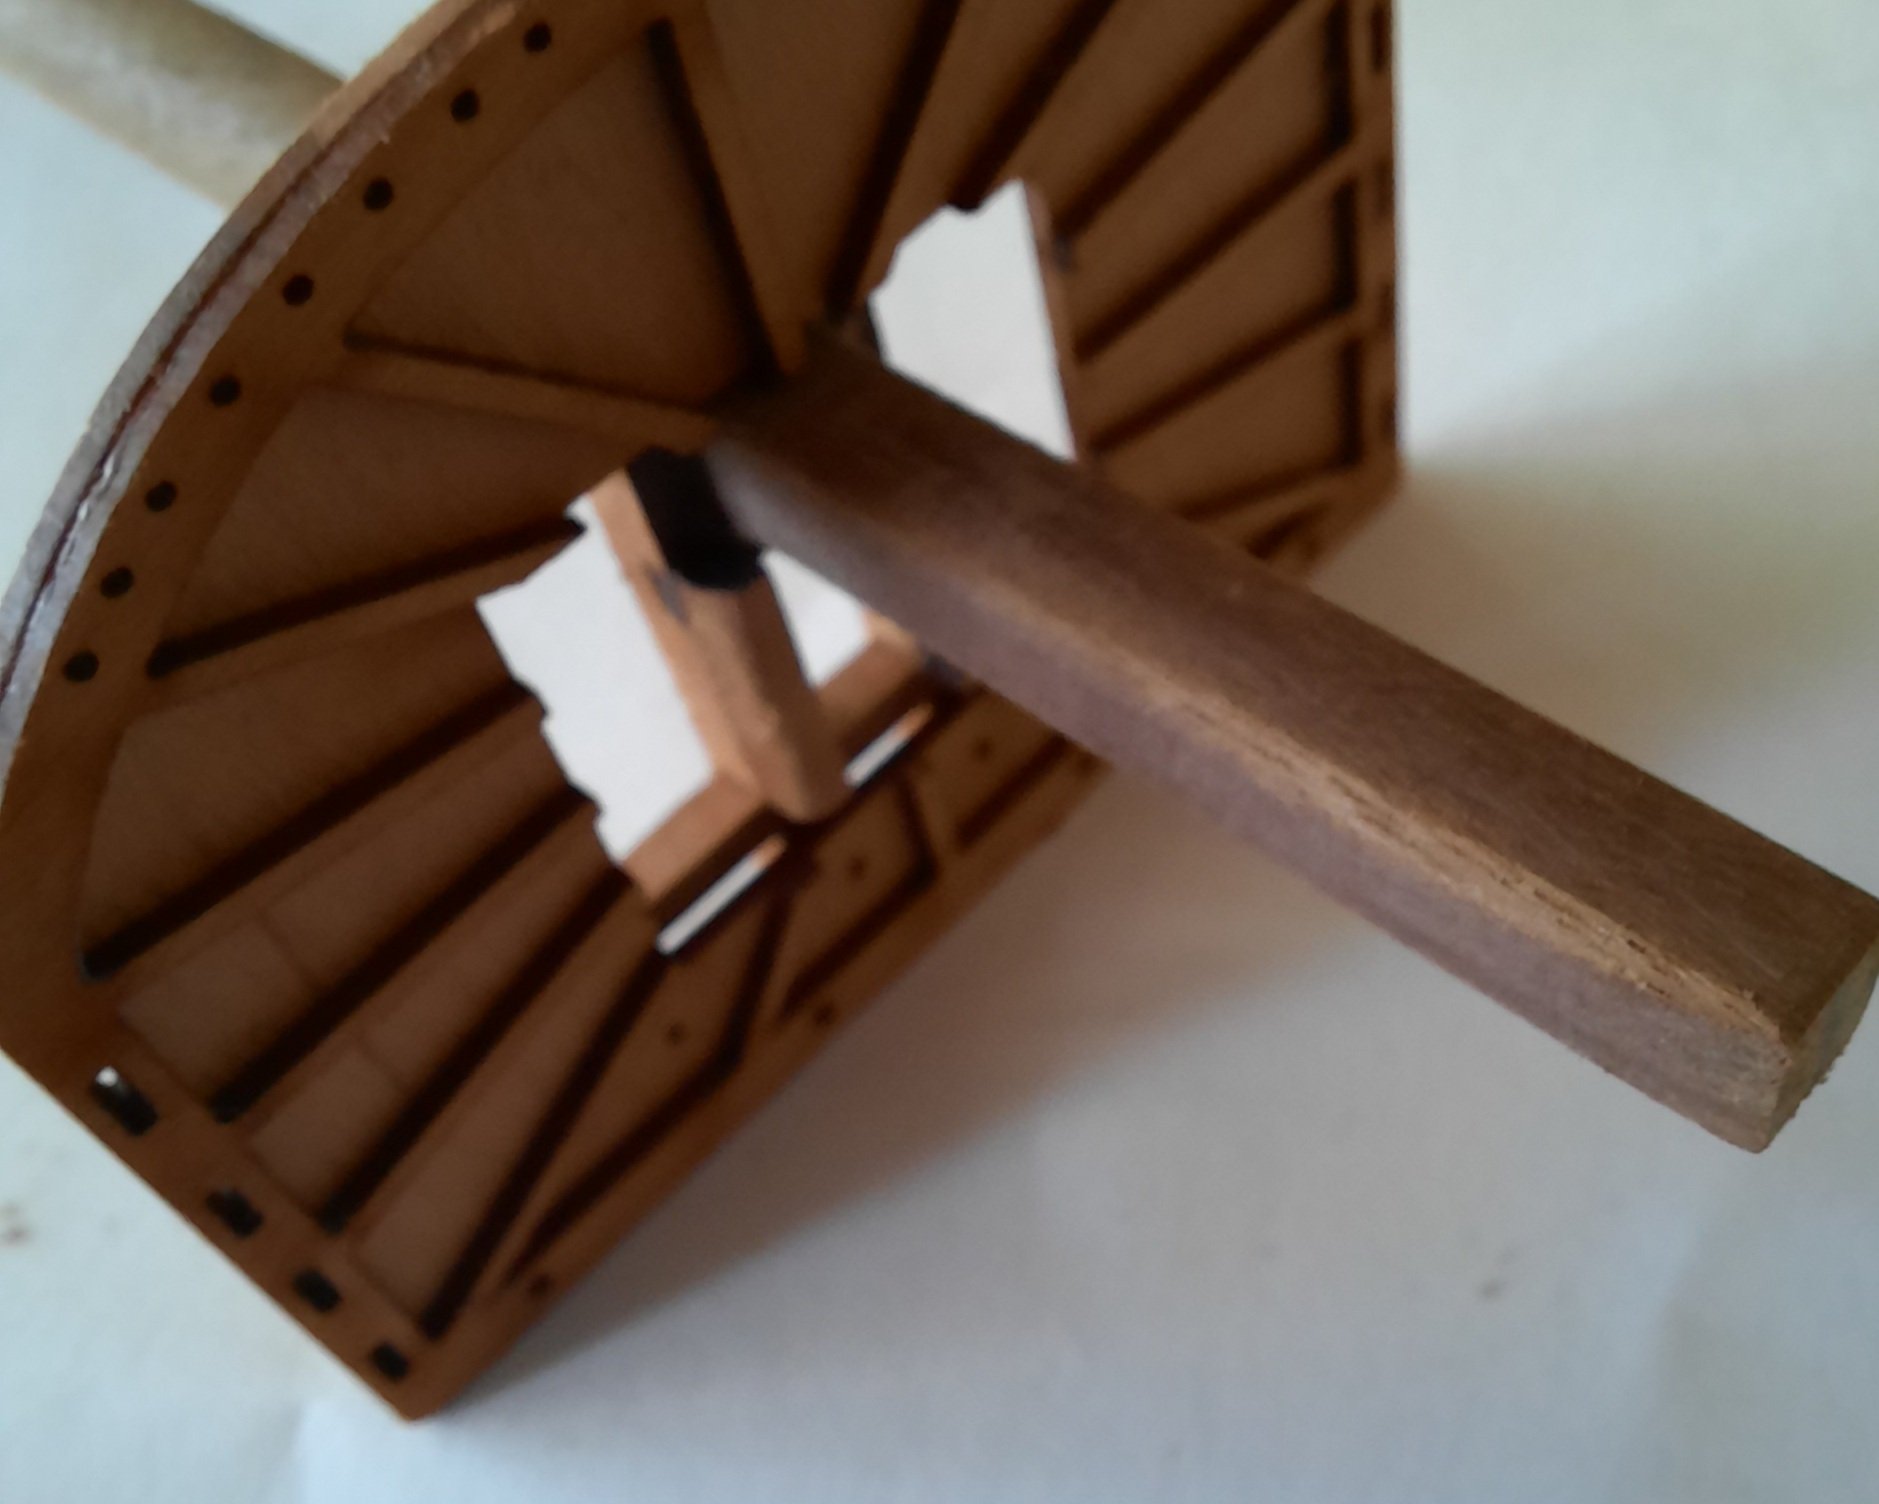
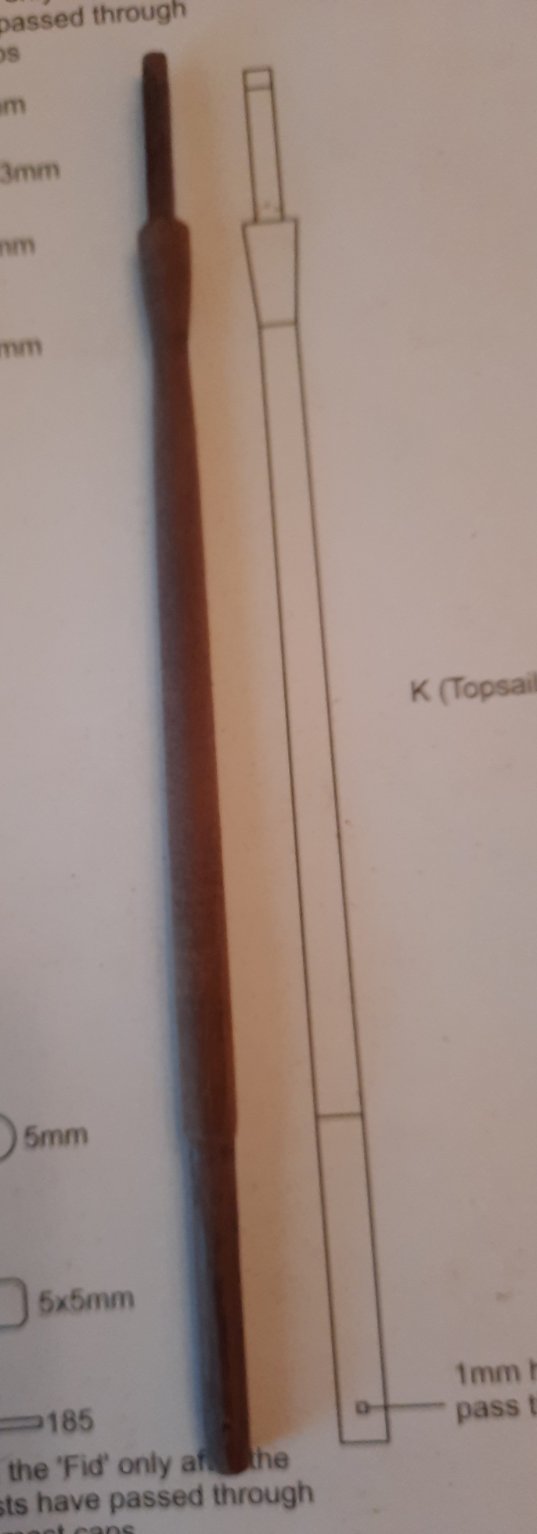
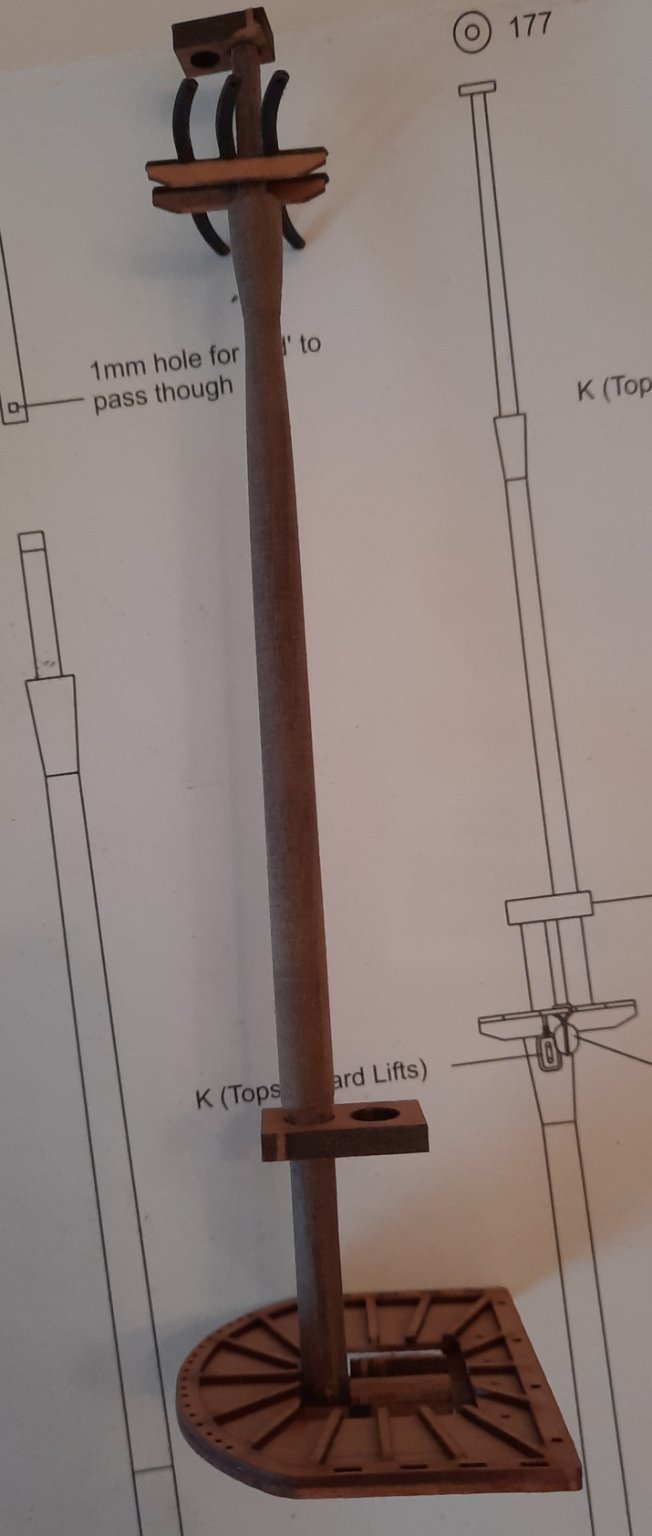
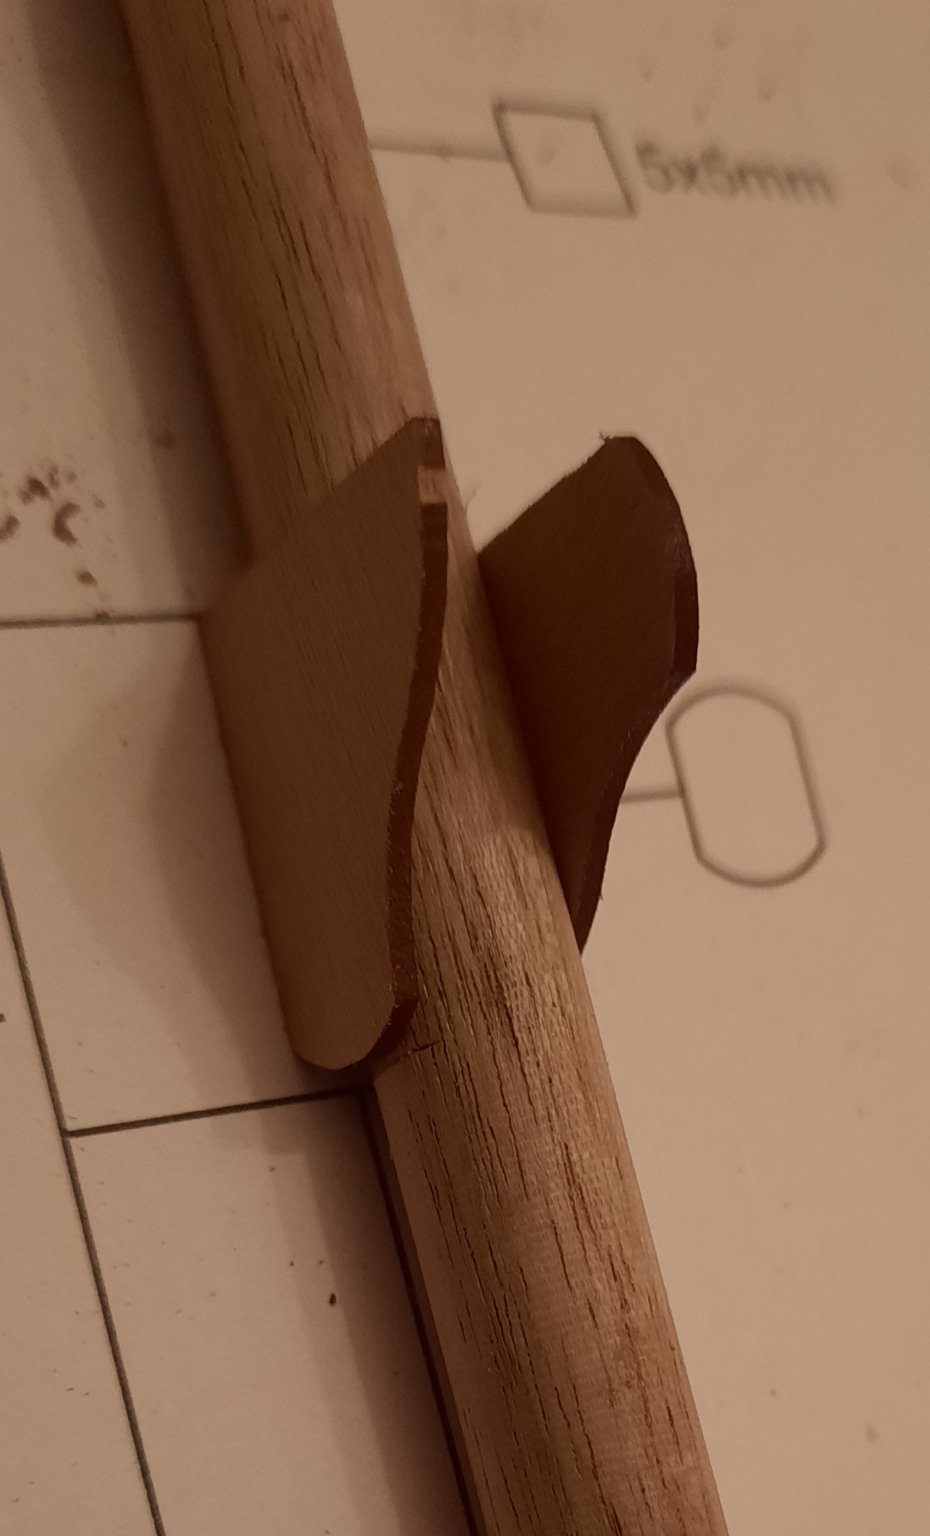
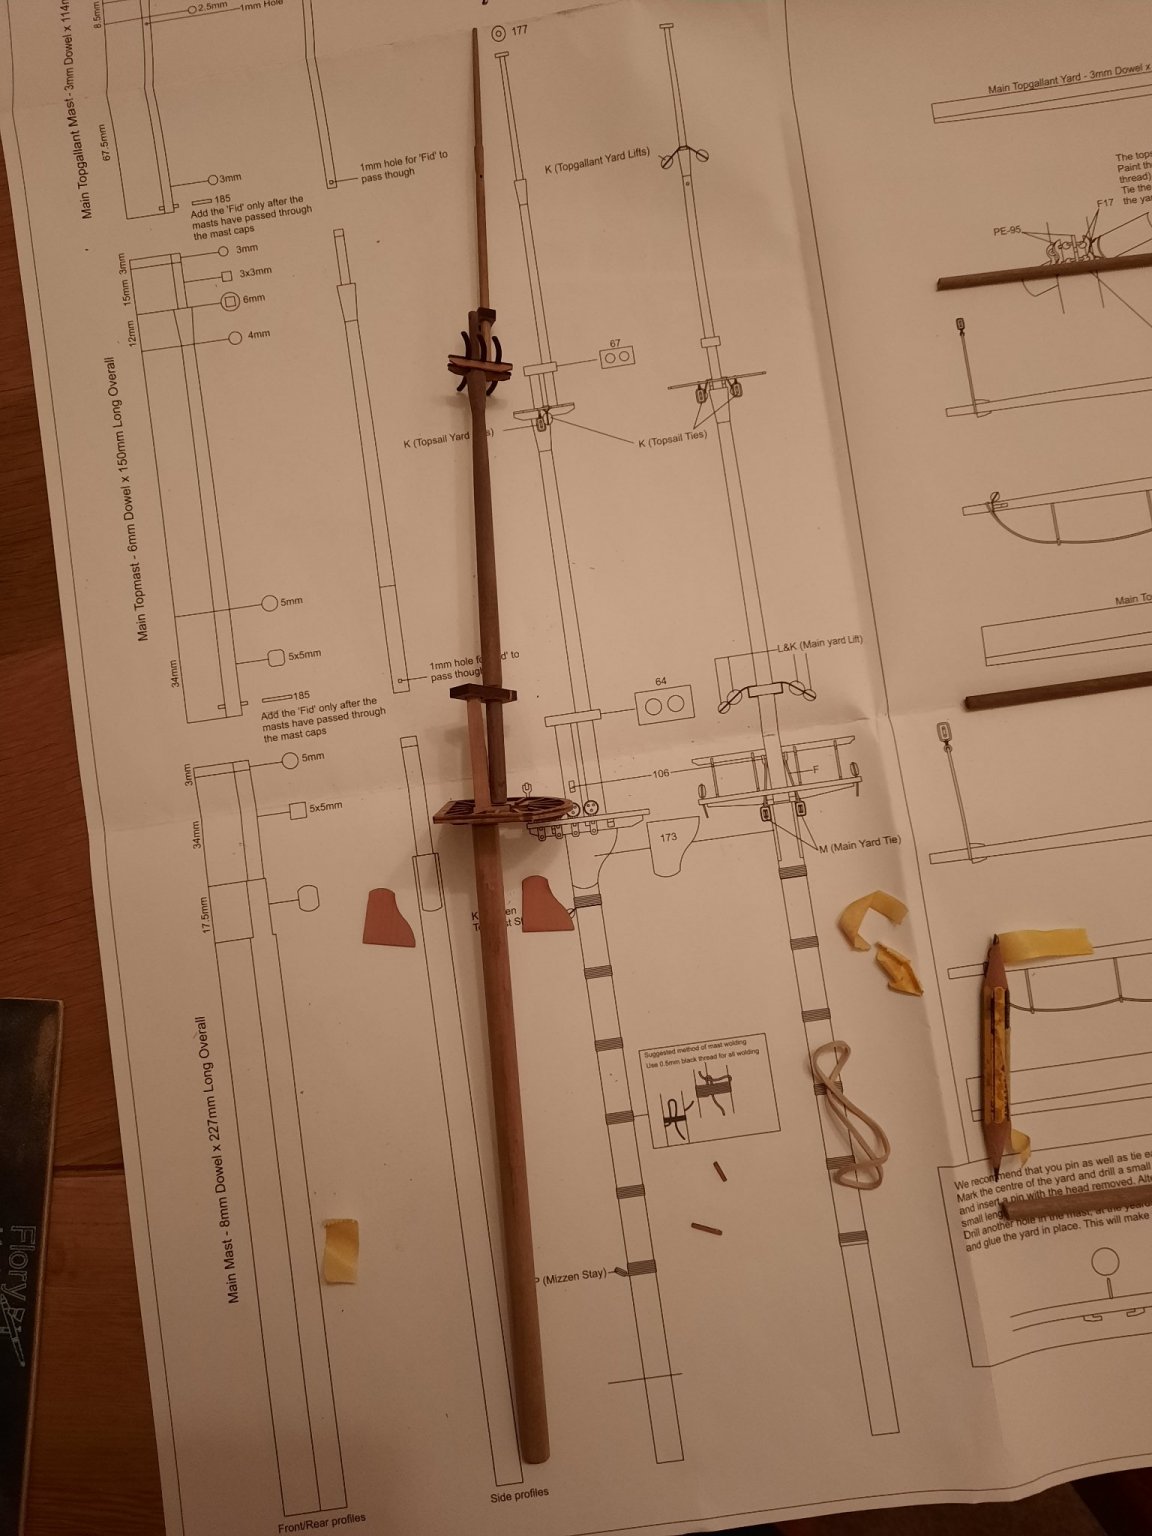
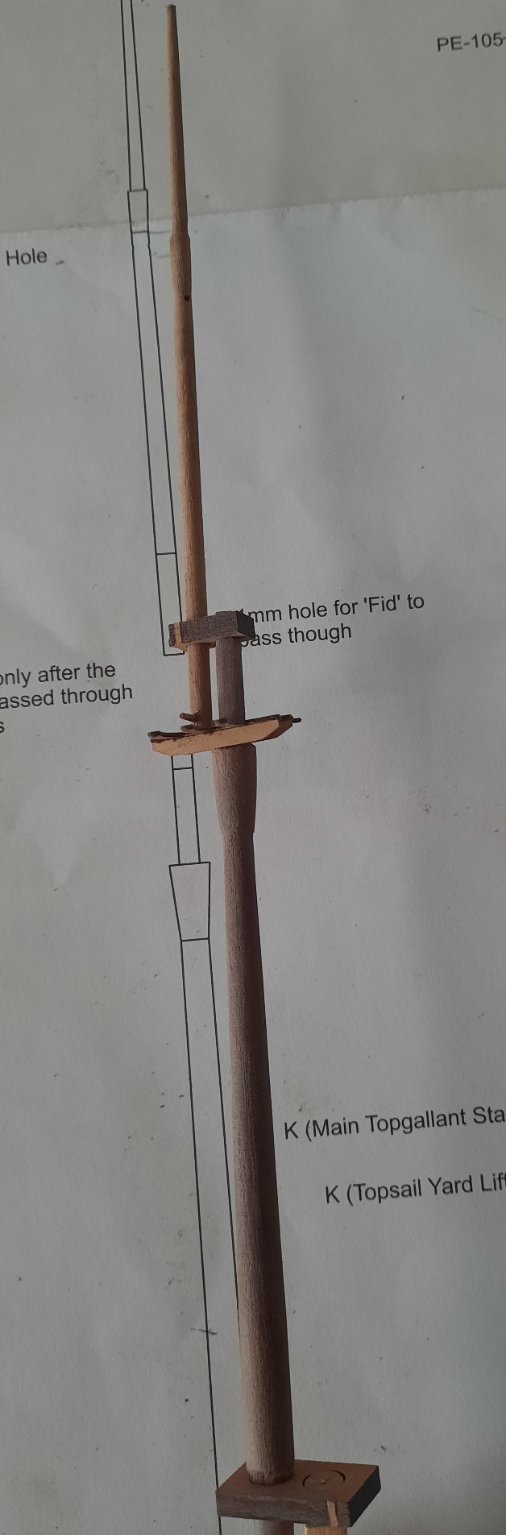
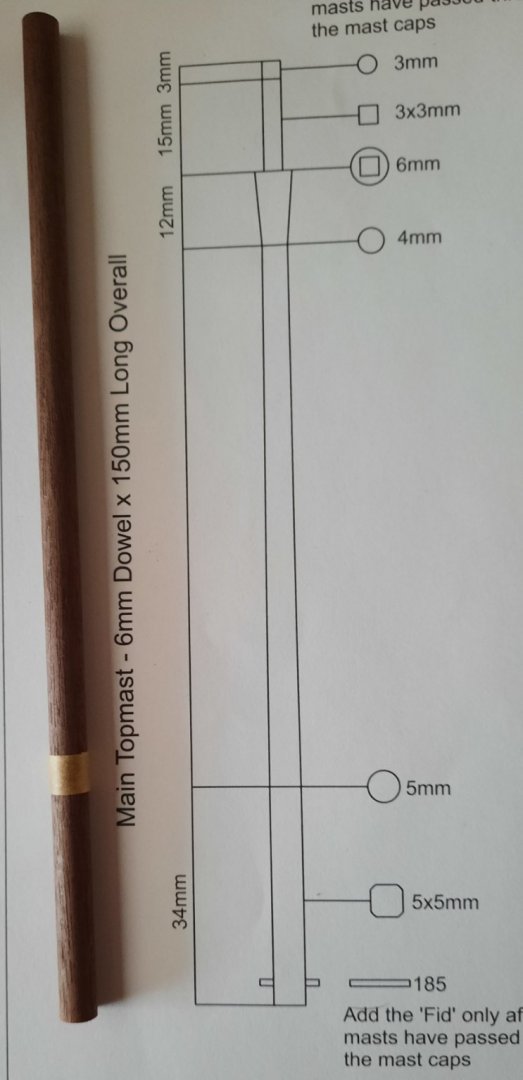
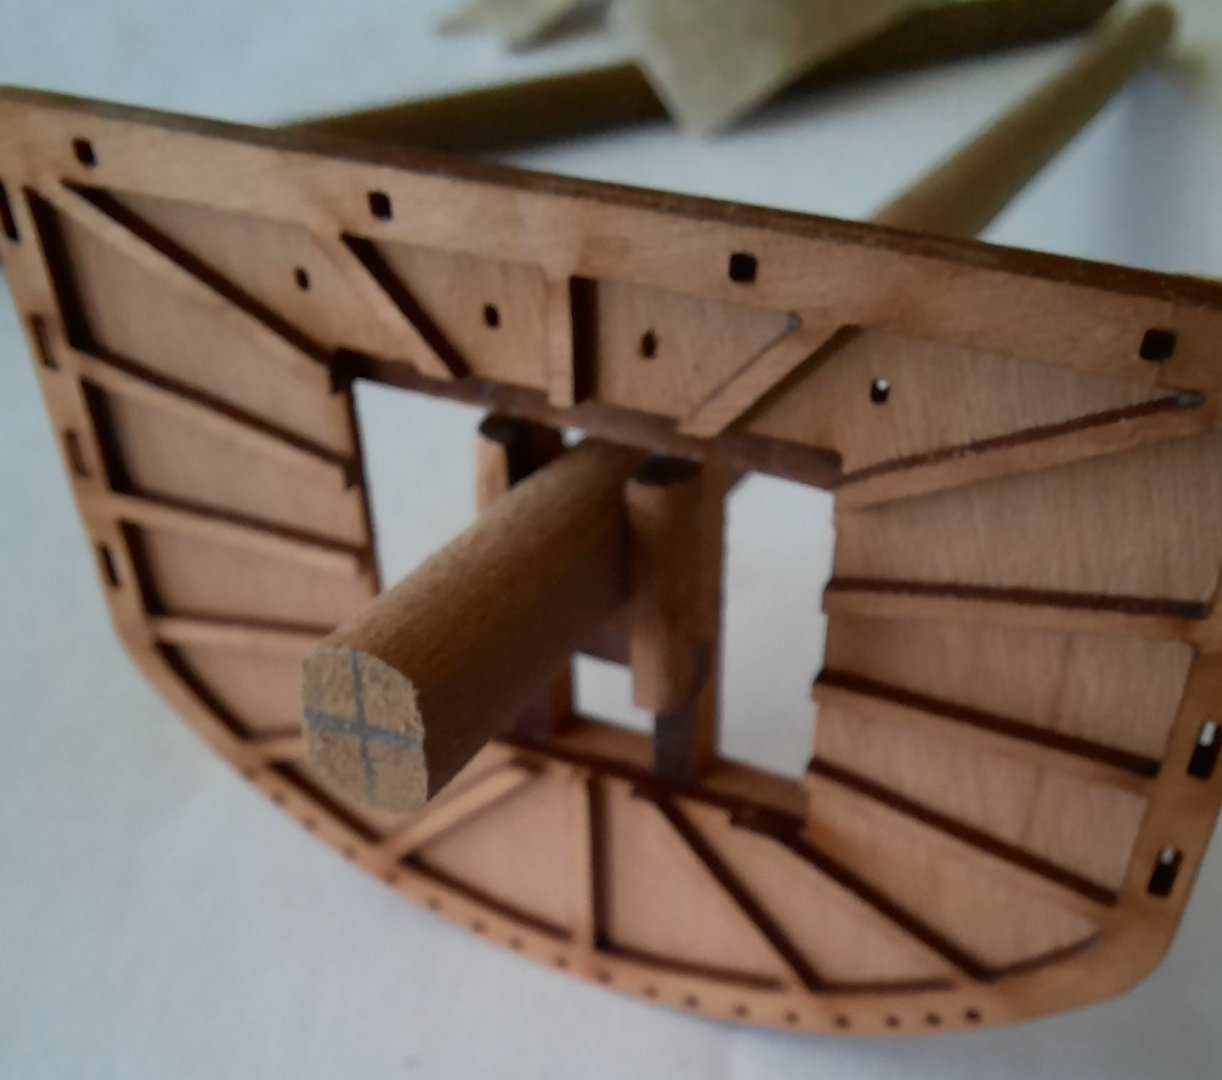
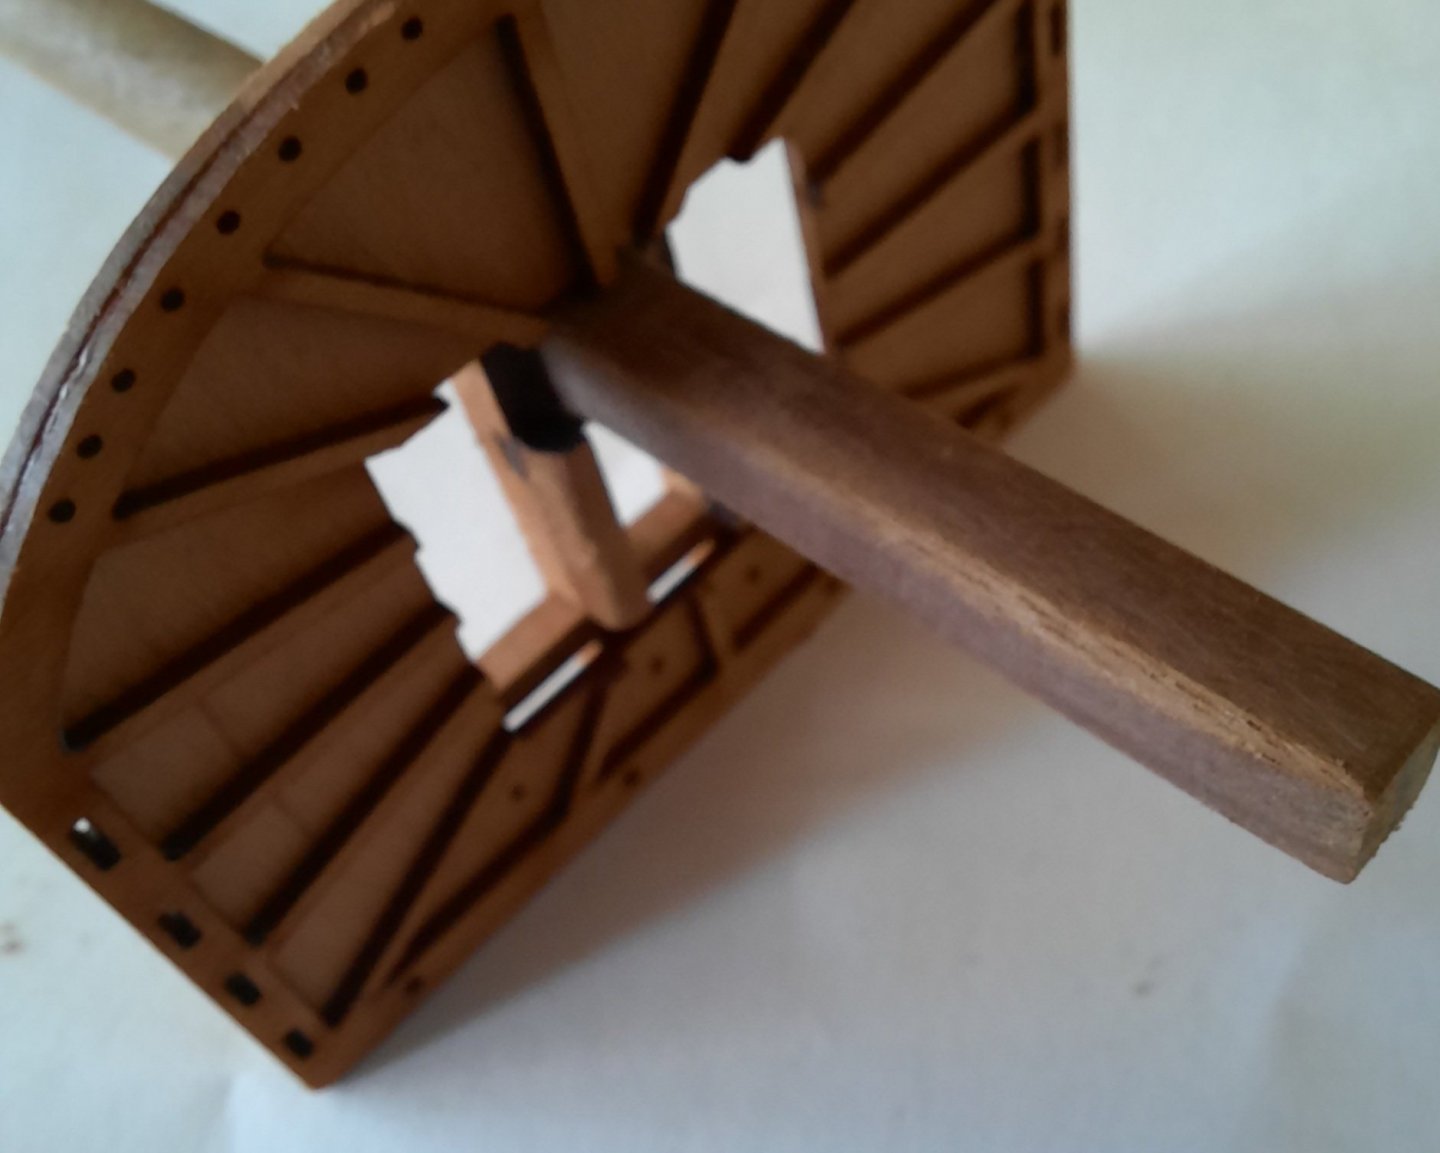
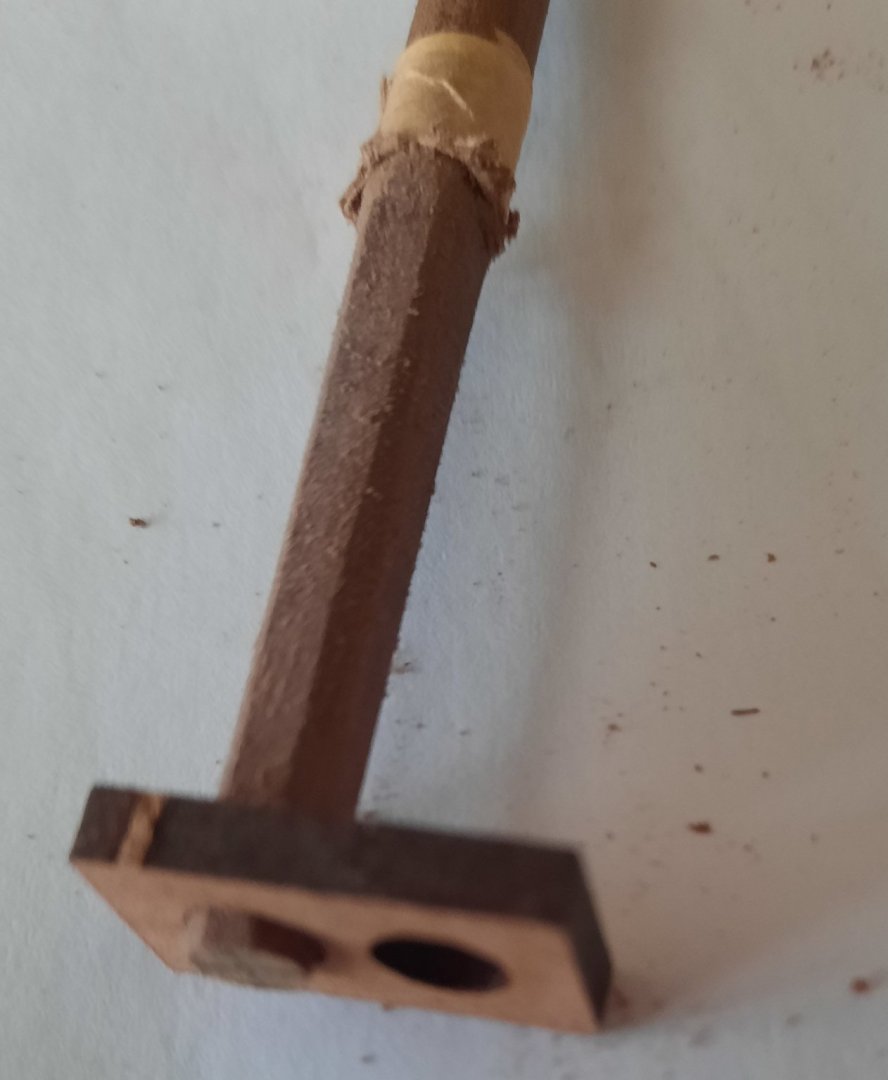
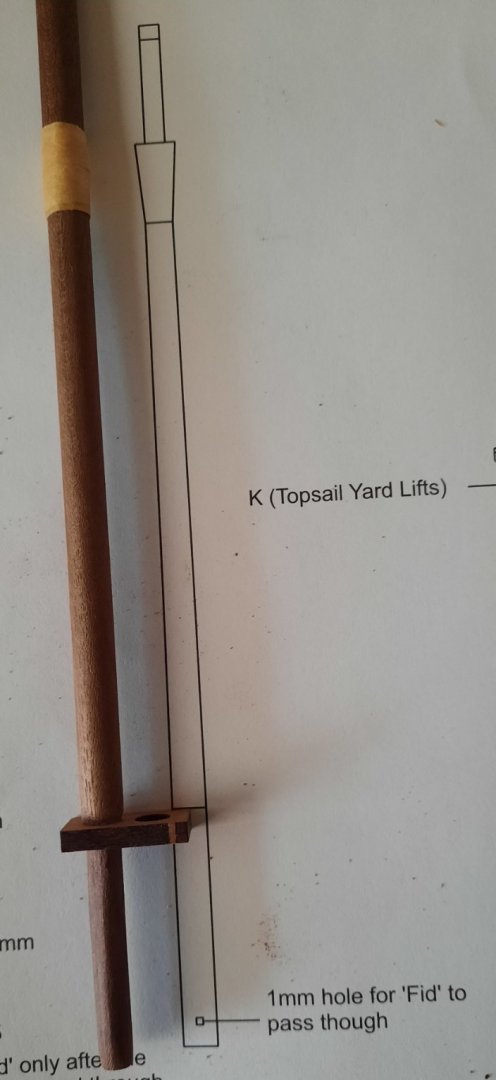
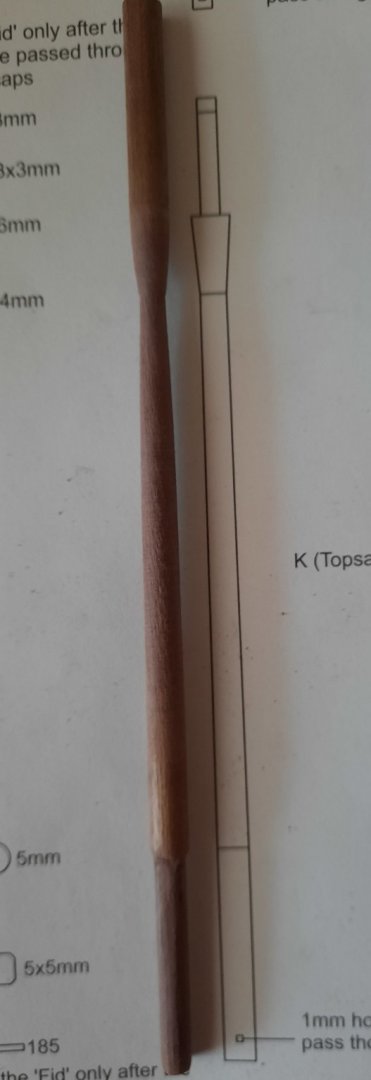
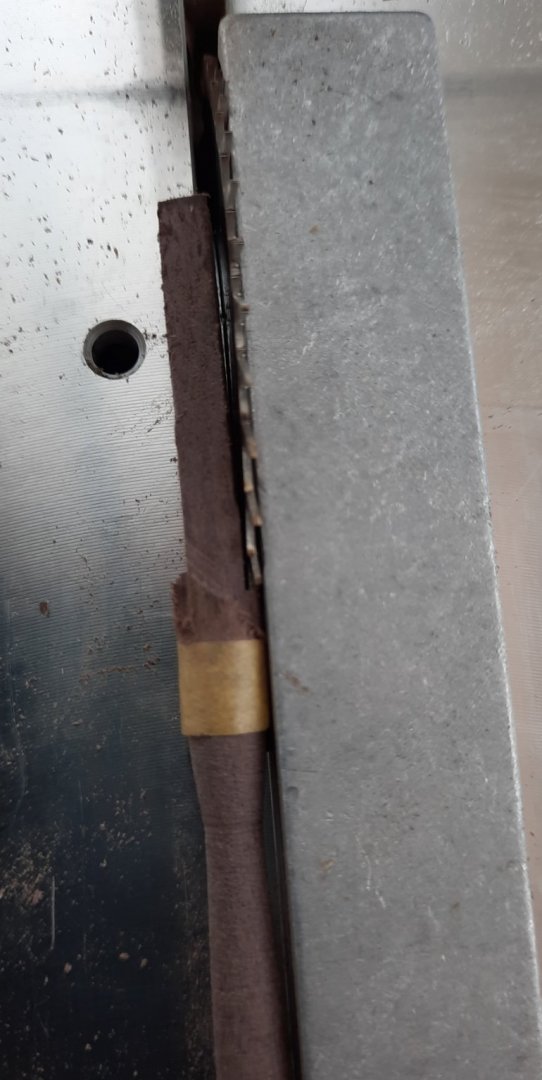
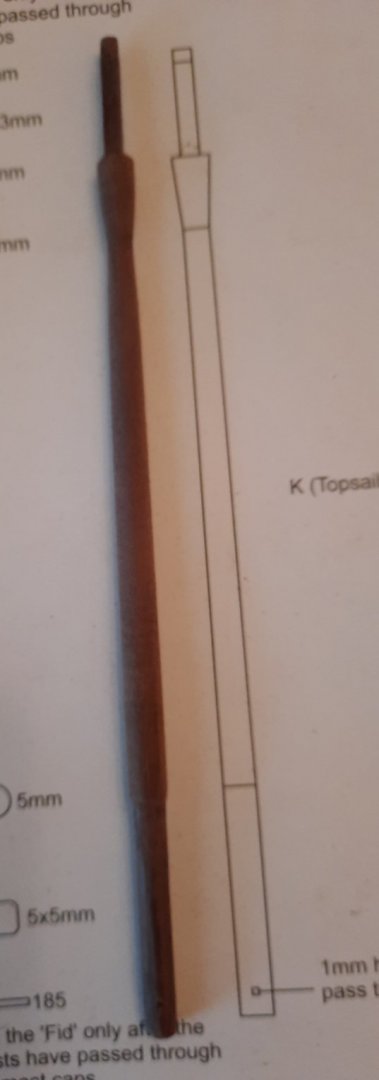
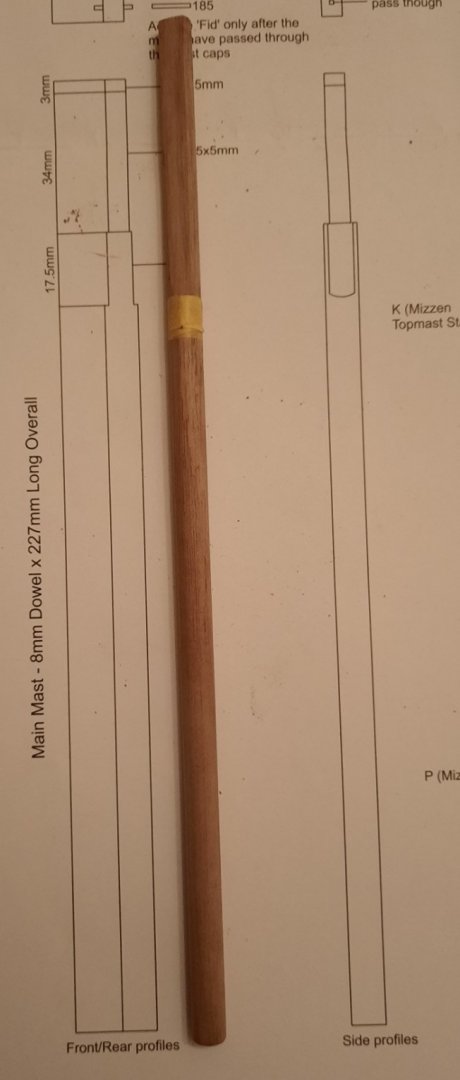
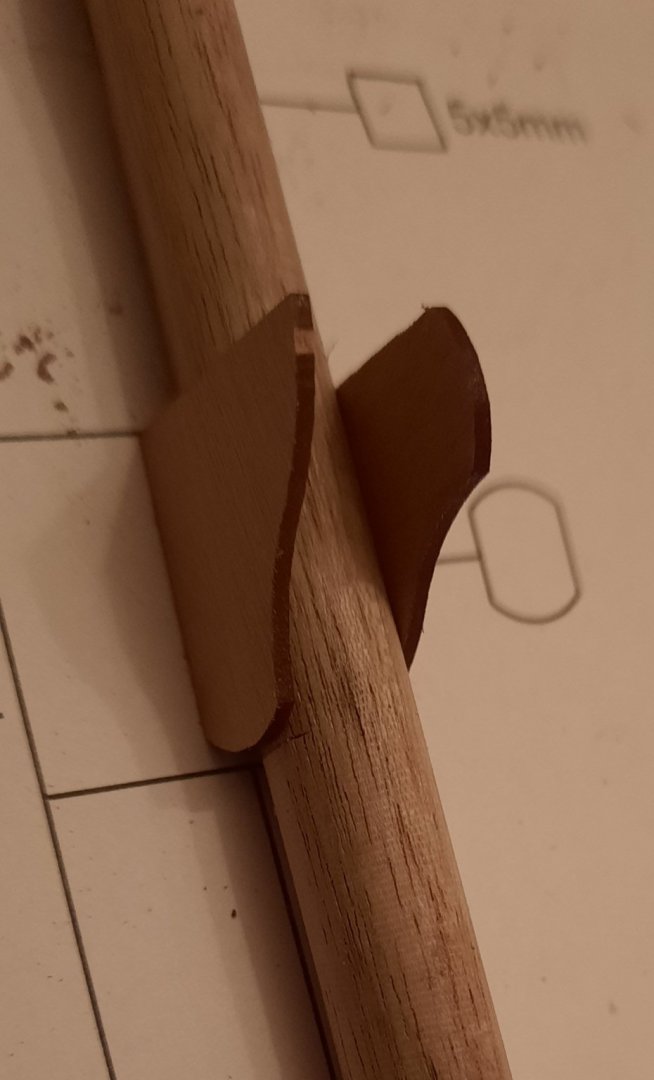
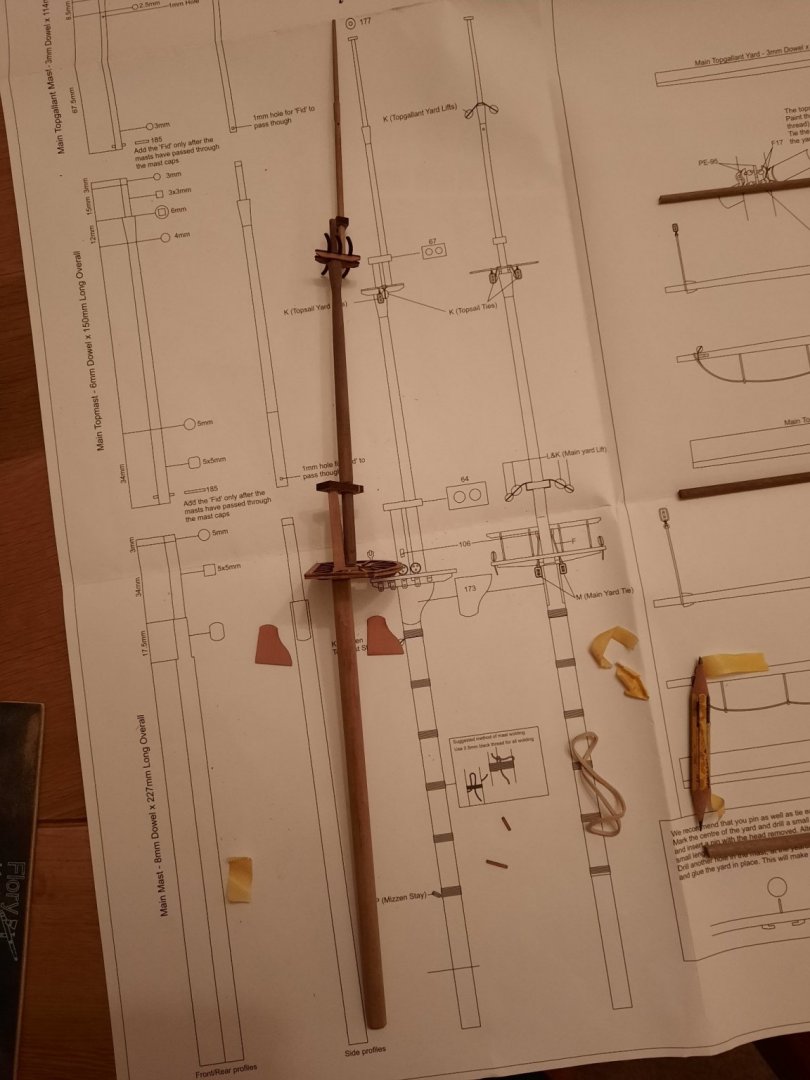
Following on my last post I thought some readers might find my methods interesting and perhaps even helpful. Therefore I have prepared a tutorial on how I shaped the masts. This may not be the best (or right) way to make make the masts. However it works very well for me and produces good results. Enjoy Main Mast This mast is made using an 8mm dowel. There are only two tasks required for shaping this mast. Main Mast Step 1 – Bibbs The two adjacent sides require flattening for the two mast bibbs which sit under and help support the platform assembly. I marked the bottom position of the bibbs on the dowel with tape. I also marked a vertical and horizontal line on the top of the down to ensure I had the correct alignment for cutting. I set the bench saw to its minimum cut and I made to adjacent cuts using a spare length of 8mm dowel. This confirmed the width of the two edges matched the plan drawing. I then repeated the process on the main mast dowel. I had to be careful with the bench saw as the cut is always longer underneath. A craft knife (with a new blade fitted) was used to trim and tidy the bench saw cut ends. Main Mast Step 2 - Making a 5mm x 5mm square end for the platform The bottom position of the 5mm square end was marked on the dowel with tape. The cut of the bench saw was adjusted slightly, and the dowel end was squared off. I used a craft knife to trim and tidy the bench saw cut ends. The square cut was a fraction oversize, so I used a sanding stick in conjunction with my craft knife (chisel mode) to remove the excess. I did continually check the fit and it did not take too long before the platform slid down the squared shaft to the bottom edge ridge. Main Top Mast This mast is made using an 6mm dowel. I find it better to work from the bottom of the mast to the top in a series of steps, as detailed below. Main Top Mast Step 1 – Making a 5mm x 5mm square end for the platform I started off by marking the end with a vertical and horizontal line which helps me with the square alignment. I also made 2 pencil marks 2.5mm either side of the centre line. I added tape to indicate where the square shaping finishes. Using a sanding stick in conjunction with a craft knife the excess wood was removed. I kept checking to see if the end would fit in the platform. It was necessary to use the oblong slot on the platform (where the main mast normally fits) for this. Not sliding all the way down the shaft, the vertical and horizontal lines are visible. After a bit more work the platform fits perfectly. Now for the senior moment, only the bottom end needs to fit in the platform, which is upside down in the picture. The fid prevents it sliding down. That said it does need to be that size as the cap does need to slide down the full squared length. I then repeated the process to remove the excess wood for the other two adjacent sides. As can be seen in the next photo the platform now fits nicely over the squared end. Again upside down platform. Main Top Mast Step 2 – Making a 5mm x 5mm square fit the end cap The end cap also needs to fit over the bottom end, but a 5mm x 5mm square end does not fit through the cap hole. The plan drawing shows the square edges are rounded. It was another case of filing and test fitting. Test fit, still more work required Although I thought the cap was correctly positioned, the bottom edge of the cap needs to match up with the line on the plan drawing. I discovered this when I did a test assembly with the main mast as can shown the final photo of this post. Main Top Mast Step 3 – Tapering The main mast requires a taper from the cap down to 4mm. The end of the taper was marked as shown in the previous photo. The dowel was placed in my bench lathe and taper was created using 100 grit sandpaper. I then moved the tape to the next position for the next short 4mm to 6mm taper section. The short taper was completed in the lathe, again using 100 grit sandpaper. Main Top Mast Step 4 – Making the 3mm by 3mm square end for top platform. The top platform requires a 3mm x 3mm square end. From a test I conducted using a spare piece of 6mm dowel I was able to use my bench saw to make the initial square end cuts. I took great care to ensure the saw blade did not cut pass the tape marker. I used a craft knife to trim the edges. The actual square end cut using the bench saw was a tad oversized (on purpose). It required a little bit of sanding to remove the excess. The top platform was regularly checked, during the sanding process, until the platform slid down the full length of the squared shaft. The end rounded off so the cap would fit. Finally, a 1 mm hole was drilled for the fid. The square edges were filled off the fid and test fitted. The test assembly of the top main mast, shown below, shows everything fitted together as per the plan drawings. Main Top Gallant Mast This mast is made using an 3mm dowel and is simply a repeat of the tapering process (step 3) used for the main top mast. The 1mm holes for the fid was drilled before the tapering. Final Assembly Check Checking the assembly with the plans Getting an idea of how it will look. The main top needs needs a bit more work as the bottom cap need to sit a bit higher, as the top mast does not locate with the bottom platform hole.


- 382 replies
-
- 6
-
-
- Vanguard Models
- Duchess of Kingston
- (and 1 more)
-
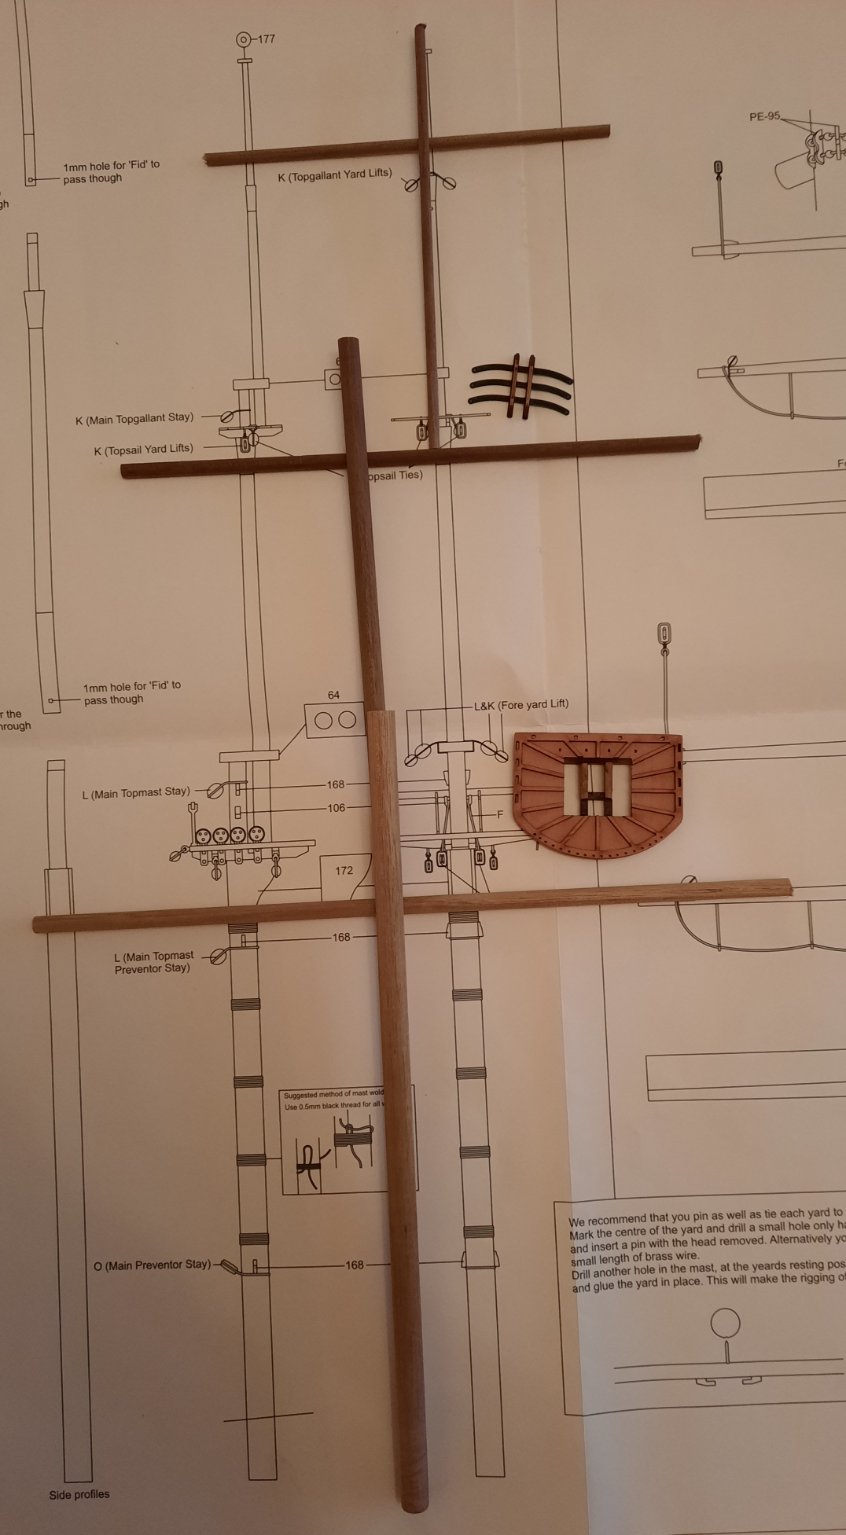
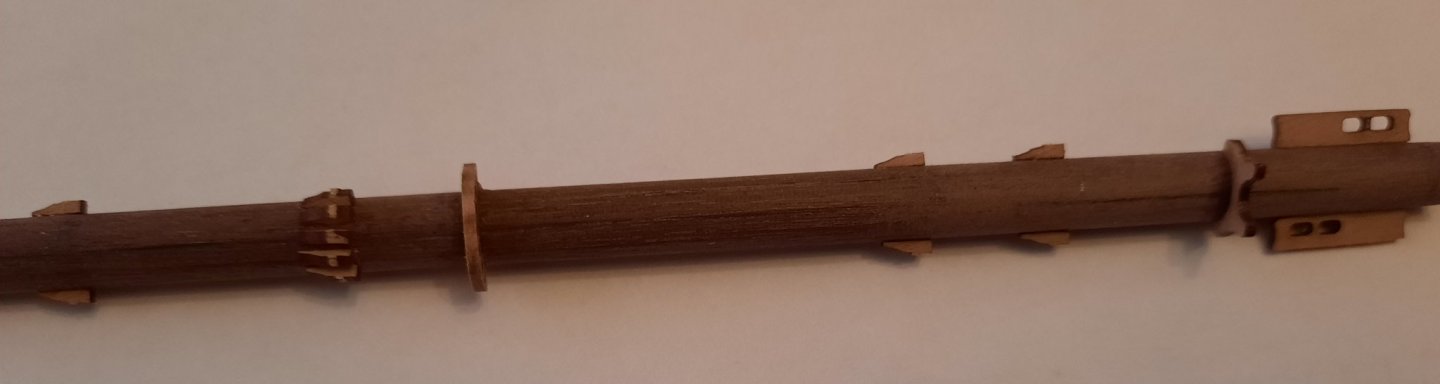
The new bench saw has been a god send. I used it to cut the angles on the bowsprit. The bowsprit required a taper over the final third so it would fit at the right angle with the end cap as can been seen in the photo below. It was a bit fiddly setting up the parts for the photo and I have just noticed a little bit of bow sprit can be seen poking out of the bottom of the forward end of the end cap. Work is now progressing well on the yard production. I started of by cutting all the yards and masts. I did slightly overcut each dowel to account for the holes required at one end when placed in the bench lathe for tapering. The spritsail and jibboom have already been shaped, as can be seen in the photo below. With the masts cut to size I made sure they all fitted which the did. Next I shaped the three parts of the foremast, checking that each part would locate in the platforms and caps as I went along. The 1mm holes were drilled for the fid's which were then test fitted. The fids did required a little bit of shaping in order to fit in the holes. Making sure I have all the masts, yards and platforms for the fore mast, the overcut lengths can be seen. Checking the fit of shaped masts. I drilled both the fid 1mm hole and the other 1mm hole in the top mast prior to starting the shaping. I did have to remake the top mast as I managed to snap the first one when I apply a bit to much pressure when sanding. The fore mast, with all parts dry fitted at this stage, added to the Duchess to get an idea of how it will look.


- 382 replies
-
- 13
-
-
- Vanguard Models
- Duchess of Kingston
- (and 1 more)
-
Great work, and looks very nice. The 4 offshot garland assembly really tested my patience and eyesight. You'll be building the masts and yards before long. All the dowels have be cut to length on my build. I have completed shaping the bowsprit, jibboom and spirtsail. I'm now working on the fore mast assembly.
-
Thanks Derek. Full steam ahead on all masts and yards. The proxxon bench saw has been a god send already.
- 382 replies
-
- 1
-
-
- Vanguard Models
- Duchess of Kingston
- (and 1 more)
-
Hi Rusty Great minds think alike or fools seldom differ.
- 382 replies
-
- 1
-
-
- Vanguard Models
- Duchess of Kingston
- (and 1 more)
-
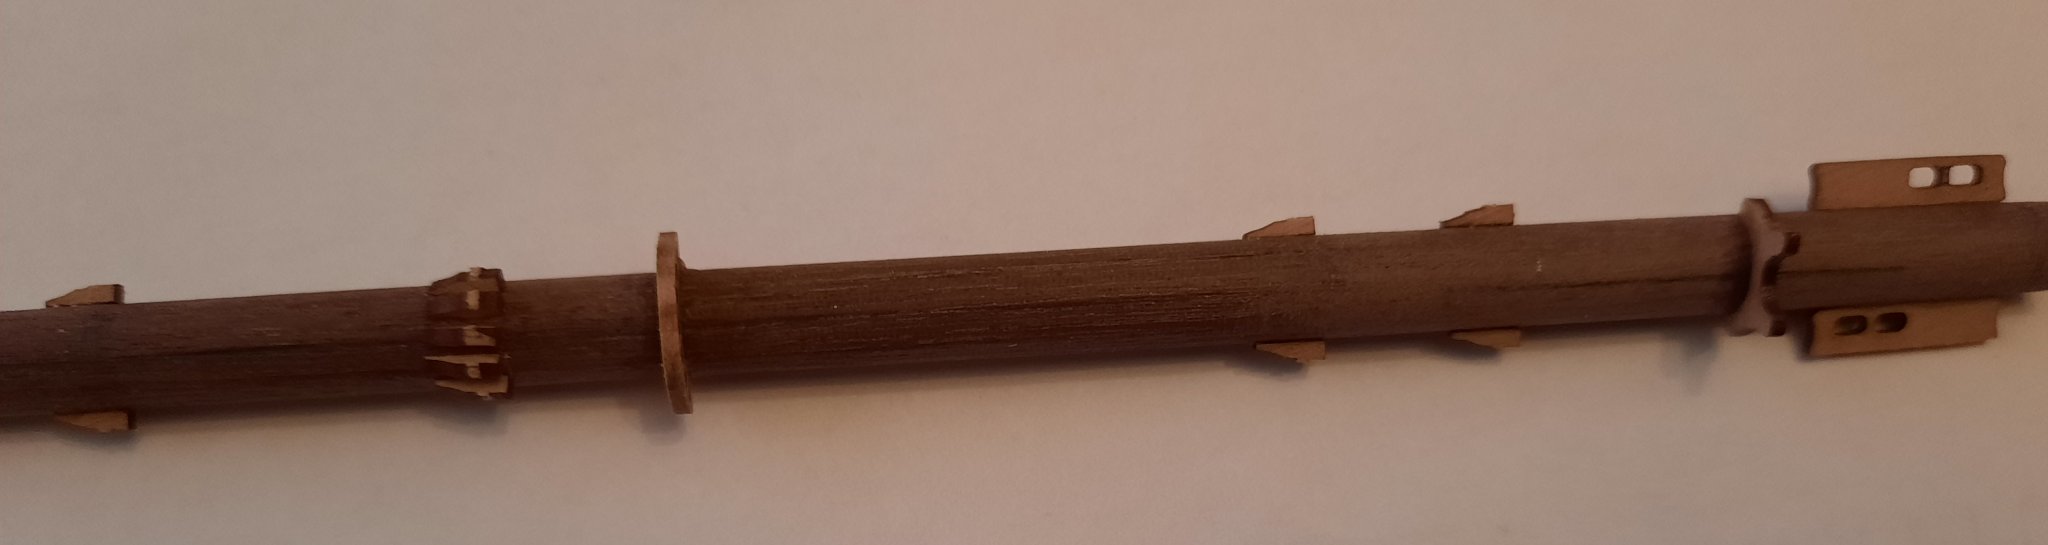
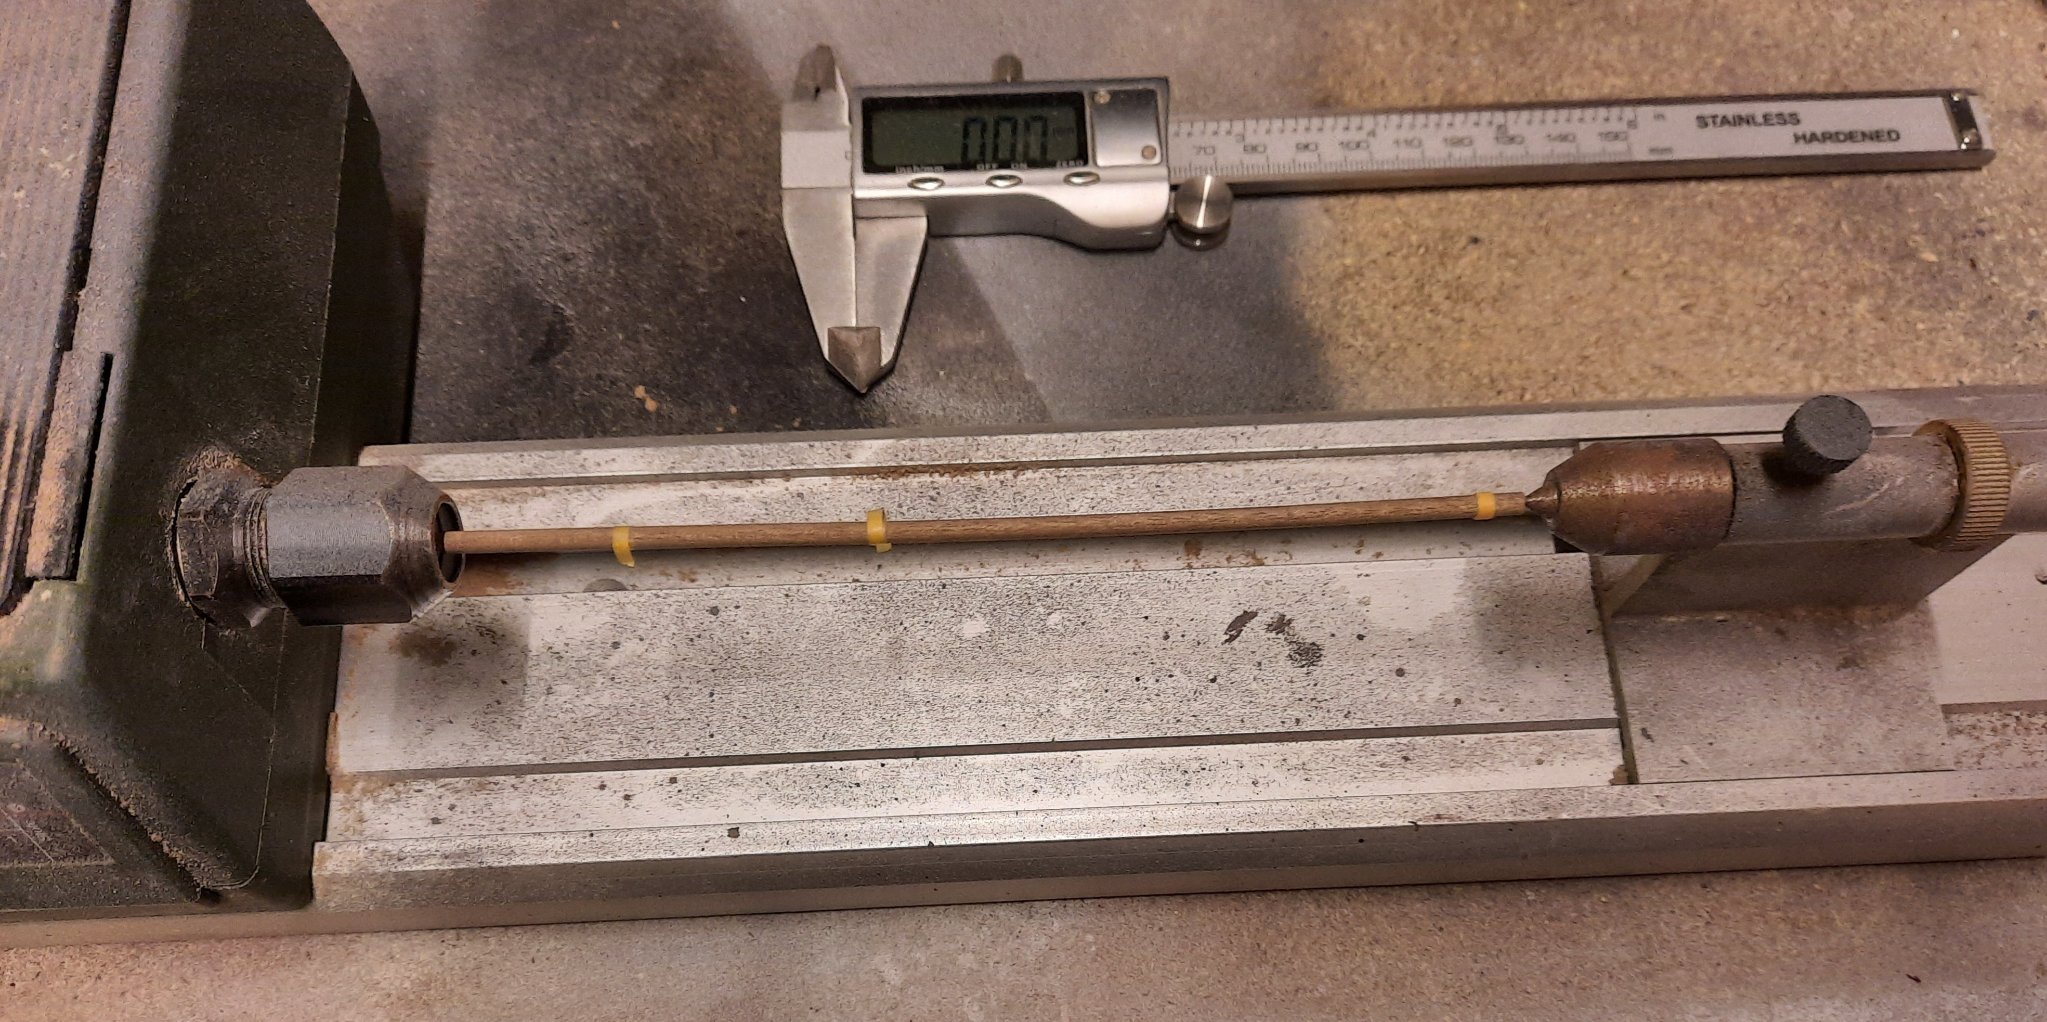
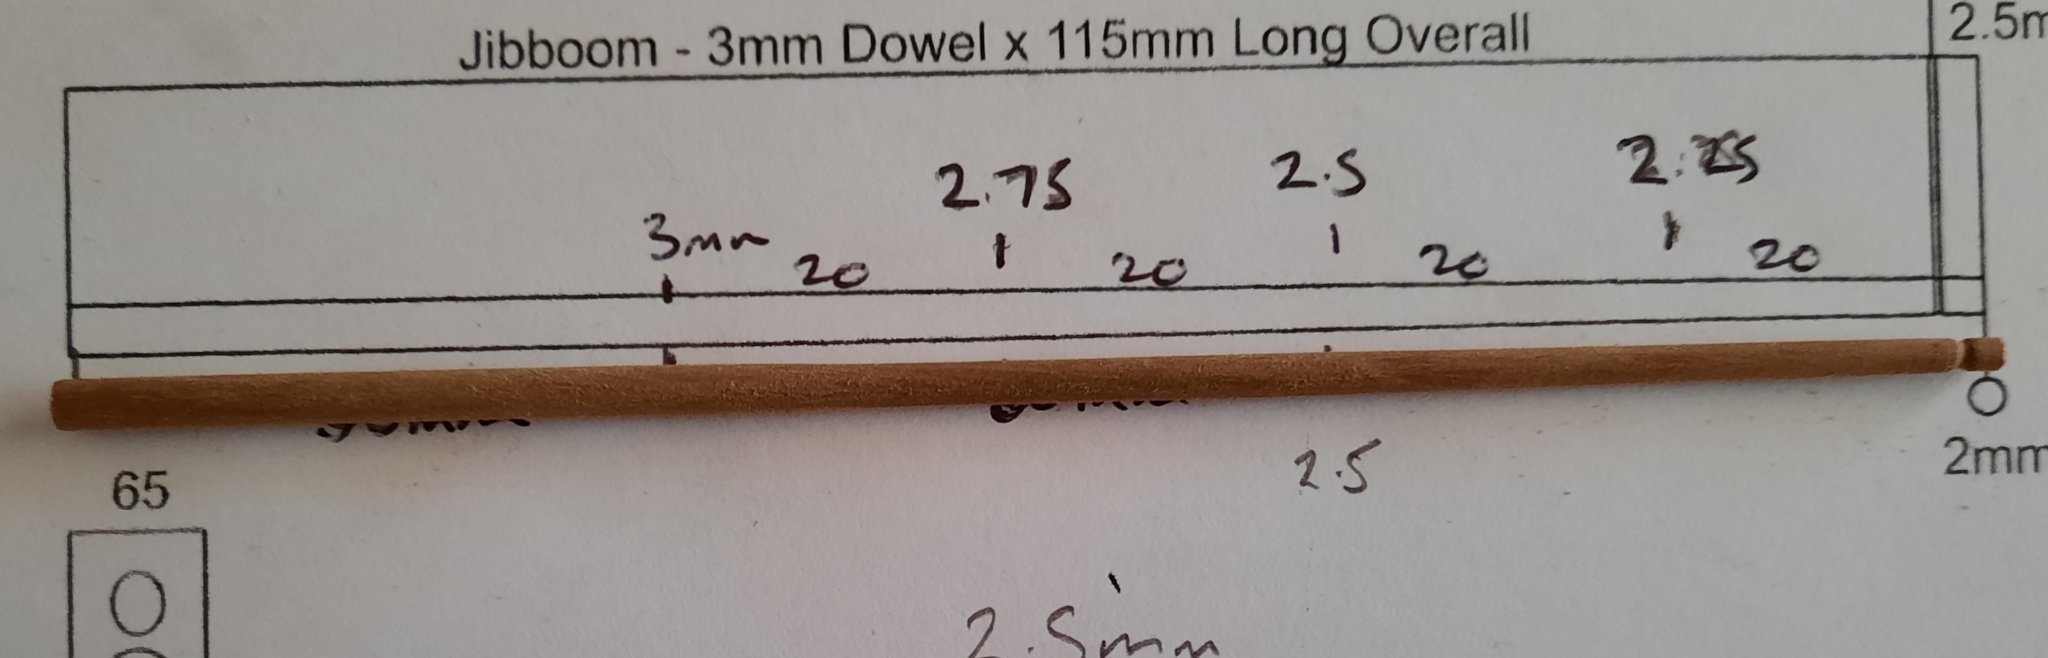
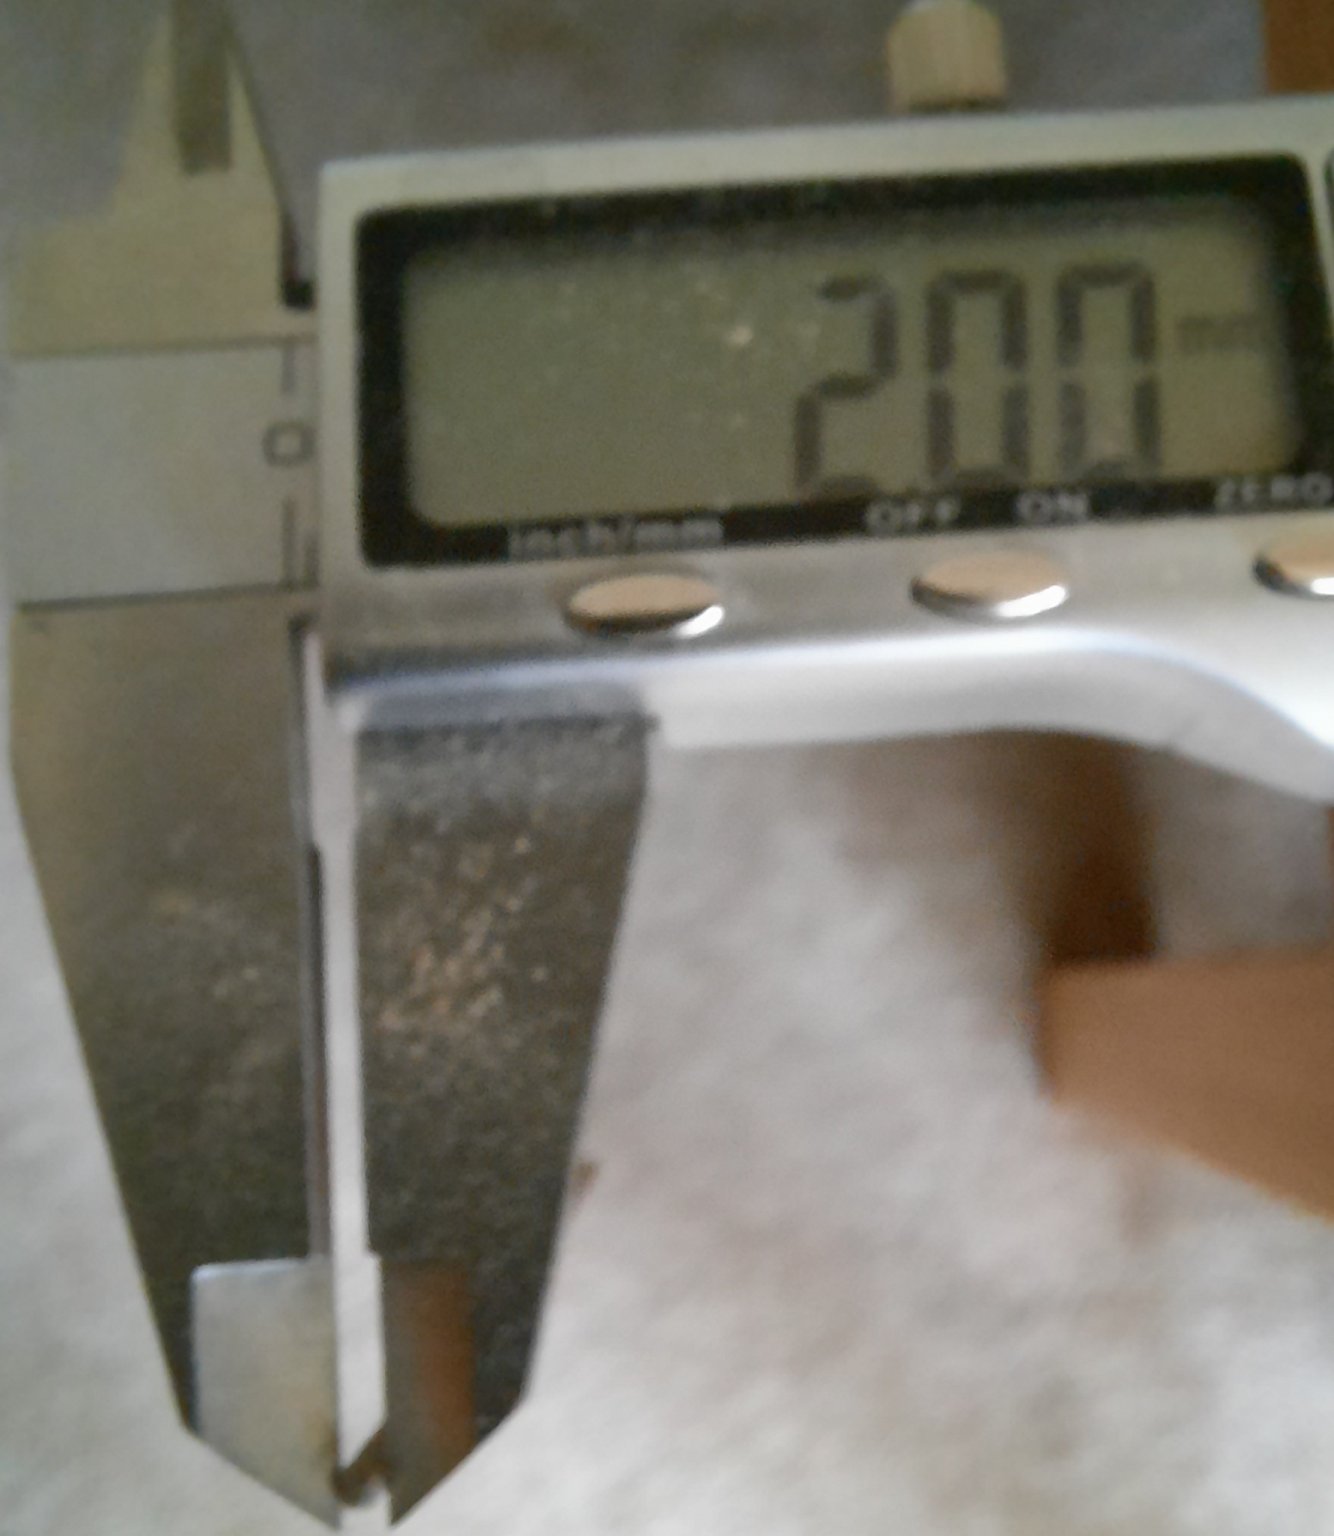
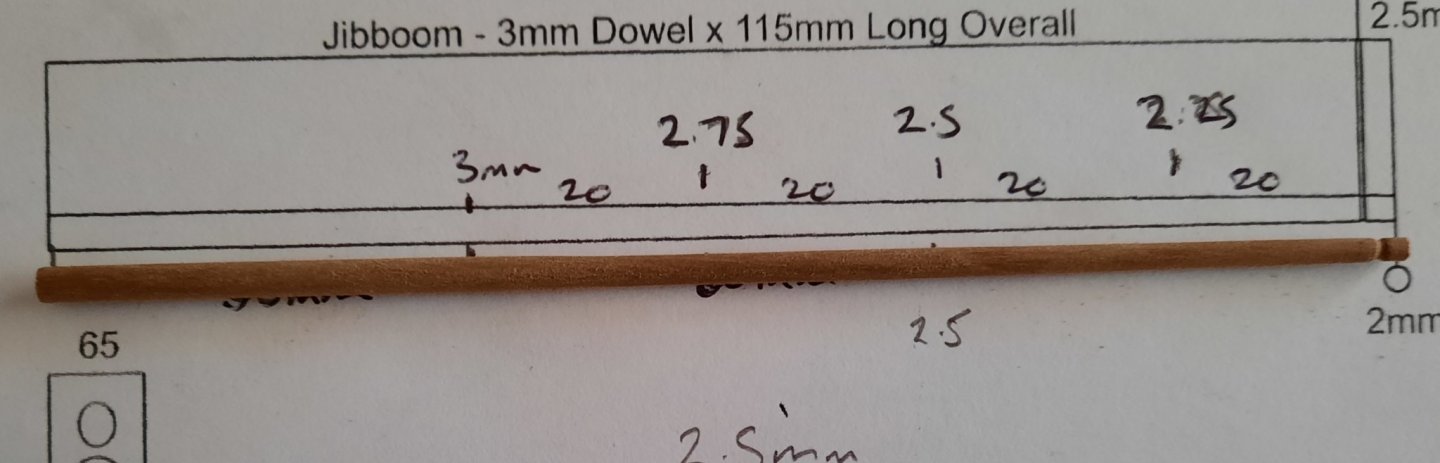
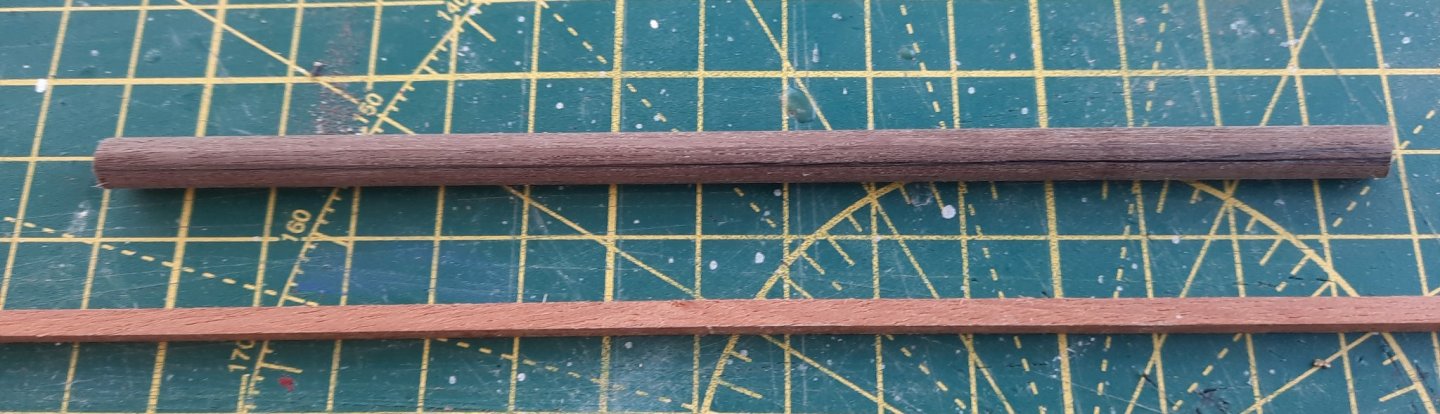
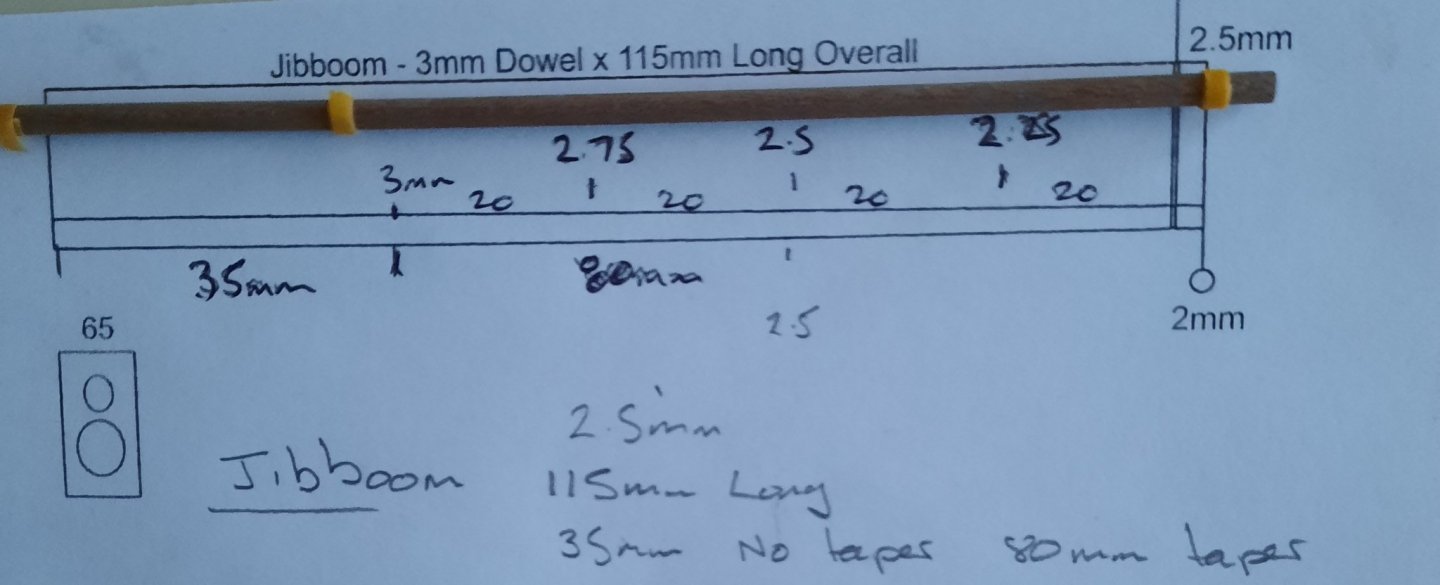
I have now started work on the masts and yards. My bench saw is out for delivery and is expected to arrive later this afternoon. I have started work on the bowsprit and jibboom. The bowsprit requires a 6mm dowel. In order to help aligning the various parts to be fitted I start with a centre line. I simply clamp a 3mm wood strip to the dowel and then I can draw a line along the entire length. As I will use the bench saw to make the angled end cuts I moved on to making the jibboom. This requires a 115mm long 3mm dowel which tapers to 2mm. I like to identify key points along the length. The first 35mm will not be tapered, so the 3mm to 2mm taper will be applied to the final 80mm. To get a good taper the diameter need to reduce by 0.25mm per 20mm. I have used some very thin tape to mark the dowel. I like to mark it slightly long The dowel was then placed in my lathe and tapered using sandpaper. I started with 100 grit and then reduced to 320 grit. It took me around 10 mins to get the required taper. I kept checking the taper at the 20, 40, 60 and 80mm points. There is a grove required near the end. I made this using a folded edge of sandpaper while the dowel was still in the lathe. The completed dowel was then given a light sand with a 800 grit sandpaper. The end result is a nice looking jibboom the matches the plan drawing I think I got this measurement pretty close!


- 382 replies
-
- 10
-
-
- Vanguard Models
- Duchess of Kingston
- (and 1 more)