


The Gimps Chimp
-
Posts
172 -
Joined
-
Last visited
1 Follower

Recent Profile Visitors
2,460 profile views


-
 The Gimps Chimp reacted to a post in a topic:
HMS Beagle by usedtosail - OcCre - 1:60
The Gimps Chimp reacted to a post in a topic:
HMS Beagle by usedtosail - OcCre - 1:60
-
 The Gimps Chimp reacted to a post in a topic:
HMS Beagle by vvvjames - OcCre - 1:60 - Second Build
The Gimps Chimp reacted to a post in a topic:
HMS Beagle by vvvjames - OcCre - 1:60 - Second Build
-
The Gimps Chimp reacted to a post in a topic:
Mary Rose by Baker - scale 1/50 - "Your Noblest Shippe"
-
The Gimps Chimp reacted to a post in a topic:
HMS Victory 1805 by kiwiron - Caldercraft - 1:72
-
The Gimps Chimp reacted to a post in a topic:
HMS Victory 1805 by kiwiron - Caldercraft - 1:72
-
The Gimps Chimp reacted to a post in a topic:
Mary Rose by Baker - scale 1/50 - "Your Noblest Shippe"
-
The Gimps Chimp reacted to a post in a topic:
HMS Beagle by Tecko - OcCre - 1:60
-
The Gimps Chimp reacted to a post in a topic:
HMS Beagle by Tecko - OcCre - 1:60
-
The Gimps Chimp reacted to a post in a topic:
HMS Beagle by usedtosail - OcCre - 1:60
-
The Gimps Chimp reacted to a post in a topic:
Mary Rose by Baker - scale 1/50 - "Your Noblest Shippe"
-
vvvjames reacted to a post in a topic:
HMS Granado 1742 by The Gimps Chimp - Caldercraft - 1:64
-
vvvjames reacted to a post in a topic:
HMS Granado 1742 by The Gimps Chimp - Caldercraft - 1:64
-
Tecko reacted to a post in a topic:
HMS Beagle by Tecko - OcCre - 1:60
-
vvvjames reacted to a post in a topic:
HMS Beagle by Tecko - OcCre - 1:60
-
 Hi Peter, Looking at ATOS for the Beagle and making a crude on-screen measurment, it looks to me that the doors are approx 4' 9" high and 1' 9" wide. So very small by todays standards, but maybe not quite as small as the OcOre kit. Geoff
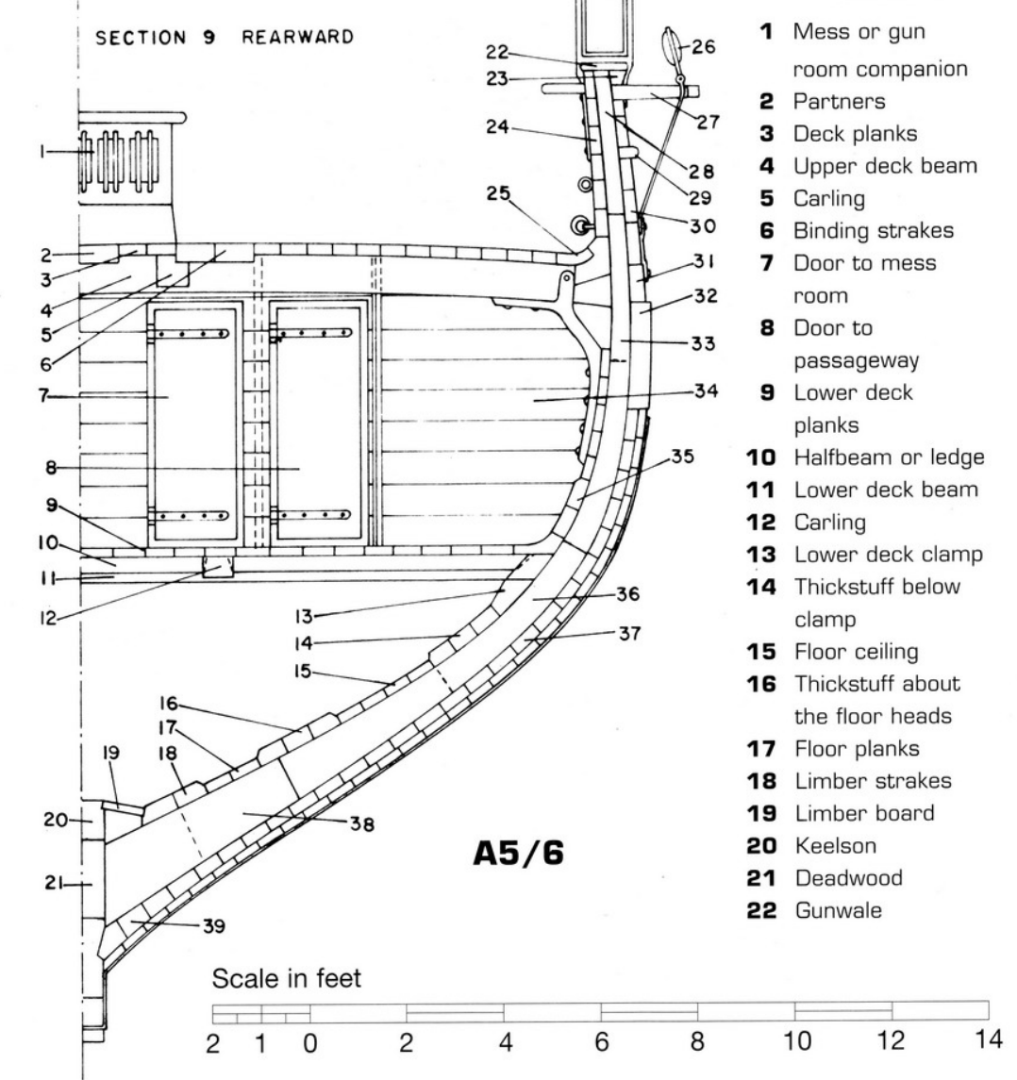
-
Baker reacted to a post in a topic:
HMS Granado 1742 by The Gimps Chimp - Caldercraft - 1:64
-
Nirvana reacted to a post in a topic:
HMS Beagle by Tecko - OcCre - 1:60
-
vvvjames reacted to a post in a topic:
HMS Beagle by Tecko - OcCre - 1:60
-
Hi Peter, You are making a fantastic job of those skylights. Can't wait to see what effect the lighting will have on the completed model. Geoff
-
GrandpaPhil reacted to a post in a topic:
HMS Granado 1742 by The Gimps Chimp - Caldercraft - 1:64
-
Ryland Craze reacted to a post in a topic:
HMS Granado 1742 by The Gimps Chimp - Caldercraft - 1:64
-
AJohnson reacted to a post in a topic:
HMS Granado 1742 by The Gimps Chimp - Caldercraft - 1:64
-
Two steps forward, one step back.... Progress has been a little slow but I'm still moving in the right direction, just. I've bent and fitted the gunport patterns to the bulkheads as per the instructions, no issues there. The only point of note is that the instructions make a point of stressing that the gunport patterns should only be trimmed at the stern end. I found that I needed to take some material from the bow end otherwise the notch in the gunport patterns which should sit on bulkhead 7 wouldn't sit at the correct location. Even after taking some material off the bow end the notch was still sitting towards the stern (see photo below): The first planking has now started and will probably take me a couple of weeks to complete at the rate I work One word of warning is that the bowsprit step (part 72) which is fitted into bulkhead 1 is very susceptible to damage. I snapped it off when fitting the gunport patterns whilst fitting a clamp. The clamp was supposed to be sat on bulkhead 1 and the bow. Unfortunately the clamp rose up the bulkhead and moved to the bowsprit step. As I tensioned the clamp the bowsprit step obviously couldn't take the force and snapped. However, it was quite easy to fix and repaired well. Unfortunately the same thing happed again when I was fitting the first plank. I couldn't believe how stupid I had been. So now I'm not going to repair it the second time until all the planking and sanding is finished. Geoff
.jpg.aa3aedd1a8c7f2b1b84719cd13aeebf6.jpg)
.jpg.f1d771e4356e757c14a84547c9b0462a.jpg)
.jpg.54e2cf32ea98ff1b30400adc4ff3a93f.jpg)
.jpg.3e0f9984c39fdde186ab06a585cefc91.jpg)
-
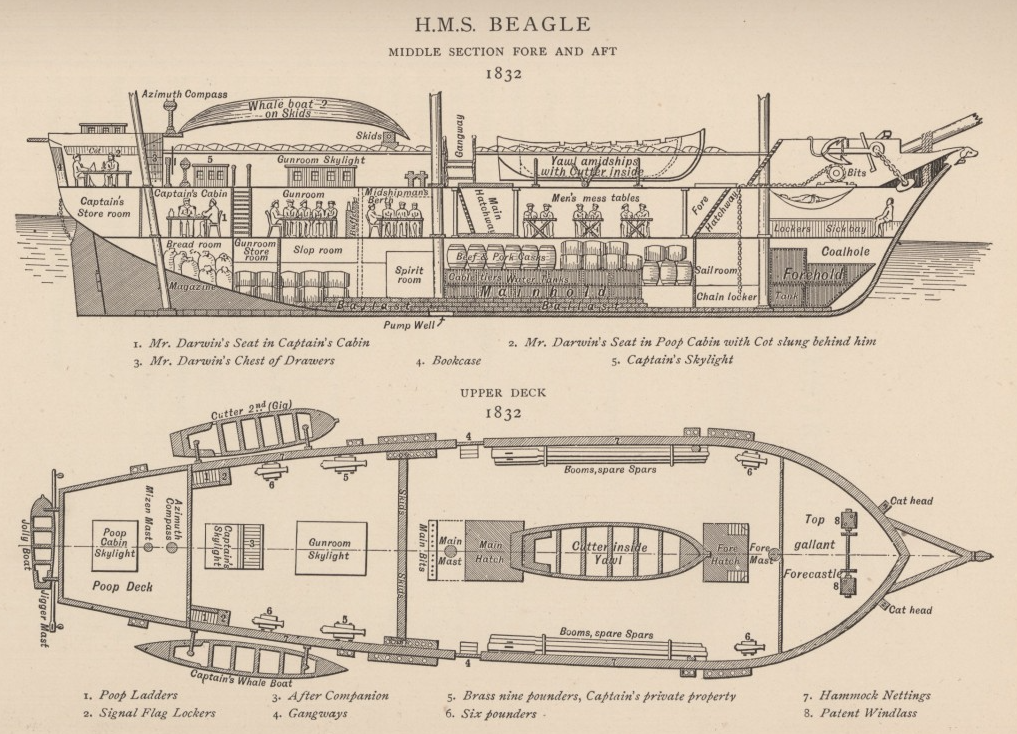
Hi 'Maid of the Mist' Your build is looking great and of high quality! The 'small deck huts' are actually skylights for the rooms below. Here is a diagram showing the Beagle: Keep up the excellent work. Geoff
-
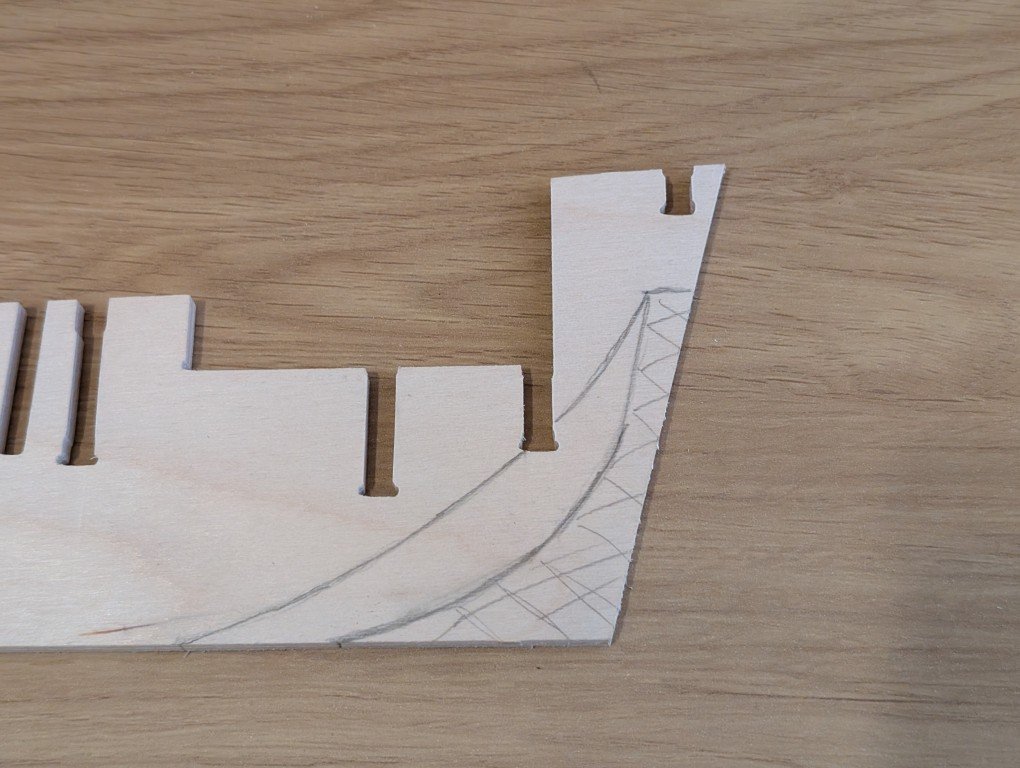
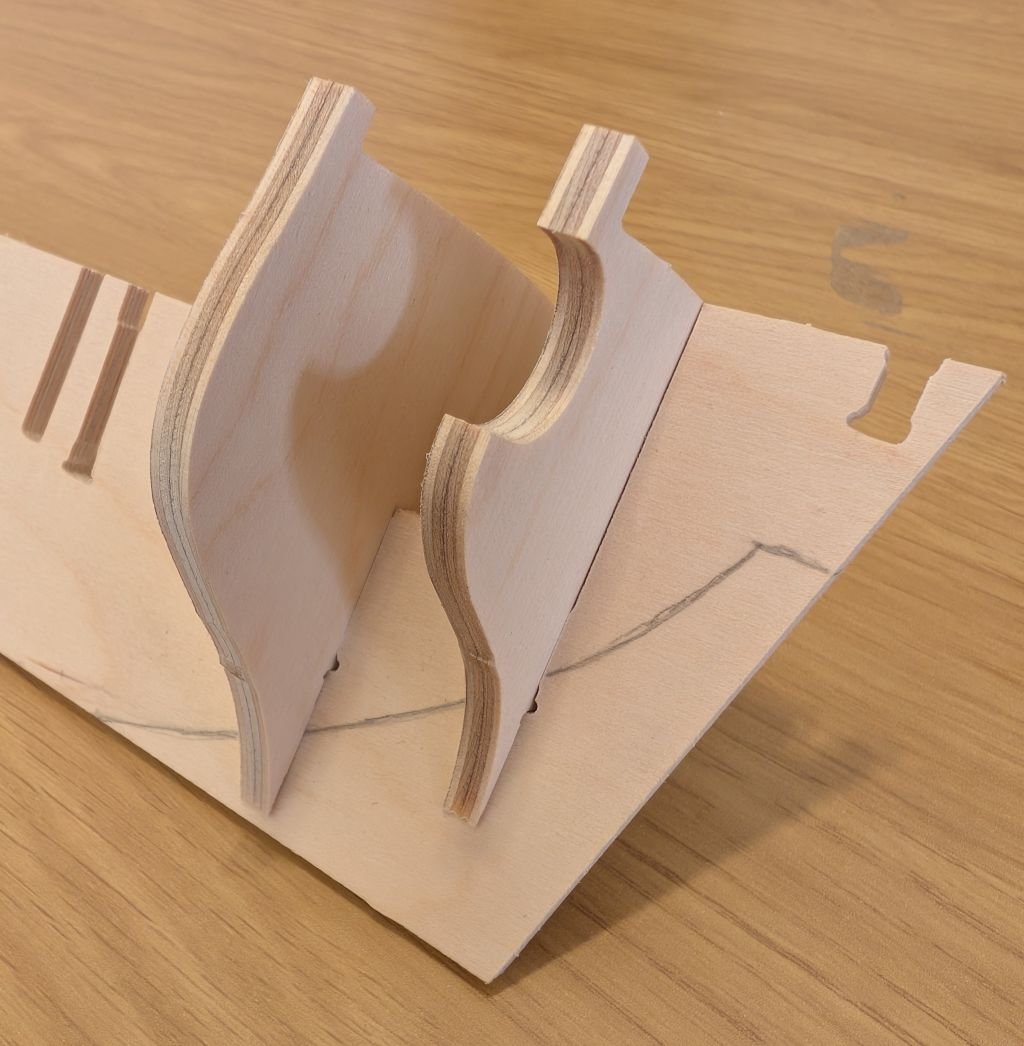
Just a quick update as to where I've got to. As it turns out, not very far The bulkheads are fitted to the main keel. I've decided not to fit the walnut stem and false keel yet until all the fairing is completed as I think it would be too easy to damage these parts when sanding the bulkheads. Below is a photo of my attempt at fairing to my repositioned bearding line Bulkhead 1 coarsely sanded to start the fairing process. I've had trouble understanding how the final bulkhead 10 can be sanded during fairing as there isn't any material below the stern's transom. So what I've done is to add some scrap wood which can be tapered down to provide a little more material for the planks to attach to. It might turn out that this isn't required but I would rather add it now just in case it is required. Hope to post another entry soon. Regards Geoff
.jpg.99c35ef86f7996056508bd1867c834b1.jpg)
.jpg.82780aed569673087813b5f4b294b7cd.jpg)
.jpg.d9d1cdfeb3999075ea20b628e6a285dd.jpg)
.jpg.1bac5e2676b89eade7e4611643348114.jpg)
.jpg.6200c4ddb3a16a2e9e2809d290e17932.jpg)
-
Hi Cathead, It's been about 2 years since I finished the Beagle and I've now finally got around to starting next project, HMS Granado. Link is in my signature if you're interested. Would love to see you there :)) Regards Geoff
-
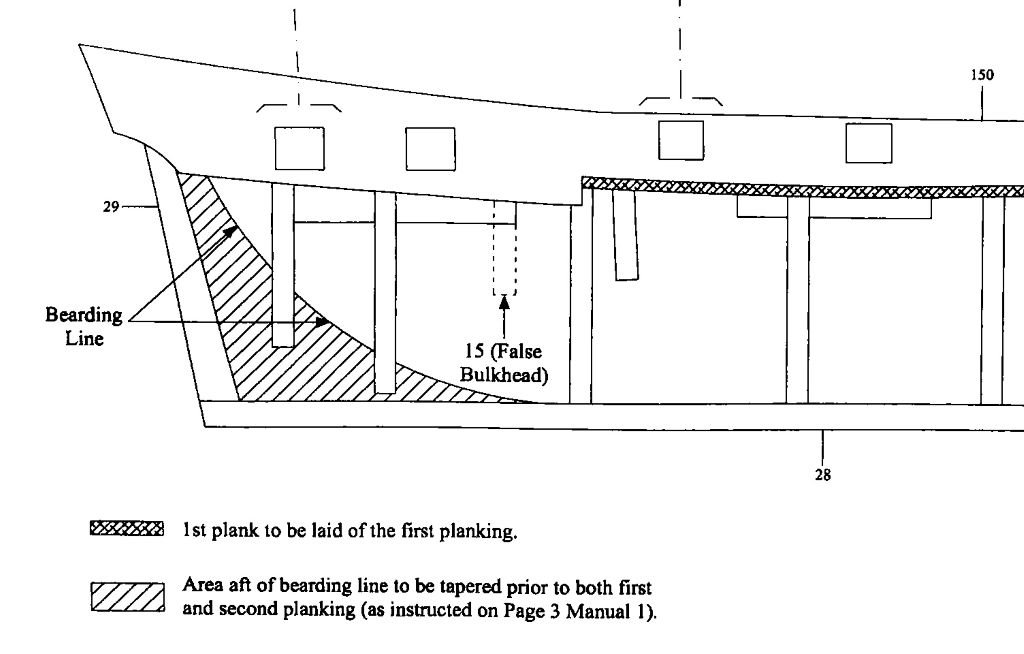
I've given this issue about the beading line a little more thought and have made the executive decision to redraw the line. I shall now be cutting to the lower of the two lines. If I'm wrong then I won't have taken off too much and can try again. Regards, Geoff
.jpg.d4286562043a5acf6a806906bbc288d7.jpg)
-
Hi Tom, So you saw it through to the end, well done! What a great build and what a fantastic build log. I'm sure future builders of this kit will find your build log invaluable, very comprehensive. Where you've chosen to do the additional research and deviate away from the kit instructions, I'm sure will have given you extra knowledge and experience, which will be useful for your next build. It also provides food for thought to other builders of the kit. You say you may not produce a build log for your next build. What I would say is, doing a log is not only useful for future builders seeing alterative approaches but it's also an easy way of asking for advice or hearing differing opinions. Whatever you decide to build I'm sure you'll do it well. Best of luck with it :)) Chimp
- 206 replies
-
- 2
-
-

-
- Endurance
- Shackleton
- (and 2 more)
-
Hi Brian, Thanks for your comment. My understanding is that the bearding line is where tapering of the false keel starts, which allows the planks to land on the false keel and tapers down to the sternpost. Surly tapering the keel under the bulkheads is pointless or an I missing something? Chimp
-
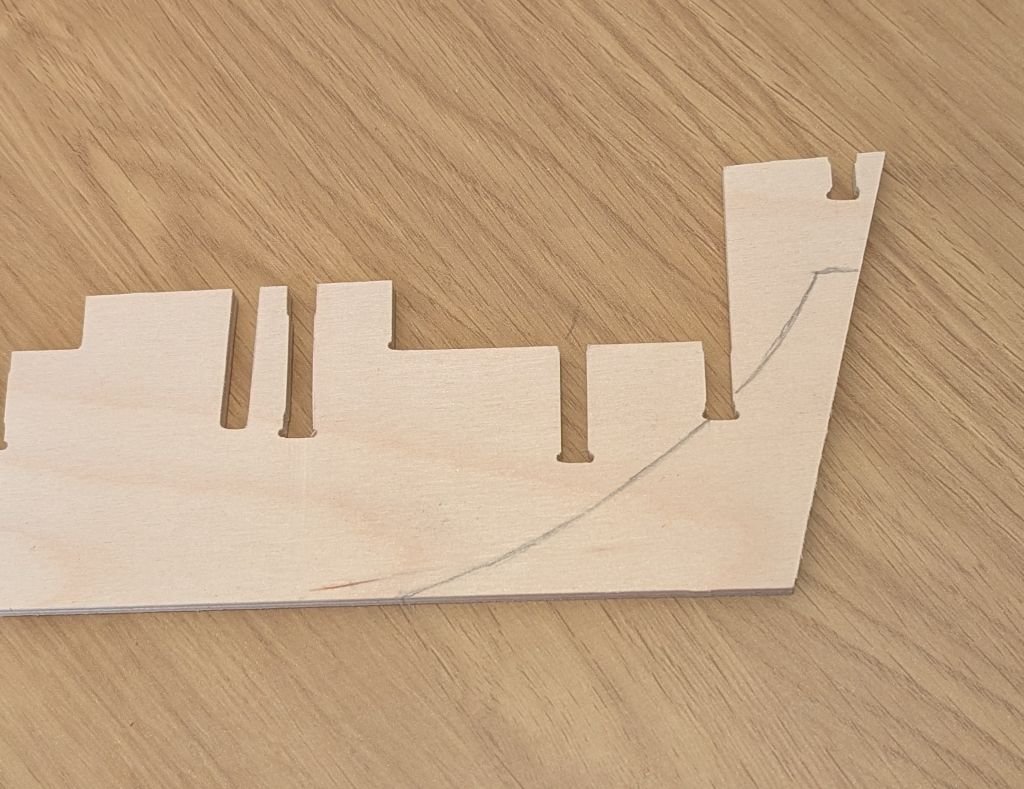
Hi guys, After two years, almost to the day, I'm back with another build log! I've finally got around to starting my Granado, which I purchased about three years ago. I won't write a brief history of the ship or a description of the kit as HardeHarHar and Vane have already provided that information in their build logs and have been more comprehensive than I would. What I will say about the kit I received was that it must have been a Friday afternoon special as it had two false keels, three sets of midsection bulkheads but was missing the fore and aft bulkheads. However, after a comprehensive check of the kit contents and an email to JoTiKa-Ltd (manufacturer) and Cornwall Model Boats (supplier) the missing parts were very quickly supplied. The positive point here is that I now have some spare parts if I were to make a mistake. Following on from my last build, which was the Beagle by OcCre, I feel I'm a little more experienced and I'm keen to make this kit to a higher standard. Don't get me wrong, I was very happy with how the Beagle turned out and I'm very proud of it but I would like to improve. I'm particularly keen to improve on my planking, so my intention is to follow the excellent document "Simple hull planking techniques for beginners" so let's see how I get on with that. I've cut out the false keel and bulkheads and transferred the bearding line onto the hull as described in the instructions: Now before I have even glued my first part, I have in issue which I need to resolve and would welcome some comments. My issue is that following a dry fit of the bulkheads I see that the bearding line is well above the lowest section of the bulkheads. I can't see this makes any sense at all, surly this is an error in the instructions. The bearding line must be below the lowest part of the bulkheads. Hopefully someone can confirm my thoughts are correct before I make my first mistake. I suppose if I do wrong I have a spare. Chimp
-
Hi, Just stumbled across your build log. Looks like you're having fun and making some excellent progress. I made this kit a couple of years ago and looking at your build log has taken me back to some of the same issues I had experienced. As you have already identified, the instructions in the kit are of variable quality and sometimes contradict the video instructions. What I would say is, yes it can be very frustrating when you have incomplete or conflicting instruction but it does give you the opportunity to look into the issue a little further to find a solution. Then hopefully you will have gained some extra experience and knowledge. I found I was constantly referring to the excellent reference book "Anatomy of the ship - HMS Beagle" by Karl Heinz Marquardt. Not sure how available this is these days but I'm sure a copy can be found in one format or another. I will be following your build with interest. Remember, it's not a race :)) Chimp
-
Hi Tom, Your ship is looking great, you're doing a fantastic job! Regarding the fuzzy thread which Occre supply with their kits, I think it's appalling and I refused to use it when building my Beagle. I was so disappointed with the supplied thread, I raised a question on the forum to which I had quite a few suggestions on how to resolve the issue: Unfortunately, I didn't find any of the suggestions really solved the problem to a quality to which I was happy with. As I explain in the link above, my solution was to 3D print a cheap ropewalk. This really solved the problem and provided me with the ability to make as much really high quality rope as I wanted at minimal cost. It's also a lot of fun to make the rope and I find it very therapeutic. So much so that I'm now looking into making a computer controlled ropewalk just for the fun of it. I know the thought of making a ropewalk will instantly put many people off but it really isn't that difficult at all, and the benefits are huge. Why spend hundreds of hours working on a model, making it as beautiful as you have, only to detract from the model by using the kit supplied thread? It's a no-brainer in my mind. Hope you find a good solution to the issue which suits you. Keep up the good work! Chimp
-
Congratulations on such a beautiful build!! I too have been a little shocked on the cost of display cases and are considering to build my own. I've just started following your next build. Looking forward to following your progress. Chimp
-
Looks like you could do with more filler. Be careful you don't sand too much and break through the wood. Chimp
-
I would say that's looking good! When it comes to sanding just be careful and don't be too aggressive. Chimp

