robdurant
-
Posts
843 -
Joined
-
Last visited
Content Type
Profiles
Forums
Gallery
Events
Everything posted by robdurant
-
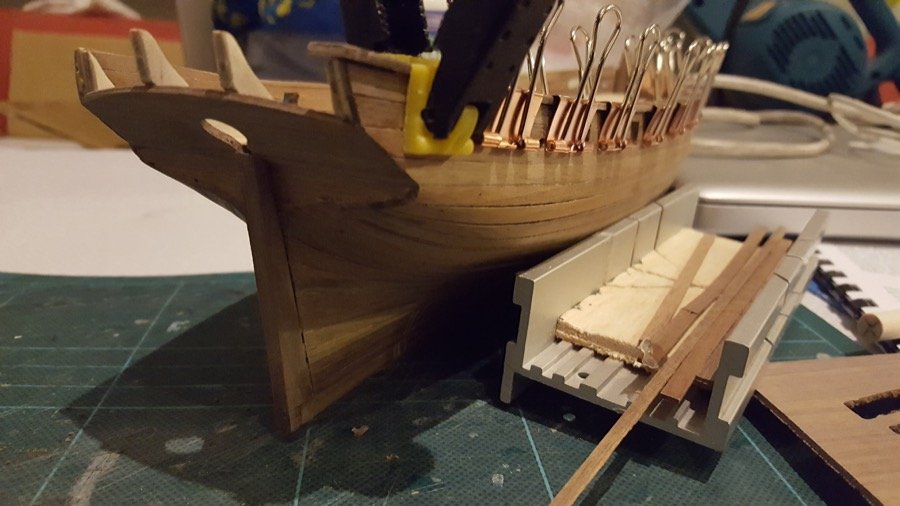
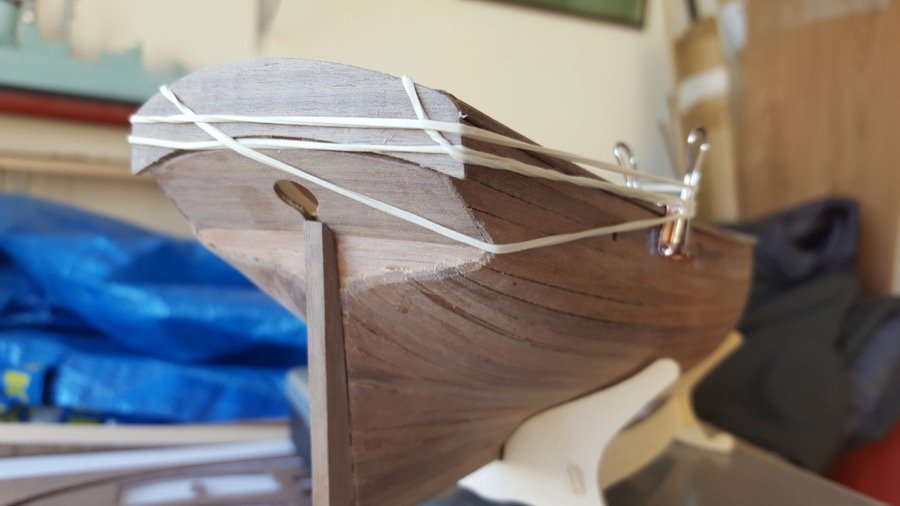
 It's been a while since my last update, and lots has happened, so here's an update. Deck planking I completed the gun deck, with 1mm maple. I'm pleased with how this has come out, and I'll be wiser when I start the quarter deck later on in the build. Replacing the wood seems to have been a good choice, not least, because I've been able to vary the widths of the planking to reflect the real ship more truly. Inner planking for gundeck I pre-painted the gundeck inner walls red using the admiralty paints and installed them. Stern Using Ray and Beef Wellington's logs as a guide, I approached this part of the build with trepidation. Only time will tell whether I've got it right, but I used scans of the plans as templates as others have done before me to line up the parts for the stern. So far, it doesn't look too bad! Once the stern parts were in place, I opened up the area where the keel former would go to take a wider stern post from boxwood. First hull planking This is in 1.5mm by 6mm lime. It's lovely wood, actually. Really sharp and easy to form. I filled at the bow and the stern with balsa to act as a support for some of the more complex curves that this hull contains. I started putting a plank on each side (to prevent the keep getting twisted) and once I reached where the gun deck was, I marked the frames and the gun port positions (The height of the port rises slightly at the back (between 21 and 25mm from the gun deck)) before I lost the frames as a reference behind the planking. At present the gun ports are marked out as they will look when framed, so the holes made will need to be larger. This has helped in terms of understanding where the bulkheads meet up with the gun ports. (For some of the gun ports, one side of the port frames will be bulkhead.) I've used a mix of plank nippers and boiling water to edge bend the planks so they aren't forced round the corners. After reaching roughly the point where the wale is, I started to work all the way down on the starboard side. Here's the progress so far.
- 275 replies
-
- 15
-

-
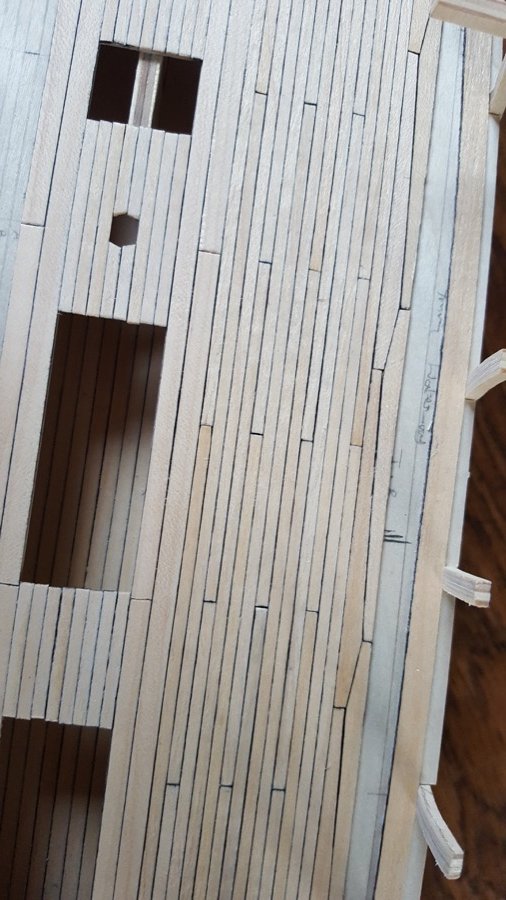
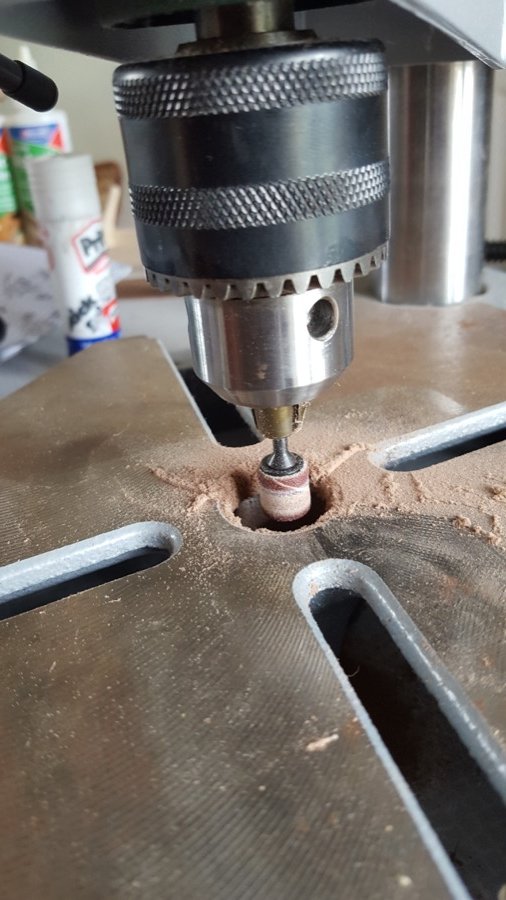
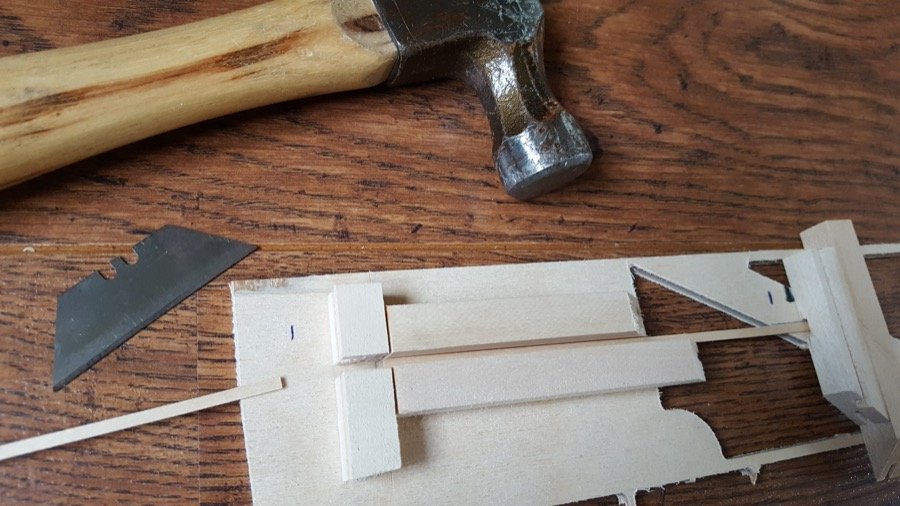
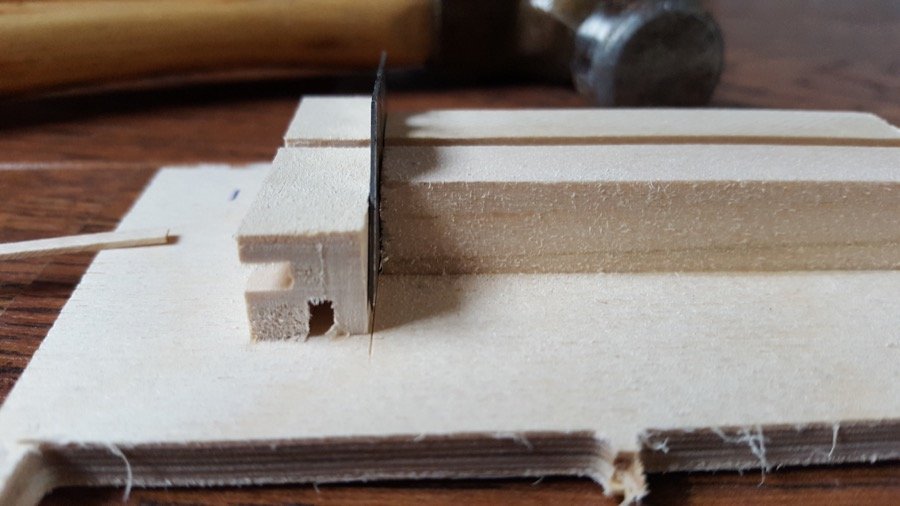
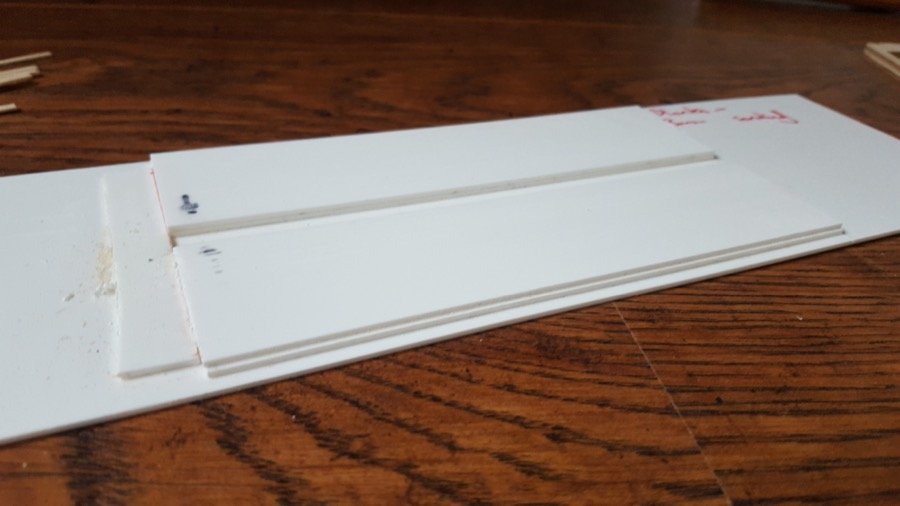
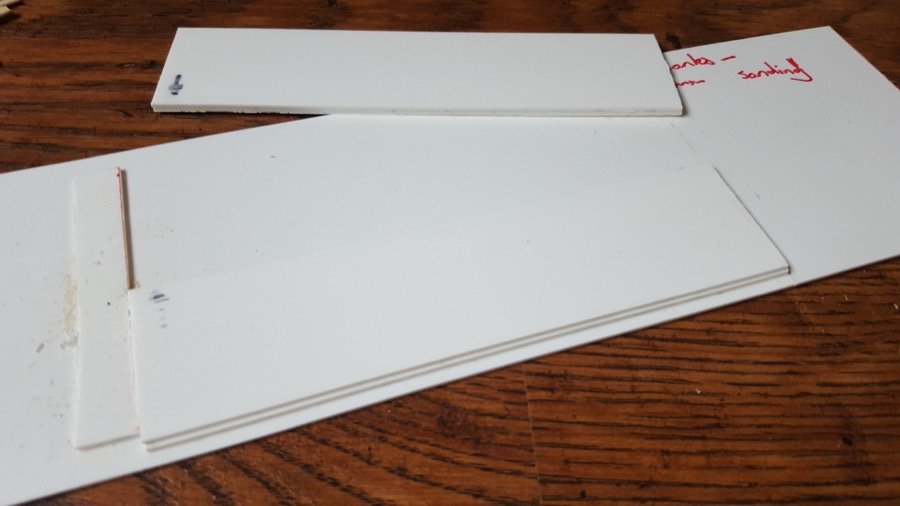
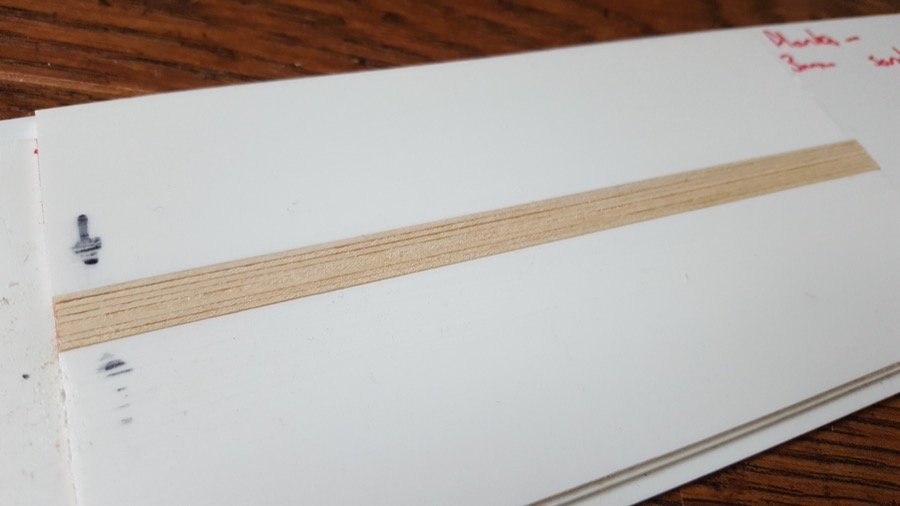
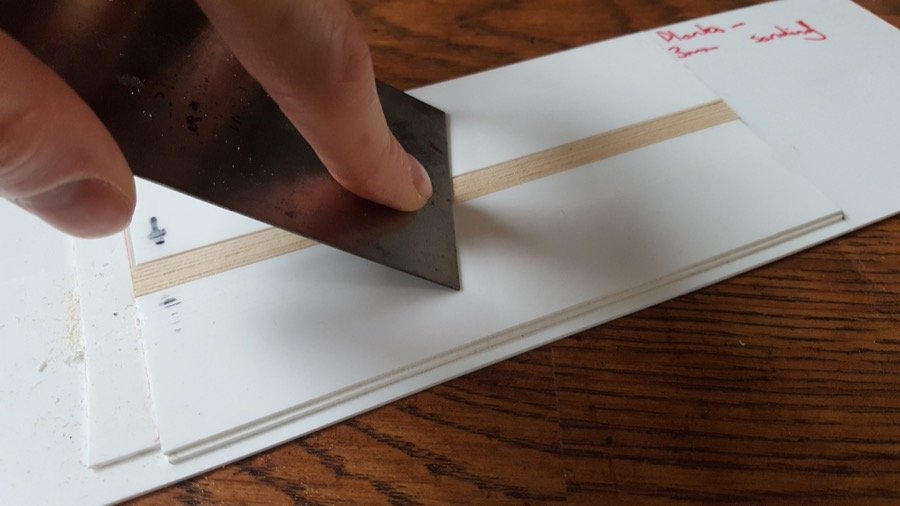
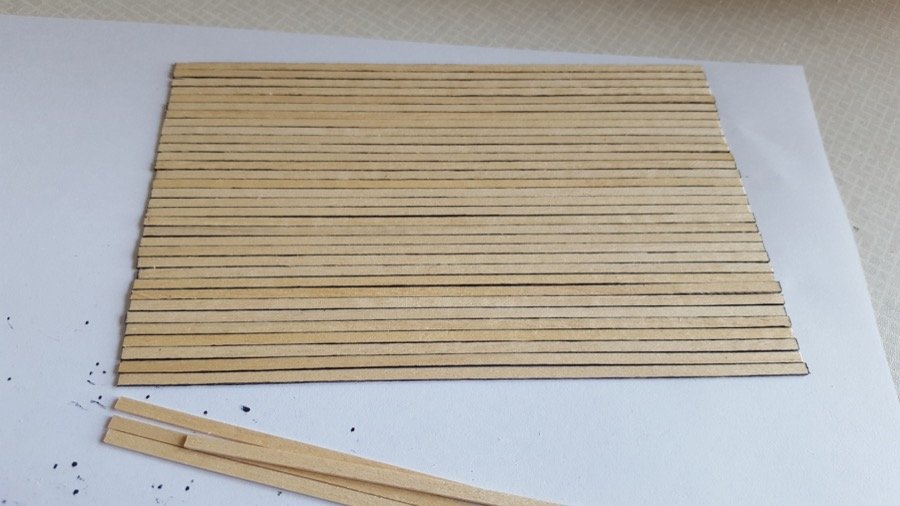
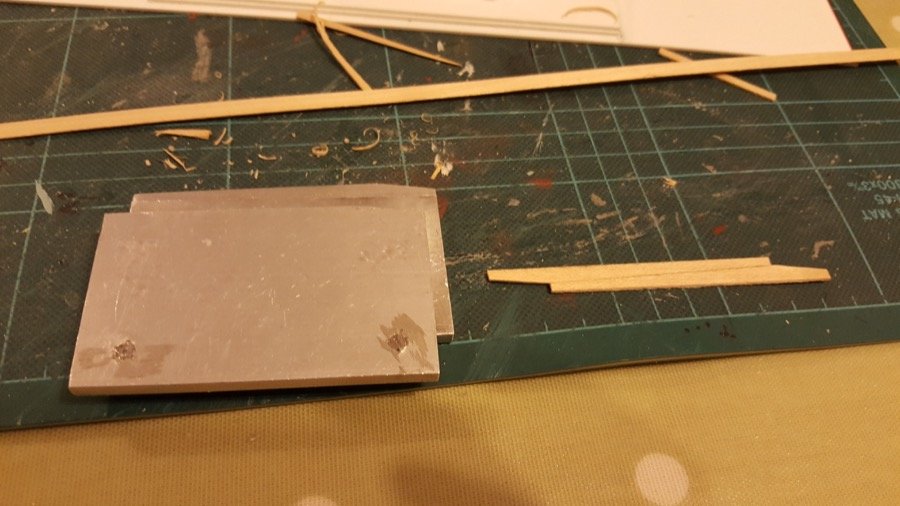
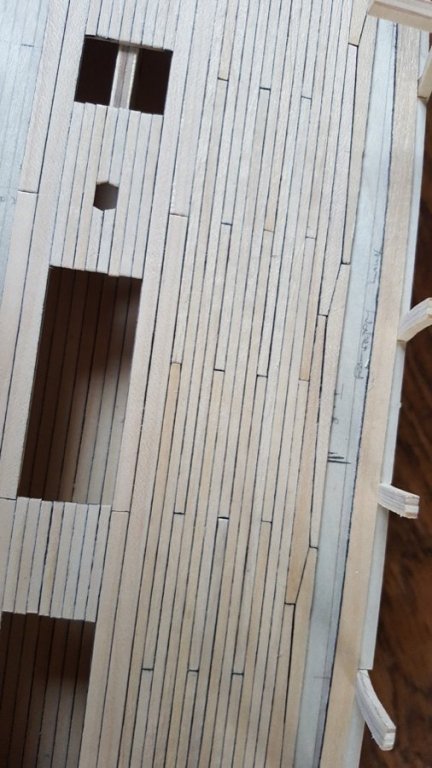
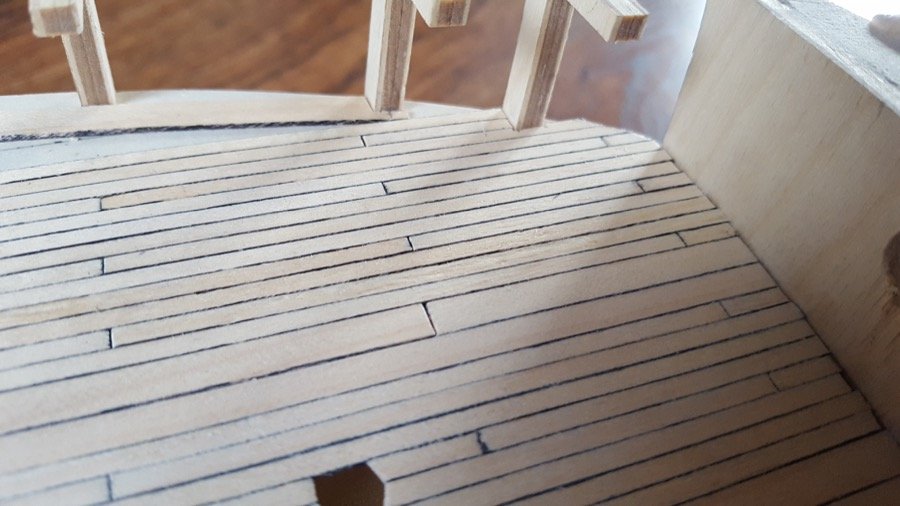
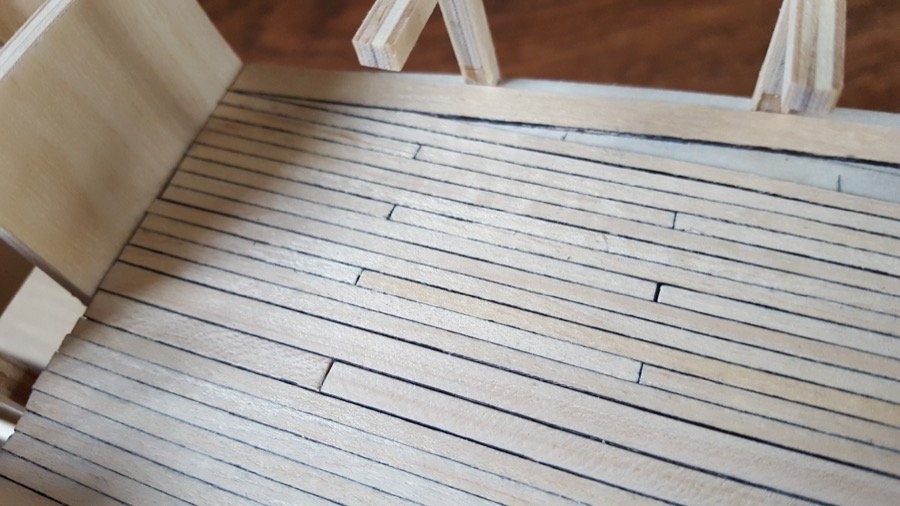
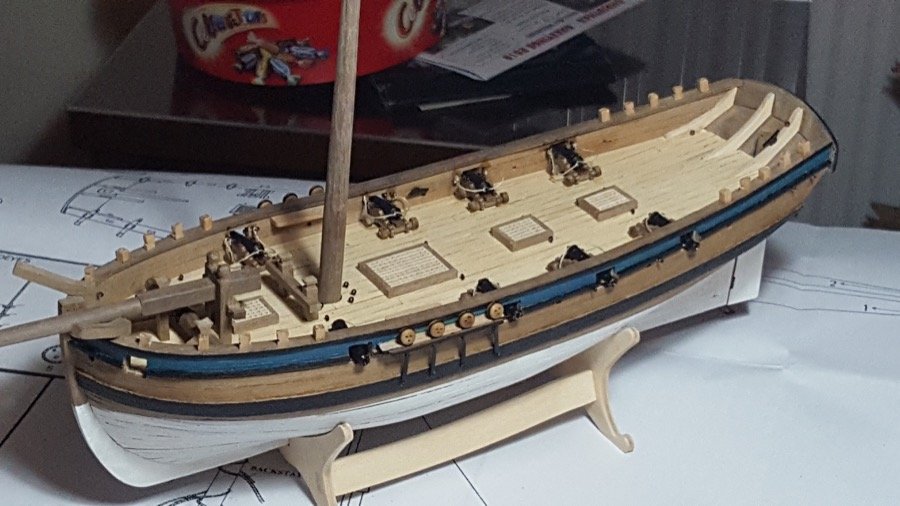
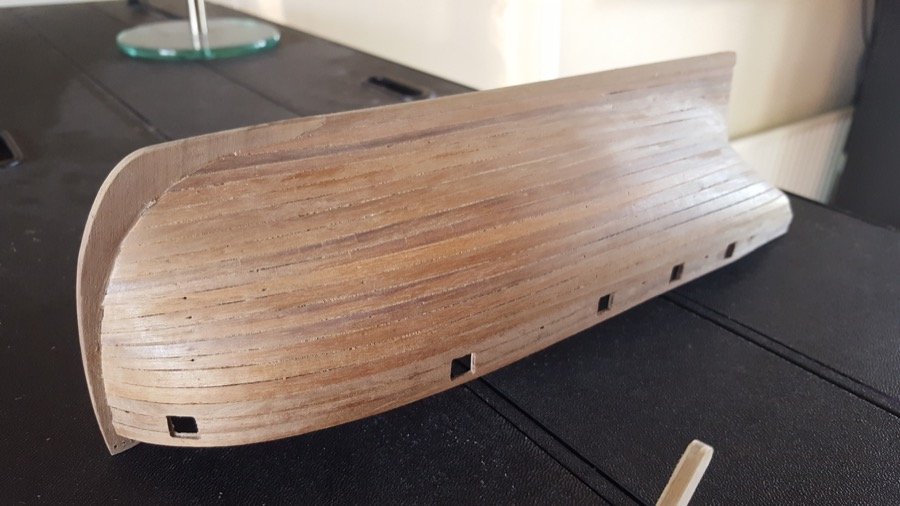
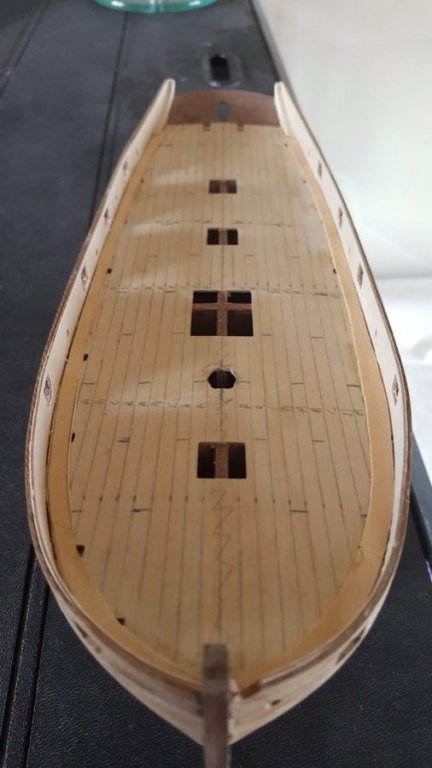
Thanks for the likes I’ve added the 7mm waterways, and continued planking with 3mm from the centre out towards the edge. To do this I needed to find a way of cutting a whole bunch of 3mm planks to the same length. I used a template with a stanley knife blade, hitting it with a hammer, to cut the planks one by one. This was surprisingly effective and quick, and I’ve been very pleased with the results. The template was made using "display case section" offcuts stuck onto a ply offcut. I used the display case section because I had it left over... the advantage being that it's nice and square, reasonably cheap (from Cornwall Model Boats) and a good size for this stuff... and they can be quickly and easily glued with carpenters glue. Hopefully the following pictures are fairly self-explanatory. It's probably worth saying that if you're going to hit a stanley knife blade with a hammer, please wear safety goggles! Once cut, the 3mm planks aren’t very sharp on the edges, so I made a second template to sand them to size… this was a head-scratcher, because I wanted the planks to end up exactly 3mm wide… eventually, I settled on using 1.5mm plasticard glued together with plastic-weld… This allowed me to make two sides (one fixed, and the other floating) that could be put on each side of a stack of planks… One edge was flattened using a scraper, and then the planks were turned over to scrape the other side to get the width down to 3mm. The pressure of the scraper and a hand holding the floating side of the template in place was sufficient to get the job done... Once scraped, I edged all the planks with a sharpie marker. Here are the results... Once I got to the edge of the top and butt planking, I started adding these in. I’ve been using Shipyard Sid’s template to do this, and it’s been extremely helpful. I’m almost finished on the port side, then it’ll be the same again to complete the deck. Here are the results so far... Not perfect, but it hasn't been scraped yet, so I'm pretty happy. The caulking should tone down a little bit when it's scraped, and I'm aiming for the newly built look, so I don't mind if it's fairly dark. That's it for now Happy building Rob [edited to restore photos, 11, 13 July 2017]


- 275 replies
-
- 10
-
-
Thanks for all the encouragement, helpful advice and likes! David: I appreciate the warning... please do feel free to point things out as I go - I'm very much wearing my 'L' plates as I go on this build, and I"m grateful for any and every bit of help I get along the way. I set the reinforcing plates with about 5mm clearance from where I expect the planking to end up, so hopefully I've left enough room. I didn't want to put them too high, because they're there to give support. This photo gives a better idea... Time will tell whether I got that right Thanks for sending that template, too. It'll be a great help, I'm sure. Hope I can do something like as good a job as you did! Jason: Thanks for the heads up... I'd spotted that short fall, and planned to add a false keel to make up the difference (in the photo above, a few mm are hidden by the building board, but it's still not a lot that'll be left once the planking's on). I'll put on the false keel the planking's done, so it doesn't get too bashed about. (Now, I just need to remember to do that!). I spent a little time fairing the bow templates yesterday, using the ship's lines from Anatomy of the Ship (AOTS) as a guide. I've just had a parcel of balsa wood arrive in the post, so the next job is to infill the gaps between the front and rear bulkheads, and then I'll look at planking the upper deck. I also need to work out how to fair the rearmost bulkhead... Might wait until the upper deck is planked before I do that. Now - to plank on or off the ship? Decisions! Both methods are mentioned in the instructions, and I notice both methods have been used with great success in others' build logs here Take care Rob [edited to restore photos, 11, 13 July 2017]
-
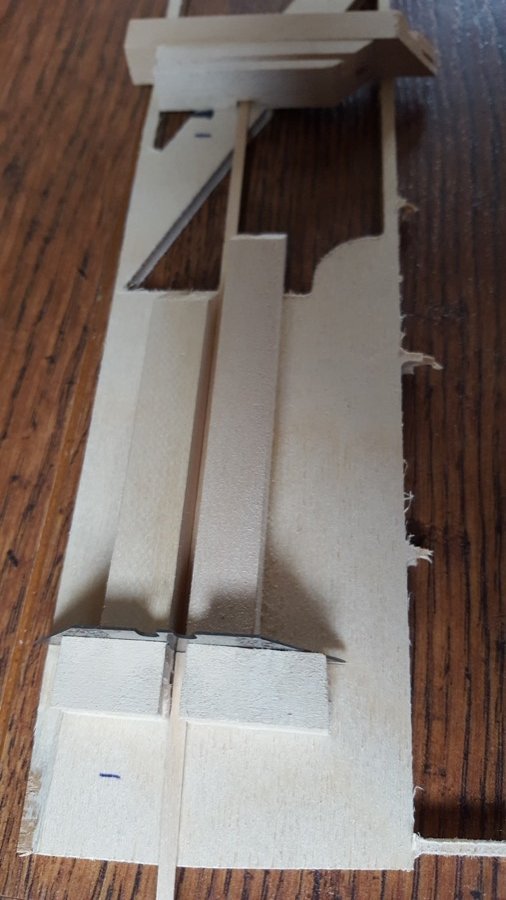
Spent some more time on Ethalion today, finishing the initial bulkhead fairing and as I prepared the keel former (cutting in rabbets and tapering at the stern), I realised that the mizzen mast slot seemed somewhat out of place and at the wrong angle when compared to AOTS... (picture below). So I trimmed out the excess, and built up the missing part to reflect the AOTS diameter and angle... (more vertical, and 8mm instead of 6mm by my reckoning.) The photo below shows the missing part added in, but I haven't cut the excess material out yet. I decided to keep the slot the same depth (the markings were longer to assist in lining everything up) While I was taking the saw to the keel former, I took a drill to it too, and drilled 4mm holes into the base ready for when its completion. I reinforced both sides with scrap ply. Once all that was done, I glued the bulkheads to the keel former. This really does provide a great deal of support to the bulkheads as they glue in place, and checking the angles I found they were spot on! I wasn't expecting it to be that simple - (probably famous last words!) Next tasks are to drill a hold in bulkhead 2 to take the jib boom, and finish off fairing the bulkheads. [edited to restore photos, 11,13 July 2017]

- 275 replies
-
- 10
-
-
Preparation and Planning…. The keel former and bulkheads I wanted to check everything was just right before I went too far. Having been inspired by some of the other Diana builders, I set up a program called QCAD to use inches as unit. I imported aligned ship’s lines from AOTS Diana (I had to cut the pages out of the book to get them to scan neatly, as the image crosses the centre-fold, but they scanned very nicely at high-res, and so I was able to stitch together a full size plan for the side, overhead and front elevations of Ethalion. This was cross-checked, against the ship’s plans from NMM by overlaying it. The following was used. http://collections.rmg.co.uk/collections/objects/82225.html This is Ethalion, but you can also find: http://collections.rmg.co.uk/collections/objects/82174.html “Artois” http://collections.rmg.co.uk/collections/objects/82195.html “Jason” There are a few differences… Note the bulkheads, and chainplate attachment points. I’ve never used a CAD program before and I think I must have set up the CAD drawing a little wrong, because I found that to print at scale I needed to print at 1:768 (12 x 64) (in fact, trial and error testing showed that 1:786 was closer for my printer). Nevertheless, what an amazing tool. That done I was able to trace the lines and create a print out of the side, overhead and fore and aft views to cross-check the hull. I also scanned the frames so that I could check they were indeed symmetrical. I marked the waterlines onto the keel former carefully, and then marked them onto the bulkheads too. Once that was done, I could take measurements from the overhead view at each waterline at the fore and aft edge of the bulkhead and mark the amount that needed bevelling onto the bulkhead. Once that was marked onto the bulkhead, a smooth line could be drawn to represent the bevelling required. I intentionally made the overhead view slightly smaller so that each bevel would be a little less than was actually required. This would leave a little room to fine-tune the bevel once the bulkheads were assembled on the keel former. Before beginning to bevel, I coloured in the edge of each bulkhead with a black Sharpie so that I could see how much of the bulkhead had been bevelled… I didn’t want to reduce the overall size or profile of the bulkhead, and this would help me avoid that. I made a sanding stick from a length of chipboard roughly 2”x1/2” by 10” with a sheet of very rough sandpaper (grade 80) stapled around it. This will help me get a smooth run and remove the worst of the material at a reasonable pace. Before this was used, however, I used a sharp craft knife to whittle away the worst of the material on bulkhead 2 (the most severely bevelled at the fore end.) The hope being that this would remove the need for me to disappear in a mound of sanding dust over the coming days. I’ve made a replacement beakhead with solid castello boxwood (the ply is just ugly, and I can’t bring myself to paint it – I’ll know it’s ply!) I’ve marked out the section I wish to replace, taking note of Jason’s (Beef Wellington) work in this area, especially with respect to the bowsprit. I intend to do the same – removing the support at the top of the keel former in order to allow the bowsprit to pass through bulkhead 2, and thus have more support. It also allows the bowsprit to stay at 10mm, rather than having to reduce to 6.5mm, and to be at the correct angle. Jason noted that removing the top of the stem meant there was no support for the planking… To avoid this, I’ve almost entirely cut through the pattern, but not quite. The hope is that the support will be there until the last minute, when I can simply remove it… We’ll see if this works. I’ve also made a replacement stern post ply with castello boxwood, with taper from 9mm at the top down to 4mm at the base to fit in with tapered rudder (again Jason (Beef Wellington) has done this excellently, and I hope to follow in his footsteps. This is the only other area where the plywood of the keel former is visible once built, so that should provide a much nicer look once done. Tasks ahead before I glue the frame together: Plan ahead, marking out rabbets, and how the planking will fall for first and second planking. I want to have at least thought this through even if it ends up looking quite different. I’ll leave the sternpost and beakhead off for as long as possible to prevent them from getting battered as the planking goes on. Insert tubes into keel former ready to take rods for display stand. Finish tapering bulkheads. [edited to move photos onto MSW, 11/13 July 2017]
- 275 replies
-
- 10
-
-
Links More details of the movements of HMS Ethalion can be found in Naval History of Great Britain, Vol II by William James at the following locations: Tory Island and capture of Bellone: pp140-163 Brest blockade duty: p300 Capture of Thetis: pp401-402 List of captured vessels in 1799: pp473-474 A map showing the movements of the Ethalion up until the moment she struck the rocks can be found on this website: http://www.archeosousmarine.net/ethalion.html
-
Service (some of the text content below copied with thanks from Wikipedia under Creative Commons Attribution-ShareAlike License) Ethalion entered service in 1797, operating in the English Channel as part of the Channel Fleet. Battle of Tory Island Soon after commissioning in April under Captain George Countess, Ethalion was engaged in chasing a French squadron under Jean-Baptiste-François Bompart intent on invading Ireland during the Rebellion of 1798. Countess kept the French fleet in sight for several days and was able to signal for assistance. This brought a significant force under John Borlase Warren to the region and the French were defeated at the Battle of Tory Island. Ethalion, with Melampus, took the 40-gun Bellone, which the Royal Navy took into service. Ethalion had one man killed and three wounded; the French lost 20 men killed. In 1847 the Battle of Tory Island earned for any still surviving crew members the Naval General Service Medal with clasp "12th October 1798". (See here for more: https://en.wikipedia.org/wiki/Battle_of_Tory_Island ) Capture of Boulonnoise cutter On 2 February 1799, Ethalion was operating with Anson when together they captured a 14-gun privateer Bayonnaise cutter. She was the Boulonnoise, out of Dunkirk, and had been "greatly annoyed the trade in the North Sea". She had a crew of 70 men and had been the revenue cutter Swan. Swan had been captured some two years earlier off the Isle of Wight in an action that cost the life of Captain Sarmon, her commander. Capture of Infatigable On 6 March Ethalion captured the 18-gun privateer Infatigable in the Channel after a 10-hour chase. Infatigable was armed with 18 guns and had a crew of 120 men. She was only one day out of Nantes, provisioned for a four-month cruise. Later that year Captain James Young took command.[2] Capture of Thetis and Santa Brigada (Action of 16 October 1799) In 1799 Ethalion was operating with four other frigates off Vera Cruz against Spanish shipping. The British frigate Naiad, Captain William Pierrepont, was patrolling off the coast of Spain when she sighted two Spanish 34-gun frigates, Santa-Brigida and Thetis. On 15 October 1799 the British frigate Naiad sighted two Spanish frigates. Captain Pierrepont of Naiad gave chase and before dawn Ethalion spotted them and joined the pursuit. At 7.00am the two Spaniards parted company so Pierrepont followed one frigate, together with Alcmene and Triton, which too had joined the chase, while directing Ethalion, to pursue the other frigate. By 11.30am, Ethalion had caught up with her quarry and after a short engagement the Spanish vessel struck her colours. Ethalion had no casualties though the Spaniard had one man killed and nine wounded. Triton, the fastest of the three British frigates, led the chase of the second frigate. The next morning Triton struck some rocks as she tried to prevent her quarry from reaching port. Triton got off the rocks and resumed the chase despite taking on water. She and Alcmene then exchanged fire with the Spanish frigate, which surrendered before Naiad could catch up. Four large Spanish ships came out from Vigo but then retreated when the three British frigates made ready to engage them. Alcmene had one man killed and nine wounded, and Triton had one man wounded; Santa Brigida had two men killed and eight men wounded. The vessel that Ethalion had captured turned out to be the Thetis, under the command of Captain-Don Juan de Mendoza. She homeward-bound from Vera Cruz with a cargo of cocoa, cochineal and sugar, and more importantly, specie worth 1,385,292 Spanish dollars (£312,000). The vessel that Triton, Alcmene and Naiad had captured was the Santa Brigada, under the command of Captain Don Antonio Pillon. She was carrying a cargo of drugs, annatto, cochineal, indigo and sugar, and some 1,500,000 dollars. Prize money was paid on 14 January 1800. In December Ethalion, by then under Captain John Searle, was engaged in the blockade of the French Atlantic Coast. Loss On 25 December she was wrecked on a reef off the Penmarks. Attempts were made to save the stricken ship but the damage was too severe. Danae, Sylph and the hired armed cutter Nimrod assisted in rescuing the crew; Ethalion's first lieutenant then set the remains on fire. Searle, the first lieutenant, and the master's mate were the last to leave. The subsequent court martial honourably acquitted Searle and his officers for the loss. The board ruled that the accident was due to unusual tides against which the skill and zeal of the officers and ship's company were unavailing. Looking in the Naval Chronicles (through Google Books) we find the following entries. Naval Chronicle : July – December 1799 (Vol 2) p707, uncertainty about whether Ethalion is lost “Wind E. Rather Mild. Arrived the Swift cutter, Lieutenant Sanders, from off Brest. By her, accounts are brought, that between the Saints and Penmarks they hooked up a few days since several pieces of floating wreck; one piece a gun carriage marked Ethalion, 24 pounder, and a writing desk: but whether the Ethalion, 38 guns, Captain Searle, is lost on the Saints, or in distress had thrown any guns overboard, still remains in a state of incertitude.” Naval Chronicle : Jan-Jul (Vol 3) p84, Notice of Court Martial and verdict for Ethalion’s captain, officers and ship’s company “Plymouth, Jan. 10. A Court Martial was held on board the Cambridge flag ship in Hamoaze, on Captain SEARLE, his officers, and ship’s company for the loss of his Majesty’s frigate the Ethalion, on the Saints Rocks, December 25, 1799. “After an impartial investigation of the existing circumstances, the Court most honourably acquitted Captain Searle, his officers, and crew. It appeared that the accident was occasioned by an unusual course of tide, and but little wind; that every exertion which skill and zeal could effect was made by Captain Searle and his officers, and the utmost discipline and subordination was observed by the ship’s company, so highly honourably to British seamen in times of danger. The Ethalion was stationed off the Saints, to preserve the line of cruisers watching the enemy’s ports.” pp86-87, Account by Captain Searle of the sinking of Ethalion “MONTHLY REGISTER OF NAVAL EVENTS” “Captain SEARLE’s Narrative of the Proceedings on board his Majesty’s Ship the Ethalion, from the Evening of the 24th of December, 1799 till the Moment in which the Captain and Officers were under the painful Necessity of quitting her. "At four P.M. Point Le Cheure bore S. E. by E. three of four leagues, standing off and on off St. Matthew’s, with an intention of beating to windward in the morning, to reconnoitre the position of the enemy’s fleet : a service I was particularly anxious to perform, as I knew no opportunity had occurred for that purpose since the 18th of December, when the Fisgard, Ethalion, and Sylph, were all driven off the coast by a hard gale of wind ; and I knew the Fisgard could not have regained here station at that time. "At eight o’clock I gave the usual and necessary directions and precautions, to the officer of the watch, and to the pilot, for keeping the Ship in a proper situation during the night; and to inform me if any change of wind or weather took place, and whenever the pilot wished the Ship to be put on the opposite tack ; and at the end of each watch to acquaint me (as was the custom every night) with the situation of the Ship with respect to the distance from the land-- St. Matthew’s light then (at eight P.M.) bore E. by N. about three leagues ; the Ship then standing to the southward under her treble-reefed topsails, fore-topmast staysail, and mizen staysail, with the wind S. E. and lying up S. S. W. going a knot and a half. "At half past ten she was, by the desire of the pilot, again wore. At twelve the light bore N. E. by E. three or four leagues ; at which time Lieutenant Jauncey told me there was not much wind, and I directed a reef to be let out of the topsails, and the jib to be loosed, to be in readiness to make sail at a moment’s warning ; which order was complied with. "At half past one A. M. the light bearing E. N. E. between five and seven miles, Lieutenant Quillim, the officer of the watch, acquainted me, it was the desire of the pilot to wear again, and stand to the southward till four o’clock as there was but little wind ; but at ten minutes past three, although the Ship had not gone more than two miles from the time of her being wore, and the light was then in sight, and bearing N. E. by E. (the night very dark) the rocks were discovered close ahead, and in attempting to wear clear of them, the Ship struck : when I ordered the hands to be turned up, and got the pumps to work, and the boats out ; sent the Master to sound ; started the water ; threw the guns overboard ; and used every exertion possible to get the Ship off. "At four she struck very hard, and knocked away the stern-post : made signals of distress to the Sylph. At six she fell over on the starboard side, and bulged. "At day-light saw the Danaë, Sylph, and Nimrod cutter ; made the signal for boats to assist – finding she had bulged in several places, and parted on the starboard side amidships ; and seeing the impossibility of saving any of her stores; sent away the idlers, and the first division of seamen, in our own boats, to the Danaë, Sylph, and Nimrod. "At nine Lord Proby came alongside, and another boat also from the Danaë, followed by one from the Sylph. The water was now over the lee gunwale, and the greater part of the stern totally under water ; and it was at this time difficult and dangerous for boats to approach the Ship, owing to the very great surf amongst the rocks. At eleven o’clock, having got all the people out of the Ship, the first Lieutenant by my directions set fire to her remains, and Mr. Bellinghall, the Master’s Mate, cut away her lower masts, which being done, and after I had seen all the commissioned Officers and the Master into the remaining boat, I was then under the painful necessity of abandoning her. – "The anguish of my feelings during the whole of this unfortunate affair, but particularly at the moment when I was obliged to abandon the Ship, those who have experienced a similar misfortune will readily judge of. – I wish it was in my power on any other occasion to describe the very great merit of all the officers and ship’s company ; sure I am their exertions, their promptness in executing my orders, and the steady perseverance they shewed, was never on on any other occasion exceeded ; for in no similar instance was there ever less confusion. "I now think it necessary to observe, that the shortness of the days at this season of the year makes it utterly impossible for any Ship to reconnoitre the enemy’s fleets in Brest, unless she keeps off St. Matthew’s during the night ; and I need not observe how difficult it is to ascertain the precise distance of a light, and the uncertainty of keeping a Ship in a safe position, without the assistance of some headland or mark for a cross bearing ; which in this instance was prevented from the extreme darkness of the night , for although the bearing of the light is always a sufficient guide with respect to the Parquet and Black rocks, yet it is of no use to avoid the dangers of the Saints when cruising within them ; and neither myself, the Master, or Pilot, thought it possible that the light could be seen at all at the distance of eighteen miles which the Ship was from it when she struck, although it was then so distant, and this opinion will be corroborated by the testimony of all the officers. It is also material to observe, that the Master of the Nimrod, who has been some time employed in the same service off Brest, was likewise on that night as deceived by the appearance of the light, that he drove amongst the rocks at a little distance from us, but got off without receiving any material damage – "I flatter myself the above statement will receive the testimony and concurrence of those officers who have been employed off Brest, and that it will afford the most satisfactory proof that my wish to keep off St. Matthew’s proceeded from a zealous desire to fulfil the purport of my orders." p174 : An sad, and ironic footnote. “Jan. 15. Win N. W. Cloudy. Arrived from a cruise the Sylph sloop of war, Captain Dashwood. A seaman of the Ethalion, from excessive joy at the very honourable acquittal of Captain Searle, the officers, seamen, and marines of that ship, drank so much liquor, that he fell, fractured his skull, and died instantly. Verdict. Accidental death.
-
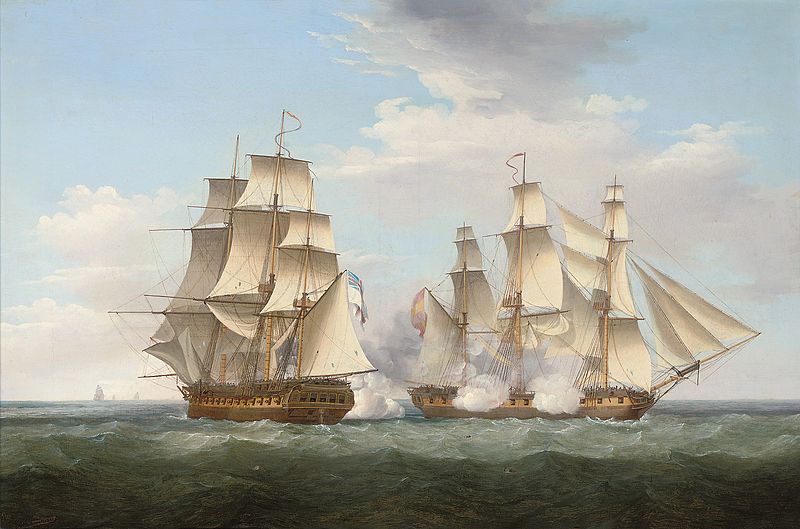
Interestingly I note that Whitcombe has put one of the ship's boat hanging over the stern... Given the painting was only a year after, is it likely that's where that ship's boat was kept all the time? Presumably it was easier to use it from there than to have to lift it from midships. And which of the ship's boats would it be? I guess I've got a bit of time to work all that out before I get there on this build
-
"HMS Ethalion in action with the Spanish frigate Thetis off Cape Finisterre, 16th October 1799", Thomas Whitcombe, 1800 (public domain image from Wikipedia)
-
Ethalion: the mythological figureEthalion actually only gets the very briefest of mentions, but mentioned he is. He turns up in Ovid’s Metamorphoses, but with his name spelt Aethálion. You can find it in the first section of Pentheus and Bacchus, in the account of Acoetes and the Lydian sailors. Acoetes is a farmer’s son with itchy feet. He doesn’t want to take on the family trade so he sets himself up as a merchant instead. He gets his own ship, and off he goes. The action takes place on one day when they’re on a voyage to Delos, an Island in the South Aegean sea. The wind blows them off course to the Island of Chios, and “by skilful rowing we made the shore.” On the shore they set up camp for the night, and as dawn breaks Acoetes orders his men to take on water. When they come back, they’re all there, but there’s trouble brewing. Mate, Opheltes has a boy in tow. He found him, and now he intends to take him home as a prize slave. Acoetes picks up something’s wrong – this is no mortal in this body – he asks the god to pray for the men… but the men are having none of it… “don’t bother praying for us” they say… Acoetes tries to stand up to his crew, but it’s full mutiny… the most violent punches him in the throat, and he barely manages to save himself from falling into the sea… Bacchus – who was disguised as the boy – is properly awake now, and asks them where they’re going take him… The crew, tell him not to worry and ask him where he wants to go. “Naxos. That’s my home.” He says. And the crew swear that’s where they’ll take him… Acoetes starts trimming the sails to sail to Naxos, when the crew overtake him… They want to go in the opposite direction… The crew, in full mutiny now, push Acoetes back. “I suppose our safety depends on none but you!” says Aethelion as he jumps to the tiller to steer away from Naxos. Bacchus pretends to weep, but as they bend to their oars to row the boat suddenly stops, stock-still in the midst of the waves and sea… Raising the oars they realise they’re tangled with ivy, and vines reach up to entangle the rigging, as Bacchus rises up his head adorned with grapes, waving a spear and surrounded by a mirage of tigers and lynxes and panthers… The sailors are terrified and jump up even as their spines begin to curve, and their skin grow black, and their noses protrude, and their hands turn to fins and they become dolphins… And so only Acoetes remained of the sailors to set course for Naxos and tell the story.
-
Reserved for contents
-
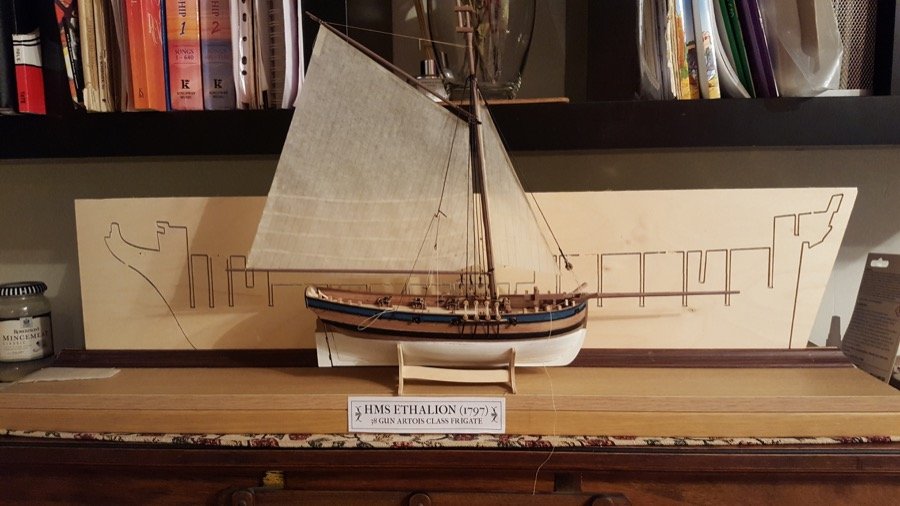
Introduction It’s time to attempt something I’ve been wanting to have a go at for a long time. A frigate of the napoleonic era. Having spent a lot of time looking round, I decided that I had neither the tools, the time, nor the expertise currently to complete a fully-framed scratch build. I was drawn by Chuck Passaro’s HMS Winchelsea, not least because I am sure the instructions when they are released will be utterly brilliant and the builds look beautiful so far, however at the time of writing the prototype is not yet completed. Given these factors, added to the expense and difficulty in sourcing good quality wood in the UK, I came back to model kits. I hope to keep on dabbling in scratch building though, and I have a cross-section of Triton underway for that purpose. I wanted to build a model in 1:64, partly because it would give a good contrast to the boats I already have in the house, which are of the same scale. I looked at Victory Models, however, though there Pegasus and Fly models are very handsome in their own rights, I could not reconcile that they were not quite Frigate enough in my mind to fit the bill. Having built two of Caldercraft’s models in the past (HM Schooner Pickle and HM Cutter Sherbourne), I was keen to come back to the same manufacturer, as I have found their models to be rewarding to build, and to have a level of detail that is manageable, but results in great looking models. Sadly, HMS Surprise, though prototyped, has not been released by Caldercraft so that was not an option, though I am a great fan of the Aubrey / Maturin series by Patrick O’Brian. However, Caldercraft do have another Frigate already in their line-up. HMS Diana. An Artois-class Heavy Frigate of 38 guns. Having seen other builds of sister-ships on ModelShipWorld.com, and since I am married to a Classicist, my interest was piqued by the other boats in the class, and I settled on Ethalion – built in 1797. In part because I didn’t really want a scantily clad woman glued to the front of the boat when I finished it, and Ethalion brings the possibility of a dolphin. Once that was decided, it was time to break out google and a some books, and try and track down firstly, who Ethalion was, and secondly some of the history of this particular HMS Ethalion.

- 275 replies
-
- 10
-
-
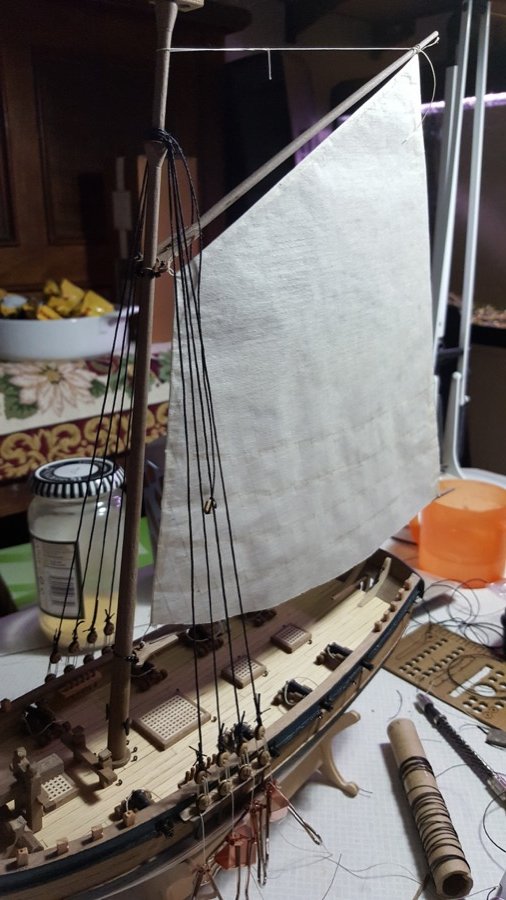
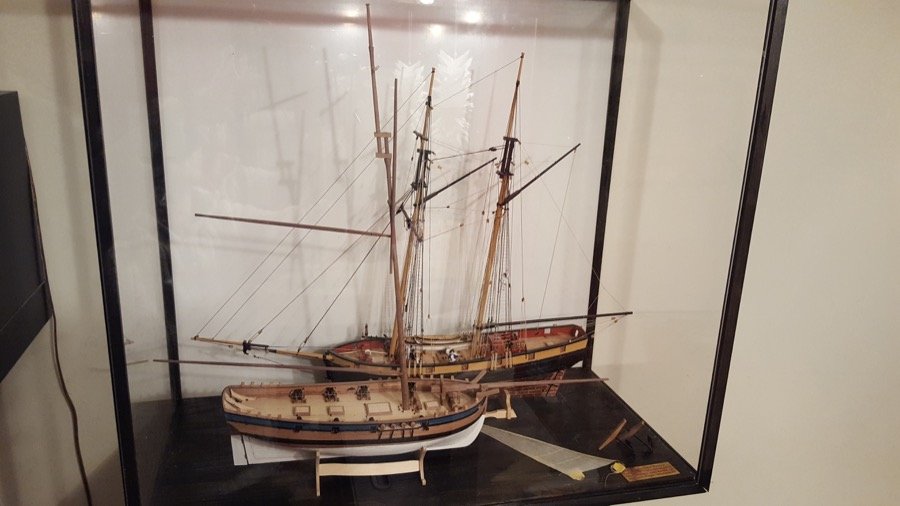
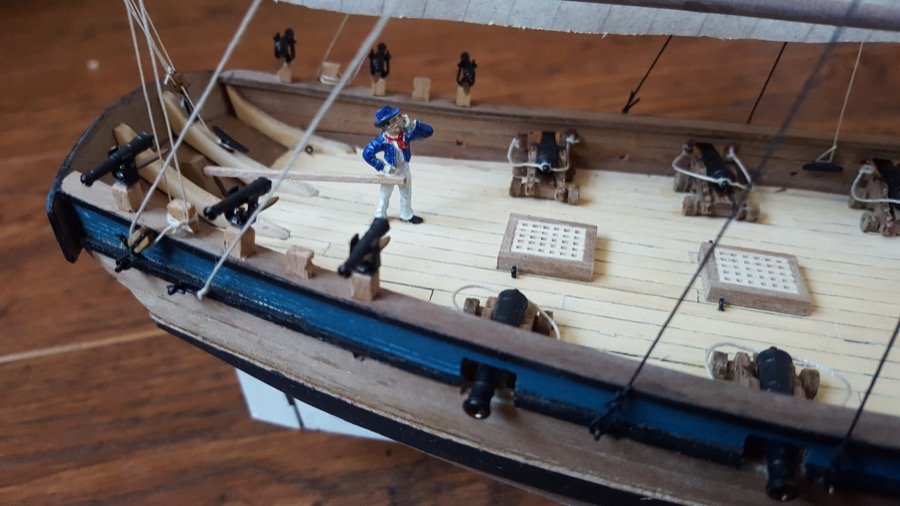
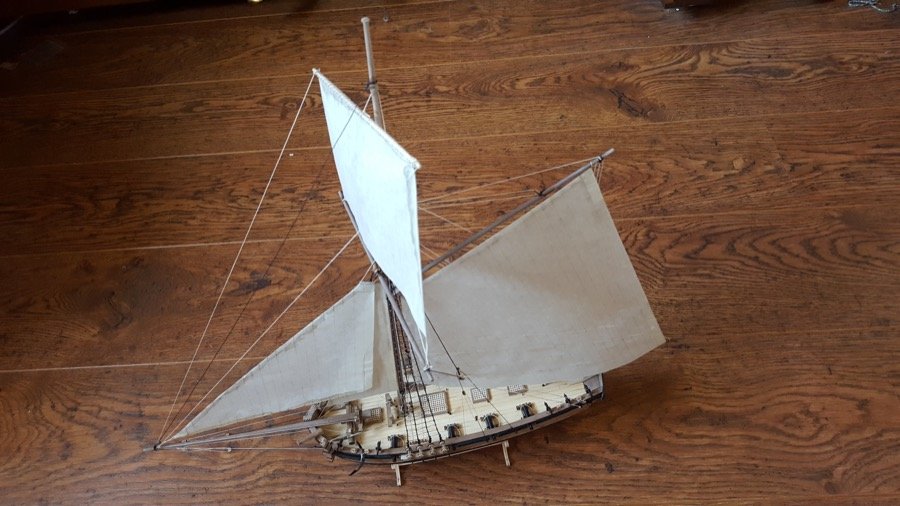
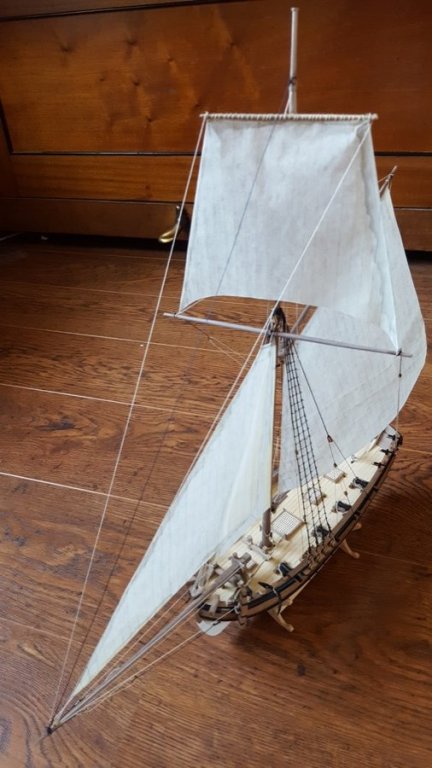
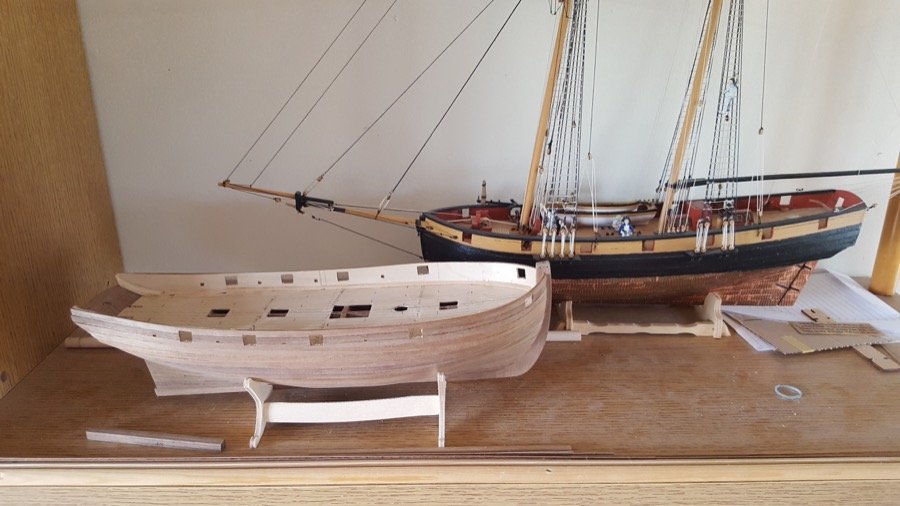
Hi Tony, Thanks so much for those pointers. I've been somewhat lax in posting over the past few weeks, but I have made considerable progress. I decided to keep pretty much to the kit, but to add an approximation of sails. Your log has been extremely helpful in this process, and although the results I have aren't nearly so neat, and the rigging isn't so authentic, I'm pleased with the results I've got. So... to the pictures... A lot's happened since 9th December. I decided the 'just wood' look wasn't really working for me, so it's had a bit of paint now... I've turned the masts, booms, yards on my lathe. I replaced the wood for this task with larger walnut dowel, which helps in three regards. 1. It allows me to centre the wood carefully to get a more even round. 2. It allows me to put a square end on the bowsprit. 3. It doesn't need staining or painting - it just looks nice out of the tin (cardboard tube!) I also rigged the cannon (with breaching ropes, but not aiming tackle). I unwound the rope to create an eye to put the rear of the cannon through (cascabel?). This looks more effective than tying it round, which is the method I've used before, and also means I don't have to do clever tying which seems somewhat too bulky when I've attempted it. Then I launched into sailmaking using modelspan tissue... At this point I paused, because I remembered a comment that I read in another log (possibly Tony's - tkay ? ) that sails attract dust like nothing else... So I finally got round to doing something I've been meaning to for a long time, and built a boat-box from wooden display box section stained with ebony stain and perspex. It's just large enough to fit Pickle and Sherbourne (as long as I have the square sail on Sherbourne trained round as though the wind's coming over the starboard quarter... That was the aim, anyway... Then it was back to building... The mainsail was next... Then the doorbell rang... And it was my next model Just as a comparison... here's the centre-former of the next model, which is also 1:64 - HMS Diana, which I intend to build as Ethalion (1797), one of her sister ships... Yep... those Frigates may not have been the biggest ships out there, but you wouldn't have wanted to take one on with a cutter! I stopped long enough to build a board to keep the straight keel straight. Then it was time for Ratlines, swivel guns, anchors, lifts, braces, etc... The finishing touches... And here it is, finished today: It isn't perfect, but as a first attempt at sails, I'm really pleased... Not sure I'd attempt all the sails on a frigate, though! Thanks so much for all the encouragement and advice along the way. Happy building Rob [edited to restore photos, 11, 13 July 2017]

- 25 replies
-
- 5
-
-
- finished
- sherbourne
- (and 1 more)
-
Brilliant. Some wonderful people gave me a jeweller's saw for Christmas, so I'm looking forward to trying that out... I think this build is going to go slowly, and hopefully plod along beside the new incoming project - HMS Diana from Caldercraft, but built as Ethalion (1797). That's due to arrive in the new year and will be much easier to get on with in the evenings without annoying the neighbours Happy Christmas to you all
-
Aah, I'm glad you mentioned that, Tony, as I hadn't spotted it... I've been focusing just on the hull, but I am hoping to try out some sails (and even add them if they turn out well enough), so I'll have another look at the logs on this site, and perhaps add some more belaying points on. Thanks so much for the heads up! Rob
- 25 replies
-
- 1
-
-
- finished
- sherbourne
- (and 1 more)
-
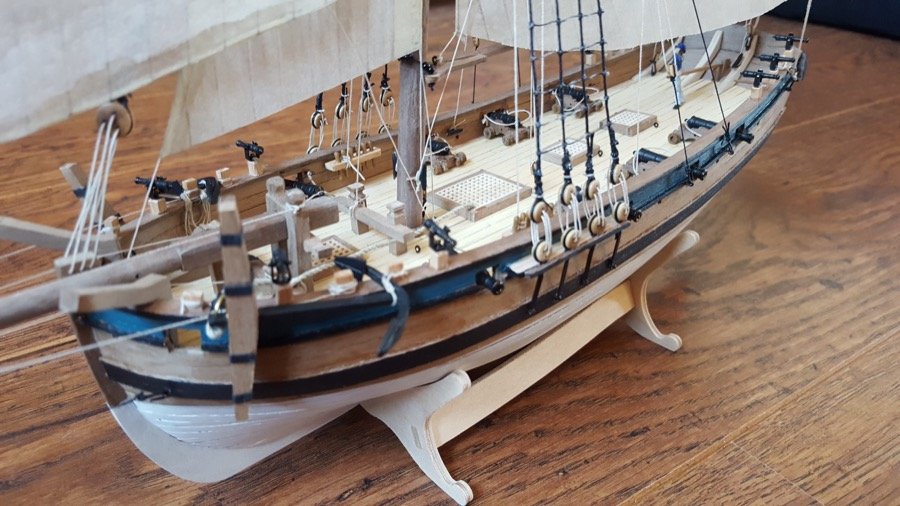
Thanks again to all for the likes and encouragement Yes, it really does spur you on when the pile of wood starts to look more ship-like... Lots of progress today... The rudder's on. Made up the anchors. Also put the channels on along with the peg boards inboard. I made replacements of these parts from beech to contrast the hull, rather than use the walnut ply, as I wanted them to look a little bit less flaky... Also made all the frame heads and swivel gun mounts out of beech to continue the theme... Long story short, here's the progress so far... Really pleased with how it's coming along. Take care Rob [edited to restore photos, 11, 13 July 2017]
- 25 replies
-
- 5
-
-
- finished
- sherbourne
- (and 1 more)
-
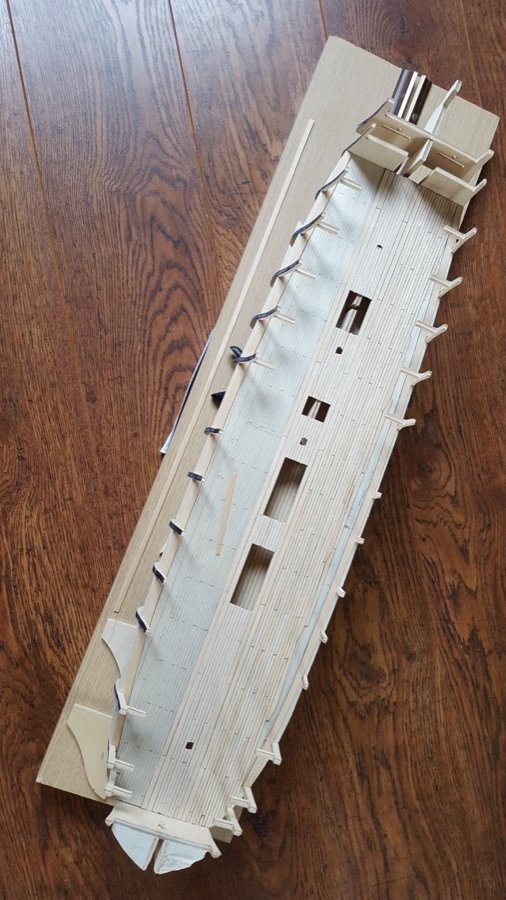
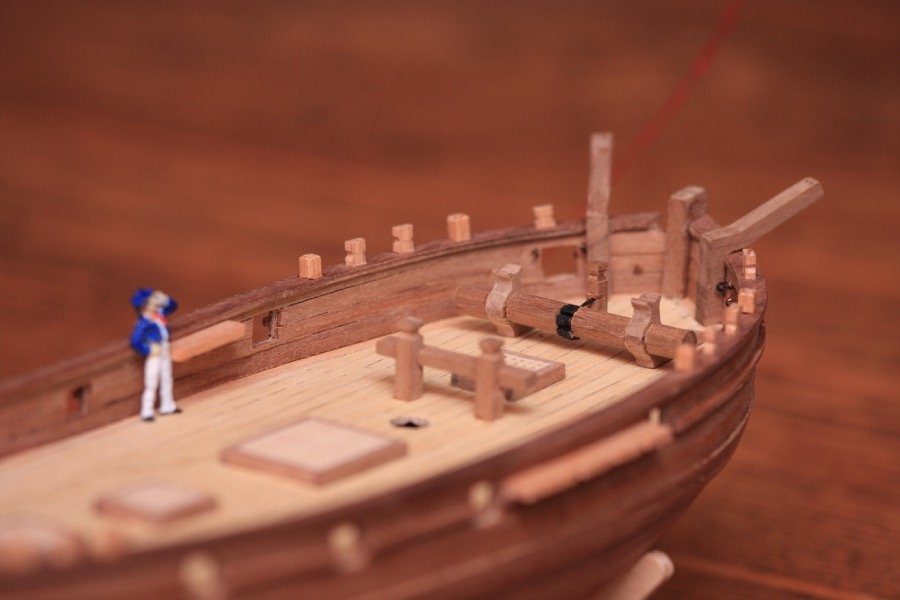
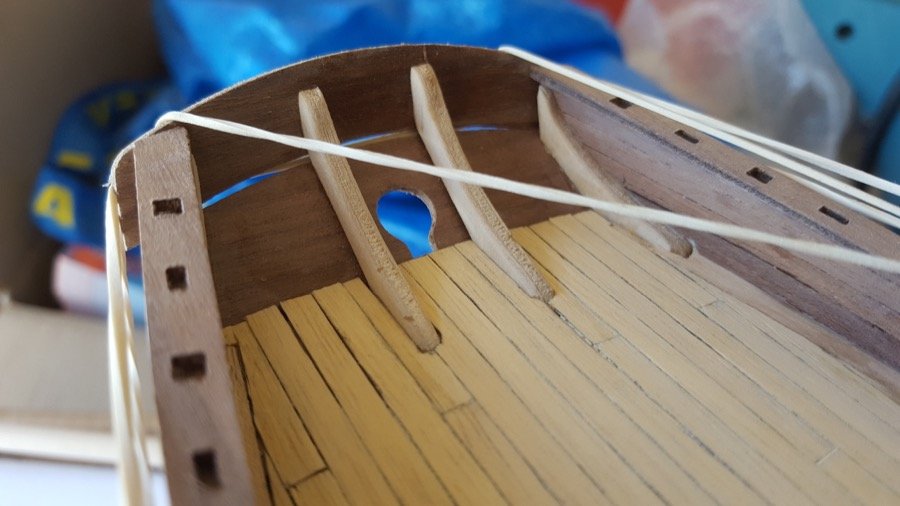
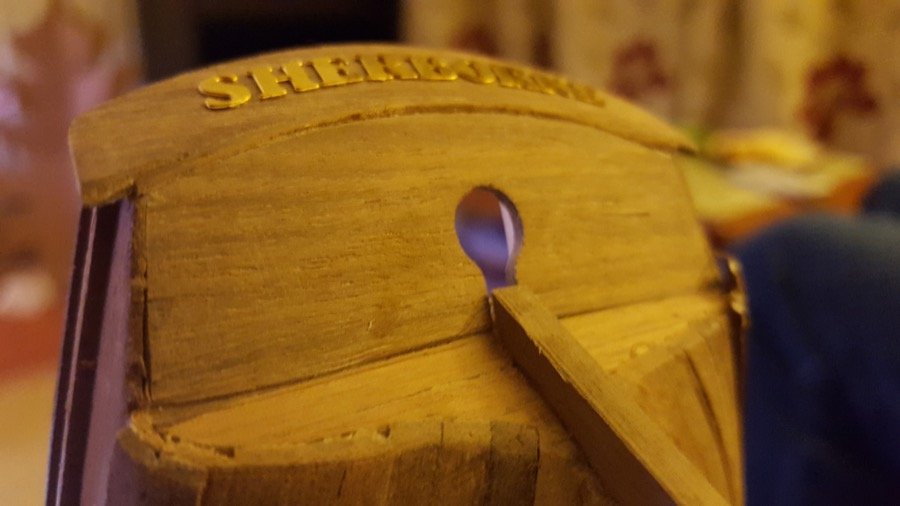
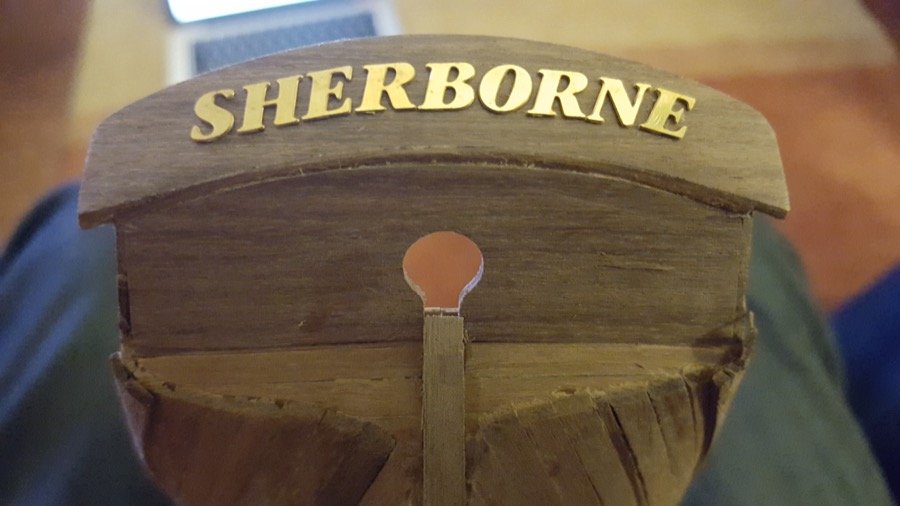
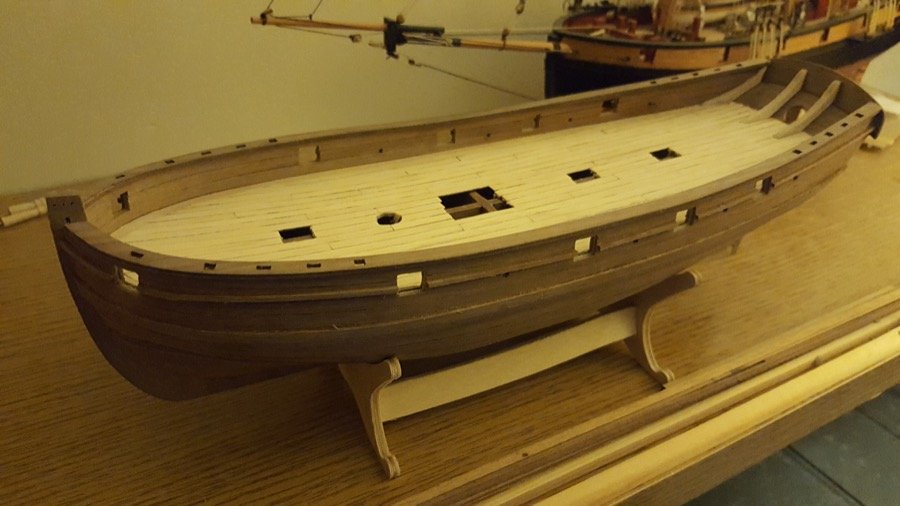
Hi again, A little more progress. The deck's down. I marked out the shift pattern and then I put the deck down using a pencil to simulate the caulking: I've also planked the inside of the bulkheads, and opened up the gunports and oar ports again. Then I put the capping rails on. (The second picture below has some of the deck furniture roughly in place, but not fixed, just to see how it looks... I couldn't resist ) Once the capping rails were in place, I trimmed them back, and added the stern. The stern fascia was first put in boiling water, then clamped round the cutlery holder from the kitchen sink to give it a curve. Once dry, it was fitted in place. This left a small gap at the bottom (so that the top was level with the tops of the capping rail, which I remedied by adding a small strip of walnut) I added the lettering on to the stern - you'll notice I dropped the "U" from the name to match my wife's old school (brownie points for free!), and then it was on to the wales... Think that's it for now. Managing to stick to the plan of not painting anything... the only things with any paint on so far are the remaining photo-etch, anchor, cannon. Quite pleased with the effect at the moment. Next job is to tidy up the ends of the wales, and put the rudder on. Happy building. Rob [edited to restore photos, 11, 13 July 2017]

- 25 replies
-
- 3
-
-

-
- finished
- sherbourne
- (and 1 more)
-
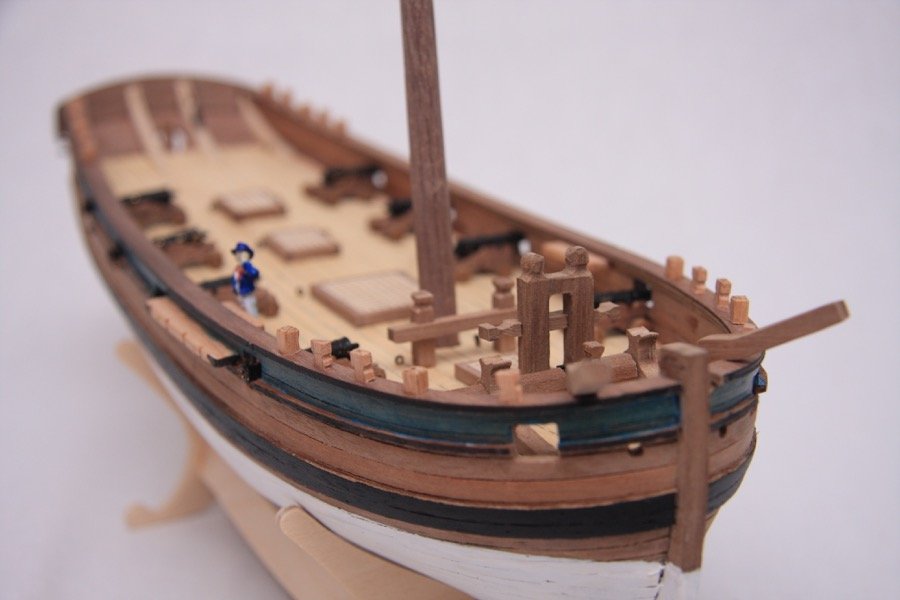
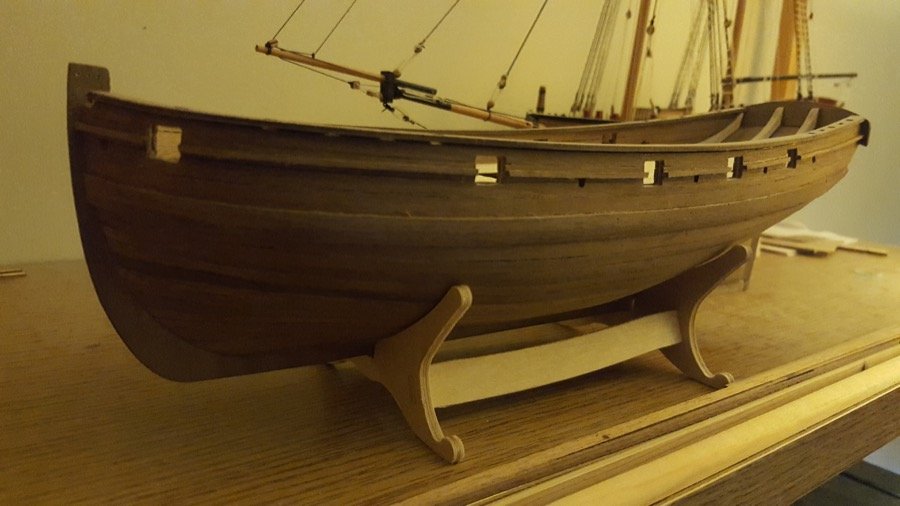
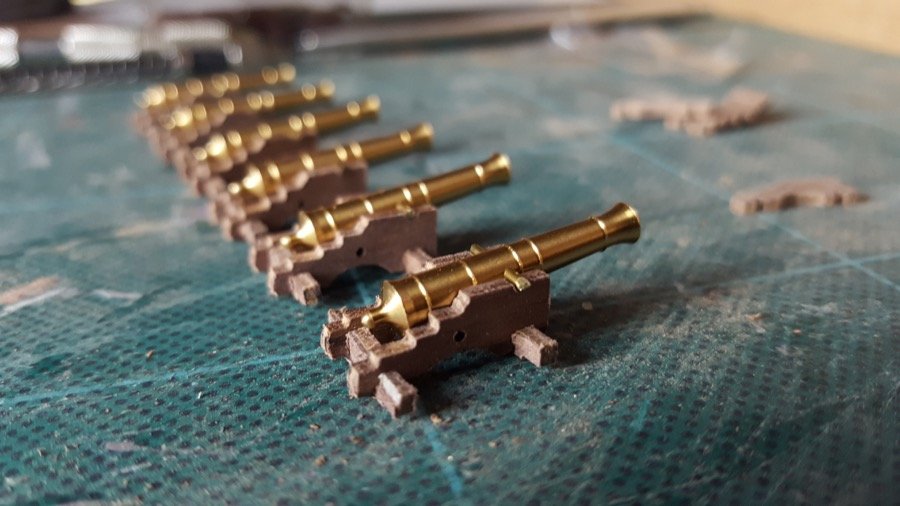
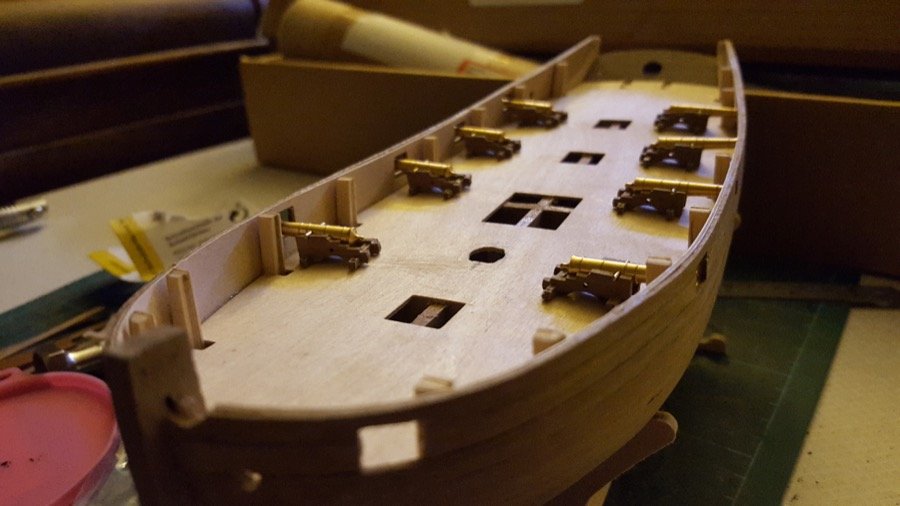
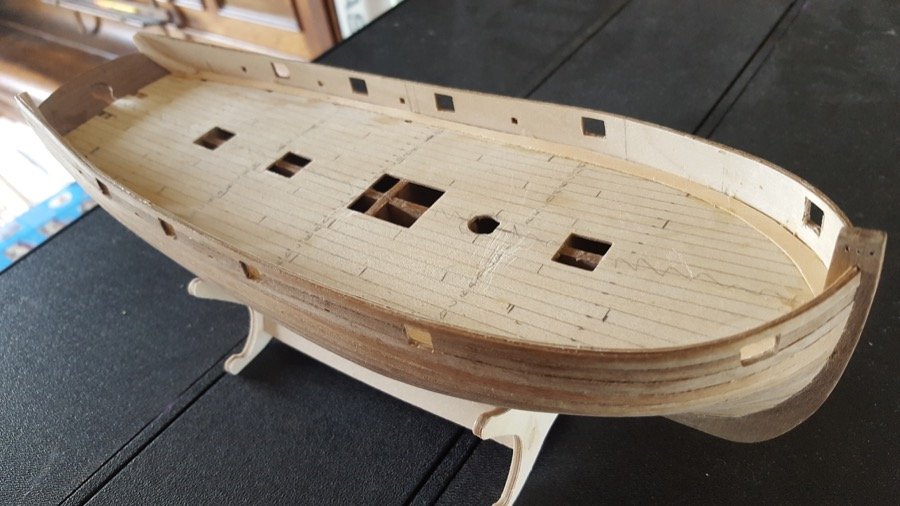
Time for an update... I didn't really see the benefit of posting every time another plank went on, but here's the result... And another comparison with Pickle... Also - while waiting for glue to dry... (and trying to build my patience!), I began the cannon... these were a little rough as they came out of the cnc cut walnut ply, but by pinning them all together, I was able to tidy them up enough that I'm happy with them (at least without a milling machine, I think I'd struggle to make better from scratch)... And one with them on the deck to see how the ports line up... (although they're not on their wheels yet, and the deck is yet to be planked...) Finally, the bulkhead stubs were removed and the deck marked up for three-shift planking (I think?!?). I used some veneer I had left from Royal Yacht Caroline for the waterways. The gaps at the edge should get covered up by the planking that will go on the inside of the gunport pattern (he said, hopefully!). Starting to take shape Happy building Rob [edited to restore photos, 11, 13 July 2017]

- 25 replies
-
- 4
-
-
-
- finished
- sherbourne
- (and 1 more)
-
Thanks for all the advice. I've paused to reflect on the best way forward as I finish off the second planking on my Sherbourne (bring on the scrapers!). Almost there now. Just two planks left on the port side. I'll have to invest in a jeweller's saw. I managed to find some replacement coping saw blades with a higher tpi, so I'll give them a try. A scroll saw does sound like a good idea though (might have to wait for that kind of investment!). I'll have a look round and see if i can get a bigger drum sander, too. Thanks again Rob
-
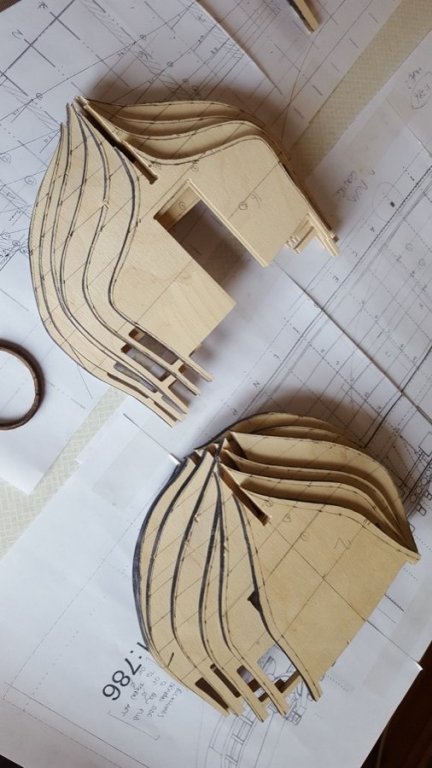
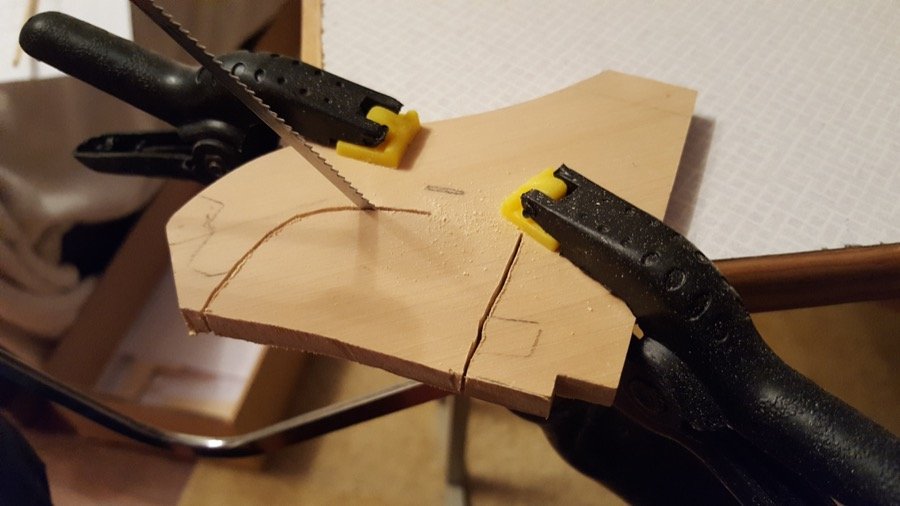
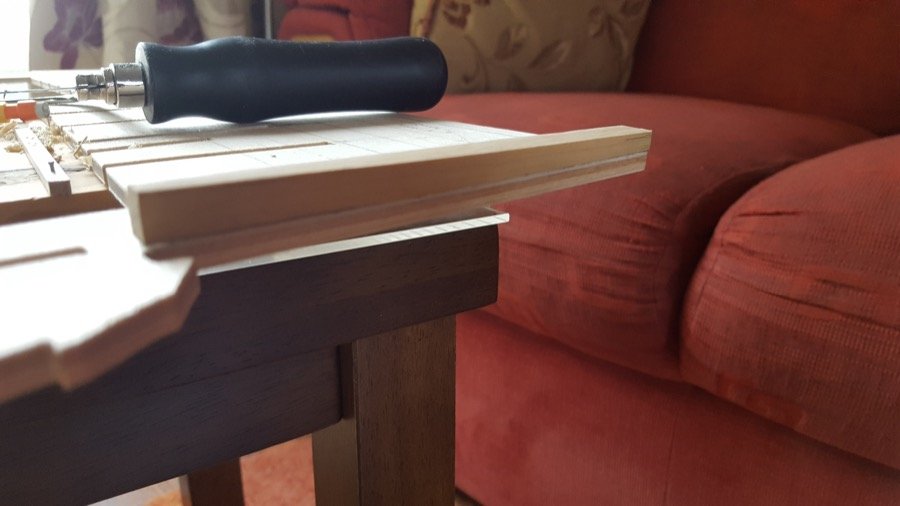
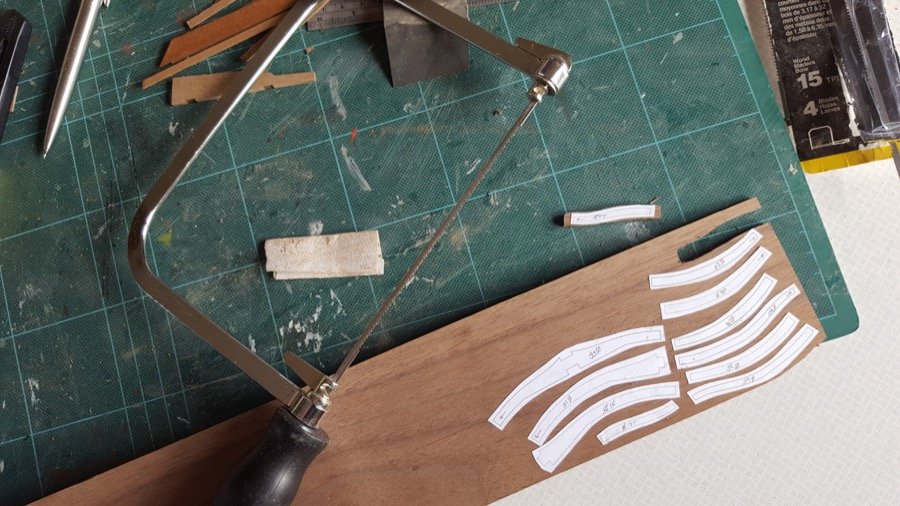
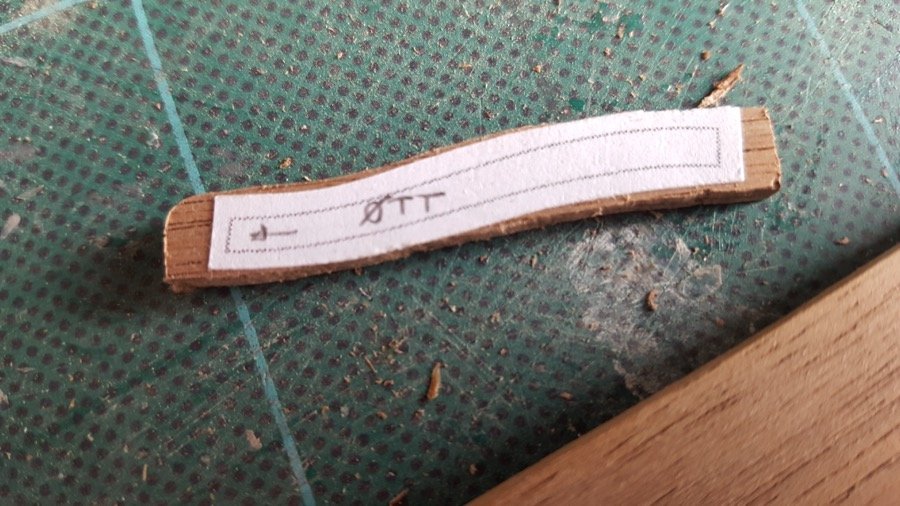
Well, not much progress, but a little. This project is going to be a slow one, as I'm working on it while I work on Sherbourne to get a feel for whether I have the scratchbuilding skills (and patience) to try something harder. That said, I had a good headscratch, and I think I'm beginning to work out how I can turn boards of walnut into something resembling parts of frames (given the distinct lack of power tools). So here's the progress so far. I've printed off the plan for frame 0 (at a factor of 0.75 to make it 1:64) and stuck the component patterns onto the walnut with pritt stick to allow me to remove the patterns later. Then very gently with a coping saw (I've ordered some finer blades!), I cut roughly round them. The next challenge was the bigger hurdle. I don't have a scroll saw, band saw or any powered sander... but I do have a basic stand for to turn a hand drill (750W) into a pillar drill... so I mounted a proxxon drum sander part into the drill chuck and lowered the stand as shown in the photo, so it was permanently level with the work surface... It sounds horrendously loud - so loud in fact, I had pity on the neighbours after a short while... and I had to keep one hand on the drill power button... but it kind of did the trick... My issue was that although it was sanding the excess away, it left a pretty wavy line, so a larger drum would be handy. It looks like the following would help: * A better way to cut the frames out, so I can cut closer to the lines (i.e. a scroll saw / band saw?) * A quieter way to sand the frames, so I don't annoy the neighbours and provide a variety or sanding disk sizes to allow me to attain smoother sanding (perhaps an oscillating spindle sander?) Anyway - progress... and I'm encouraged that this isn't impossible, just time consuming and requiring patience on my part. Pictures below:


-
Thanks Pete, and thanks everyone for the likes. I'm planning on using walnut. But this is very much a try-it-out project, so that may well change. I've got some wood on order for the frames at the moment. Rob
-
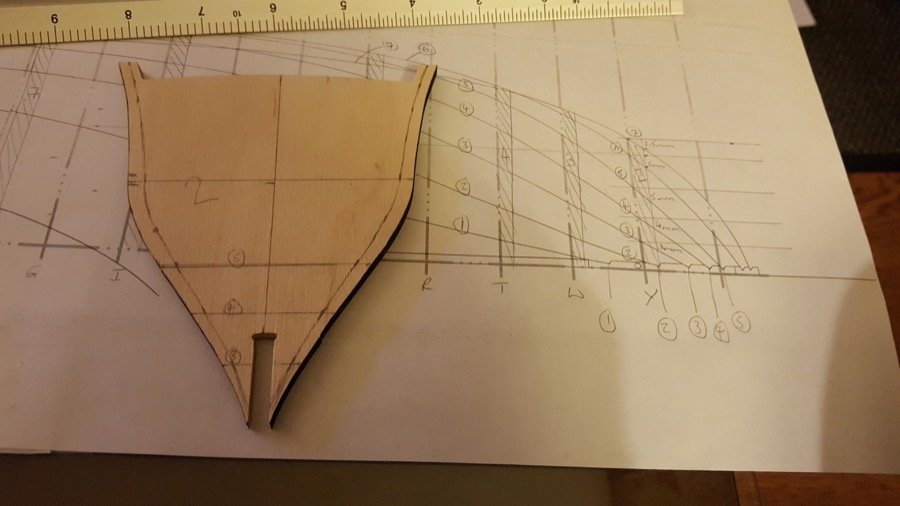
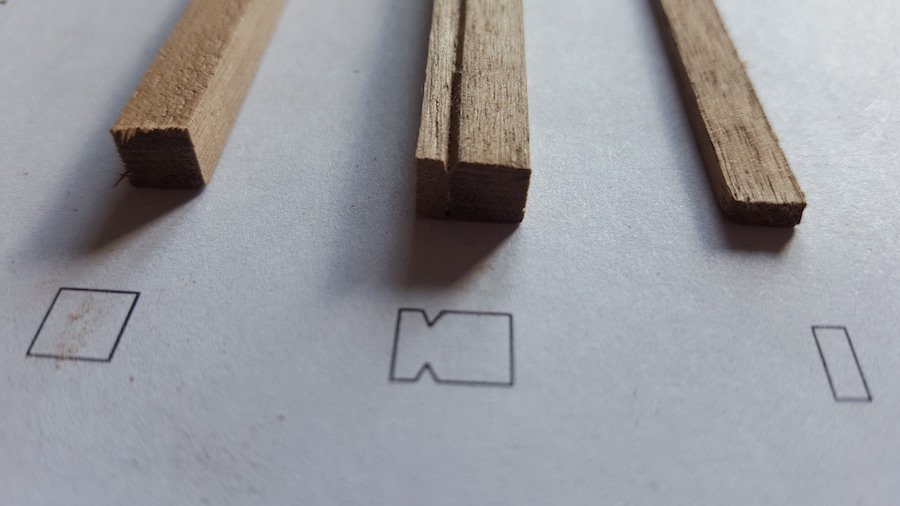
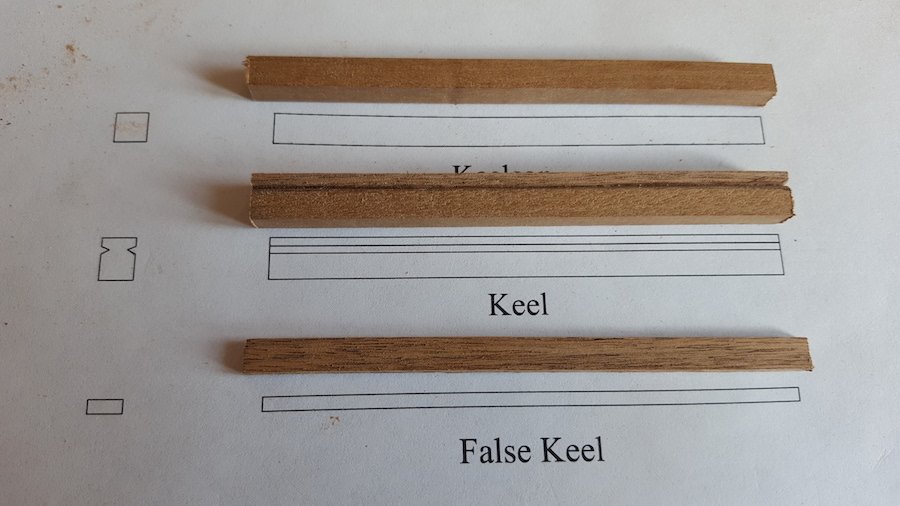
Hi, Hoping to make a fully framed frigate in the future in 1:64, so this seems the perfect place to try out some of those skills. I've only done plank on bulkhead before from kits, so it's a bit of a journey into the unknown, but how helpful to have so many others who've travelled the path before me! I scaled the plans down by a factor of 0.75 to take them from 1:48 to 1:64 (where 3/16" is equivalent to 1ft). Here are the picture so far. Parts are walnut. I've left the keelson, keel and false keel longer than the plans and intend to trim them down later on in the build.
-
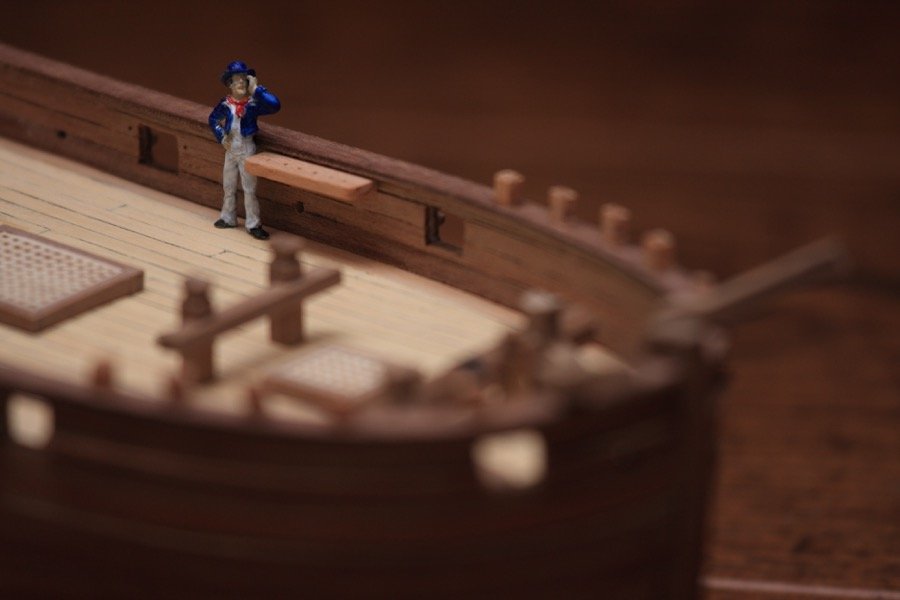
Hi Frank, There are no characters included in the kit, but I bought them separately from here: http://www.cornwallmodelboats.co.uk/acatalog/amati_crew.html They're amati figures (I think the 25mm figures, which works out at around 5' 3" in 1:64 scale - the next size up i 35mm which comes out as around 7' 4" - so giant!). They come in white metal, and I painted them using Vallejo Acrylics. They do look quite good. Thanks for the compliments Rob
-
Thanks for the likes and the helpful comments. It's the first time I've soaked planks so I'm on the learning curve. It is encouraging to have other builds going on at the same time. Bit more time today so I'll try letting the planks dry before I fit them finally. Might make a start on some other bits while I'm waiting for that to happen.
- 25 replies
-
- 2
-
-
- finished
- sherbourne
- (and 1 more)