HOLIDAY DONATION DRIVE - SUPPORT MSW - DO YOUR PART TO KEEP THIS GREAT FORUM GOING!
×


robdurant
-
Posts
842 -
Joined
-
Last visited
Content Type
Profiles
Forums
Gallery
Events
Everything posted by robdurant
-
 This looks exciting - hope you don't mind if I pull up a chair Will you make her radio controlled? I guess she'll have quite a big displacement. Rob
 -
A brief update - not too much more to show (I'm a pastor, so it's a busy time of year ) - but I have been working away at the guns when energy and time allow...
-
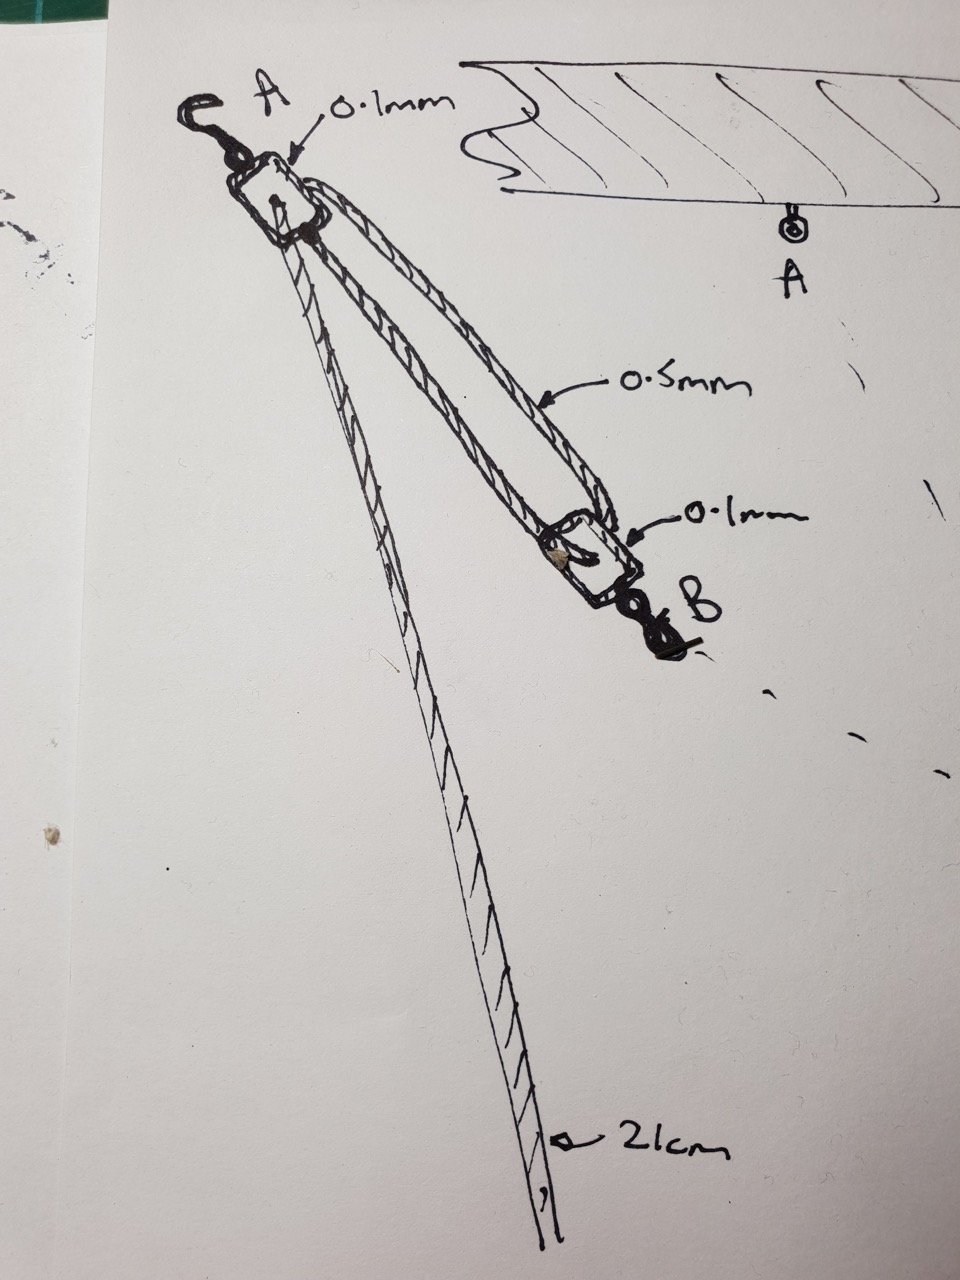
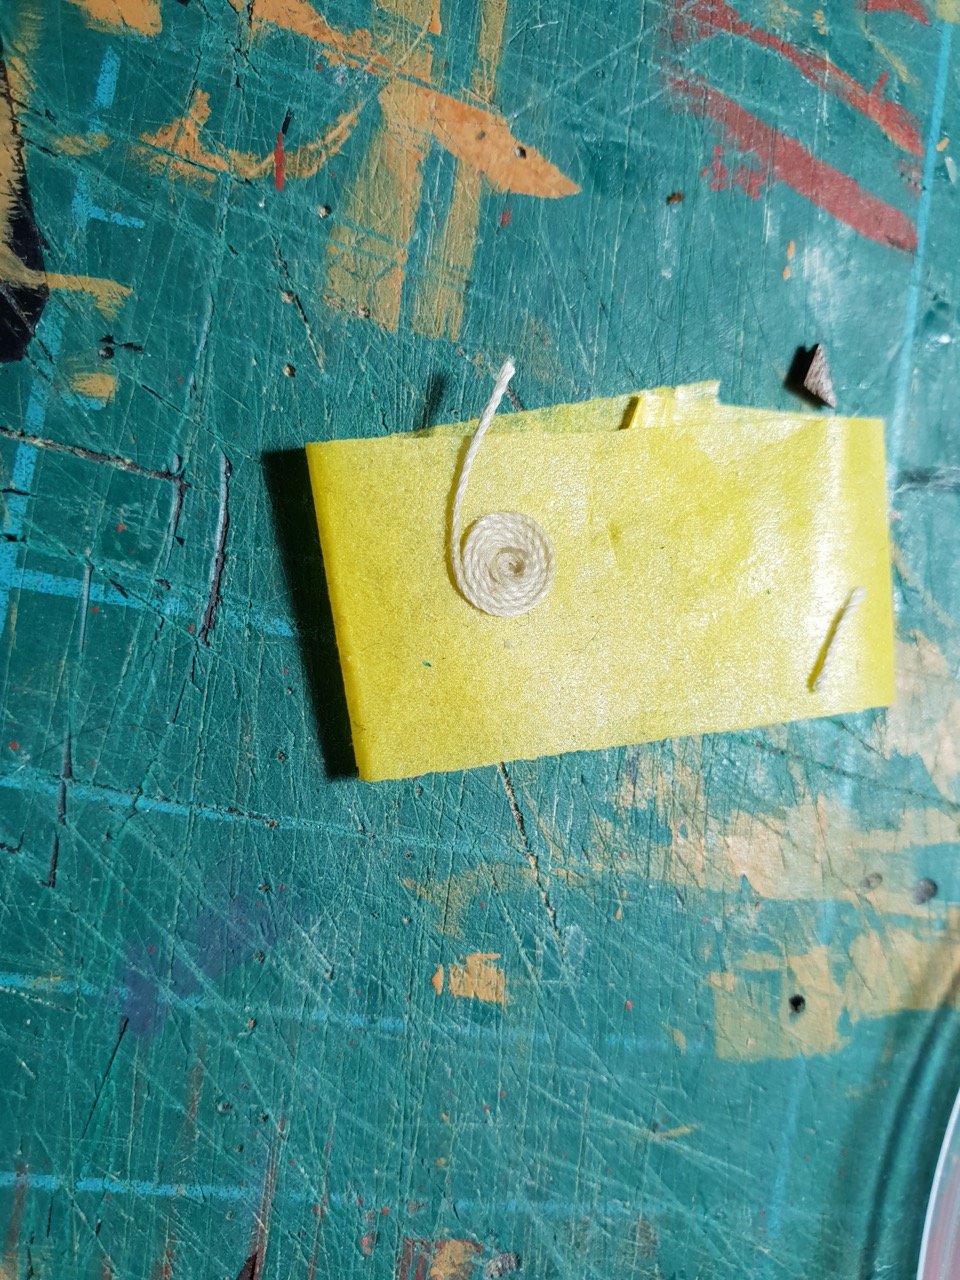
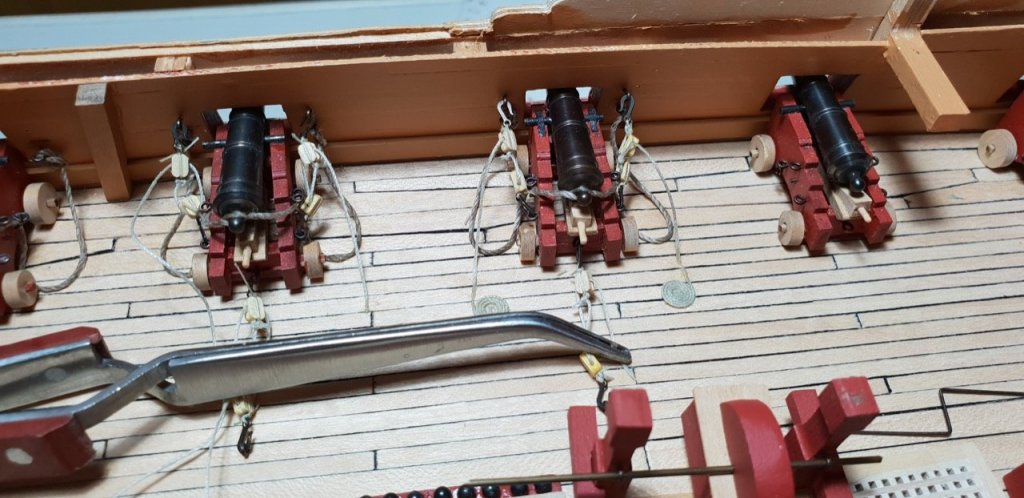
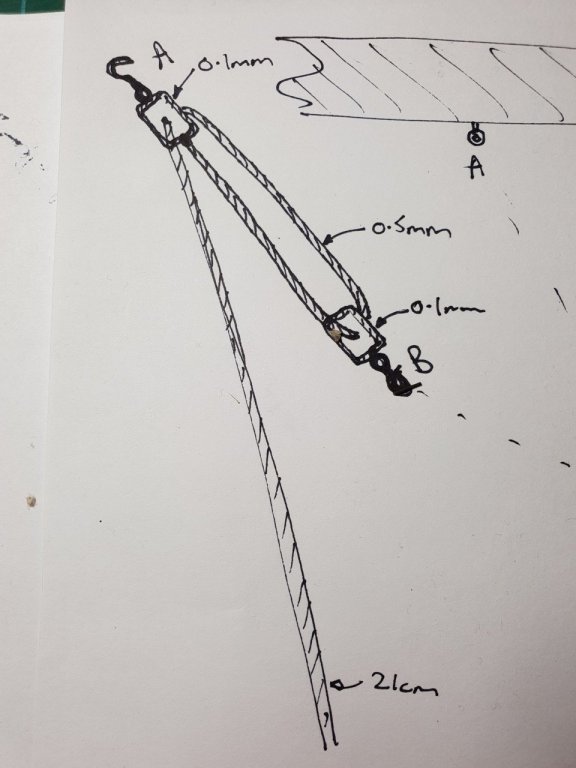
Before I go too much further I want to get the guns mounted on the upper deck and rigged. That means getting all the aiming and running in / out ropes ready. I ordered 110 boxwood 3mm blocks from cornwall model boats and some extra 0.1mm natural thread. The plan is as follows (excuse my drawing) Rig three of the following with two single blocks. One will go on each side, with the falls nearest to the bulkhead. One will go at the rear of the gun for pulling away from the bulkhead to reload... the fall will be nearest the gun on this one. The ropes in use are 0.5mm for the main rope, and 0.1mm for stropping(?) the block. I'm using 2mm hooks at either end (available separately from caldercraft through CMB)... These have been blackened with brass blackener, making the whole thing much easier, as the holes don't have to be opened up again as they would with painted hooks. Superglue is used on the end of the rope to help get it through the hooks / blocks as necessary. The 21cm at the bottom is the scale length of the rope, however in practice I'm making these shorter, as the plan is to put cheese at the end of each rope. I've put a photo of these in construction at the bottom too... I can't remember who suggested making these by putting them onto the stick side of masking tape, but it's genius! Thanks to you! I realise I haven't mentioned the breach rope... I'm using some rope I had left over from Royal Yacht Caroline, which looks really nice... I think it's about .75mm, and a nice light grey colour. It's untwisted in the centre and the loop placed over the cascabel. So... 11 side tackles done... I'll be fully rigging all the visible guns but not the rest... They'll have breaching ropes, but not side tackles. (That is, unless I change my mind, which may well happen... we'll see. Once the guns are in place, I'll finally install the gratings, pillars, chain pumps, hand pumps, bitts, manger, elm-tree pumps, and gun shot racks... I also need to remember to put the cleats in... Once that's done, we'll really be making some good progress, and it'll be onto the head rails. At least, that's the plan. Should keep me going for a while! Still loving this build. It's by far the most complicated I've ever attempted, but it rewards patience, and nothing's so hard it can't be done with forethought and planning. (oh yes, and you lovely ladies and gents on modelshipworld to give inspiration and encouragement!) Anyway - happy building Rob

-
I spotted this kit some time ago, and couldn't find a build log at the time so I'll be very interested to see it come together. It certainly looks like it has the potential to be a very handsome model indeed! Hope you don't mind if I follow along. All the best Rob
- 356 replies
-
- 3
-

-
- red jacket
- finished
- (and 1 more)
-
A quick update. I finally plucked up the courage to stain the beakhead black in preparation for the head rails. I've assigned the guns individually to their ports, and gone along setting the elevations. I'm pleased with how this went, although the final gun towards the stern needed the carriages modifying so they fitted. I've also boxed in the stern lights, fixed the transom onto the stern and filled the gap between the stern galleries and the stern transom, and repainted that area. It's ready for the final decorations. I've started making the ladders that will lead down from the gun deck through the companionways. The next task will be to rig the guns, and for that I've ordered some light single blocks to take the place of the walnut ones for the guns. I didn't have the facility to scratch the ladder sides - at least, I didn't think I'd be able to do a neat job, so I've painted the walnut parts, and used box veneer for the steps. This is before the steps are trimmed to be the right height. Happy building! Rob


- 275 replies
-
- 12
-
-
Aggie's looking great, Ian. Hope you don't mind if I follow along. Neat solution with the guns. Rob
-
Thanks Jason. Looking forward to it. It's a bit of a jigsaw and a very tight fit where the chain pumps fit round the mast.
-
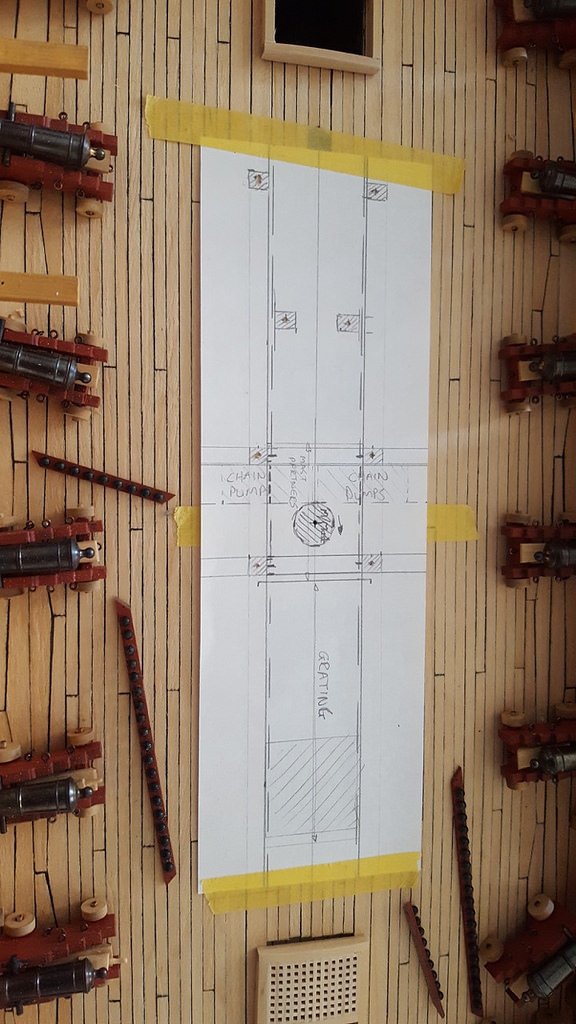
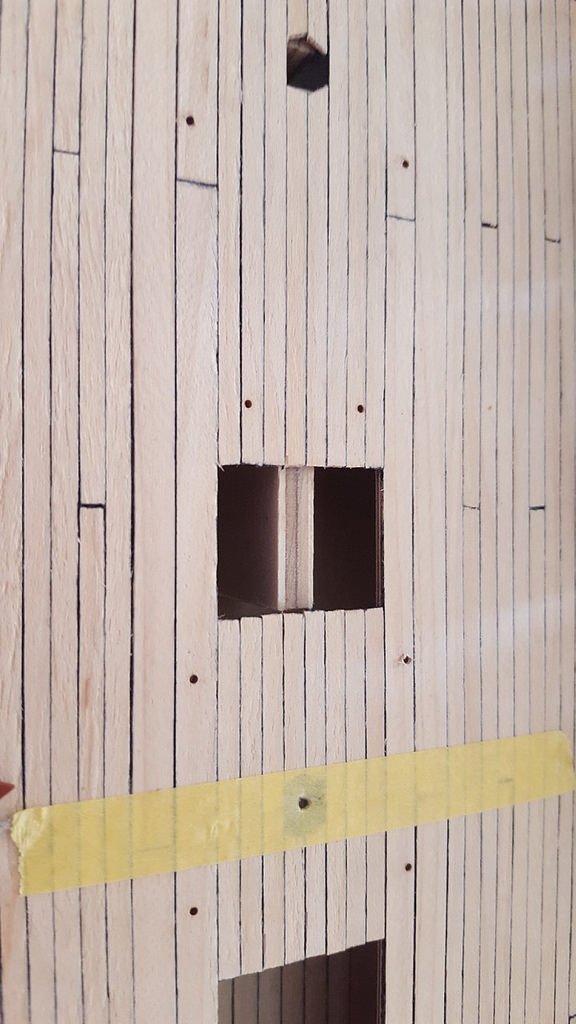
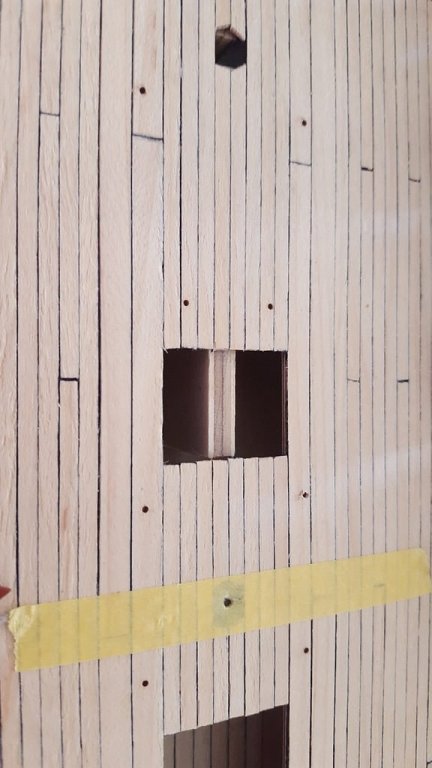
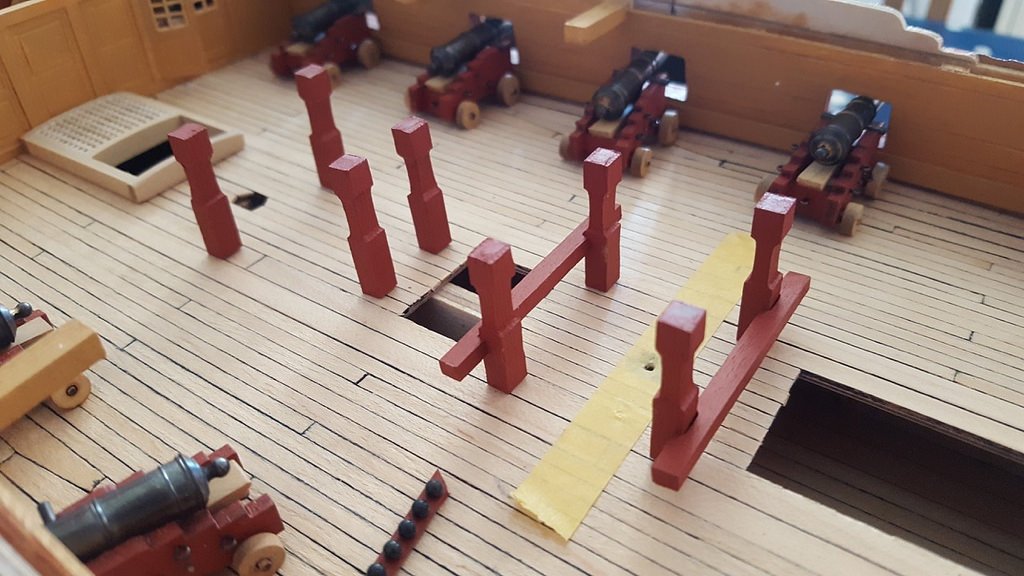
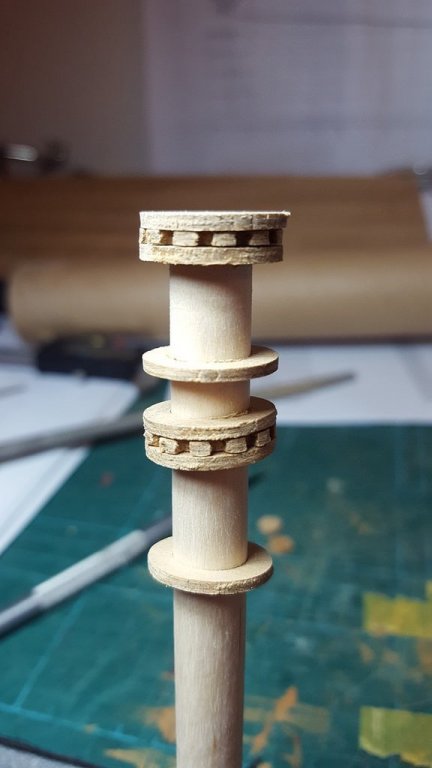
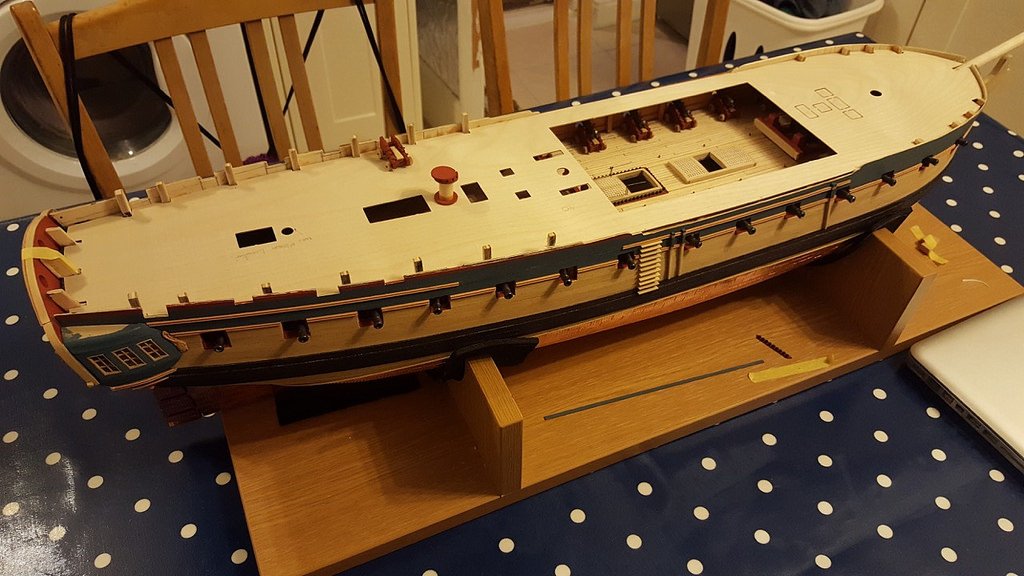
As always - thanks for the likes and encouragement Hi Jason - I couldn't agree more... if you could look through the stern lights down the gun deck that would be awesome! A lot of work to make that happen,though, and it would need to start way earlier on in the build. I don't think I would have been comfortable I could cut away that much structure and keep the stern the right shape. Progress? Well, I've been kind of feeling my way forward. I wasn't sure quite which details I wanted to focus on... Ray completed the gun deck, putting all the guns in position, and then got the second deck on before channels and head rails etc... Jason is completing the outer hull before mounting the guns... decisions, decisions! Anyway, I thought I'd at least get the deck furniture in place. I think I'll follow Ray's lead on this one, and try and get the deck complete, that way I can be confident about the deck level before i start to install final rails and channels etc... That meant sorting out the chain pumps and posts to hold the pump handles. It also meant getting the holes for the gun tackle / breeching into the bulkheads. I made a few plasticard templates to help me get this uniform around the hull. I also made up the capstan. So... here's the question. I noticed that one of the ladders is in the middle of the space where the capstan bars would go... presumably the steps (and anything else i nthe way) could be removed as necessary - that'd be a shock if you tried to get down from the quarterdeck to the upper deck in a hurry! You might get there quicker than you expected. I had a first attempt at making up the chain pump housings a while ago, but I wasn't happy with them. So I remade them. The housing was made from a wood left over from another build... not sure what it was, perhaps lime? It didn't matter too much as I painted it. The tops were solid box. I made feet mimicking the boxes where the pump went down into the hull. These were different heights outer and inner to accomodate the boarding around the mast. Once complete, I took a look at the brass-etch handles. I wasn't very happy with these, as it strikes me they should be round section, not flat. So I made my own out of .5mm brass rod, with the ends hammered to flatten them. I made a diagram of where the posts should be, and then used that to drill the mounting points for the posts into the deck. The posts were filed to make the insets on all four sides, rather than just the two as they come in the kit. These parts are walnut, and were painted so they fit with the rest of the deck furniture. Posts before: Posts after: Diagram for deck layout... Holes drilled in upper deck And the parts dry-fitted in place... Once everything's in, it's pretty tight. In fact, it would be very easy for the chain pump housings to end up in the space the main-mast occupies. Finally, as I mentioned, I started work on the capstan. I have to say, they'll do, but the walnut ply is so much harder to tidy up and make look neat than box. I think a few more going overs with some wet and dry may help a lot. At least, I hope so. The Bottom capstan is complete (if in need of tidying up), the top capstan all dry fitted, as it will need to fit onto the central column once the deck is on... Something like this... (This is the point where I heaved a huge sigh of relief - it fits!) The next task is to rig the guns on the upper deck (the gun deck, that is... the one that isn't the quarter deck, or the focsle... which also have guns on them... don't blame me, I didn't decide on the terminology!) Once the guns are rigged the deck furniture and the beams overhead can go into place, and we'll really be motoring. I neglected to get a picture of all of the bits in place at the same time on the upper deck... I'll try and get one tomorrow and post it. I love this bit of the build! Happy building Rob


- 275 replies
-
- 12
-
-
You're making me wonder whether my qd ports are in the right places now.... but I think I used the NMM plans so hopefully we're good. I'll have to check. That's a neat solution with the isopropyl. I'm sure you'll do a great job of the rework and it will be impossible to tell you needed to once it's done.
-
Hi David Looks good to me You may want to consider getting a coat of paint on the gunpoint linings before you put the second planking round them... they're tricky enough to paint without having to avoid the final outer hull finish at the same time. My boat ended up looking like a toddler who'd got hold of some lipstick around this point... I'm sure you'll do a great job and it will look really smart as you get the next skin on. All the best Rob

-
Hi Peter, Thanks for looking in, and for your kind words and advice. Yes, you're quite right. I measured the shot and they come out slightly over scale (2.38mm on the few I measured, rather than the 2.04 mm they ought to be to give a scale 5.04". I've had a little look round, and found that #9 shot for shotgun cartridges will be the perfect size, so I've ordered some of them - I say some... if anyone wants some, I'll most likely have 0.999 kg left over when I'm done! Even I can't catapult that many off onto the floor. I'll have a go at remaking the shot lockers as you suggest, and we'll see where we get to I'm definitely keen not to have the shot rolling around the deck - I'm sure the Captain George Countess would agree... (interestingly I just read that section in O'Brian's "Post Captain" a couple of days ago ) Take care. Rob
-
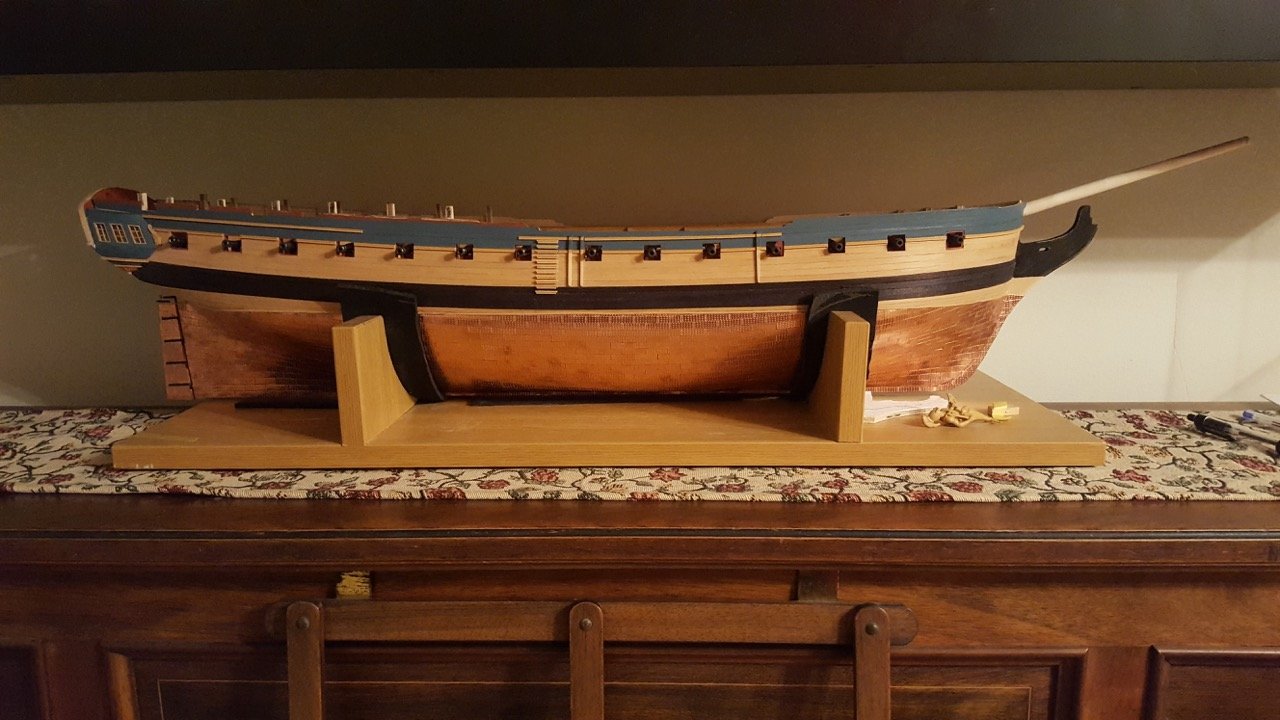
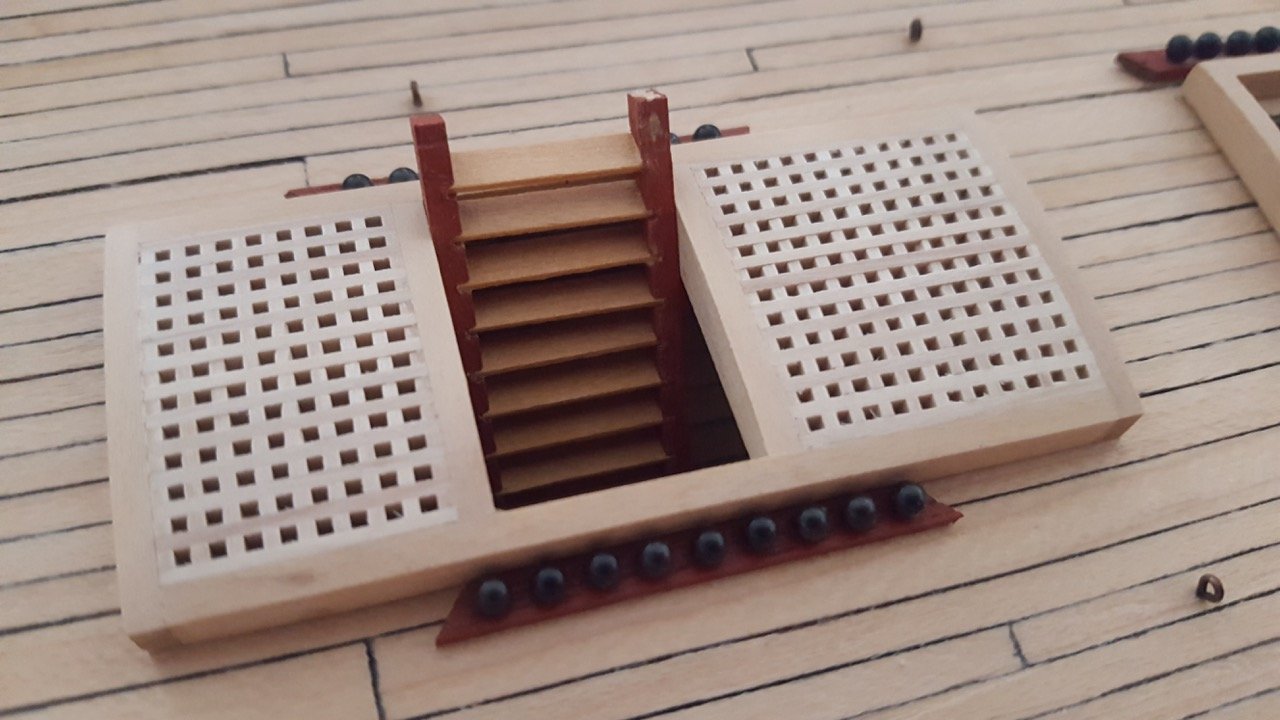
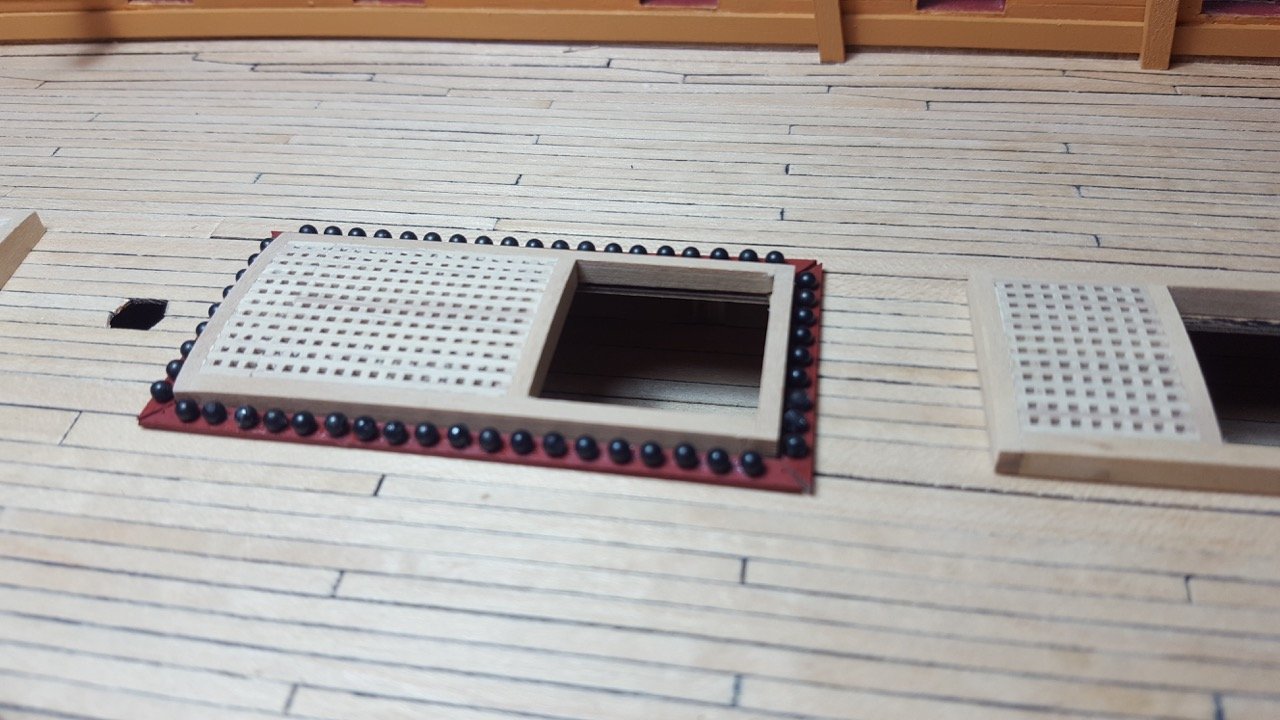
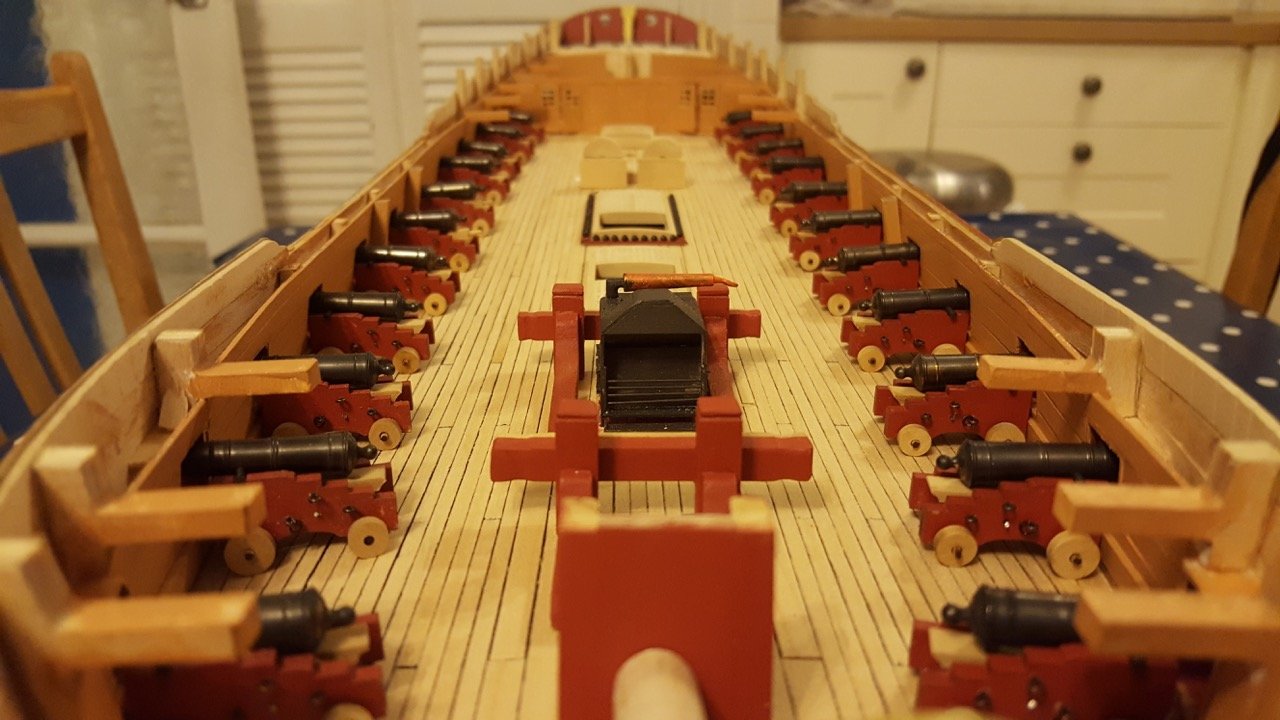
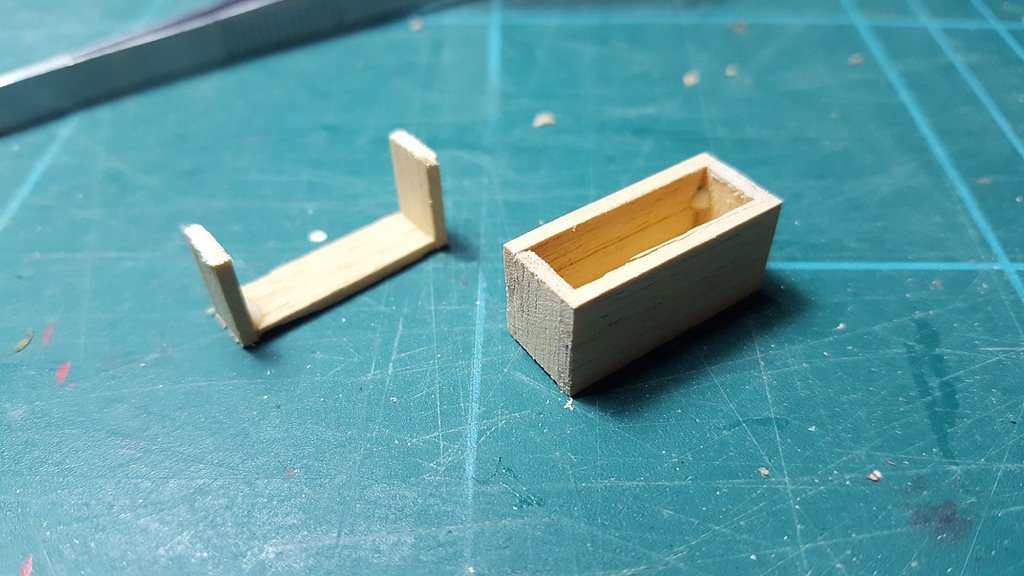
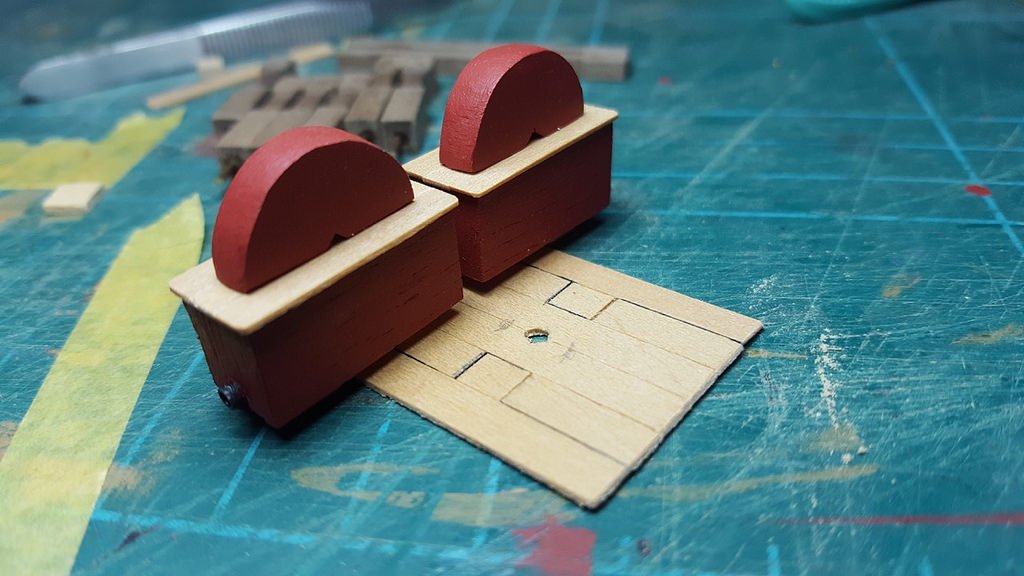
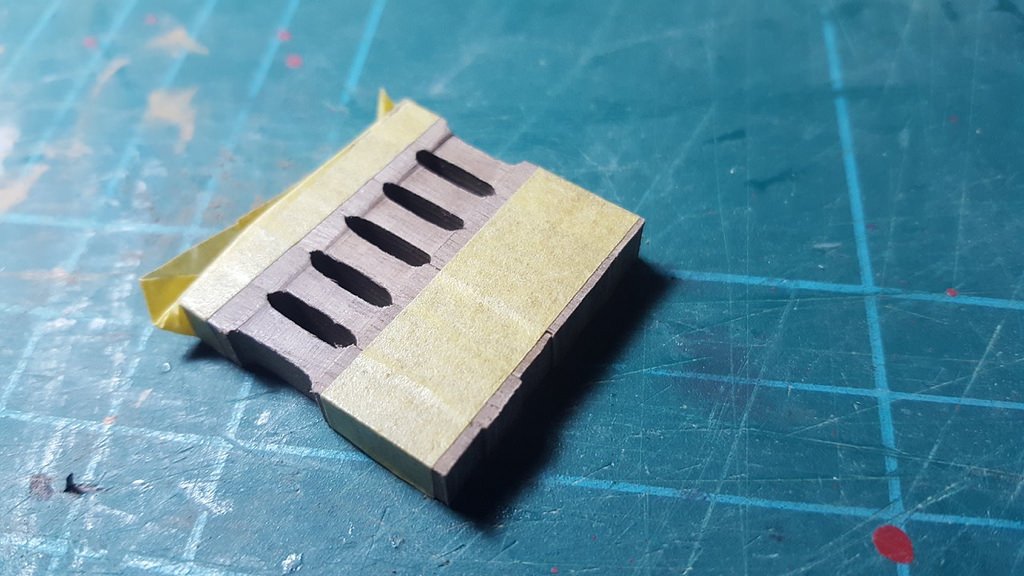
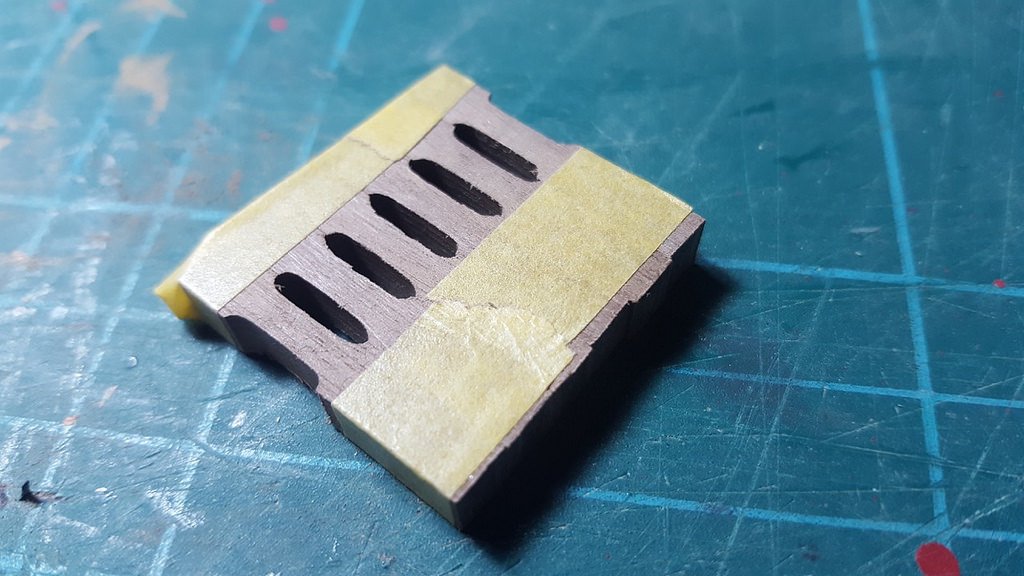
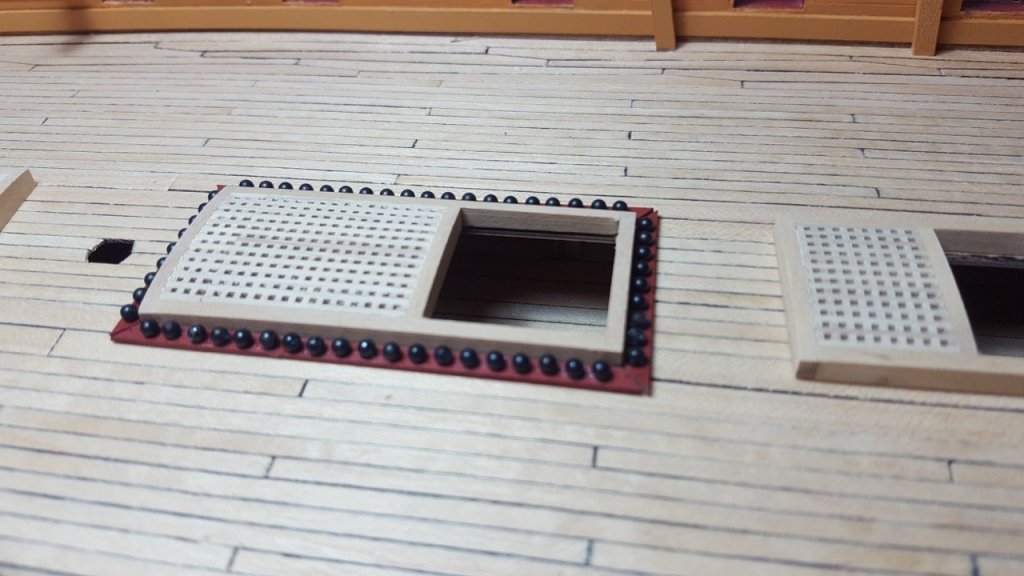
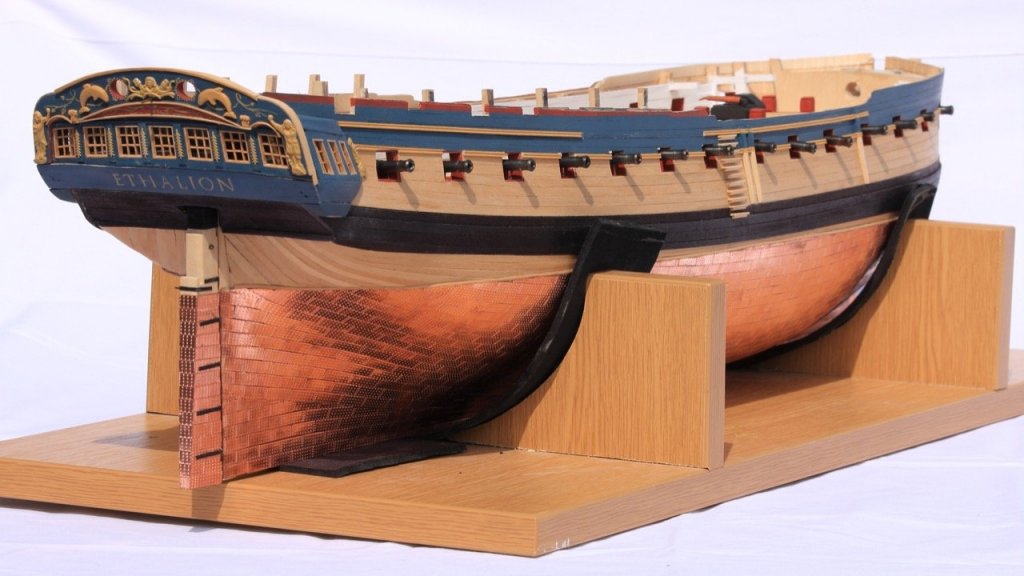
Hi all, Thanks so much for the likes. They're such an encouragement. A little update as Storm Bronagh blows. We live on top of a hill, so we're pretty much the first thing the wind reaches in about 30 miles... It sounds pretty impressive out there (for England any-how ) I've been working to finish off the 18 pounders. They're mainly there structurally on port and starboard now, with only the wedges, and the rigging to be done. (He says "only"!?!) For a little diversion, I spent some time working out how to make the shot racks around the gratings. I'd been a little concerned that the colour of the boxwood I'd used was too close to the colour of the maple on the deck. The solution? Make the shot racks red ochre, like the gun carriages. None of this is fixed to the deck at the moment, but I'm pleased with the overall look of it. I don't have a mill, so I created a plasti-card template to drill through to make the little dimples for the shot to sit in, then I used that template to drill .5mm holes where the dimples needed to be, and opened them up with a spherical engraving bit in my proxxon hand drill. It isn't perfect, but I'm pretty pleased with it. The shot comes with the kit, and was fixed in place with a dab of superglue (using tweezers and patience...!) Here's a pic of Ethalion with her teeth in! Happy building Rob

-
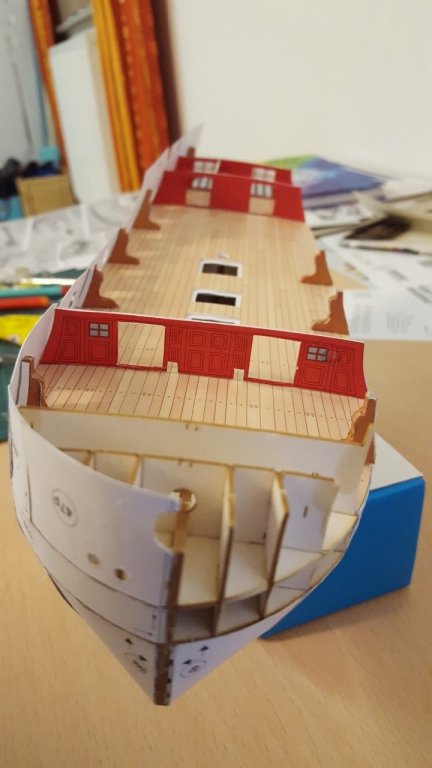
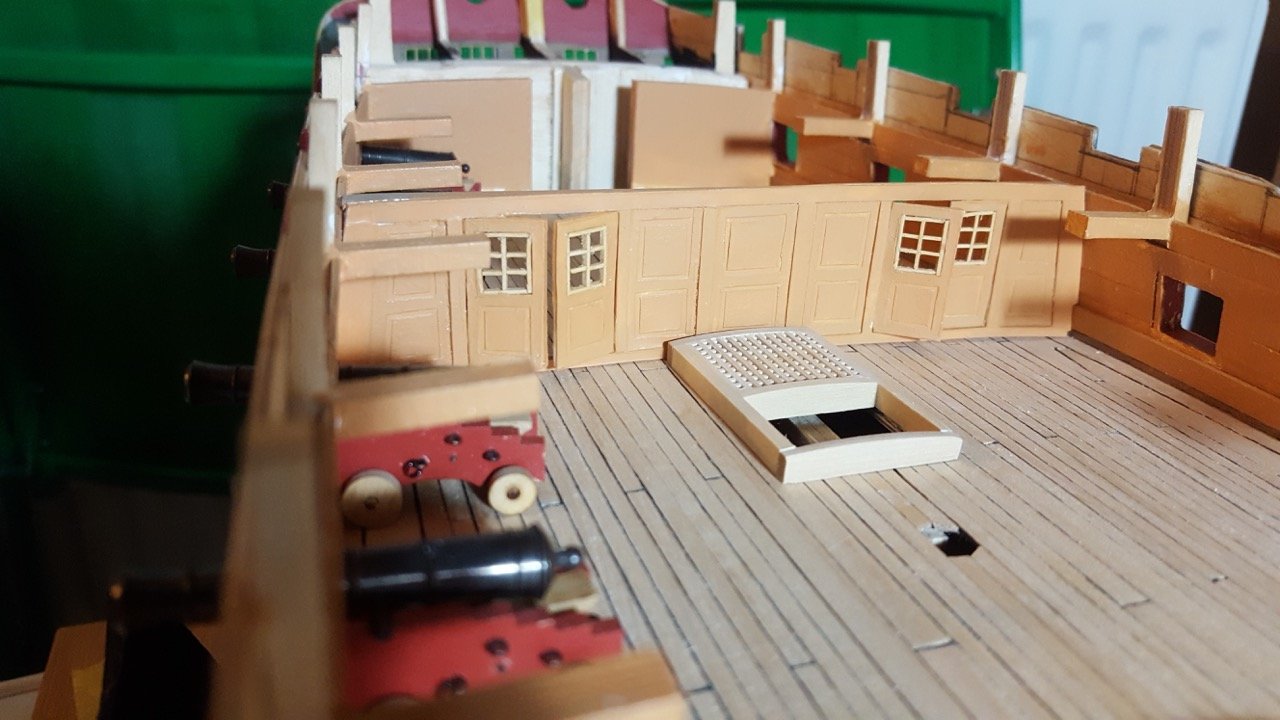
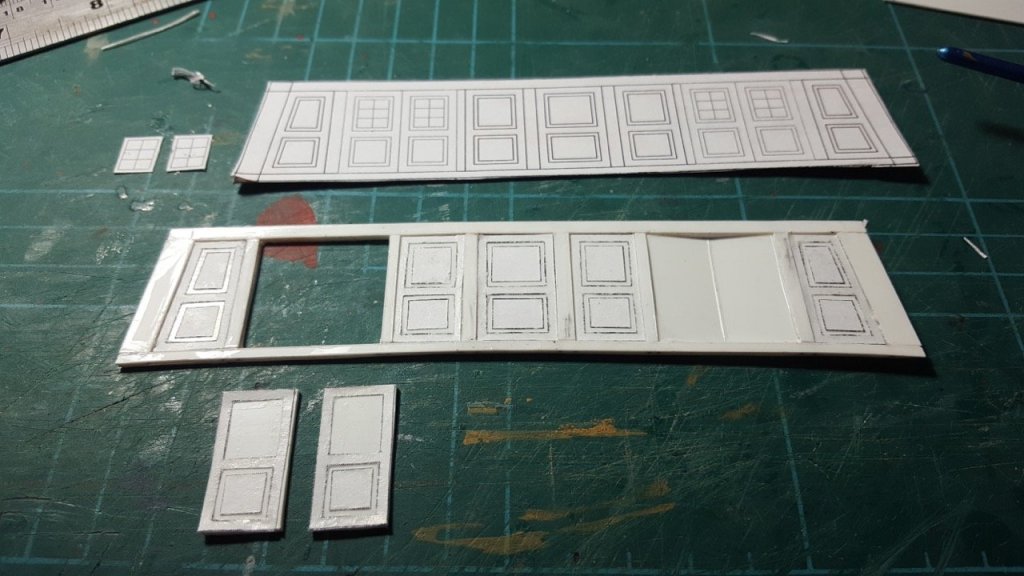
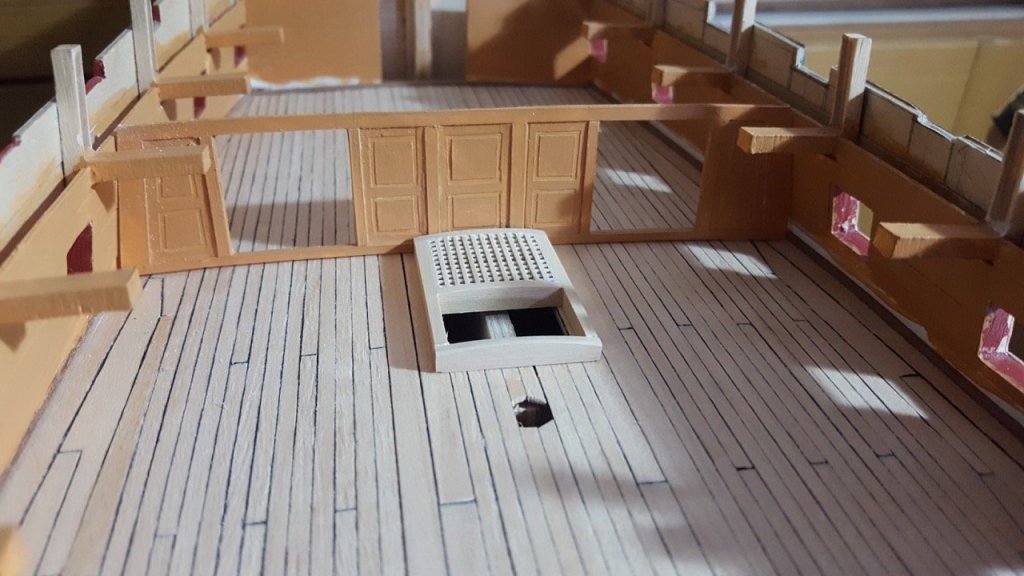
And a shot of the finished bulkhead temporarily placed in situ. The last step will be to glaze the windows. I've added the spirketting since my last post, too. Pleased with how it came out.

-
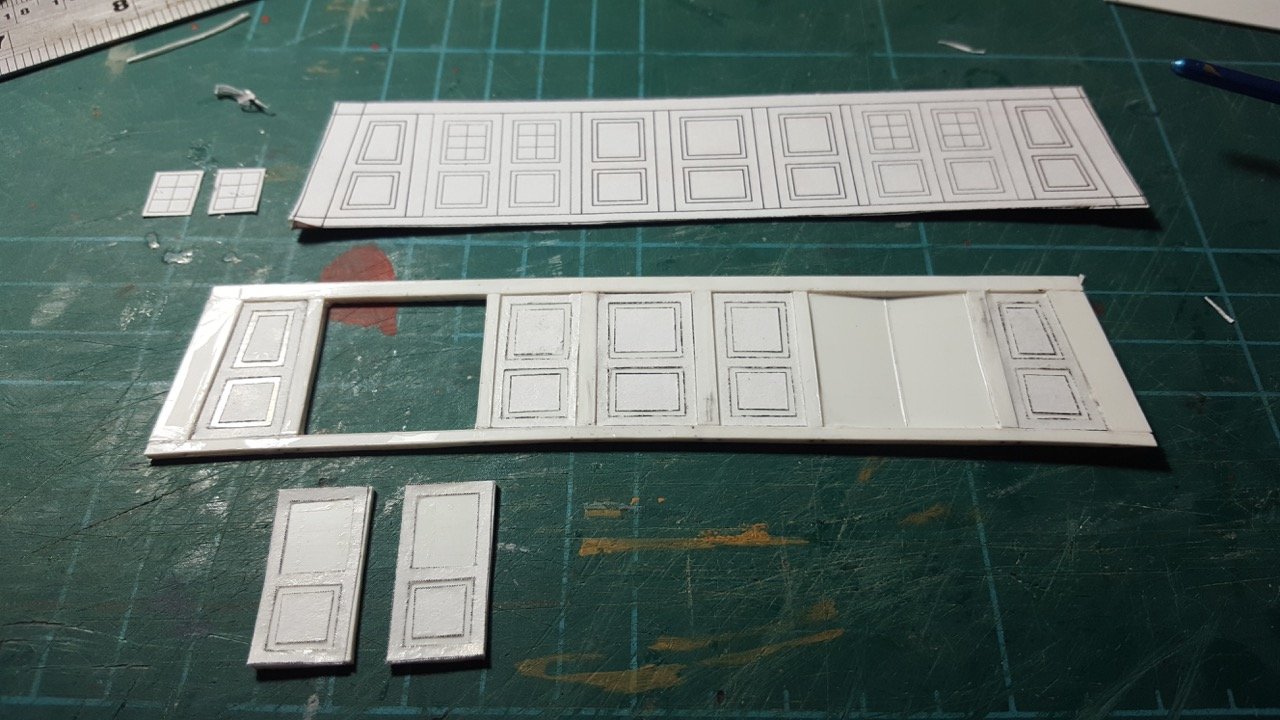
A couple of pictures of the bulkhead doors under construction. Because of the deck curve, each of the doors are slightly different in shape, so they were numbered in an attempt to help when it came to fitting.

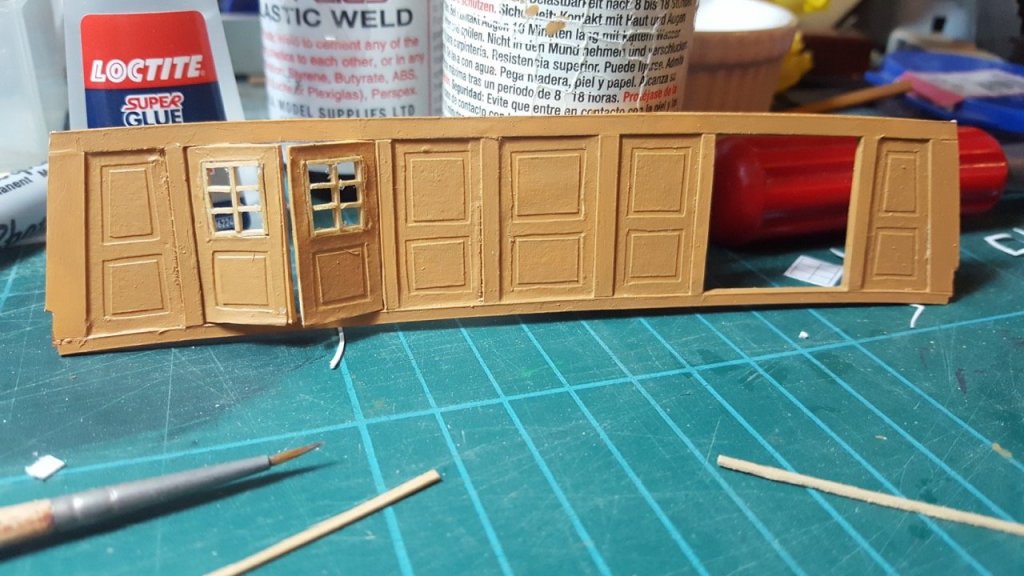
-
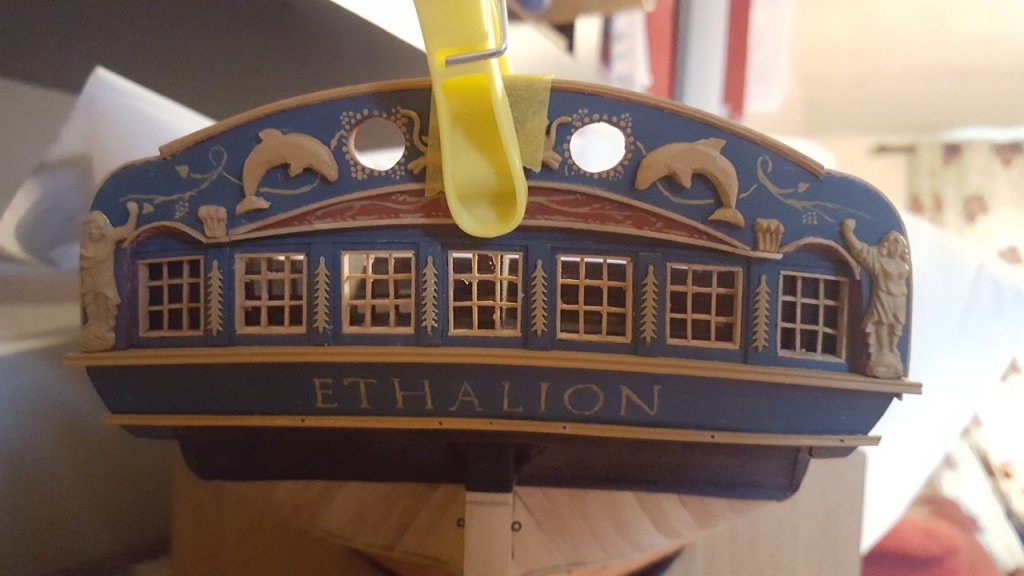
I was looking at Ethalion yesterday evening and wondering why something was jarring. Earlier on in the build I'd decided not to have red bulkheads on the gun (upper) deck. Having just visited HMS Victory I thought I'd paint them white, but in retrospect, at 1:64 scale, it just looked jarring, and to my mind took away from the lovely yellow tone of the boxwood. So. After some careful masking, I decided to paint them ochre instead. The hope is this will tone them down so they sit more in the background. It will also be a good moment to add some of the detail on the deck. This morning I decided I didn't like the look of the deck right towards the stern. I'm sure no-one will see it, but I know it's there. So, inspired by HMS Mercury, I drew up a bulkhead on QCAD, and have spent the day turning it into a reality. Here's the pdf of the CAD drawing. (I make no claim to absolute authenticity, but it looks correct to my eye) Artois.Gundeck_bulkheads.20180913.pdf I pondered whether to use wood to make the bulkhead, but the details were so fine that I wasn't sure I was up to it. I didn't want it all to end up looking clunky and overscale... So I used a mix of 1mm plastic for the bulkhead shape, 0.5mm plastic for the uprights and top and bottom beams, and paper for the detailing. I still need to finish the doors (these will have boxwood windows as per the stern lights and quarter galleys. Having painted it ochre I'm pleased with the result so far (it still needs final fitting, and to have the doors attached - they'll be open a little). According to AOTS it should fit just behind the sternmost grating, and before the third gunports from the stern. The white line along the bottom of the outer walls is where the spirketting will go (I've pre-painted some wood strip that will be fixed to neaten it all up)

-
You won't be disappointed with the Mary Rose museum - it's truly spectacular Enjoy!
-
What a fascinating project! That rubber band motor looks like a real challenge, but you certainly seem to be mastering it.
-
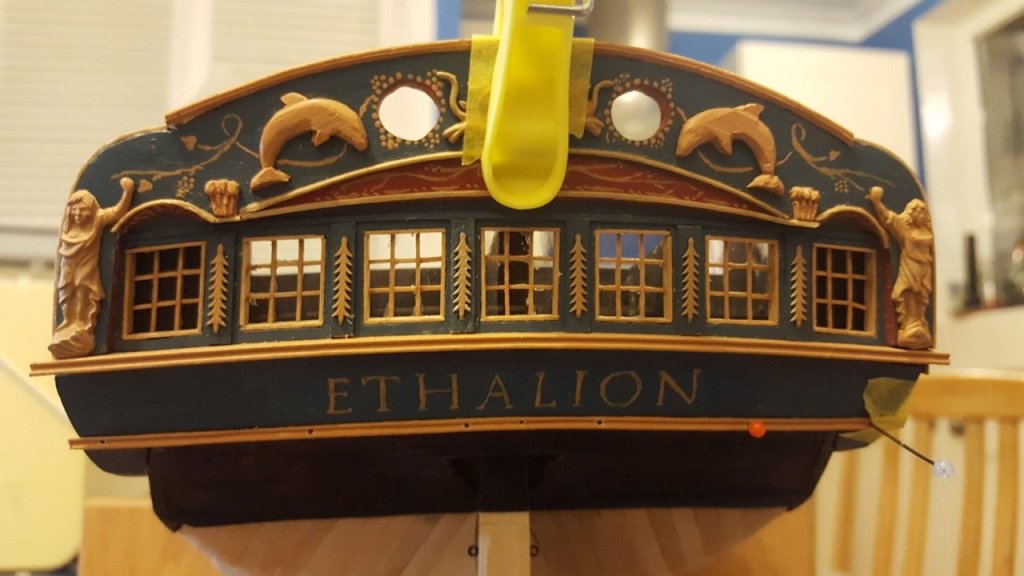
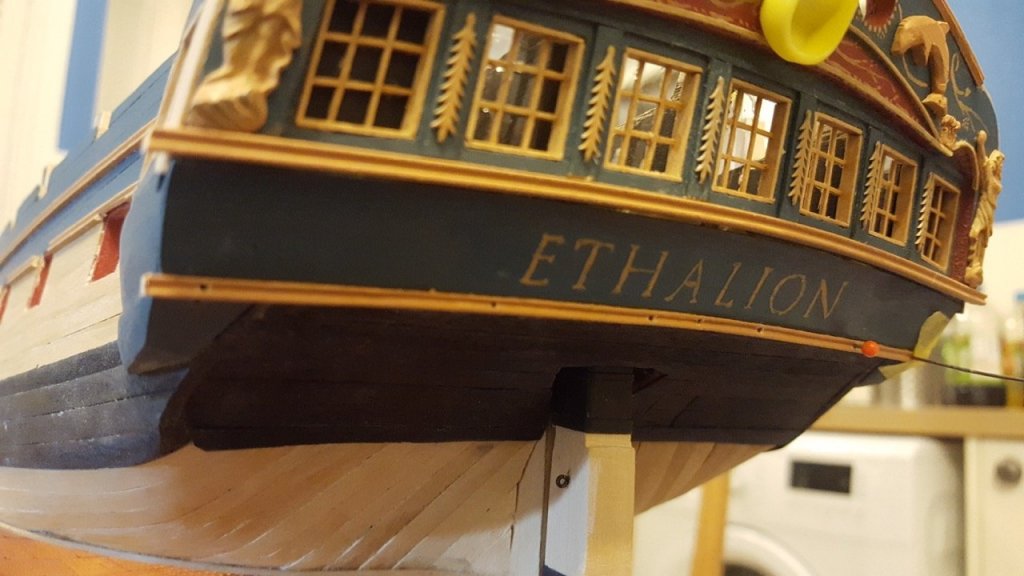
It certainly worked I can't imagine what I'm going to build after this Frigate. They really are the most handsome ships for me. Thank you OC When you put it like that I think I would have been glad of the false lights... lol. Not that I would have been resident in the captain's cabin. Powder monkey or waister more likely Thank you for the encouragement gents. Rob
-
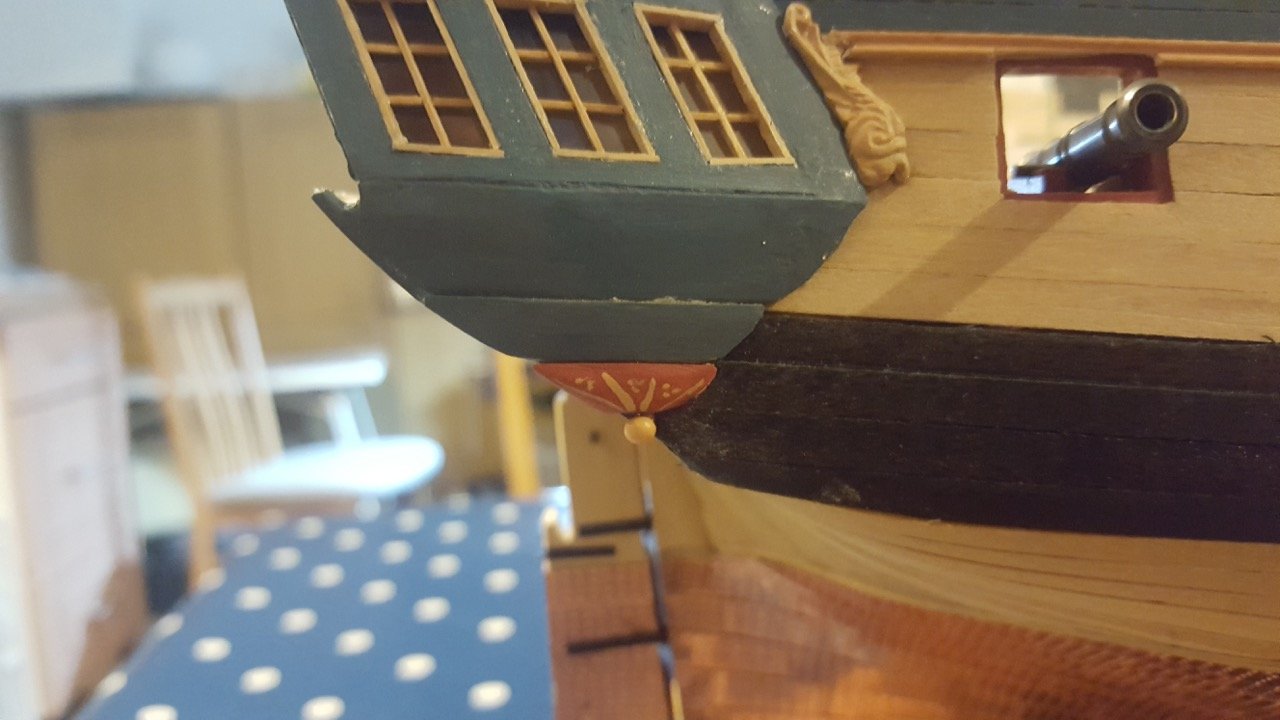
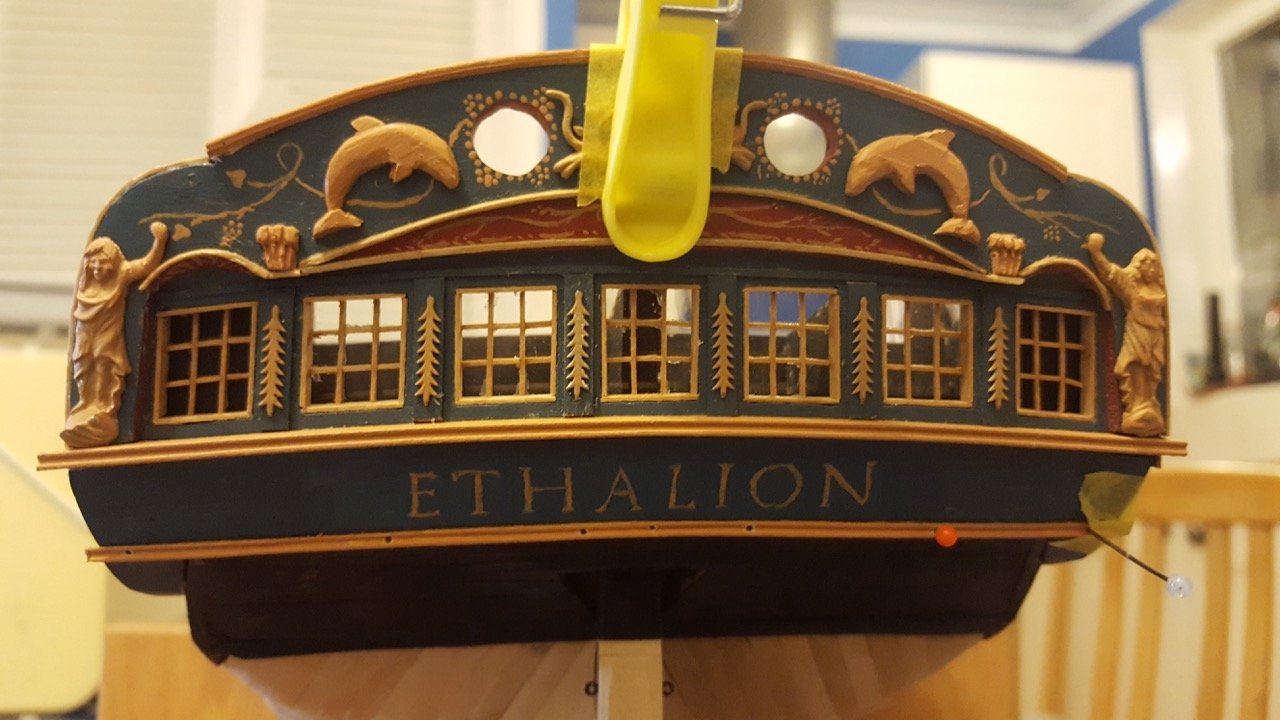
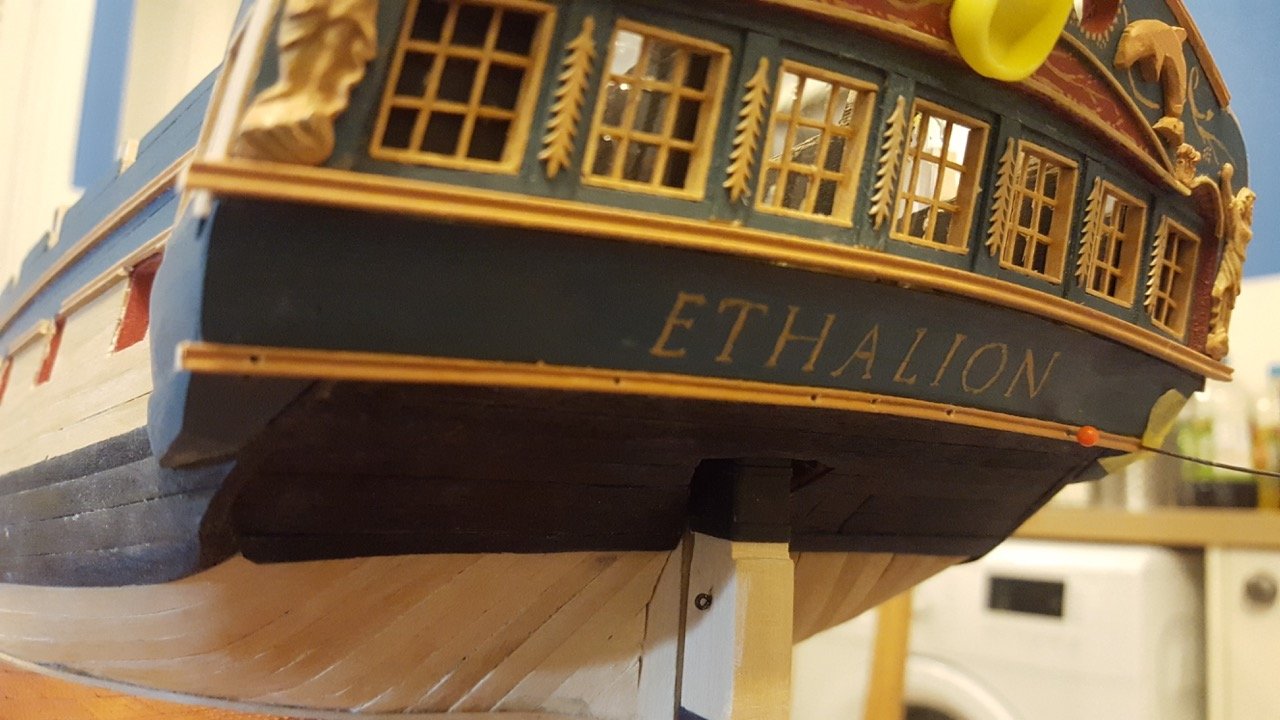
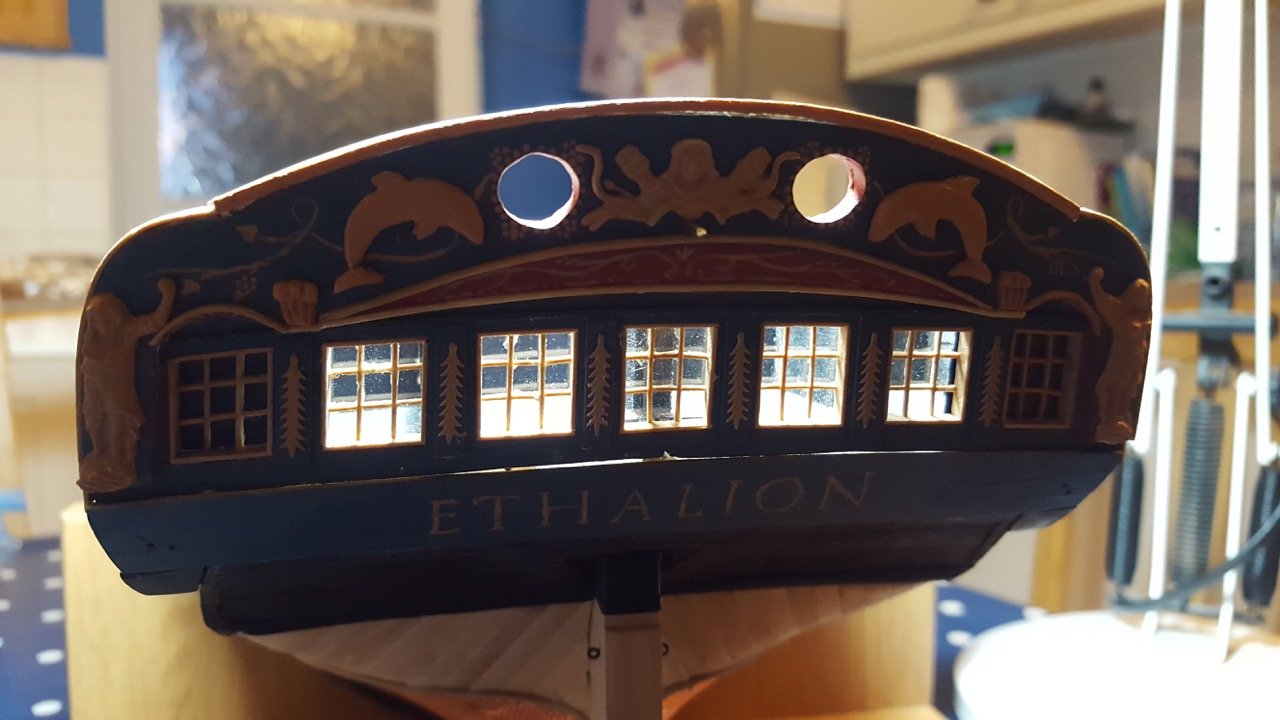
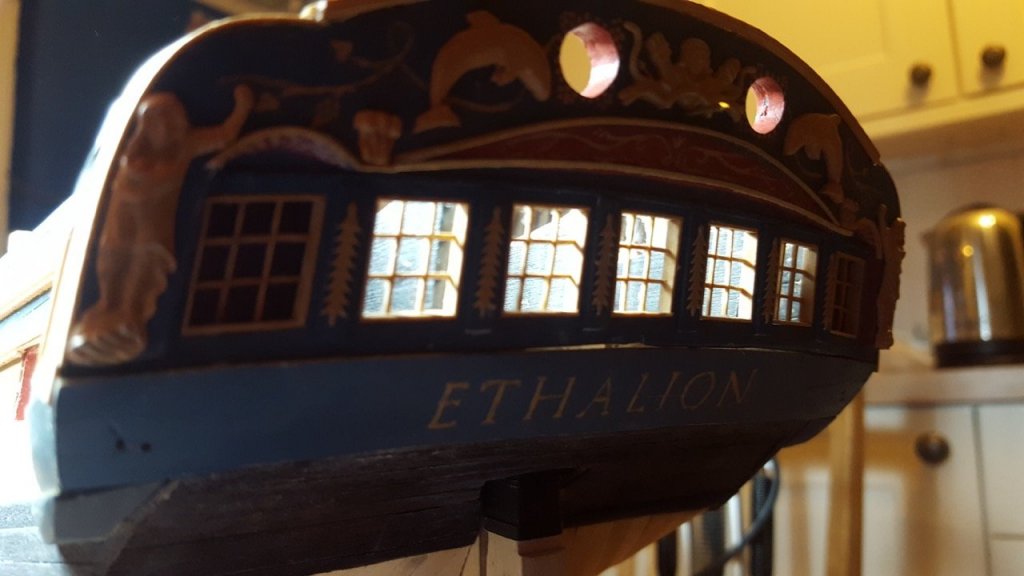
A little progress... I've been working on the stern, trying to tidy it up and make sure everything fits together neatly. I've worked myself into something of a corner. I want to glue it all together, but as soon as I do, the window glazing has to go in, because the frames are fixed. I don't want to do that until I'm confident I'm not going to fill the stern with dust... and I can't be confident of that until the quarter deck is fixed on, and it's all sealed... It's all a bit of a poser... but until I've worked out how that happens in my head, I'm not gluing the stern lights on. That said, I've started making the lower-most sections of the quarter galleries. These are provided as white metal parts, but because of the way the stern on my "version" worked out, I've remade them to fit better. The decorative spheres at the bottom are still a little further towards the stern than I'd like, but I think I'm getting to the point where I can live with it. (They're glass dress-making pins) The lines will all be covered by the decorative mouldings. Next job was to start putting the decorative moulding strips on. I started with the stern, so that things match up side to side. (NB: The stern isn't glued on, just held in place so I can make sure it all lines up - the decorative moulding at the bottom of the stern lights is glued onto the stern lights.) This was quite tricky, as increasingly there's nowhere to fix clamps to keep everything in place... I used a mix of masking tape, and 0.65mm drilled holes to pin the rails in place before gluing with carpenters glue. Everything was checked before and after gluing to make sure there was a nice curve (to my eye) both from side to side, and top to bottom... This curve needs to match between the upper and lower rails, so it's not a job to rush! The lower rail was sanded so the profile was not facing the floor, but facing more outwards... This seems to have helped with the look. The upper rail was sanded to face pretty much directly outwards, almost as though it were a window sill. So... after much rearranging, and checking, and double-checking and careful trimming... That's the progress I've made to date. You'll notice I trimmed the rails, but left them a little over length. The side rails will butt up against the front of these, and then they'll be gently shaped (hopefully) to merge them into one. They'll be painted with Admiralty Paints yellow ochre, so hopefully any minor bodges will be hidden by that point Just for the fun of it, here are a couple of pics before I did the rails, with the light coming through the lights as it were. (Notice the false light on right and left - they couldn't be real windows, because the hull intersects with the transom in the middle of them... From what I understand they were put on to make the ship look bigger and more imposing). The glazing (which is not fixed yet, and before I do, needs a good clean) is in once piece, and is the clear plastic supplied with the kit, with black card glued onto the back to block the false lights. Happy building Rob


- 275 replies
-
- 14
-
-
Hi Jason. Thanks - yes, I agree, the quarter is definitely a lovely angle on these frigates. Looking through your log, I noticed the barrels had changed. I'd seen the comparison on your log of the different barrels, and had intended to swap mine up for the RB barrels, but comparing the ones in my kit with the AOTS book, they're certainly close enough for my liking... I'm really impressed with them. A considerable difference at the muzzle and the cascabel to the ones you were provided with. Hopefully that's a change that's going to be permanent for future Diana builders, as it seems a shame to let down such a beautiful ship with the previously kit supplied barrels. That said, I'm also looking at the carronades which are the whitemetal moulded ones, for the quarterdeck, and thinking I want to upgrade those with the caldercraft ones they sell separately. Thankfully there aren't so many of those to swap up! As always, your build is an inspiration, and a great encouragement along the way, and given we're both working on gun carriages at the moment, I feel your pain - I've done half of them and turned back to the Stern to work on that for a break! I'm happy with the results I'm getting, but yours are something else! I stopped a step short of adding the vertical bolts... I wasn't sure how many holes I could put in the carriage sides before they'd start turning into sawdust I also agree that blackening the brass wherever possible is better to painting. It's so nice to be able to handle the parts without knocking off flakes of acrylic paint left right and centre! And the idea of hand painting 600 eyelets doesn't really appeal, if I'm honest! It took 30 seconds to blacken them. A technique I'll be using every time from here on in. Rob
-
Coppering is okay once you get into the groove. If you're using ca glue I'd strongly recommend getting a mask to protect your lungs (one that deals with vapours not just dust)... you'll get through a fair bit of ca and be sat there a while. I made a note of which mask I used on my log here (post 71): https://modelshipworld.com/index.php?/topic/15132-hms-ethalion-1797-by-robdurant-modified-from-caldercraft-164-hms-diana-1794/&page=3 The few times I forgot to use it I regretted it. I'd suggest doing something to seal the wood before you start otherwise you'll use a lot of ca just wicking into the wood.
-
Welcome Chris! Looks like you've made a great start Looking forward to seeing your progress on Nelson's favourite ship. There's so much knowledge and a real willingness to help, so this is certainly the place to find encouragement and the knowledge to keep going. I'm building HMS Diana - the heavy frigate also by Jotika, and I wouldn't have got as far as I have if it weren't for all the help and encouragement I've been given. Rob
- 29 replies
-
- 3
-
-
- agamemnon
- caldercraft
- (and 1 more)
-
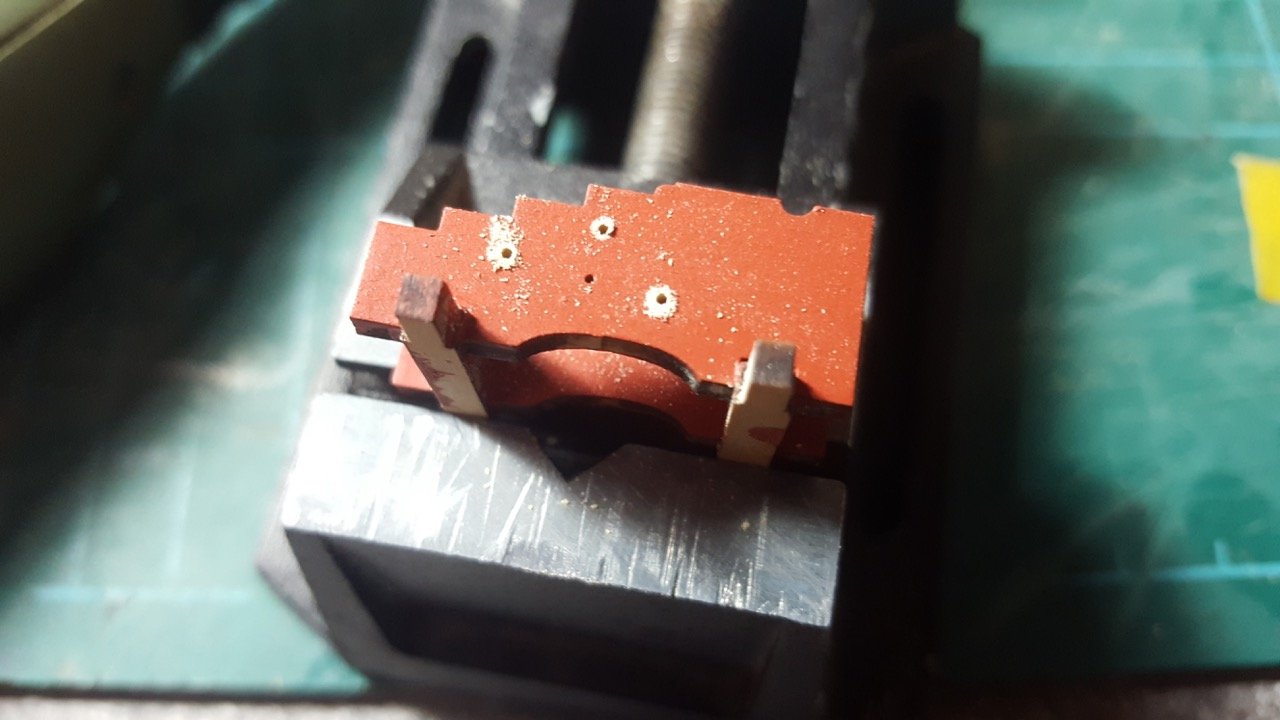
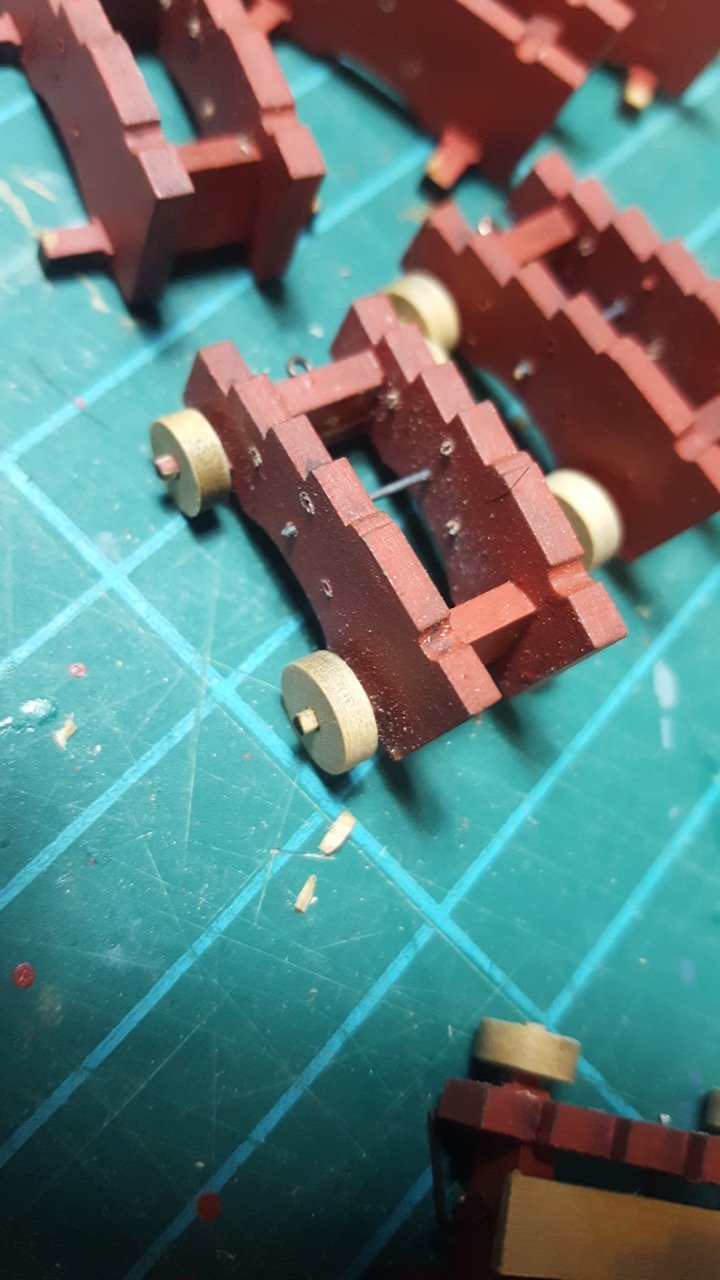
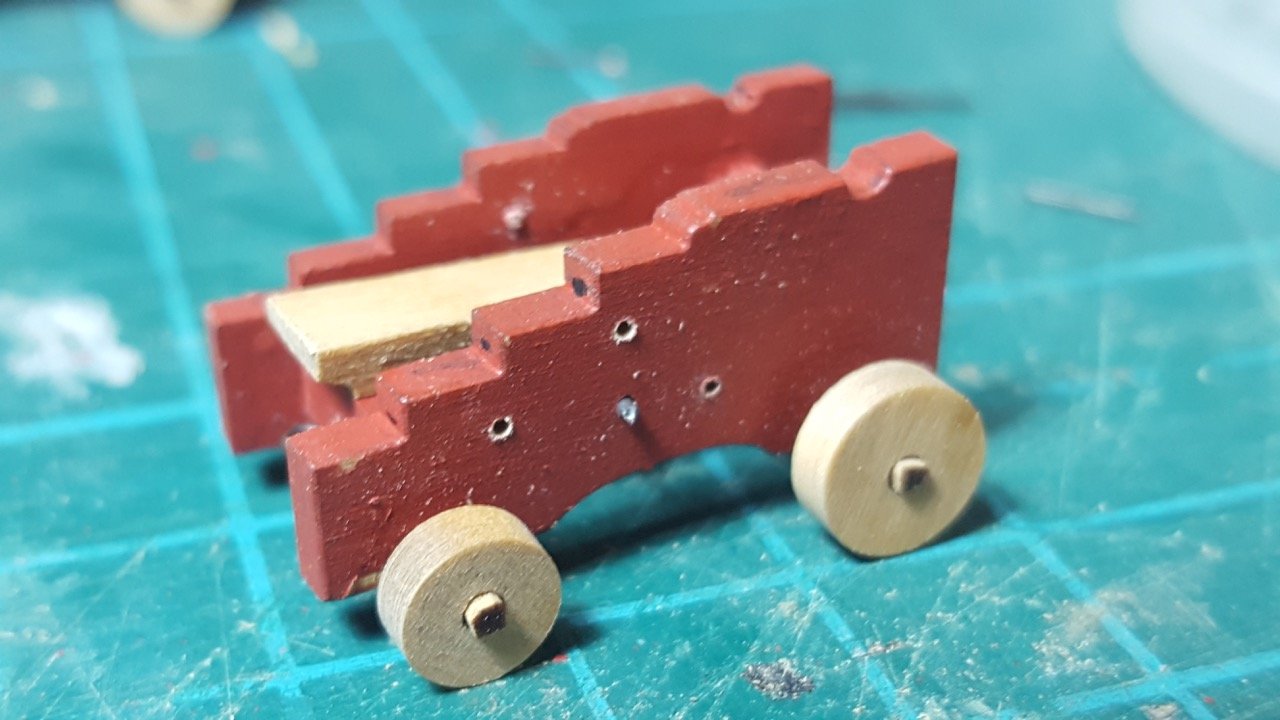
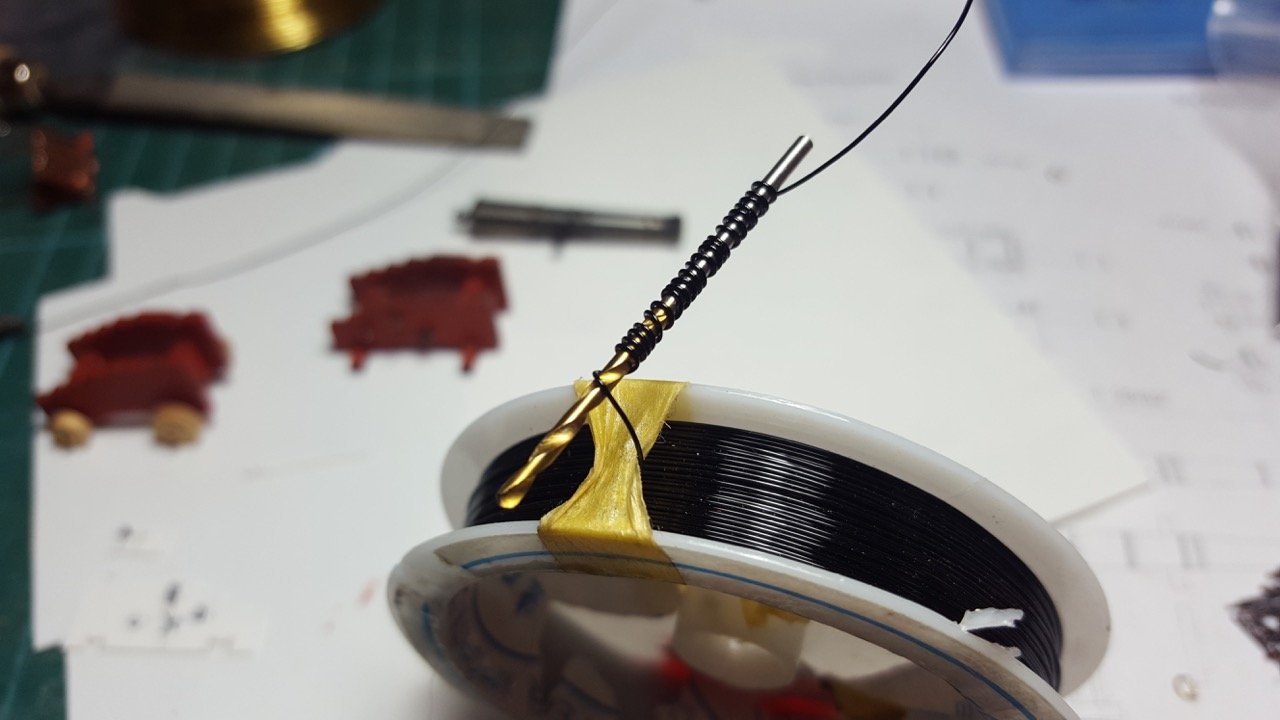
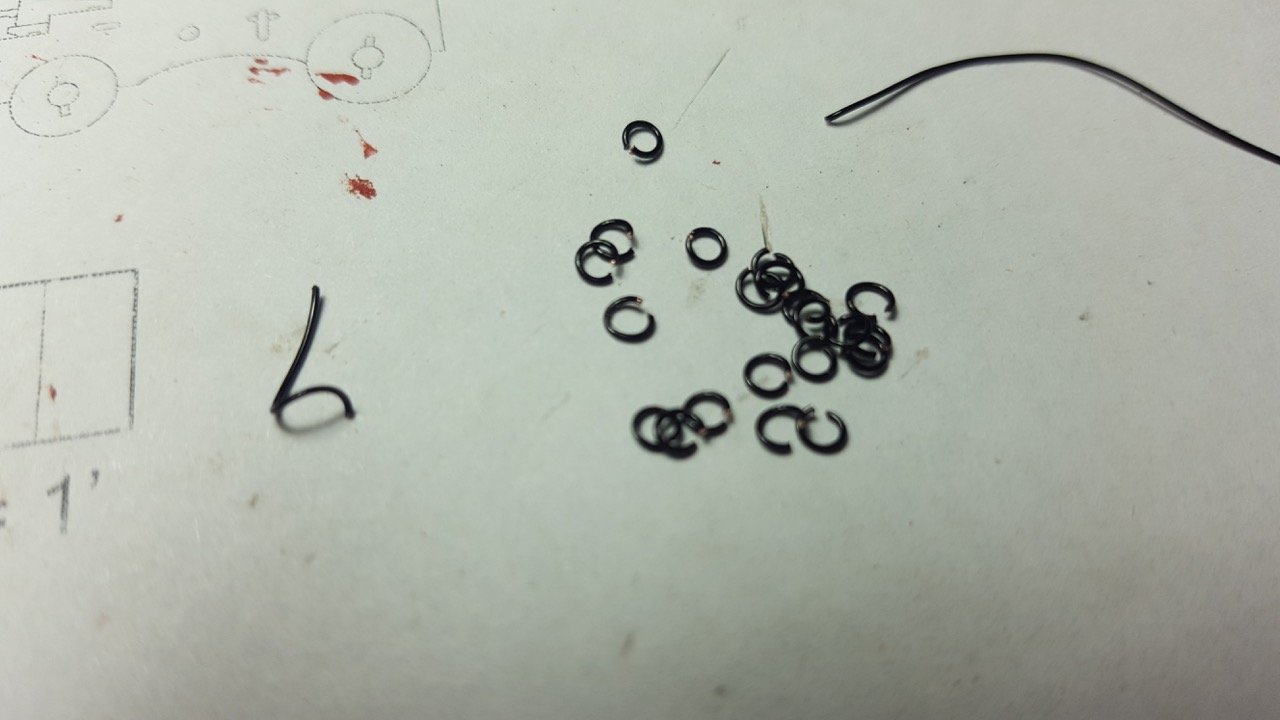
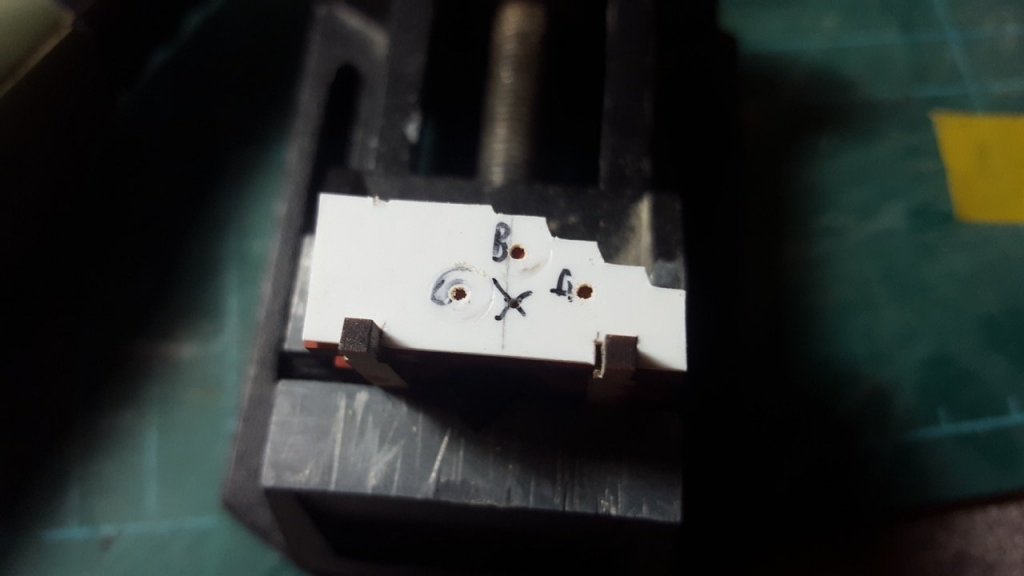
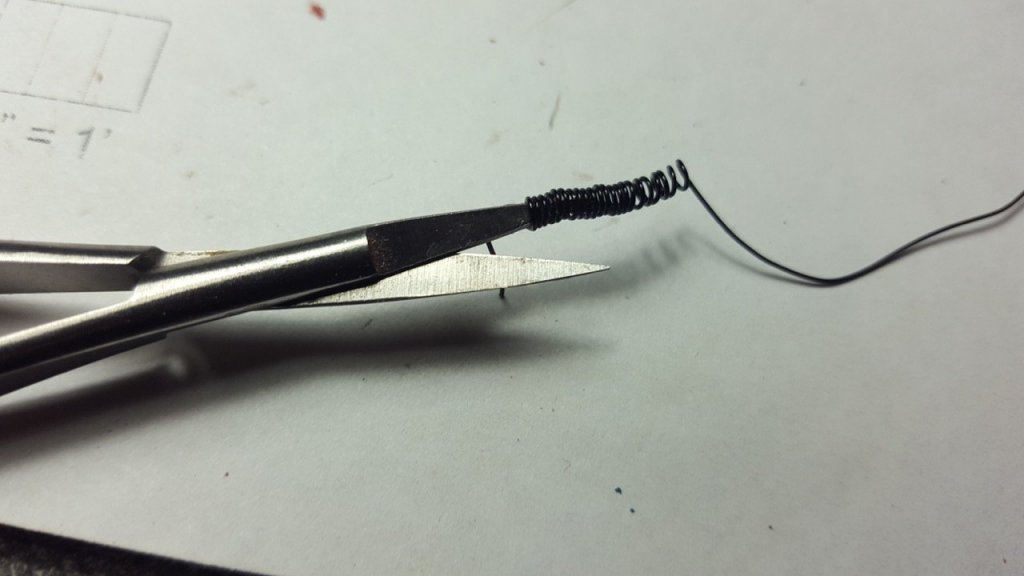
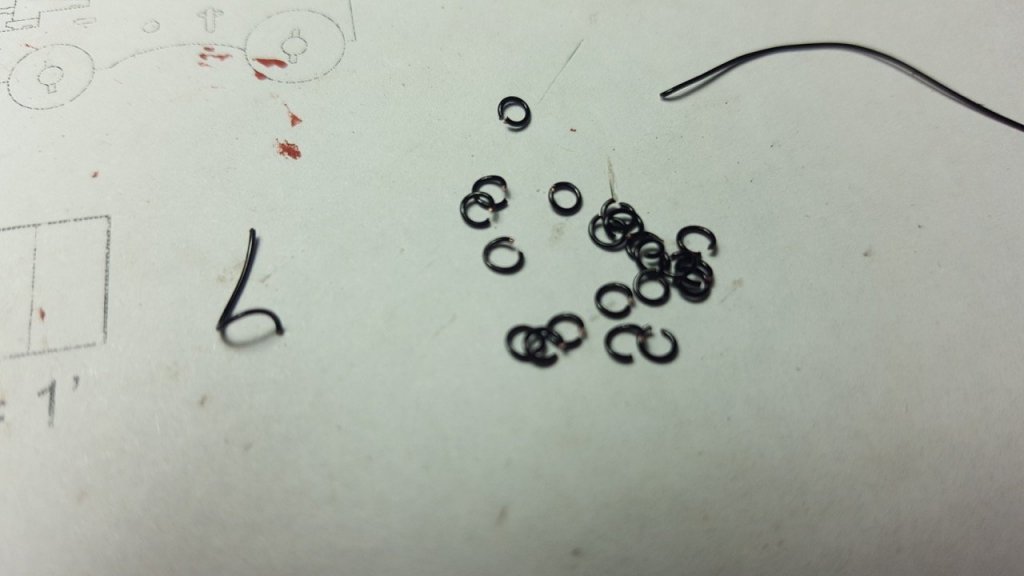
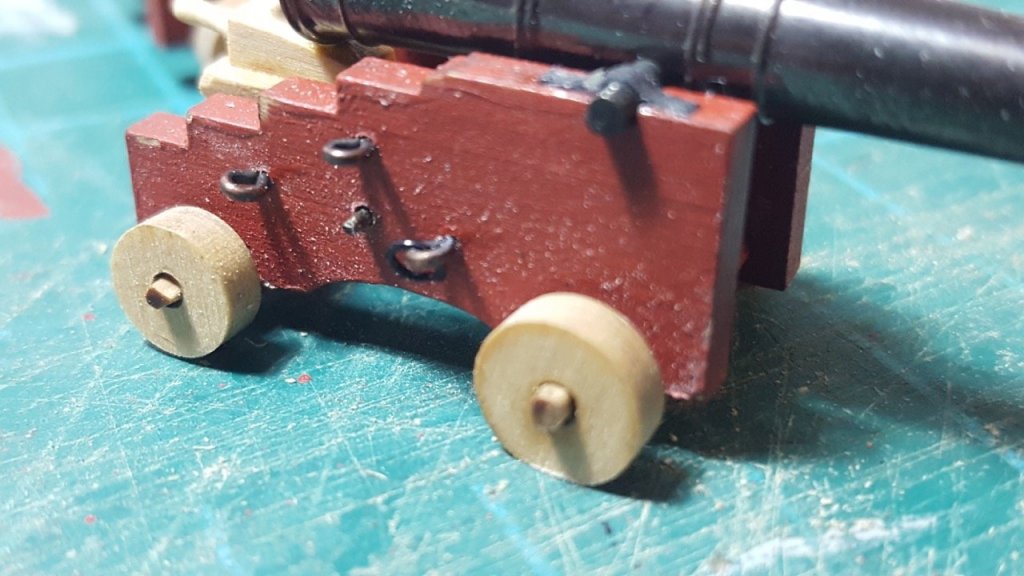
Hi all, A swift update. Mainly a conveyor belt of getting gun carriages finished. I'll try and outline the process I'm using below: I'd already removed all the wheels from the boards, fitted them onto my mini drill and put them over sandpaper to get rid of the char. Then I put the big and small wheels in separate bags so I could find them later. 1. Assemble the carriage frames. (Sides, axles and front and back) I used a plasticard jig to do this. 2. Whittle the axles to fit the wheels. There's no shortcut. It's just slow and steady with a sharp xacto knife, stopping and checking the fit time and time again. 3. Drill the holes for the eyelets and breaching rings I made a template for the sides out of plasticard, and for the back. The side one worked brilliantly by slotting over the axles. When I came to use the one at the back, there wasn't enough purchase to stop it simply getting picked up by the drill and spinning on the drill bit. So I used some masking tape to stick it into place on each carriage. (This is for the eyelet that will be fixed to the rope used to pull the carriage back in to the Frigate. The holes were drilled with a 0.65mm drill. The hole with the cross through it on the template is the pre-drilled hole used for the supporting bar between the sides. This template was used for both sides, simply reversed. The notches in the bottom fit over the axles where they narrow) By leaving my wood working vice a little ajar, I could sit the axles into the gap, and that gave the support to be able to drill into it carefully with a proxxon mini-drill. Again, I'm sold on this little drill. All in, for the 28 main guns, it was 196 holes, without the re-opening up after painting for the pre-drilled holes, so the proxxon drill made a massive difference. 4. Add the bar that goes between the sides. This was .65mm steel bar - not sure where it came from, but it saved me needing to blacken a whole bunch of brass rods, and looked pretty neat. 5. Add the fore and aft part on top of the bar, and the back axle. (This remained unpainted, because I liked the contrast, and wanted a way to show the carriage was box as per the grating surrounds etc...) (wow, close ups are cruel! or maybe my eyes are being overly generous!) 6. Add the eyelets and breaching rings. The breaching rope rings are not included in the kit as far as I could tell, so I wrapped thin black lacquer wire around a 1mm drill bit lots of times, slid it off, and cut it into lots of rings with a pair of scissors. These were gently prised open and pushed shut on one of the blackened copper eyelets to make a ring. Tedious, but looks pretty good. My only slight concern is that these might be slightly tight for the breaching rope. I need to check this sooner rather than later. They fit the scale of the rings on Chuck Passaro's excellent pdf of his gun carriages (see his website), and it's that I've been working to. 7. Make up the wedge with it's holder, used for setting the elevation of the gun. I used my mini drill to spin the box strip and files to shape it into the handle for the wedge. 8. Put the gun barrel in place (not glued yet, because I want to set the height of all the guns individually.) 9. (Also not done yet) Add black card strip over the main bar the gun sits on, so it looks like it's held in place by metal bars. I tried those last few steps on one gun as shown above and it looks nice to my eye. Having seen these close-ups I clearly need to go over and have another look at some of these and tidy them up a bit, but it at least gives an idea of the process I've been using. Anyway - 14 guns down, and a bunch still to do, but the weather was nice this afternoon and it seemed like a good opportunity to try and get some photos of the progress so far. I can see a whole bunch of things that need tweaking / fixing before it all gets fixed in for good, but it's nice to see that I'm at least heading in the right direction Happy building everyone! Rob


- 275 replies
-
- 14
-
-
This project is going to be on hold for the time being, as it's in Germany! - I left it behind when I came home off holiday - and hope to resume it when I go back. In the meantime, my attention will be back on Ethalion. Thanks for the encouragement and likes. Rob
-
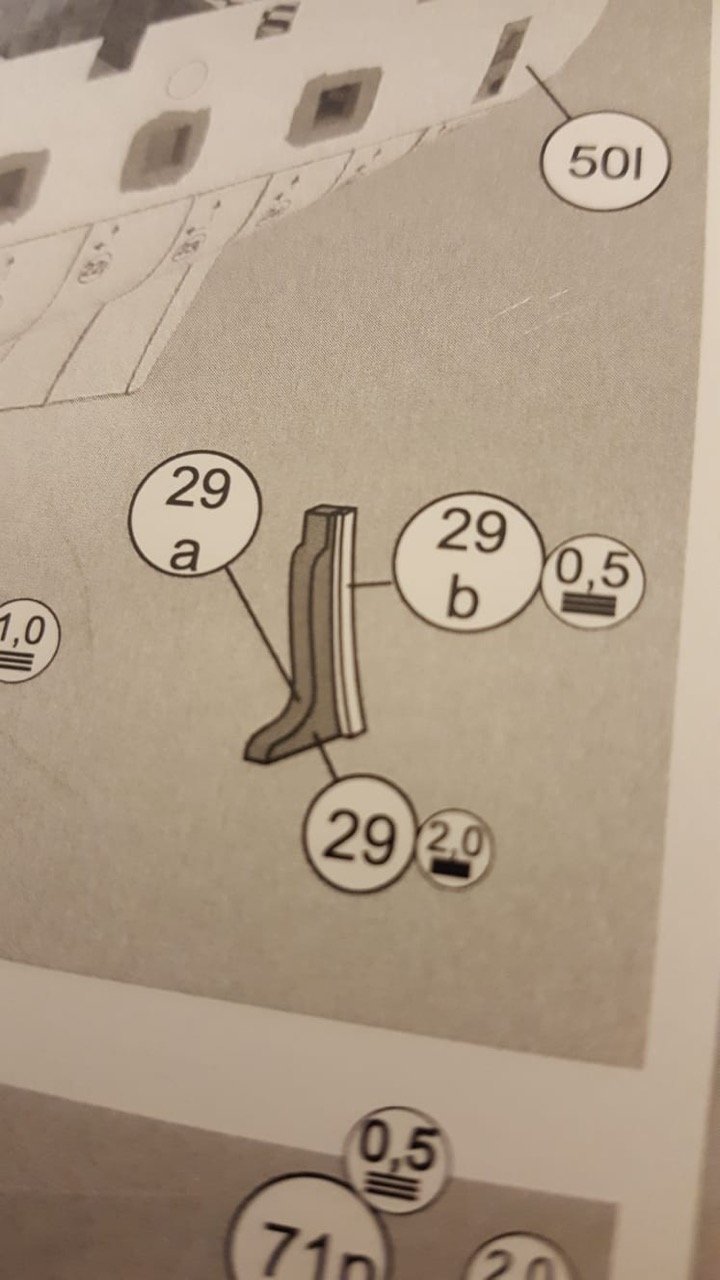
Thanks Chris - that's a great encouragement 3. Hull sides and framing So - here start the "noob" questions, and a few more "this seems to be the wrong number" observations. Where the plans show a part thickness to be made up, is that the final thickness, or the thickness of the card that I'm sticking the part to? (see picture below - should part 29 end up as 2mm thick, or as the thickness of part 29 PLUS 2mm card backing? At the moment, I've been sticking the part to 2mm card, although for these parts it seems a little thick. I've been adding these parts in - parts 29 through to 32... though it seems that the lines that join the parts (i.e. 31 to 31, 32 to 32, 33 to 33) are not in the right places... or at least, when I came to add them to the hull the two 31 parts were completely different shapes, one of them being too high and pushing the hull sides out too much. I lost track of which was which after a while, but suffice it to say, the taller parts go at bow and stern (in 29, and 33 positions) - stern (32) slightly taller than bow (29), then the shorter ones go in the centre (32 slightly taller than 31)... I'd suggest making these all up, then lining them up on the table before sticking them all into place. Once done in this way, they don't push the hull sides out of line. Parts 33 seem right. As can be seen, I still have two more of these parts to fit (32 and 33 at the stern on the port side...), and then the remainder of the spacers that separate the internal sides from the external hull sides. Before the internal sides go on, I'll also need to line the gun ports. I've left the doors off the cabin walls as they seem a little vulnerable at the moment. They should be simple enough to add in once the hull sides are on.