robdurant
-
Posts
843 -
Joined
-
Last visited
Content Type
Profiles
Forums
Gallery
Events
Everything posted by robdurant
-
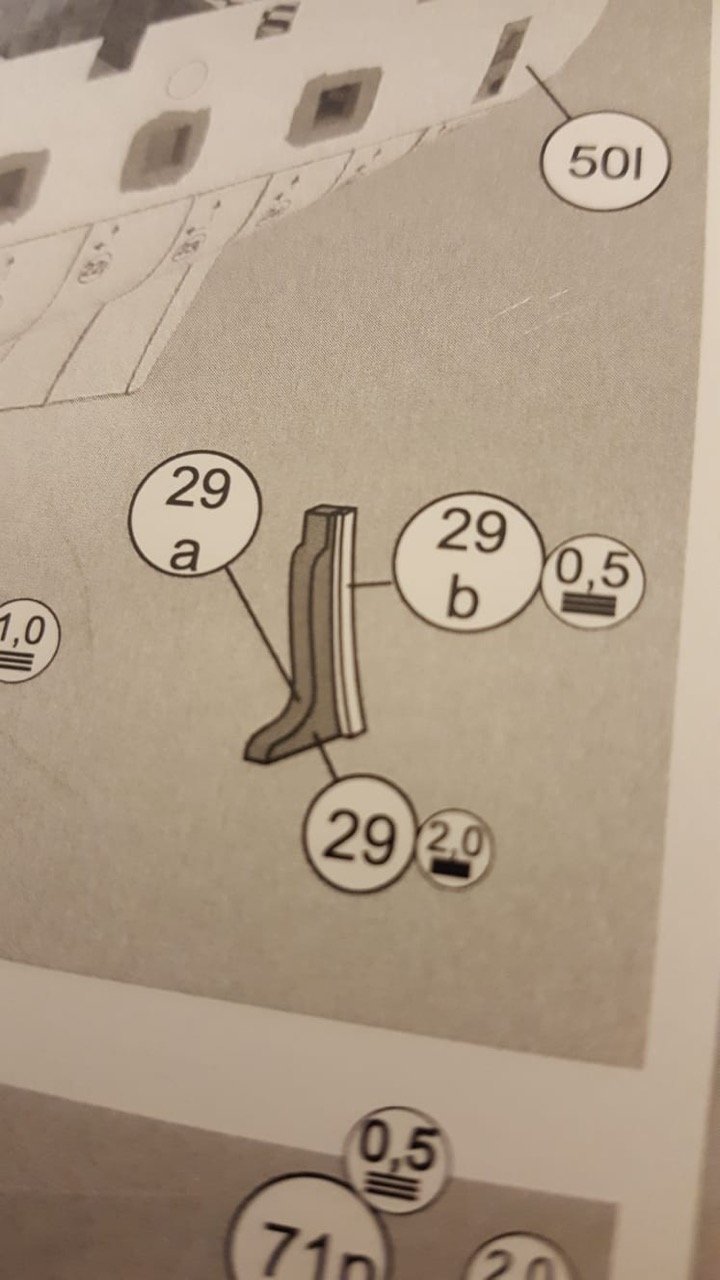
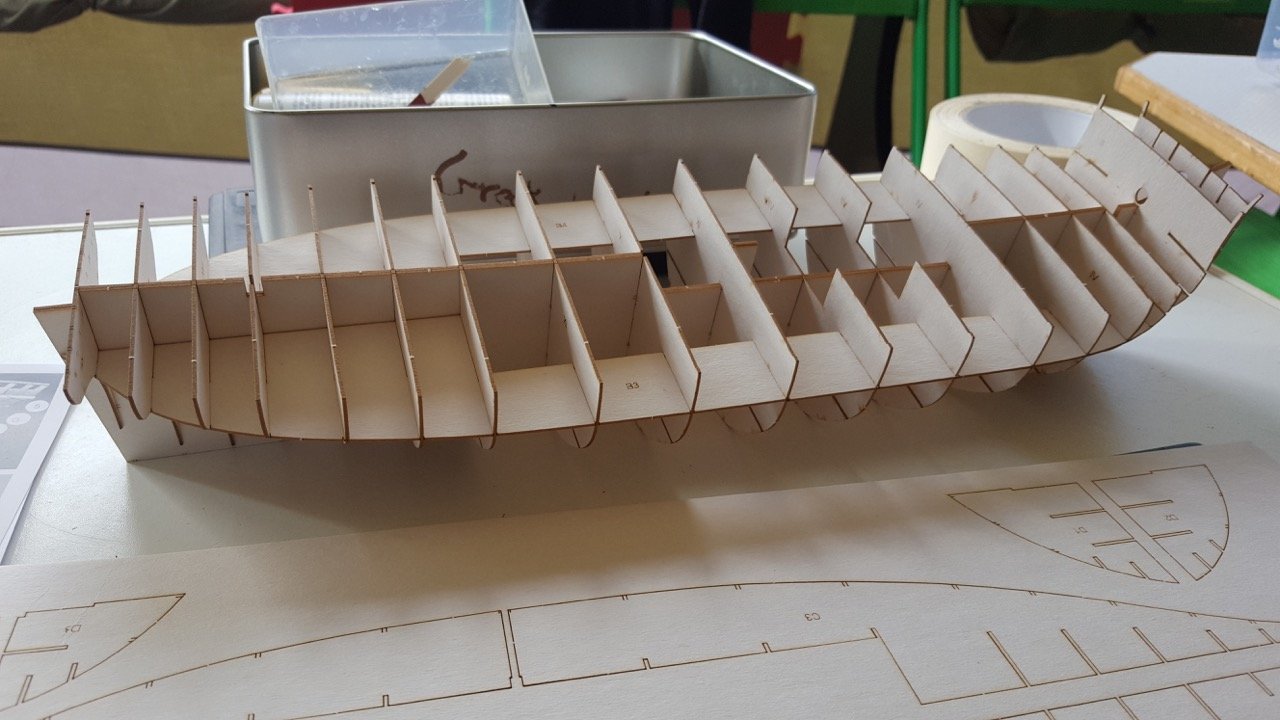
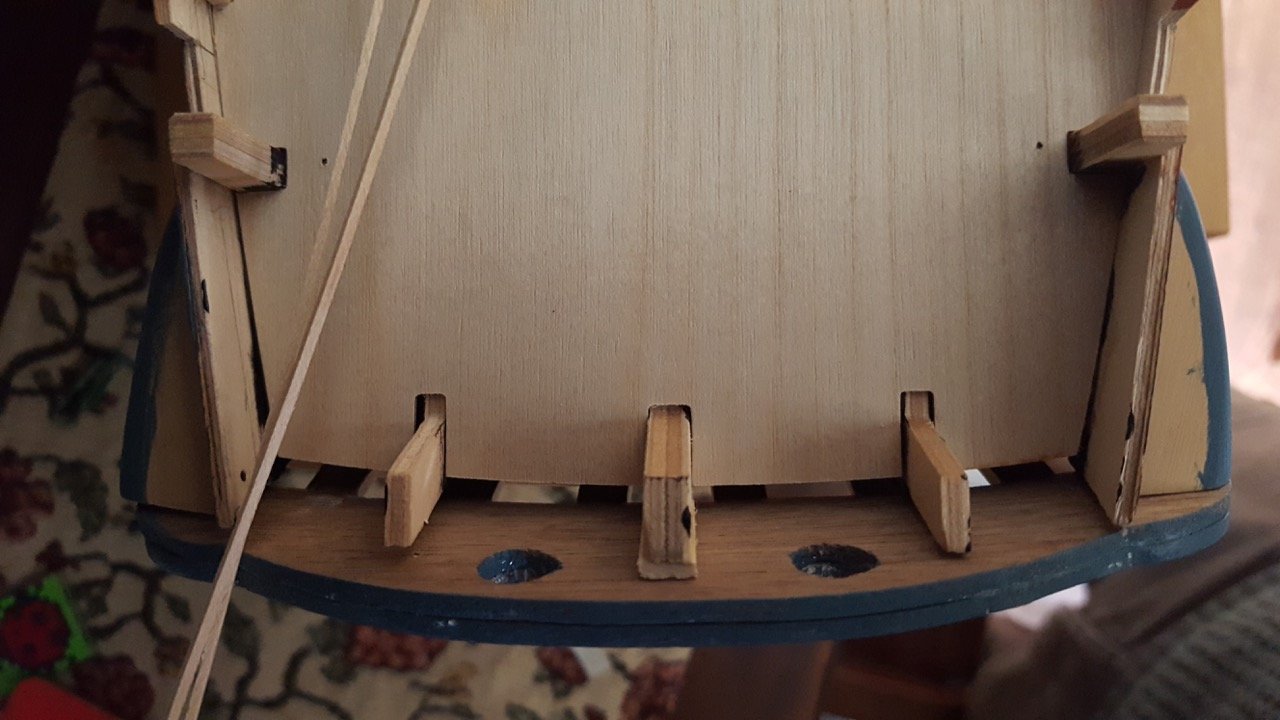
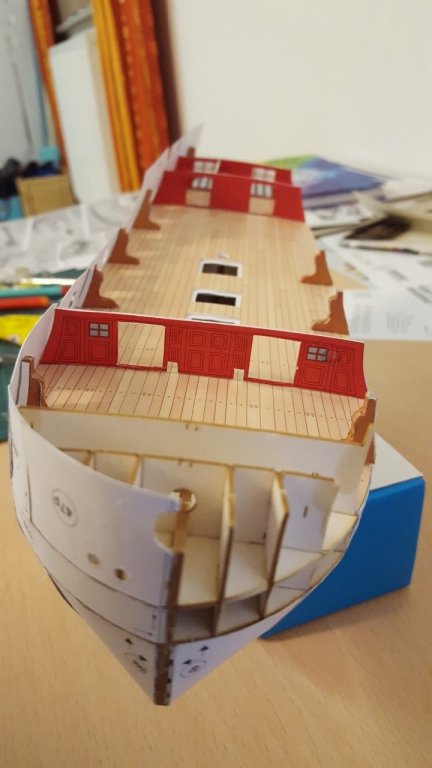
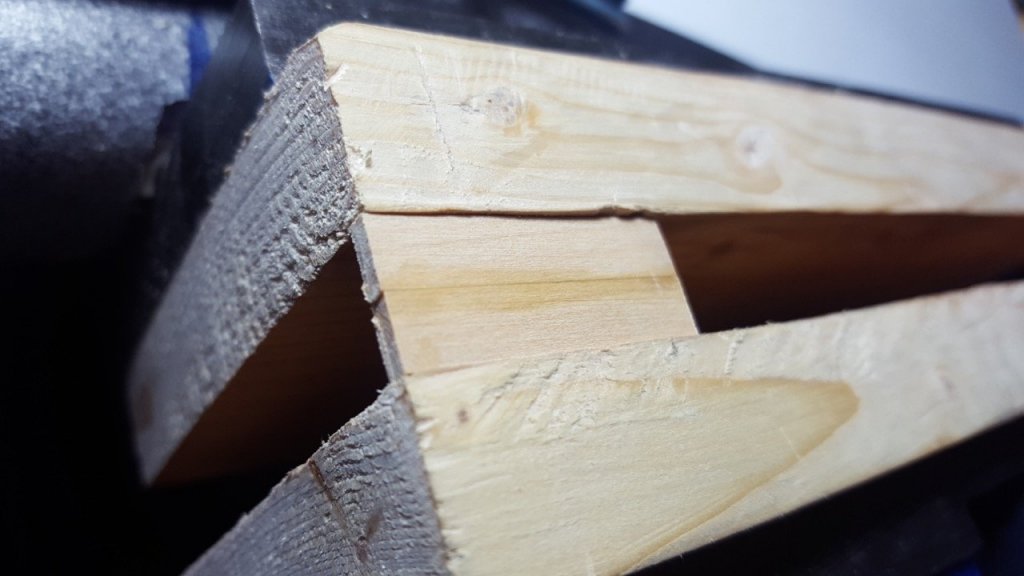
 Thanks Chris - that's a great encouragement 3. Hull sides and framing So - here start the "noob" questions, and a few more "this seems to be the wrong number" observations. Where the plans show a part thickness to be made up, is that the final thickness, or the thickness of the card that I'm sticking the part to? (see picture below - should part 29 end up as 2mm thick, or as the thickness of part 29 PLUS 2mm card backing? At the moment, I've been sticking the part to 2mm card, although for these parts it seems a little thick. I've been adding these parts in - parts 29 through to 32... though it seems that the lines that join the parts (i.e. 31 to 31, 32 to 32, 33 to 33) are not in the right places... or at least, when I came to add them to the hull the two 31 parts were completely different shapes, one of them being too high and pushing the hull sides out too much. I lost track of which was which after a while, but suffice it to say, the taller parts go at bow and stern (in 29, and 33 positions) - stern (32) slightly taller than bow (29), then the shorter ones go in the centre (32 slightly taller than 31)... I'd suggest making these all up, then lining them up on the table before sticking them all into place. Once done in this way, they don't push the hull sides out of line. Parts 33 seem right. As can be seen, I still have two more of these parts to fit (32 and 33 at the stern on the port side...), and then the remainder of the spacers that separate the internal sides from the external hull sides. Before the internal sides go on, I'll also need to line the gun ports. I've left the doors off the cabin walls as they seem a little vulnerable at the moment. They should be simple enough to add in once the hull sides are on.
-
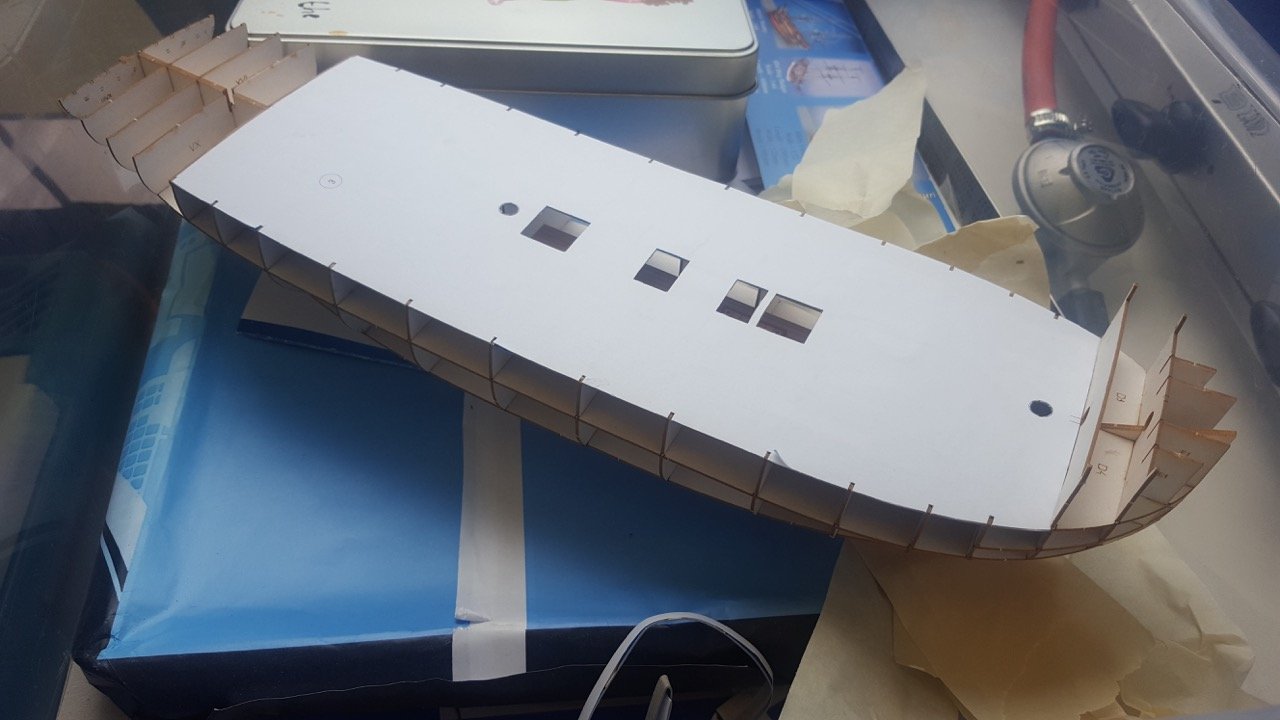
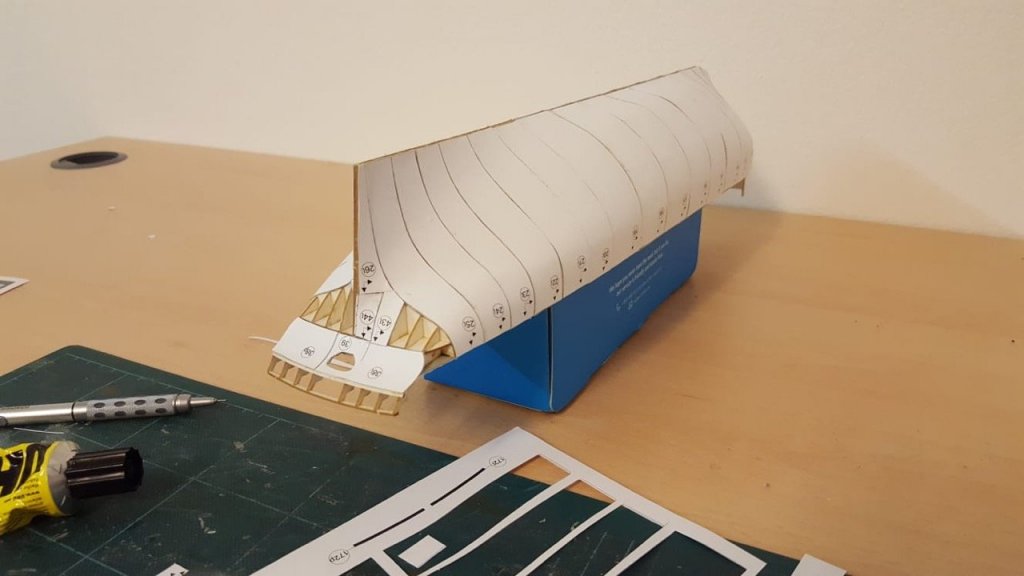
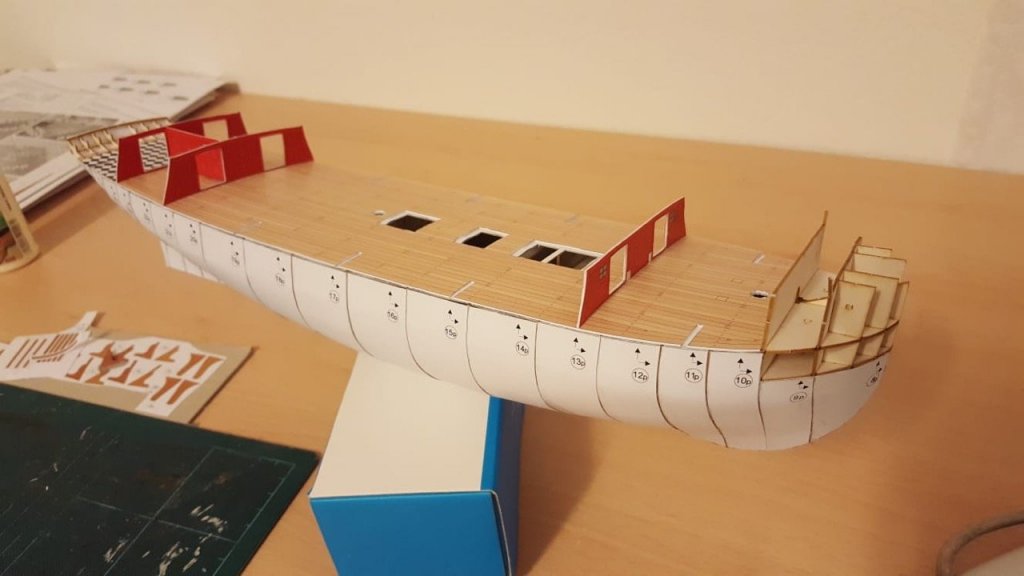
2. First "planking" This is where the neat cutting out becomes critical - that said, I managed it, and I was pleased with the result... Bending each part carefully, before sticking down makes a huge difference. I started cutting off the tiny tabs at the bottom of each piece as they seemed to only get in the way. One point to note... when you get to the end of this, if you follow the numbering, the next piece is 27... and there's no mention of this piece on the exploded diagram. Looking at it on the paper, it's clearly the gundeck, but that doesn't help you to know whether it should be stuck to card before fixing on to the model. I took the approach that 27a IS attached to 0.5mm card, and it continues the sweep of the deck, so I did... and it helped cover up the complete mess of the false deck I mentioned in the last post. Once in place, the chequered floor of the captain's quarters can be added, and the bulkheads, again each strengthened as per the diagram with thicker card. And this is the progress so far. So far I'm extremely impressed with the accuracy of the parts - they seem to me to fit beautifully... any discrepancies being entirely my fault and not the model's. That's me up to date, then.
-
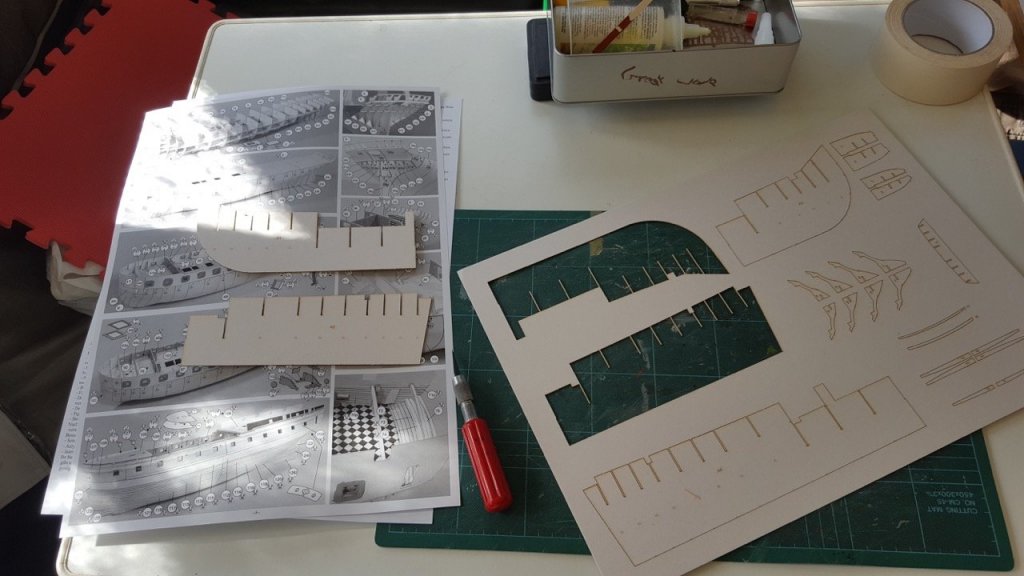
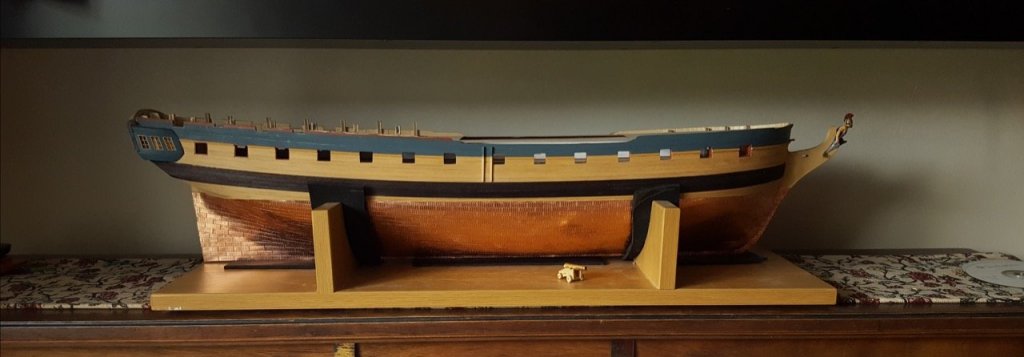
I had a search, but couldn't find any other build logs of this model, so although I feel deeply unqualified, I thought I'd post a build log. This is the first card model I've built - in fact, it is mainly paper, with a laser-cut card frame (ShipYard also do a card version which is 1:72, and much more expensive!). So this won't be a masterclass, but hopefully the surprises and lessons learned as I go will be helpful to someone else following in my footsteps I started this model last year when I went on holiday - my main build is way too big to travel, so this one is more manageable (and a little less anti-social) - it may take me a while to finish, but hopefully I'll get there. I started by assembling the card structure of the ship. The diagrams provided are excellent, and the laser-cutting so good that this was very simple, and with a little care, it went together very nicely. I've read elsewhere that using a little superglue to wick into the extensions at the tops of the bulkheads strengthens them somewhat... I was too slow, and they got pretty mashed up. I'm hoping I'll be able to make up for that later on. So far, I've skinned the lower part of the hull, and started putting the details onto the gundeck. Here's a slightly more in-depth description of what I've learned, and done so far. Basic tools: Carpenters glue (Aliphatic) UHU glue (really really useful!) Pritt stick Superglue Lots of sharp xacto blades #11 and a handle Cutting mat 0.5, 1, 1.5, 2mm card to stick the paper onto where directed. (This was found in my local art supplies shop - I found it really hard to get online) 1. Assemble the frame from the laser-cutting. I used Carpenters glue to do this, and lego bricks to check it was all lined up... I think this was probably overkill, because with the deck on, it's pretty rigid, but it was my first attempt so I wanted to make sure it was all perfect. Sandpaper was useful to bevel the frames once put together... the card won't go over them (or have a flat surface to stick to) without this step, so it's pretty crucial. That said, it's pretty quick compared to bevel the frames on wooden models... that means it's even easier to go too far! - I marked the edges of the bulwarks with a marker so I could tell when I was not only reducing one side, but the overall outline of the bulwark. Once the frame was built, a couple of detail bits get stuck on to the lower deck (a brown sharpie was useful to edge the bits that are cut out to get rid of the white edges and make it look tidy), and then the false deck was then added... I made a mistake here by splurging on carpenters glue thinking that the paper covering would lie flat if only I pushed it down enough... not so much, it seems. It ended up looking horribly bumpy and I thought I'd wrecked the model... The answer (for me) it turns out is to use UHU, add it to the card, and then use a piece of card to scrape it and make it nice and flat, then add the paper, smoothing it as you go. This ends up in a nice flat surface... Thankfully, as we'll see, the false deck gets covered over later with a second 0.5mm sheet of card with the real gundeck pattern glued on top of it, so disaster was well and truly averted, and you'd never know I stuffed up now! Here's the first gun deck - you can't see the bumps, but trust me... they're there! More later. Rob


-
Inner bulwark painting
robdurant replied to Peter Y.'s topic in Painting, finishing and weathering products and techniques
Hi Peter. It's looking great :) You could mask it carefully, and paint the bulwarks, but then if you want to get a really neat line, add a pre-painted strip at the bottom of the bulwark to get a pin-sharp divide. This would allow you to stop painting slightly short of the deck too. I hope Jason (Beef Wellington) won't mind me pointing to his thread as an example of how this strip can look really tidy! https://modelshipworld.com/index.php?/topic/7219-hms-jason-by-beef-wellington-caldercraft-164-artois-class-frigate-modified-from-hms-diana-1794/&page=18&tab=comments#comment-567526 If there's a coat or two of varnish on the deck planking, you'll probably have a better shot at removing any paint that creeps onto the deck under the masking? Rob -
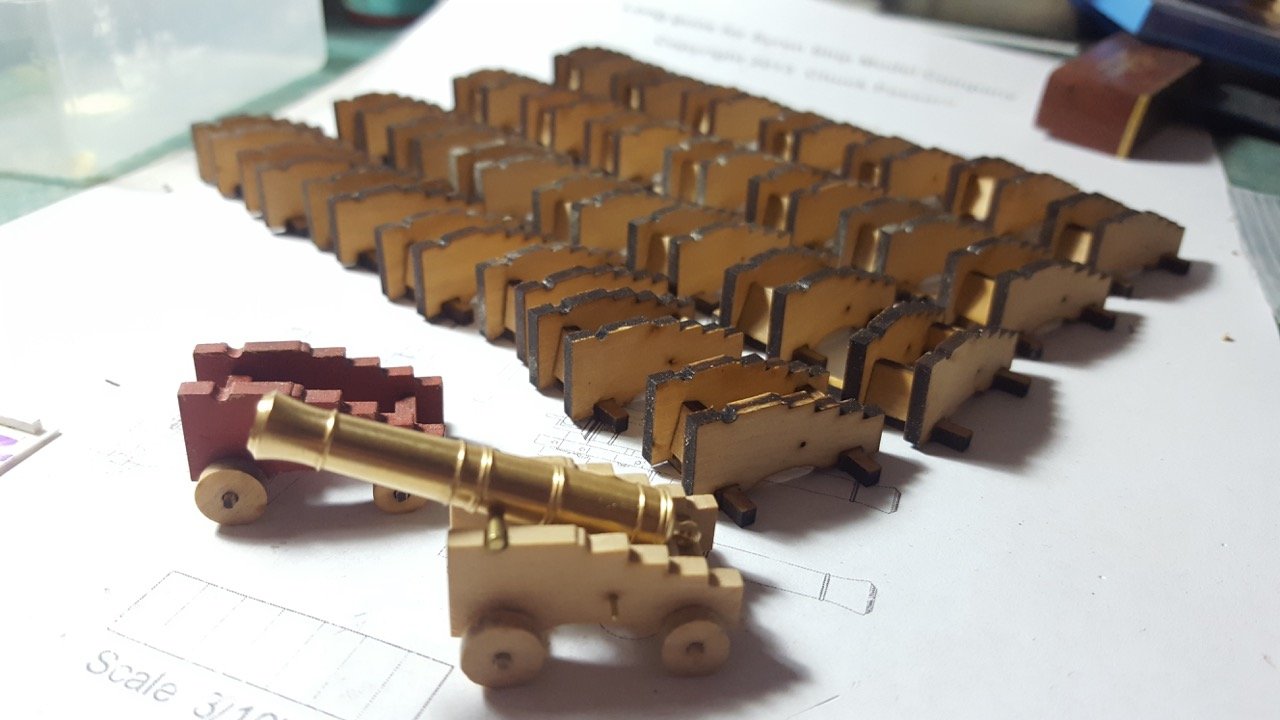
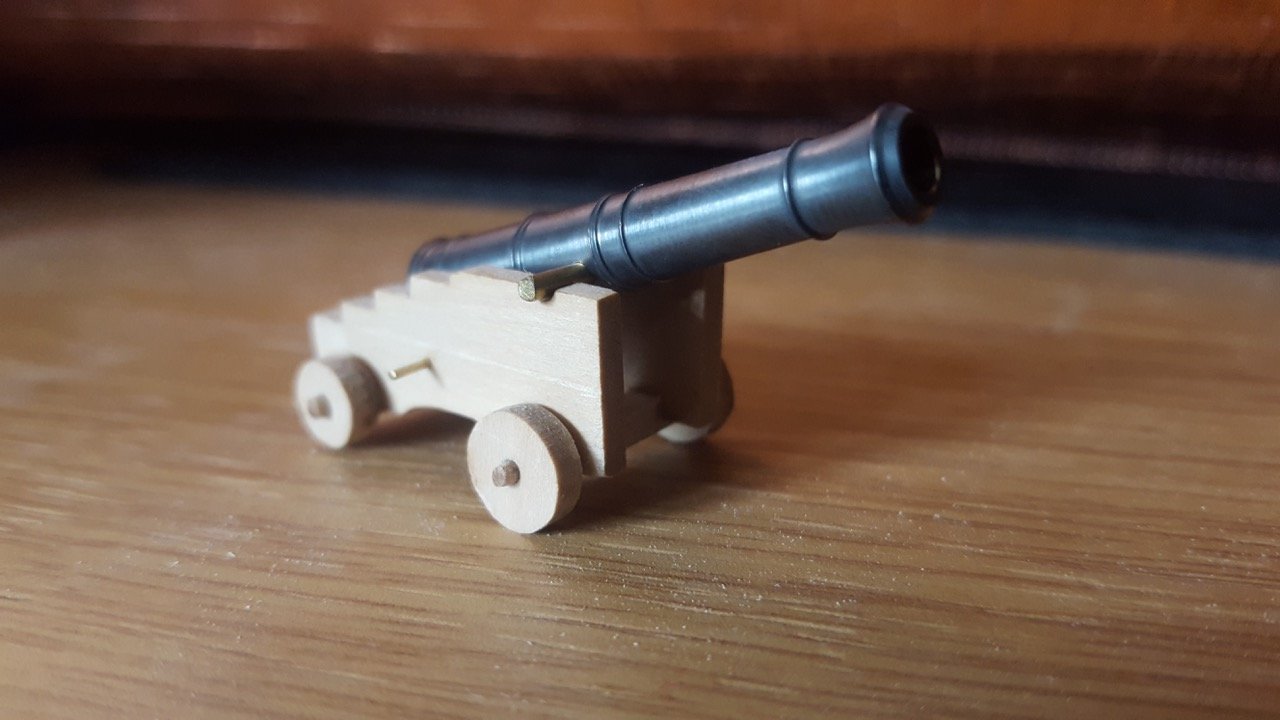
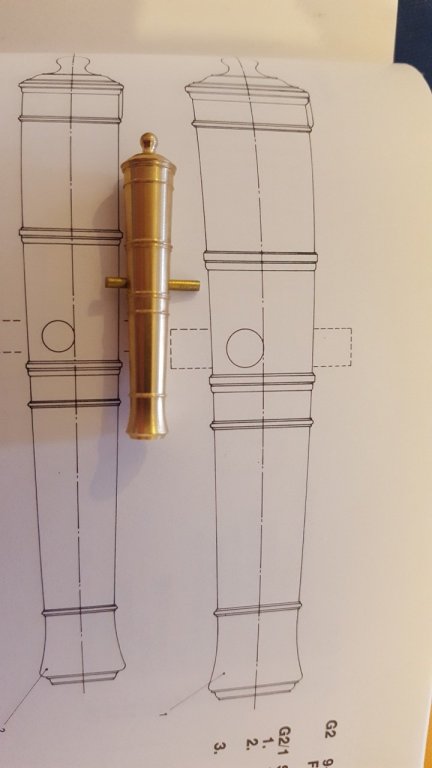
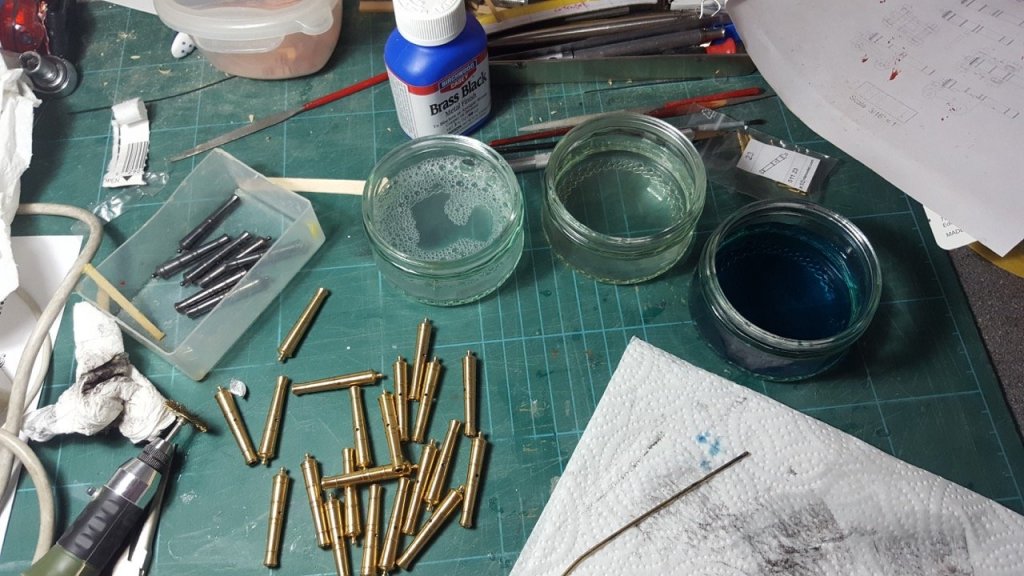
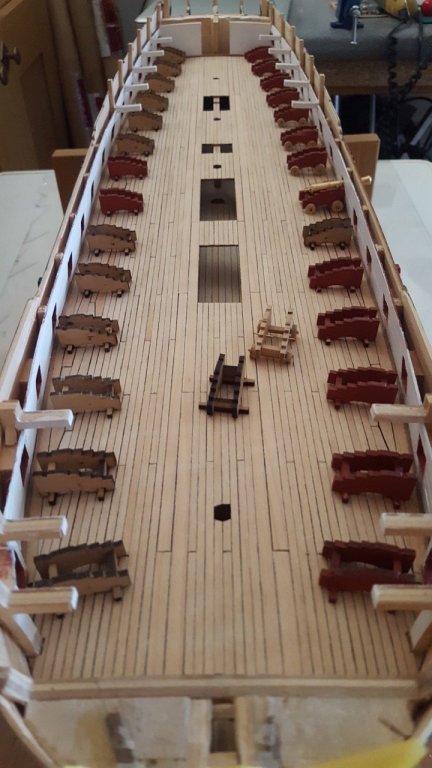
Hi all, Thanks again for all the likes. I finished the rudder, added the straps and spectacle plate (yes, they should be brass, but I find the brass / copper colour combination jarring, so someone painted mine) - and hung it. The straps on the hull are still to add. The straps are made out of card as the photo-etch ones are oversized. I've continued working on the fittings for the gun deck. I made a little production line, and put together the main parts of all of the 18lb gun carriages. I'm not done with that, but I was going cross-eyed whittling all the trunnions, so I decided to deal with the guns, too. I did an experiment, sanding the char back, but not trying to remove it completely... the carriages will be painted, so I'm happy with this. I also purchased some casey brass black (this comes with a serious health warning!) and I've begun blackening the guns themselves. This was more involved than I expected. The method I used is as follows: 1. Use a brass brush in my proxxon mini drill to gently buff the cannon (this removed any surface coating) 2. Wearing gloves, wash thoroughly in fairy liquid (I started with white vinegar, but the fairy liquid seemed to work just as well, and it stinks considerably less!) 3. Transfer to clean water. 4. Remove and air dry - this was done with the gun muzzle sat on top of a brass rod so that no part of the outside of the gun was touching anything. 5. Dip into neat Casey Brass Black and keep a close watch until it looks fairly black... lift out with needle nose pliers and drop into clean water. 6. Once clean, take out, dry off and buff with kitchen towel. Any areas that had not blackened nicely were buffed with the brass brush again, and the process repeated. Sometimes I didn't get a completely even finish the first time, but by the second time, the guns had turned a nice even grey. The finish is far more even than my painting efforts, and it buffs to a nice shine - the kind of finish you can imagine a gun crew being really proud of... (In the photo of the gun on it's carriage, there are a number of steps left unfinished on the carriage.) I'm thrilled with this. I need to finish blacking the guns, (I've noticed that caldercraft sell brass carronades now, so I'll look at getting some of them for the quarterdeck)... and then I need to work out a way of blacking the copper eyelets in reasonable bulk without them turning into a black clump! perhaps sticking them into a balsa block? Here are my results. Looking through the previous build logs for the Caldercraft's Diana, I was concerned that the guns provided with the ship may be a slightly odd shape with cascabels that were over-sized and a somewhat heavy muzzle... My fears were unfounded when I opened the fittings. They're things of beauty. Looking at the ones supplied before, it seems that Caldercraft have very much upped their game! Kudos! Here's a pic of one of the ones I received (they're all identical) - it seems to match up very closely with the AOTS diagram. And just 'cos I can, a picture of the gundeck with all it's unfinished carriages. Very pleased so far. Happy building Rob


-
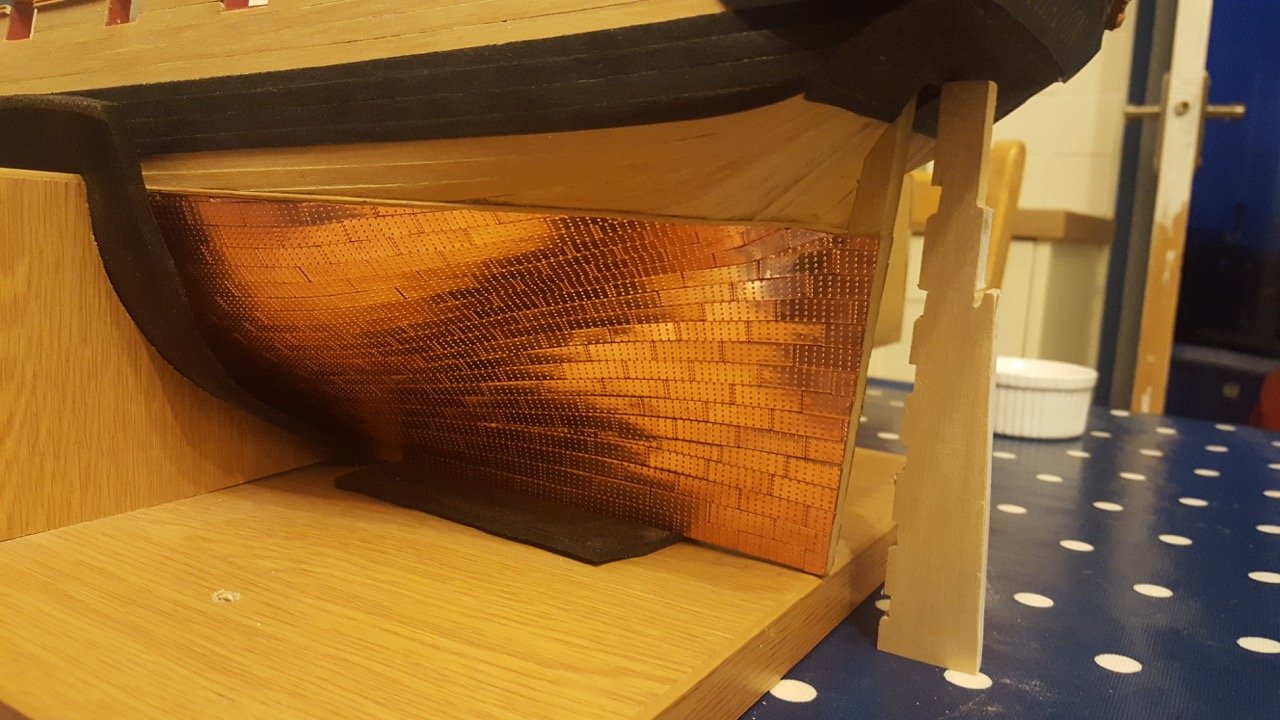
Hi all, Once again, I'm indebted to Jason (Beef Wellington), Ray, and Barbossa for their excellent insights along the way with their builds of the Caldercraft HMS Diana... I've taken a pause with the sheer rails until I've got the quarter deck / fore deck on... I think then it will be easier to make it all look right. That means there are some things that need tidying up before the model starts sitting upright permanently! The Fore Bitts. I made up the fore bitts... only one is provided in the kit, and I really wanted to beef them up a bit (I was struck by just how sturdy they really were when I visited Victory - albeit she was a bigger ship! So I started from scratch with boxwood, using AOTS and Jason's excellent effort as a guide... The square section uprights and crosspieces are made up of laminated 2x6mm guitar stringer, and the shaped supports from 6mm boxwood sheet. Before they were stuck together I checked that the stove and its brick base fitted in between the supports. I started making up the chain pump boxes... although for some reason I don't have a picture of them. I'll take some and put them up when I next work on them. Rudder. Next was the Rudder. Because I'd modified the backbone of the ship to have a tapered stern post, the rudder in the kit wouldn't fit. Again, AOTS provided the template (photocopy it out at the right scale, Pritt-Stick it on, then soak gently once it's cut out) to create one from boxwood sheet. I cut out the shape using a coping saw, and then filed and planed it down to shape, and sanded, then scraped the gradient from top to bottom. This took quite a while. Once done, I added the pintles, 2x6 boxwood section cut to shape with 0.6mm brass rod inserted. Black card was used to simulate the bands at the top of the anchor, and copper paint added to the edge that will be towards the hull. The kit provided copper eyelets were used for gudgeons, and the shape in the counter opened up to accomodate the rudder properly. I had to take a fair amount of material out of the transom to provide space for the rudder to lift up a little higher than the point at which it eventually hangs so it the pintles could be lifted over and into the gudgeons. All in all, I'm very happy with it. I haven't finished coppering it yet, but the effect is pleasing already.


- 275 replies
-
- 11
-

-
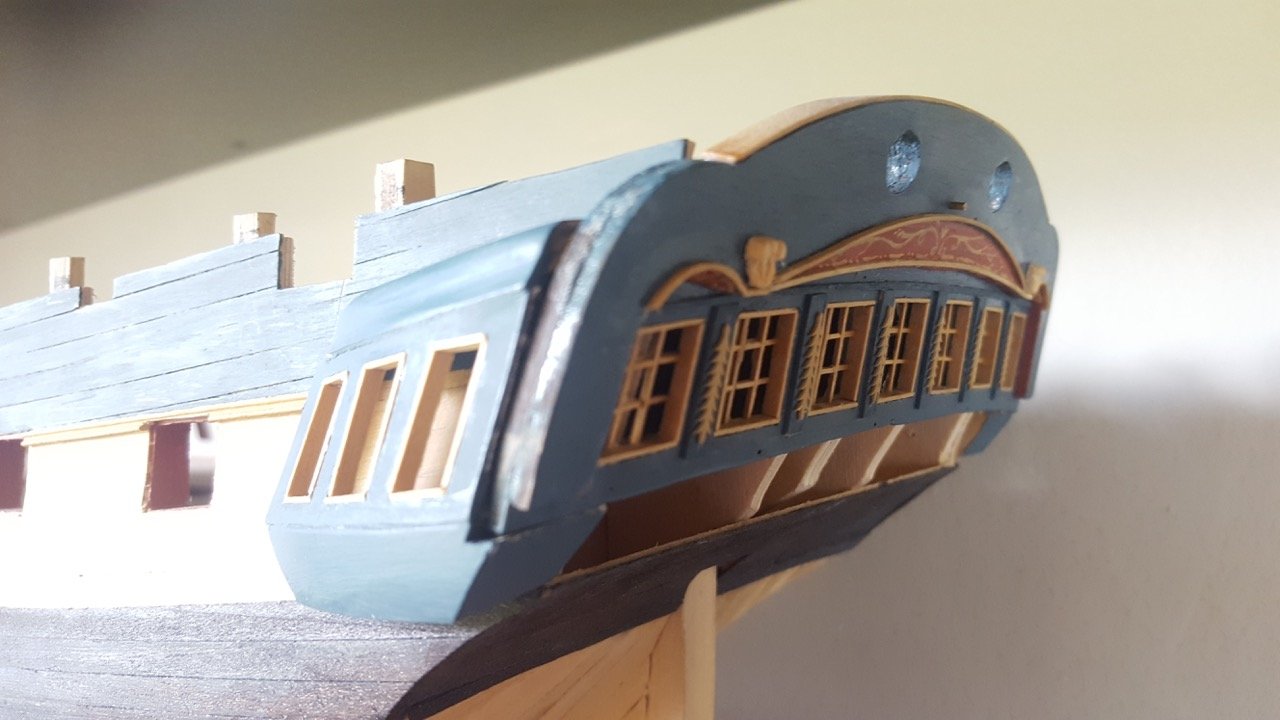
Hi all, A bit more work on Ethalion today. I was musing over how the sheer rails went onto the sides of the ship, and decided to go back and have another look at the pictures on the National Maritime Museum website. I remembered looking at the builders models when I started out on this path, and the pictures weren't brilliant, but had a note next to them saying they planned to get better shots soon. Well... cut a long story short, they're there now. (At least either they're new, or I just missed them before.) http://collections.rmg.co.uk/collections/objects/66303.html Under the main image, if you click the right arrow to view more thumbnails, there they are. You can click the thumbnail, and then if you click the expand icon they're really nice quality images. A slight side note, this model's marked as a Diana class, but the date is 1794, and I'm pretty sure it's Diana, of the Artois class? Happy to be corrected. I'm hoping to replicate the really nice decorative pattern on the tops of the quarter galleries. More pictures of my progress soon. Rob
-
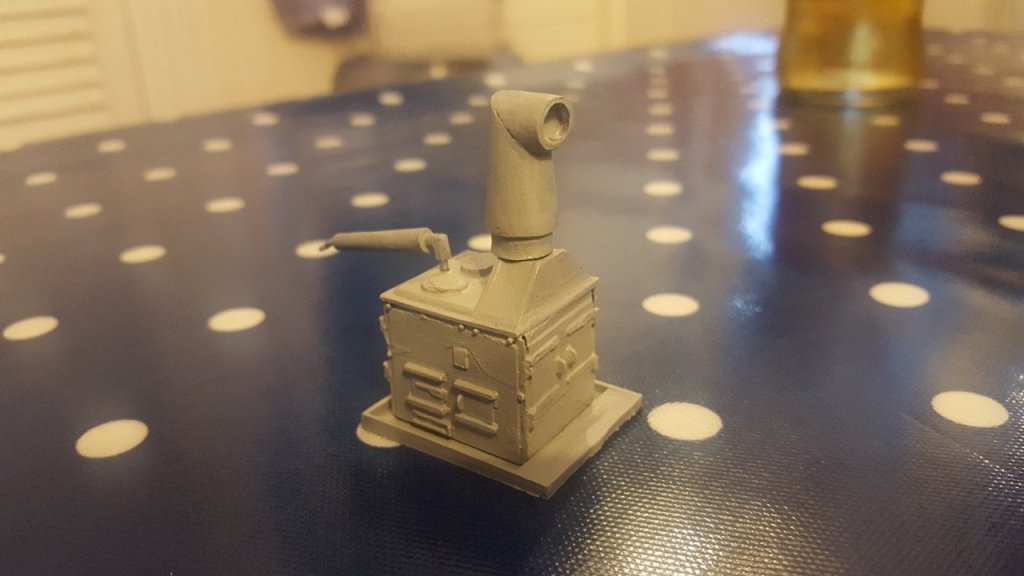
For the sake of clarity - and in fairness to Caldercraft, I should make clear that I am using their flue and condenser, as they seem a good likeness and are well made (albeit a bit of a challenge to hollow out the flue.
-
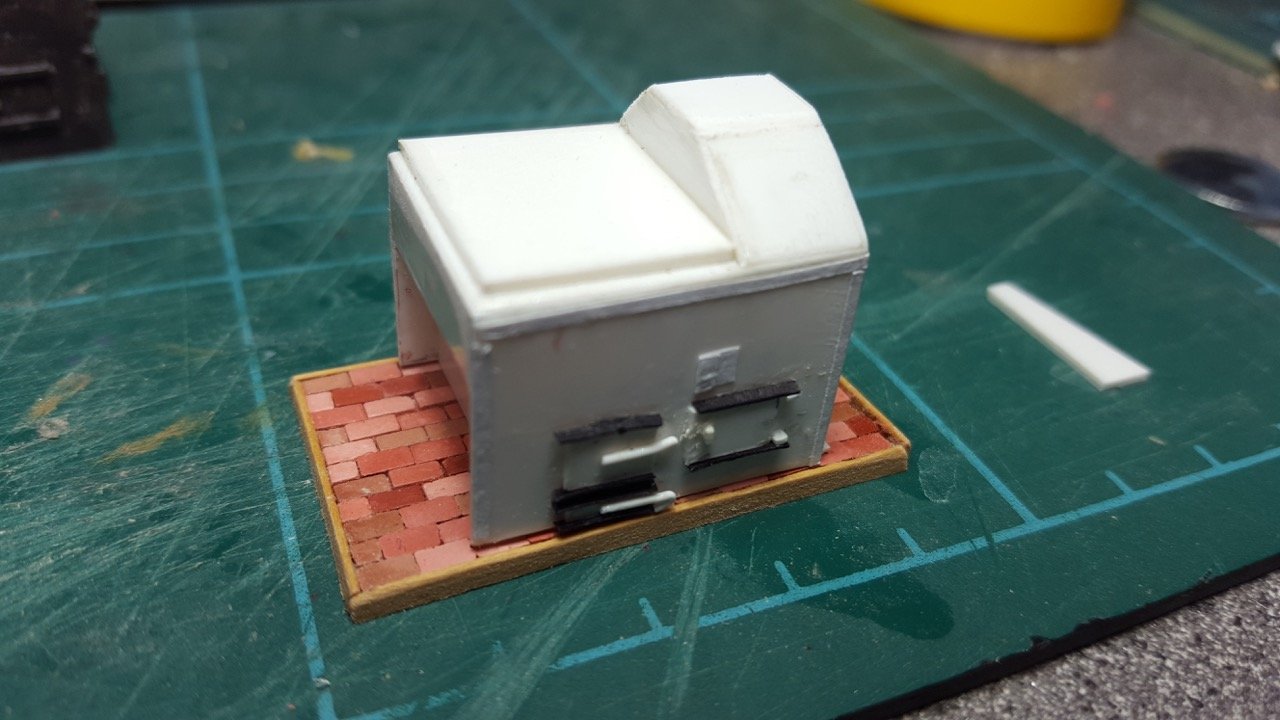
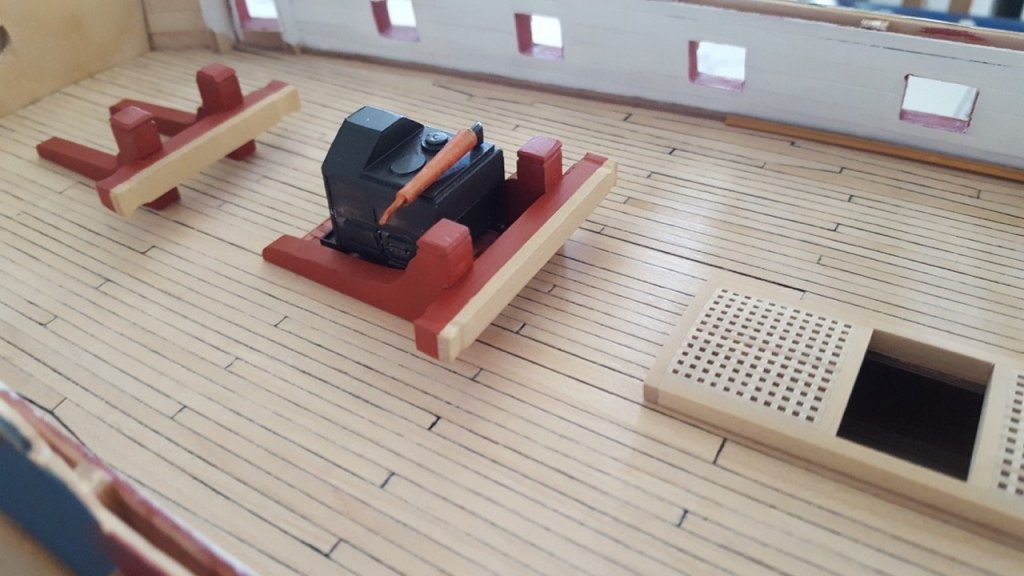
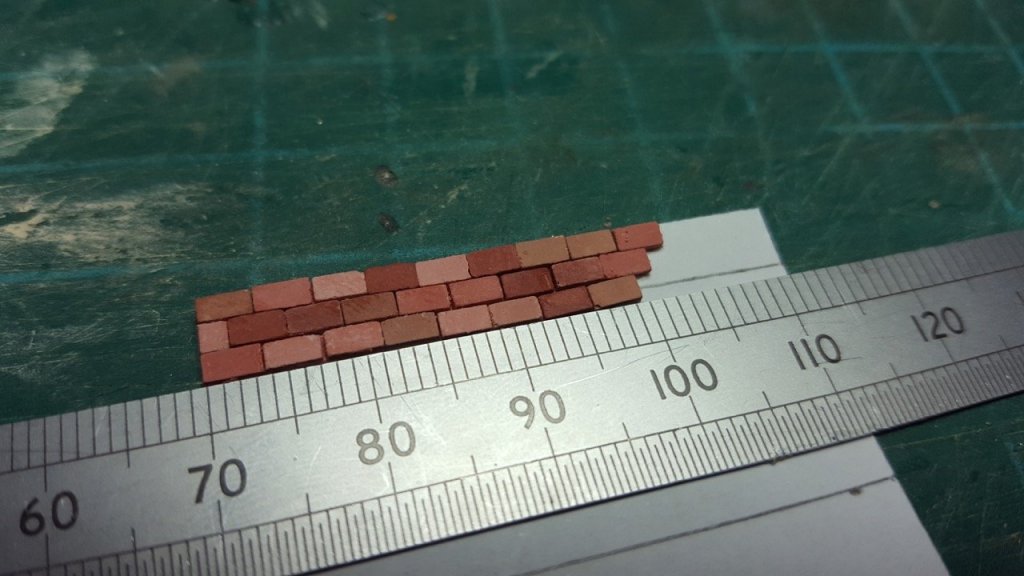
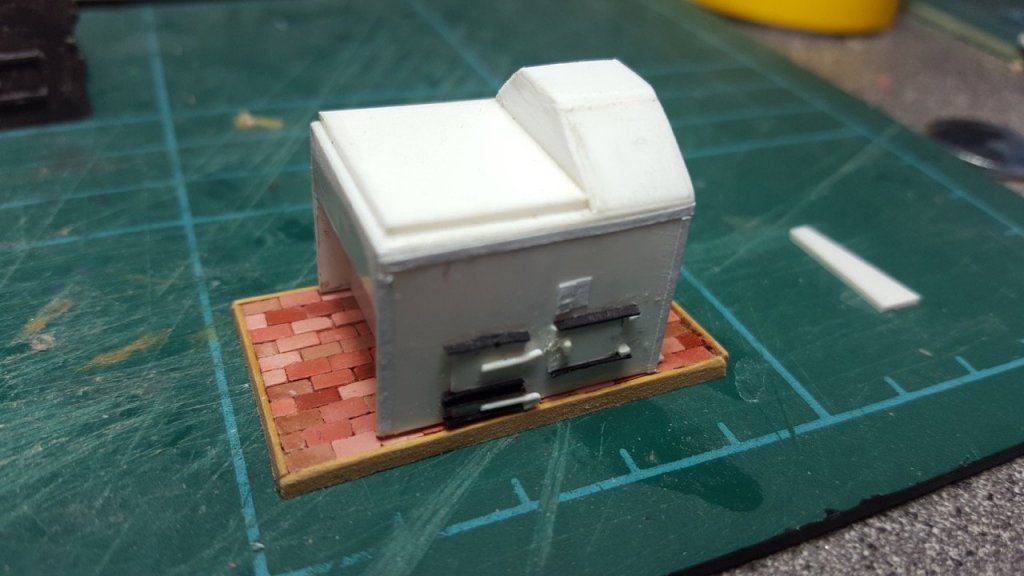
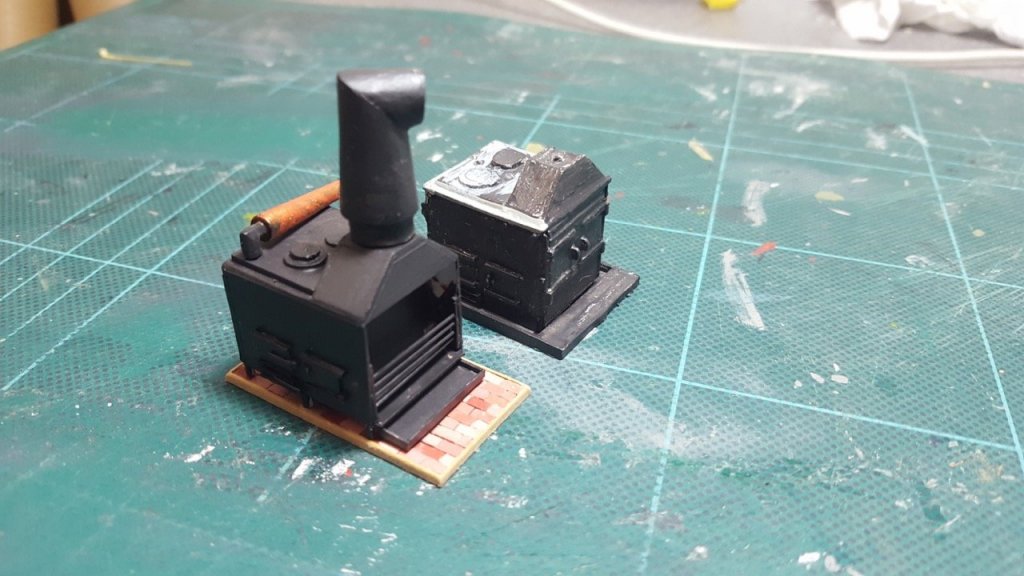
A mini-update on the stove, then. I got some scale OO gauge bricks, and laid them onto paper using PVA to fix them for the fire-proof base. Once completed, the base was painted over with water-down pva to fix it, and provide a kind of glaze. Then it was lined with 0.7mm box veneer to provide a surround. A shot of the stove so far, with plasticard legs, driptray and a lick of paint added. (Kit-supplied background, mine, foreground.) I've left a few areas unpainted, as there are still some details to add. Overall, I'm pleased with it, and it weighs 18g including the white metal flue instead of the white metal version which weighs 65 grams! Happy building! Rob
-
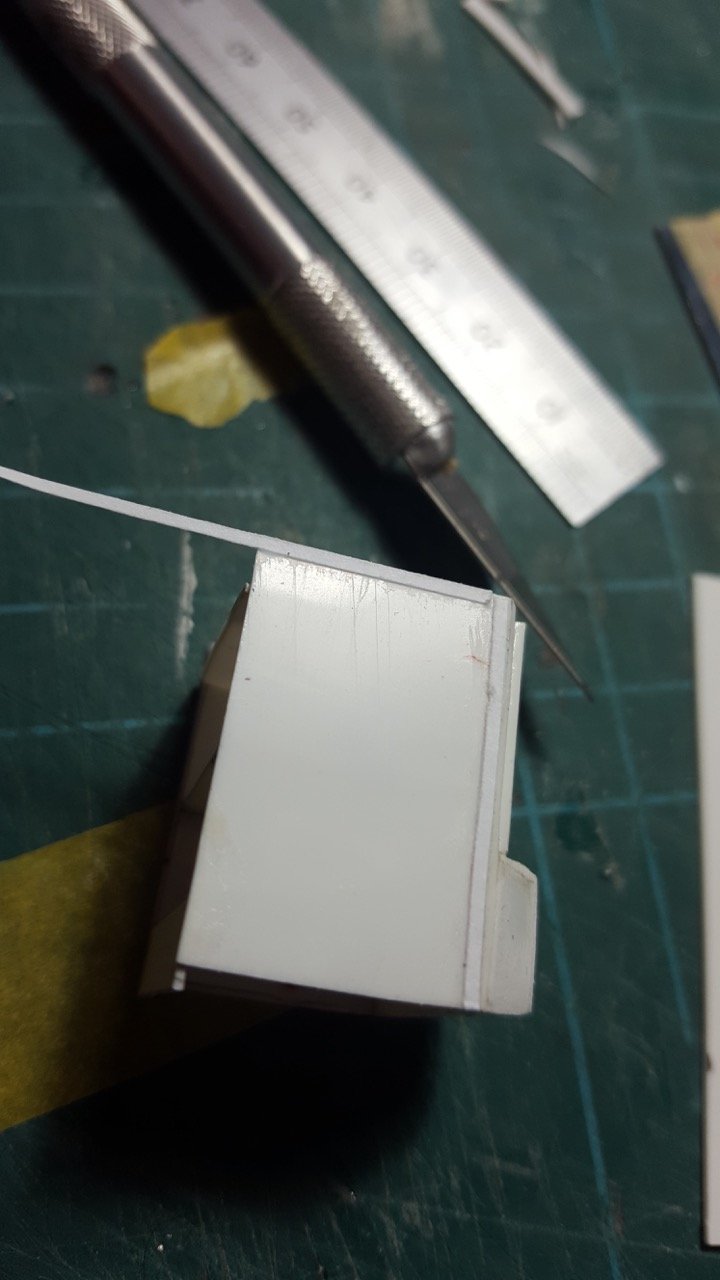
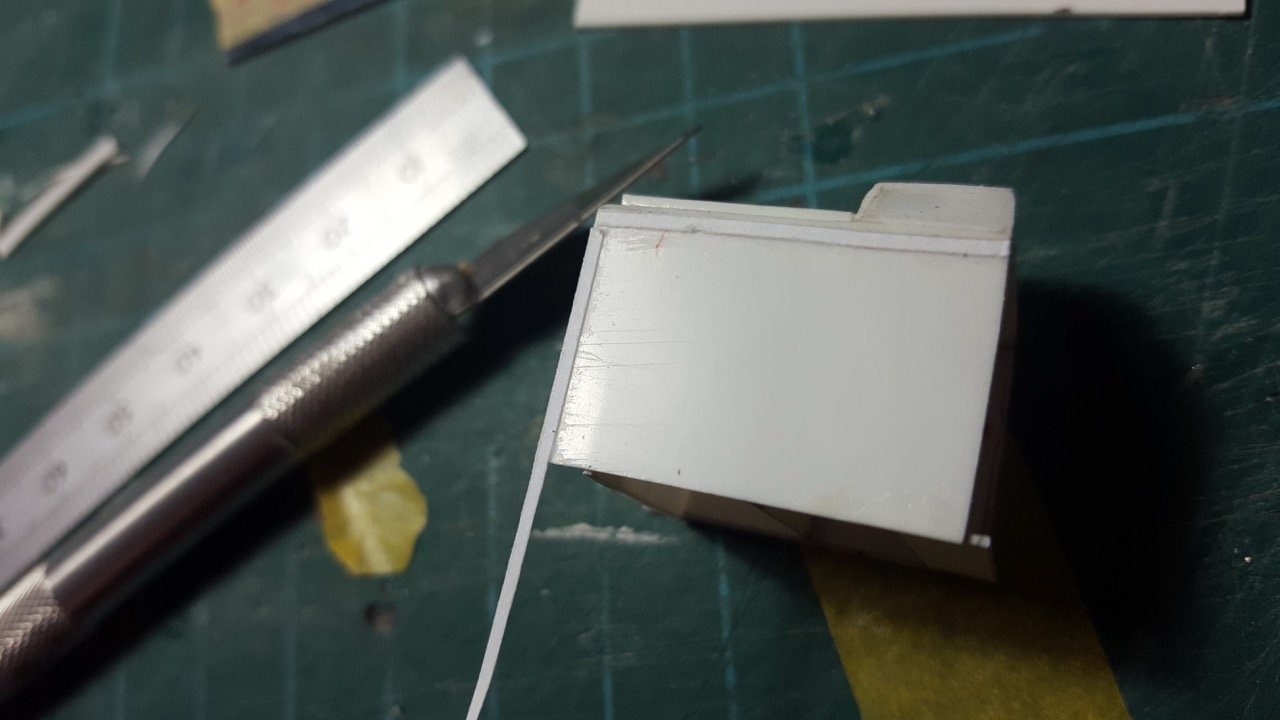
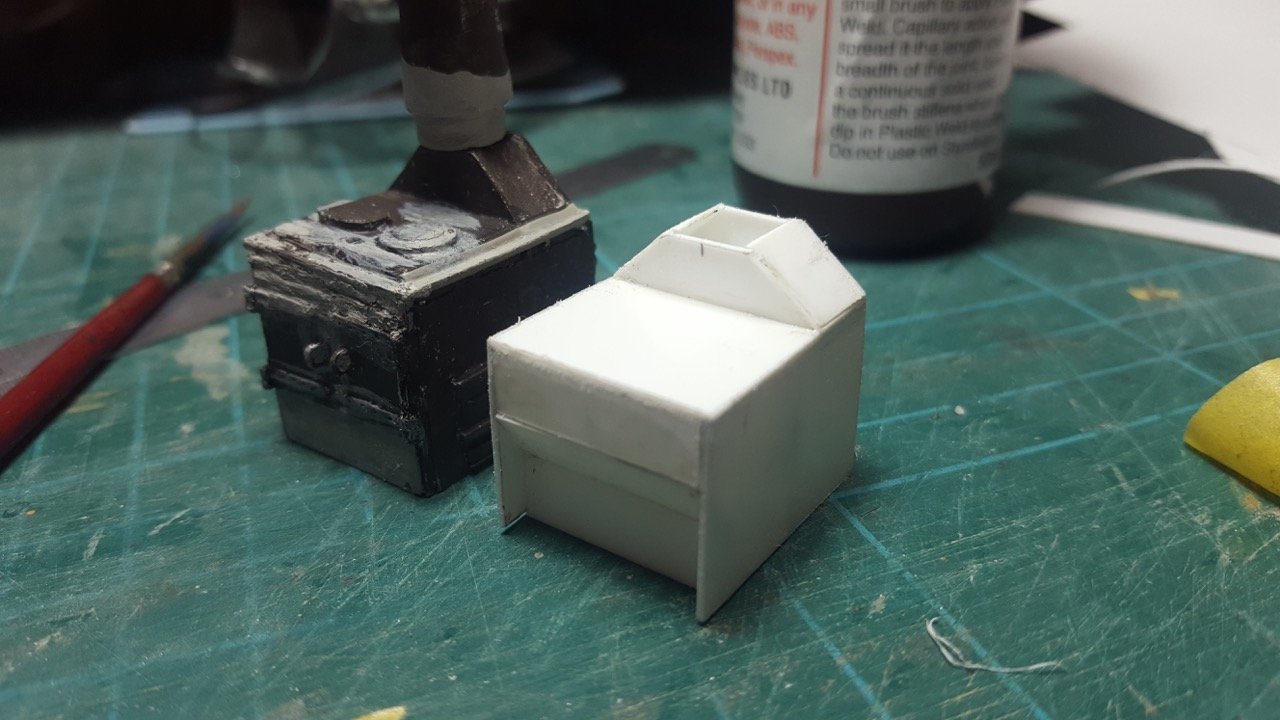
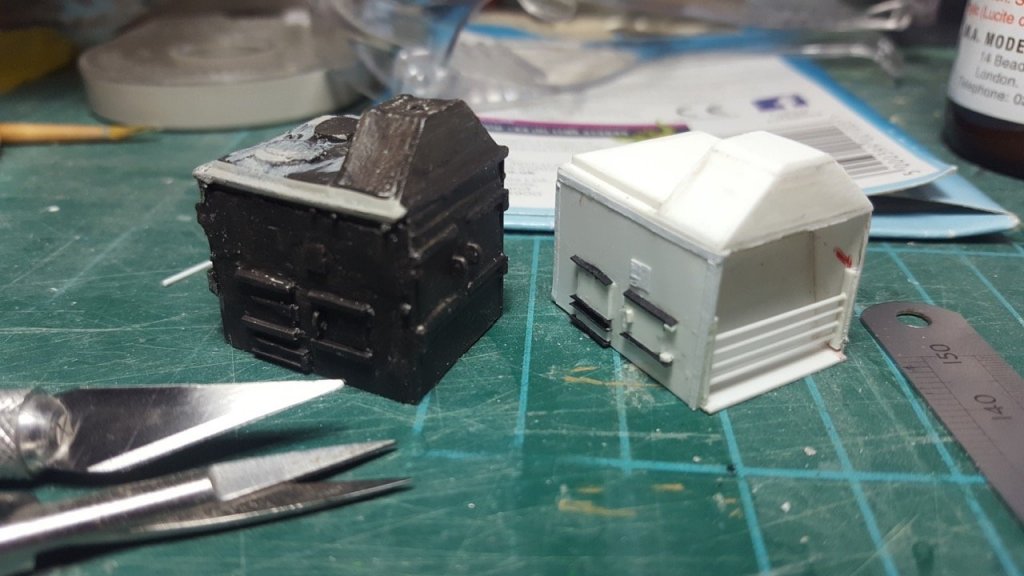
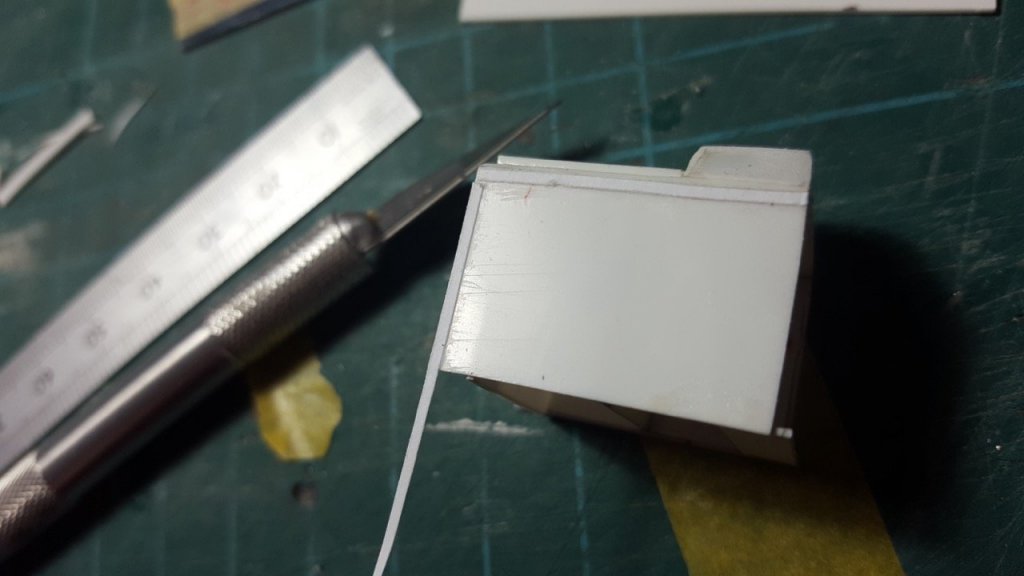
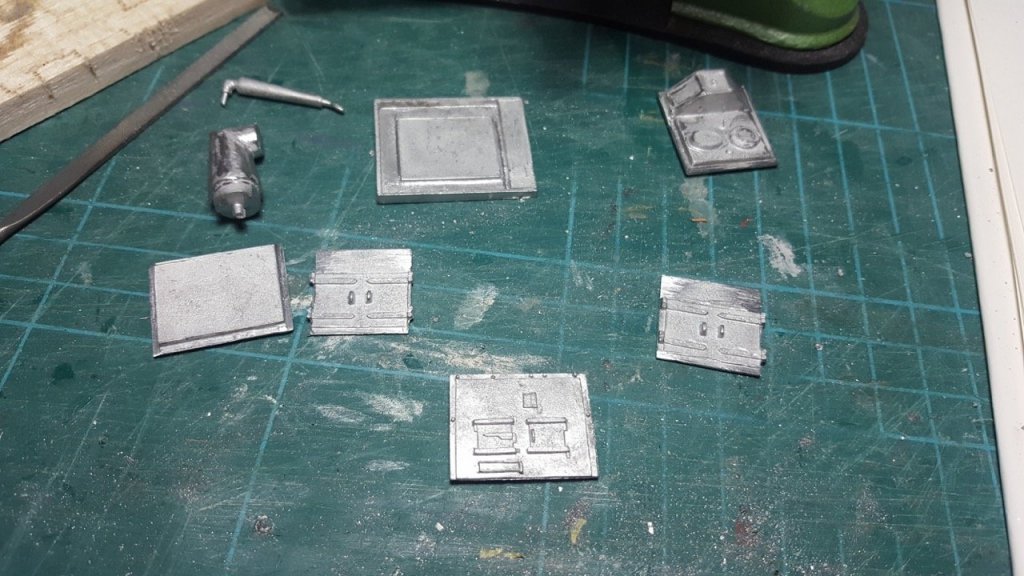
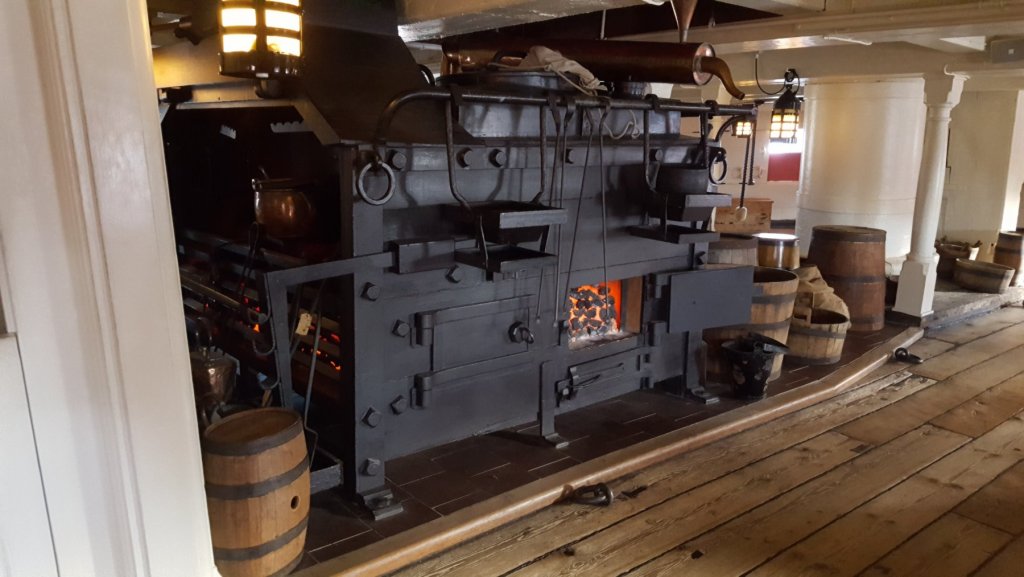
I fancied a bit of a change after wrestling with the stern, so I got out the brodie stove mini-kit and starting putting it together. I'd forgotten how much I dislike white metal. Every time I use it, it just seems to turn to mush. It's hard to stick, and heavy. I didn't want to spend any more money if I could avoid it, though Jason (Beef Wellington) has used a 3D printed one that looks very good from what I can see. So... after a frustrating time trying to turn it into something that looked remotely like a stove, I gave up, and started making one out of plasticard and card instead based on the AOTS plans. Here's the progress next to my shocking attempt at the kit to compare it with... The white metal parts provided in the kit: My attempt at putting them together... Now, starting to build my own (you can see the mess I made trying to paint the white metal one... Here. I'm adding the cowling for the flue, which is slightly angled back in to the centre of the stove: I added the edging using paper - .5mm plasticard looked way too clunky. As it stands now... (Caldercraft kit, left - My attempt, right) You can see the grating details going in, and a whole variety of other detailng will also now be possible. That said, it's debatable how much is worth it, as it's well hidden away in the finished Frigate. Finally, I dug up this photo from when I was visiting Victory in November... a helpful comparison. I've also ordered some scale bricks which will help me make a nice tiled floor for the stove once it's ready to place. For anyone who's interested (and hasn't seen them yet), I put all the photos up online and linked to them on this thread:


-
Those carronades look great! Fiddly little things aren't they. If I had a pound (or dollar for that matter) for every time I realised I could have gone about something a better way, I'd be raking it in by now - I have very fond memories of building Pickle. She was the first wooden model I built, but I got there in the end. It's a fantastic model that I'm sure will give you a great degree of satisfaction. Hope you don't mind my following along. Rob
- 37 replies
-
- 1
-
-
- pickle
- caldercraft
- (and 1 more)
-
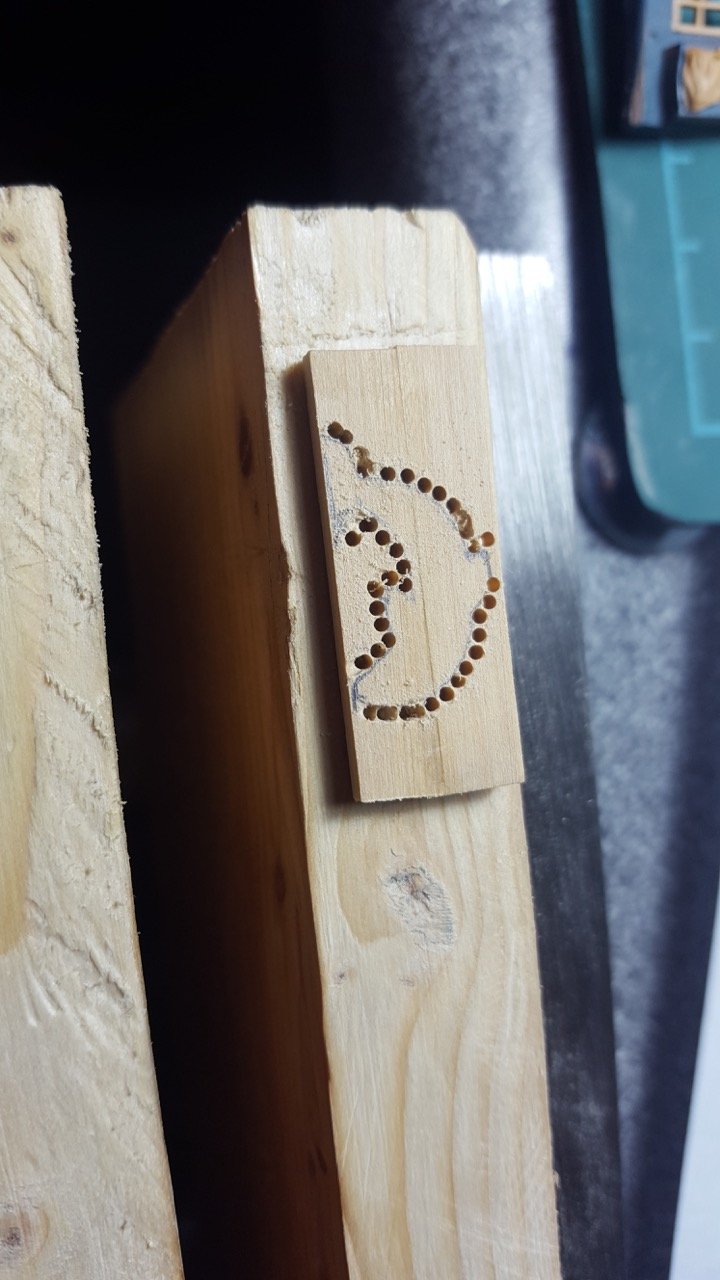
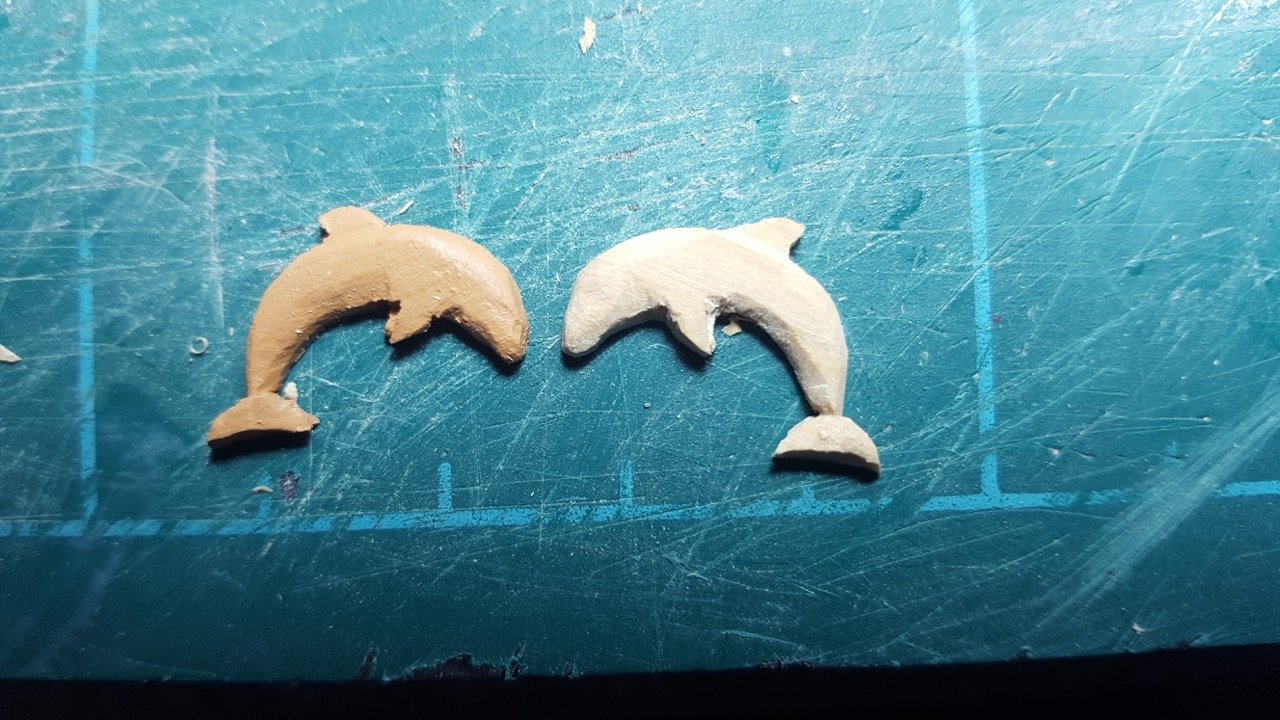
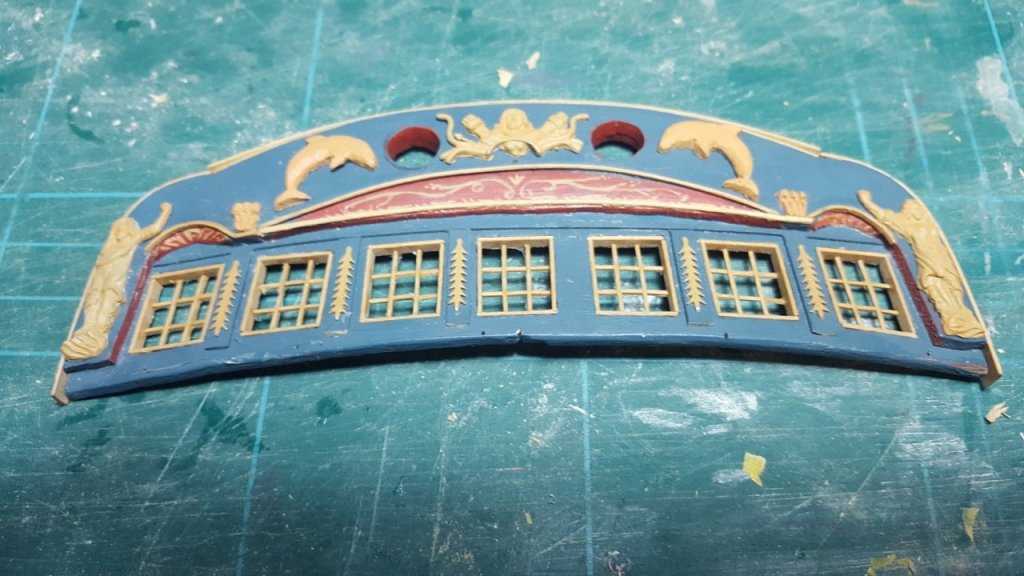
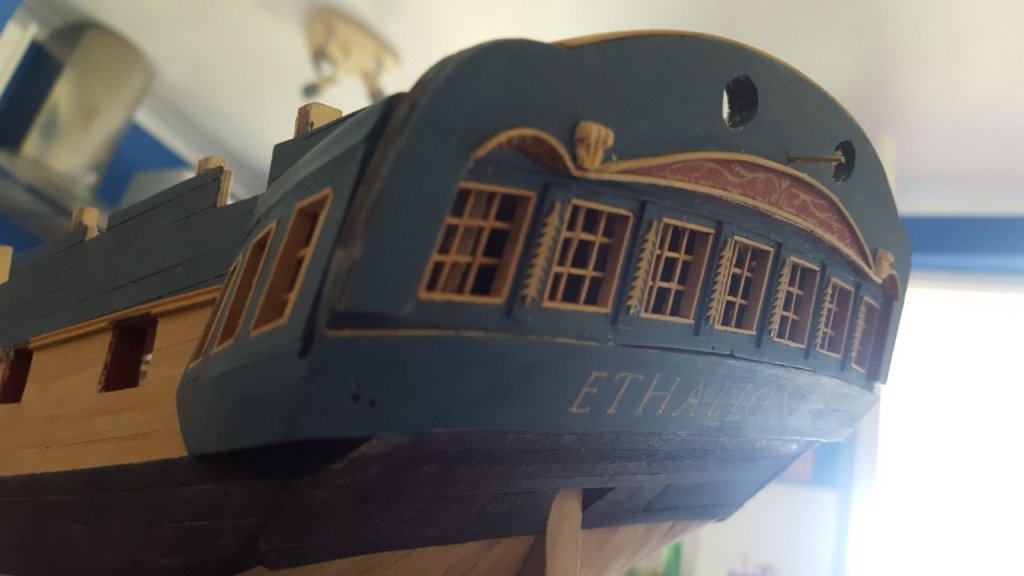
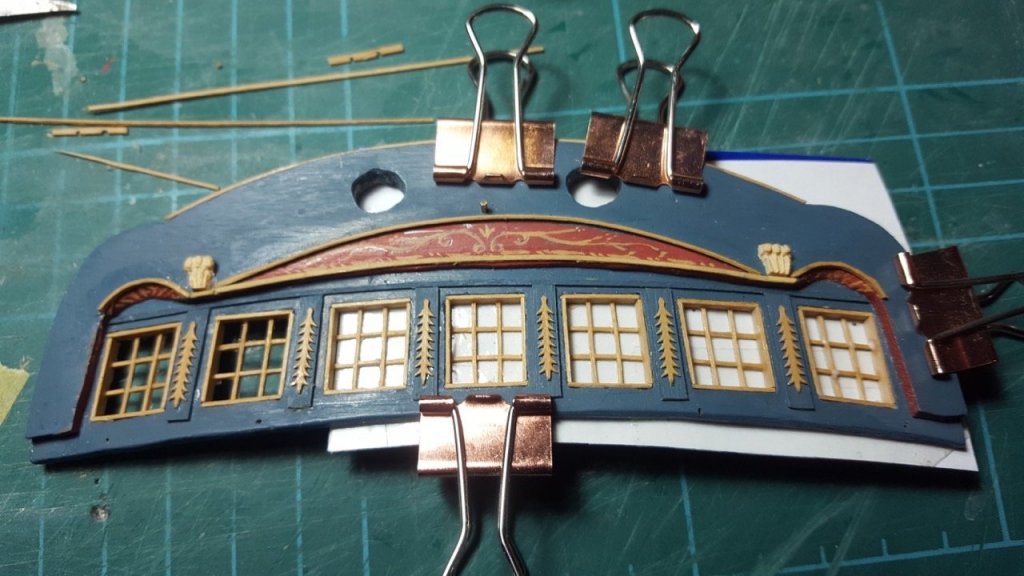
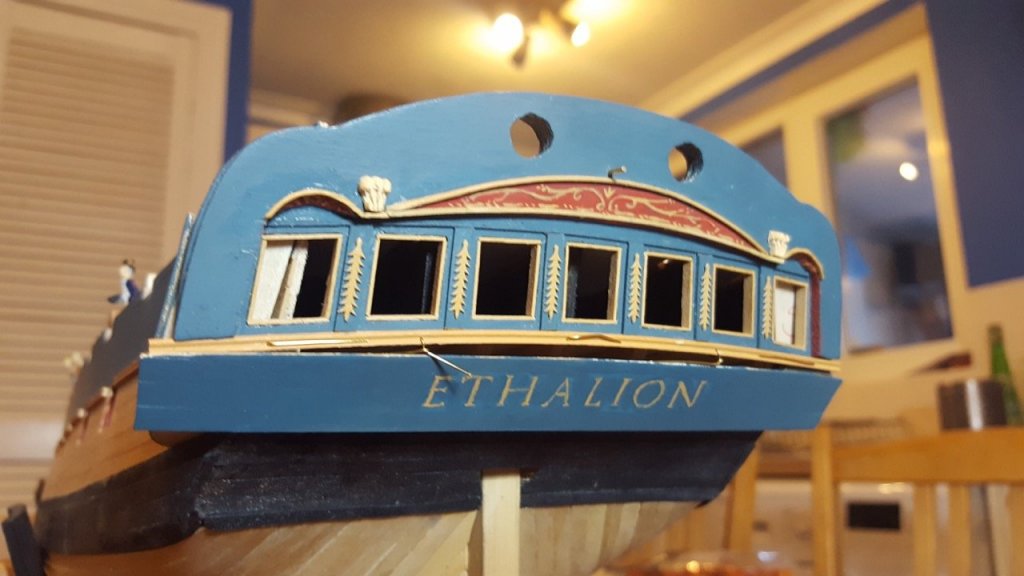
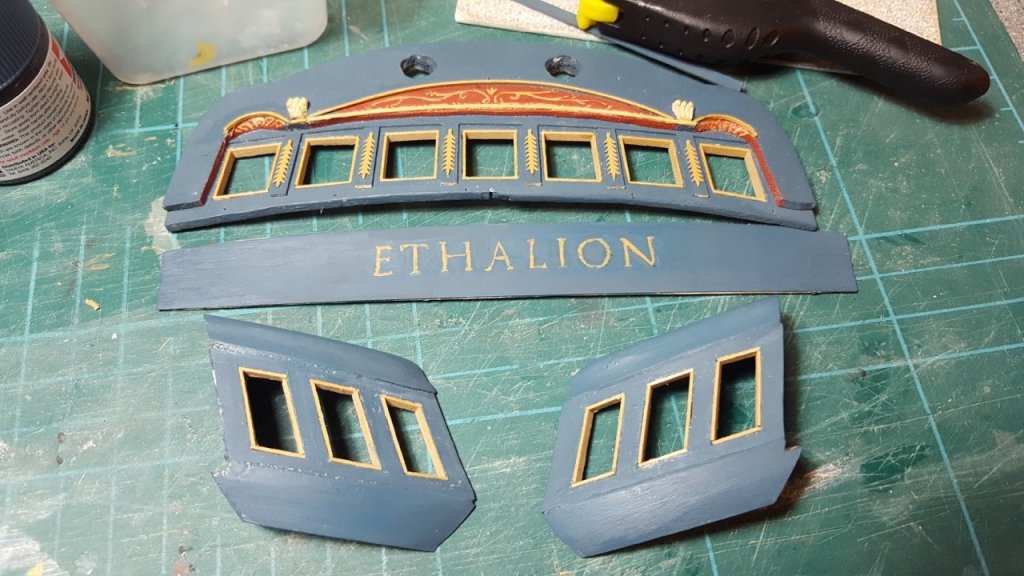
Hi all, Thanks again for the likes I've spent a happy day working on the stern of Ethalion today... I mentioned yesterday I wanted to do some more work on the decoration just below the taffrail... I've been working up the courage to try some carving, and the moment had arrived. The narrative involving Ethalion in Ovid's Metamorphoses involves the sailors being turned into dolphins, and so I'd already done a Frankenstinian manoeuvre creating a new figurehead that is a soldier morphine into a dolphin's tail, as below: Now the challenge was to make the stern work too. At present (understandably) it's Diana with her quivers full of arrows slung over her back, and lions on each side showing she's a huntress. But I wanted to put dolphins in the Lions' place... Was my carving up to it? Well, I'm amazed at what some patience can do ... I glued 6x2 strips of castello boxwood edge to edge with carpenters glue and printed out some pictures of dolphins and sketched them onto the wood, then I set to work. I chain-drilled round the outside of the dolphin to get the shape, and then gently and slowly, with a brand new x-acto blade carved away. Here are some of the stages as I went, and the finished items... I may thin them down a little more. The tails proved almost impossible to keep stuck to the dolphin during this process, so were carved separately and glued on. Painted, they fit quite nicely with the existing decorations. It's made me want to try some more bits! The bug has bitten! I then spent some time getting the top angle of the stern right so that the rail sits parallel to the line of the side rails as they approach the stern. Once this angle was right, I glued on another strip of box to neaten up the edge (the ends aren't stuck down yet in the picture below). The observant among you will notice that somewhere along the line I also lost one of the decorative bits that goes between the windows and search as I might I could not find it. Happily, Caldercraft provide one spare... I need to make sure I don't lose that one! Next step is to mark the extra decoration between the dolphins and the ladies at each end, and paint that in before sticking the decorations in place. Then I think I shall store this somewhere safe until I'm a bit further along. Take care Rob


-
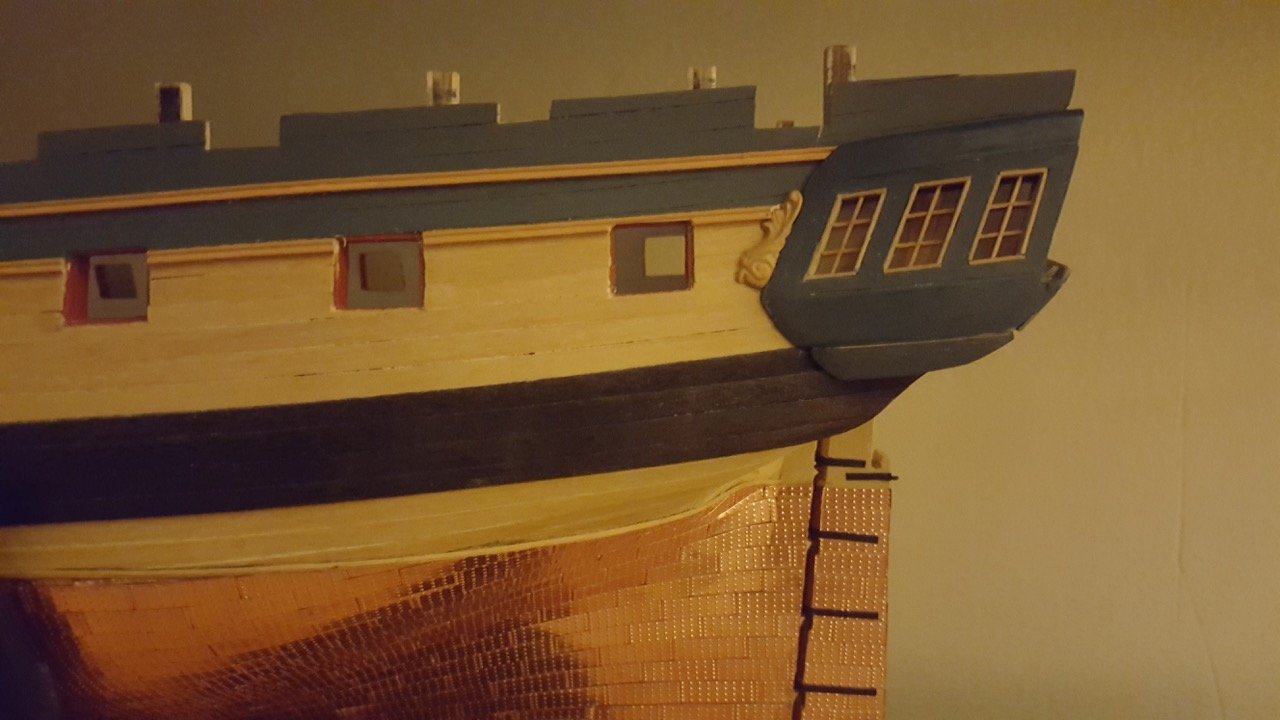
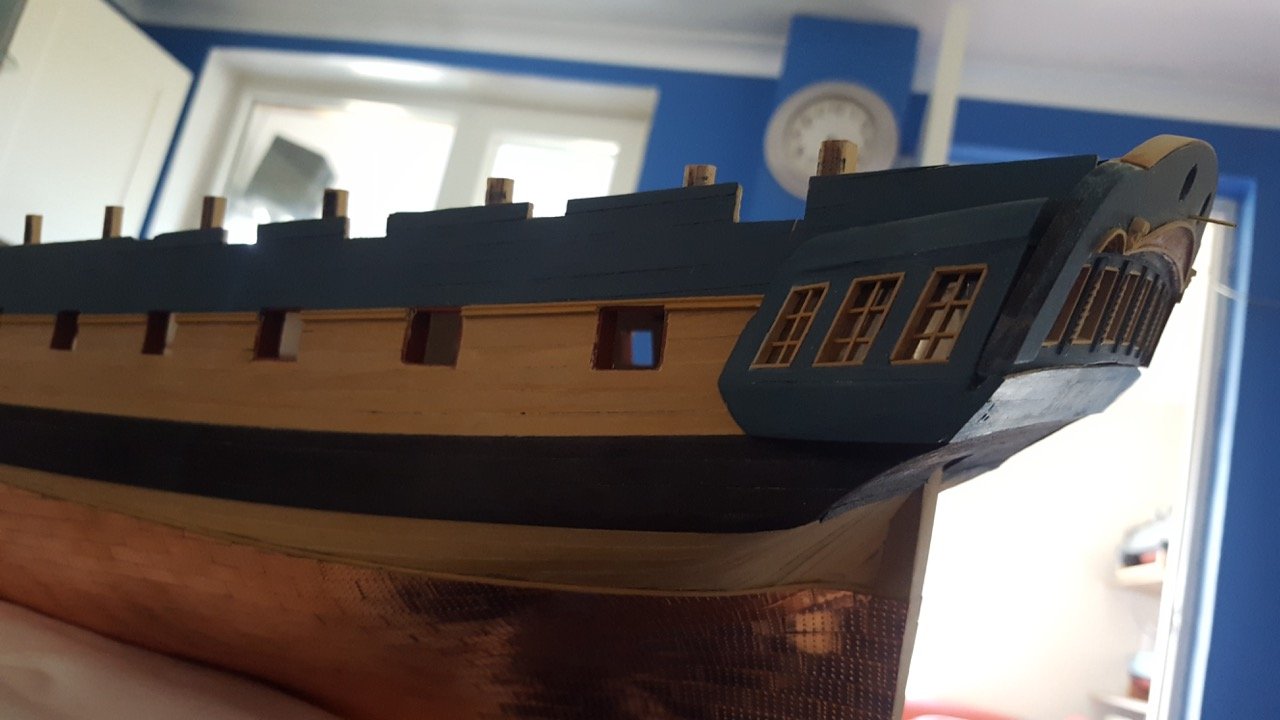
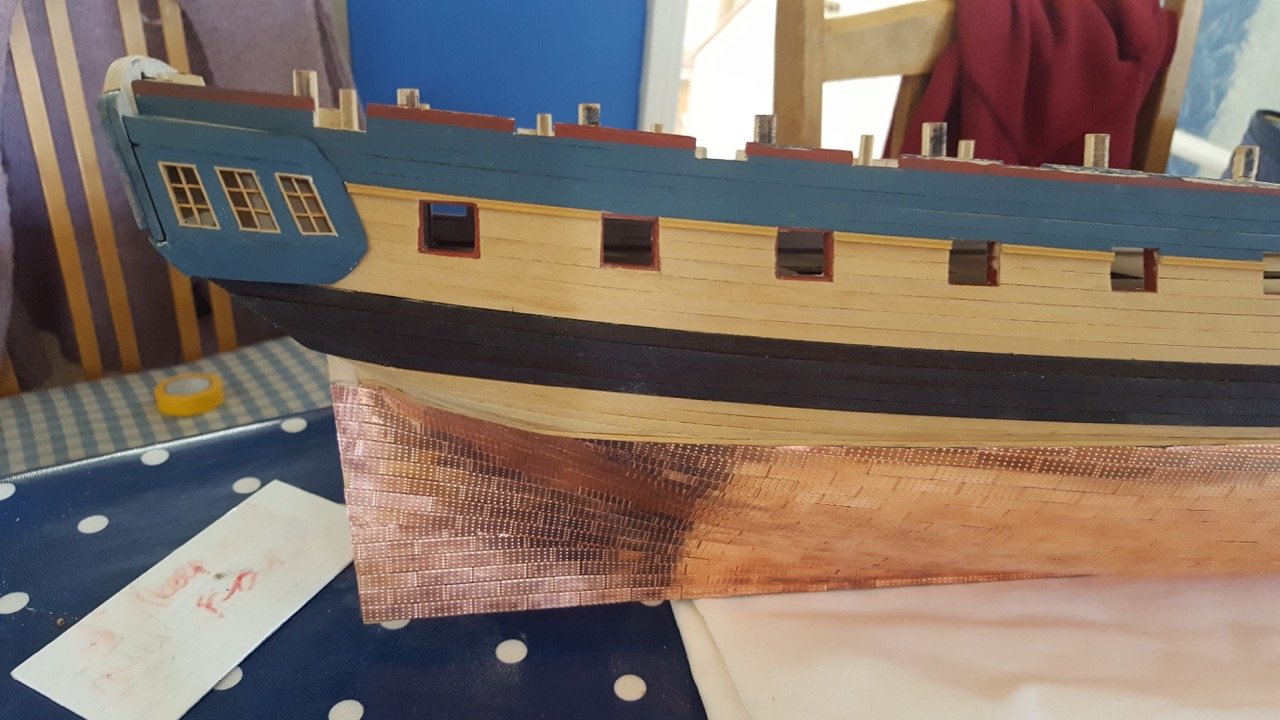
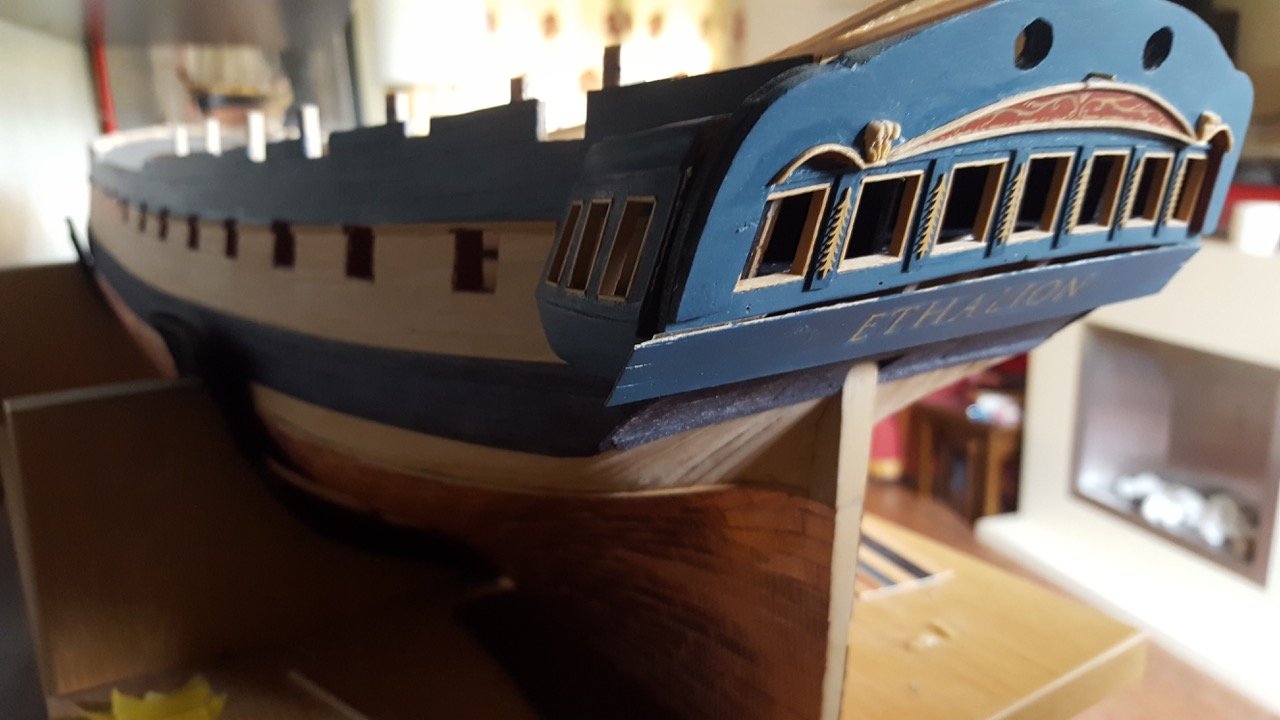
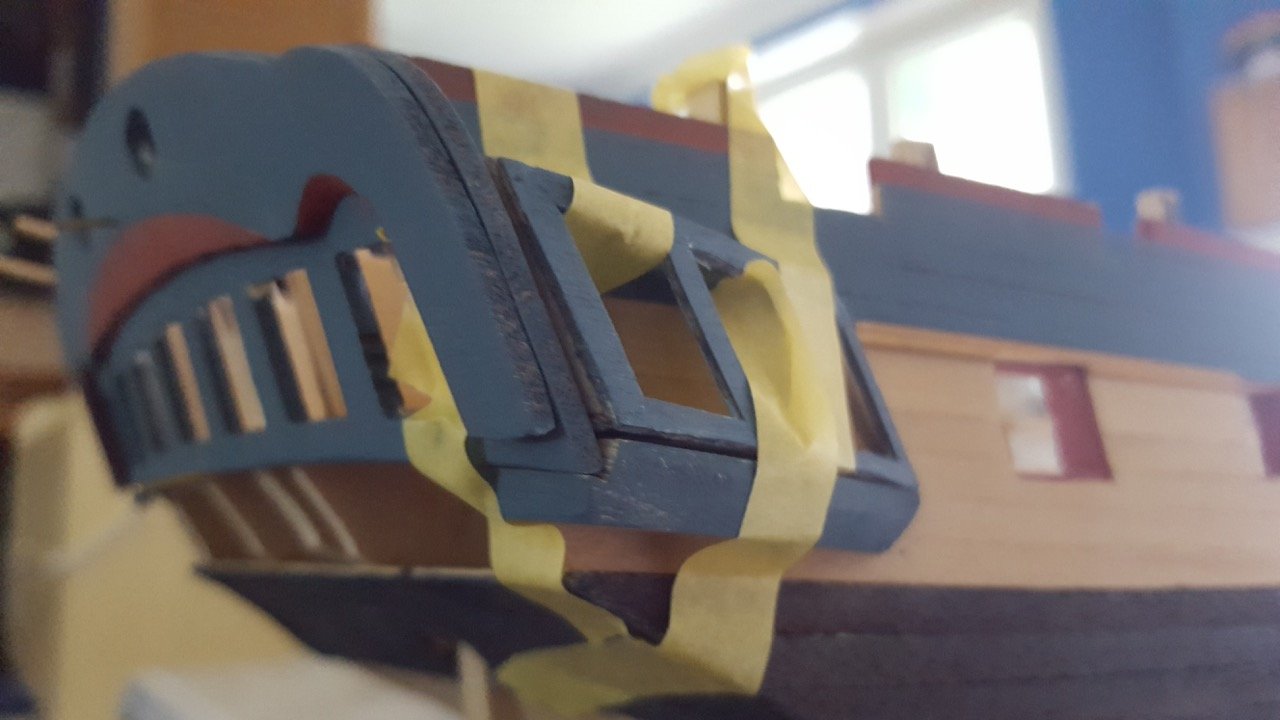
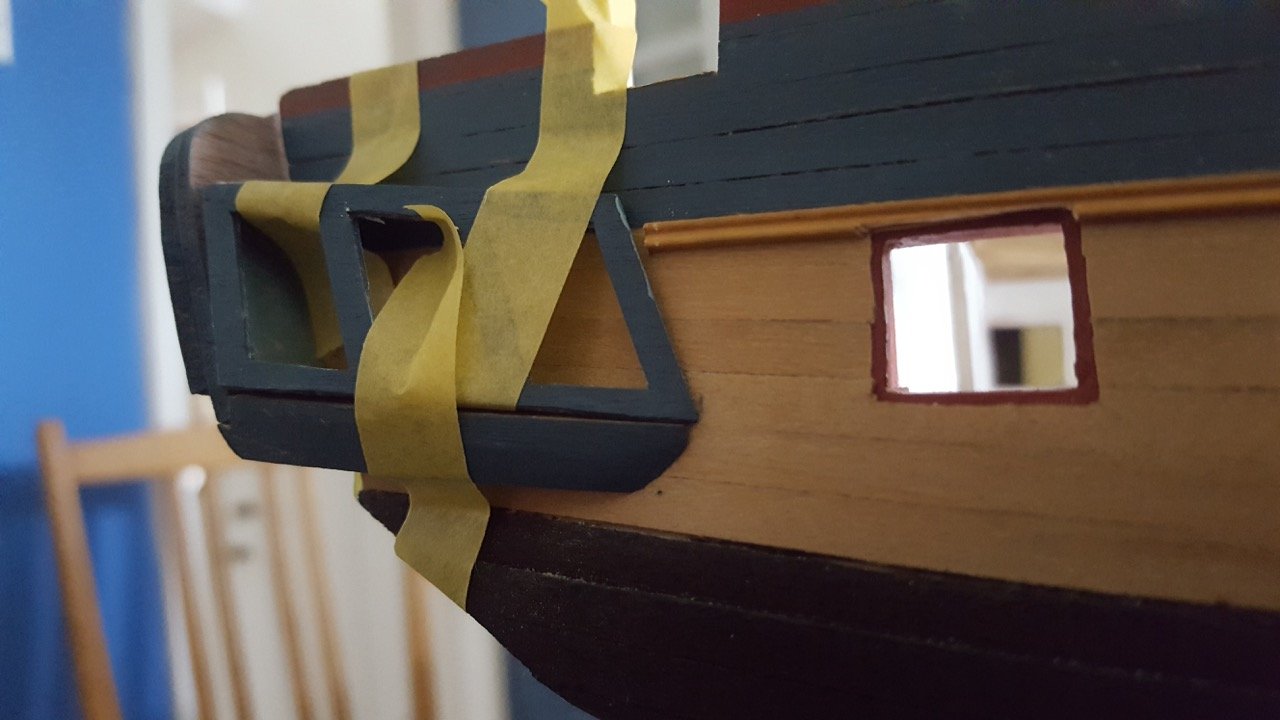
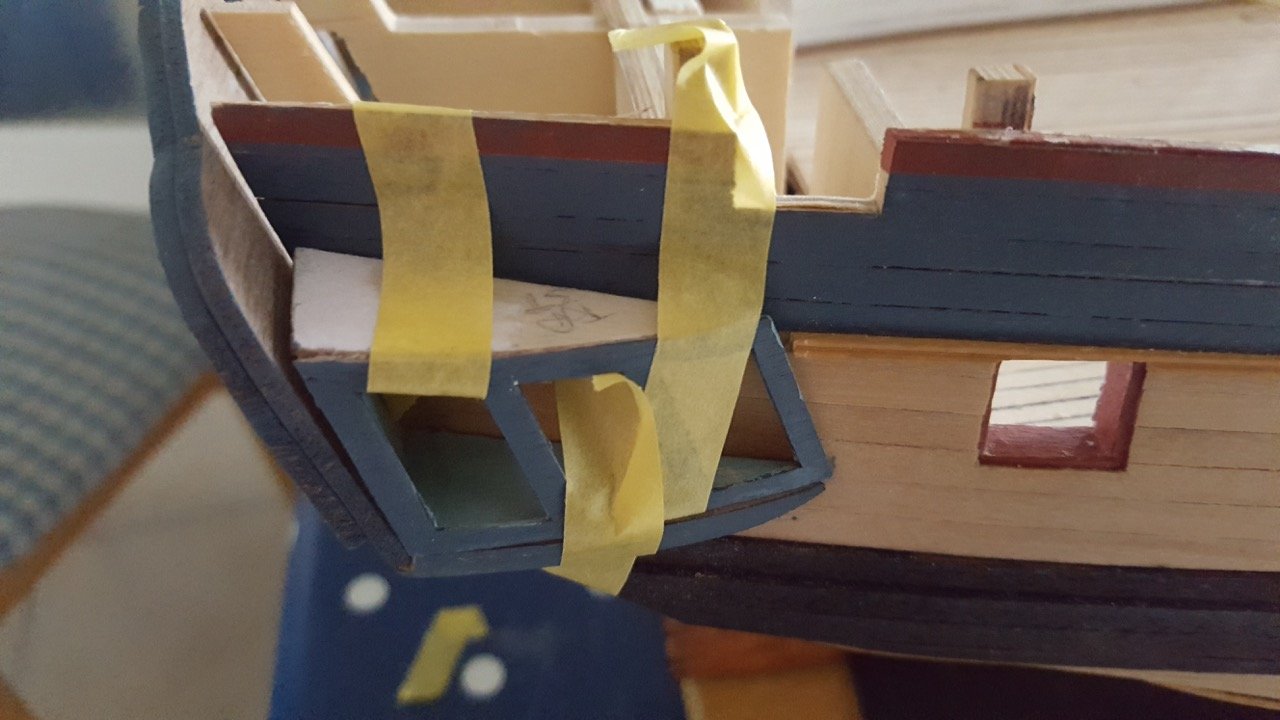
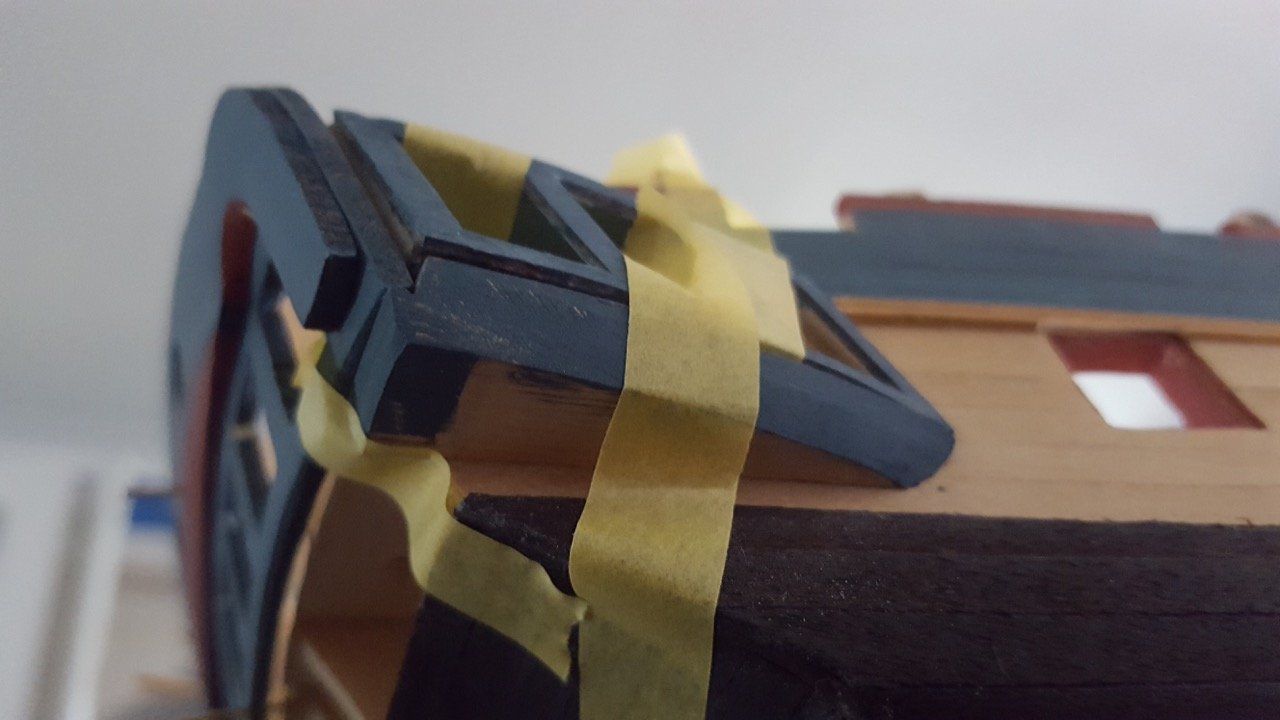
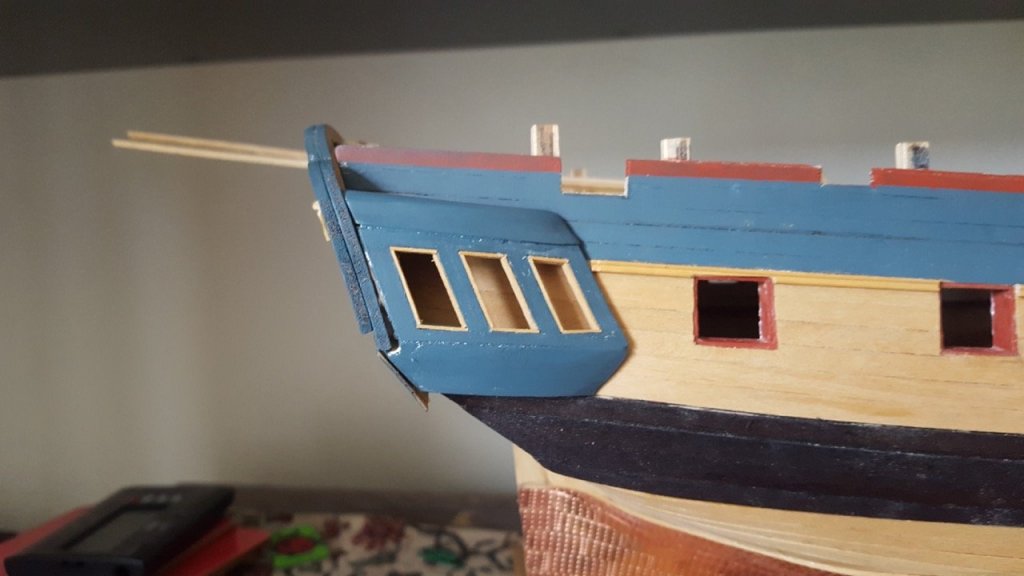
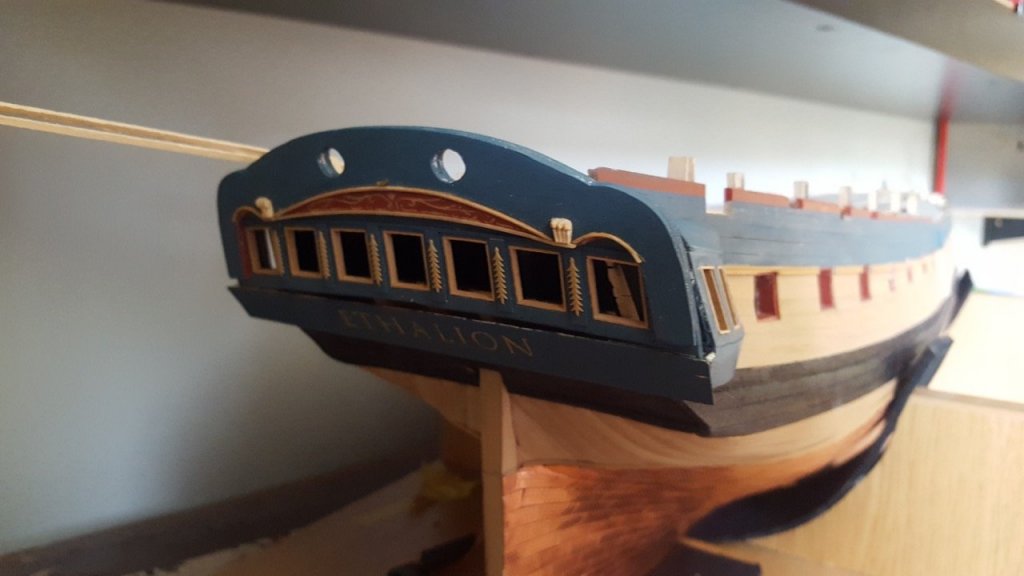
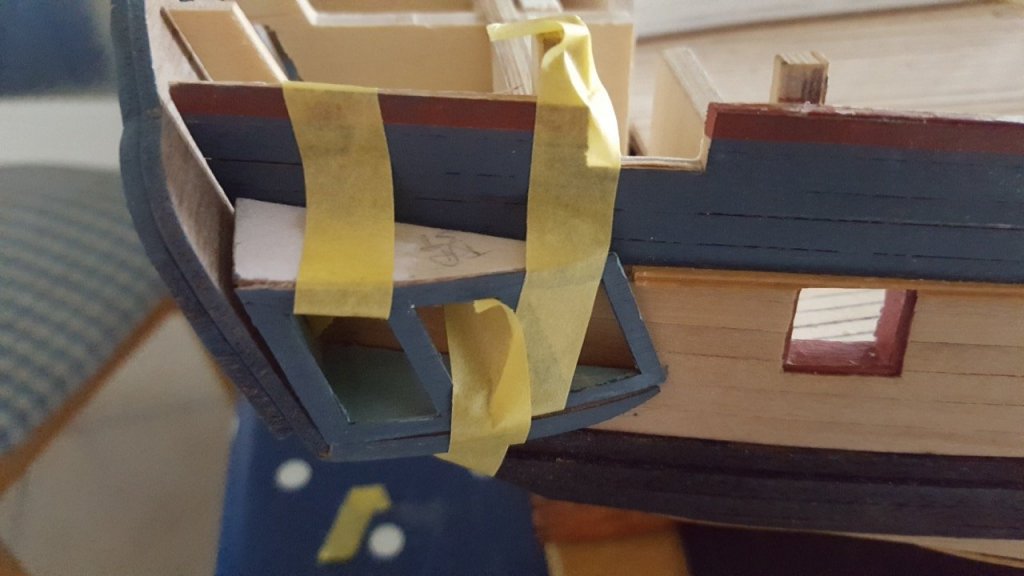
Hi everyone. Thanks so much for the likes and encouragement. A small update. First I filled the stern counter with balsa to give some support to the upper counter (and provide more area for it to be glued to)... I also extended the lower counter to add on the curve at the top (I left this off earlier to avoid it getting bashed, and I'm glad I did). Having pinned the quarter galleries and pieces at the stern (with 1mm brass rod), I got the point where I was comfortable with their fit. I don't know how else I would have managed as it feels like you need twenty hands to do this, and masking tape isn't up to the job. I finished the glazing of the quarter galleries (from the inside) and placed some strips of wood behind the plastic to give it some more support. I don't want it falling into the model later! Then, having double and treble checked everything, the quarter galleries were stuck into position. Once in place, the upper counter was fixed, again according to the pins that had been put in place. It was fixed having shaped it, and with the stern gallery in place (but not glued yet - it isn't glazed, and I want to do of the decoration off the model) to make sure it all fitted together. Here are the pictures so far. I'm really pleased with the sweep of the gunports and windows. Also with the box window frames. Happy building Rob


- 275 replies
-
- 14
-
-
Wow... those guns look fantastic all lined up. And the stove looks the bee's knees too.
-
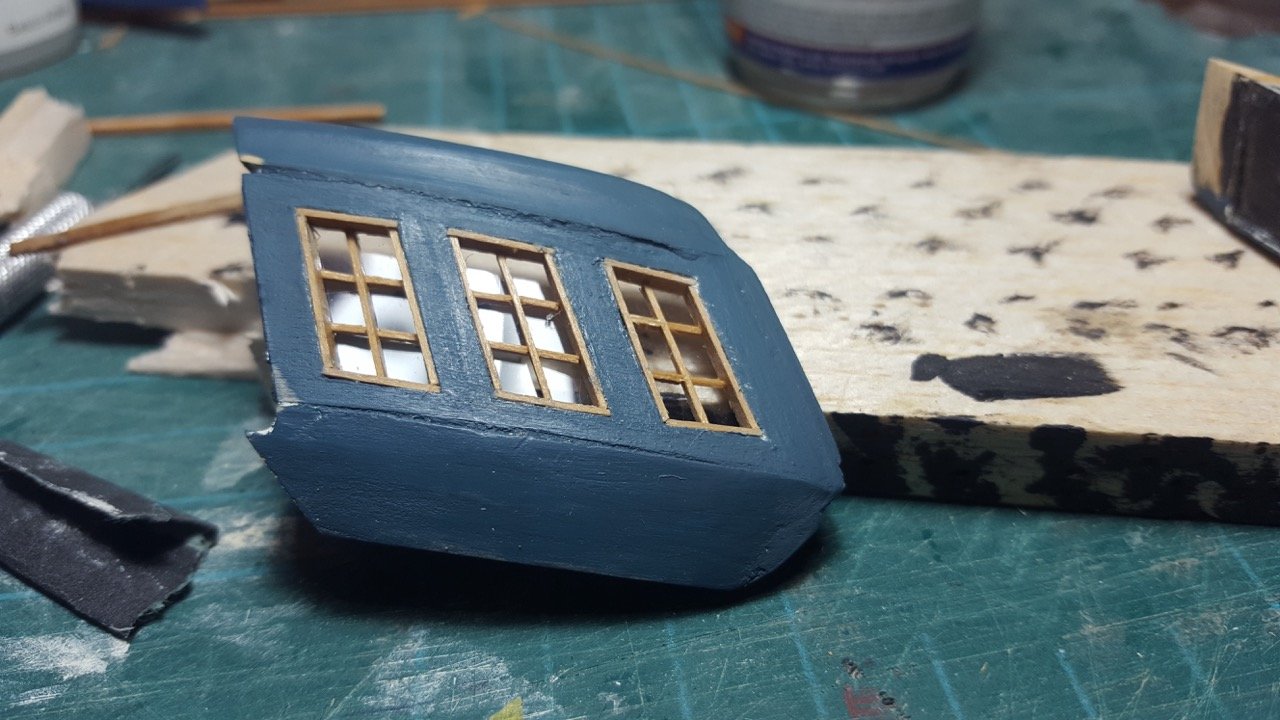
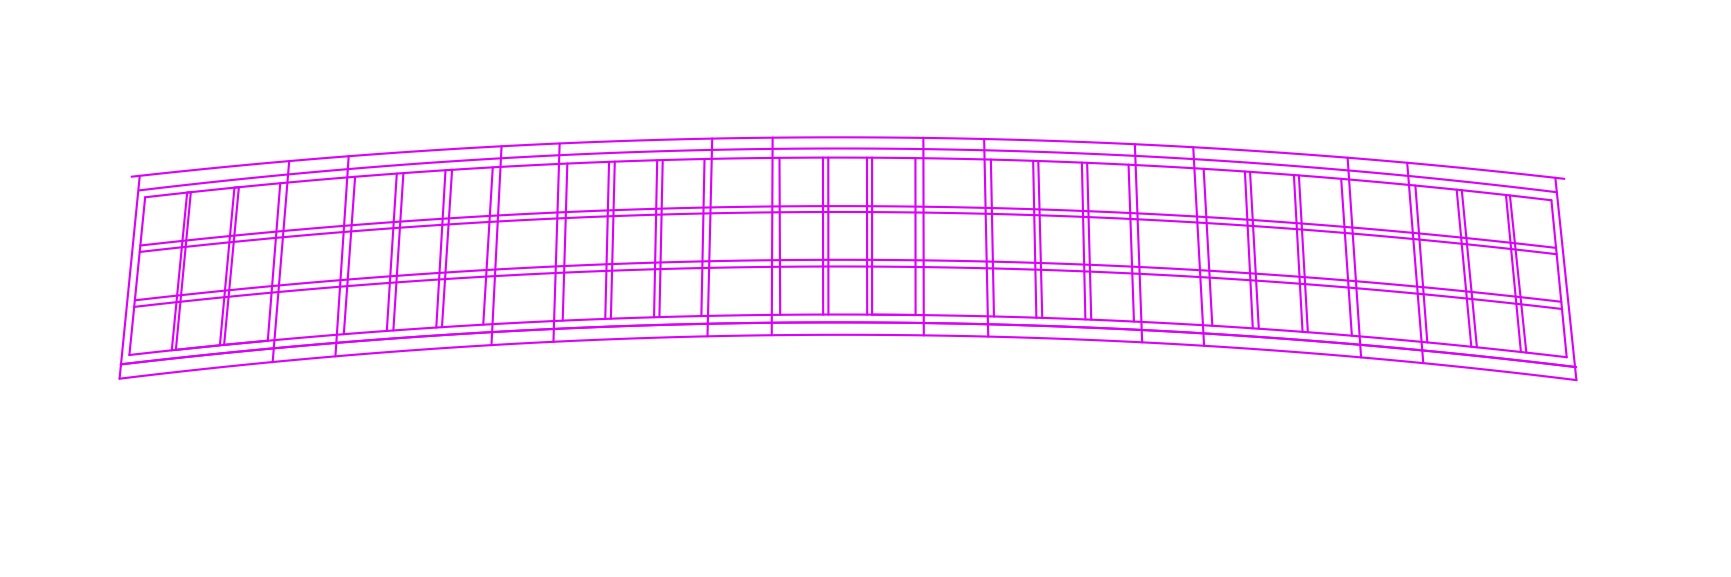
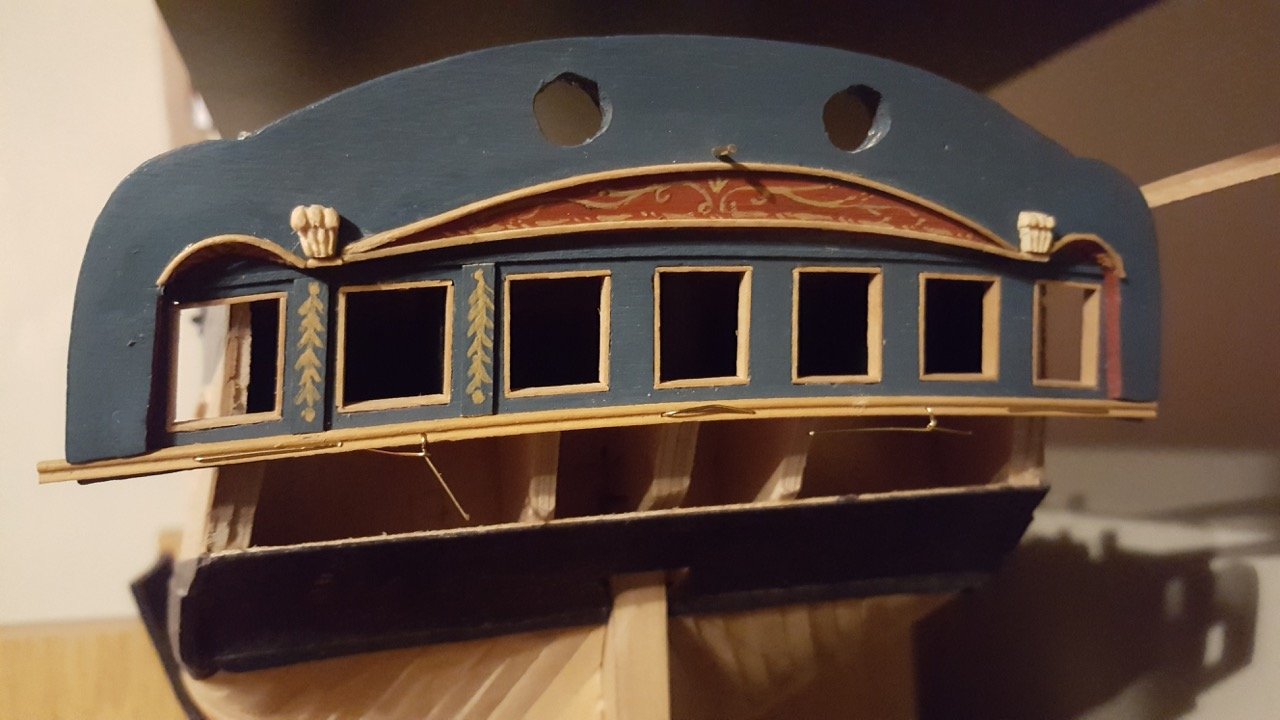
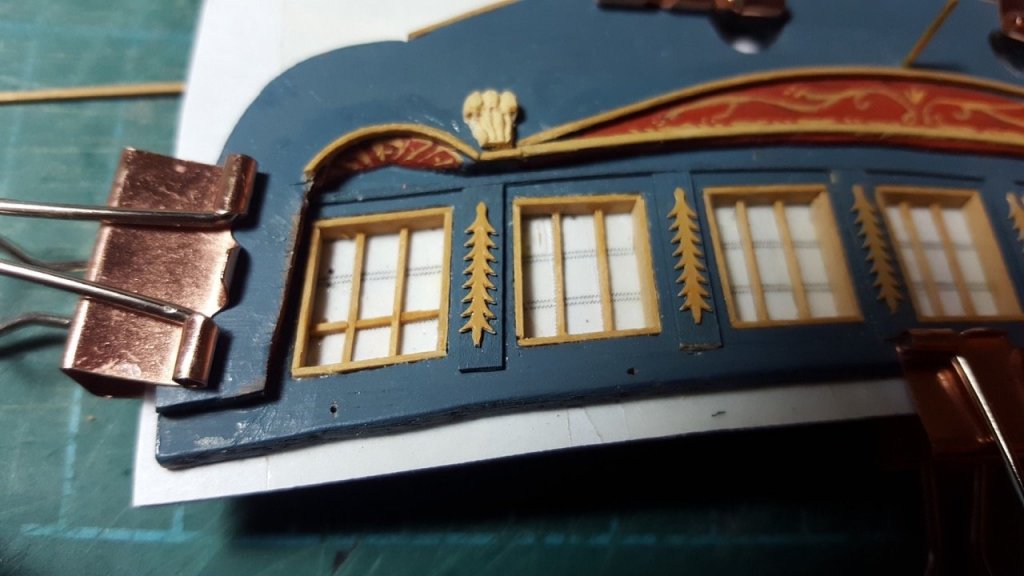
Thanks Jason. I started by working out a template for the windows (based on the AOTS diagrams extended out in the same way as I calculated the transom shape). Then I printed it out and stuck sellotape over it to stop the pva from sticking to it. I put some cereal box card behind it to give it a bit more substance, and clipped it behind the transom lining up the diagram with the window apertures. I'd already lined the apertures with boxwood. This was boxwood veneer (0.7mm thick officially but actually closer to .5mm when I checked with the micrometer). I cut it to about 3mm for the window surrounds, and to ~0.75mm for the internal framing (using a sharp scalpel and lots of patience). The pre-cut edge of the veneer was always placed facing out to ensure a good square edge: the cut edges I achieved with the scalpel were nowhere near as clean. The verticals were put in as single strips, carefully checking the heights with the digital vernier calipers and using the point of the calipers to mark the wood rather than trying to mark it with a pencil which is just hopelessly inaccurate. Often the strips needed very slight amounts shaving off the ends to fit neatly. Sometimes it would take two or three attempts. Once gently placed in position I used a paintbrush to apply watered down pva to fix the vertical in place. The horizontals were done the same way, but as three separate parts for each horizontal. Tweezers were an absolute must, and it took a lot of attention to make sure the line followed the diagram underneath, but the PVA allows the part to be re-placed as many times as necessary. Finally, I realised pretty quickly that not only was good light a must, but the light needed to be directly overhead, otherwise the shadows make everything look completely out of whack. Hope that's helpful. If you've got any questions, just ask. Rob


-
A mini-update... Stern lights... the carpenters glue still needs to be cleaned up a little, but I'm going to let it set really hard first. Once these have clear plastic glued behind them they'll be plenty strong enough


-
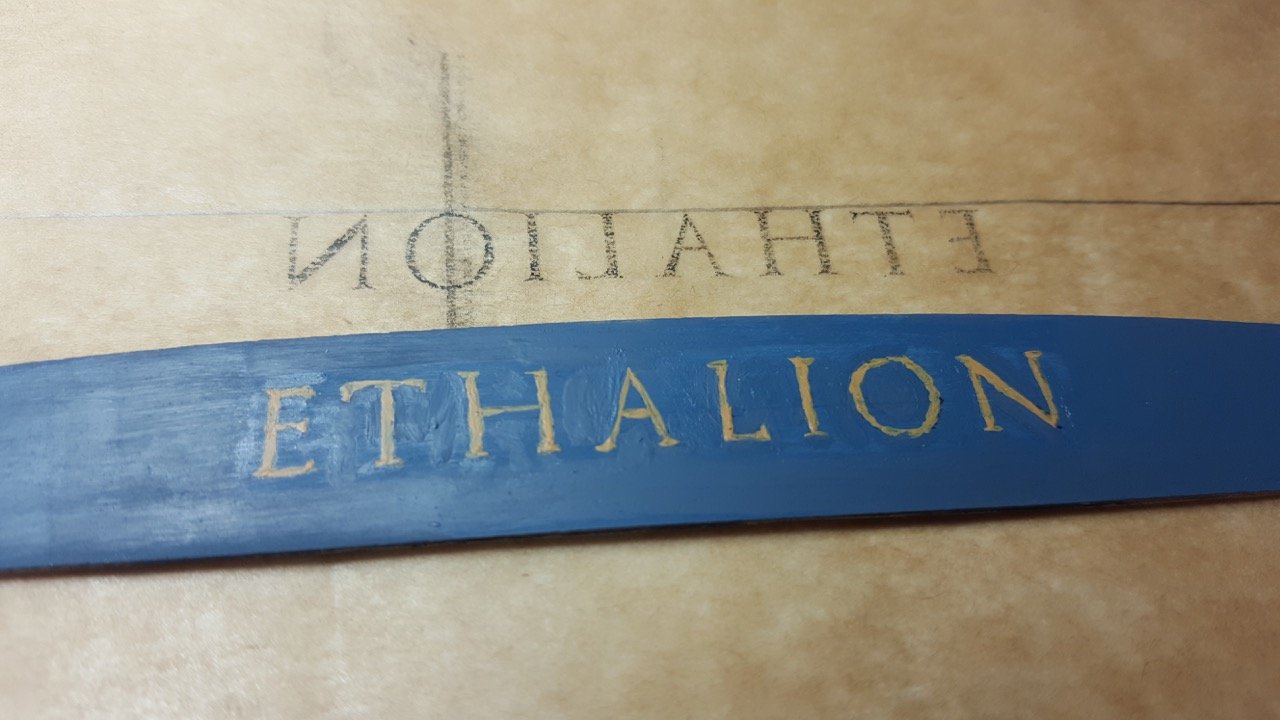
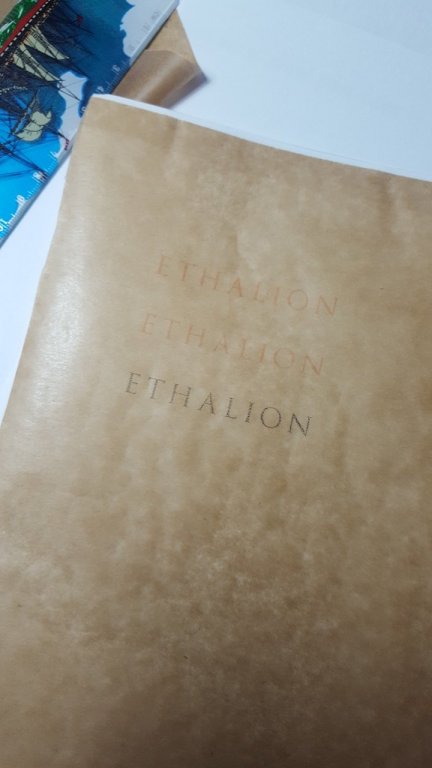
Hi Jobbie Yes that's right. Just normal baking paper that you use to line cake tins. I sellotaped it over a sheet of A4 paper to give it some strength. I use a mac and in the print box it has a "flip horzontally" checkbox. So it really couldn't be easier. It's also useful for printing out bits of plans for port and starboard. Just hit print and select the checkbox as necessary. Thanks to all for the likes and kind words of encouragement. Rob
-
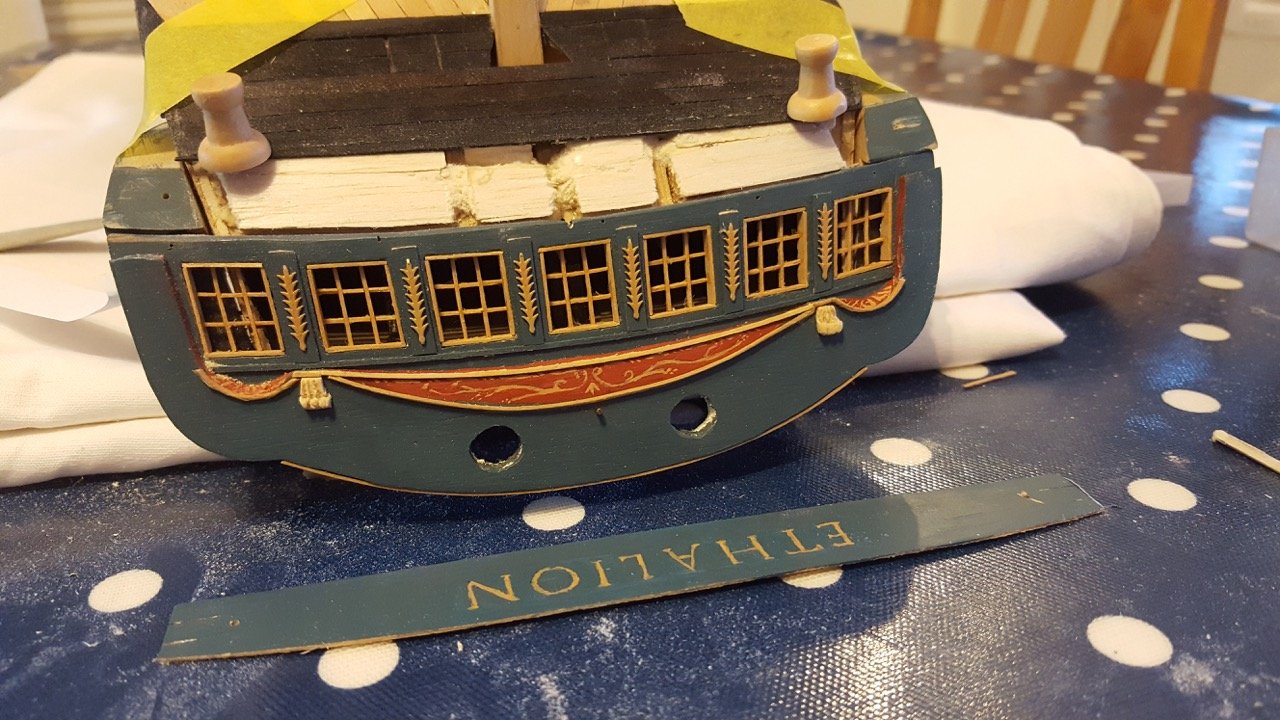
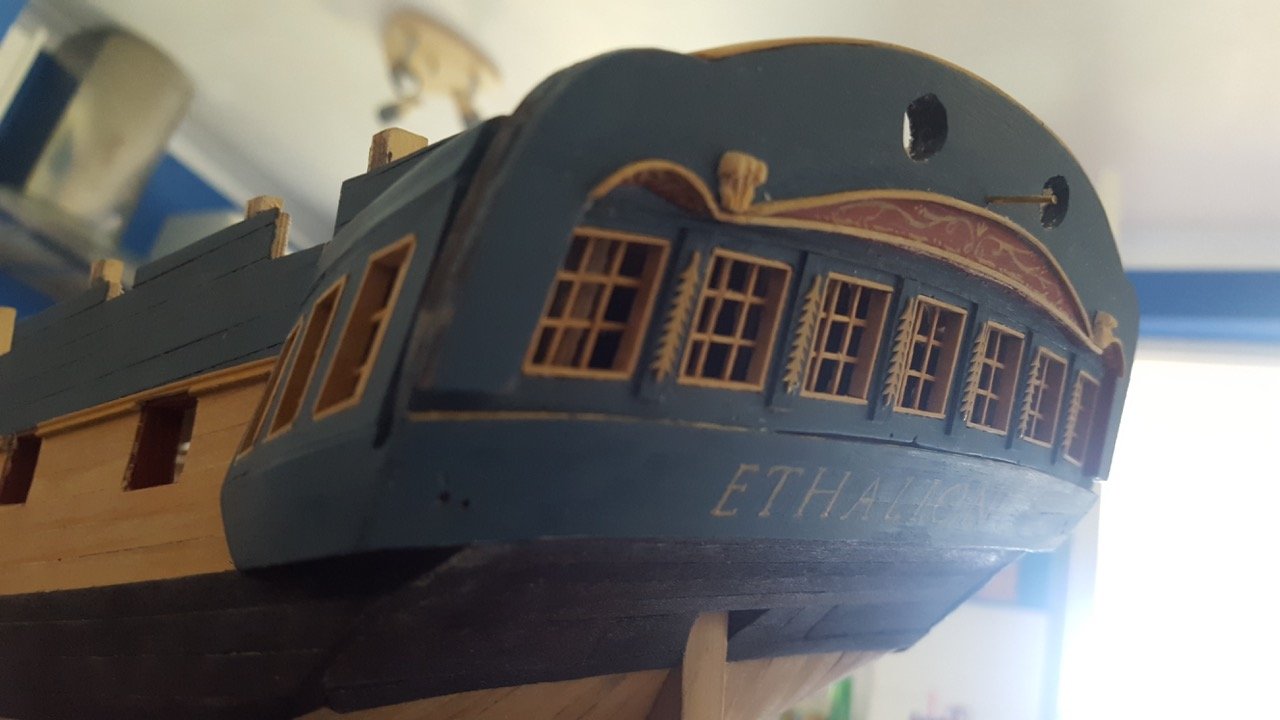
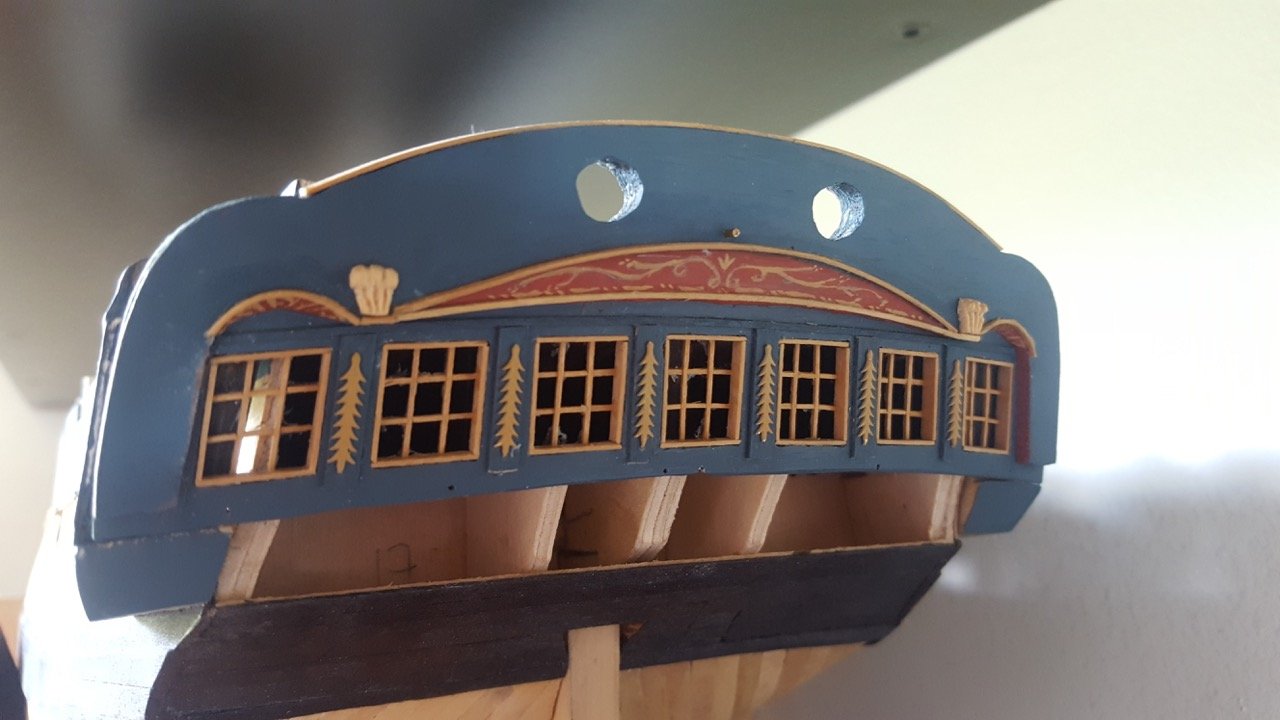
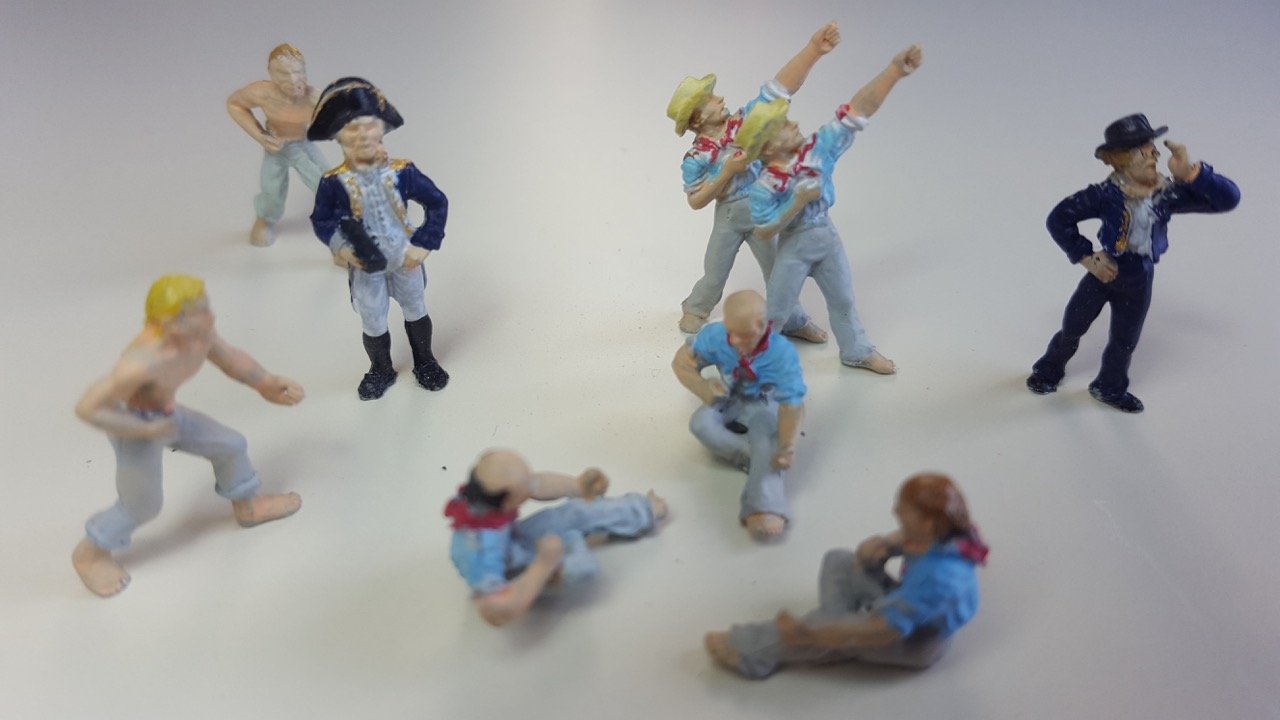
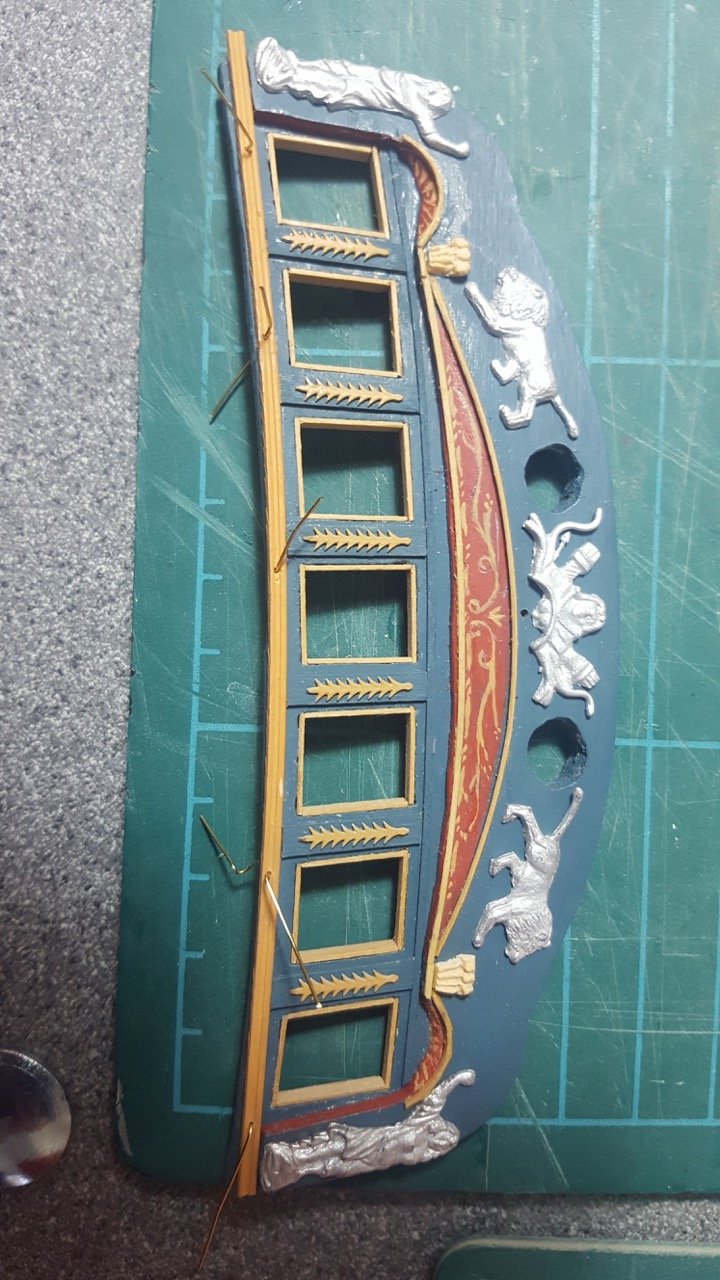
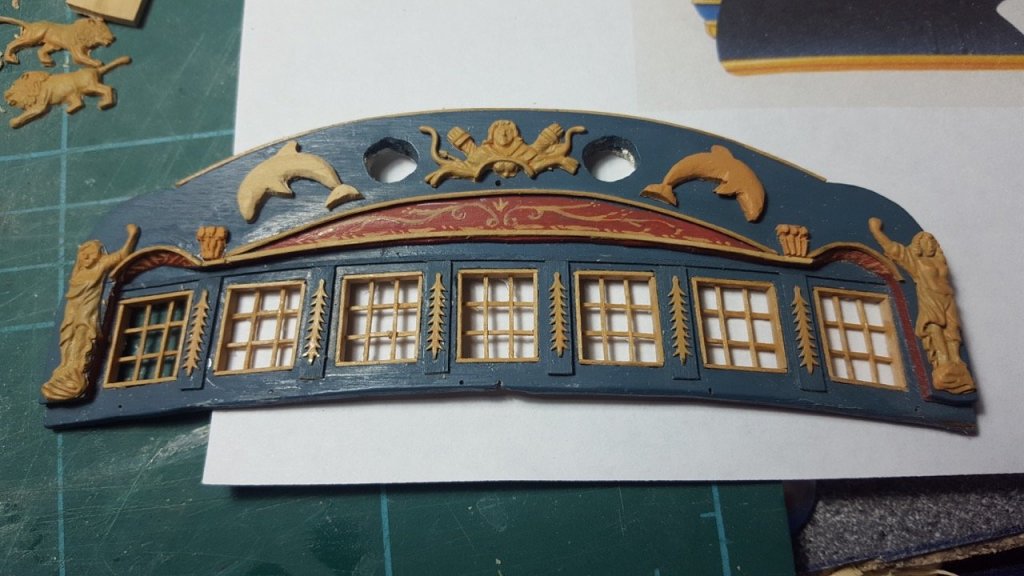
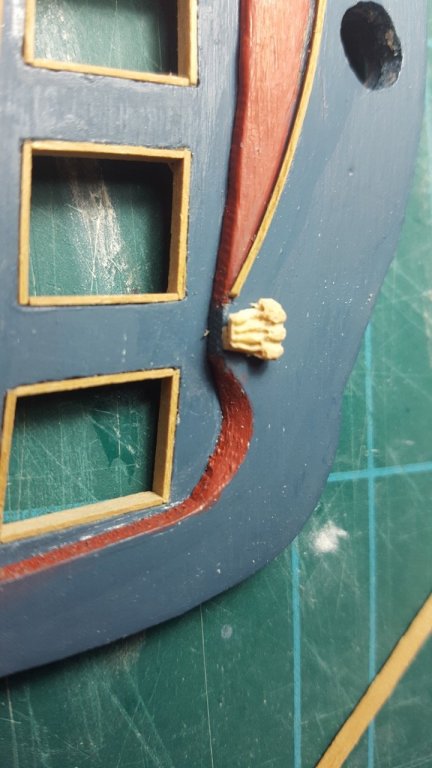
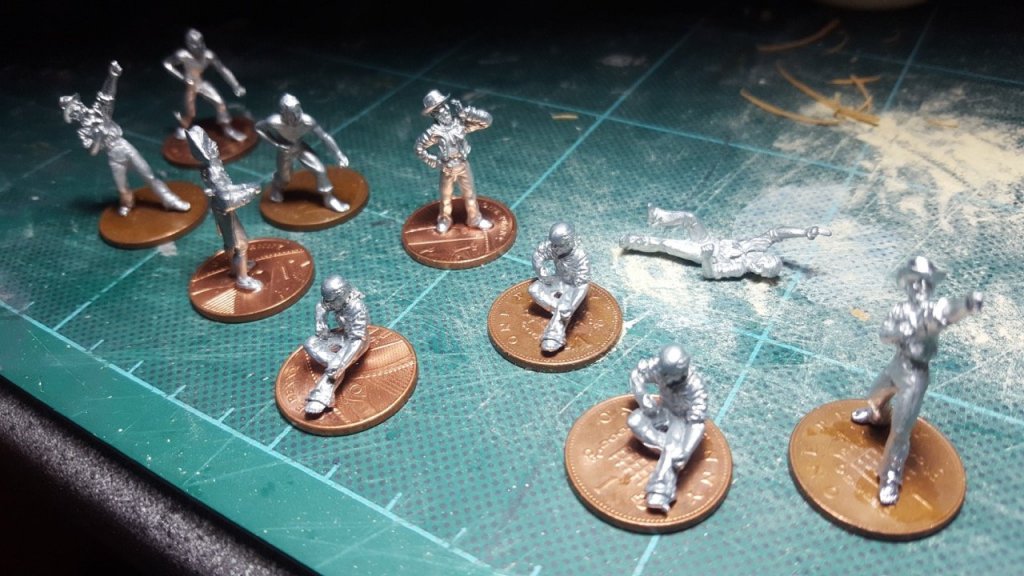
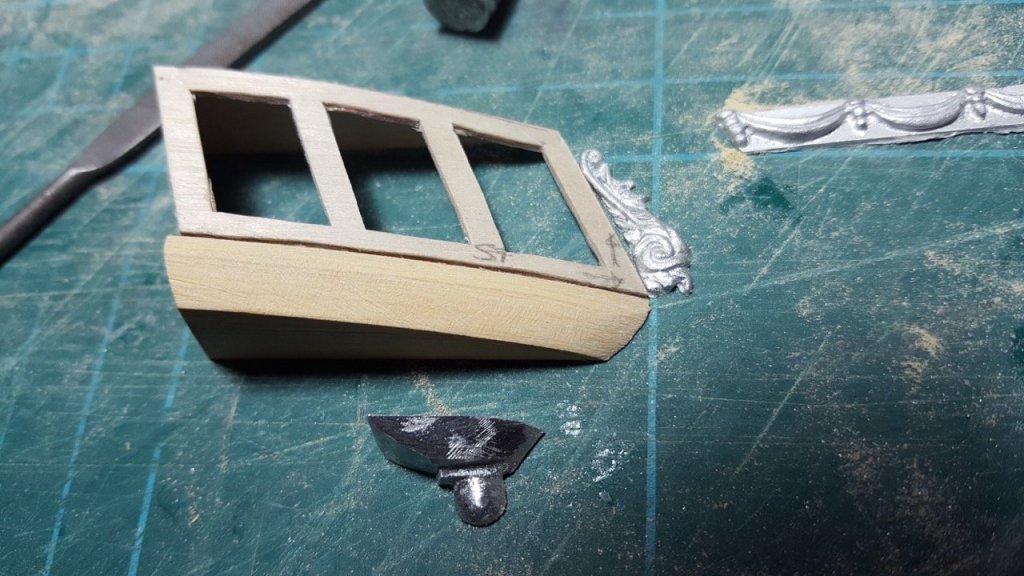
Time for a little update. Remaking window template for quarter galleries to get right size of windows I've continued shaping the quarter galleries. I'd been concerned that the window apertures were too large, and the uprights too narrow. I've remade them and lined the apertures with box to match the stern gallery. (see below for photo) Lining windows These were lined with Boxwood - 6mm x 0.7mm boxwood veneer cut in to 3mm strips. By using the outer edge, a nice square edge is found to go flush with the gallery. Painting decoration on stern gallery I got out my best brush and got to work painting the decoration on the gallery - to my eye this looks so much better than the somewhat heavy brass photo etch which lacks a little something in detail. I tried painting the decoration on the uprights between the windows, but found that too tricky, and the photo etch for these parts is quite nice, so I've used that. (photo before I changed the painting on the uprights for photo-etch) Shaping above and below quarter galleries A lot of time was spent fashioning these 3D puzzles... Each part is unique, and needs checking constantly to get it to fit well. They're not perfect, but thankfully they will be painted, so a little filler will hide a multitude of sins! Lettering on upper counter I used an inkjet printer on baking paper to transfer the lettering onto the upper counter, then painted over the impression. It took about 10 attempts to get the print in the right place, but then it worked quite well... It isn't perfect, but I'm quite happy with it. Crew The crew arrived and were duly painted, ready to help getting a sense of proportion. First attempt at carving I wanted to include the feathers shown in AOTS above the uprights where the wide curve ends on the gallery. So it was time to break out the proxxon engraving set. Taken from 2x6mm boxwood (guitar stringers). Again, as a first attempt I'm reasonably happy, but I think I'll probably end up taking these off and thinning them down - they're a little heavy at the moment. Testing spacing for decorations on stern gallery I placed the white metal decorations provided in the kit onto the stern to check the spacing. It fits pretty well, but the lions really ought to become dolphins, and the centre figure of Diana needs to become a Georgian representation of a male figure of Bacchus, or perhaps Acoetes as per Ovid's Metamorphoses... We'll see how brave I'm feeling. On the plus side, this can all be done off the model, so many attempts are easily possible. I can keep going til I'm happy! And finally, a picture of the pieces in place on Ethalion...


- 275 replies
-
- 14
-
-
Hi Chuck It looks really great! Will the masts be stepped on deck or will a slot be cut out at some point? I wondered whether that was what the black marks were for but they seem too far forward and aft for the fore and mizzen masts respectively? Really fascinating to see your well thought through design coming together. Cedar looks lovely too. Thanks Rob
- 1,784 replies
-
- 4
-
-
- winchelsea
- Syren Ship Model Company
- (and 1 more)
-
Hi Peter, What a beautiful bridge... great photography too! Nice job you're doing on those gun carriages. Once they're all in place, the focus will be on the overall effect rather than the individual detail... are you going to rig them? Rob
- 366 replies
-
- 2
-
-
- bellerophon
- victory models
- (and 2 more)
-
Thank you OC it's very kind of you to say so. It's so great to see others builds and get ideas and encouragement. Thanks to everyone for the likes. Rob
-
Another brief update... more work on the quarter galleries. The quarter galleries are a little proud at the moment, but I will be adding a strip for the tafferal (?) so this should fill in that space. It will also neaten the edge of the stern lights. These photos do give an idea of how tricky all the angles are... there's another block to go beneath the one already in place, and then the metal casting below that... On top, there are two more blocks... each has to be carefully shaped, and then duplicated on the other side. I've replaced the four walnut parts per side with two 6mm box parts (although it did feel a little wrong painting it!) Nothing's glued in place yet. I've also filled the grain and painted the stern transom. Happy building! Rob


- 275 replies
-
- 13
-
-
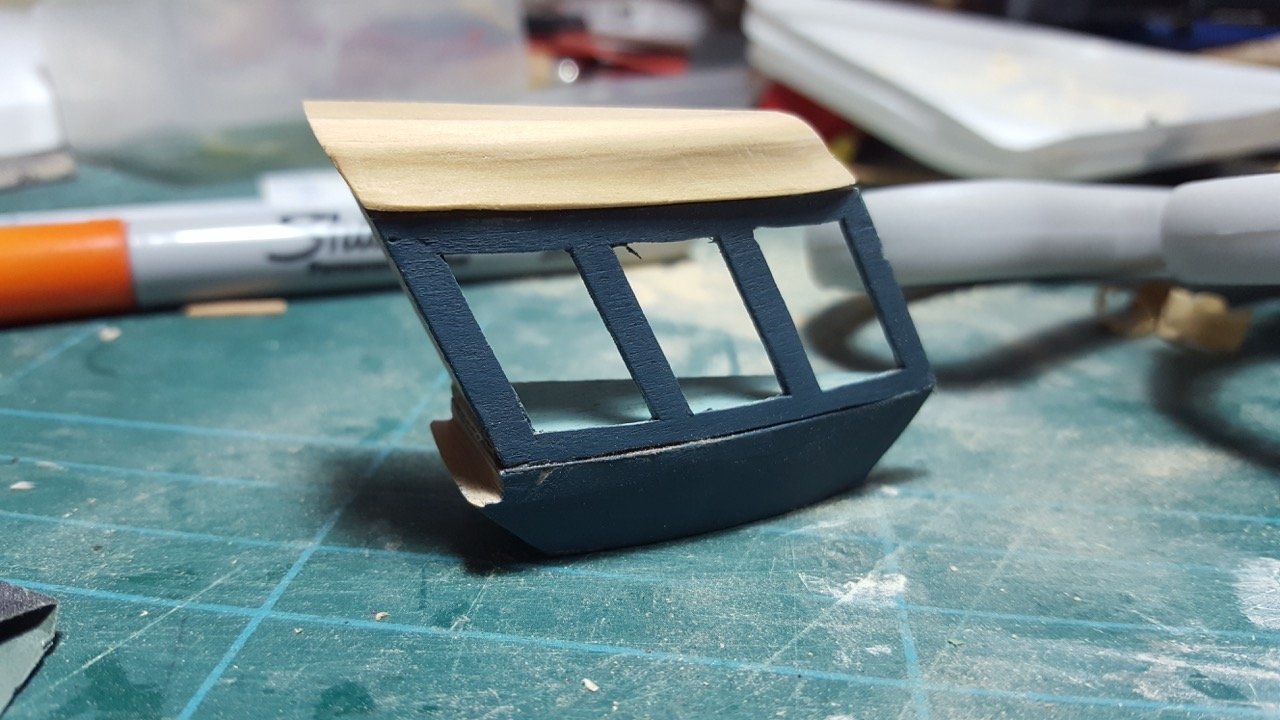
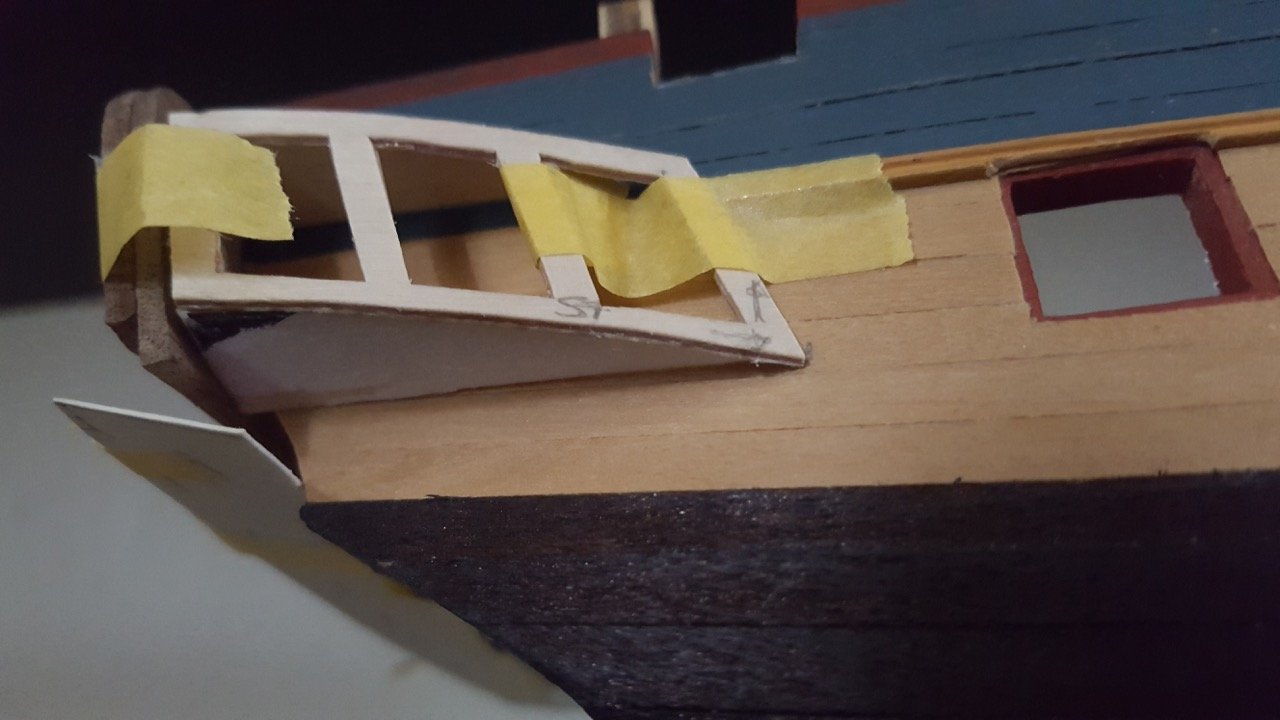
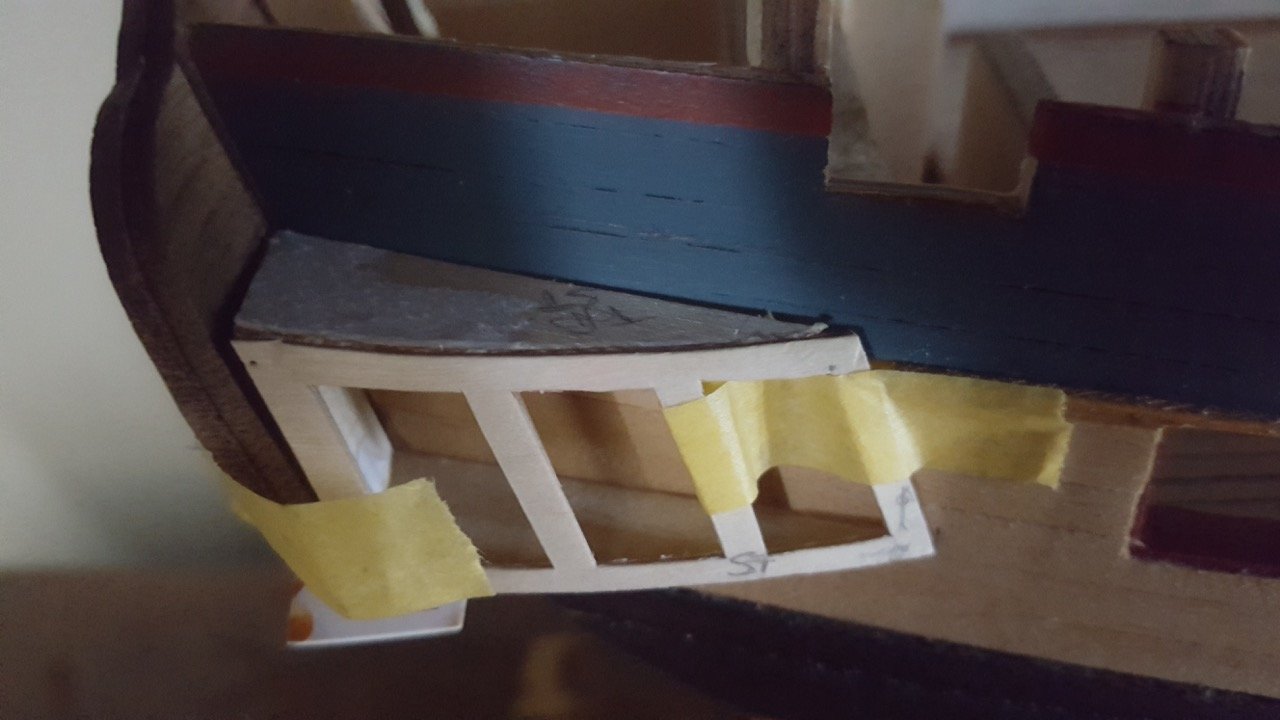
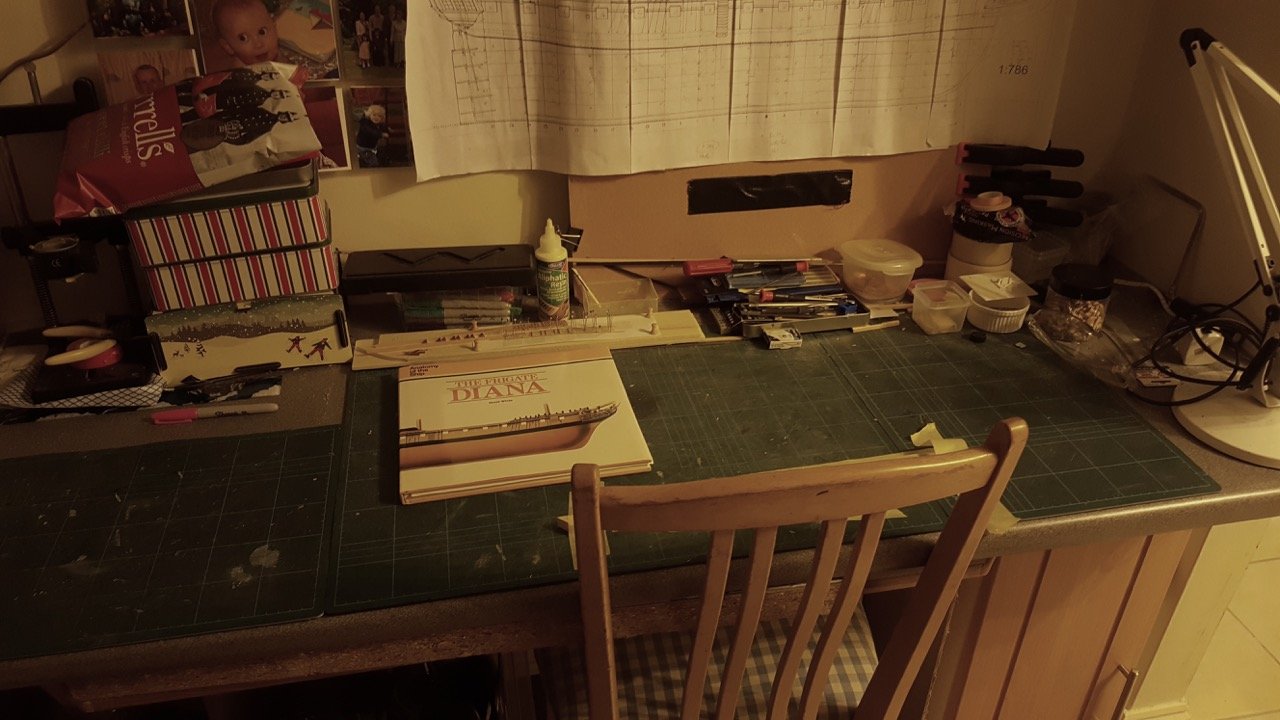
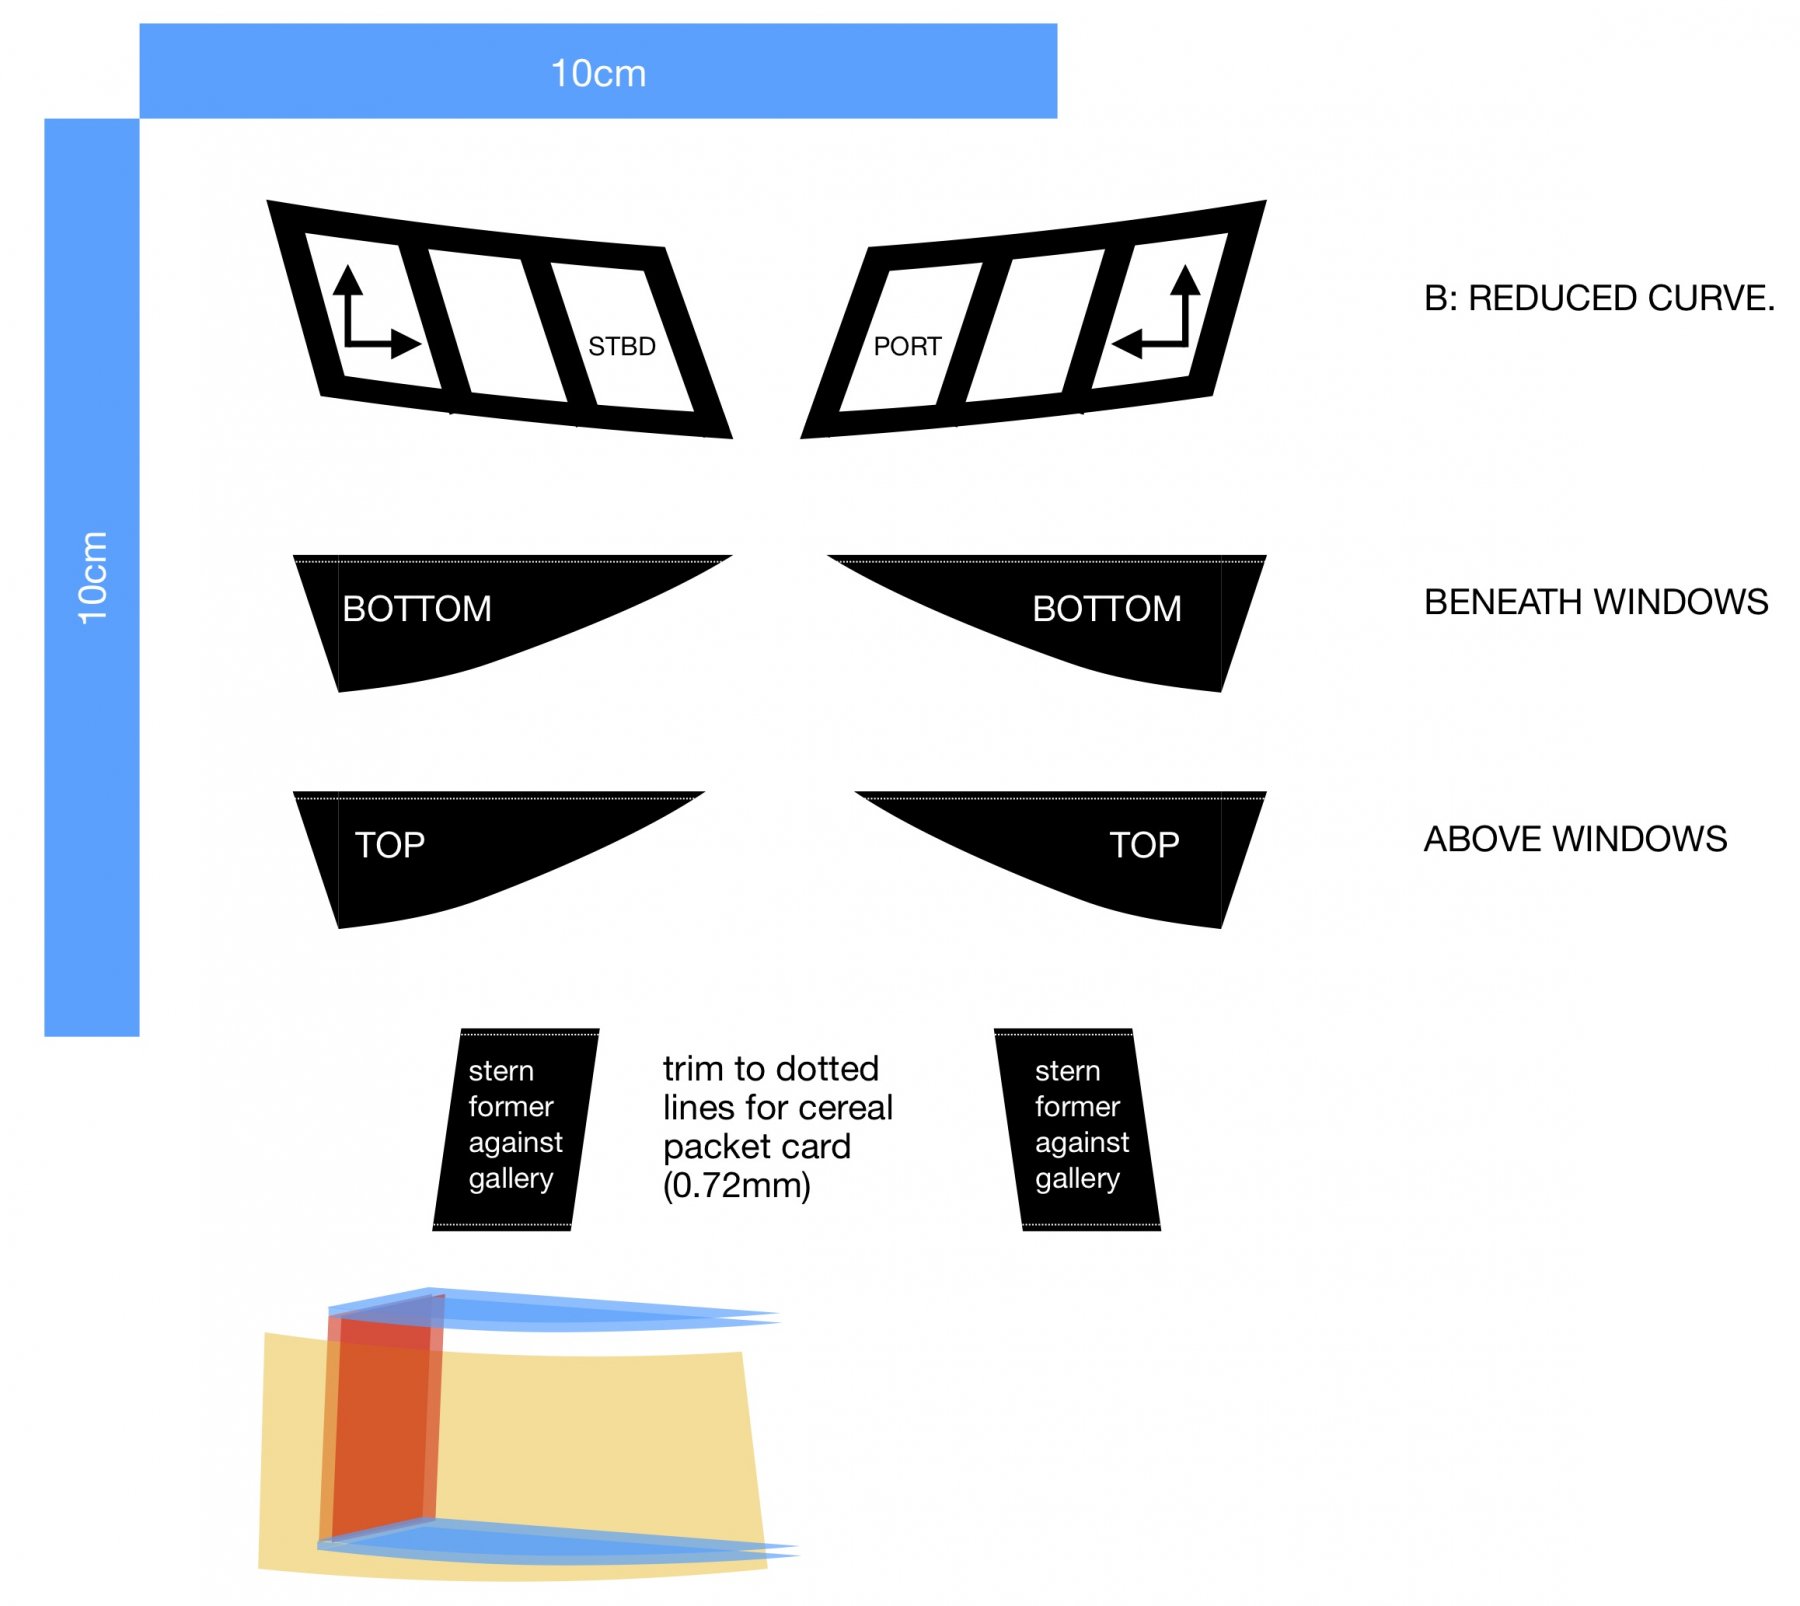
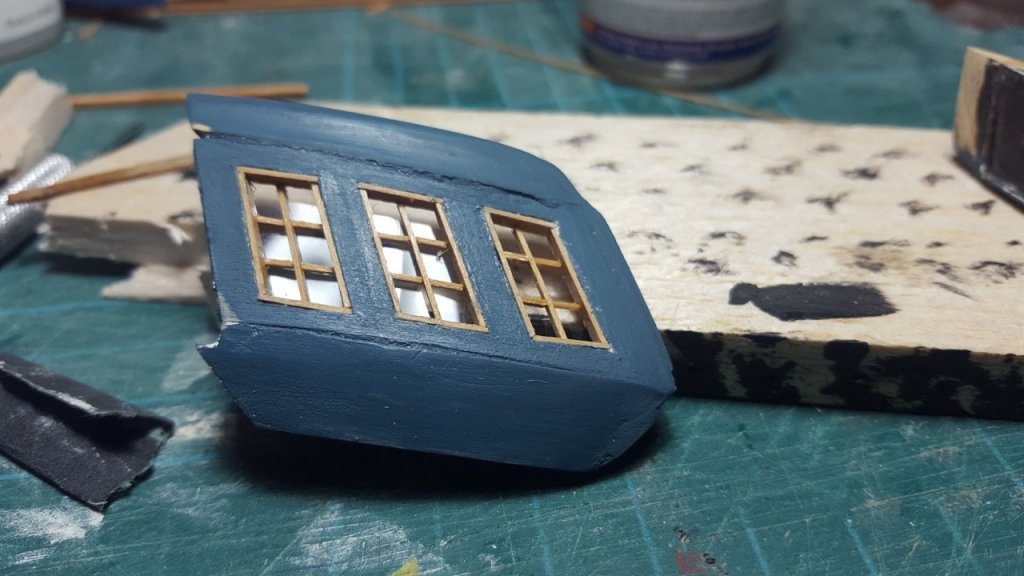
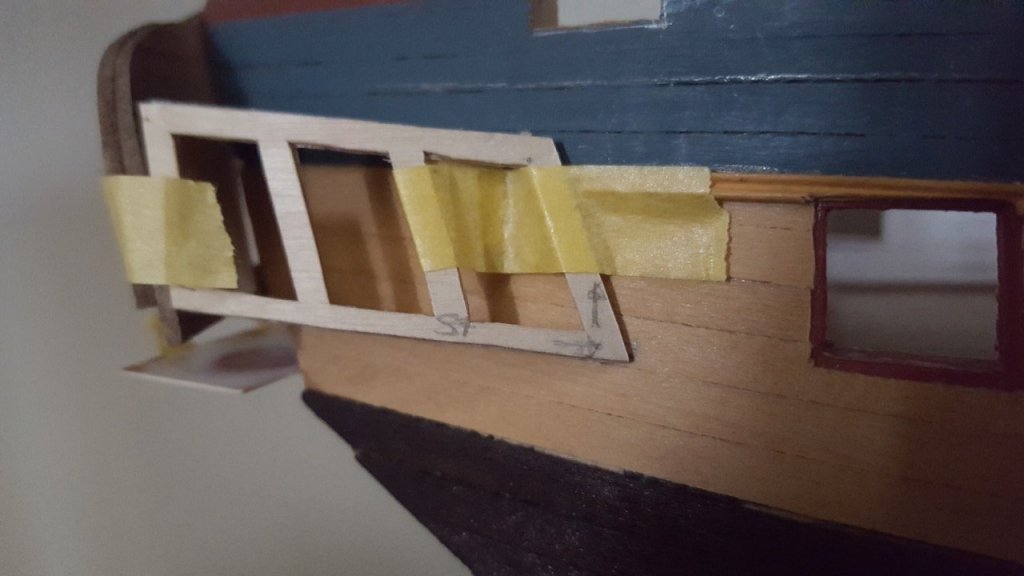
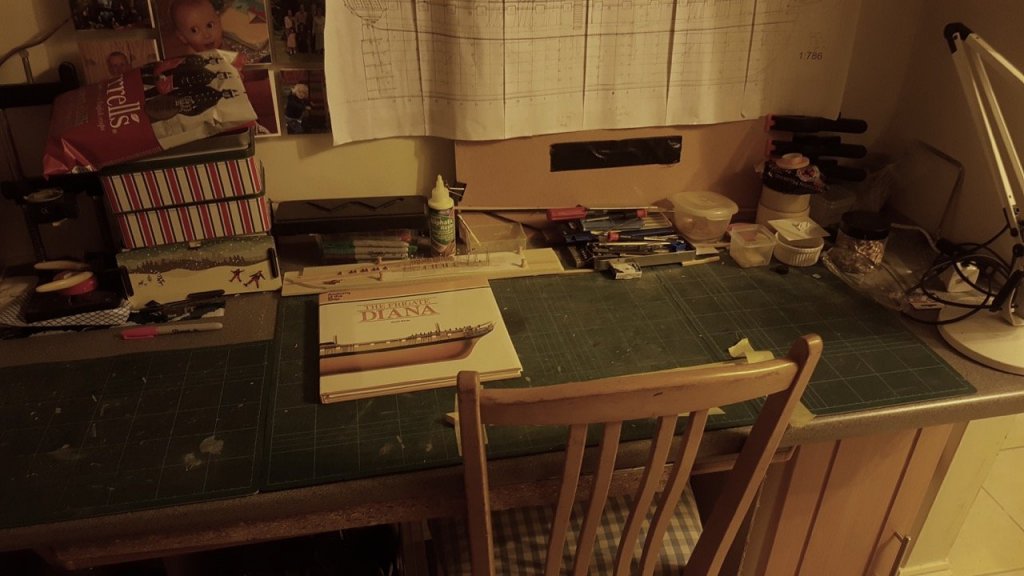
I've updated the template above to include a former for the aft edge to provide support for the top and bottom templates. quartergalleries_templates.pdf So, here are the first attempt at the new quarter galleries... I pritt-sticked the templates to the parts on 1mm ply and cut them out (scissors and craft knife), then soaked the fascia and fixed it round a metal cutlery pot to bend it to shape... Soaking the fascia took the paper off, and I managed to build the starboard quarter gallery with the window part upside down! The effect was to make the curve upwards even more pronounced - it really looked odd... I didn't take a photo, but trust me, it was all wrong It didn't take along to get it fixed. I'm much happier with the line... the windows are perhaps a little large - I need to have a re-measure - but I don't think they look out of place. (Note the upper counter is a card mockup and the masking tape came unstuck as I took these photos... ) The black and the white fuzz you can see is the remnants of the paper templates. Also, this evening I finally got round to it and tidied my boat building space.... (will wonders never cease!)


-
Thanks Jason, though if anyone ought to be taking off their hat it ought to be me. I may yet give up on it and go the same route. I'll give it a go first though. Nothing ventured, nothing gained and all that