robdurant
-
Posts
843 -
Joined
-
Last visited
Content Type
Profiles
Forums
Gallery
Events
Everything posted by robdurant
-
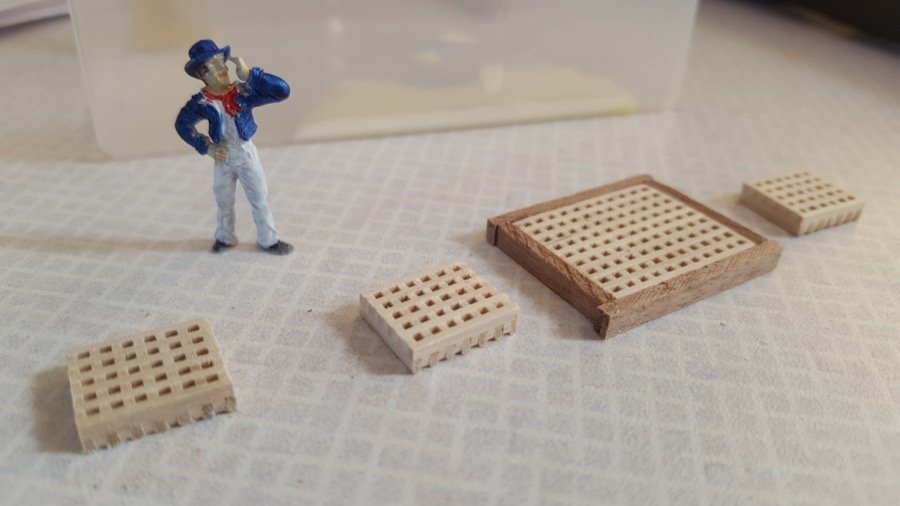
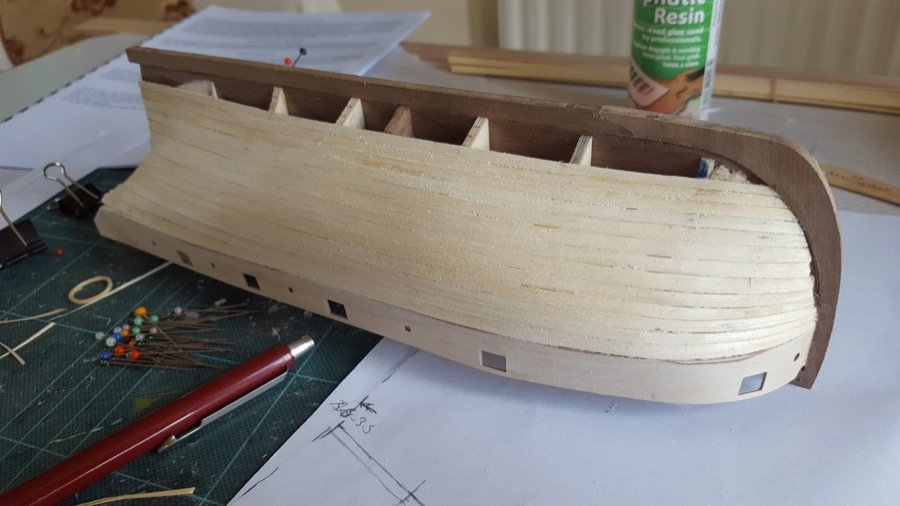
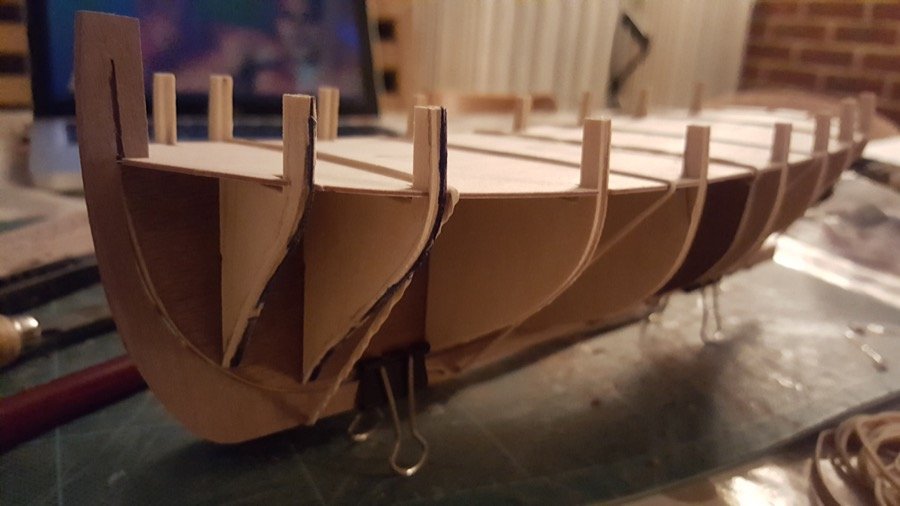
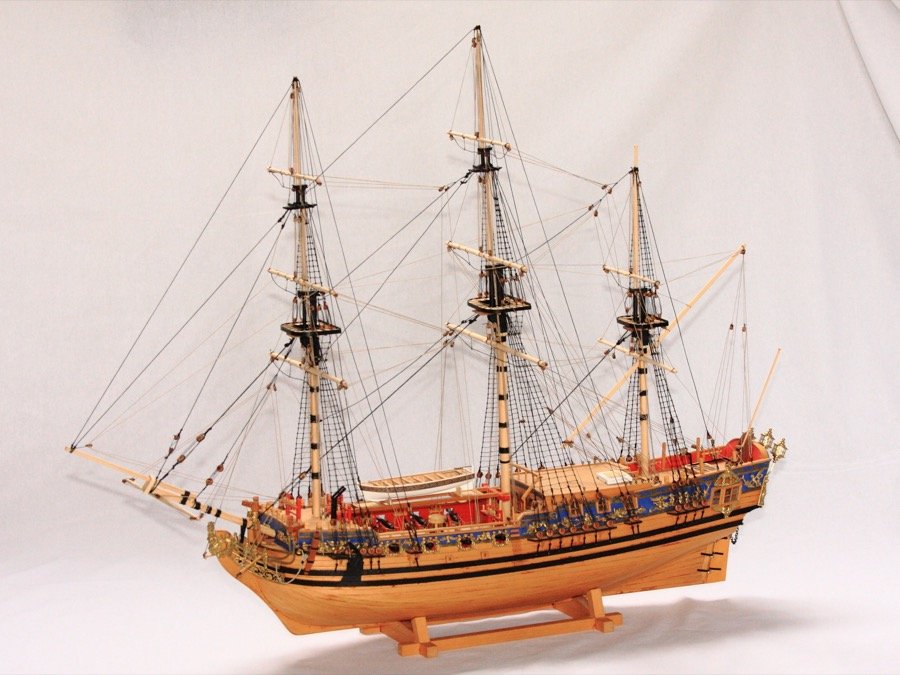
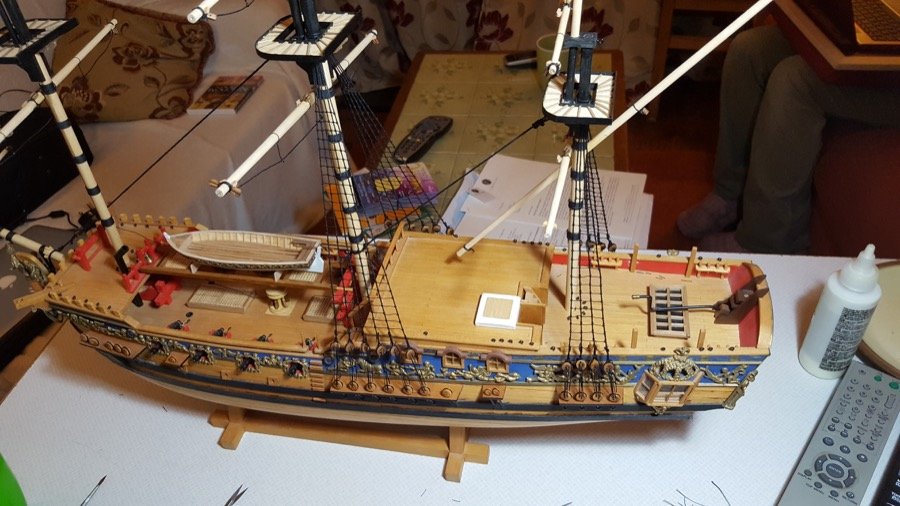
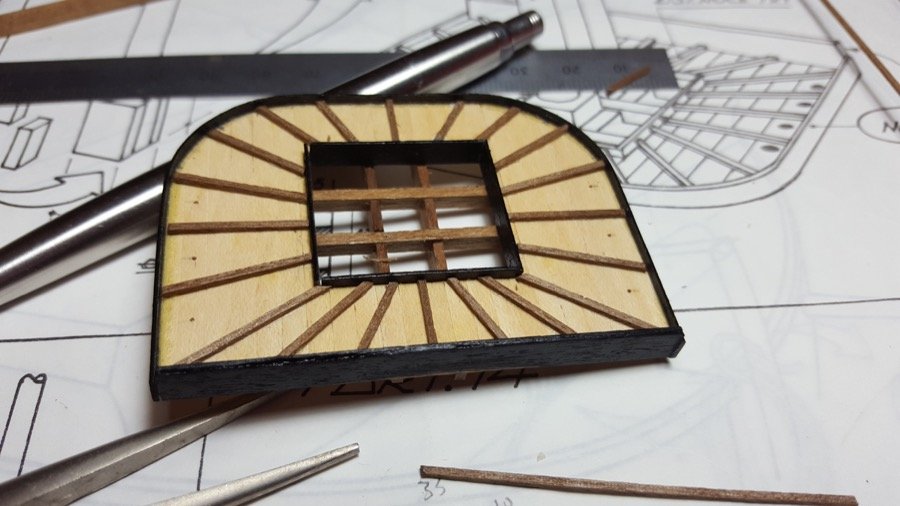
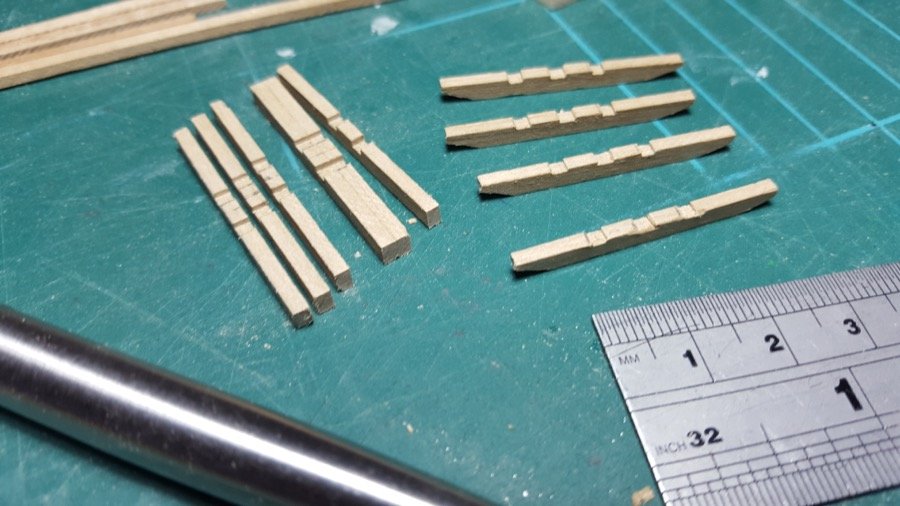
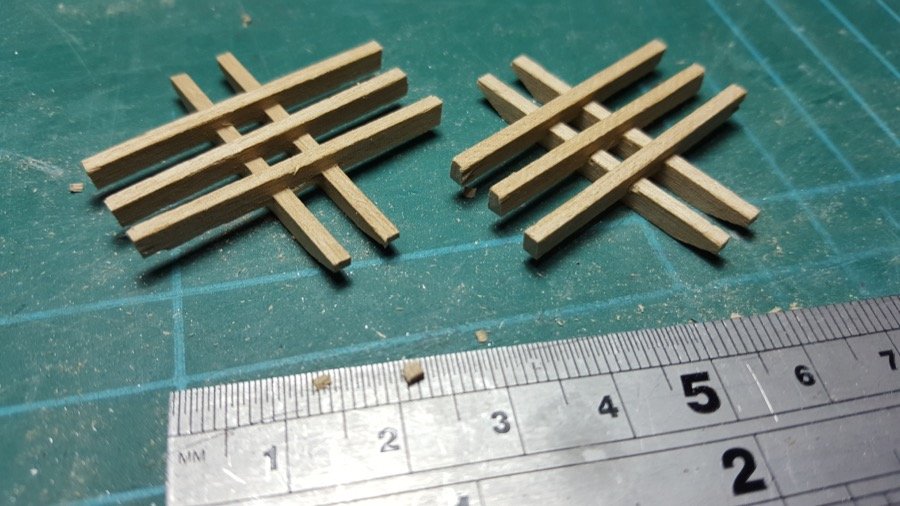
 Now we're up to date... I've been using the same strategy with the second planking to try and get really neat runs of planking without lots of drop planks and stealers... time will tell whether I end up getting bitten, but so far I'm pleased with it. I have a thermos flask with freshly boiled water in it, and then here's what I do for each plank: Use paper to take a map of the curve of the plank (as though spiling) Mark out the width of the plank to fit and trim with a craft knife and sandpaper. Bevel the edge of the plank (I have good intentions, but I'm not very good at this yet!) Soak the plank in the _hot_ water for 30 seconds Edge bend the plank according to the paper prepared above. (with 1x4mm walnut, it'll hold it's shape fairly easily) Use plank nippers to bend the plank in for the bow and stern. Test, re-test, and glue in place with pins (or near the top, clamps to avoid pin marks) And here are the results so far... There are gaps in between several of the planks, which I suspect may be shrinkage... I'm hoping next time I can spile, to avoid the soaking process, and that way avoid those gaps... Of course, it may not be shrinkage at all, but simply that my skills aren't quite up there yet Anyway - I'm pretty pleased with how it's going, and the rest of the planks will be under the waterline and painting dull white, so it's not looking too bad now! In amidst the planking I decided to start on something completely different to freshen up a little... I've begun the gratings. And I found a sailor left over from Pickle to keep eyes on proceedings too Once the edging is on, I'll sand these to have curved tops... But that's for next time. Happy building Rob [edited to restore photos, 11, 13 July 2017]
- 25 replies
-
- 5
-

-
- finished
- sherbourne
- (and 1 more)
-
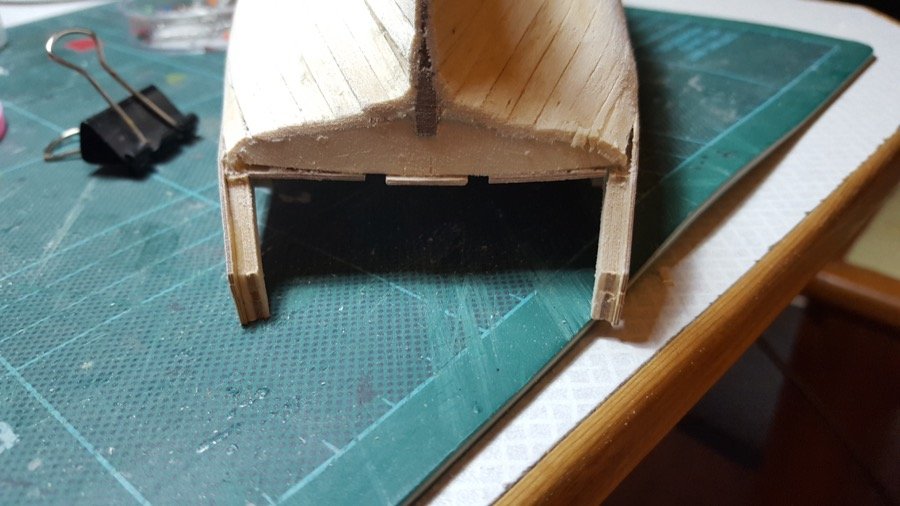
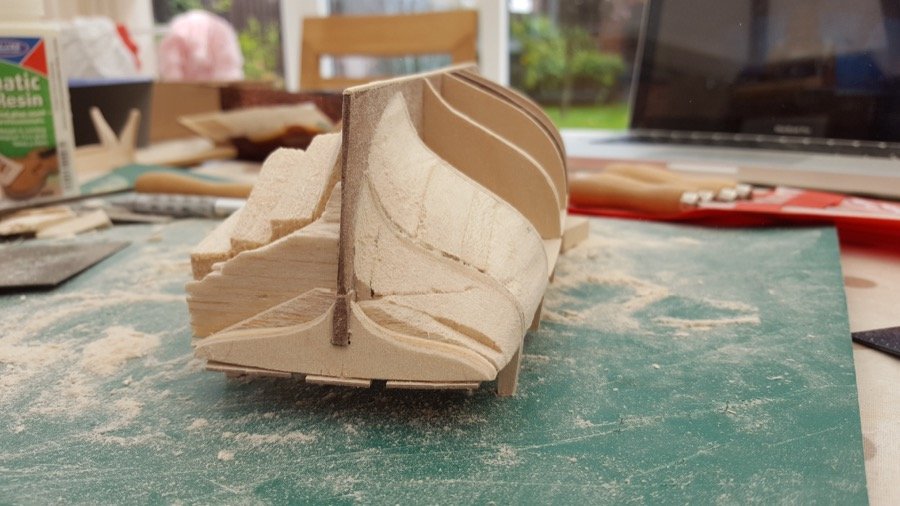
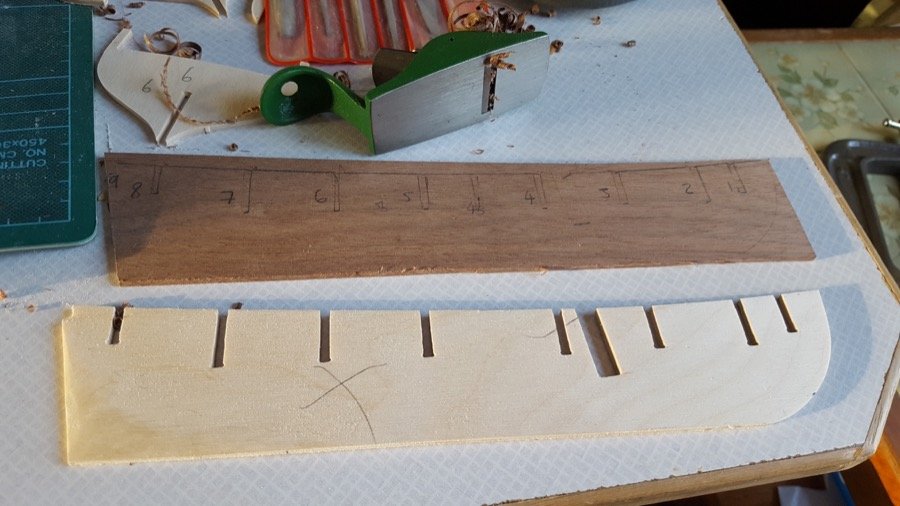
Next up was planking... I wanted to try spiling, but I didn't want to splash out on lots of extra wood at the time, so I thought I'd try edge bending the wood to see how well I could get it to fit. I was fairly pleased with the results, but even using the tick strips, it became evident just how much edge bending was required to get a nice run of wood without lots of stealers and drop planks... Next time I hope I'll be able to get the wider planks and spile instead. Nevertheless, not too bad for a first planking. Again, you can see bulkhead 9 waiting to jump out and get me! Next it was time to put the transom on - and this was where I had to deal with bulkhead 9. I tried just gluing the transom on and leaving a gap, but it looked really messy. I would have had to double-plank the bulkhead so that I could fill the gap between it and the transom, so I took the transom off again, and sanded down the bulkhead so it was even. Now it plays nicer! That meant I was ready for the second planking. [edited to restore photos, 11, 13 July 2017]
- 25 replies
-
- 5
-
-
- finished
- sherbourne
- (and 1 more)
-
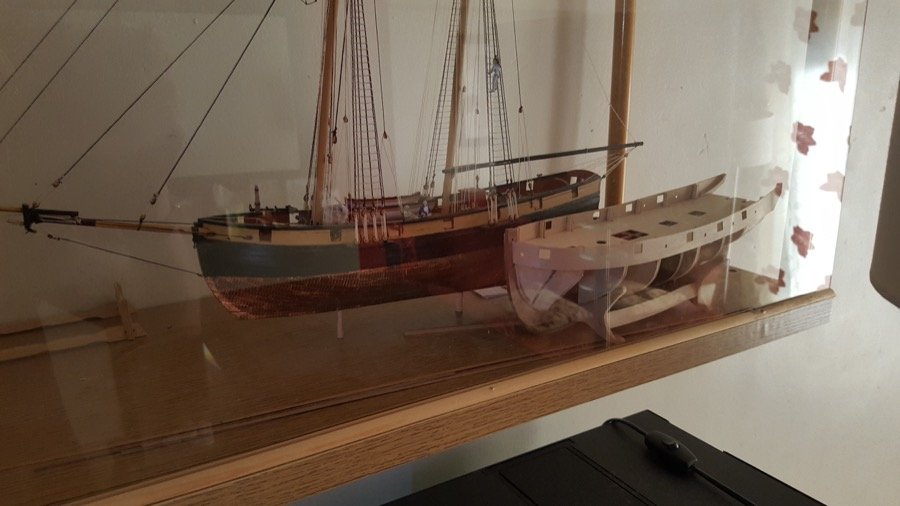
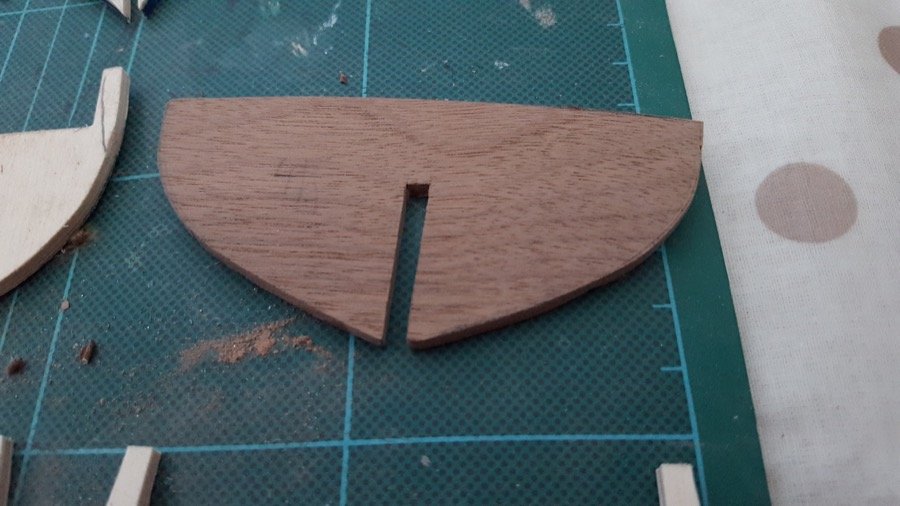
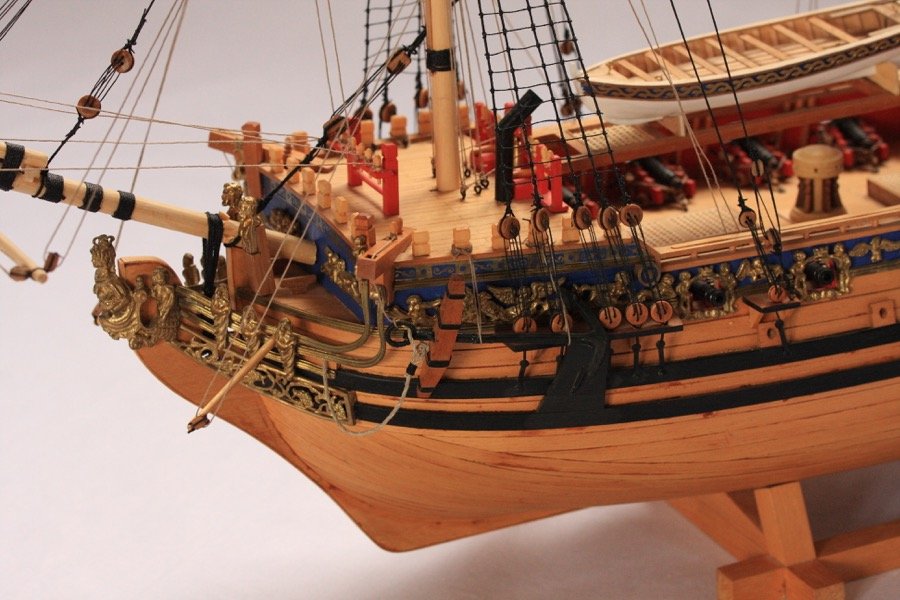
The next task was the gunport patterns. These were placed for 30 seconds in water straight out of the kettle, and then clamped round a coffee mug that was roughly the same radius as the bow of Sherbourne. A couple of hours later, they'd dried, and held their shape beautifully... In fact, I'd bent them slightly too far round, and putting them back into the hot water for a few seconds loosened them up and allowed them to be glued and clamped in place while the glue set... This job's a little bit fiddly, but well worth taking time over, because it affects whether the guns will look right in their places later on, and has a big impact on the symmetry of the boat. After drying overnight I took off all the clamps, and I was really pleased with how they'd turned out... perhaps .5mm down on one side, but not so much it'll be noticeable. For those of you wondering how she sizes up against Pickle... here you go (apologies for the reflections / quality of the pic - I was in a hurry): [edited to restore photos, 11, 13 July 2017]
- 25 replies
-
- 3
-
-
- finished
- sherbourne
- (and 1 more)
-
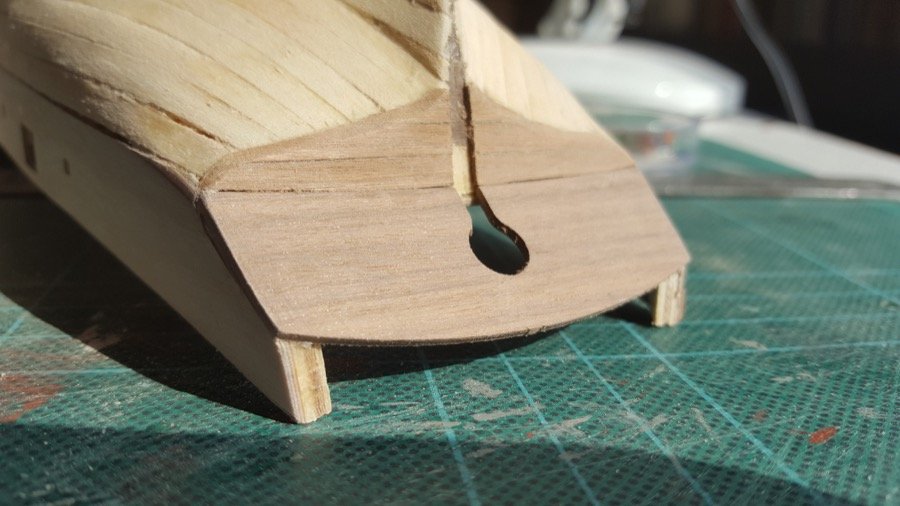
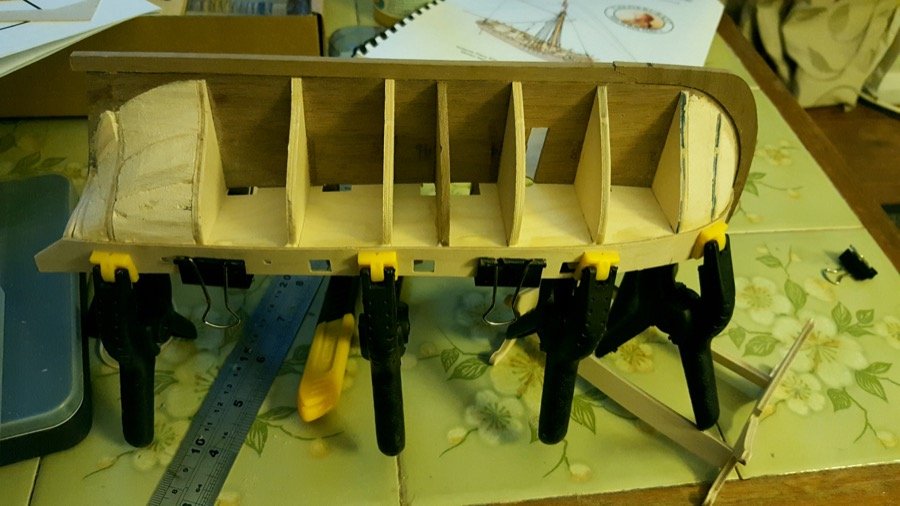
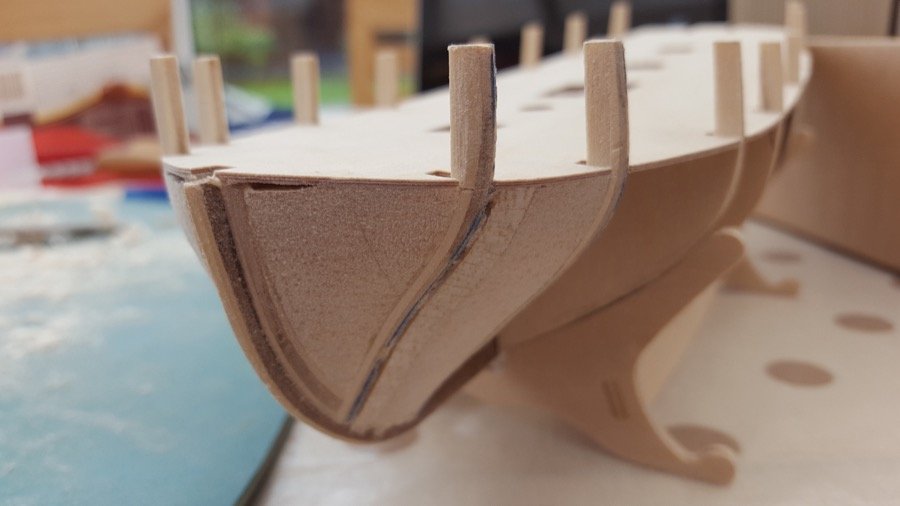
The next task was to fill the gaps between bulkheads 1-3 and 7-9 with balsa to help me find a smooth flow as I finished fairing the bulkheads. You may notice in these photos that I clean forgot to add the bow formers that sit up against the keel former at this point, and had to cut into the balsa to add these retrospectively. Again - too much haste, and so less speed! You can see in this photo how bulkhead 9 is at a slight angle - with the starboard side (on the left of this photo because it's keel up) slightly further forward... across its width, this adds up to ~6mm! Eventually, it started to look like I was hoping it would... I added a strip of lime to the bottom of the keel former to help the rabbet. [edited to restore photos, 11 July 2017]
- 25 replies
-
- 5
-
-
- finished
- sherbourne
- (and 1 more)
-
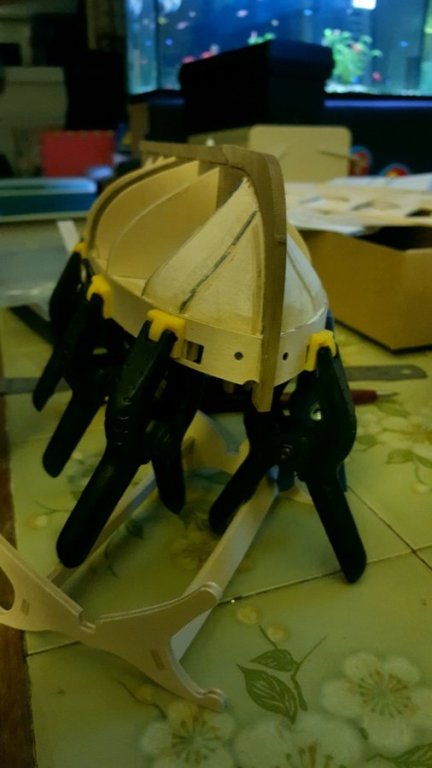
So - to the build. I started about a month ago, and unpacked the kit eagerly... having checked the parts I got the ply keel out and checked to see if it was flat... sadly it wasn't. It was about 5mm out lengthwise, and two or three from top to bottom, giving a shape rather like a bowl. Attempted remedies of making one side damp and weighting it down for 48 hours seemed to work at first, but minutes after the weights were taken off, the ply sprung back. Rather than give up, I decided to be brave, and use the keel as a template to make a new one from a sheet of walnut I had. Several hours later, I'd made this (and included an extra frame to help with the planking). It was only later on in the build that I'd realise that bulkhead 9, which forms the base of the transom was wonky because the back of the deck was not square... That's my fault for being in too much of a hurry! We'll get to that later, though. I roughly faired the bulkheads to take off the worst of the excess material at the bow and stern, sanded a rabbet into the keel former, and then I used the deck to square up the bulkheads and glued the bulkheads into position, using lego blocks to square them up. Here you can see the results with the walnut stem and keel added. [edited to restore photos, 11, 13 July 2017]
- 25 replies
-
- 4
-
-
- finished
- sherbourne
- (and 1 more)
-
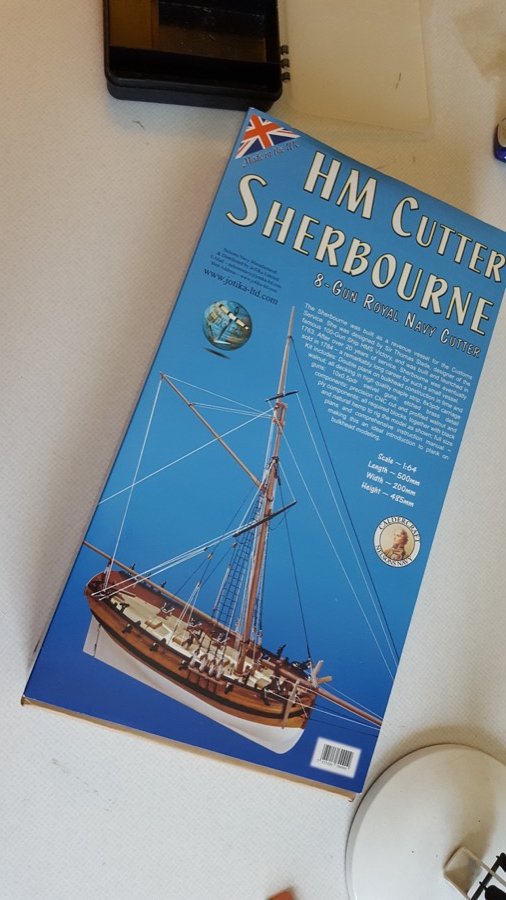
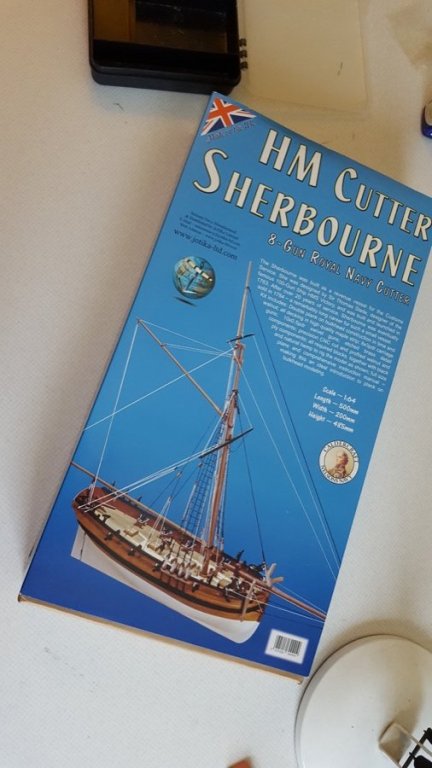
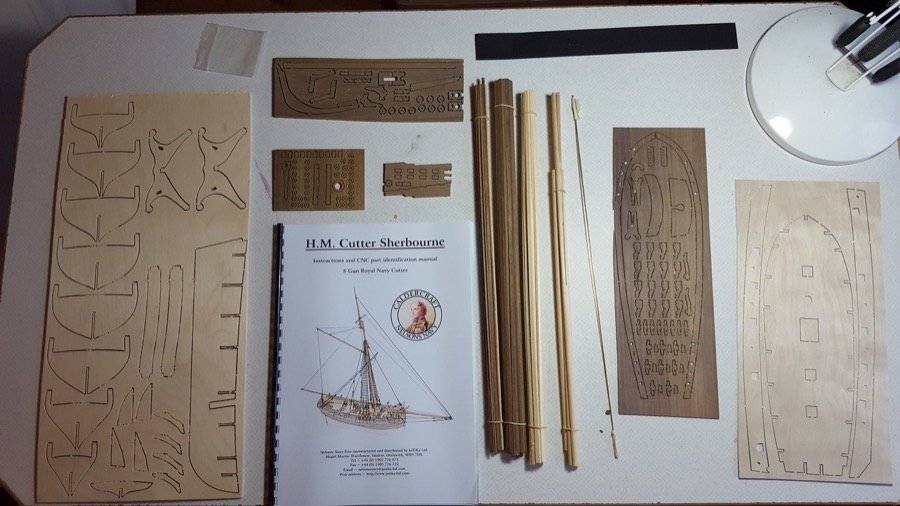
Well, I'm a little late starting this building log, but it's been an interesting model to build, so I thought I'd share my experiences. Hope it's helpful, anyway. I'm hoping this will be an opportunity to try out some new skills and improve my planking skills before attempting something a bit larger! First off, a quick look at the kit itself. It comes in a small, but really nice and sturdy box, with everything packed in very neatly. The instructions are much more simple than the instructions for Pickle (a more recent kit, I believe), and reading them through I was glad I'd built Pickle first. Nevertheless, having build Pickle, these are perfectly adequate. The plans are excellent, and give lots of detail, including step by step illustrations for the construction of the hull. Looking closely you'll see the the walnut ply used for the cannon carriages and capping rails has been cut out right to the edge... on the other side this has led to a slight split going through the capping rail itself, but nothing too major, and it should be simple enough to put right (I'll mount it good side up!) So far I've found that all the materials are provided with plenty to spare, just as with Pickle. [edited to restore photos, 11, 13 July 2017]
- 25 replies
-
- 5
-
-
- finished
- sherbourne
- (and 1 more)
-
Thanks John, I really am thrilled with her. Can't quite believe I played a part in making her, now. Glad she's home, though. Rob
-
Well, this evening Caroline reached her home berth: Thanks for all your kinds words and support. Rob
- 39 replies
-
- 15
-
-
- royal caroline
- panart
- (and 1 more)
-
Thank you for your kind words Rob
-
And now for something completely different... F138, HMS Rapid - a type 15 Fast Anti-Submarine Frigate ... a rebuild of an old Deans-Marine destroyer I built when I was a teenager... Progress so far is here... http://modelwarshipsuk.informe.com/forum/destroyers-frigates-and-corvettes-f21/1-96-type-15-fast-a-s-frigate-hms-rapid-semi-scratch-t2906.html#p41613 But I'll be back - the sawdust's far too ingrained in my fingers, now...
-
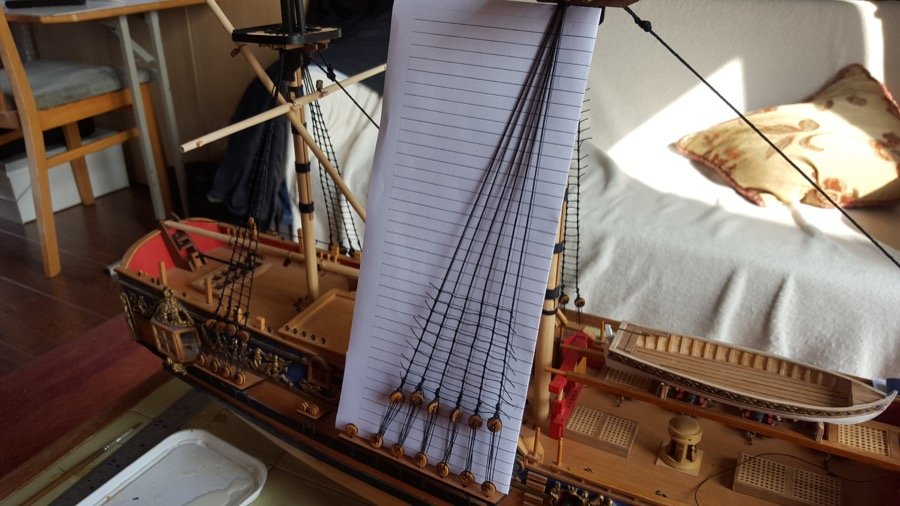
So... as others have said before it's harder to get decent photos of the rigging underway... but I've worked my way through it, and here are the results... Really pleased with how it's turned out. Just need to get it back to my mum's house, now... Plenty of bubble wrap, blankets, made-to-measure boxes and some smooth driving are called for :S Thanks so much for the advice, encouragement, suggestions and likes! It makes a big difference! Rob
- 39 replies
-
- 11
-
-
- royal caroline
- panart
- (and 1 more)
-
Hi Terry, Just checked in to see the progress, and its looking fantastic so far! Slow and steady's definitely the way. I was impressed with how nice the walnut looked once it was sanded down... seemed a shame to put paint on it, really. Glad to hear you're going to leave it on display. Your progress so far suggests that's going to be a great choice! I've noticed a number of posts on this forum have recommended mixing wood dust in with carpenter's glue to fill gaps? Might work well, although I've not tried it myself. Sounds like it might have the same effect as the water and filler but end up even closer in colour to the existing planking? It might also take the varnish better when you come to finish the hull? A sample test might be in order. Just my tuppence. Feel free to ignore. Rob
-
Hi John, That's really helpful, thank you. I'll try tightening the lanyards up and see if that does the trick, and if not, then yes, I think I'll be re-doing the stays. Watch this space. Rob
-
Thanks Nils, Yes, Pickle has been an excellent introduction for this significantly larger task. I don't think I would have had the confidence to make it this far otherwise. Rob
- 39 replies
-
- 1
-
-
- royal caroline
- panart
- (and 1 more)
-
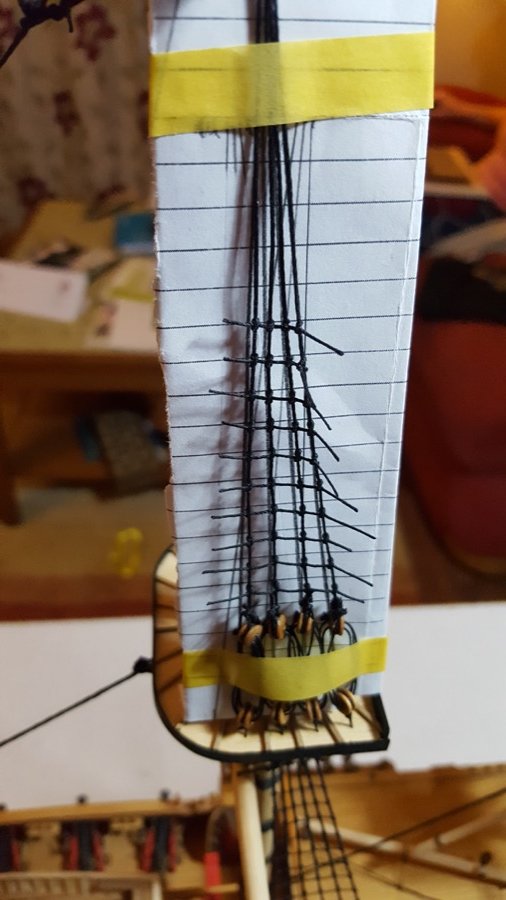
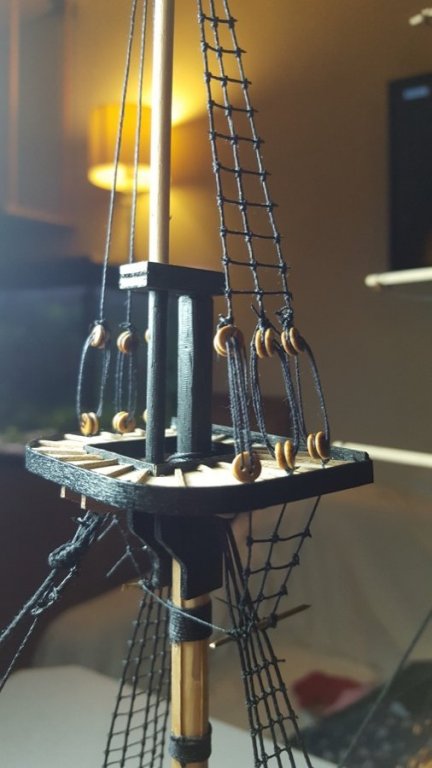
Thanks Per, I had a look through your builds - just beautiful I think my dad would have approved. It's certainly making Caroline look more like I know he would have intended. Thanks to everyone who looks and 'likes'! I've made some progress since my last post. The mainmast shrouds are complete, I've added various stays, and begun the topmast shrouds. Along with the topmast shrouds come the futtock shrouds... Not my favourite thing I have to say, but perhaps I'll like them more as I get more used to doing them. Anyway - here are some pictures of the shrouds and ratlines going on... The foretopmast shrouds and ratlines Maintopmast shrouds, futtock shrouds and ratlines being put on... I find it hard to stop the deadeyes twisting when I'm rigging it up... don't know whether anyone has any wisdom or cunning suggestions to avoid that? It looks worse on this shot, because the masking tape's pulling them even further out of line, but it illustrates the problem... I've also added shrouds to the foretopgallant - something I see in the "Period Model Shipbuilding' book, but don't see on the model plans - They seemed to be a realistic addition, so here they are.. It's all progress, as long as I can straighten up those deadeyes... a target for this evening, I think. Finally, here's a picture of progress so far... Thanks again for all the encouragement. Happy building Rob


- 39 replies
-
- 5
-
-
- royal caroline
- panart
- (and 1 more)
-
Hi Terry, Looks like you've made a great start. If you don't mind, I'll follow along. If Supply's anything like Pickle (another Caldercraft kit, and the only one I've built), then those protruding bits will be to support the bulkheads as you plank the hull, on Pickle, they come off to allow the deck to go down. On Pickle, it looks like this (I used a tiny saw blade in an xacto knife to saw as far through the stubs as I could before I snapped them off and filed down the rough patch): Hope someone building Supply can help with the question about the false deck fit... it does look somewhat wide. Rob
-
Hi all, Thanks for the likes. Progress is slow as the ratlines are tied. With a bit of help from my brother I've completed the ratlines on the mizzen and main masts. I've been using a printed out sheet with lines the right spacing apart (I make it 6mm), which has made it much less tiring on the eyes than when I did Pickle. Happy building Rob
- 39 replies
-
- 5
-
-
- royal caroline
- panart
- (and 1 more)
-
Hi John, It's hard to see in the pictures, but each of the yards has been tapered down at each end to the dimensions specified on the plans. I used a proxxon lathe to do it. On the picture of the whole ship the middle yard on the foremast still has the stubs on each end which are the full dimension of the dowel - those ends will be chopped off before the yard's attached. Rob
-
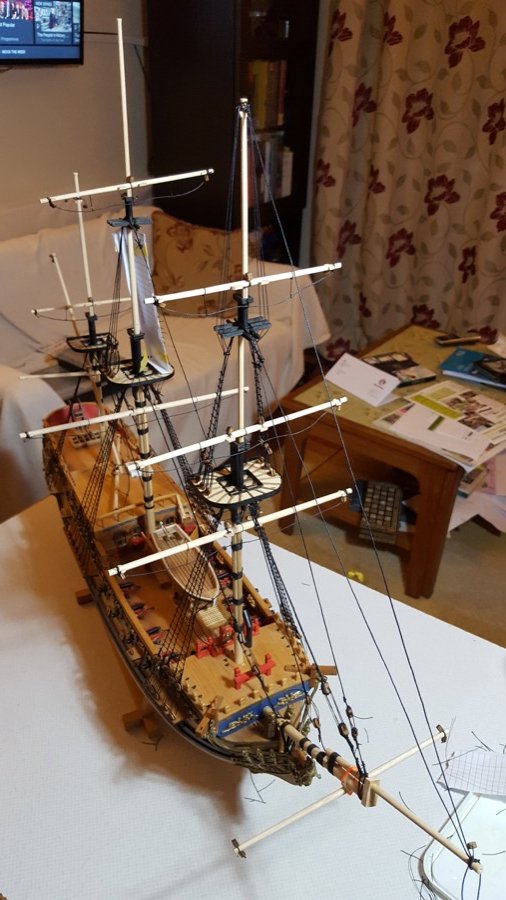
Hi all, Thanks for the likes. I've carried on working on the tops, masts, and I've turned the yards. At the moment, I've put them in place using loom bands (courtesy of my daughter), which helps me to keep tabs of which yards I've turned, and which I still need to do. Some of them still have the stubs on each end where the lathe was clamped, but most of them (due to lack of excess dowel) were cut precisely to length. Detailing on tops: Jibboom and bowsprit: Yards ready to be turned Yards so far... (all over the place, but at least roughly in place on the masts to help me remember which I've already done) You can see I've begun putting some detail on the first yard (cleats and blocks), as per below. I also went over the rigging plan and marked the different types of sheets / lines with different colours to try and make it a little clearer. Detailing the yards... I'm hoping to get all the blocks onto the yards before they're attached to make the whole process somewhat simpler. Take care Rob
- 39 replies
-
- 3
-
-
- royal caroline
- panart
- (and 1 more)
-
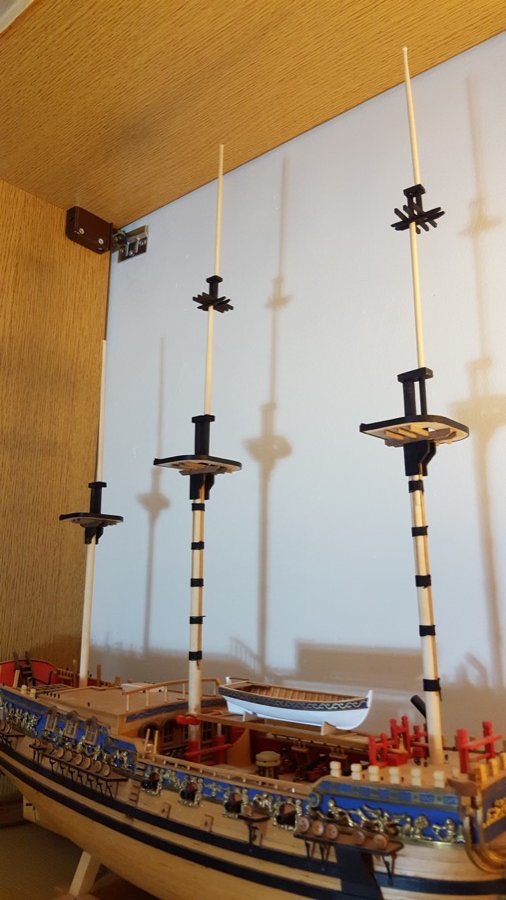
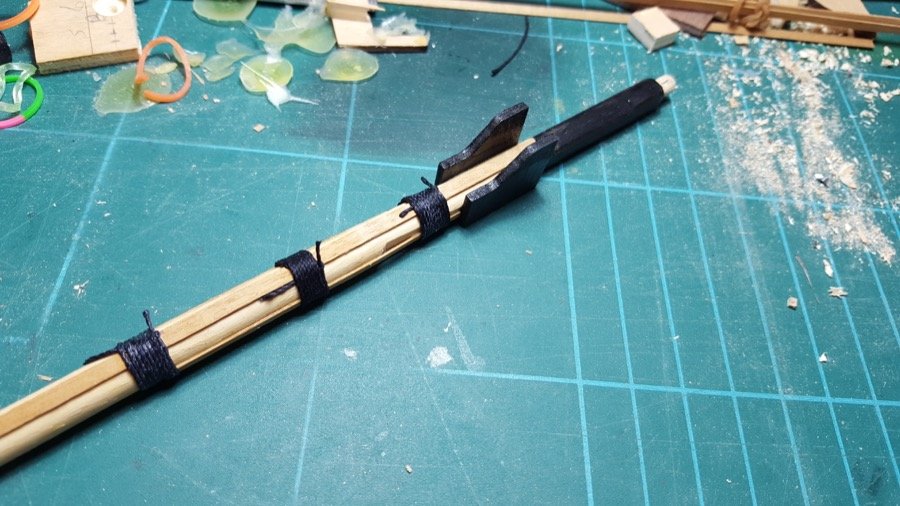
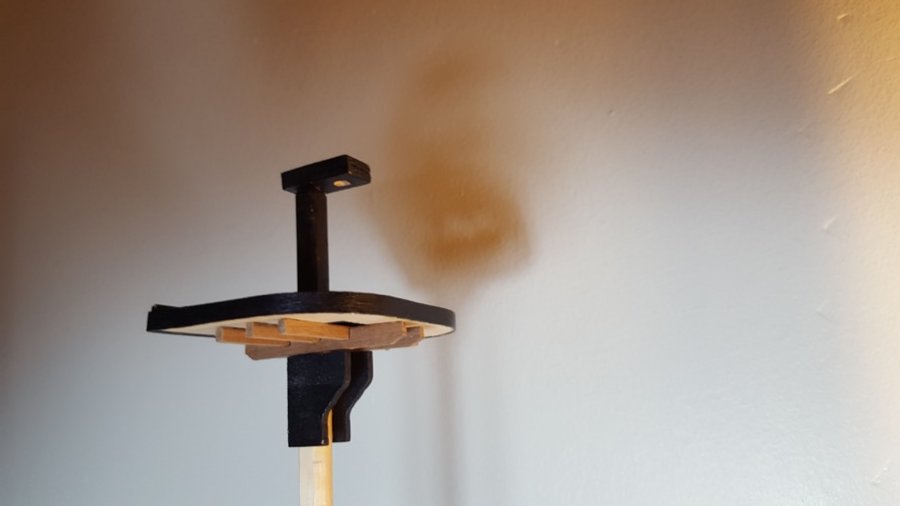
Hi all, Thanks for the likes. A little progress on the masts, tops and crosstrees: Fore top detailing (I ran out of the walnut strip, but I've got some more on order from Cornwall Model Boats) In the meantime I started making up the crosstrees: I finally managed to drill some passable mast caps by drilling from both sides, and added some detailing to the fore and main masts: And the progress so far... Having made it through the frustration of making the mast caps (which was a patience-building exercise as I seemed to lack the ability to drill a simple hole no matter how many ways I tried!), it's all going quite well again Happy building Rob
- 39 replies
-
- 7
-
-
- royal caroline
- panart
- (and 1 more)
-
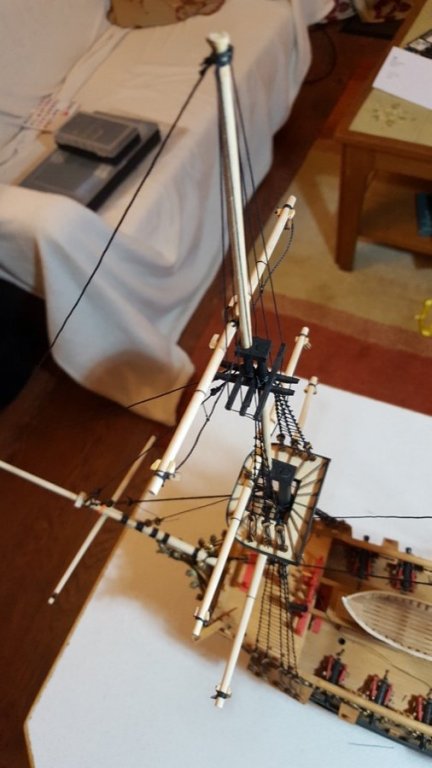
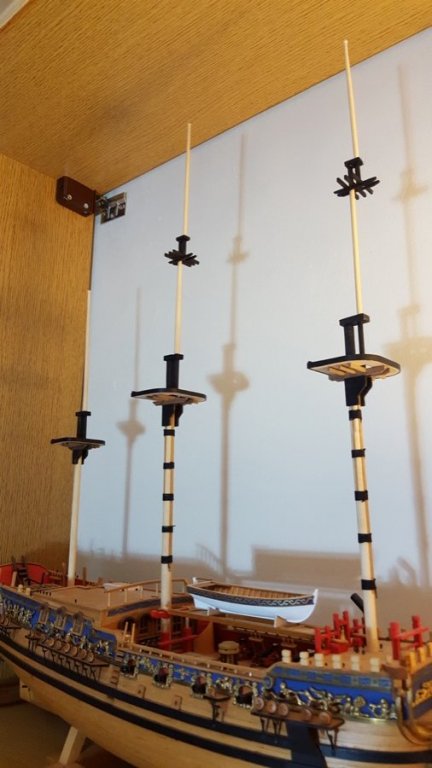
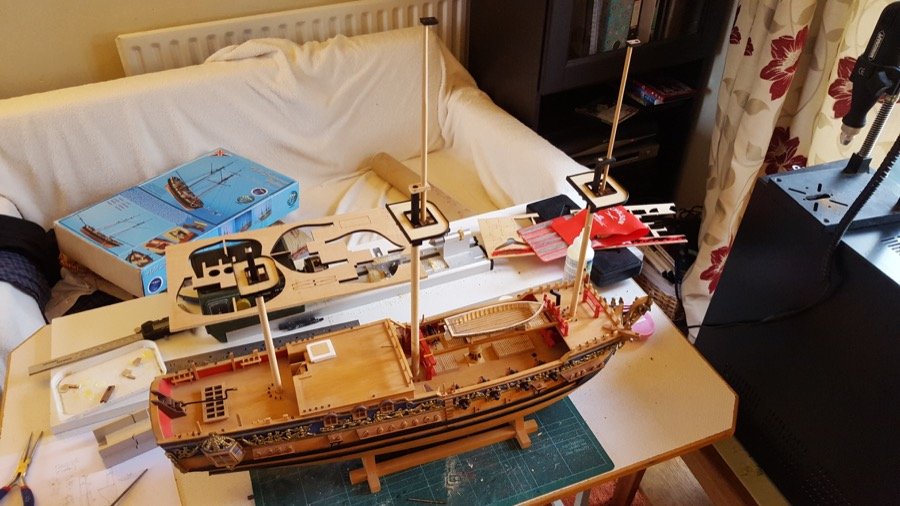
Hi all, Thanks so much for the likes. Always an encouragement. I've spent a good part of today working on the masts... Built the structure that supports the main-top and mizzen-top, turned the maintopmast, mizzen-topmast and made some caps, although two of the caps will need making again, as the plywood disintegrated as I drilled it... They work, but they ain't pretty... Next time, I'll drill before I cut them out of the plywood sheet, and drill through on to an extra sheet of wood so that the ply is supported as the drill comes out of it... Once the masts are turned and dry-fitting okay, I'll take it all apart again and add the detailing onto the tops, and make sure all the holes are drilled ready for rigging. The keen-eyed amongst you may spot that the main topmast is a little too long. I made it oversized, and haven't cut it down yet... it's probably about 2cm too long, but I guess, that's almost a metre on the real thing... Being my first three-masted model, I'm not quite sure whether it looks right or not... I'll cut it down and forge ahead as per plans and we'll see how it turns out. I'm planning on following Panart's option with the mizzen-top-gallant, hence the long mizzen-top-mast. That's as high as that mast gets now. Happy building Rob

- 39 replies
-
- 6
-
-
- royal caroline
- panart
- (and 1 more)
-
Hi all, I've started work on the foremast and foretop. It's all dry-fitted at the moment, and the top has more detail to go on. I want to try and assemble the whole mast, dry-fitted before the mast is stepped. More soon Rob
- 39 replies
-
- 9
-
-
- royal caroline
- panart
- (and 1 more)
-
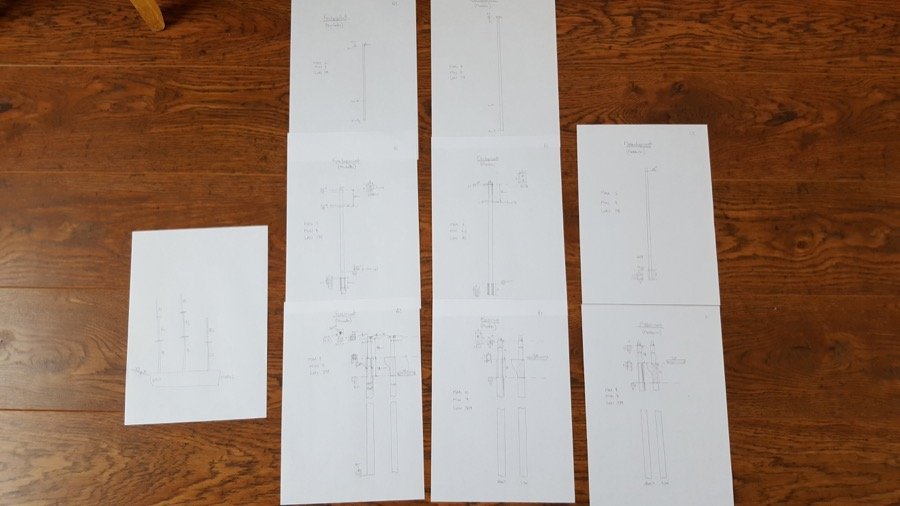
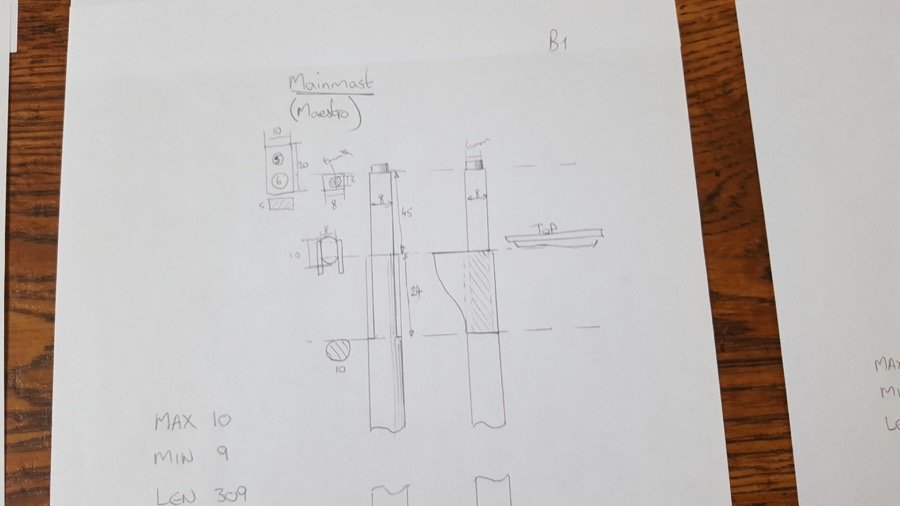
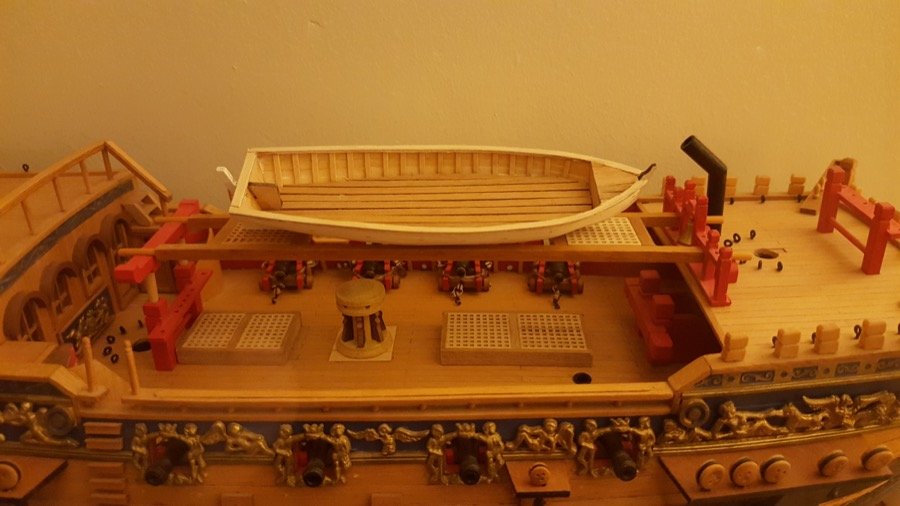
Hi all! Thanks for the kind words Don. I've done a little more work on the launch: I added a tiller from brass rod (painted with Caldercraft Walnut acrylic paint)... I also used this walnut paint to paint along the edges of the ply wales. I added the wale strips (4mm below the wale) from 1x1 walnut strip. Then painted in the 4mm band with blue acrylic (Humbrol 25), and added the brass etch gilding. You can see a small spot on the rear corner where the blue needs touching up. Otherwise, I'm very happy with the results I'm planning to put some matt varnish on the brass to stop it tarnishing. Still to do: I need to add the rowlocks, oars (waiting for my new lathe to arrive - yes, I finally took the plunge and have bought a Proxxon DB250 - and "benches". I've spent a couple of hours drawing up individual plans for each of the mast sections ready to start shaping them. I'm creating these from the plans, and then I'll take a look at AOTS and see if there are any changes I want to make. They're not to scale, but they do give some idea of how those masts are going to be built up. It also begins to give me some idea of where caps, crosstrees, tops and masts meet, and how they're going to go together. Thanks again for the likes and kind words. Such an encouragement! Happy building Rob
- 39 replies
-
- 6
-
-
- royal caroline
- panart
- (and 1 more)
-
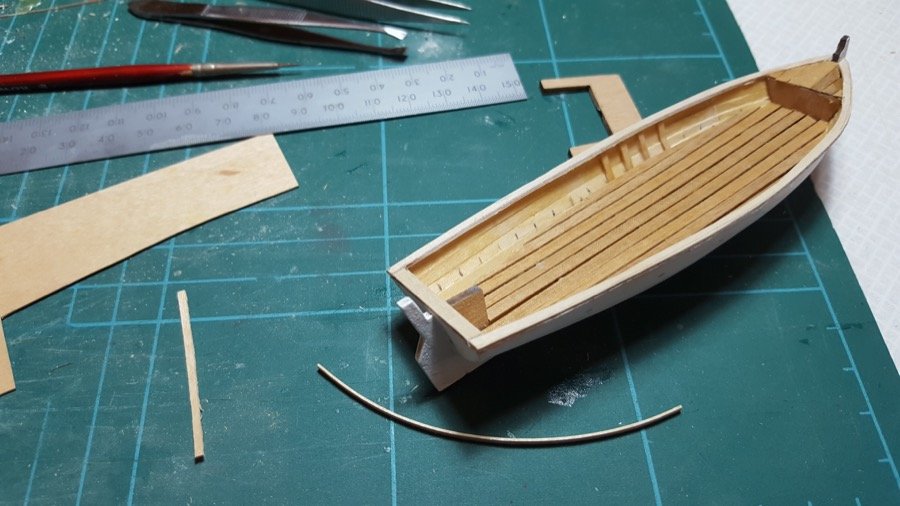
Thanks Dimitris A small update on the ship's launch. It's starting to come together a bit better now: I ditched several ideas along the way here... The .5 x 3mm strip for the ribs is far too grainy to bend, and seemed to me to be too thick to look scale, so I used some veneer instead. I also decided to use ply from the pickle kit for the wales, as then I could cut and sand it to shape rather than trying to bend a 2mm strip (again, too thick?) against the widest dimension. By my reckoning the ribs end up about 6mm apart. I also ditched the former at the front and the "bench"? at the back as being way too thick. I've just planked the front with walnut, and I'll do the same at the back for the "bench". The wales need a bit more sanding to make them more uniform, but otherwise I'm pleased with the progress so far. Next step, the "bench" at the back and then the 1x1mm strip and the brass decoration with the blue behind. Soon be onto the masts and spars Has anyone turned the masts and spars for RYC on a Proxxon DB250 - I'm considering buying one to replace the mantua lathe I have (which really isn't man enough, and is dying slowly: not least, because the home-brew power supply I've been using has been providing too many volts to the motor - 14 instead of 12), but I'm wondering whether it's the best way to spend the money Rob

- 39 replies
-
- 7
-
-
- royal caroline
- panart
- (and 1 more)
-
Hi Nigel, Thank you for the kind words. I've looked through your build log for Royal Yacht Caroline - wow, it's going to be a cracking Caroline! a level up from mine, but I'm glad to be pottering along doing the best I can, and I think my dad would have approved so far It's interesting to hear about your solution for the ship's launch. It confirms what I'd suspected - that there's a can of worms (a delight to some, and a horror to others) waiting for the person who takes a ruler to the plans and compares them against AOTS. Your way through this maze sounds like an excellent one, and certainly seems to be paying dividends. I hope in years to come I shall have the skills and confidence to follow suit. I'm hoping to attempt HMS Diana next, and I have the AOTS ready so I have all the materials to cause lots of double-checking and head-scratching!! I hope your house move goes well. I remember with my schooner, Pickle, that there was definitely a moment where it went from being relatively robust to being a very fragile thing that caught or snagged on everything that went near it. I moved house with Pickle and she survived, I'm very glad to say! Although she did go to stay with someone else during the move to avoid the big day! The avatar is of my interpretation of Revell's Flower Class Corvette HMCS Snowberry, although I made it up as a generic Flower class a good few years ago. It's stand-off quality at best, but it does look the business out on the water, and it's fun to sail. I've got a MCMV sat on the shelf that's never gone further than a paddling pool, so when that gets wet, I'll update my avatar Thanks again Rob
- 39 replies
-
- 1
-
-
- royal caroline
- panart
- (and 1 more)