


Meredith
-
Posts
260 -
Joined
-
Last visited
Content Type
Profiles
Forums
Gallery
Events
Posts posted by Meredith
-
-
Taking a break from Syren (awaiting some supplies) so decided to get two of the kits I have stashed away up to the decking part. I thought it might be a good idea while it was fresh in my mind all the mistakes I made with Syren - and hopefully improve.One step at a time

Originally I didn't like the ply that came with the kits - it was bent - so I spend a morning building a keel clamp to straighten it up - worked a treat.
I used angle brakets and drilled holes through the keel to hold it straight - and now its great - AND solid. I can lean on it and it doesn't budge. Should do this more often.
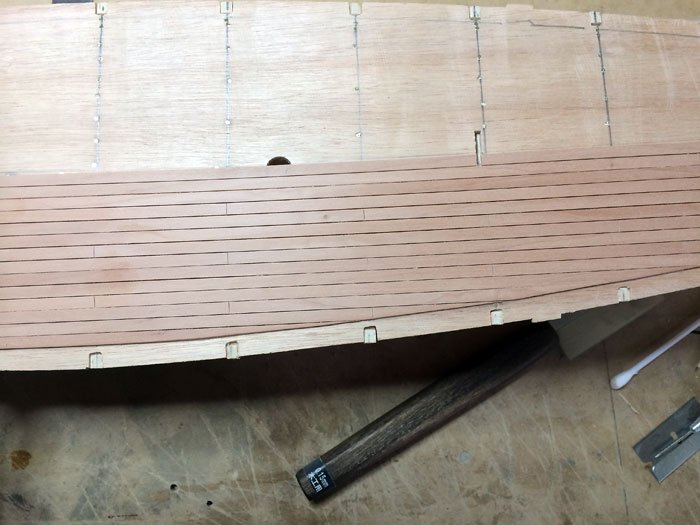
I planked with pear - but unfortunately I didn't have any stock wide enough to cut the margin planks - so they are from basswood and lime wood. The will need sanding down as they are much thicker than the pear stock for the deck planks. Not sure yet how I will treat them - leave natural or stain.. time will tell.
I am happier with the but joints - seem to be more in line and straighter than previous attempts. I will caulk as per Syren - so that has happened yet. Still have 8 more rows of planks to lay.l But all in all everything went well.
The keel clamp thingie....
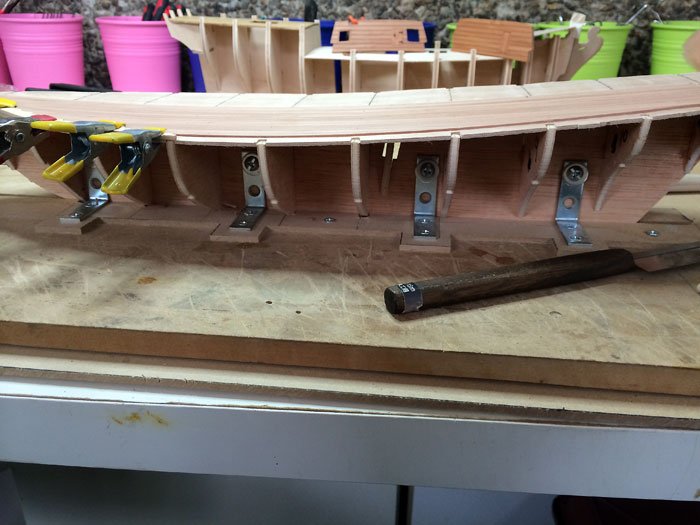
To keep the bulkheads square - I used aluminium square (hollow) tube - worked great - easy to clamp at opposite corners of each bulkhead. I forgot to take pics - I will take some with the Supply build I have also started.
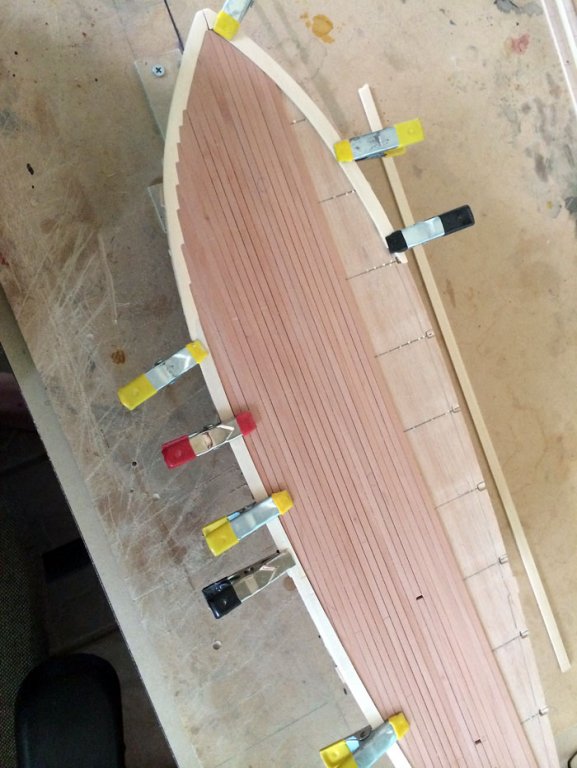
Onto the planking...
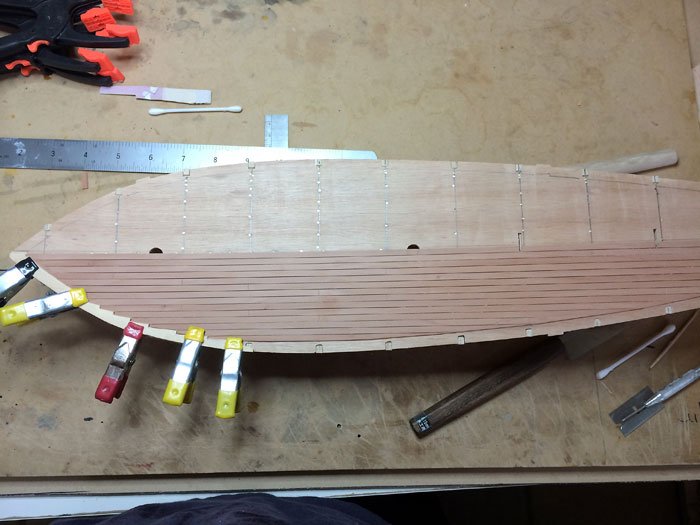
The margin plank is not glued - just clamped so I can take it off to easily cut the joggles...
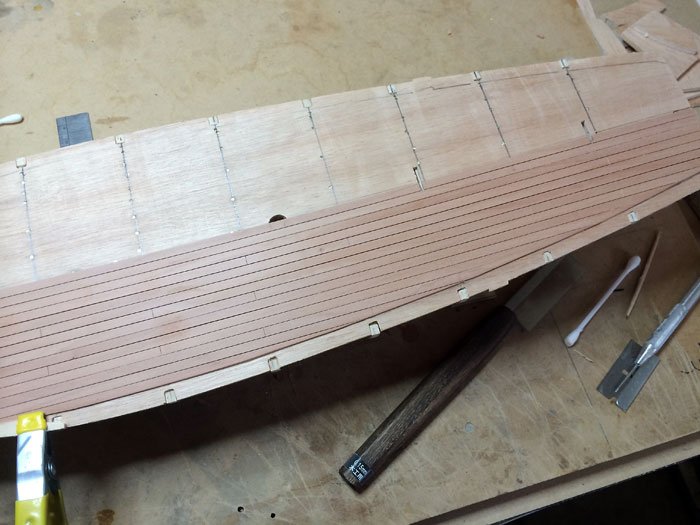
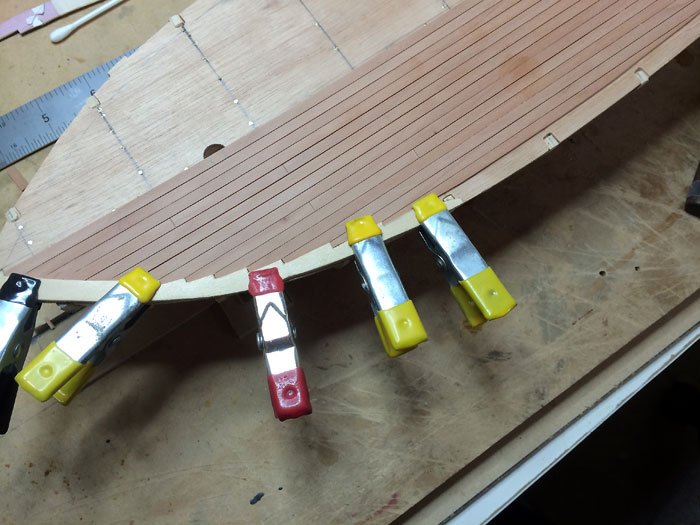
I dint joggle the back end of the planks - maybe next time... thought I was pushing it a bit and might not end up very happy with it - so left well enough alone. I will cover these bits with lots of deck stuff anyway... cant have too many ropes
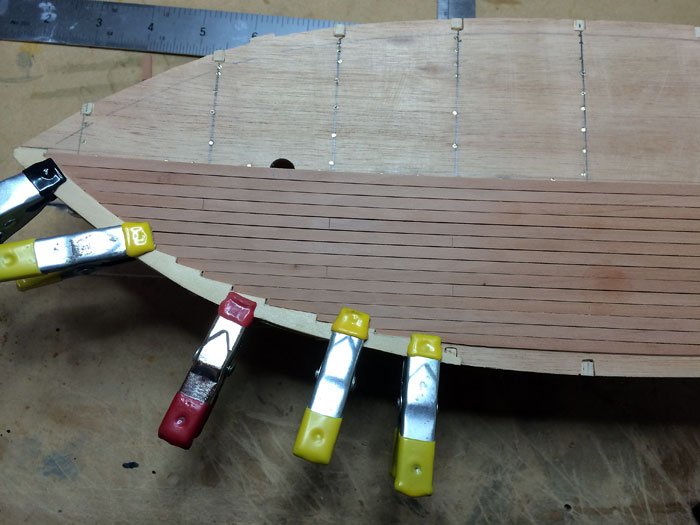
Clamping the next bit of the margin plank to shape...

No too worried about the dents from the clamps - the margin planks need to be sanded a lot down to height size anyway...
One half done... only 8 rows of planks o go - up to the joggling on the second side now..
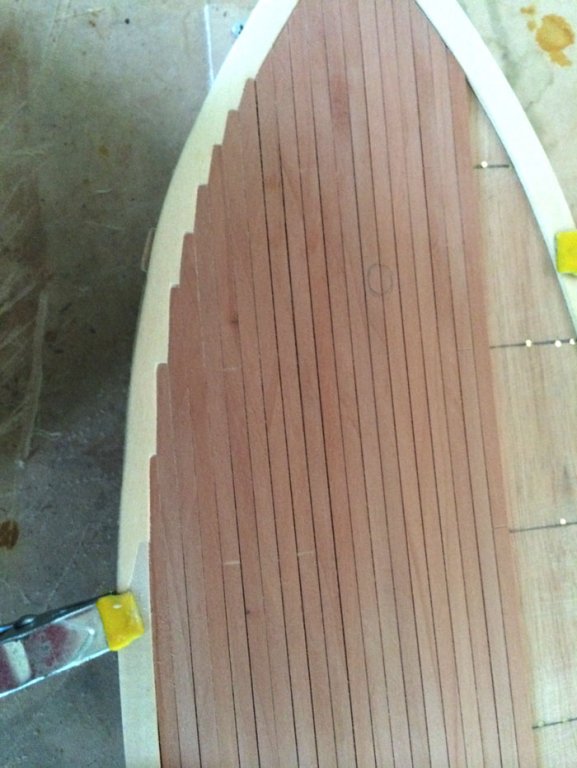
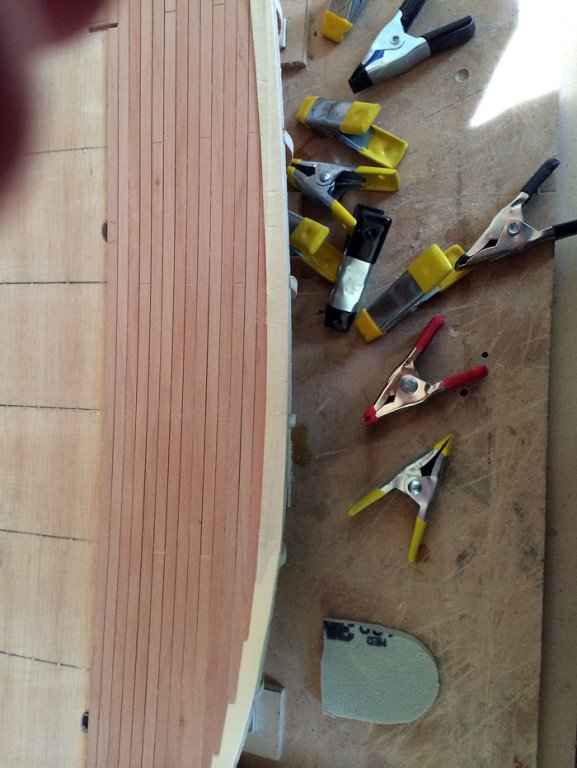
All glued....
down to the last 8 rows.. and that's all there is so far folks...
-
Thanks Augie, the black is an easy fix. I decided to keep painting - get a good coverage and then when the flat finally comes - it will only need a couple of coats. Admiralty metal black is a nice flat black - but I ran out
-
Few more photos.. few more mistakes
I am actually thinking I should get my next kit out and get up to the decking and fix all the mistakes I made on the siren
that way I shouldn't forget.The waterways are too close to the gun ports - I THOUGHT I made enough allowances when I added the deck - I didn't use the kit supplied timber - but I didn't make enough allowance. I am going to have to notch out the waterway under each port so they little supports that are strewn around the deck can be attached at sill level.
The deck - I tried a few things but ended up staining the edge strip as it was basswood and the deck boxwood. Instead of trying to make them match and not getting it - I went the other way and did the contrast thing. The alternative was waiting ages and ages for some boxwood wide enough to cut to shape. I was impatient
The black paint... way too glossy - and its called "dull black" - I actually went to the site and re-read the description - and it says its satin to match Victory (Admiralty Paints) - I am STILL waiting on my flat black paint - ordered in on 12th December... I might have to go the flat/mat varnish and order it from another supplier. So all the black will be FLAT.. not this gloss....


- Charley54, fatih79, Vivian Galad and 6 others
-
 9
9
-
Hi Vivian - I am just a beginner too
Treenailing is definitely one of the easier tasks on ship building.I have all the deck finished and fixed up all the ruined paintwork...and about to cut out some cap rails.
-
Hypodermic needle? I think it was an 18.. but I did then roll them over some sandpaper when done - so they are littler than 18 - I really only needed to taper them so they would be a good fit.
-
I haven't got a sharp enough chisel - just a tiny hobby type Its on my list of shopping when I take a trip sometime
Yes Floyd I prefer the timber treenails - but I have done putty ones too - I quite like them.. You don't get any bleeding in real close-up photos with the timber
-
Started on a bit of deck treenailling...
Drilled some holes.. using a size 78 drill bit
Deck is boxwood

Tools used...

The holes

Cut round toothpicks/cocktail sticks in half and used a drawplate to just take the ends down - bit like sharpening a pencil
The one on the left is made by just twisting in the drilled hole in the deck - its actually simpler and quicker than the drawplate method and the holes need smoothing off anyway. So serves two purposes.
Size shown in relation to a dressmakers sewing pin

More holes..

Tried the hypodermic needle as a drill bit and used some huon pine..

A few sanded back a little bit - sanding dust all over the deck and caulking

Using toothpicks cut in half give you plenty of grip room - unlike the hypodermic needle style ones. Need to use tweezers for those


Snip back most of the excess with end nips

result

Then trim back with nail clippers (half toothpick is a bit long and makes cutting first with nail clippers a bit more awkward - so I used the nips to get rid the majority

Lightly sanded back... still needs a bit more - but I will do it after the whole deck is nailed.

-
On my test piece the filler looked much better. But I know what I would do next time to make the gaps more even. I will scribe some of these out a bit more ( some times glue gets between them and I did it roughly once - but now the filler is in its easier to see where I need to adjust a little. Also I sealed the deck with some sanding sealer before I filled - trying to prevent ant staining on the light timber - the sanding sealer of course filled the gaps - although I did scrape it out - I did miss some as its clear and not so easy to see where you have been if you are disturbed while doing the task
On the last couple of rows I used a very thin piece of plastic (bit like X-ray film) to wipe out the joints as I was laying the planks. I think I would do this to every row. The sealing I would just do with proof seal and not sanding sealer too.
-
Believe me.. it was very crude
I didn't even do a trial.. I was playing with the burrs and had no intention of actually making anything - just seeing what they did - and I used the trial bit of brass to make the lock bit.Now I have some new tools (things that the burrs fit into... dentists drill - I am very impressed with it) - I suspect next time it will be a planned item and hopefully done a little better.
-
I have actually been working on Syren - but not really happy with results - so many things I have re-done - and more than once
I guess I have learnt a lot of what NOT to do again. I SHOULD write it down as I will probably forget and make the same mistakes next time.Just a few photos:
Hull planked and the wales being added (I also found the kit short of the right timbers - so I cut my own from pear)


Copper plating almost finished - had heaps of trouble with the waterline.. but that's another story

I ran out of metal black paint by Admiralty paints.. so used their dull black... its too shiny for my liking - so waiting for more paint to come in the post.

holes drilled in my replacement canons - purchased from JB models

Did my deck with boxwood... made a mess of it. I tapered the planks to the rear.. but I should have just joggled them all the way.... disappointed - but I have no more wood to rip it up and replace. I have already ripped up and done one side twice. Might just have to live with it.

caulking the deck with ebony wood filler


scraping the deck after filling


Drilled holes for some of the treenails... I will do the rest later when I transfer markings/placement all the deck fittings

So that's about me all up to date....
- fatih79, Dubz, fnkershner and 3 others
-
6
-
Few pics for you Keith:

Just cut from a brass strip and crudely shaped. Hole drilled for a nail in top and a big hole drilled and ground to fit over the loop bit

I just played with some of my carbide and diamond bits to texture etc.


the bit attached to the chest bottom had two holes drilled into it and I made a ring eye - cut in half and glued into the drilled holes and into the wood of the chest.


Hinges made from brass strip cut to size and then cut to look like a capital "F" and the sticky out bits of the "F" were rolled back to make tubes - and a pin inserted through the holes
- CaptainSteve, mtaylor and captainbob
-
3
-
Just cut and shaped it from some brass strip. I will get some photos tomorrow in the daylight
-
Just superb and so inspiring!
-
If I remember well, it was a while a feature of the royal navy for the plates to finish at an angle with a batten, while continental ships (and american?) preferred 1 to 3 layers of horizontal layers on the waterline.
Is this correct?
Daniel
So could I use two rows of horizontal layers of copper plates at the waterline on my Syren?
-
Ohh I like this - something a little bit different. Some nice detail you have going there. well done
-
-
I can't really consider micro mark electric tools due to voltage etc - Europeans would be in the same boat. Proxxon markets worldwide with the appropriate voltage configuration. Many times I would have liked to buy USA tools - mainly due to the price and variety available but then I would need to run a proper transformer it's not usually the case that a differently configured plug will do the job. So I don't have anything at all against mm or other tools available in USA it's just not a viable option for me
- Q A's Revenge, Martin W, WackoWolf and 2 others
-
5
-
Oh great. That will be most helpful for people like me. I am also waiting to hear about the oantograph
-
. I love tools too. Some people dream of flash cars or big grand houses or expensive holidays or jewels I dream of a wonderful workshop with a crAftsman built traditional wood workbench and endless tools

-
Ohh I forgot to add.. previously to these I had a Zona too.... but I have actually tossed that to the back of the drawer - its like a kids toy compared to these.
Everywhere on the Dieter's site - it states these saws are NOT for the beginner.. so I was a bit dubious before they arrived... I AM a beginner.. but I think I was born to use these - with western saw I always have to force myself to cut on the push stroke. I find it far more natural to use the pull stroke to cut. so these were definitely made for me
:) -
 These are some of my Japanese saws:
My absolute favourite is the little one laying on top - its about 5cm (2inches) blade and about 42tpi..and the cleanest cut I have seen.
I got them from Deiters fine tools in Germany - as it was just as quick and cost about the same shipping as somewhere in Australia - and cheaper for the items,
Links:
The 3 set mini's
http://www.fine-tools.com/G312054.htm#ziel10
the little favourite.. with a 0.15mm kerf
http://www.fine-tools.com/micro-saws.html
My US fret saw: (this one is pretty good too..)
http://www.fine-tools.com/knew-concepts-fretsaw.html
Ohh and the one at the back is about 4" blade and is a flush cut Japanese saw...


- Q A's Revenge, src, cristikc and 1 other
-
4
-
There are some 1;48's available here...
http://www.shipmodels.com.ua/eng/accessories/artillery/cannon/index.htm
I saw some at 80mm and 85mm,,, so might have what you are looking for
-
Go Charley!.. I am so pleased to see quite a few more Syrens joining the group... I don't let a day go past with out looking at the current Syren builds here - and watch Dubz/Dirks build log like a hawk
Roger on the scratch builds has one too.. pity his log got lost in the great crash - he has some photos back now and they are well worth a look.
I notice Augie here too - he's been through all the tough bits and I am sure he will help along your journey. Ohh and its about time we saw a start on the Syren Floyd... (unless I missed that!)
The Syren fleet is growing again... which is great news.
Have fun.. this really is a great hobby/passion...
-
Ohh.. great lot of new toys:) I will be watching with interest.. you will probably catch up to me before long. I have been playing with my carronades and sleds - got myself a natty little toy coming for my build too.. just hope it works!
I need to order some Chuck blocks too..... They look so nice compared to the commercial ones.
Dos Amigos by Meredith - OcCre - 1:53
in - Kit build logs for subjects built from 1801 - 1850
Posted
Forgot to add.. its going to be 900mm long when finished - so my biggest yet.