scott larkins
-
Posts
489 -
Joined
-
Last visited
Content Type
Profiles
Forums
Gallery
Events
Everything posted by scott larkins
-
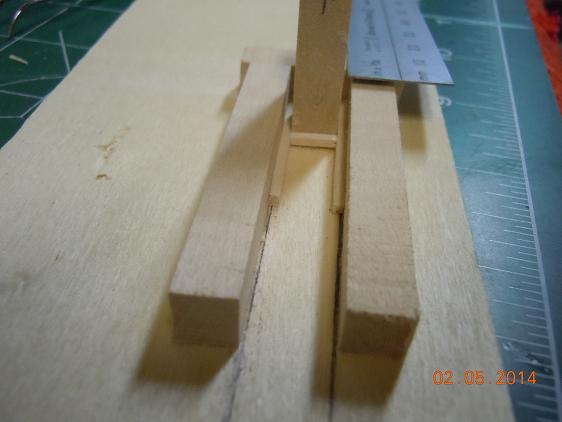
 Here is one side done. Eric. I don't think the wood suggested for this work is as thick as the bulkheads. I did see, I think in one of the other Rattlesnake posts, that the bulk head extensions above the deck may need to be sanded down to the correct thickness. Thanks for the reminder as I had forgotten about this. I will look at the the wood thickness and the sanding and see what I need to do. I will also make sure to look at the rail caps to make sure the wall thickness is correct for either one of the two methods verses the rail caps. But anyways, here is my first side done. I think the small deck piece and cannon really helped in setting these to the proper height. I did make sure that these pieces where properly sanded for the fairing.
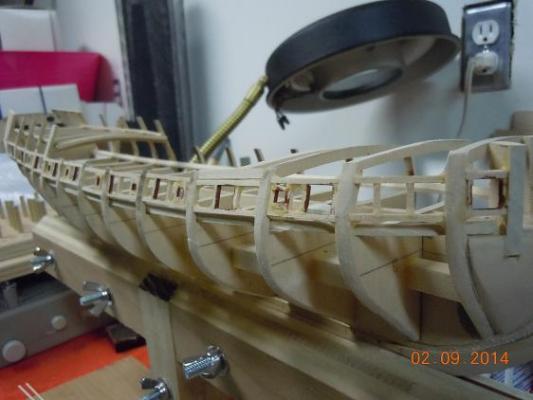
-
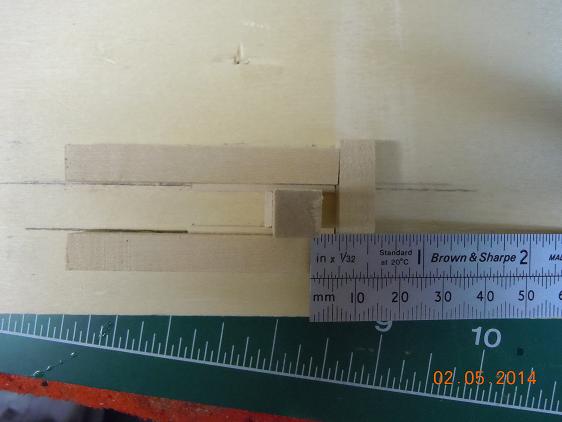
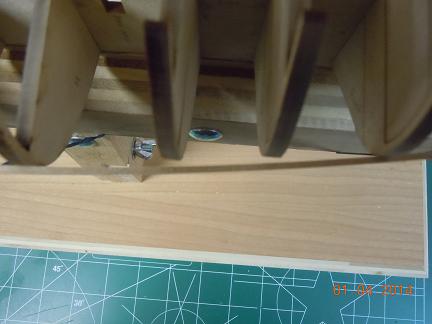
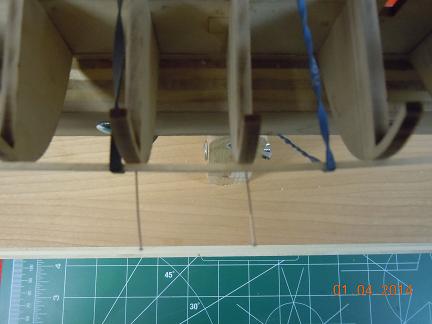
Came up with this jig. How's this for luck. The pieces of wood I used to reenforce the bulkheads also happens to be the same size as the cannon ports and I had scrap wood left over from other works to frame in the oar ports. Although this piece does not have an oar port in it. Hopefully this will work well or perhaps work for others. Or if it doesn't work for me you know what not to do. LOL I made measurements for the ports, cut the wood, placed it in the jig and then measured from the right edge of the jig to the tall cannon port piece. Then placed a small amount of glue on a toothpick and just touched the wood intersections. Once this "tack job" was done I took it out of the jig and then glued the corners to make a stronger bond.


- 264 replies
-
- 2
-

-
- rattlesnake
- model shipways
- (and 1 more)
-
I'm inspired. Nice work.
-
Mike, Don't sweat those little items with the poopdeck. Get it close with sanding and shimming on the top of those back bulkheads. And since most if not all of the poopdeck/ officers quarters/inside will not be showing or have any part of your build, don't worry about the bottom curves. As for the bend on the false center keel. again, that back area won't be showing on the build. They will be incapcilated. I really would not mess with that center keel. Things seem to be going pretty well for you really. Keep it up. Words of advice, look at all of the layout plans and compare and contrast where you can. As I've been reminded several times, it's a wood kit, not prefabricated molded plastic.
-
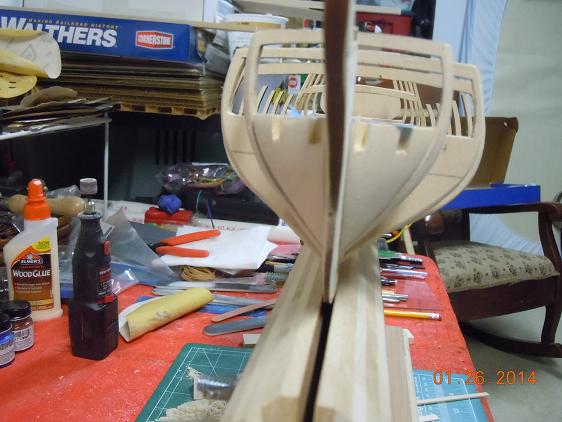
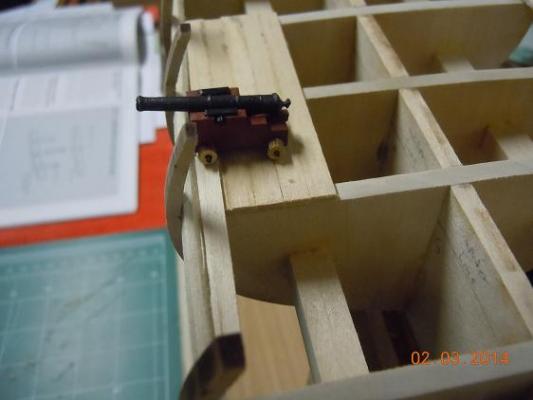
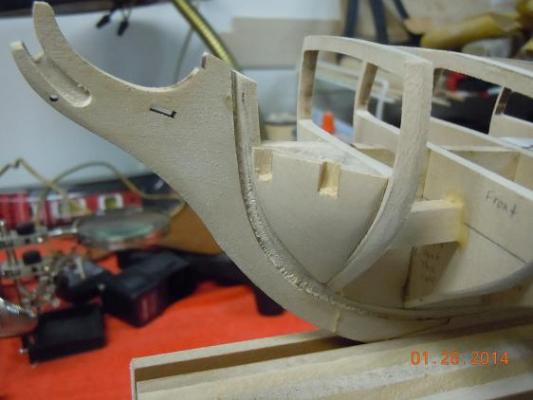
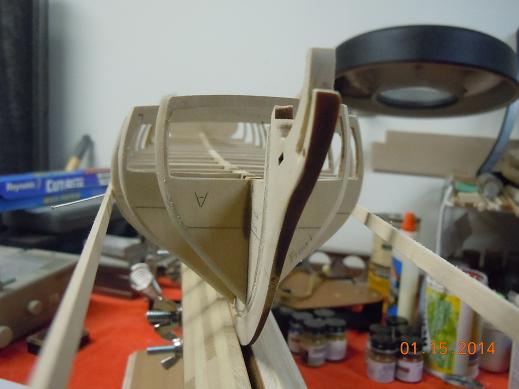
Movin Movin Movin, keep this post a movin. Next, Here you can see my choice to cut off the top of the knights head becasue I made it too thick for the bottom of the forecastle bottom rail to fit over it. You can see that small hole at the point of the bow. That is supposed to fit over and around the knights head. oops. I will probably dowel and glue the top back on later. This was my choice and not per instructions. I altimately felt that the original knights head was too thin and febble. You don't have to follow my choice. I am also not putting those two pieces on yet. I'm going to wait until I plank that area to make sure I get the depth that it sits out from the hull correct. Those two pieces become an outside framing / molding piece. I suppose you could put it on and add additional framing later but I'm not sure how that would affect the overall build of the forecastle decking and railing. It looked like the bow piece is supposed to fit in a certain way. Next is to frame in the cannon and oar ports. I built a small piece of decking and a cannon to make sure I get the dimensions and placement correct. The cannon is not finished yet. I still have to put on the various pins and rings but you get the idea. I took this idea from others before me because I thought it made good sense. Just my luck I'd place the openings too high. I'm hoping an ounce of prevention now saves me a ton of heart ache later. This will also be the color I use to paint the inside of the deck walls. It looks quite a bit darker here than it actually is. I was standing between the cannon and the light for this pic. I like the dark rich color of this red. Well, rust actually. Next post will be of the framing. AAHHhhhhhh, then the planking. Very nervous about those steps.

- 264 replies
-
- 1
-
-
- rattlesnake
- model shipways
- (and 1 more)
-
Me too. I'm assuming it is close to scale and that is one reason you are going it. Plus perhaps the detail will be better. If this goes well perhaps I'll get one for my Rattlesnake as well.
-
Have a question for the other Rattlesnake builders. When does one add the poopdeck bulkhead door piece. Nowere, at least that I could find, do the instructions actually tell you the best time to add the facepiece. And then what wood do you use? It doesn't seem like the supplies come with wood for this and all I have to go by in making it is the print on the drawings. HELP!
- 264 replies
-
- 1
-
-
- rattlesnake
- model shipways
- (and 1 more)
-
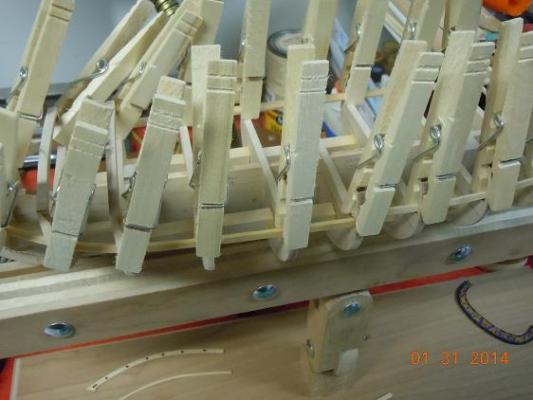
Next, perhaps a little out of order from the instructions was the two (or four) bow pieces. Like others before me, I made the back piece a little thicker to allow for planking pressure and I made the Knights head thicker too so I would have places to glue and not worry about snapping. Here's the pick of my work. Here I made sure the wood was plumb. Again my Knights head was made thicker by gluing two pieces of sacraficed planking together. Note: Not sure that was so smart. When I cut out the railing pieces, my knights head is too thick as the lower laser cut bow piece is supposed to fit over the lower railing piece. Now I'm going to have to cut the Knights head to get things to work. You make you choice, thin woood or thick. Also note that the back pieces on the bow were cut and sanded appropriately. The waterways are easy to file, I measuered two sides of the wood as per the plans and used my drummel to sand, at an angle, down to the marks. Half way on the two sides makes for a nice 45 degree angle. I soaked the wood and bent it. Be careful. Due to the thickness of the wood piece and the sever angle, the wood started popping and making little cracking noises. I figured that the wood must have been starting to break. I didn't panic, I ended up doing the bending by hand instead of my bending board. Once I was sure it was close I let it dry with the cloths pins over night, then glued the next day and let set over night. The cloths pins did a nice job of keeping the waterway pieces tucked into the corners of the bulkhead risers.

- 264 replies
-
- 2
-
-
- rattlesnake
- model shipways
- (and 1 more)
-
Looking good. Lots of questions. Not sure if I qualify to anser them all compared to the real experts here. Lets see.... for removing material I used one of my bog emery boards, not my drummel. It was sand, sand, sand, check with plank, repeat until satisfied. But always make sure to check 3 to 4 bulkheads at a time. You want to overall flow of the lines, not just 2 bulkheads. Make sure to look at the big picture. Don't touch the keel.
-
I do not suggest you move that bulk head off of the reference line, it is key to having a well lined up ship. The deck can be sanded down or shimmed and the sides of the bulk heads can be sanded or shimed to the proper size. I was told that the reference line is very important.
-
Thanks for the pic there Eric. After reviewing everyone's transom work I put a lot of consideration into the whole stern area. Like you said, i didn't want to make too much of a bend angle back there. Especially considering that the planks transform from horizontal to vertical in that whole area. Your transform looks really good, I like how you got your letters to be large. For some reason my model did not have that much space available. Don't know why considering I think we are both macking the shipways model. Perhaps I messed up somewhere else.
-
Nice. Had you not said something I would never had guessed there was an issue. In no way is it noticable.
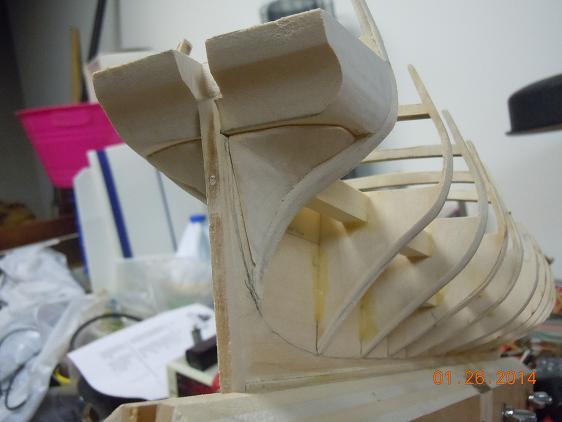
-
Okay, made changes to the Transom and made the filler blocks. Changed the windows, added the middle one and the name with molding. Pretty much just followed the instructions. The bow filler blocks were not too bad to make. My advise to others is to get yourself a hand held drummel with a sanding drum. I used a small hand held saw, the drummel and a big nail file the get these right. Here are the stern blocks. The horizotal block was not too bad to make. Make sure you use sand paper wrapped around a dowel to make the curved part. The lower stern fillers are in no way fun. Turning wood blocks into these oddly shaped three dimensional pieces are by no way easy. One has to think very three dimensionally. I spent a lot of time using a plank to measure here, there and everywhere in between. I don't think mine turned out as well as some others but it's what the planks say needed to be done. When I get to the planking I may have to use some filler. Or did I really botch these? Update, because I was feeling guilty I used some wood filler and smoothed out the transition from the stern filler to the tansom block.


- 264 replies
-
- 1
-
-
- rattlesnake
- model shipways
- (and 1 more)
-
OH, just read this. Sorry to hear about that man. Take care of yourself first, the model is not going anywhere.
-
Nice. Got any more pics of the back and close ups of the rope work and bow? thye may inspire the rest of us.
-
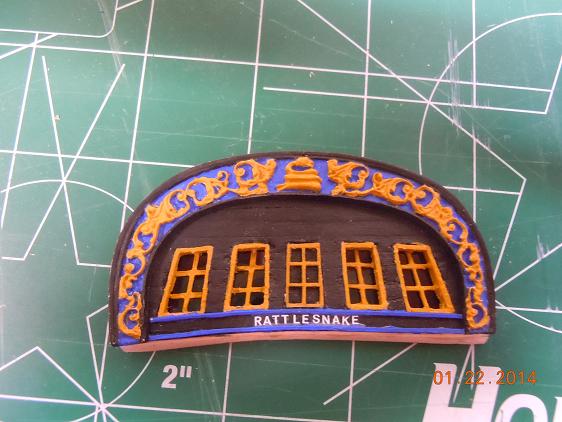
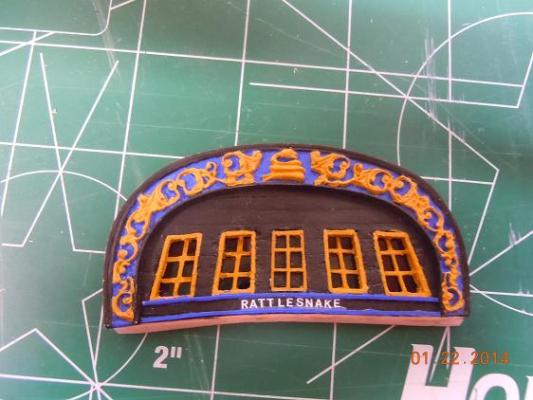
Sport, Thanks, a fine tipped paint brush and a magnifying glass can take most of the credit. The stars have since left, they fell off, oh well. I had put them on in a simply minded attempt to replicate a professional model I saw of the rattlesnake. Not sure if they have a meaning or not. Doesn't matter now. I have also added the fake middle window in. I will be painting the hull white below the water line, a few bands of black, the gunwal (sp?) yellow ochra and they will be a stripe of blue, like you see here, along the side of the forcastle and poop deck. Trying to replicat that professional job I saw. The colors really pop. Word to others reading this build log. Do not simply attach the window frames to the back of the transom, they must be inside the transom window frames. I did not notice until I did a dry fit of the transom to the filler wood behind bulk head M, the wood covers up part of the windows; and thus my transom did not sit flush with the wood block. If you look at the drawings that come with the kit you will barely notice that the level of the top of the wood actually goes behind the window. I did not see that. Or siimply wished not to see it. Needless to say, after a few choice words late last night, I have modified my windows just a tad. Now I know why the instructions have you paint the windows, because unless you do some major kit basing, parts of the windows are over the wood.
- 264 replies
-
- 1
-
-
- rattlesnake
- model shipways
- (and 1 more)
-
Got a few more little things done in the last few days. My version of the Rattlesnake transom. Molding and the ship name to come in a little while. Like after I get the stern filler blocks made and installed. I need to see if I can do something else. Yes, I added planks across the face, reframed the windows and put the rest of the window panes in, and I put clear plastic behind the windows. Not sure if I'll paint the back side blue, black or paint the captain's cabin dark red and leave the windows to show the painted inside.

- 264 replies
-
- 2
-
-
- rattlesnake
- model shipways
- (and 1 more)
-
Very impressive build. Your work is outstanding.
-
Sport, Yes, I went all the way up and down the bulkheads all the way along the ship to check for proper alignment. Even tried a little bit of fitting the end of the plank into the rabbet and bent around bulkheads A/B and L/M; and tried to see how the keel rabbet worked with the transition to the blukheads. When I said I tried to bend the plank at least up to 4 bulkheads I was really focusing on the ends. In the middle I was able to, with pins, get up to 6 bulkheads "eyed". The whole process got kind of tedius after a while and I moved on to cutting out and sanding the transom to take a break from it all. Perhaps I was putting too much pressur on myself to get it right the very first time but I know how criticle this step is to getting a smooth flow of the hull. I so want this to look really good when I'm done and I would like to do as little hull sanding as possible.
-
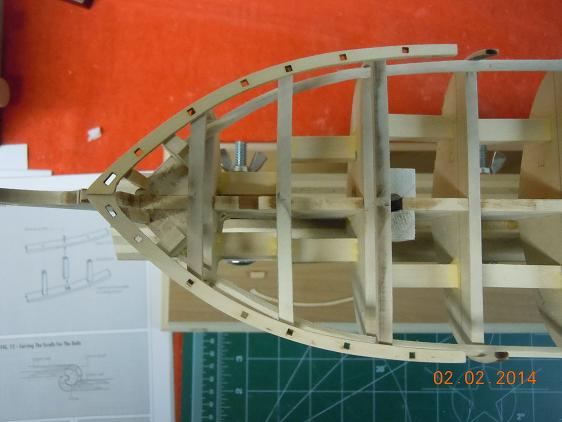
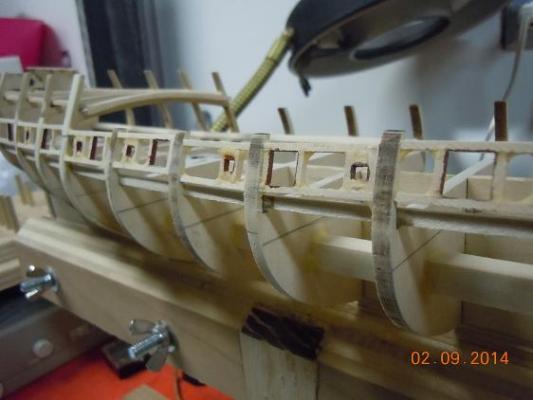
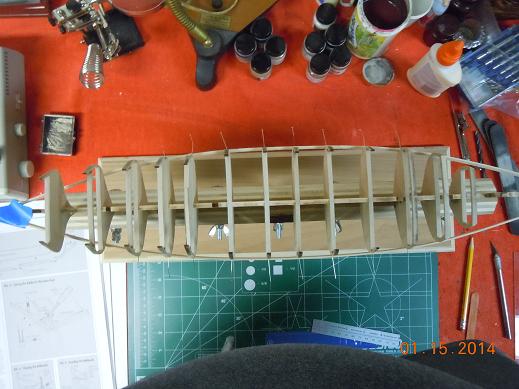
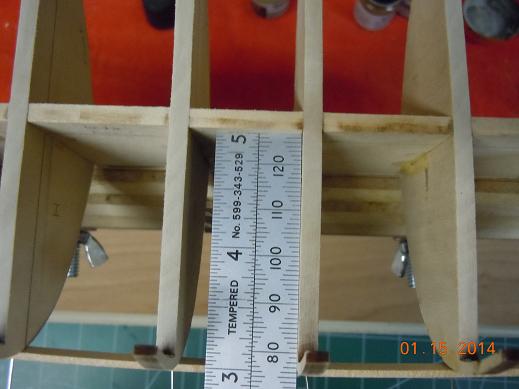
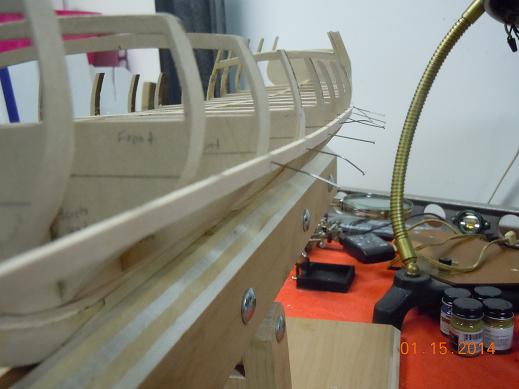
Okay, you guys tell me, with the battons in place, what do you think? A pic from the top with the battons pinned on. I did not pin the very back and front because I could not find rubber bands to pull the battons in. I did tape the very ends together though to show at least that I hope I got the angles of the beveling right. I did bend them with my hands and eyed the angles. Here I'm using a metal ruler to show that the bulkheads are perpendicular to the center keel. Close up of the battons on the port side. You can see where I did some shimming and beveling. Input please, did I get things right? Do I need to take additional pics for better judgment?
- 264 replies
-
- 1
-
-
- rattlesnake
- model shipways
- (and 1 more)
-
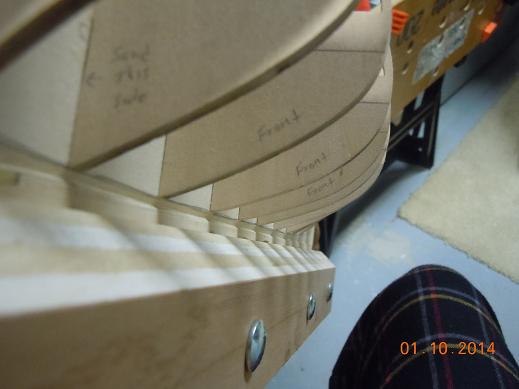
Okay, here the most recent update. The pics follow with explanation. Here I am busy getting all of the bulkheads to line up with the beard line. Pretty straight foward really. Sanding and shimming is easy enough when taking your time. Here is the standard shimming of bulkheads. Looks like I and J need a little work to get a smooth flow. When it comes to this step, take your time and make multple measures with your eyes.... looking for a smooth flow. No dips or bulges should be present. Again, make multiple measures. Measure between 2 bulk heads and then 3 and try to do 4 to see how things flow. I bought a sheet of 1/16 basswood and am cutting out slivers for the shims. Also, when it comes to beveling, I learned that you have to bevel the whole bulkhead from the back of the bulkhead to the front. Don't bevel from the middle of the bulkhead forward. The angle of the bevel just changes as you move forward or back. EFGH all look okay. No dips or bulges. Did some work with the bulkhead deck sanding to get things lined up right with the center keel. I suggest you do this before gluing the bulk heads in. Just keep the bulkheads in the slots that you are not sanding. I removed one at a time, did some sanding, put it back, look to see if it lined up. If not, I repeated the process until it did line up. Also, notice the steep angle of bulkhead A compared to B.
-
rhephner Thanks for the advise. I did keep the bulhead cut out pieces for whatever possible future use I could find for them. I've been told to support those top bulk head pieces by others as well. Seems to be a common theme. LOL On the list of things to do, but haven't gotten there yet.
-
If I may ask, what was the change you made and what kind of trouble did it cause you and how did you fix it? I don't remember seeing any comments on your log.
-
Quick question for the Rattlesnake construction crews regarding the Transform. While my bulkheads are busy drying I started some of the simple work and looked at the transform and looked at people's build logs. Although the instructions say to slightly bend / mold the transform it would appear that not everyone did. It would even appear that the drawings differ on this fact as well if you really look at them. So my question is this: Is it really necessary to bend the transform or is keeping it straight acceptable? That is, does keeping it straight impeed the tiller assembly at all?
-
Nice work on those. I'm not looking forward to that step. May be picking your brain when I get there. Say, later this year. LOL