scott larkins
-
Posts
489 -
Joined
-
Last visited
Content Type
Profiles
Forums
Gallery
Events
Everything posted by scott larkins
-
 Double and triple check that bulkhead fairing. Make sure to run on of the actual plank pieces over several bulkheads at once making sure you get contact and bending where appropriate. If not it will come back to haunt you. I hated that transom block too but not as much as the blocks below it. Carving those two pieces out of a solid block of wood should be cruel and unusal punishment regulatted by the Geneiva Convention. LOL I used the same blocks to support by bulkheads. Really makes a difference. Again, take your time with the bulkhead fairing. The Rattlesnake is my rookie build too and I got a bunch of reminders to triple check that fairing. Continue the good work.
 -
I love the tight in shot there. Almost feels like I'm actually on the mast looking down on a real ship. LOL
- 800 replies
-
- 2
-

-
- snake
- caldercraft
- (and 1 more)
-
Wow, that is some very good tiny work. It is obvious that you put a lot of time into that.
-
Wow, nice work. Stunning
-
Nice job on that little boat there. Nice detail inside.
-
Man, I'd hate to be stearing the ship when those cannons go off. Not a good place to be when tons of hot metal come rolling back from the recoil.
-
I'm going to enjoy watching this builid.
-
Brian, A word of warning for you here. You might want to tape those pieces of wood back in the forecastle and poop deck bulkheads. Lots of other Rattlesnake people have accidently snapped those frail second level cross-over pieces. I kept mine in until I had to remove them. And then I still ended up snapping one in the forecastle. Twice. Nothing is more frustrating then trying to be careful and suddently hearing that "SNAP". Oh that words that have left all of our mouths. Anyways, think about that. Also, as I was given the advice, you may also want to glue some very thin wood under those cross-over pieces to help support them. I used 1/32 thin bass wood sheeting I got at the hobby store.
-
Thanks Martin. Is that something I can find here or should I hit the Amazone web site?
-
Well keep up the good work. Looking forward to seeing how main deck turns out.
-
Interesting intrupretaton of the decking there. Must have been tough getting those planks in the center sanded so they tapper so uniformaly. Or are my eyes playing games on me with the photo? I like that sanding tool, think I'll call it a sanding boot. May make one myself when I get to this step. How did you keep the sand paper on the wood base?
-
Making good progress. I noticed that you have an older version of the ship. Can't speak to the accuracy of the laser cutting program. I think any of us who have baught the kit can tell you that you will run into mutliple engineering issues. I can only suggest that you review our logs to see what we came across so you have a heads up. Again, since your kit is older I can't say you'll have the same issues us newer kit builders had.
-
Look forward to your continued work.
-
All great work. I will continue to review our log to gain great insight on my work yet to come. Your ship looks wonderful. Words escape me really. Sorry to see the rudder took a cannon ball there. LOL. I know when you fix it no one will know. Thanks for showing us the way.
- 104 replies
-
- 1
-
-
- rattlesnake
- mamoli
- (and 1 more)
-
Interesting work around. Can't wait to see what your genious finishes turning out.
-
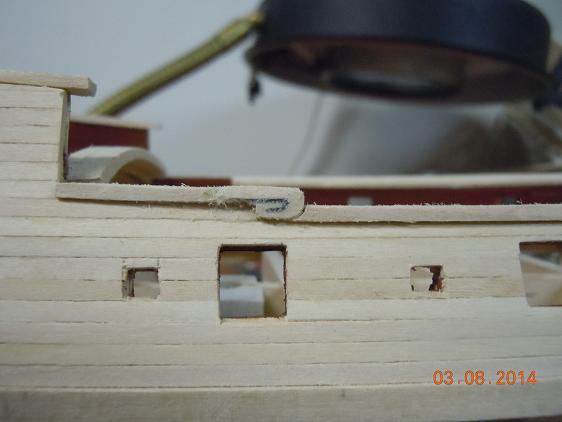
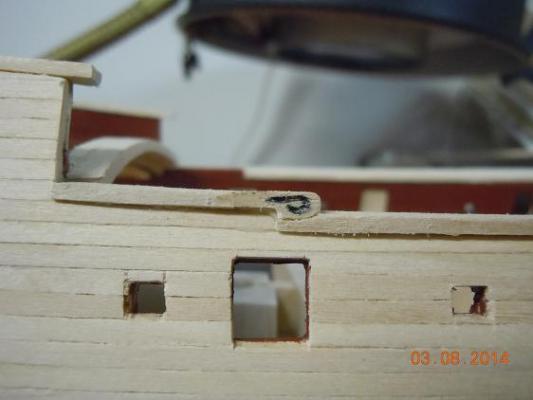
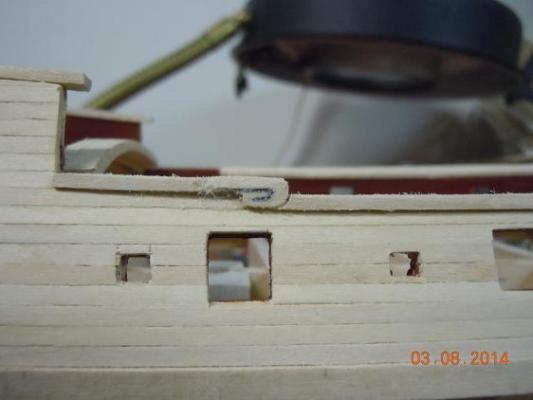
Trying my hand at some tiny work here. Thought I'd get the wall caps on and work on that fancy elevation change scrolling work. I guess it's not too bad. Took several attempts to figure out just how to work this. My drummel tool just couldn't do this. I actually ended up using my exacto knife, a pair of tweezers and a magnifying glass to "etch" out the swirl and I used a mechanical pencil to highlight what I did. Unfortunetely I don't think you'll see this when I actually end up painting that rail Oh well. I'll know it's there. Unless someone out there has a better idea. Guess perhaps I'll finish etching the top rail back to the planked wall. First unsatisfactory attempt. Like so many people have said, what is nice about theses wood models is that you can cut out a piece and start again. So I did. Here was my fourth attempt at making this decorative piece. The first three attempts produced that first pic. The pic below was my latest and I think most satisfying. I think the bottome of the rail cap flows better with this version. I used thicker wood this time. Took this pic before I finished the sanding. In case you noticed some fuzzy wood there. I'm waiting for the glue to dry before I mess that whole thing up by sanding too early. Must remember to take my time.
- 264 replies
-
- 1
-
-
- rattlesnake
- model shipways
- (and 1 more)
-
Nice first step
-
Brian, Welcome aboard the Rattlesnake group. You will find a large number of us are building this ship. Some of us are very experienced and some of us are using this ship as our first build. You will have a great number of logs to consult as you build and have questions.
-
Looking good. Going to do anything below the water line?
-
All really great work. I really like what you did with the top of the rudder post.
-
Well keep at it. With your skills I'm sure you'll get it done.
-
Thanks David and Martin. Aren't we our own worst critic though? But since this is a build log with the intent of teaching others the good, and bad points, of a build I had to mention it. Just like I mentioned the 1/16 inch difference in height of my wale line board. I thought, by my eyes, that is looked good. Until I starting putting the planks up the side. I feel lucky though that I got the two sides exactly one board off. Couldn't have planned that flub up any better. LOL
- 264 replies
-
- 1
-
-
- rattlesnake
- model shipways
- (and 1 more)