scott larkins
-
Posts
489 -
Joined
-
Last visited
Content Type
Profiles
Forums
Gallery
Events
Everything posted by scott larkins
-
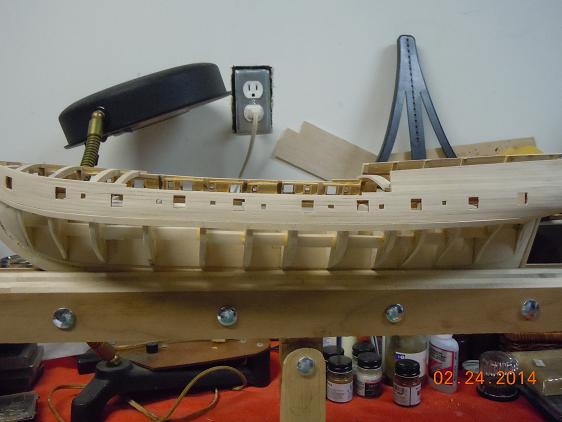
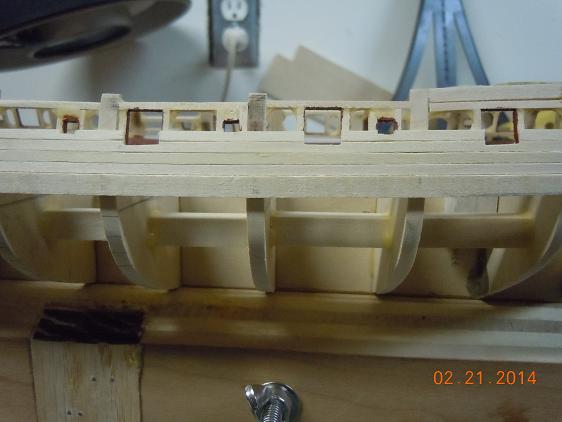
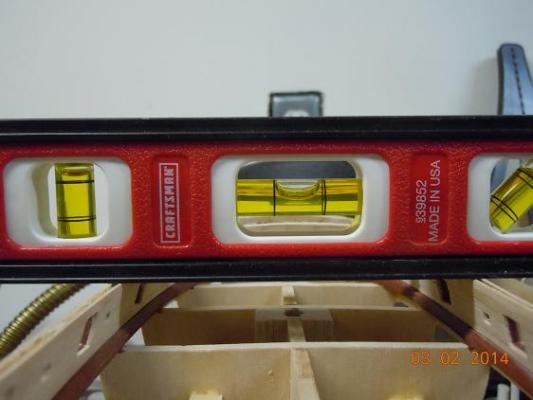
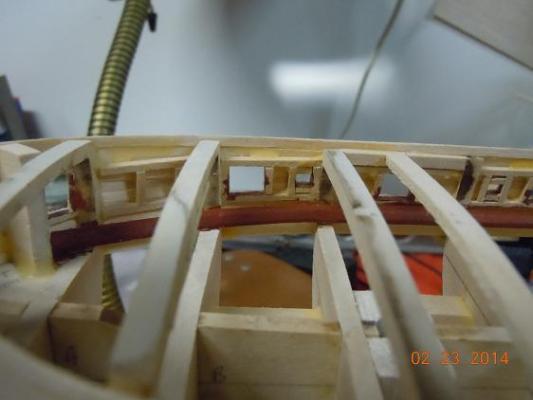
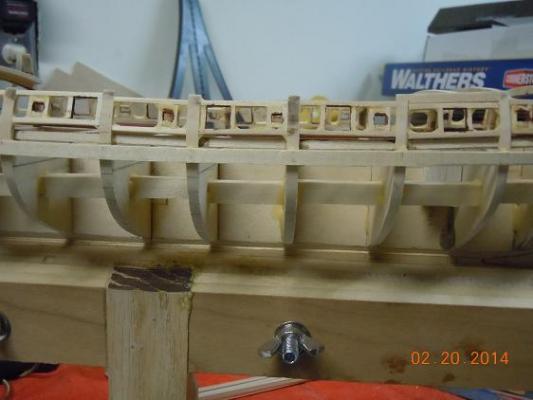
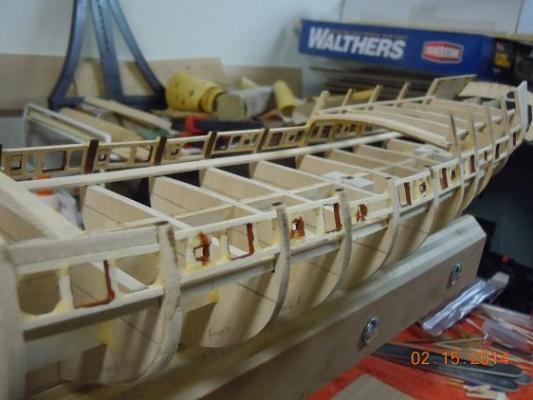
 Okay, got some serious work done during the past week or so. Finished the inside gunwals (SP?) No more excuses for not working on the planking now. Man! Not too bad I think. I didn't plank further back as I'm not showing the cabins etc. The bulkhead will go in so I planked just past that for "flow through" effect. Well the level says it is level but if you look really close it appears that the right side is taller. Or my eyes are uneven? LOL The plank count is correct, the level is correct but yet I can't help but think it isn't. Well, I guess I'll leave it alone. Not going to argue it at this point. The front part is level at the top of the rails. Either I'm better than I thought at building these things or just luckier than usual. Considering this is my first real build of a wood model with this level of difficulty I'll go with lucky. LOL And if you were wondering, yes, the forecastle is level too. Wow. Really don't know what more advice to give here from the few previous posts on this step. Make sure the bulkhead pieces and the cannon and oar frames are level on the inside and outside of the bulkheads before starting this so there is no gap between the frames and planks. Eric reminded me of that. Kinda important. Measure twice, cut once, Keep the planks tight to one another when gluing. I found cloths pins worked well when gluing these pieces. I'll go back to the metal paper clips for the actual planking. To cut the gun ports, as I've said, I used a small hack saw blade with my fingers and followed up with an exacto knife. I used small jewels files for filing the ports smooth after cutting. Hope this all helps.

- 264 replies
-
- 3
-

-
- rattlesnake
- model shipways
- (and 1 more)
-
Keep it going when you can man. No rush
-
The Syren is a nice looking model. I look forward to watching your log.
-
I hear what you're saying on critiqueing your own work. I too have high expectations for myself and cringe when I put a couple pieces of wook on only to notice, after the glue has dried that there is a small gap or valley between two boards because the board edge was not perfectly cut. I have had to say, oh well, it is what it is, I can't see light through the gap, move on. As so many people here have told me, have fun with it. I don't make my livelyhood out of making these. Not that I'm slappying wood on any which way, just not sweating the small stuff I have no control over. Keep building, it's looking good.
-
That's nice sail work there. I like it.
-
Gil, Yes I do think they look good and I can see why they would be on the rebuild. I'm a safety engineer by trade so I understand having them on today's rebuilt ships. I ask the question because I cannot imagine that the British navy would be so far forward thinking as to protect their marines that way. Not to slam the British navy, I just ask considering the era that these ships sailed. I question what their real concern was with people's safety back then. That's all. I wouldn't remove them based on my quetion. I like the look.
-
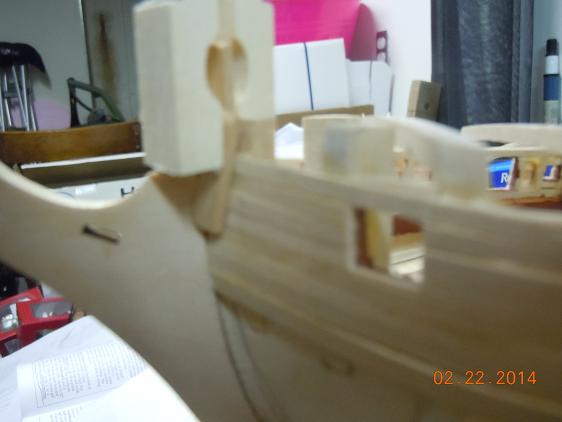
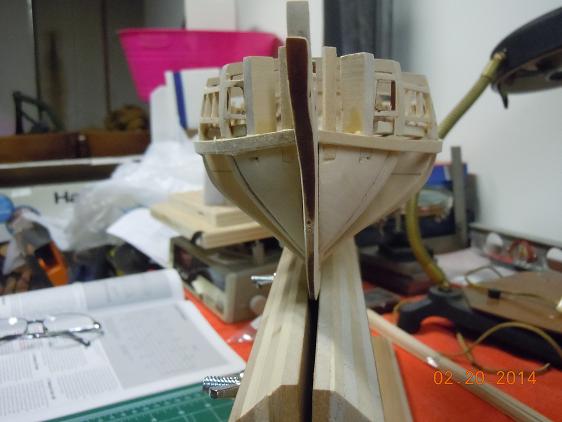
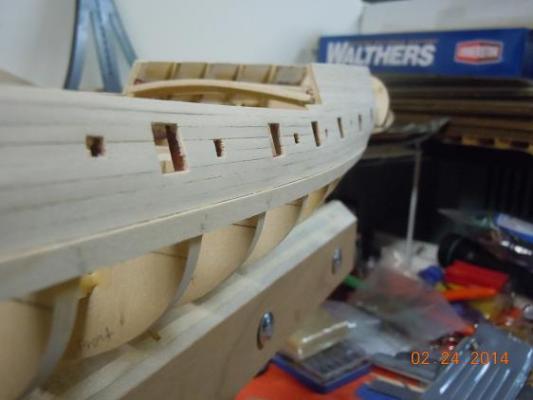
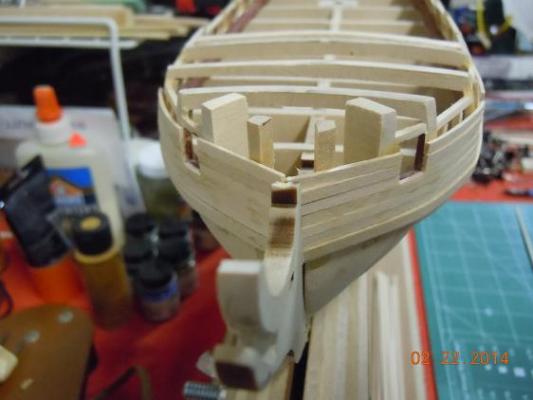
Got the outside sides done. Moving on to the insides next. Here was my solution to making sure the bow pieces would stay lined up with the lower pieces. I used two pieces of wood on both sides and the cloths clip forced the wall plank to stay in line with the lower pieces that were already clued to the knights head. Oops, Did I end up doing this or the manufacturer? My plank count was correct yet I ended up about half a plank above the forecastle bulkheads. Perhaps the wale plank is too high. Well, no biggy. It was just the back ones (B & C) so I shimmed them up so all would be level. Easy fix. Got the sides done and sanded. I used a 320 grit paper at first and then finished it with a 600 grit paper. Make sure to sand with the grain, that is, along the length of the ship. Even in the stern by the transom. I had to very carefully pull the paper out of that corner. More of the above. I took the ship out of the holder and held onto the whole ship as I sanded, cleaned with a larger model paint brush. I had to make sure not to sand the wale piece, there is supposed to be a "shelf" there. Oh almost forgot. Messed up the back pretty bad. About 4 planks up the side from the wale, at the back behind the last gun port, I found out that my wale plank, back at the stern, were not actually at the same height. My eyes said they looked the same. So the starboard side actually has one more plank on the forecastle section than the port side. I don't think it's really going to mess up the molding pieces though. I don't think if I said anything anyone would notice. But I know. After sanding the top of the rails so they were level at the forecastle, I think it all leveled out. Anyways, word of warning, find a way to double check the wale height before gluing.


- 264 replies
-
- 4
-
-
- rattlesnake
- model shipways
- (and 1 more)
-
As I watch thhis log I continue to be impressed. Very well done.
-
Nice addition there. Was that something found on the actual ship when it was in service many eon ago?
-
I can see where that would be a little tough. Making good progress though.
- 55 replies
-
- 1
-
-
- ships boat
- model shipways
- (and 1 more)
-
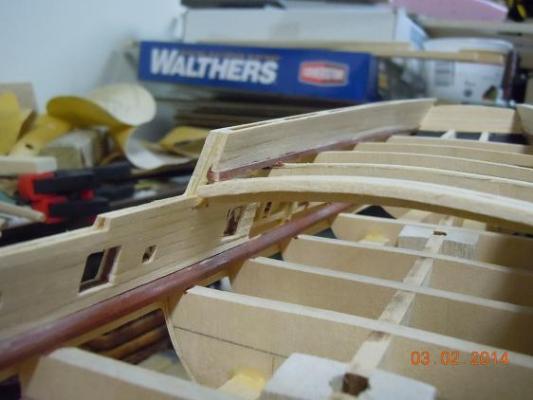
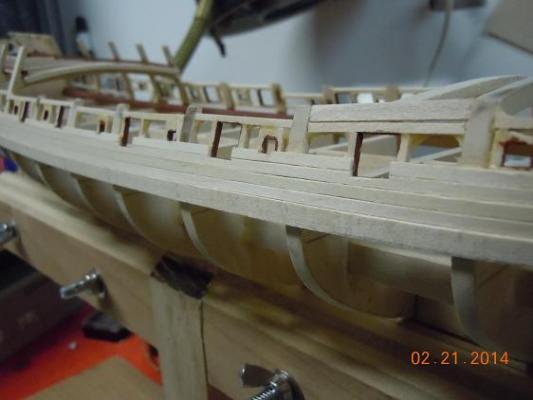
On to the rails now. In actuallity, the rails are pretty easy. I made sure not to use too much glue and what squeezed out as I pushed the strips together I made sure to wipe it away quickly. One thing I did for the bow was to use another piece of wood over the bow section with a cloths pin holding it in tight until the wood held. It got a tad tricky back by the stern. The lower wood pieces had to go from verticle to almost horizontal. But they did come back to verticle as I worked my way back up. After putting about four rows on I started cutting out the cannon and row ports. As I moved up two more rows I once again cut out the ports. I had to do a little touch up painting as I knicked or filed off some of the color of the ports. Couldn't really help it really. As I got to the sixth row I ran out of the stem piece to use as a glue spot. Unfotunetley the instructions don't tell you how to manage from here up. Guessing I'll use something similar as before with a temporary piece of wood as I move up, making sure that the planks are glued together between seams. Unless someone out there would like to share some words of wisdom.
- 264 replies
-
- 1
-
-
- rattlesnake
- model shipways
- (and 1 more)
-
That's going to be a nice touch to the build.
-
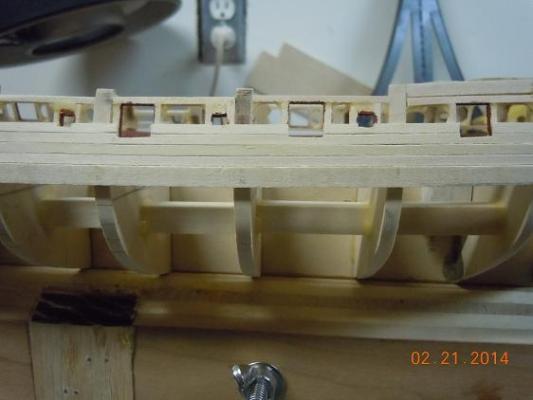
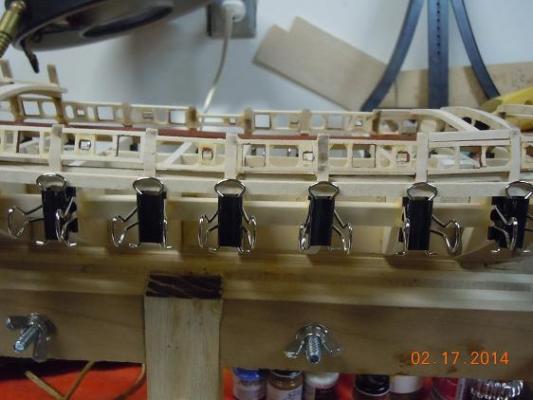
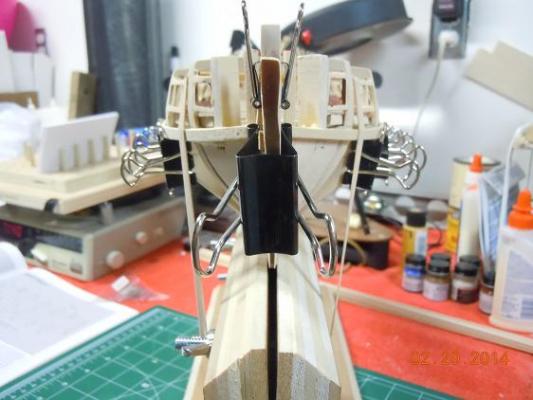
Next steps have been started. Did a little sanding on the bulkheads, both inside and out and got the Wale plank on. First I took some time to really eyeball the bulkhead smoothness from top to bottom and made sure that those rail pieces are the proper thickness as per the plans. Don't want any gaps in the port holes when the two sides of the rails get put on. I believe JPett mentioned something to that effect in another RS post. Zev's maybe? I also took a little extra time to bend a planking piece on the bulkheads again for fairness. Did a little sanding and touching to "feel" for smoothness and flow. I find that sometimes your hands can feel what your eyes cannot see. Anyways. I think I'll start at the top and get the rail planking done first. Seems easier and would allow me to break in my skills for planking later. Here are some pics. Here's a neat trick I saw from another builder here on MSW for holding planks on during glueing. Easy to buy these clips and modify them and leaves no holes in the wood. Thus no worry about splitting the narrow planks. I have two clips on the stem because I have two pieces of wood laying over the left side piece to keep it in place and at the correct level. And here I go, got the wale plank/ strike done. I'm told this is very key for the next steps so I hope it passes the test of all of you out there. Did a little tapering on the bow as the instructions suggested. I want to thank Eric for his help on this. As suggested in the planking for beginners pdf from this site, I started the bow taper several bulkheads back so it would be gradual.

- 264 replies
-
- 2
-
-
- rattlesnake
- model shipways
- (and 1 more)
-
Looking really nice so far.
-
Looking good. Keep working at it.
-
That came out great. I can only hope my RS comes out that good.
-
It's looking nice so far. Can't wait to see the finished product.
- 55 replies
-
- 1
-
-
- ships boat
- model shipways
- (and 1 more)
-
I'll look for that. Is it here on this site? I did pull up one thick article on planking from this site and its instructions on planking are quite different than the rattlesnake's plans. Where the snake's plans show three sections of strakes, the article describes 4 sections plus some left over. Plus a lot of drawing on paper, or card paper and transferring to a chart. Not sure whether to go with the article or the plans; or simply go with the flow of the ship and more or less wing it. Suggestions? I really don't want to make this more difficult than it has to be.
-
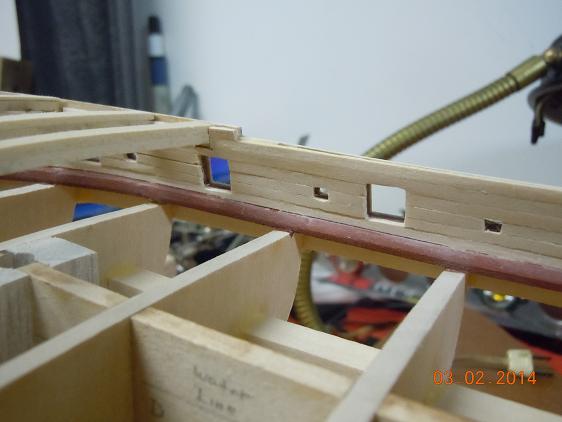
Okay, the last side of cannon and oar ports are done. I'm just going to do a little sanding on the sides and do an eye ball of the lines of both sides to make sure it all flows well from front to back. Then..... da da daaaaaaa, the planking. Looks like it is going to be a while for my next post. I have a lot of reading to do from both the instructions and other planking instructions found on this site. I can only hope my planking comes out as well as some of the others I've seen here. Perhaps for those coming behind me, if I was going to do this again, knowing that I was not going to put actual cannons in the officers quarters, that is the last three cannons, I would not have taken the time to put in the cannon framing and cut out the gunwal planking later. My advice to you, if you are not putting in any cannons back there, don't place and cut all of that stuff out. Don't waste the time. You are just going to glue the cannon door on in the closed position anyways.
- 264 replies
-
- 1
-
-
- rattlesnake
- model shipways
- (and 1 more)
-
You are going to have to take it easy up front there. I actually undid those middle bulkheads so I could get the angle on those front 4. It's tough. Remember, you are going to be soaking, steaming and/or heating that wood up there to help the bend. The lines look pretty good though. As to be expected, shimming will need to be done. Keep up the good work though and don't obsess over the little things.
-
Nice work so far. Can't wait to see how she comes out when she's painted.
-
Had to go back to page 6 before I got to see my first pic of your ship. Wow!, Very nice. Sharp looking ship.
-
Bob, Nice work so far. Inspiring. I think if I build one more after my Rattlesnake, the Niagra might be it. I'd like to build a ship with some positive American history. Now I see I have at least one log to look into.
-
Nice to see you back on the log. Yes, you are correct, maintaining a good log does take time especially when you have to resize each pic so you can post it on this site. But all of us who are behind you in the build process appreciate the effort. Nice work. Happy Birthday Bounce!
- 104 replies
-
- 1
-
-
- rattlesnake
- mamoli
- (and 1 more)
-
dgbot and Mike. Thanks! After I finish the next side I'll take a serious step in slowing down. I've got a few papers to read on planking and a few build logs to review. I'm really nervous about the next step. I really hate wasting the wood from the kit and have no likeness for multiple repeated mistakes. I'm waiting to see how many I made up to this point when the planking comes up. Keep working on it Mike. You'll get here. Keep reviewing those logs. I do, almost daily.
- 264 replies
-
- 2
-
-
- rattlesnake
- model shipways
- (and 1 more)