


Beef Wellington
-
Posts
2,245 -
Joined
-
Last visited
Content Type
Profiles
Forums
Gallery
Events
Posts posted by Beef Wellington
-
-
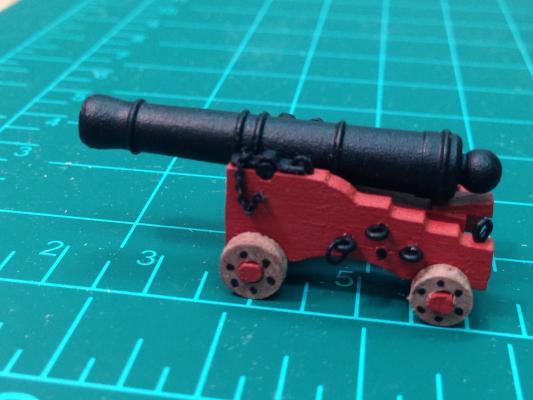
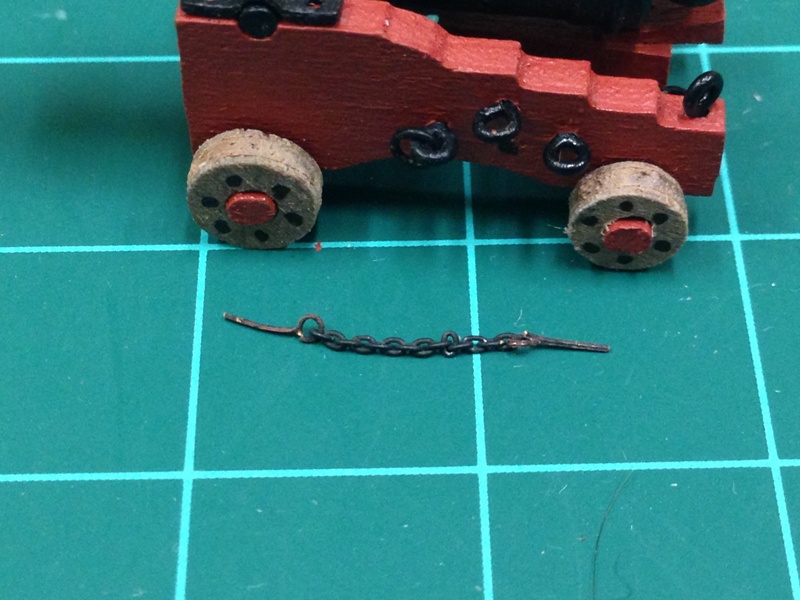
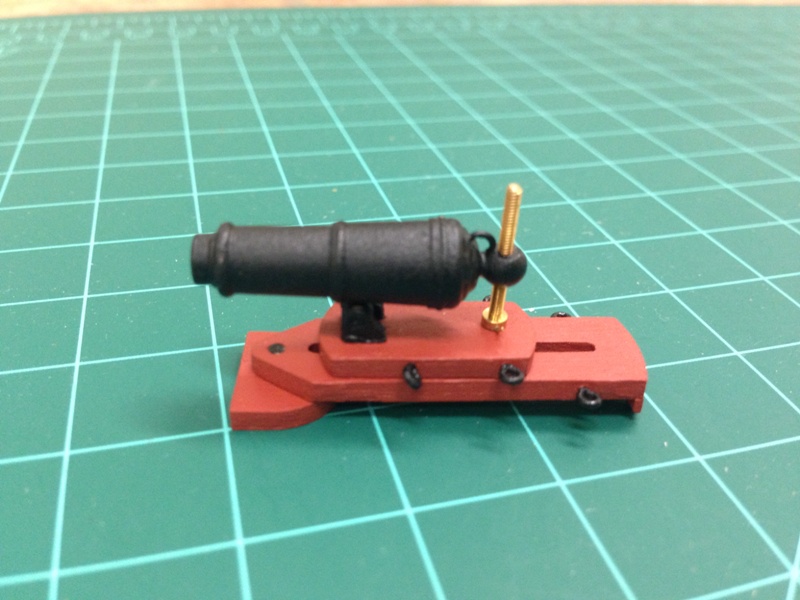
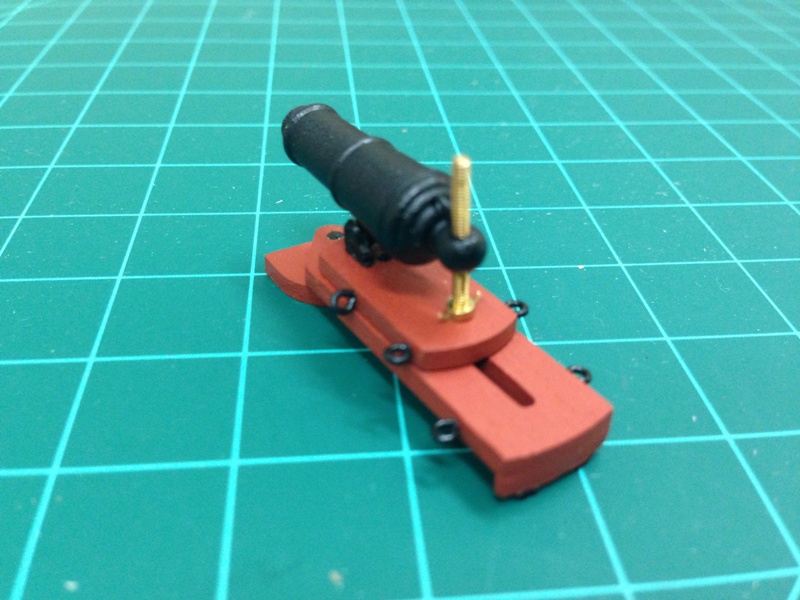
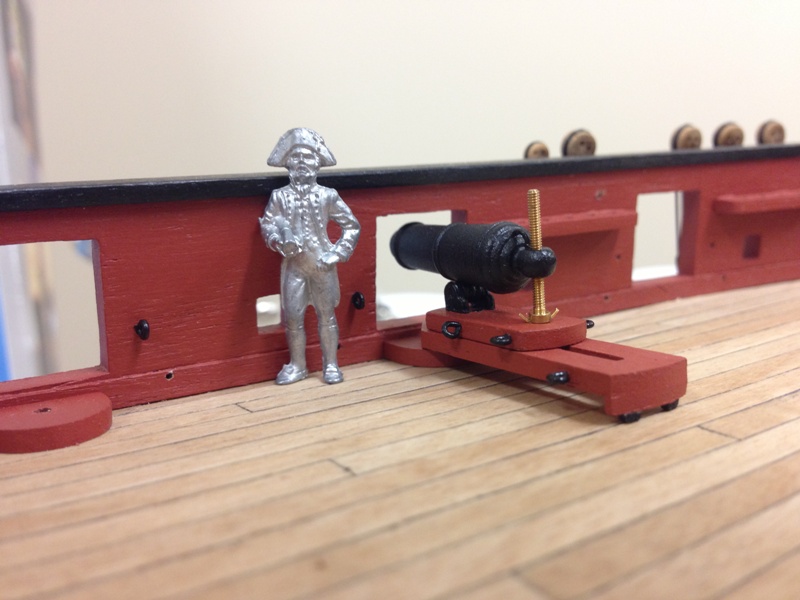
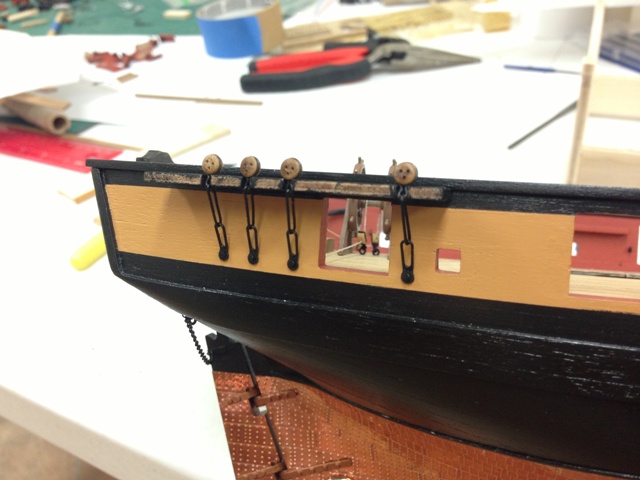
Worked on some final tuning of the cannon, unfortunately it took me pretty much an entire evening to do a couple of 'small' things, adding the chains for the cotter pin, and the hinge for the cap square. I cut each chain to length after having blackened it and attached some Caldercraft 2mm photo etch eyebolts at each end, drilled in the appropriate place and attached. The hinge was made from wire bent to shape into two pre-drilled holes. Think this looks much better than the suggested flat head pins to secure the cap square per the instructions. Thanks once again to B.E. for the pointers. Must confess I was very happy with the result and some useful skills learned, even though there were many frustrating moments.
I still have the flintlock to install but I'll do that once everything is in place and rigged.

- Blue Ensign, Ferit, dafi and 2 others
-
 5
5
-
Thanks for checking in Norman, appreciate the support.
-
Absolutely agree with Norman, take a look at the log of various Cruizer class 'battles' that DFellingham has been putting together, its a great read, you can see that there were lots of different configurations - seems some did have the 24lb carronades as well.
-
You got it Adrieke...back to you
-
Wow...made my day! Anyway, I apologize if this is too easy for all you pros out there.

-
OK...next up HMS Brilliant

-
HMS Battleaxe, now BNS Rademaker?
-
Its one of the Type 22 Frigates (batch 1), given there is not much to differentiate them externally I'll start with HMS Broadsword.
-
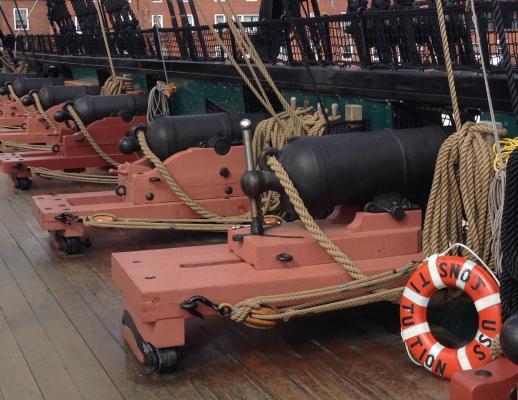
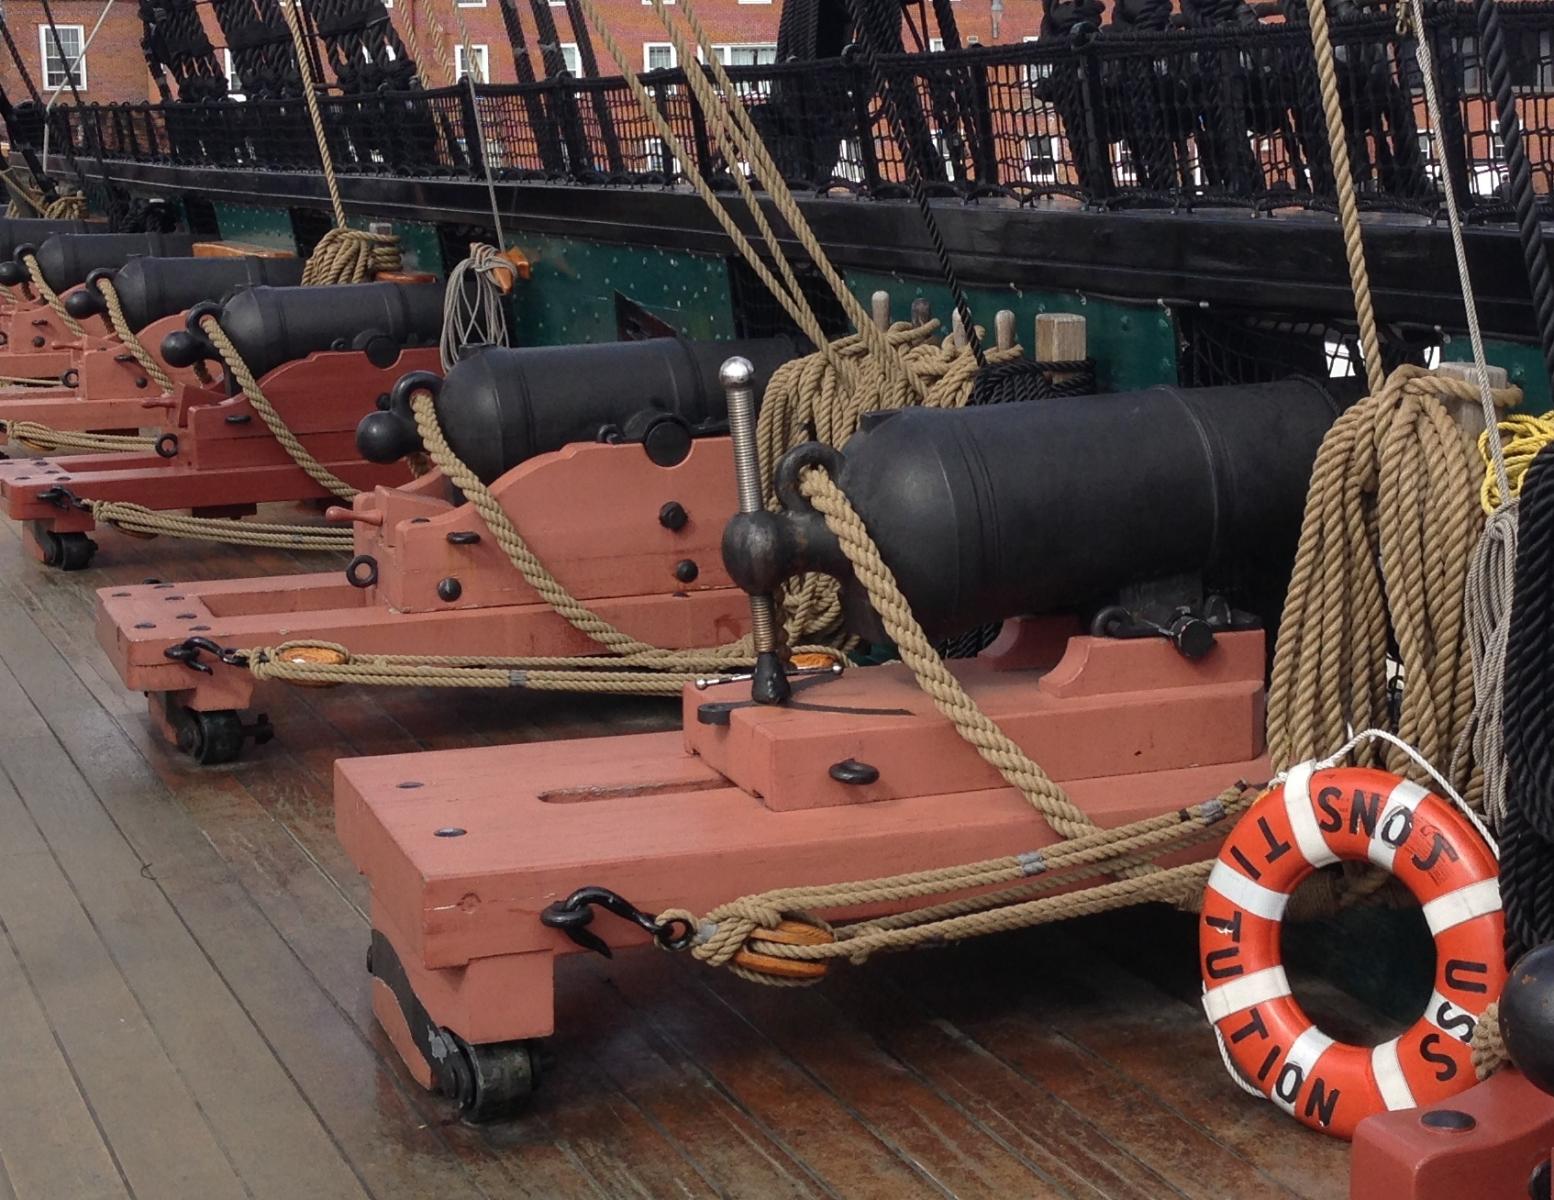
Andy - this is a something I plan to keep an eye out for when I head back to the UK in a few weeks with my son to do (amongst other things) the Portsmouth historic dockyard. I don't think any of the screws would be ferrous for because there is no way that these would be useable with rusting, brass (or some similar alloy) would more likely be used because its self lubricating - I would hazard a guess that the threads in the carronade cascable would also be similar metal by way of some sort of bushing. The Trincomalee carronade clearly shows a 'brass colour'. I also found the following photo from my last visit to Constitution, most of them use the wedge elevation, but there is one example where there is a screw, and is brass (or similar), just not polished. Of course, clearly I'm not an authoritative source and just basing my opinion on examples I can find
Stergios - you're correct, the plan is still to use two 9lb'ers at the two foremost gunports, the rest will be the carronades.
-
BE, Sjors, cheers!
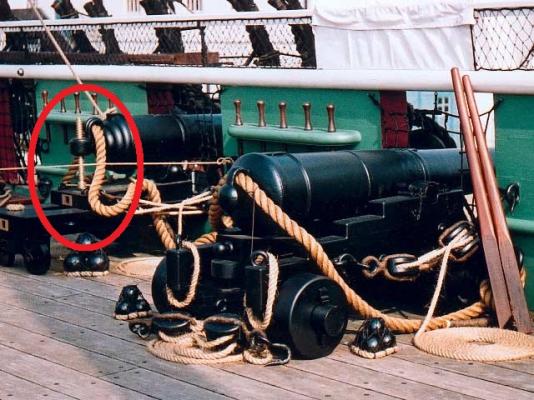
Ferit/Hamilton - thanks for kind words and taking time to help me think it through. Some commentary from DFellingham who has been doing a lot of reading on Cruiser class history helped my thinking - it seems that the elevation screws were one of those things that certain captains would have kept 'bright', requiring constant polishing, which is apparently noted in some of the ships logs - I wonder if there is an argument that it was considered 'maintenance of the mechanism'. There is some contemporary evidence in the modern photo below as well. Its all personal taste really, but something on the deck that's not black or red might be a refreshing touch.
http://modelshipworld.com/uploads/monthly_05_2013/post-891-0-48935400-1368816392_thumb.jpg
-
Ferit, wonderful work, haven't checked your log for a bit and all of a sudden there are 3 pages of updates! Love the look of the chains and shrouds, very clean and precise work indeed.
-
Sjors, ZyXuz - appreciate your interest and support
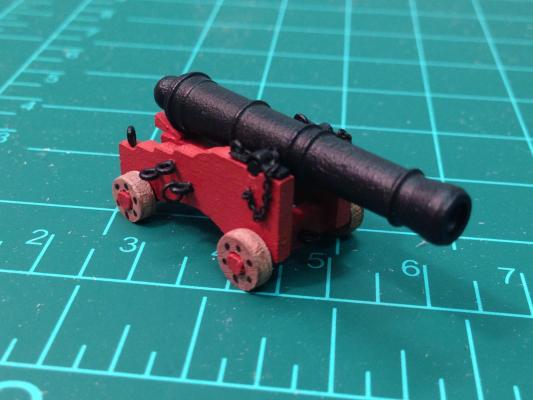
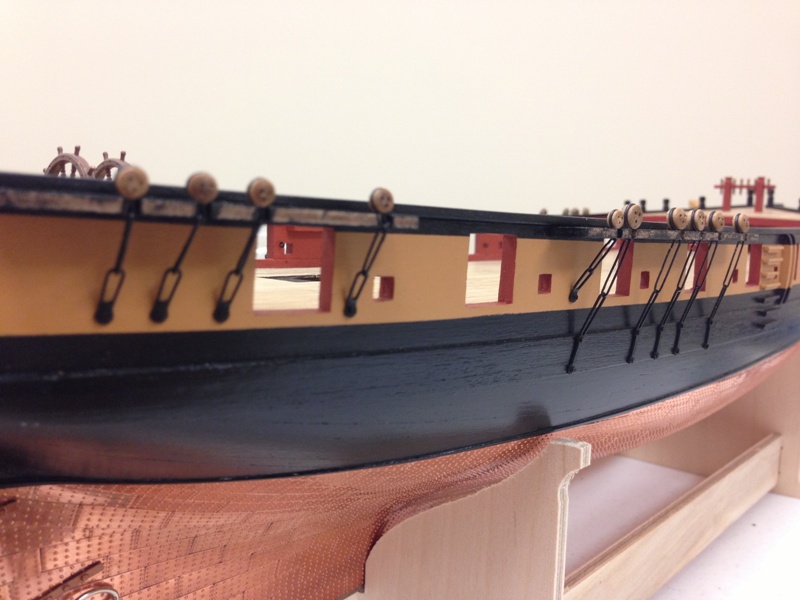
The carronade assembly line is in high gear, and have made some tweaks to my guinea pig carronade (v3) which I hope to replicate, apologize for yet more carronade pics...
1 - breaching rope hole made using 20 gauge wire - not called for in instructions but seems pretty ubiquitous
2 - added training tackle eyebolts which are also not identified in the instructions - although I will not rig training tackles as I think it could be too 'busy'
3 - added some wheels to the trunnion which seems more authentic, and it also help align the angle of the base with the camber of the deck. I thought about trying to use the white metal parts supplied but they proved to be too high. In the end, I used some small slices of the supplied 2mm dowel and cut in half for the wheels
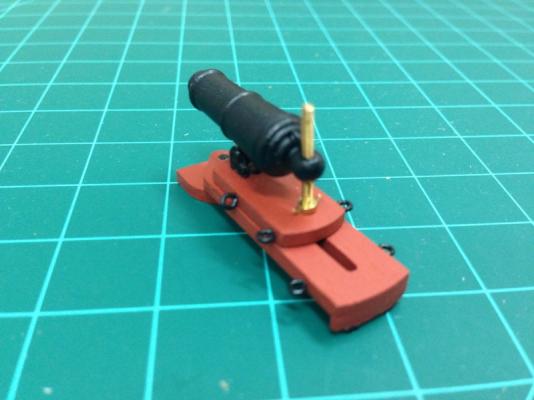
4 - handles added to the elevation screw base - I used a some of the small brass etch eyebolts and cut the head off, seams a nice match, the Caldercraft supplied wire is steel colour. Decided to leave the elevation screw brass coloured, should mellow a little with age
If anyone has any other suggested improvements would love to hear them.


-
Hamilton - appreciate the support and kind comment, your Blandford is looking great as well!
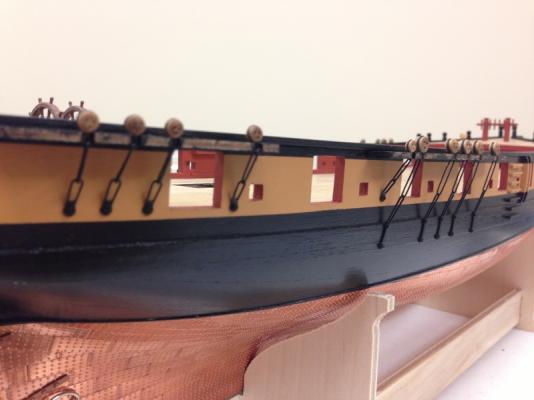
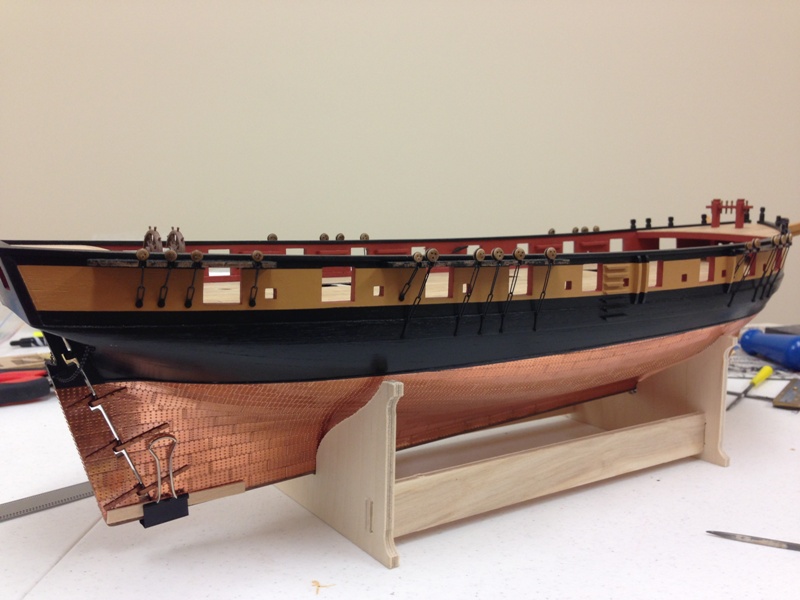
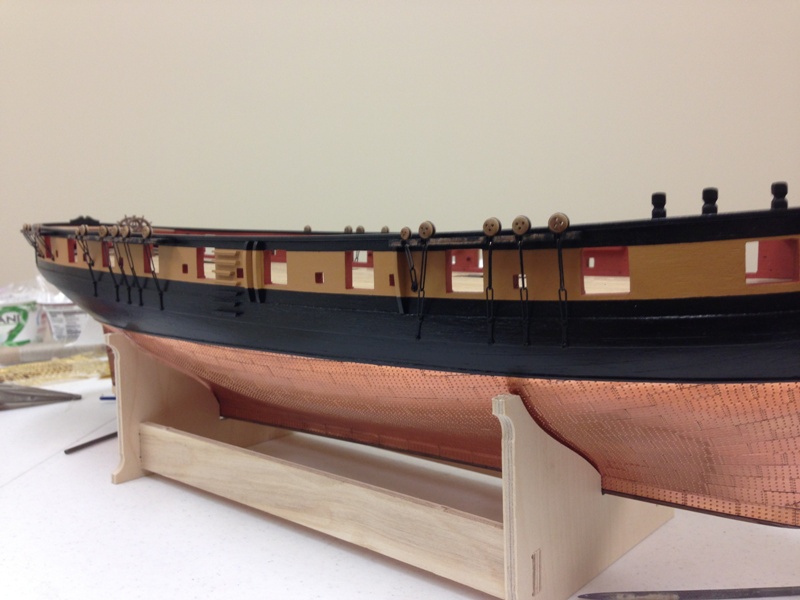
Finally managed to get a good few hours in today and managed to get the channels and chains close to completion, only some final sanding and another coat of paint needed.
As I've mentioned, I was a little wary of the deadeye strops coming off the chains when I get to rig the shrouds. To hopefully make this a bit more secure I used some epoxy in the channel slots.
Once all done, the instructions say to use 1.5x1.5mm strip to close the channels, only problem is that the channels are 2mm thick, so I decided to cut my own to be 2x1.5mm. Think it looks more in keeping.
Onto something else...

-
Hi Juergen,
You are right and have a very kind manner in your notice...

I don't think that the shrouds were white...
But I decided to left them as the kit had supplied...
I think my decision is wrong but I don't want another effort to buy and replace the ropes, I am an obsessive man and sometimes this temper fatigues me and sometimes to break this temper makes me feel happy... that situation is one of them...
I haven't done this myself (yet) but I believe you can darken the shrouds with 'India Ink'. I'm sure others with more experience can provide more insight, but would seem to be an straightforward task. She is looking wonderful, and I'm sure whatever you decide it will look great.
-
Ferit - the front port under the deck is a bridleport and would not have had a cannon mounted there. The front and aft "decks" are really just platforms as they are probably about half height of a typical deck. The original design did not have them, and I suspect they were added to provide some additional protection and functionality. I can't really comment on the plans with 100% confidence, but comparing them to the drafts on the NMM site (HMS Cruizer and HMS Bellette/Gannet are available) they seem pretty much in line. Where the plans are a little deficient is in the detailing (ladder size, chain placement) but I none of these present any huge problem, just a bit of thinking. Once I realized that the plans were not 100% accurate I felt much better just working the pieces in a way that felt like it made sense.
Andy - I'm sure you're right, my main struggle has been with the closure of the deadeyes metal strops on the chain as these tend to pop out if forced (the gap is right at the bottom of the strop, soldering just didn't work for me). It took a lot of time to make the chains so they were the correct length, the result is that there is a variable amount of play in them. My main challenge is I never seem to get more than 15mins at a time to work on her so getting 'into the zone' is a challenge. Your Pegasus continues to look better and better by the way
- Ferit and realworkingsailor
-
2
-
Its only a small update, but its the only one I have. I seem to have got bogged down in the chains, not sure whether I'm obsessing too much or just not getting enough time in one sitting to get in the right frame of reference and get it done because these are proving really fiddly. To try to get the right line of the chains I used the plans to estimate the heights of the various stays/shrouds and marked on tape on the hull. One item I may have miscalculated, I realized a little late that perhaps the deadeyes should slope inwards a little more rather than sitting almost vertical on the channels. I'm hoping this won't be too obvious as I'm not sure I have the appetite to change, its hard to see on photos of other builds. Starboard side done, larboard about 50%.
Photos are pretty self explanatory.


-
Looking very nice Stergios. I'll post some photos of the carronades when I get them finished if they can be in anyway helpful. The captain will not have much room back there when you get everything rigged and mounted
-
Happy birthday Sjors!
-
do you think I need to adjust mine so that the bow grating sits further back??
Pete - I'd suggest dryfitting with the "Bow Upper Railing" (Part 58) to determine the fitting, these need a little shaping/sizing. Given these need to meet at the bow, fit the sides of the grating and join the hull correctly I used these to determine the placement of the grating first as this seemed most important, and once that was done then figured out the gammoning slot placement. From memory, what you are showing looks similar to what mine did, I may have taken a sliver off of the rear of the grating for fine tuning but no major shaping.
I did adjust the height of the Bow Head Rails as described in my log to get all the various alignments where I felt they should go and to allow the bowsprit to fit.
-
Hi Jason , please could you explain the adjustment you talk about above. Is it simply a matter of enlarging the slots or do you have the trim the vertical supporting parts to allow the bowsprit to fit?
I think this picture at link below best illustrates it and attempts to explain. I found the slots needed to be enlarged to the rear only , don't think any adjustment is needed to the other parts. Hope this helps.
-
Richard, Hamilton - thanks for the kind words
Ferit - You're far too kind! There are a number of items that of course I see and wished I could have gone back to redo, but I'm happy with the learning experience. I love a quote that I saw on someone else's log "Thats what first builds are all about, second builds"
Anja, David, ZyXuz, Timmo, Sjors, Andy, Jim - thanks for the birthday wishes! When I saw all the comments I was thinking that somehow there must have been a lot of progress on my ship while I was sleeping...but sadly no
I've not been able to get much time in the shipyard recently, but I can feel her calling out to me...too many outside projects and nice weather.Jim - looking forward to see you moving forward again!
-
HMS Windsor Castle?
-
-
David, once again a very interesting insight, fascinating research. Maybe for an upcoming episode you could cover a battle where the Cruizer class is victorious, I already know where the HMS Penguin story heads.... :-). Thanks for posting.


HMS Snake by Beef Wellington - FINISHED - Caldercraft - Scale 1: 64 - First wooden ship build
in - Kit build logs for subjects built from 1751 - 1800
Posted
Don't really intend my log to become a historical treatise on carronades, but I thought I'd pass this on given that the subject seems to have generated so much discussion/interest. I had asked the question to the HMS Trincomalee Trust, here is the reply. On another side note, it was very interesting that the original manufacturer of the Carronades (Carron company originally in Selkirk) also made the famous British red telephone boxes and now makes kitchen sinks.
Hello Jason
Thanks for your enquiry about our carronades. As far as we know, they are either ‘of the ship’ or of the period and we consider them to be historically accurate. To be honest, I’m not entirely sure what metal the elevation screws are made of. They are ‘brass’ in appearance but this metal inevitably would be too soft to withstand the regular screw action. Therefore I must conclude that they are made of a high brass content alloy – one which would withstand maritime conditions and also be hard enough to withstand the screw action. For a definitive specification, it would be worth contacting the makers – Carron Phoenix in Manchester, England – www.carron.com – tel: 01324 638321
Hope that helps
Best wishes,
David McKnight
General Manager