
Supplies of the Ship Modeler's Handbook are running out. Get your copy NOW before they are gone! Click on photo to order.
×


Beef Wellington
-
Posts
2,246 -
Joined
-
Last visited
Reputation Activity
-

 Beef Wellington reacted to Ferit in HMS Snake by Beef Wellington - FINISHED - Caldercraft - Scale 1: 64 - First wooden ship build
Hi Jason,
Nice, precise, clean as usual...
"If anyone has any other suggested improvements would love to hear them." My suggestion after this sentence (my apologizes):
If you decided to leave the elevation screw brass coloured, should mellow a little with age; may the area which is out of the working section of the screw through the carronade be more darker because these bottom and top areas remain unrubbed?
-
Beef Wellington reacted to Blue Ensign in HMS Snake by Beef Wellington - FINISHED - Caldercraft - Scale 1: 64 - First wooden ship build
Very nice job on the carronade Jason
B.E.
-
 Beef Wellington got a reaction from dafi in HMS Snake by Beef Wellington - FINISHED - Caldercraft - Scale 1: 64 - First wooden ship build
Worked on some final tuning of the cannon, unfortunately it took me pretty much an entire evening to do a couple of 'small' things, adding the chains for the cotter pin, and the hinge for the cap square. I cut each chain to length after having blackened it and attached some Caldercraft 2mm photo etch eyebolts at each end, drilled in the appropriate place and attached. The hinge was made from wire bent to shape into two pre-drilled holes. Think this looks much better than the suggested flat head pins to secure the cap square per the instructions. Thanks once again to B.E. for the pointers. Must confess I was very happy with the result and some useful skills learned, even though there were many frustrating moments.
I still have the flintlock to install but I'll do that once everything is in place and rigged.
-
 Beef Wellington got a reaction from hamilton in HMS Snake by Beef Wellington - FINISHED - Caldercraft - Scale 1: 64 - First wooden ship build
BE, Sjors, cheers!
Ferit/Hamilton - thanks for kind words and taking time to help me think it through. Some commentary from DFellingham who has been doing a lot of reading on Cruiser class history helped my thinking - it seems that the elevation screws were one of those things that certain captains would have kept 'bright', requiring constant polishing, which is apparently noted in some of the ships logs - I wonder if there is an argument that it was considered 'maintenance of the mechanism'. There is some contemporary evidence in the modern photo below as well. Its all personal taste really, but something on the deck that's not black or red might be a refreshing touch.
http://modelshipworld.com/uploads/monthly_05_2013/post-891-0-48935400-1368816392_thumb.jpg
-
Beef Wellington reacted to JPett in Rattlesnake by JPett - Model Shipways - Scale 1/64th - Kit #MS2028
Ahoy Mates
This is where I am as of this morning.
The wales have been taped off and painted but I am not finished with the weathering. I laid down 3 coats of Testors Classic Black enamel. I wet sanded between each coat with 600 grade sandpaper and then went to a finer grade on the finish coat. Now I am applying watered down coats of Tamiya acrylic flat black which I alternate with Tamiya regular black. After that I will borrow Ben's trick of burnishing it with a cloth. My hope is to create a less uniform color on the wale to eliminate the effect a solid color like black tends to have on models.
I have also Photoshoped the background to add more contrast. The original was just too bright and overpowered the image of the hull. Sorry about that. I should have just taken another pic.
I will finish the wales and make a determination on whether I will add any more paint to the hull. The wales have toned down the speckled look of the treenails which was a good thing. As I am still undecided on how much more paint I will add your comments would be very much appreciated. Alternative points of view are very welcome here.
PS: I am very happy with how fudging the line on the wale came out. If you look you can see how the line runs into a treenail or two near the bow. Tapering these planks was a mistake I made right from the start but I guess that is a part of the process. I also see now that they are a little low overall. If I am correct they should follow the top of the deck which they do not. I'm learning "I think .
Deduct another scale point "lol" I have plenty of them to use for this build.
-
 Beef Wellington got a reaction from realworkingsailor in HMS Snake by Beef Wellington - FINISHED - Caldercraft - Scale 1: 64 - First wooden ship build
Don't really intend my log to become a historical treatise on carronades, but I thought I'd pass this on given that the subject seems to have generated so much discussion/interest. I had asked the question to the HMS Trincomalee Trust, here is the reply. On another side note, it was very interesting that the original manufacturer of the Carronades (Carron company originally in Selkirk) also made the famous British red telephone boxes and now makes kitchen sinks.
Hello Jason
Thanks for your enquiry about our carronades. As far as we know, they are either ‘of the ship’ or of the period and we consider them to be historically accurate. To be honest, I’m not entirely sure what metal the elevation screws are made of. They are ‘brass’ in appearance but this metal inevitably would be too soft to withstand the regular screw action. Therefore I must conclude that they are made of a high brass content alloy – one which would withstand maritime conditions and also be hard enough to withstand the screw action. For a definitive specification, it would be worth contacting the makers – Carron Phoenix in Manchester, England – www.carron.com – tel: 01324 638321
Hope that helps
Best wishes,
David McKnight
General Manager
-
 Beef Wellington got a reaction from jaerschen in HMS Snake by Beef Wellington - FINISHED - Caldercraft - Scale 1: 64 - First wooden ship build
Worked on some final tuning of the cannon, unfortunately it took me pretty much an entire evening to do a couple of 'small' things, adding the chains for the cotter pin, and the hinge for the cap square. I cut each chain to length after having blackened it and attached some Caldercraft 2mm photo etch eyebolts at each end, drilled in the appropriate place and attached. The hinge was made from wire bent to shape into two pre-drilled holes. Think this looks much better than the suggested flat head pins to secure the cap square per the instructions. Thanks once again to B.E. for the pointers. Must confess I was very happy with the result and some useful skills learned, even though there were many frustrating moments.
I still have the flintlock to install but I'll do that once everything is in place and rigged.
-
Beef Wellington got a reaction from hamilton in HMS Snake by Beef Wellington - FINISHED - Caldercraft - Scale 1: 64 - First wooden ship build
Worked on some final tuning of the cannon, unfortunately it took me pretty much an entire evening to do a couple of 'small' things, adding the chains for the cotter pin, and the hinge for the cap square. I cut each chain to length after having blackened it and attached some Caldercraft 2mm photo etch eyebolts at each end, drilled in the appropriate place and attached. The hinge was made from wire bent to shape into two pre-drilled holes. Think this looks much better than the suggested flat head pins to secure the cap square per the instructions. Thanks once again to B.E. for the pointers. Must confess I was very happy with the result and some useful skills learned, even though there were many frustrating moments.
I still have the flintlock to install but I'll do that once everything is in place and rigged.
-
 Beef Wellington got a reaction from 4whelr in HMS Snake by Beef Wellington - FINISHED - Caldercraft - Scale 1: 64 - First wooden ship build
Sjors, ZyXuz - appreciate your interest and support
The carronade assembly line is in high gear, and have made some tweaks to my guinea pig carronade (v3) which I hope to replicate, apologize for yet more carronade pics...
1 - breaching rope hole made using 20 gauge wire - not called for in instructions but seems pretty ubiquitous
2 - added training tackle eyebolts which are also not identified in the instructions - although I will not rig training tackles as I think it could be too 'busy'
3 - added some wheels to the trunnion which seems more authentic, and it also help align the angle of the base with the camber of the deck. I thought about trying to use the white metal parts supplied but they proved to be too high. In the end, I used some small slices of the supplied 2mm dowel and cut in half for the wheels
4 - handles added to the elevation screw base - I used a some of the small brass etch eyebolts and cut the head off, seams a nice match, the Caldercraft supplied wire is steel colour. Decided to leave the elevation screw brass coloured, should mellow a little with age
If anyone has any other suggested improvements would love to hear them.
-
Beef Wellington reacted to Bender in Tying blocks to yards or masts.
I am not very good at drawing but . . .
The last four pictures shows different places I have used this method.
Around a yard.
Under a top. These blocks were added by passing the thicker thread around the cross tree before doing any warping.
All of these blocks are attached with this method. I used a variation of this method to attach the stay.
And one more
I lied. One more.
-
 Beef Wellington got a reaction from mort stoll in HMS Snake by Beef Wellington - FINISHED - Caldercraft - Scale 1: 64 - First wooden ship build
Sjors, ZyXuz - appreciate your interest and support
The carronade assembly line is in high gear, and have made some tweaks to my guinea pig carronade (v3) which I hope to replicate, apologize for yet more carronade pics...
1 - breaching rope hole made using 20 gauge wire - not called for in instructions but seems pretty ubiquitous
2 - added training tackle eyebolts which are also not identified in the instructions - although I will not rig training tackles as I think it could be too 'busy'
3 - added some wheels to the trunnion which seems more authentic, and it also help align the angle of the base with the camber of the deck. I thought about trying to use the white metal parts supplied but they proved to be too high. In the end, I used some small slices of the supplied 2mm dowel and cut in half for the wheels
4 - handles added to the elevation screw base - I used a some of the small brass etch eyebolts and cut the head off, seams a nice match, the Caldercraft supplied wire is steel colour. Decided to leave the elevation screw brass coloured, should mellow a little with age
If anyone has any other suggested improvements would love to hear them.
-
Beef Wellington got a reaction from hamilton in HMS Snake by Beef Wellington - FINISHED - Caldercraft - Scale 1: 64 - First wooden ship build
Sjors, ZyXuz - appreciate your interest and support
The carronade assembly line is in high gear, and have made some tweaks to my guinea pig carronade (v3) which I hope to replicate, apologize for yet more carronade pics...
1 - breaching rope hole made using 20 gauge wire - not called for in instructions but seems pretty ubiquitous
2 - added training tackle eyebolts which are also not identified in the instructions - although I will not rig training tackles as I think it could be too 'busy'
3 - added some wheels to the trunnion which seems more authentic, and it also help align the angle of the base with the camber of the deck. I thought about trying to use the white metal parts supplied but they proved to be too high. In the end, I used some small slices of the supplied 2mm dowel and cut in half for the wheels
4 - handles added to the elevation screw base - I used a some of the small brass etch eyebolts and cut the head off, seams a nice match, the Caldercraft supplied wire is steel colour. Decided to leave the elevation screw brass coloured, should mellow a little with age
If anyone has any other suggested improvements would love to hear them.
-
Beef Wellington reacted to Sjors in San Ildefonso by Sjors - FINISHED - OcCre - 1:70
Here I'am again….
On the port side the gun port lids and cannons are in place.
She has her teeth !
Now I can do the starboard side and go on with other stuff.
Drilling a few holes for the eyebolts and rings on the deck.
And then the cannons on the upper deck….
And of course….pictures !
-
Beef Wellington reacted to chris watton in Newsworthy updates from Chris Watton
Have started on the masts while I wait for the new poop parts. Initially, I tried to rush this as I went into auto-pilot - and made some stupid mistakes (bowsprit gammoning cleats in the wrong place due to me not pushing the bowsprit in right to the end - so had to remove and start over - no extended cheeks on the mizzen, when it clearly has them - what an idiot!). I decided to slow down and complete the mast plans before going any further, which I have now done.
The lower mast are almost complete and have been primed:
(My wife is re-decorating around me!)
I did make sure I had laser cut mast and yard cleats in various shapes and sizes - saves a little time... (Pity I couldn't have had the gammoning cleats laser cut...)
And that's where I am right now - I spent all of yesterday (Sunday, in the sweltering heat) turning the upper masts.
-
 Beef Wellington got a reaction from ModelBoatMaker in HMS Snake by Beef Wellington - FINISHED - Caldercraft - Scale 1: 64 - First wooden ship build
Sjors, ZyXuz - appreciate your interest and support
The carronade assembly line is in high gear, and have made some tweaks to my guinea pig carronade (v3) which I hope to replicate, apologize for yet more carronade pics...
1 - breaching rope hole made using 20 gauge wire - not called for in instructions but seems pretty ubiquitous
2 - added training tackle eyebolts which are also not identified in the instructions - although I will not rig training tackles as I think it could be too 'busy'
3 - added some wheels to the trunnion which seems more authentic, and it also help align the angle of the base with the camber of the deck. I thought about trying to use the white metal parts supplied but they proved to be too high. In the end, I used some small slices of the supplied 2mm dowel and cut in half for the wheels
4 - handles added to the elevation screw base - I used a some of the small brass etch eyebolts and cut the head off, seams a nice match, the Caldercraft supplied wire is steel colour. Decided to leave the elevation screw brass coloured, should mellow a little with age
If anyone has any other suggested improvements would love to hear them.
-
 Beef Wellington got a reaction from Blueskippy in HMS Snake by Beef Wellington - FINISHED - Caldercraft - Scale 1: 64 - First wooden ship build
Sjors, ZyXuz - appreciate your interest and support
The carronade assembly line is in high gear, and have made some tweaks to my guinea pig carronade (v3) which I hope to replicate, apologize for yet more carronade pics...
1 - breaching rope hole made using 20 gauge wire - not called for in instructions but seems pretty ubiquitous
2 - added training tackle eyebolts which are also not identified in the instructions - although I will not rig training tackles as I think it could be too 'busy'
3 - added some wheels to the trunnion which seems more authentic, and it also help align the angle of the base with the camber of the deck. I thought about trying to use the white metal parts supplied but they proved to be too high. In the end, I used some small slices of the supplied 2mm dowel and cut in half for the wheels
4 - handles added to the elevation screw base - I used a some of the small brass etch eyebolts and cut the head off, seams a nice match, the Caldercraft supplied wire is steel colour. Decided to leave the elevation screw brass coloured, should mellow a little with age
If anyone has any other suggested improvements would love to hear them.
-
Beef Wellington got a reaction from jaerschen in Frigate Berlin by Ferit KUTLU - Corel - 1/40 - 1674
I haven't done this myself (yet) but I believe you can darken the shrouds with 'India Ink'. I'm sure others with more experience can provide more insight, but would seem to be an straightforward task. She is looking wonderful, and I'm sure whatever you decide it will look great.
-
 Beef Wellington got a reaction from Ferit in HMS Snake by Beef Wellington - FINISHED - Caldercraft - Scale 1: 64 - First wooden ship build
Sjors, ZyXuz - appreciate your interest and support
The carronade assembly line is in high gear, and have made some tweaks to my guinea pig carronade (v3) which I hope to replicate, apologize for yet more carronade pics...
1 - breaching rope hole made using 20 gauge wire - not called for in instructions but seems pretty ubiquitous
2 - added training tackle eyebolts which are also not identified in the instructions - although I will not rig training tackles as I think it could be too 'busy'
3 - added some wheels to the trunnion which seems more authentic, and it also help align the angle of the base with the camber of the deck. I thought about trying to use the white metal parts supplied but they proved to be too high. In the end, I used some small slices of the supplied 2mm dowel and cut in half for the wheels
4 - handles added to the elevation screw base - I used a some of the small brass etch eyebolts and cut the head off, seams a nice match, the Caldercraft supplied wire is steel colour. Decided to leave the elevation screw brass coloured, should mellow a little with age
If anyone has any other suggested improvements would love to hear them.
-
 Beef Wellington got a reaction from mtaylor in HMS Snake by Beef Wellington - FINISHED - Caldercraft - Scale 1: 64 - First wooden ship build
Sjors, ZyXuz - appreciate your interest and support
The carronade assembly line is in high gear, and have made some tweaks to my guinea pig carronade (v3) which I hope to replicate, apologize for yet more carronade pics...
1 - breaching rope hole made using 20 gauge wire - not called for in instructions but seems pretty ubiquitous
2 - added training tackle eyebolts which are also not identified in the instructions - although I will not rig training tackles as I think it could be too 'busy'
3 - added some wheels to the trunnion which seems more authentic, and it also help align the angle of the base with the camber of the deck. I thought about trying to use the white metal parts supplied but they proved to be too high. In the end, I used some small slices of the supplied 2mm dowel and cut in half for the wheels
4 - handles added to the elevation screw base - I used a some of the small brass etch eyebolts and cut the head off, seams a nice match, the Caldercraft supplied wire is steel colour. Decided to leave the elevation screw brass coloured, should mellow a little with age
If anyone has any other suggested improvements would love to hear them.
-
Beef Wellington got a reaction from dafi in HMS Snake by Beef Wellington - FINISHED - Caldercraft - Scale 1: 64 - First wooden ship build
Hamilton - appreciate the support and kind comment, your Blandford is looking great as well!
Finally managed to get a good few hours in today and managed to get the channels and chains close to completion, only some final sanding and another coat of paint needed.
As I've mentioned, I was a little wary of the deadeye strops coming off the chains when I get to rig the shrouds. To hopefully make this a bit more secure I used some epoxy in the channel slots.
Once all done, the instructions say to use 1.5x1.5mm strip to close the channels, only problem is that the channels are 2mm thick, so I decided to cut my own to be 2x1.5mm. Think it looks more in keeping.
Onto something else...
-
 Beef Wellington got a reaction from Blue Ensign in HMS Snake by Beef Wellington - FINISHED - Caldercraft - Scale 1: 64 - First wooden ship build
Sjors, ZyXuz - appreciate your interest and support
The carronade assembly line is in high gear, and have made some tweaks to my guinea pig carronade (v3) which I hope to replicate, apologize for yet more carronade pics...
1 - breaching rope hole made using 20 gauge wire - not called for in instructions but seems pretty ubiquitous
2 - added training tackle eyebolts which are also not identified in the instructions - although I will not rig training tackles as I think it could be too 'busy'
3 - added some wheels to the trunnion which seems more authentic, and it also help align the angle of the base with the camber of the deck. I thought about trying to use the white metal parts supplied but they proved to be too high. In the end, I used some small slices of the supplied 2mm dowel and cut in half for the wheels
4 - handles added to the elevation screw base - I used a some of the small brass etch eyebolts and cut the head off, seams a nice match, the Caldercraft supplied wire is steel colour. Decided to leave the elevation screw brass coloured, should mellow a little with age
If anyone has any other suggested improvements would love to hear them.
-
 Beef Wellington got a reaction from Ray in HMS VICTORY by Kevin - FINISHED - Caldercraft - 1/72
Very nice Kevin, one day I hope to tackle her as well. Will be following closely!
-
Beef Wellington got a reaction from jaerschen in HMS Snake by Beef Wellington - FINISHED - Caldercraft - Scale 1: 64 - First wooden ship build
Hamilton - appreciate the support and kind comment, your Blandford is looking great as well!
Finally managed to get a good few hours in today and managed to get the channels and chains close to completion, only some final sanding and another coat of paint needed.
As I've mentioned, I was a little wary of the deadeye strops coming off the chains when I get to rig the shrouds. To hopefully make this a bit more secure I used some epoxy in the channel slots.
Once all done, the instructions say to use 1.5x1.5mm strip to close the channels, only problem is that the channels are 2mm thick, so I decided to cut my own to be 2x1.5mm. Think it looks more in keeping.
Onto something else...
-
Beef Wellington reacted to Ray in HMS Diana 1794 by Ray - FINISHED - Caldercraft - A 38 gun Heavy Frigate
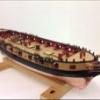
Copper plating complete the second side has now been finished, only the rudder to do, to complete all the plating to sum up the plates went on very well were easy to cut dress to fit, there was loads left over, glad its completed and it was a good move to break it up by building the galleries at the same time.
I have also remove the protective tape of the gun deck.
2nd side well under way
Both sides completed
Protective tape removed from gun deck
-
Beef Wellington got a reaction from mtaylor in HMS Snake by Beef Wellington - FINISHED - Caldercraft - Scale 1: 64 - First wooden ship build
Hamilton - appreciate the support and kind comment, your Blandford is looking great as well!
Finally managed to get a good few hours in today and managed to get the channels and chains close to completion, only some final sanding and another coat of paint needed.
As I've mentioned, I was a little wary of the deadeye strops coming off the chains when I get to rig the shrouds. To hopefully make this a bit more secure I used some epoxy in the channel slots.
Once all done, the instructions say to use 1.5x1.5mm strip to close the channels, only problem is that the channels are 2mm thick, so I decided to cut my own to be 2x1.5mm. Think it looks more in keeping.
Onto something else...