KenW
-
Posts
1,232 -
Joined
-
Last visited
Content Type
Profiles
Forums
Gallery
Events
Everything posted by KenW
-
 I echo everyone's comments. Your workmanship is unbelievable. I also like the syringe for the glue. Great skill all round.
 -
That is a great idea. Wish I had thought of it. You are definitely well on your way. Cheers.
-
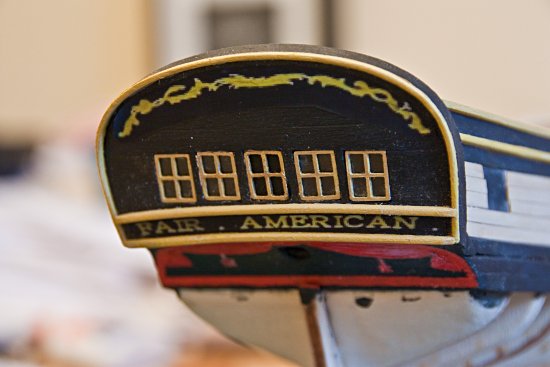
Thanks russ and KennyH78. In answer to your questions, Kenny: I scanned the stern view from the plans and created .jpg files for both the name and the scroll. I inserted the files into Windows Word and printed the result onto decal paper. However, the decal paper I used was obtained from "www.modeltransoftware.com/decalpaper.html". It seems this paper is unique. Printers don't have white ink and white areas are clear when printed on most decal papers. This paper is different in that the white areas of the decals actually dry white. You have to follow a special procedure (using canola oil) to get the white areas to show up clear. I was going to have the ship name and the fancy scrolling be white, but I noticed that on the photos of the Fair American model at Annapolis, those areas were gold. So I made a last minute change. One thing - with this paper do NOT use solvents if the edges of the decal curl. Follow the instructions and use cigarette lighter fluid. Good luck.
- 455 replies
-
- 1
-

-
- fair american
- model shipways
- (and 1 more)
-
I’m model building with snow falling outside my window. Very picturesque. And I’m glad I’m in where it is warm. Outside it is 20 degrees fahrenheit or -7 degrees celsius. I completed the stern with all of its fancy art work. I attach photos showing the progress of the effort. When painting the curtains, I tried to build up the paint to simulate the folds in the ‘fabric’. The name and scroll work are decals that I made from a scan of the plans. The word “Fair” is a bit faded, so I may redo it. It doesn’t look as perfect as I imaged it would, but then, whatever does?
- 455 replies
-
- 5
-
-
- fair american
- model shipways
- (and 1 more)
-
Keep in mind that the Fair American is only my second build. But, I had the guns built and I used them when I constructed the gun ports. Also, the gun barrels can be raised and lowered somewhat. In addition, I am not going to glue the barrels to their carriage until I am ready to install the guns. Just in case. Cheers
-
I am pleased to see another build of the Fair American and a build log to accompany it. I also have been using Bob's log as my practicum. My keel and bulkheads were NOT plywood either. I guess, as Bob says, it is a new thing. I look forward to following your progress. Ken
-
What type of solder do you use? Is it easy to acquire; along with a soldering iron? Never soldered before. Thanks.
-
I used a hair straightener that I bought from the local pharmacy. Just let the straightener get too hot. Worked fine.
-
Believe me, close up the paint job doesn't look as good as the photos. But, it may be the best I can do.
- 455 replies
-
- 1
-
-
- fair american
- model shipways
- (and 1 more)
-
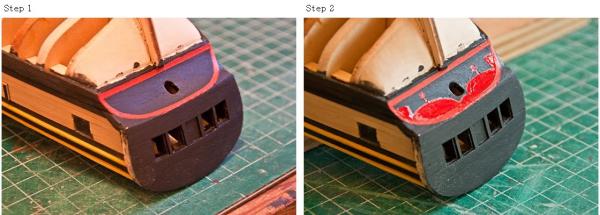
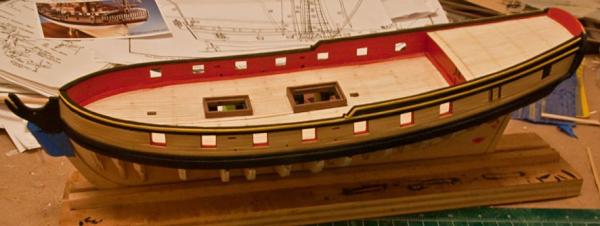
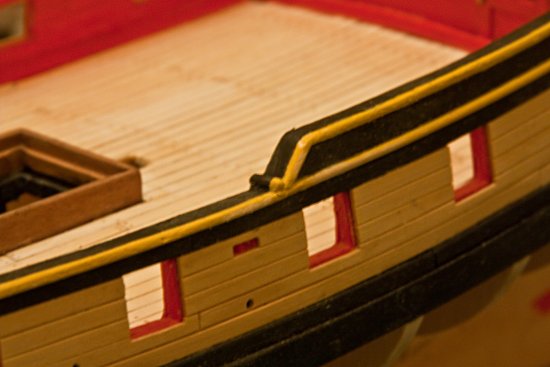
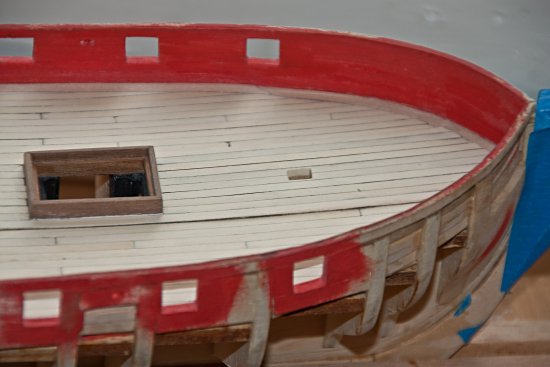
I hope all had a Happy New Year; and wish all the best for 2014. Now I am back in the ‘shipyard’. I finished the port side of the outer bulwark planking and wales. I also added the cap rails (both on the fancy rail and the main rail) and painted according to the plans – except I painted the inner side of the rails black. It was all pretty straight forward except I have to improve the line between the black and gold painting.
- 455 replies
-
- 3
-
-
- fair american
- model shipways
- (and 1 more)
-
I'm really impressed with those windows. Your craftsmanship is outstanding. Gives me something to strive after. Great work.
-
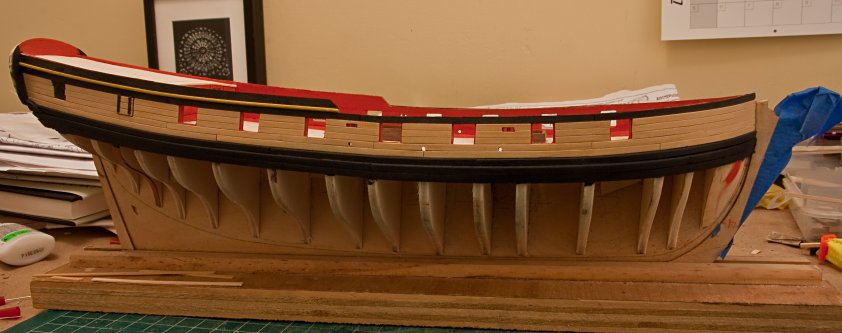
I finished the starboard side of the outer bulwark planking and wales, and there were several problems. I had almost completed the planking above the black strake when I realized I had used 1/16th planks when they should be 1/32nd. So I had to tear everything down and start again. The thinner planks do look better; but I left the thicker planks as the door on the unused gun port. I like the look better, even though I realize it’s probably not historically accurate. Also, the fashion piece had to be redone since the first one was too small and not adequate at all. On the finished starboard planking, I left the new fashion piece and the wales extending beyond the counter. They will be trimmed once the counter planks have been added. The ochre planks are boxwood and I will leave them unpainted. That is a big step from my last (and first) build; so I am pleased with the results so far. Ship building definitely slows down during the holiday season.


- 455 replies
-
- 2
-
-
- fair american
- model shipways
- (and 1 more)
-
Hi Russ. I'm interested in your modified close pin clamps. Are they made by simply gluing a square piece of wood to one side of the pin? I assume you can then push up as well as in. Thanks.
-
I have yet another question: On your quarter badges, you have the window divided into 4 frames. Did you use the two unused window frames from the stern? If not, how did you create them? Thanks.
-
Thanks. I am using a 74. Can you order just one size from someplace? Or, do you have to order a whole set for just one bit? Inquiring minds want to know.
- 1,477 replies
-
- 1
-
-
- essex
- model shipways
- (and 1 more)
-
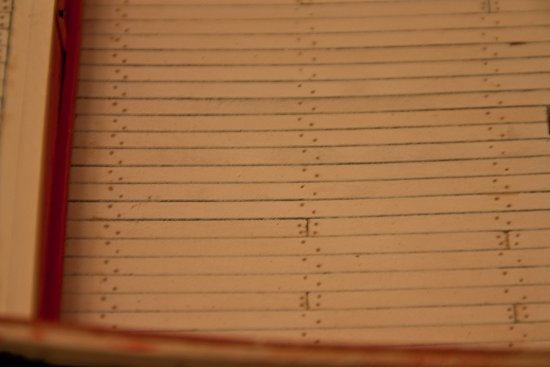
Thanks russ. I attach another photo that takes a closer look at the treenails. They aren't perfect, but probably not noticeable to anyone who doesn't build models.
- 455 replies
-
- 3
-
-
- fair american
- model shipways
- (and 1 more)
-
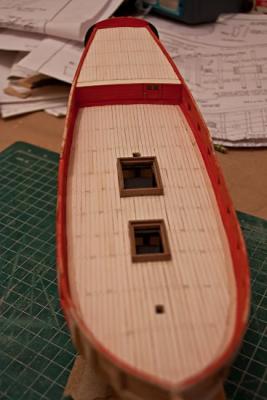
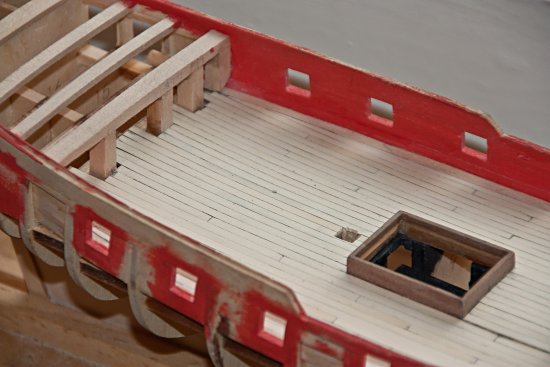
I finished the planking the deck and drilled all the treenails. I decided to follow the color scheme of the Roberts Collection model; at least to a point. Chuck Passsaro has placed photos from his trip to Annapolis in the Gallery section under, “Contemporary Models from Museums and Private Collections.” I should go down to Annapolis myself since it isn't that far. Next up is to plank the outer hull along with the wales. You can get to Chuck’s photos from here: ‘http://modelshipworld.com/index.php?/gallery/album/448-fair-american-rogers-collection-annapolis/’.
- 455 replies
-
- 3
-
-
- fair american
- model shipways
- (and 1 more)
-
What size drill do you use for the treenails? I may be using one that is too small since I keep breaking it. Thanks.
-
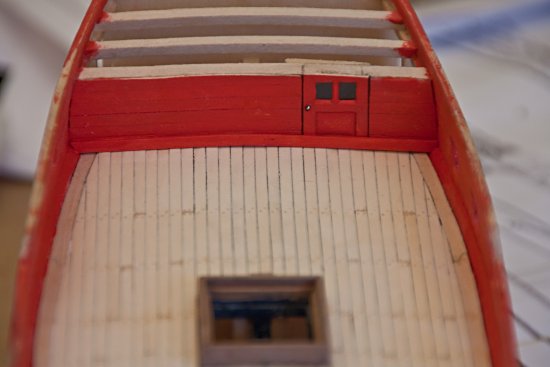
The cabin front is created. I followed the plans that show a planked housing and the door is my own design. For the window ‘glass’, I used the window from window envelopes. Since all my monthly bills come in window envelops, I have an unlimited supply. The glue called, Krazy Glue, sold here in the states, holds the ‘glass’ in place. I put the molding across the entire front because, to me, it looks like a coaming that keeps water out of the cabin. That means that the door must open inwards and that means the hinges are on the other side of the door.
- 455 replies
-
- 3
-
-
- fair american
- model shipways
- (and 1 more)
-
Thanks. I will see if I can find acetate sheet here. Also, I will research the Uhu glue to see if it is available here. I appreciate your help.
-
What is the best thing to use for windows? I don't like wax paper because it is too 'foggy'; and I don't like the clear plastic wrap. I think it should be something in-between. Thanks.
- 455 replies
-
- 1
-
-
- fair american
- model shipways
- (and 1 more)
-
Russ: I agree, the treenail problems will probably go unnoticed. This brings up the question as to why we bother with treenails in the first place. Bob: I agree with you as well. You can always do with more sanding. Thanks.
- 455 replies
-
- 1
-

-
- fair american
- model shipways
- (and 1 more)
-
All the treenail holes are drilled, the deck is sanded, and the result is satisfactory. It is not perfect due to two oversights I made earlier in the building process. Where the deck planks meet, one of the planks is not always the same height as the other. This must be due to an error in my process of cutting and squaring the planks. Also, when the two planks meet, the join must be in the exact center of the bulkhead. A center line should be drawn on top of each bulkhead. If these issues are corrected, the tape used to line up the treenail holes can simply follow the plank joins. Next up is the housing; and there is always more sanding that can be done.

-
Thanks for the tips. I am definitely not going to do the whole deck in one sitting. I did two beam lines and just tried to align the treenail holes with the plank ends. The first line is off, however. It is closest to the bow, so there will be a lot of stuff covering the error. I will try the tape method. Thanks again.
- 455 replies
-
- 1
-
-
- fair american
- model shipways
- (and 1 more)
-
I finished the deck planking and thanks to the helpful advice of Bob, Russ and Alistair, it doesn’t look bad. So, I am ready to drill the ‘treenails’. I did some tests and I am using the pine plastic wood from DAP since my local hardware store doesn’t carry the Minwax wood filler products. The color looks good, so I’m satisfied with that. I can see that I will be drilling a lot of holes in the next few days.
- 455 replies
-
- 2
-
-
- fair american
- model shipways
- (and 1 more)