KenW
-
Posts
1,231 -
Joined
-
Last visited
Content Type
Profiles
Forums
Gallery
Events
Everything posted by KenW
-
 Thanks Ed. I will have to watch out for splitting! Perhaps using a slightly larger drill will prevent that. Cheers.
 -
I installed the deadeyes. I had to use wire since I couldn’t find the ‘brass backing link’ that the kit used to supply. Bob (rafine) used something similar on his Fair American, but I couldn’t find anything similar in any hardware store here in Brooklyn. I guess it will have to suffice. I think I will have to redo that one second from the right. I don’t like the look. Still working on the upper masts.

- 455 replies
-
- 3
-

-
- fair american
- model shipways
- (and 1 more)
-
Well, I keep adding "likes", but you are still one of the master builders in my opinion. Cheers.
- 1,477 replies
-
- 2
-
-
- essex
- model shipways
- (and 1 more)
-
Hey Ed: I replaced all the rigging with rope from Chuck Passaro. You can check out his site and order stuff from him at www.SYRENSHIPMODELCOMPANY.COM. If you go to this site, "http://www.modelexpo-online.com/product.asp?ITEMNO=MS2260", and click "Documents", you can access the book of instructions that Chuck created for the ME model of the Syren. I use that documentation, along with Bob "rafine"'s FA log as the main resources for my FA build. The later chapters of the Syren doc. deal with building the masts and yards as well as the standing and running rigging. I get line thickness from his doc. (keeping in mind that the Syren is a1:64 model and the FA is 1:48 so some lines may be thicker). I also refer to the instructions from my previous model, which was also 1:48 scale. Chuck's documentation also is clear about the difference between standing and running rigging. He even recommends an order in which each line should be added to the model. Check it out.
- 455 replies
-
- 1
-
-
- fair american
- model shipways
- (and 1 more)
-
Thanks Gary and Victor. Sounds like you had a pretty exciting sail, Gary. Perhaps too exciting. I'm not bothered anymore that the wooldings are on the fore mast but not on the main. Does anyone know if the method of attaching a gaff rigged sail (rings) helped strengthen the mast? Just thought the rings might spread out the pressure whereas with a yard, all the pressure is all at the top of the mast. More comments, please.
-
On the issue of wooldings: I recently acquired a copy of Howard Chapelle's "History of American Sailing Ships". He doesn't mention wooldings but some of the drawings in his volume show them. I know it is risky basing decisions on drawings, but what I see is that some boats of this period had them and some did not. Boats like the Syren with reinforced masts always had wooldings. However, the smaller boats, like the FA, are inconsistent. I feel they probably installed them if the captain felt that the masts required strengthening. Of course a mast with a gaff rigged sail didn't have wooldings. So at this point, I think I will keep them. As always, I welcome comments.
- 455 replies
-
- 1
-
-
- fair american
- model shipways
- (and 1 more)
-
Thanks Victor. I still am undecided on having a woolding only on the fore mast. You're right in that it probably wasn't needed. I like the look of them though. Still thinking.
-
Hey Ed. You know, I'm going to have the same problem. I haven't drilled mounting holes yet either. Didn't think of it. Oh boy!
-
Thanks Pete. I use Bob (rafine)'s blog as my major reference tool and your name has been mentioned on it. I find your techniques to very interesting as well.
-
Hey Ed - Not that I know of. Let me find my notes and maybe I can send you (and Gary) the page on splicing. It isn't easy to explain.
-
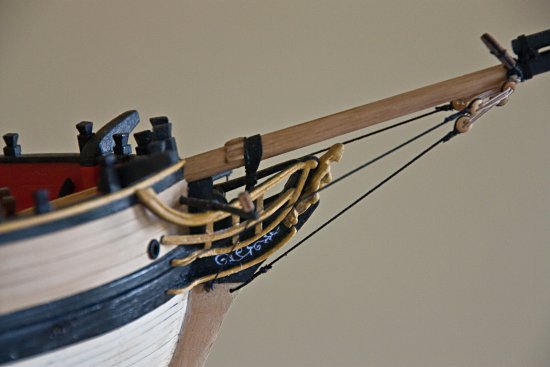
Hey Ed. I spliced a single block to the end of a line, ran the other end through a hole in the boomkin and seized the that end to the eye bolt on the hull. The splicing technique was something I got from a workshop given by David Antscherl.
- 455 replies
-
- 1
-
-
- fair american
- model shipways
- (and 1 more)
-
I believe I found the answer to how my gaff rigged mainsail should be mounted. In Howard Chapelle's, "The History of American Sailing Ships", he says that, "The gaff was always lowered to furl the sail, the so-called 'standing-gaff' that remained aloft was never popular in America." While Mr. Chapelle was not talking about the Fair American, I am going to assume that the gaff was lowered for furling.
- 455 replies
-
- 2
-
-
- fair american
- model shipways
- (and 1 more)
-
Thanks Russ and Scott. As for the head rails: The head rail was cut from a large, flat piece of scrap wood, so no bending was required. The middle rail was bent, as were the cheek knees. However, the cheek knees were each made from two pieces of wood, as per the instructions.
- 455 replies
-
- 1
-
-
- fair american
- model shipways
- (and 1 more)
-
Thanks for the welcome. I still have a lot of work left on my current build, so I don't worry about your speed. As a "friend" on this site (russ) says, "T'aint a hobby if you hurry". And besides, even if I started tomorrow, it would take me quite a while to catch up with you. So have fun, and I will keep watching. Cheers.
-
Just started following your build log. Very outstanding - both in showing your growing skills and as a set of instructions for someone like me who is thinking of attempting this kit bashed model for his next challenge. I look forward to watching your rigging adventures and advise. Keep it coming! Cheers.
-
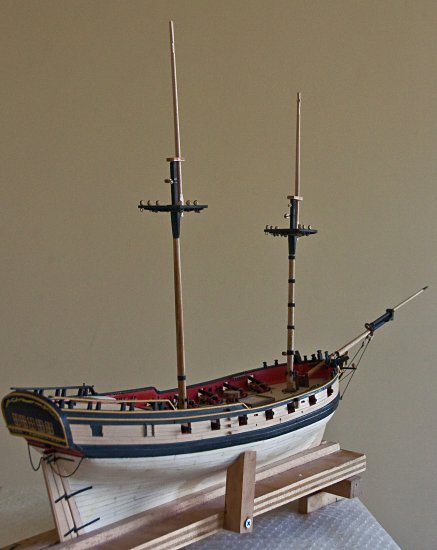
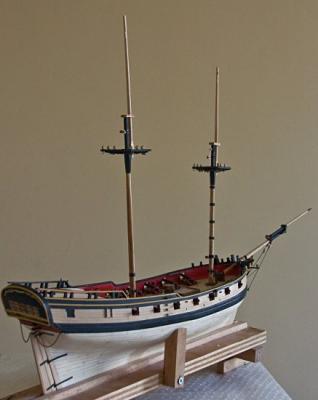
The lower masts are made and the top masts and topgallant masts are carved out. The ship looks really good with the lower and top masts mounted, although nothing is glued so the alignments are not perfect. I took some photos and am ready to glue the lower masts and start rigging them. I’m still not sure if I like the look of the wooldings on the fore mast but not on the main mast. If the gaff is mounted with parrels, does it mean that the main sail was not brailed? Anyway, all rigging will have to wait until after the WC final.
- 455 replies
-
- 7
-
-
- fair american
- model shipways
- (and 1 more)
-
I have been studying the plans that came with the kit and I believe that the gaff is attached to the mainmast with parrels. Therefore I believe that it was lowered and the gaff-rigged mainsail was not brailed. So I guess I will have wooldings on the foremast, but not on the mainmast. Also, the plans do not show a boom rest on the mainmast, just an eye bolt for a hook at the end of the boom. (Even though the kit comes with a dye cast boom rest.) So I will leave the boom rest off. Please, comments are welcome.
- 455 replies
-
- 1
-
-
- fair american
- model shipways
- (and 1 more)
-
Thanks Gary. The cleats on the mast are from the kit.
-
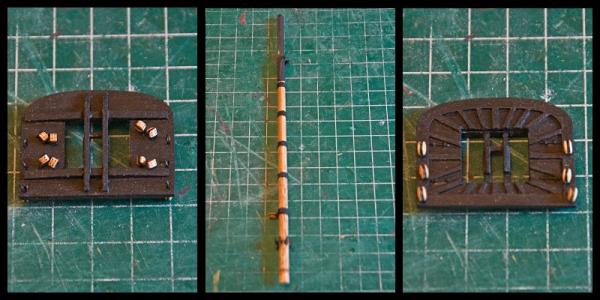
It has been a good World Cup so far (except for the biting incident), and I have managed to do some work between games. The fore mast and the fore top are ‘done’, although I expect there will be some modifications when rigging starts. Some photos of the ‘completed’ fore mast parts are below. (Some paint touch ups are needed.) I also started work on the main mast. From looking at the plans, the main mast diameter is slightly larger than the fore mast. By my measurements, the fore mast is ¼ inch in diameter and the main mast is 9/32 inch. I didn’t have a 9/32 dowel so I went to my local hardware store. They only had a 5/16 inch dowel so I got that. But the thing you have to watch out for is that I had to go through the whole selection to get a dowel that was straight. I was able to scrape the dowel down to the required diameter and shape. But, the other thing I noticed is that the main mast has a slight rake to it. The instructions say to follow the plans. And the fore mast is at 90 degrees from the water line; but the main mast is 92 degrees. I don’t think I will be able to get that exact rake, but I will do my best.
- 455 replies
-
- 4
-
-
- fair american
- model shipways
- (and 1 more)
-
Congratulations on an excellent model. On to the next project? Cheers.
- 803 replies
-
- 2
-
-
- colonial cutter
- modellers shipyard
- (and 1 more)
-
I agree. Also, I hope to be able to get some help and advise from The Ship Model Society of New Jersey. I joined in January and they are very knowledgeable, friendly and helpful. You can read their news letter on the "Monthly Local Club Newsletters" page. Although the most recent issue is Feb., 2014. We just have to keep asking questions and hopefully sharing the answers we get.
- 455 replies
-
- 1
-
-
- fair american
- model shipways
- (and 1 more)
-
I agree with you that the sail plans that come with the FA kit are poor. They are almost no help for installing the running rigging at all!. I am using the Syren documentation and it is helpful, but there are some things that I don't believe apply to the earlier FA. Another source I recommend is, "Rigging Period Ship Models", by Lennarth Petersson. He shows (on pages 47 & 70) that the tops have two pair of double blocks on the port side and two pair on the starboard side under the tops. One double block pair is for a spritsail brace and leech line, and another double block pair is for two bunt lines. (There is another single block pair for a sprit top sail, but the FA doesn't have one.) I hope I am able to make myself clear with all this.
- 455 replies
-
- 1
-
-
- fair american
- model shipways
- (and 1 more)
-
I have the lower foremast and main top almost complete. I added rope wooldings and I do like the way they look. I am also going to add blocks for the bunt and leech lines. I still have to install the dead eyes, but everything is coming along despite the World Cup interruptions.
-
I was not going to include either wooldings or the 'extra' blocks on the tops for various rigging lines used for bunt lines, leech lines and chew lines. However, I still have time to change my mind. I like the look of the wooldings and if they are period correct, I should include them. Also, I have been thinking from the start that I would like to have reefed sails, so I should have those blocks (and perhaps the lines) as well. I will have to do some research on the number and location of the blocks.
- 455 replies
-
- 1
-
-
- fair american
- model shipways
- (and 1 more)
-
I enjoy watching your build. And I was wondering - When is the boat show? I still want to see photos of the real boats (or replicas). Cheers.