KenW
-
Posts
1,232 -
Joined
-
Last visited
Content Type
Profiles
Forums
Gallery
Events
Everything posted by KenW
-
 Just thought I'd add my two cents. Your work is looking good and I like that you show the entire process in photos. My variation is to do everything I can before the gun carriage (with barrel attached) is installed on the deck. Once attached, all that remains is securing the breech line eyebolts to the bulwark; then fastening the two rigging ends to the bulwark and tightening the lines. The lines are glued to the deck, trimmed and a pre-made coil is put over the end to look like a continuation of the rigging. I like having everything done off the boat first. But there is more than one way to do it and your way yields great results.
 -
She is one beautiful boat!. Great work. I look forward to seeing photos of the real ones. Cheers.
-
Just to add my compliments to the growing list. The finished model looks like a real tribute to these type of boats. Seems like there was lots of love there. Congratulations.
-
Ollie: I'm impressed with your workmanship; hard to believe it's your first model. I favor the guns rigged as if awaiting an admiral's inspection (i.e. with coils and side tackles). There are a lot of possibilities that are period correct. Again, great work and I will continue to follow your build. Cheers.
- 803 replies
-
- 2
-

-
- colonial cutter
- modellers shipyard
- (and 1 more)
-
Hey wq3296. I think one of the main things I have learned from our discussions on this and other sites is that wooden ships of the period did not have a static appearance. Even the guns looked one way when the ship was 'cleared for action' and another way when sailing in heavy seas. Even in port, they were rigged one way for normal daily routine and another when awaiting an inspection by an admiral. As modelers, we research these appearances and get to choose how we want our model to be displayed. "Its all part of the adventure." Cheers.
- 455 replies
-
- 3
-
-
- fair american
- model shipways
- (and 1 more)
-
Gary: I am definitely going to rig the remaining 8 guns as I did the first. The 'defi' Victory build log seems to be a great source of photos and modeling techniques. (Thanks Alistair). I now have another site to use as a reference.
-
Thanks for the reply. I don't have that source, but I find it interesting. I will do some research. I still like the look of the out haul rigging, however. Thanks again.
-
Gary: I have been thinking about whether the outhaul tackles (and possibly the inhaul tackles) were stored when the ship was not "cleared for action". A ship not involved in combat was still sailing on the sea in all types of whether. These guns must be prevented from 'moving around' at all times. I would think these lines were needed to keep the guns in place. I have rigged the guns "out hauled", i.e. pulled up against the water way assuming that they were therefore not able to move about. Would this be sufficient? I don't know. I do know that a 'run away' gun was dangerous to both the ship and its crew. I would like to hear what others think.
- 455 replies
-
- 1
-
-
- fair american
- model shipways
- (and 1 more)
-
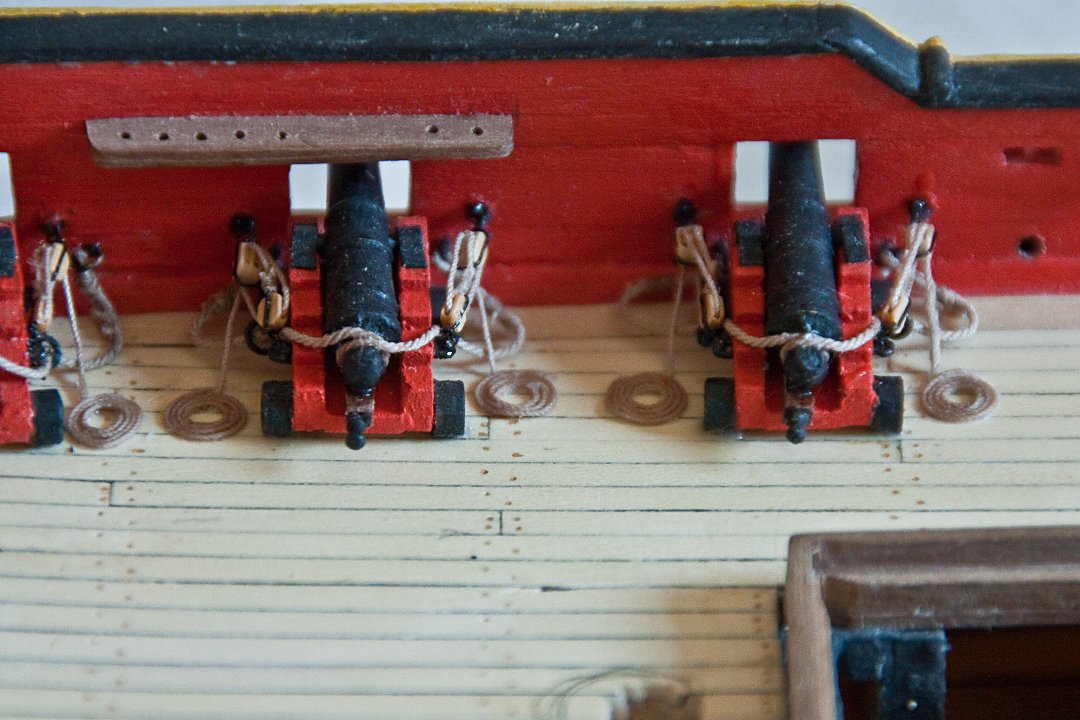
I mounted four more guns using recommendations made by Russ and Alistair. I adjusted the placement of the eyebolts for the outhaul and breech lines. And, I threaded the blocks and attached them to the carriage before mounting the guns. It was much easier. However, I noticed that because I made the gun ports closer together, there was less room between the guns. So the outhaul coils had to be wound tighter. I’m glad that Chuck Passaro’s line is so easy to work with. So, I have 6 guns installed and 8 more to go. But I’m going to work on some deck furniture next as a break from gun installation, and install more guns next week. (I notice that when I took the photo the inhaul eyebolts weren’t there; but they are now.)

- 455 replies
-
- 4
-
-
- fair american
- model shipways
- (and 1 more)
-
I will have to look for steel wire. I don't know what mine is made of. I only know it is 28 gauge. Cheers.
-
For deck coils, I use diluted white glue (around 50-50). I apply it with a paint brush and it looks good when the glue dries. I also found that Chuck Passaro's line is much easier to work with than the kit supplied line. Good luck with the coils and gardening.
- 455 replies
-
- 1
-
-
- fair american
- model shipways
- (and 1 more)
-
I have decided to have the out haul tackles (side) but not the in haul tackles (rear). (I think have the names correct.) And my family really thinks the coils look neat. So, my boat is in harbor and the admiral is due to inspect at any moment.
-
Hey Alistair, thanks for the advise. I see why putting the tackle bolts wider does give you more room. The breeching lines can easily go closer together. I will make that change on the rest of my guns. I will continue using 28 gauge wire until it drives me crazy. My wire seems to break easily - are there different types of wire; some stronger than others? I got mine from a jewelery shop as well. My fat fingers are probably just too rough. My blocks are 3.2mm (or 1/8 inches); I don't think I can handle the 2.5mm ones. Your line thicknesses look to be very close to mine. Thanks again for the help; and I am enjoying following your HMS Fly build.
-
Hi wq3296, good to hear from you. I enlarged the gun ports to be 3/16 square. This was done by several builders due to the size of the gun barrels that came with the kit. As a result, I kept the 1/8 inch plank between the water way and the gun port, and added a 1/8 inch plank above the ports. So the height of my bulwarks above the water way is 1/8 + 3/8 + 1/8. I hope this answers your question.
- 455 replies
-
- 1
-
-
- fair american
- model shipways
- (and 1 more)
-
Thanks Gary. I know I have the outhaul tackle eyebolts closer to the gun port and above the breech line eyebolts. I did this based on what I saw happening on other models, including my last build. I have no idea which is correct. I am also considering using thread to strop the blocks and either tying the eyebolts or seizing them to the strop. I am also interested in what others think. Cheers.
-
Thanks Tom and Russ. I will have to try that method. I have the eyebolts attached to the bulkhead/gun carriage first. I'll let you know how it works out. Thanks again.
- 455 replies
-
- 1
-
-
- fair american
- model shipways
- (and 1 more)
-
I mounted the aft two guns and the ‘deck furniture’ between them. Bob (rafine) used this method on his Fair American and I like the plan. I get time off from rigging cannon, which I am finding very frustrating. I am using 1/8 inch (4/32) blocks and .012 line. I found I had to enlarge the holes in the blocks to get the line through the block’s hole. And threading the blocks still required stiffening with CA glue. I attached the breech lines to a gun first, then mounted it and secured the breech lines. Next I strop the blocks using 28 gauge wire; the end of the strop wire forms the hook that attaches to an eye. However, attaching the rigging to its gun is proving a problem. I can’t get the first attached hook to stay in its eye while I try to attach the other. If I do too much to the hook, it breaks off. Are there any tricks that I’m unaware of?

- 455 replies
-
- 1
-

-
- fair american
- model shipways
- (and 1 more)
-
Blocks and line can be gotten from Chuck Passaro. I'm using his for my current build and find them excellent. He may not have everything, but what he does have is high quality. The site is: http://www.syrenshipmodelcompany.com/ Cheers.
-
Thanks and good to hear from you. I know this is an old question, and I can only say that I re-established the bearding to line up with the bottom of the bulkheads. However, if one bulkhead was out of alignment with the surrounding ones, I added a shim to the one that was "out of line". The same applies to one that was a bit longer - I sanded it down to match. I tried for a good line of bulkhead bottoms. Don't know what others would say.
- 455 replies
-
- 1
-
-
- fair american
- model shipways
- (and 1 more)
-
Your build is looking great. I like the companion way. Good design and workmanship. It looks like a paneled door. Well done.
-
They are both good builds. The AVS is probably the easier build. Your choice.
-
I am looking at your capstan. I believe that you altered the kit supplied one; is that correct? I like the 'V' slots you made in the bottom. Any advice - since I am starting to evaluate mine? Thanks.
-
I agree with the other posters: I think your model is looking really good. ... I've been thinking about this post and I think I didn't make myself clear. I was trying to say that: On my build, I wasn't pleased with my workmanship on the planking of the lower hull. Yet when I showed the hull to members of my family, they couldn't understand what I was talking about. They thought it looked great. Also, the feedback I got from members of this site was the same. We all tend to be hardest on ourselves. In my case, after working on some other things, now I don't think the hull looks that bad after all. Sometimes we have to just relax and enjoy the process. And, don't judge the product until you see it finished.
-
Thanks Alistair.
-
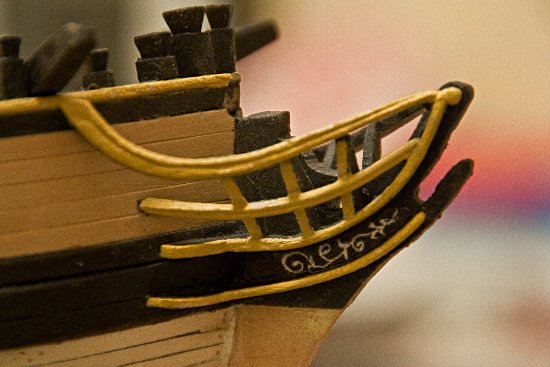
I came down with the flu virus that is going around here in NY. Combine that with the coming holiday means that the ‘shipyard’ is pretty much inactive. But I did draw, after many attempts, a scroll pattern for the bow. After scanning and running it through my photo software, I glued the print between the cheek knees and like the result.
- 455 replies
-
- 8
-
-
- fair american
- model shipways
- (and 1 more)