


KenW
-
Posts
1,232 -
Joined
-
Last visited
Content Type
Profiles
Forums
Gallery
Events
Everything posted by KenW
-
 Thanks Russ. I did pin them, so I can only hope for the best.
 -
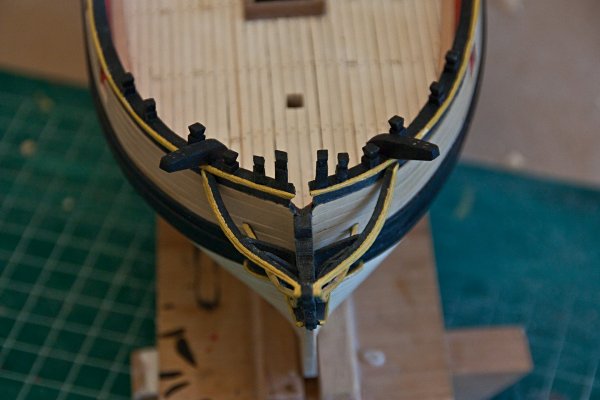
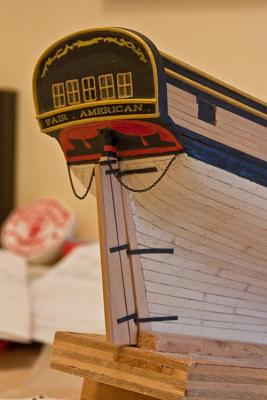
The timberheads, knightheads and catheads are installed. I cut the heads of the timberhead/knightheads from the 1/8 inch square plank and then cut off at the proper length. Working on the whole plank is much easier than cutting a small piece first and then trying to whittle the head. The two knightheads are an odd shape, like a trapezoid. For that I used a 3/16 inch square plank and cut off a 3 inch piece and used my sanding block get the trapezoid shape and then cut the head and sawed off at the proper length. I thought that the catheads supplied by the kit were too small to drill those 4 holes, so I made two catheads from a 3/16 inch thick piece of scrap wood. Each cathead was made in one piece, but if I do too much more of this kind of work I’m going to have to get a power scroll saw.
- 455 replies
-
- 3
-

-
- fair american
- model shipways
- (and 1 more)
-
Your build is very impressive. Great workmanship! I may have missed it, but how are you going to 'finish off' the gun rigging? I think the ends of the lines are just laying on the deck. What do you have in mind? Thanks.
-
Thanks Frank, Ed, Bob, Nils and wq3296. I appreciate the encouraging words.
-
Thanks Russ and Gary. And thanks, Gary, for the warning about the fitting of the figurehead. Fortunately, I already put in the dowel for the bowsprit along with the kit figurehead and made the adjustments so there is sufficient spacing. Cheers.
- 455 replies
-
- 1
-
-
- fair american
- model shipways
- (and 1 more)
-
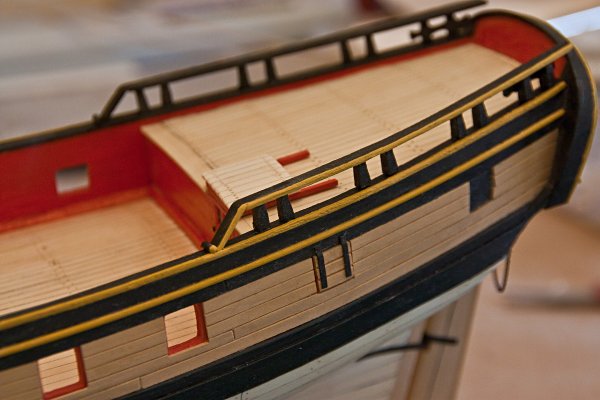
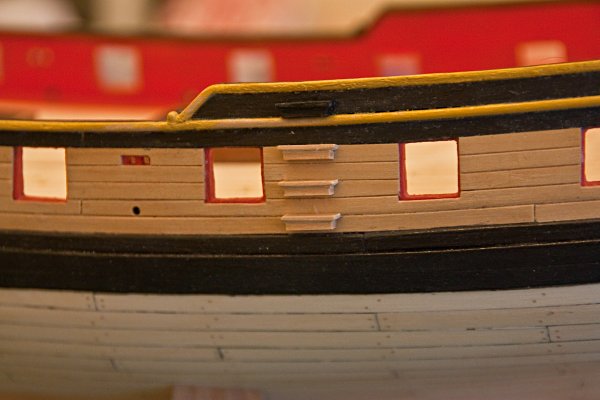
The newest additions to my Fair American are the poop deck rail, the gangway steps and chess tree. This completes the outside of the hull (except for the quarter badges). The poop deck rail follows the painting scheme of the Rodger’s model, which I like. I painted the cavil black, as well. The gangway steps are made from a 1/32 inch piece of boxwood laminated to a 1/16 inch piece. They are unpainted except for the upper one which is painted black. I used a round file to shape them. The chess tree was made from two pieces of 1/16 inch boxwood since I didn’t have a boxwood 1/8 inch square plank. Next up are the timber heads, knight heads and the cat heads.
- 455 replies
-
- 8
-
-
- fair american
- model shipways
- (and 1 more)
-
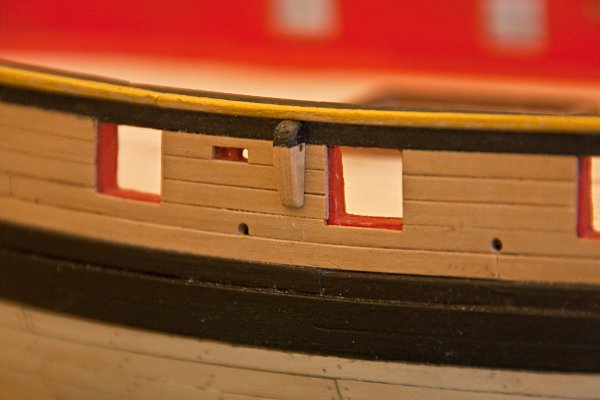
Good work on the channel and chains. Also the gangway steps. They are small and a real challenge. As to my rudder, I just liked the look of the groove. Didn't know that there was a reason for it.
-
Thanks Joe. Are you currently working on a build; and do you have a log for it? Cheers.
-
Great to see your build progress again; and I must say it is coming along nicely. I really like the cabin interior with the checkered floor and the cleats and line to open the windows/ports. Everything looks good as well. I agree with you and plan to replace all the dye cast deck furniture. I hope you keep up with regular posting - seeing the problems and solutions of others helps me as I'm sure it helps others as well. Cheers.
-
Thanks Scott. Are you currently working on a build?
-
Hey Russ - Your craftsmanship is outstanding. Almost too bad to paint and cover it up. Great job!
-
Thanks Russ and Bob. I have been retired for two years and I'm finally getting it through my head that Russ is right: " T'aint a hobby if you hurry." Cheers.
- 455 replies
-
- 1
-
-
- fair american
- model shipways
- (and 1 more)
-
I completed and installed the rudder. Again, I made the straps from 1/16” strips cut from a manila folder. The chain was my first time using “Birchwood Casey Brass Black”, and I had no trouble using what seems to be the standard procedure. Clean the chain (and eye rings) by soaking them about 15 minutes in Muriatic acid, wash clean with tap water and then put the chain into the Brass Black. Wait until it looks the right shade and remove. Clean with water again and try on a paper towel. Next time I will dilute the Muriatic acid, however. I may dilute the Brass Black as well.
- 455 replies
-
- 9
-
-
- fair american
- model shipways
- (and 1 more)
-
Thanks Gary, Alistair and Bob. It doesn't look as bad as I originally thought.\ Next I plan to mount the rudder. Cheers.
-
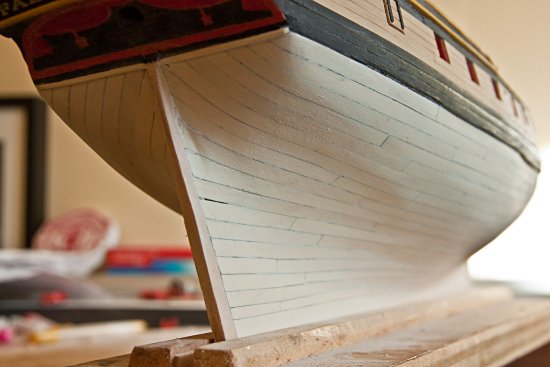
The lower hull has been sanded and treenails drilled and filled with plastic wood. So I am definitely not painting the hull. Also, since I did a bad job on the rudder, I made a replacement out of spare wood from one of the pieces that contained the frames. The new rudder is visible in the first photo.

- 455 replies
-
- 16
-
-
- fair american
- model shipways
- (and 1 more)
-
The Model Ship World site was updated and unavailable over the weekend. When the problems were resolved and the site on-line again, there were problems with some of the photos in my build log. The "work-around" is to find the entries with references to photos, rather than the photos themselves. Then 'Edit' the entry, go to 'Full Edit', and delete the old references; Then re-attach the photos creating new references. I corrected my build log (which only has 9 pages), but I can see that for some builders, this will be a real hassle. But I want to inform as many people as possible so they can fix their build log. Good Luck.
-
Thanks Kenny, Gary and Alistair. And Gary is right - I am really making the model for myself. I also appreciate the advice from Alistair. I definitely have some ideas on how to improve on my workmanship on my next model. For now, I will not paint.
-
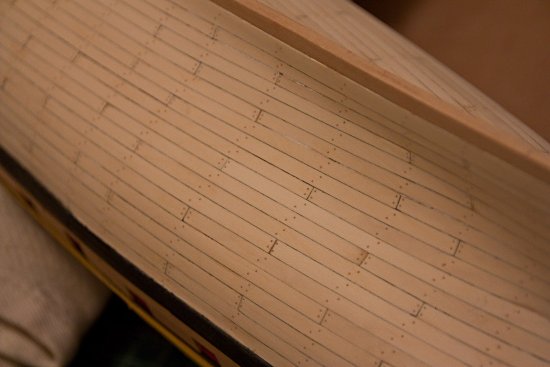
I drilled the treenails with a #74 bit in a hand drill, not an electric one. I then used "Plastic Wood". The plastic wood hardened pretty quickly and I then sanded the holes. I've never used 'putty'. I didn't like the basswood cannon parts. My last model came with walnut carriages and trucks; much better.
-
Thanks russ. I'll keep that in mind when I get to my next model. The planking on this model is much better than on my previous model. Cheers.
-
I completed planking the lower hull. It has been roughly sanded and wiped with a tack cloth. More sanding is necessary. I’m not really pleased with my workmanship and am tempted to paint the lower hull. My son insists that I leave the way it is; he thinks that it looks good and you can tell that it is really a wooden model. I am still undecided. I guess if I decide not to paint I will have to do the tree nailing. I think my problems started with the fairing of the hull. I have to be more conscious of the shape of the hull. It is not just that the frames are altered for the planks, but the entire shape of the hull is being determined. Also, I didn’t do any spiling. That may have caused gaps between planks. If I spile my next model, what size planks do I need? Will ½ inch be sufficient?


- 455 replies
-
- 4
-
-
- fair american
- model shipways
- (and 1 more)
-
First, your pay has just doubled. Next, are you going to paint the lower bulwark planking? I am still undecided. Cheers.
-
Hey Gary: I still plan to hold off on the lifeboat. I don't know if I can carve one; my skills need some work. I agree that the poop deck looks naked, but there will be the boom for the gaff sail there and some rigging eventually. Again, I can change my mind later. It seems that it will be possible to add one in the future if I want. For now, I am sanding the lower hull planking before going on a 4-5 day trip. The weather here has been nice for the last two days, but they say that more cold will come tomorrow. Bring on Spring!
-
Gary: About the sky light - I was thinking that the captain has four windows in the stern, two more windows through the 'quarter badges', and two gun ports that don't have guns in them but can be opened. Also, the sliding top to the cabin door can be pushed back, weather permitting. It's not like he's living in a cave. What do you think?
-
Hi Gary. As to the treenails - I used a #74 drill to make the holes and "Pine" plastic wood. You could also use "Honey Oak". I agree that the Fair American would have a long boat. It would have been lashed to the 'gallows' during sailing. However, I don't feel confident in my ability to create a long boat from scratch. I may change my mind - But, I intend to build Chuck Pissaro's Syren model next. That kit comes with a long boat and I may learn enough from that build to then attempt to build a long boat for my Fair American. My intention for my model is to show the ship as if it was in harbor. The long boat would be in the water tied by the steps or trailing from the stern. (Or ashore with the captain.) I haven't yet thought about a skylight. I will think it over. Keep me informed.
- 455 replies
-
- 1
-
-
- fair american
- model shipways
- (and 1 more)
-
Well, I am also retired. However, my wife now considers my time, her time. I get a lot of interruptions. It looks like the storm here in Brooklyn may just fizzle out. They now say it will head south of us ( toward your area). I always enjoy the photos. Cheers.
