Maury S
-
Posts
1,490 -
Joined
-
Last visited
Content Type
Profiles
Forums
Gallery
Events
Everything posted by Maury S
-
 Druxey, I did a bunch of research into the type faces of the period. Pretty close to the evidence we have, Maury
 -
installed Maury
-
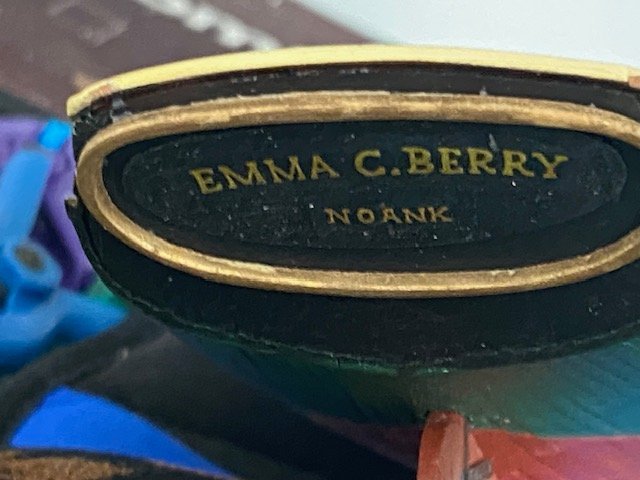
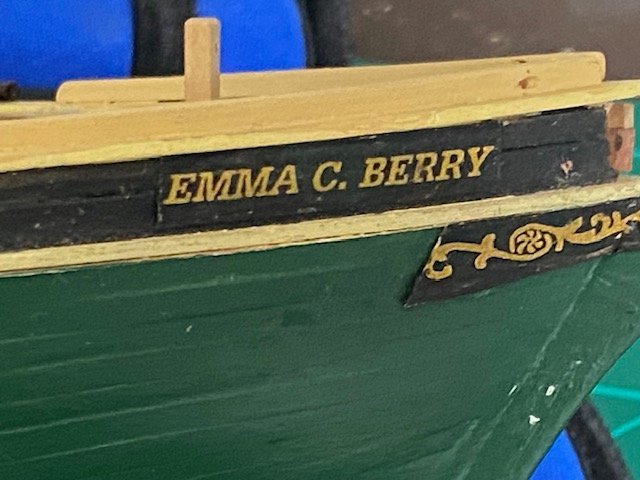
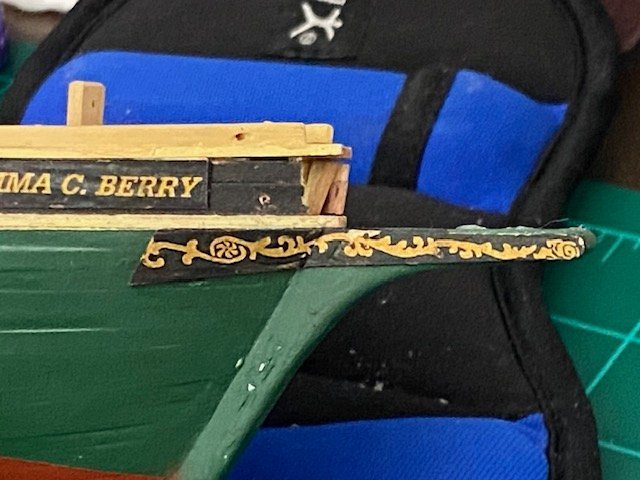
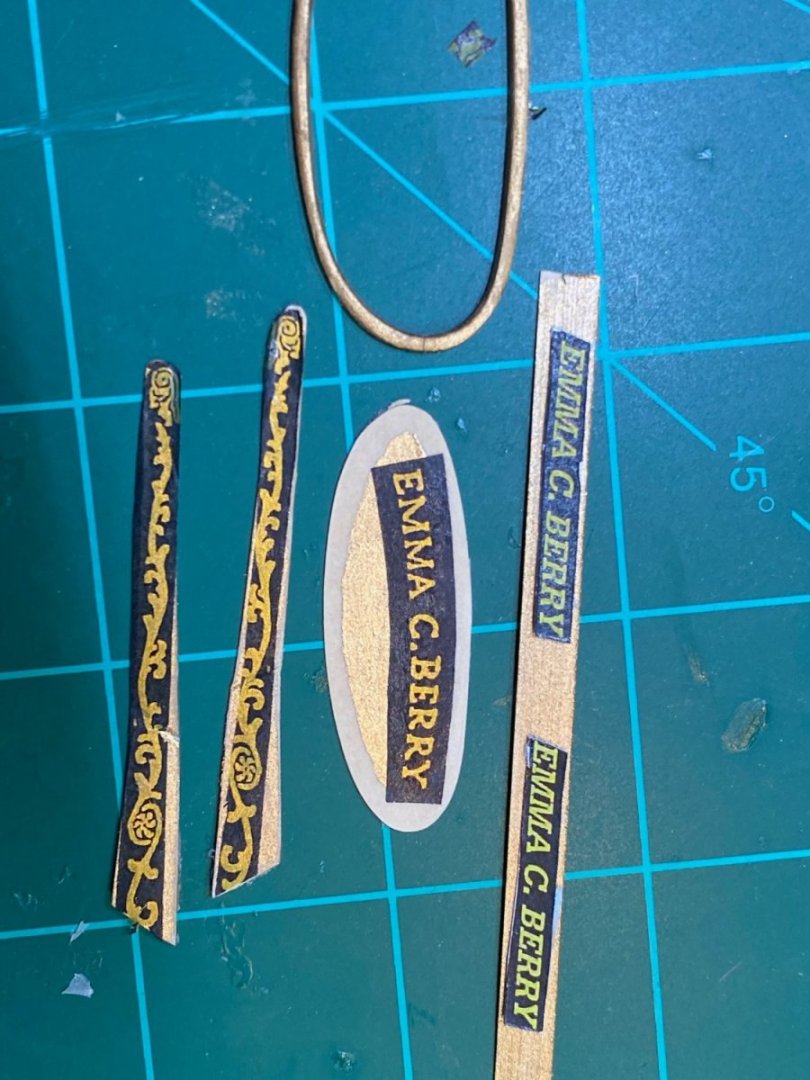
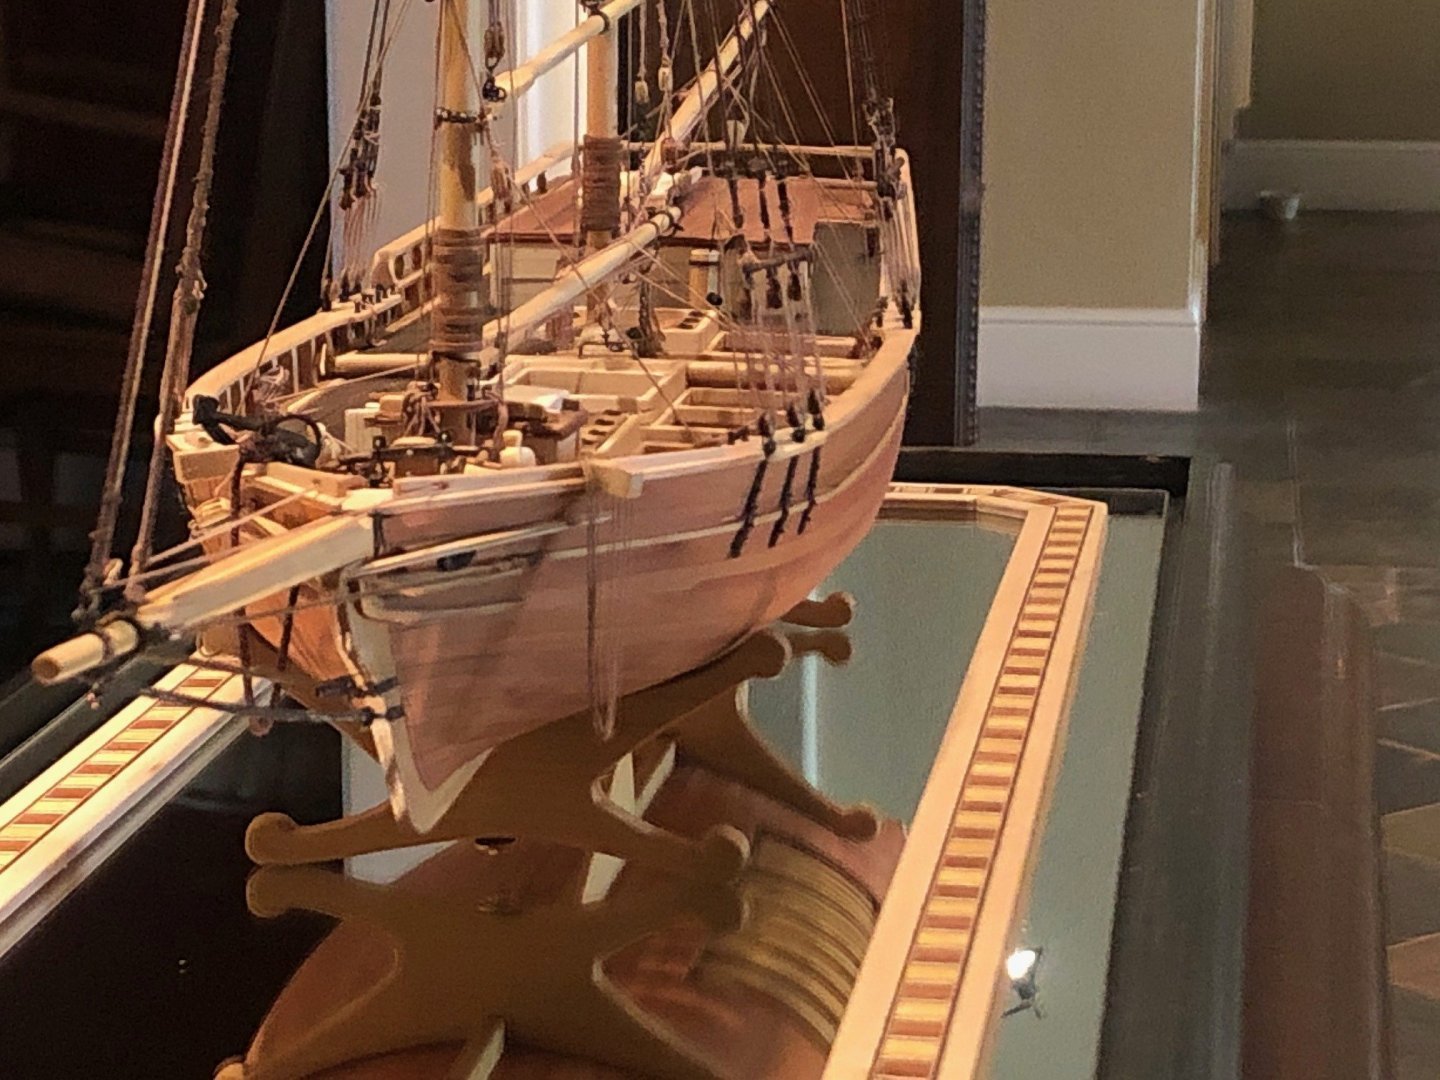
Back in the shipyard for a while. Working on lettering and scroll work for the trail boards. The name boards and trail boards are cut from .015" laser board. They are painted gold so the color shows through the decal. The surrounding areas will be painted flat black. The two names on the right are still on the decal backing and have not yet been attached. Maury
-
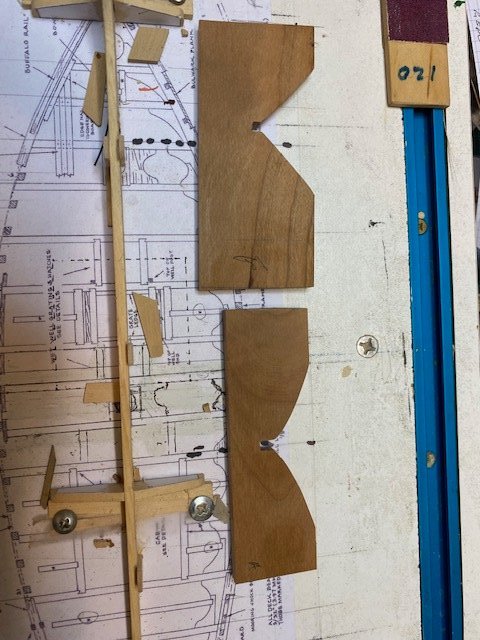
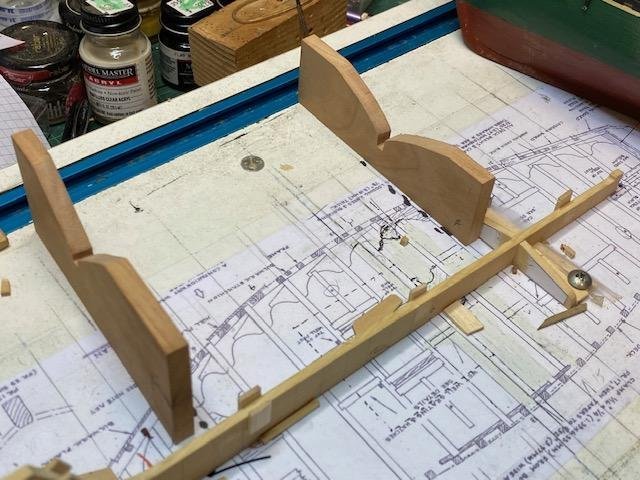
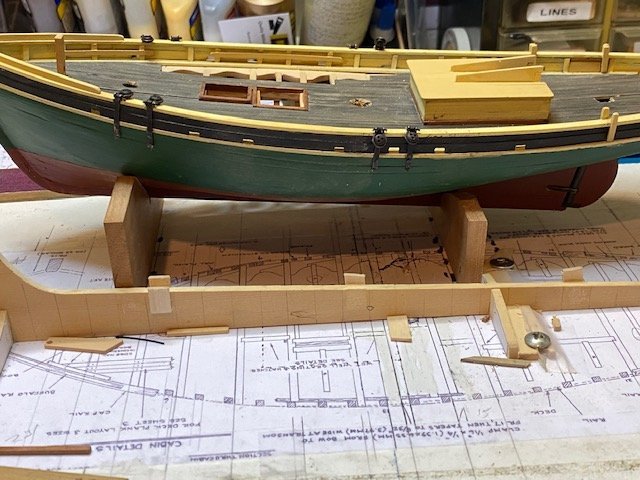
It's time to take her off the building board. The support system is a pair of cradles similar to the cradles for my Centerboard Schooner Post 302 March 21, 2021. I start by tracing the #4 and #17 frames from the plan sheet and transferring that pattern to card stock for rough fitting. The lower part of the frame is close to the shape of the hull at the points where the embedded nuts are located. After that, I copy the shape to some 1/32" box for final shaping. Since the ECB is built on a sloped jig, I measured the distance from the top of the jig and the building board at the two mounting points and transferred that measurement from the keel slot to the bottom of the rough cradle. The scroll work will be done later. Maury
-
Scotty, ...and of course you're going to serve the ring, right? Maury
-
Yves, Thank you. That is my next choice. I have a jar in my collection. Maury
-
Re. material... the bolts react to a magnet. They contain some iron, obviously. Could be some version of stainless. I had hoped BlueJacket's nickel blackener might work, but NO. Any other ideas are appreciated. Maury
-
I too am waiting for my recollection to improve. Maury😊
- 3,618 replies
-
- 2
-

-
- young america
- clipper
- (and 1 more)
-
BTW, regarding the tiny nuts and bolts blackening...The nickel blackening solution does not blacken the bolts. I can use paint. Maury
-
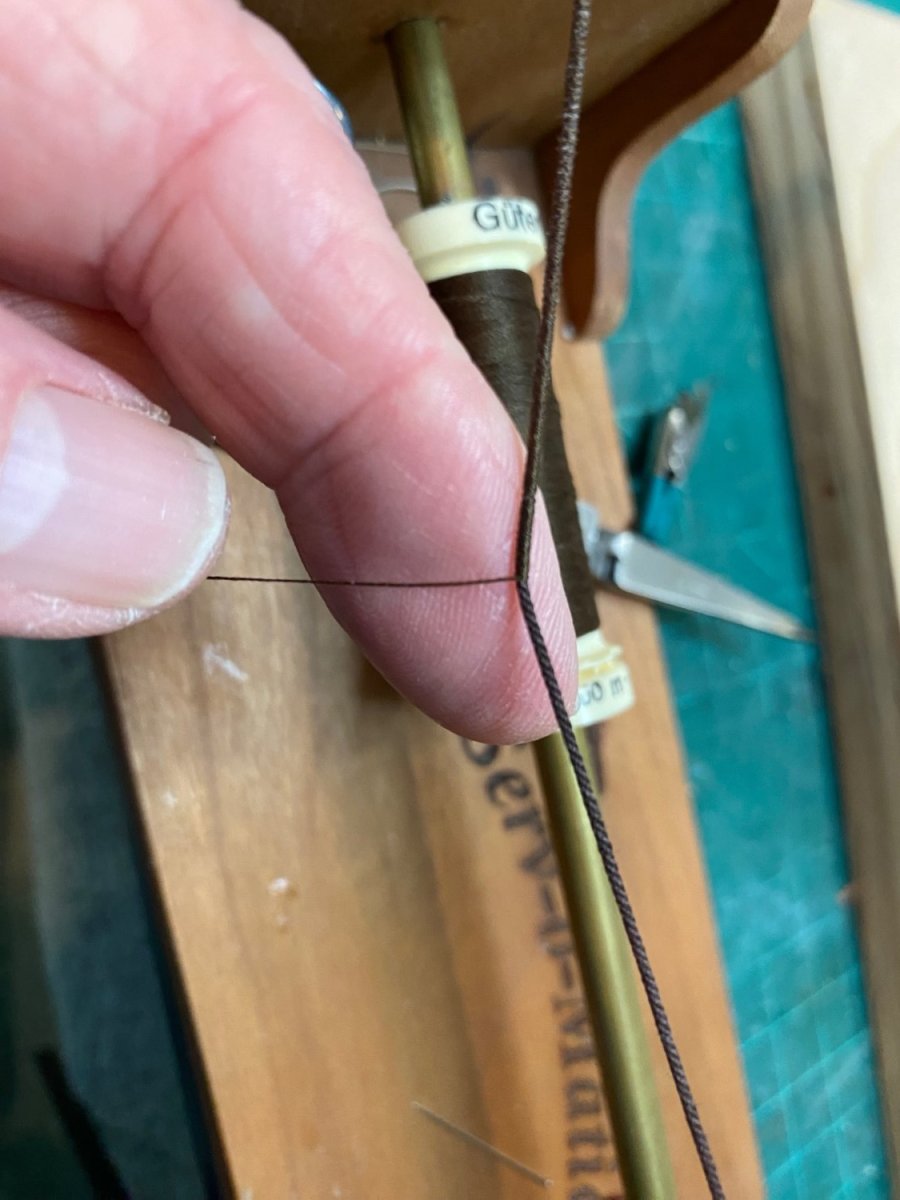
Using a serving Machine. ( Syren Serv o matic)
Maury S replied to DaveBaxt's topic in Masting, rigging and sails
see post#244 for use of Serv-o-Matic: https://modelshipworld.com/topic/28039-emma-c-berry-by-maury-s-148-scale-pof-rigged-as-schooner/page/9/#comment-974182 -
Serving the shrouds: I have been using Syren's Serv-o-Matic for years now. The only modification I've done is to put a key into every place where the brass tube goes into the gear to prevent slipping. Easy to use, and I can only do about an hour at a time due to eye focus strain. I run the serving thread through the rope (with a needle) near the left side, tie a couple of overhand knots, then serve to the right. The rope is held in the tube with alligator clips (with heat-shrink tubes over the teeth). I make sure the serving is going the opposite lay of the rope threads and maintain a mild tension on the serving thread. Maury

-
Chuck, I get the sense that you REALLY enjoy doing this. It's a major accomplishment to design and prove out these projects. Kudos. Maury
-
Allan, I don't know. I have a Nickel blackener that I'll try, then it's paint. Maury
-
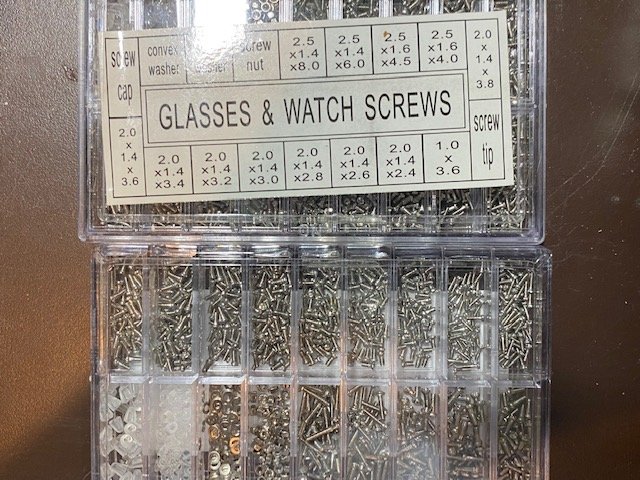
My partner gave me a kit of small nuts and bolts (washers, etc.) for watch and glasses repair. It comes with 6 drivers that is all he wanted. I haven't tried to blacken anything yet, but for about $20, there must be hundreds of these things that might be useful. Label reads "King'sdun" Maury
-
Yes. Grommets are just paint dots, drilled through (hat tip Druxey). They will be mostly obscured once the sails are furled. I played with folding a sample (practice) sail and I think it will come out fine...we'll see. Connecting the sails to the mast hoops will be a challenge. Maury
-
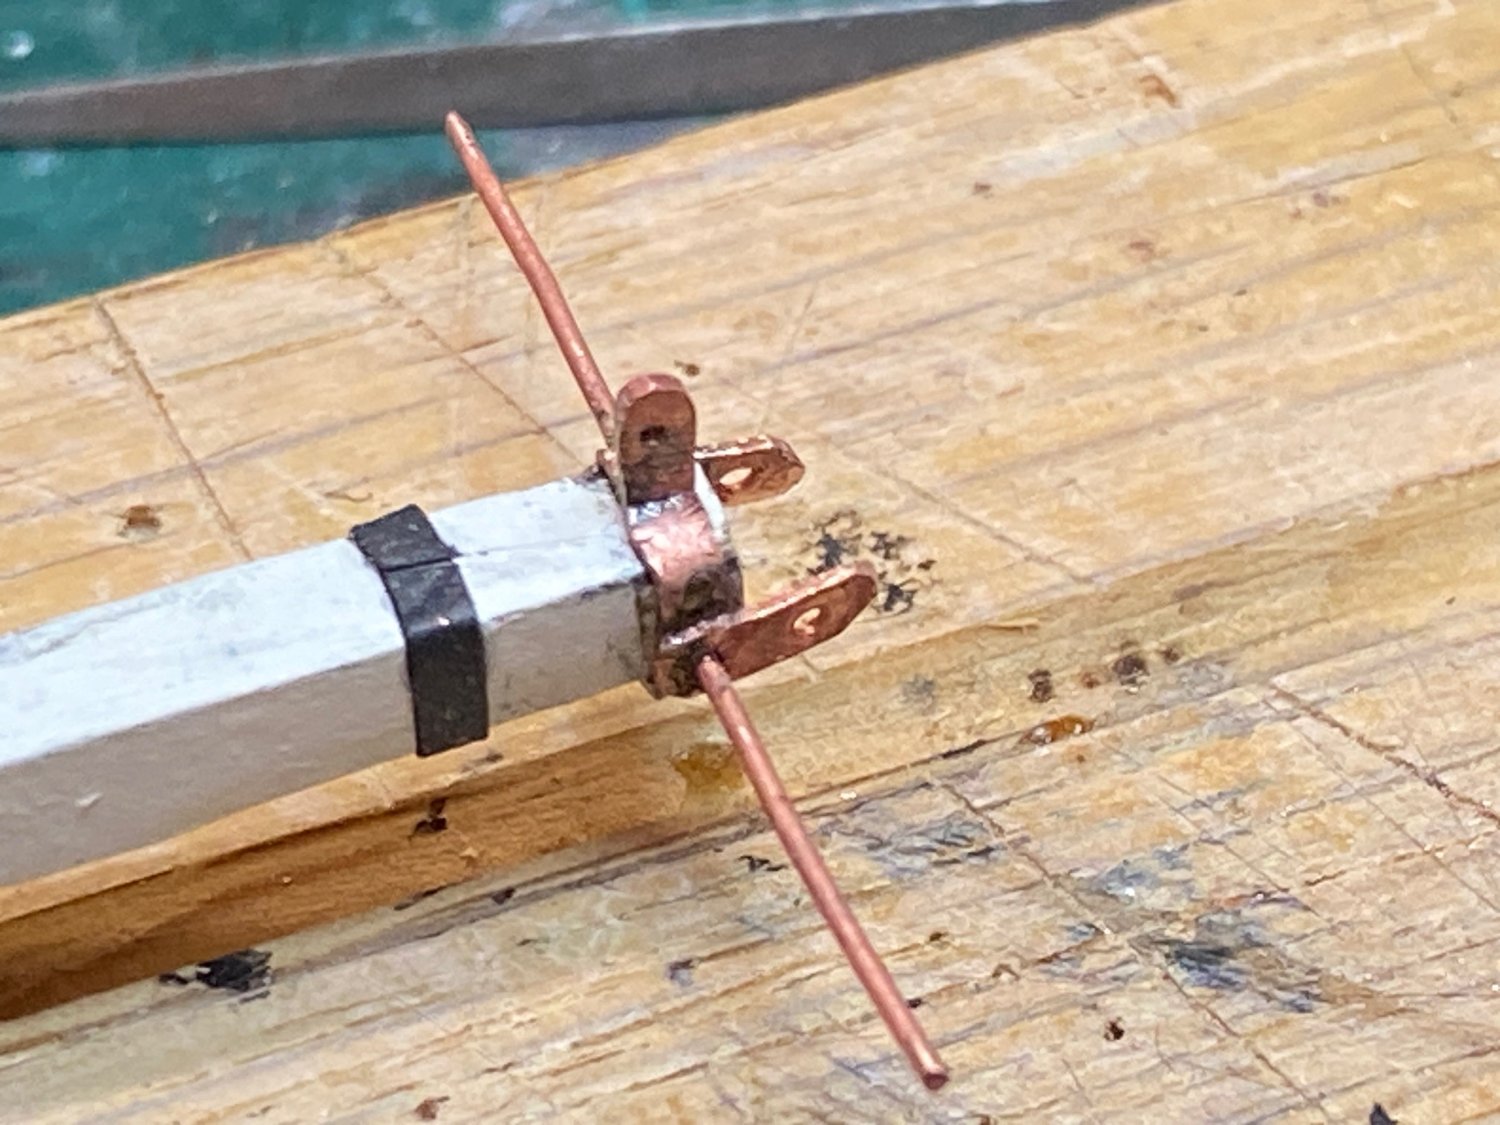
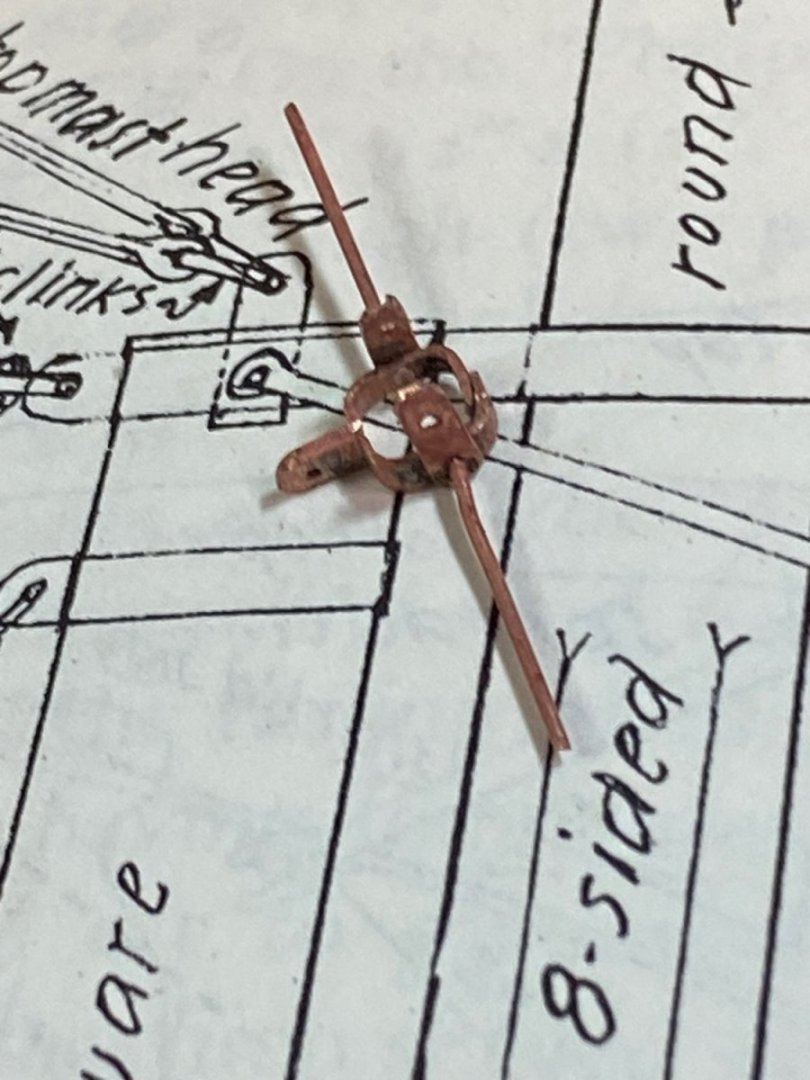
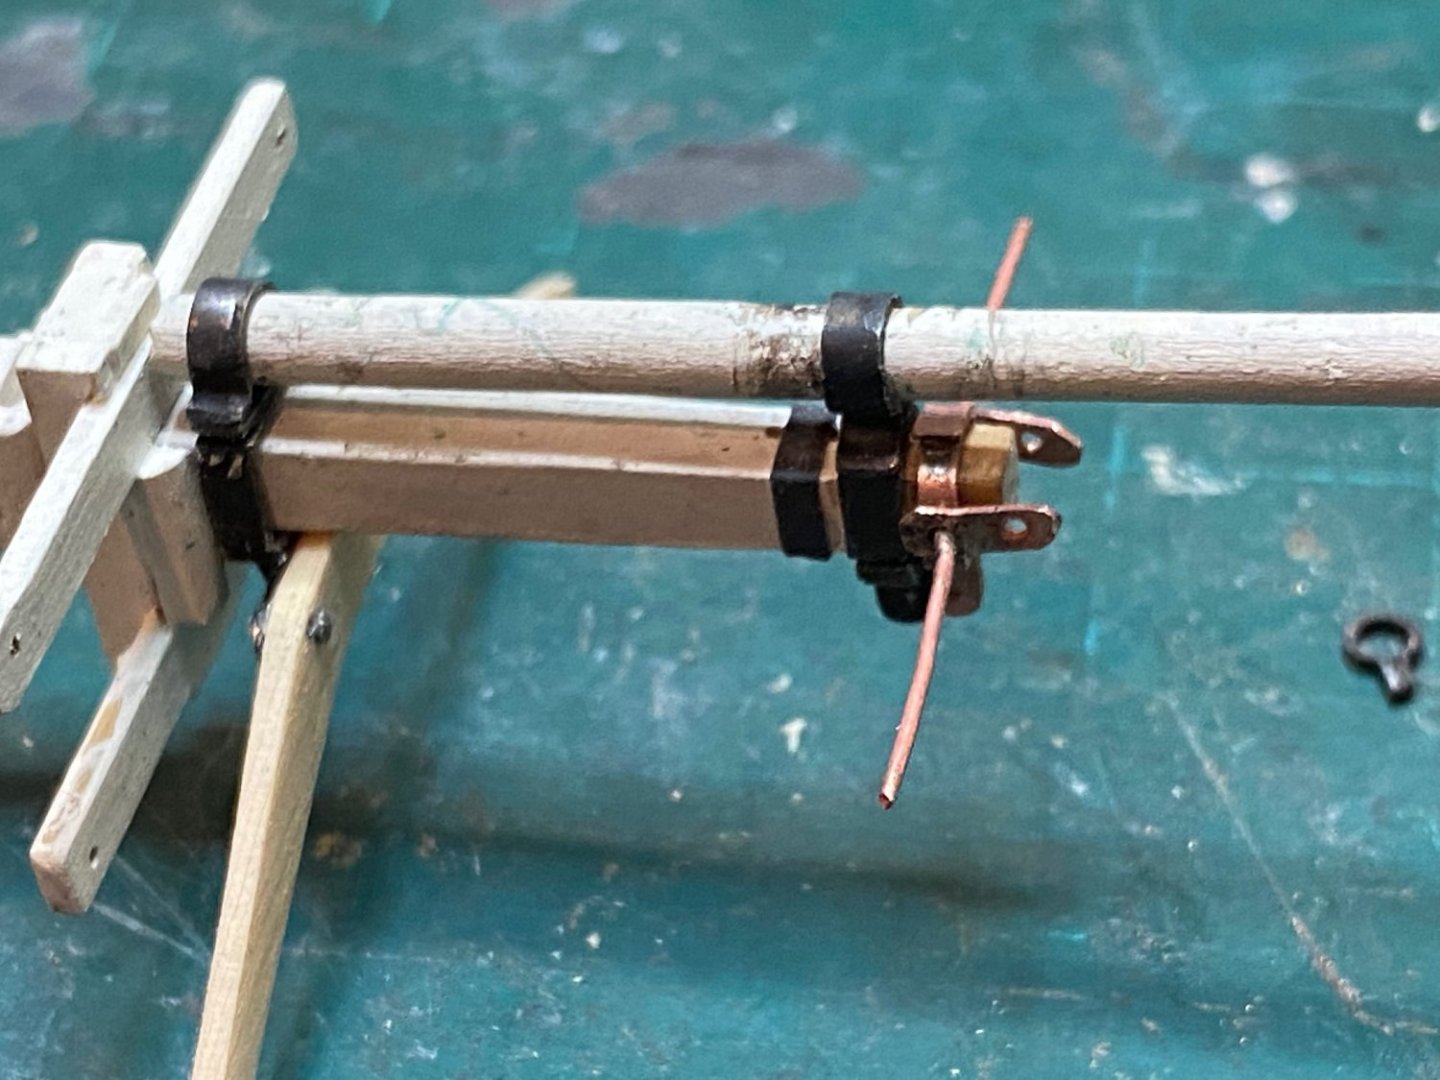
More work on the mast iron work. The background is a page from Chapelle's American Schooners...where most of the details are documented The rods sticking out will be the supports for the bail and will be trimmed back, but holding things in place for soldering has to be thought out as well. Keeping in mind all of the parts that have to go on in order is important like the mast hoops on the top mast before the wyes are installed. Maury

-
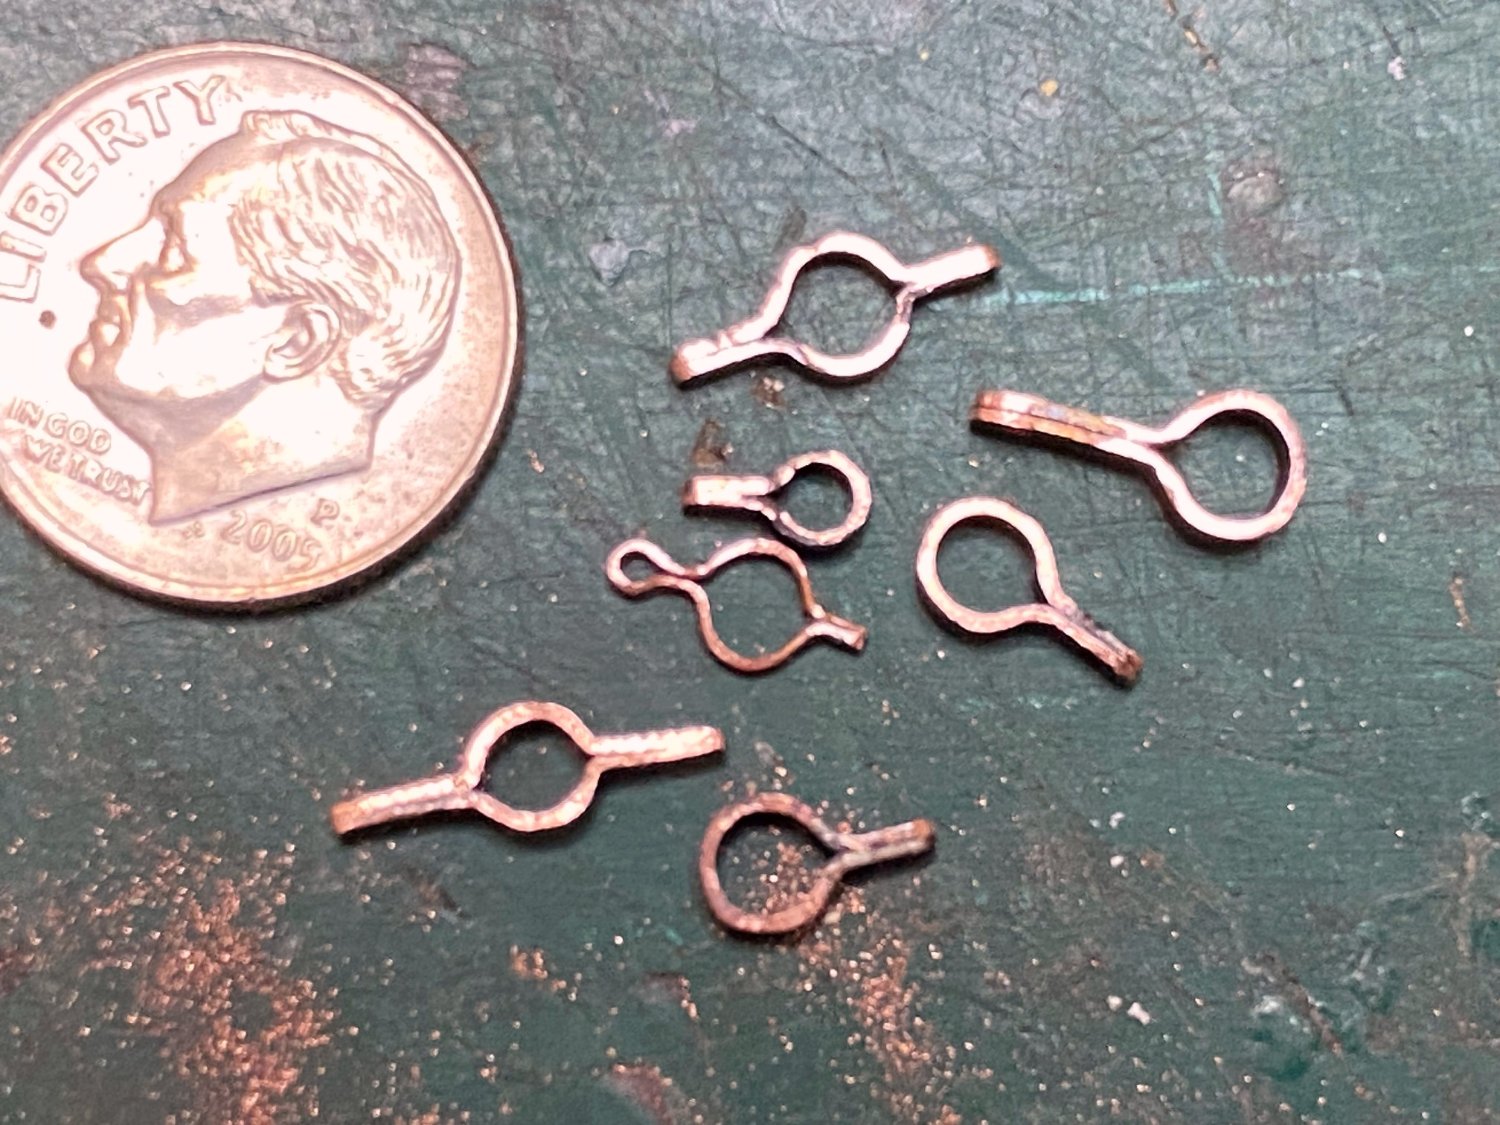
Misc. Hardware. Various copper sheets and wire hammered into flat shape and silver soldered. They go on the bow sprit, booms and gaffs Maury

-
Happy tenth anniversary! We are eternally grateful for your contributions. Maury
-
for glue, I prefer Luthiers Musical Instrument glue. It's just like Tite-bond but has a dye in it that shows up under black-light so you know if you've smeared any where it doesn't belong. Similar cost as Tite-bond. Order direct: https://www.lmii.com/ Maury
-
A sled does not have to be fancy, just stable (thickness). Like Greg, I used 1/4" Plexiglas. This one has been used for years and is beat-up but still fits the bill. If the piece I'm working on is too short, I might use double stick tape to hold it. I've been advised, to rotate side to side and end to end when thickness-sanding. Maury

-
Kevin, create a simple "sled" for the sander. I use a piece of1/4" "Plexiglas" about 12" x 6". I think you will find it much better than just feeding a piece of wood through. Same technique...push stick and thumb pressure on the output. The sled also gives you a longer table. Maury
-
Wire rigging for 1885 Puritan by Mamoli
Maury S replied to bridgman's topic in Masting, rigging and sails
Even wire shrouds would have been served. Maury -
Regarding bending wood, I believe it is heat that allows bending and water just allows the heat to penetrate better. Lots of evidence from the "old days" showing bending wood with little or no water involved. Maury
-
Kevin, A small supplement to your very good treenail video...I mount the draw plate in a bench vise and pull the bamboo through with a set of parallel pliers (they do not crush the ends like regular pliers do). Maury
-
Thanks to everyone. Still not settled but more information helps. I have all those photos of her taken in the 1930s but wondered if the late 1800s were different. Dutch example is informative. Maury