

jhearl
-
Posts
355 -
Joined
-
Last visited
Content Type
Profiles
Forums
Gallery
Events
Posts posted by jhearl
-
-
This question may be a bit "out there" but I am wanting to make a part on the boat I'm building that is a (approximately) 1mm diameter rod with threads on each end. I can't use all-thread for it because most of it needs to be unthreaded. I've searched around on the web and found any number of jeweler's tap and die sets in the 0.6mm & up range. That would work fine. But I was thinking to use some hex nuts from Scale Hardware. It occurred to me that I could wind up with a die that cut a different number of threads per inch than the hex nuts were tapped for. None of the suppliers I've found for dies mention the number of threads per inch - nor does Scale Hardware.
I sent an email to Scale Hardware and got a quick and helpful reply as follows:
"Metric threads are measured by pitch (the distance between two threads) rather than threads per inch. I can say the .6mm thread is approximately 169 tpi and the 1.0mm thread is 102 tpi. "
I've sent an email to the Otto Frei company (one of the suppliers of jeweler's taps & dies) but haven't heard back from them so far. Since they are just a seller, not a manufacturer, they may not know the answer. So, I thought, just for grins, I'd ask if anyone here might have tried using a jeweler's die and matching it with nuts from Scale Hardware? It might seem like all metric dies are the same, but the Otto Frei page says "Jeweler's tap & dies sets have broader threads than watchmakers or machinist taps & dies, which have finer threads." http://www.ottofrei.com/Swiss-Made-Colibri-Jewelers-Screwplate-With-Taps-Set.html
So I'm worried that the two could be different. Of course, I can, if forced into, struggle to make my own nuts, but I know they won't look as good as those from Scale Hardware.
Thanks in advance -
John
- thibaultron and mtaylor
-
 2
2
-
Check online jewelry suppliers for something called "jump rings." They come in various sizes and metals. But these are quite easy to make. Take some brass wire and wrap it in a tight spiral around a drill bit or brass rod slightly larger than the desired inside diameter. Then, use a jeweler's saw to cut the rings off (just cut in a straight line down the length of the drill bit while holding the assembly in a soft-jawed vise). When you make the cut, it will, of course, remove some of the material, so that's why you want to start with a drill bit that's slightly larger than your desired size. Of course, depending on the scale, close enough might just be close enough.
If you need to make eyebolts, check this page - http://modelshipworld.com/index.php?/topic/3336-securing-eyebolts/?p=107526
Cheers -
John
-
This is a wonderfully executed model of what is, to me, an unusual subject. A real pleasure to see and an inspiring piece of work. Congratulations!
John
-
Very nice and clear explanation - thanks very much! I'll be interested to see how the tap and die set work out. I hope you'll post your results here.
Cheers -
John
-
Ah - got it - thanks!
-
Just as an FYI - the Marathon tool sold by Gesswein appears to be made in South Korea. There is another brand called Besqual 2, also made in South Korea that is a bit less expensive. See this site - http://www.fdjtool.com/ProductInfo/MO4015.aspx Interesting video there. I have no experience with either tool or supplier.
Cheers -
John
-
Pics would be great. I've got the concept but as they say, "A picture is worth a thousand words." The part that stumped me when I tried making them was soldering the round bits (that the pin goes through) to the U-shape part. I couldn't seem to figure out a good way to hold everything together while soldering. So pics of a jig would be really helpful.
Thanks!
John
-
Another technique you may want to consider is simply making the bands from paper. Use a sheet of regular typing paper and cut off a strip as wide as the band you need. Apply a thin coat of white glue (Elmer's) and wrap the band around the spar. Make as many wraps as you need to get the desired thickness. Then you can paint the band black once the glue is dry. If you need an eye, simply drill a hole and insert an eye made from brass wire.
Cheers -
John
-
Your shackles look great - I'd be interested to know your method for making them. How did you make the two parts that the pin goes through and what kind of fixture did you devise to hold all the bits and pieces while you soldered them together? I haven't had a lot of luck with this myself.
Cheers -
John
-
Since I work for a museum that has many pieces of furniture dating to the 1700s, I thought I'd pop upstairs and ask our curator what she thought of the beeswax thing. She isn't an expert on ship models but conjectured that there were other things that could cause damage to rigging more readily than any acid in beeswax, such as dry rot and insects although she didn't discount the possibility of beeswax causing damage over a very long term. However, she said the conservator we use typically only puts Butcher's Wax on antique furniture although he sometimes uses the Renaissance Wax referenced above. Both are made by the same company. http://www.bwccompany.com/
I also found a very interesting article about beeswax from the North Carolina State Cooperative Extension. http://cleveland.ces.ncsu.edu/beeswax/ One thing the article points out is that the acids are "fatty acids." I have no background in chemistry so I don't know if those sorts of acids are different than something like muriatic acid. They do mention in the article that beeswax is found in the wrappings of Egyptian mummies. They've been around for a pretty long time!
Cheers -
John
-
From the last picture, it appears to me that the 2nd-5th (and possibly the 6th) bulkheads don't come close enough to the rabbet. If you lay a plank along those bulkheads, down near the keel, while you're fairing the hull, you'll likely find the plank won't hit every bulkhead. This is pretty easy to correct though. Get yourself some basswood in a 3-inch wide, 24-inch long sheet. Thickness may depend on the amount of space you need to fill in but 1/16" should work OK. Cut a piece off the end of the strip as wide as the bulkhead so you wind up with a strip that's 3 inches long with the grain running crossways. That makes it very easy to bend the wood around the curve of the bulkhead. Apply some wood glue to the bulkhead and glue on the strip. I just hold it with my fingers for the 60 seconds or so it takes to adhere. Once the glue has thoroughly dried (I usually wait over night) you can proceed with fairing the hull. Of course, if three inches isn't enough length, you can just add more pieces as needed.
Cheers -
John
- GLakie and CaptainSteve
-
2
-
Back when I built my copy of Armed Virginia Sloop and wrote a series of articles about the build, I gave a fairly detailed description of how to make a mouse on a stay. I've attached the relevant article in PDF form. Take a look at pages 6-8. It might be helpful to other builders.
Also, if I may, I'll comment on the issue of finding lines attached where you need to attach another line. If there's one thing ship modeling will teach you, it is to think ahead. In my early builds, I sometimes discovered I'd overlooked something like putting in an eyebolt which, it turned out, was in the plans, but I'd just missed. Over time, I got to the point where even when constructing the hull, I'd think about rigging or something else that might be affected by what I was doing (or failing to do) at the time. If you take up scratch building, you'll find you really need to develop this skill since you won't have any instructions at all. All part of the learning curve! I have a feeling this is one lesson you've managed to learn already. :-)
Cheers -
John
-
I may be wrong, but I suspect that once you cut away the outboard tabs, you'll be able to pry the longitudinal stringer out of those slots without a lot of difficulty. The planking material is only 1/32" thick, so it will be pretty flexible. The ribs will add some stiffness too, but not so much that it's like you're trying to bend a thick piece of hard wood. Just for grins, temporarily clamp a stringer to the keel, seated in the slots, and see if it isn't pretty easy to move outward. It only has to go 1/16".
Also, be aware that the instructions call for putting the ribs entirely over top of the keel piece. In other words, each rib goes from the slot on one side to the slot on the other in one continuous piece. Which means the top of the keel needs to be flush with the top of the formers. (It's really the bottom of each, but from the way they're oriented in the photos, I'm thinking of those surfaces as the "top.") Also, I suspect you'll want to fair the formers before you add the ribs just as you would the hull of the ship itself. I haven't seen the plans myself, but perhaps there's a false keel/stem added after the boat is planked?
Cheers -
John
-
Here's a suggestion for you - as you place the deck beams, be aware of the locations of the holes in the deck covering board (or waterway) for the stanchions. The stanchions come later in the process but they are designed, in some places, to fit right next to a frame. I thought I had followed the plans when set the deck beams. But when I placed the covering board much later, I discovered that some of the holes were right over the tops of deck beams. Of course, by then it was far too late to do anything to correct it - the deck was already installed - so I had to cut the stanchions short and epoxy them in. But this would be a good time to take the covering boards out of the matrix and place them in position to see if you have room for the stanchions.
Cheers -
John
-
-
There is a book named "Bluenose II" by L.B. Jenson that has some very good drawings of the rigging. The book might be out of print and used copies are pretty expensive (around the $40 range) but you might be able to get a copy through your library.
Here's a link to the Amazon page for the book -
-
I use a similar but slightly different method to the video shown above. I have some pics and descriptions on my website.
http://modelboatyard.com/stropping.html
Cheers -
John
- IgorSky, tkay11, CaptainSteve and 1 other
-
4
-
That's my thinking as well but, as I say, perhaps I am misunderstanding how the table is to be set up. It also takes me back to my original question - is there any real use for this accessory? Like I say, the only thing I've come up with so far is making the bevels on hatch coamings.
-
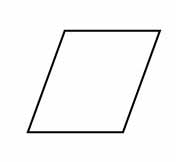
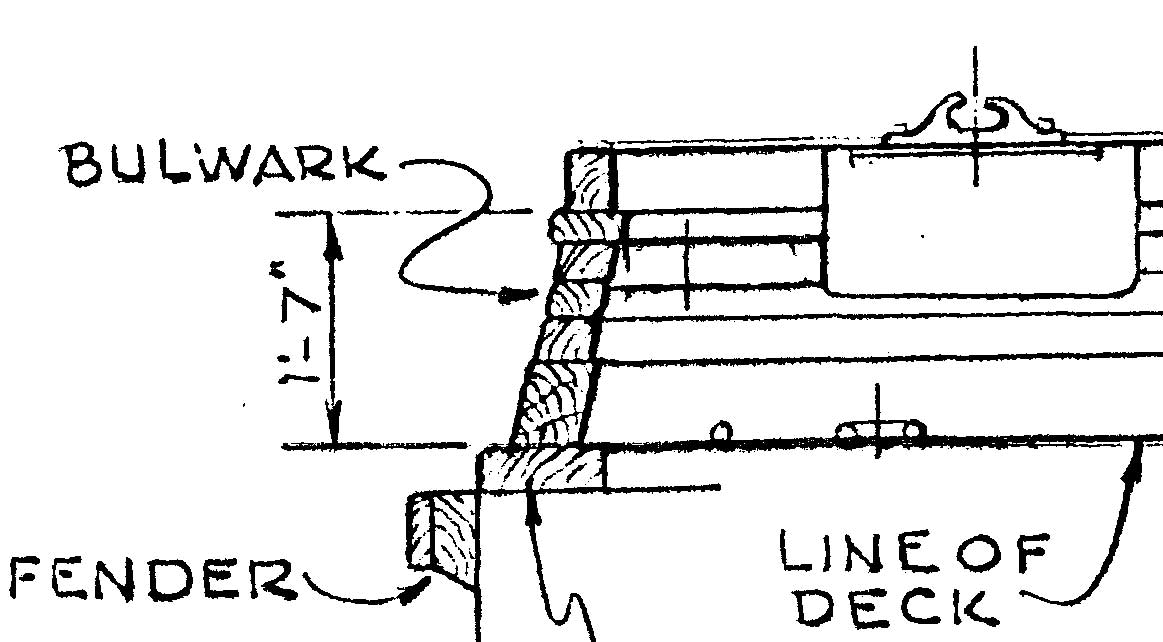
I probably haven't been clear. The illustration with the parallelogram is a cross section of a long strip. In other words, it's a piece that's, let's say 24 inches long but if you looked at either end of the piece, it would look like a parallelogram. Here's a drawing of the bulwark (again, in cross-section).

In the image above, it's as if you're looking from the bow aft so the outboard side of the bulwark is to the left. I don't have the exact dimensions in front of me, but those bulwark pieces at scale are probably 3/16" or 1/4" wide.
I can, of course, cut these on my full-size table saw with its tilting blade although there's a good bit of waste, but I was wondering if I am just misunderstanding how the tilting table is set up and used.
-
Here's my simplistic representation of the way I think the tilting table is set up:

Again, I may be misunderstanding the setup or its proper use since I don't own one. If the illustration is accurate, then I can't see any way to move the stock down the tilting table to make a second cut. The saw table is in the way. Moreover, if you decided to lower the tilting table to make a narrow strip (or start with a square strip as suggested above), then raise the table again for the second angle cut, it would be difficult, impossible, or extremely dangerous to try to hold the strip in place as you make the cut.
-
OK - this is where I get confused. Let's say I have the tilting table to the right of the saw blade. The table tilts up to allow the stock to be sawn at an angle. It would seem to me (and this was my experience with the Preac) that the left edge of the stock touches the saw table (not the tilting table) where the saw blade and tilting table come together. (It seems to me that the left edge of the tilting table must almost touch the saw blade.) So you can make that first cut at an angle, no problem. But how, after that, can you move the stock any more to the left (down) to allow you to cut off a strip? The main saw table is in the way. As I say, I must be missing something with regards to how the table should be used. I've searched around on the net looking for a video or even photos of someone actually using the table but haven't found anything so far.
Cheers -
John
-
I'm wondering how folks use the tilting table on their Byrnes saw. Years ago, when I bought my Preac, I bought the tilting table accessory. I think I tried it out once but never wound up using it for a project. About the only thing I could think of to use it for was hatch coamings, which often have a bevel on the outside. But I wound up just doing them on the disk sander.
There is something I could use a tilting saw blade for on a model. The bulwarks on a particular ship I'm building are made up of pieces shaped like a parallelogram in cross section. Like this:
But I don't see any way to do that with a tilting table. It seems to me you can only make an angle cut on one edge. Of course, you could make the cut on one edge, then turn the stock around to cut the other edge, but with small stock, that would seem pretty much impossible and dangerous to me - I don't see how you could hold the stock for the second cut. (I'm talking about stock that's maybe 3/16" (4.7mm) wide). But maybe I'm missing something since I don't own the Jim saw or the tilting table.
If you own this accessory, have you ever used it for a real project and, if so, what did you use it for?
Thanks -
John
-
-
Big box stores have pretty much taken over the Mom & Pop hardware stores here too although I'm lucky enough that there are still two in my area. Many years ago, I worked in a small hardware store. One day a guy came in looking for a particular size screw or some such thing. Our price was higher, of course, and he complained that he could buy the same thing at the big box store for half the price. I asked him why he didn't buy it there then and he said they were out of them. To which I replied, "Oh - when we're out of them, we sell them for half the price as well!" That pretty well ended the conversation.

Good luck on getting your spare bowsprit.
Threads on miniature nuts & bolts
in Metal Work, Soldering and Metal Fittings
Posted
grsjax and Paul - thanks for your thoughts. The nuts would be brass, so maybe it would work to try to rethread them if necessary. Paul - the statement on the Otto Frei website about jeweler's threads being different from watchmaker or machinist threads is what worries me. If that's the case, it seems the thread pitch would be different even on the same size bolt for different types?
The other thing I've considered is faking it by buying slightly smaller nuts and drilling out the internal threads enough so they'd fit over the threads of the rod. I suspect no one could tell. But it would be nice to be able to say they were truly threaded, so that's what I'm shooting for.
Cheers -
John