

jhearl
-
Posts
355 -
Joined
-
Last visited
Content Type
Profiles
Forums
Gallery
Events
Posts posted by jhearl
-
-
-
Check out the Dremel MiniMite. They make it in a rechargeable version (Dremel 7300-N/8 MiniMite 4.8-Volt Cordless Two-Speed Rotary Tool)
and one that uses standard AAs (Dremel 7000-N/5 6-Volt Cordless Two-Speed Rotary Tool). They are small and inexpensive ($25 & $22 respectively). Just two speeds but I find the slowest speed ideal for drilling small holes. I added a 3-jaw chuck to mine because I like the convenience. If you get such a chuck, be sure you get one that is compatible with that model (Dremel 4486 MultiPro Keyless Chuck ). I have one that won't work on the MiniMite . I had the rechargeable version for years but the battery finally died so I replaced it with the AA version because I had some spare Eneloops that work well.
Cheers -
John
-
Personally, I can't imagine not having a small modeling table saw. I use it for so many things. The other day, I needed some pieces about 1/8" square to go on the corners of a deck house. I had to notch out one corner of the square stock so it would fit over the corners of the deck house (leaving 1/16" on either side for later planking). Simple enough to do with the table saw but it would have been very difficult to do accurately by hand with an Exacto knife. If I need a 2.5mm wide board and don't have one, I can cut it on the saw. Do I want to cut several pieces so they are all exactly the same length by only measuring once - I do it on the table saw. If I need something that's tapered, I can easily cut it on the saw. I could fill up a page with all the uses I find for the saw. I suspect if you get one you'll wonder how you ever did without it. Is it a necessity - of course not. I remember reading Harold Underhill's books and how he used not much more than a pen knife. But is it a greatly appreciated tool? It sure is in my shop!
Cheers -
John
-
I like to steer beginners to Midwest models for several reasons: they are inexpensive, have very clear instructions, require a minimum of tools, don't take very long to build, and are very good looking models when finished. There is quite a learning curve when it comes to building wooden ship models and you can't learn everything at once. If you start with too complex a project, you greatly diminish your chances of ever finishing. Even with a simple project, you might find that you don't enjoy wooden ship modeling and if you have only made a small investment in a kit and minimal tools, you won't feel that you've lost much. But if you complete a simple model well, you will have learned a lot about the hobby, you'll have a great sense of accomplishment, and even simple models are something you can be proud of. Here is a link to the Midwest site - http://midwestproducts.com/collections/boats I'm particularly fond of the Muscongus Bay Lobster Smack and the Sakonnet Day Sailer as good starter kits.
I do not recommend AL kits for a couple of reasons: they tend to be historically inaccurate and the instructions are minimal at best. I'm also not a fan of double planking, but that's a personal choice. You mentioned historical accuracy and double planking with thin veneer strips is anything but. Of course, there's plenty of help available on the forum for when you get into difficulties so if you find yourself drawn to an AL model, you can probably get it built despite the lack of instructions. Sometimes your passion for a particular boat can overcome a lot of problems with a kit.
Cheers -
John
-
I have an older Sears Craftsman oscillating spindle sander that I find very useful indeed for sanding inside curves (like frames). One thing I like about mine is that it has a large, square table. Some sanders (like the Rockler) seem to have very little table space in front of the spindle. I see that Grizzly makes one similar to mine for $160 - http://www.sears.com/1-3-hp-oscillating-spindle-sander/p-SPM1127850014
Even with the finest grit drum, these things are pretty aggressive, so you have to be careful when using them. But I'm really glad to have one.
Cheers -
John
-
Since you say you're a teenager, did you/do you have a shop class in your high school? Perhaps someone there would be able to clamp up the top for you? Perhaps some friend's dad has some pipe clamps you could use? Craigslist post offering some service in exchange?
-
If you haven't yet run across it, you would, I'm sure, be very interested in a book called "Chesapeake Sailing Craft" by Robert H. Burgess. While he covers more than just skipjacks, there are 37 pages on skipjacks with many excellent historic photos. Lots of good details there. The rest of the book is very good as well for anyone with an interest in the subject.
It has been quite a few years since I was last at the Chesapeake Bay Maritime Museum in St. Micheals, MD, but they then had E. C. Collier on exhibit inside a building and you could walk along the hull and see inside. According to their website, the exhibit is still there.
http://www.cbmm.org/v_oystering.htm but it might be worth a call or email to be sure. If you've never been to that museum, I'd certainly encourage you to go - there is a lot to see. Nice weekend trip for you.
Back in 2006, I built a model of a crab scrape. The hull is very similar to a skipjack in construction. I have a few pictures here - http://modelboatyard.com/crab_scrape1.html - in case you're interested.
Cheers -
John
- KevinR and thibaultron
-
 2
2
-
I've owned two Sterling kits many years ago - American Scout (a freighter) and Emma C. Berry. Never finished either. Both were mostly balsa - not very good for ship modeling in my opinion. Emma C. Berry was a complete fabrication - nothing at all like the real boat. It was designed for RC operation.I would not recommend either for a beginning modeler.
-
I would find using this tool a bit fiddly for cutting the ends of line just because the cutting part is so narrow. I use cuticle clippers that you can buy at any drug store. You may not want to buy the very cheapest because the blades don't always meet perfectly. But a good pair works really well.
Cheers -
John
-
I bought an expensive scroll saw years ago and almost instantly discovered I didn't like it because of the up-and-down movement of the blade. I replaced it with a tabletop bandsaw (9" Delta in my case) and was much, much happier. Since the blade is always moving downward, it helps to keep the work on the surface of the table. Of course, with a bandsaw, you can't put the blade inside a hole in the work, but I just never have a need for that and if I did, I could saw it by hand. The bandsaw is great for sawing out frames or pretty much any other curved shape. You can also use it to resaw larger pieces of stock although I have a 14" bandsaw and a 10" table saw that work better for that. A Ryobi 9" bandsaw is $129 at Home Depot.
Cheers -
John
-
Very kind of you - thank you! I determined that the nut is a 7/32. Unfortunately, a socket won't fit between the nut and the base (even the small 1/4" drive socket I have), but I was able to get them loose with a wrench. The allen screws appear to need a 1/16" wrench, which I got at the hardware store, but it is really tight. I got a cheap set, so maybe it's just not exactly 1/16". In any case, I got the gibs tightened and now the table is much better.
So, thanks again to everyone for the help!
Cheers -
John
-
Thanks to both of you for the very quick response! I had gone to the Proxxon web site looking for a manual and couldn't find any, but I didn't think to search for the X-Y Table manual. This process is pretty much what I figured it would be. I'll just have to see if I can find the appropriate tools. Again - many thanks for the replies.
Cheers -
John
-
I own a Proxxon MF-70 mill that I bought a number of years ago and have barely used. I wanted to try something the other day with it and realized that in the X dimension, the table is very wobbly. I think that I need to adjust the gibs but I can't quite figure out how. I can see that there are three nuts on the side with what looks like may be some teeny, tiny allen screws in the middle of them. My eyesight isn't that great, but if they are indeed allen screws, I sure don't have a wrench that small. For that matter, I don't have a nut driver small enough either (and there's no way to get a wrench in there). But given that I don't have a clue what I'm doing and can't find any instruction manual (if I ever had one) I need some help understanding how to do this from a more experienced member who also owns this mill. I don't mind buying the tools I need, but I want to make sure I'm doing the right thing in the first place. The Y dimension seems to be just fine.
Thanks in advance for the help -
John
-
One wood that often seems to be overlooked is beech. It looks, to me, like oak at a miniature scale. I've used it on several models. Also, if you are painting your model, poplar is a readily available and inexpensive wood that is easy to work but harder than basswood. It takes paint very well.
-
Keep in mind that while a building board to hold the keel straight as you're gluing on the bulkheads is not a bad thing, it doesn't necessarily mean that the assembly will be straight after the glue dries. Consider this highly exaggerated illustration of a warped keel:

Note that the bulkheads (two vertical lines) are individually perpendicular to the keel but if the keel is warped, once it's out of the building board, the keel will still be warped and the bulkheads will not be parallel to one another. One way to solve this problem is, once the bulkheads are solidly glued on and dry, with the keel still in the building board (or clamps or whatever) glue pieces of material between each bulkhead. For example, I'll often use something about 1/4" square but size isn't important. It just has to be strong enough to not warp itself. You will need to cut the pieces carefully so they are exactly the same length port and starboard (although the distance between each bulkhead will likely vary).
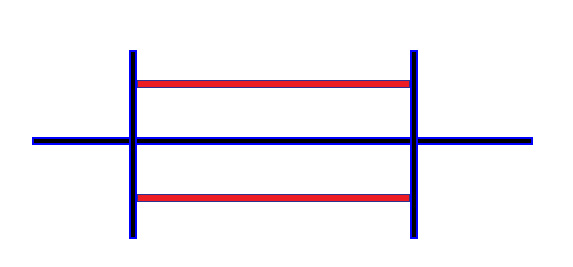
Hope that makes sense.
John
-
I have never seen this kit, so I may be off base here, but surely there's some sort of keel piece that gets glued to the bottom? And I'd guess there's a stem piece as well? Maybe they don't get glued on until after you plank the hull (that would seem unusual to me) but if that's the case, perhaps you could attach the keel piece with screws while you're gluing up the bulkhead? If there is no separate keel piece (or even if there is and you just don't want to drill holes in it), then how about making one that, again, you could temporarily attach to the bottom just long enough to glue up the bulkheads?
Hope that helps -
John
-
Check out the Michi carving tools from Japan Woodworker - http://www.japanwoodworker.com/search2/search.aspx?query=michi
They are razor sharp and stay that way. Available in seveal sizes. Not cheap at all, but I really like mine and would buy them again
Cheers -
John.
-
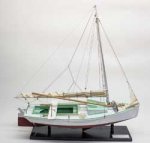
I built the AL version of the kit back in 2003 and wrote a series of articles for Ships in Scale Magazine. These articles are available to download on my site for free - http://modelboatyard.com/bluenose2.html The AL kit has lots of problems but in a sense, it's an OK first-time kit because you can make your inevitable beginner mistakes with it and not really lose anything.
- Mfelinger and irishjohnny98
-
2
HM Mortar Vessel Convulsion by jonny.amy - FINISHED - Caldercraft
in - Kit build logs for subjects built from 1801 - 1850
Posted
Let me say right off the bat that I have no idea what places you may have tried and I know nothing about Southampton. However, I did find a place called Hobby Craft - http://www.hobbycraft.co.uk/southampton that lists 3mm dowling. Whether or not your local store has it, of course, I can't say. We have big craft stores like this in the US and they often carry a limited selection of basswood for various types of crafts like dollhouse makers. You might look for other types of craft shops in your area. My apologies if you've already thought of this. Also, you might try what we call hardware stores (maybe you call them iron mongers?) for dowling. Even if you didn't find a dowel quite thin enough, you could likely sand it down without any great difficulty.
Shaping a round spar from square stock doesn't require a lathe - espcially in a small size like this. Just use a file to knock off the corners, then sandpaper to smooth it to a round shape. It's really not difficult at all. Of course, if you don't have a source of square stock or any scraps, then it would be pretty difficult.
All of that said, if you're content to wait for Jotika to send you a piece, then by all means, save your petrol!
Cheers -
John