

jhearl
-
Posts
355 -
Joined
-
Last visited
Content Type
Profiles
Forums
Gallery
Events
Posts posted by jhearl
-
-
-
-
I second the suggestion on poplar. It's not hard to find pieces without any green. It's very easy to work with and is harder than ordinary building pine. It has a fine grain and machines well. It's inexpensive and is readily available in 3/4" thick boards, which makes it easy to turn into ship modeling lumber. In some of the large lumber stores, you can also find boards in 1/4" and 1/2" thicknesses that are typically 3"x24" and often they are very white and almost grain free. I've used poplar on several models and like it a lot. At the moment, I'm using it to plank the outside of a deckhouse and the planks are 3mm wide and less than 1mm thick.
Cheers -
John
-
Are you aware that you can purchase the plans directly from Model Expo?
http://www.modelexpo-online.com/product.asp?ITEMNO=MSPL2033
Cheers -
John
-
-
The most challenging (and rewarding) part about building from scratch is that there are no instructions. You have to figure out what to do, when to do it, and how to do it. You have to think far ahead to understand how something you do now might affect what you need to do in the future. The best plans in the world won't help with that. Having experience in building kits is helpful, of course, but you may be surprised at just how different the experience is when you have to go it alone just from a set of plans. If you want to try scratch building, I'd suggest starting with a very simple boat so you can really get a feel for what it takes. Don't forget as well, that you won't have any pre-cut parts. You're bound to need dimensioned lumber that isn't available unless you can mill it yourself. Scratch building is great fun and highly rewarding, but it's certainly not easy.
Cheers -
John
- Ryland Craze, russ and mtaylor
-
 3
3
-
I've watched all of his videos in the past and that guy is just amazing. Highly recommended!
Cheers -
John
- GuntherMT, thibaultron, Canute and 2 others
-
5
-
I can't say exactly what width your planks should be, but there should be 5 planks between the bottom-most plank of the first belt and the top of the second batten. Of course, the width of each plank will change as you move aft. So the width of the plank at bulkhead 7 will be greater than the width of that same plank at bulkhead 13. You might want to take a look at page 6 of part 2 where I talk about placing the second batten. Note that the hull is fuller between bulkheads 8 and 9 than it is on either bulkhead. So in order to have a 5mm wide plank between those two bulkheads, the plank has to be slightly less wide on the bulkheads on either side. That's the reason for pulling that second batten up the hull a bit.
Note too, that when you plank the second belt, you'll wind up with fewer planks on each bulkhead as you move forward from bulkhead 7. That's discussed on page 6 as well.
-
As Doug says, the planking batten is just a guide - not an absolute. When you fair the bulkheads, you might take off more or less material than someone else building the same model so your measurement from keel to deck along any given bulkhead could be slightly different. The key with this and perhaps most other models is that you want all the planks at the widest part of the ship to be about the same width (mostly because it looks nicer). It doesn't matter what that exact width is. For example, if when you measure along the outside of the bulkhead you determine it is 75mm from deck to keel (assuming that's the area you plan to cover - I'm not referring to this model specifically) and you want to use 15 planks, then each plank needs to be 5mm wide at that bulkhead. If you decided you wanted to cover that space with 17 planks, then each plank would have to be about 4.4mm wide at that bulkhead. The number of planks you use is up to you. Of course, if you want to make a realistic model, you might not choose to use planks that would be 3 feet wide on a real ship! And, as with any rule, there are always exceptions. The garboard plank, for instance, could be wider than the rest of the planks. That's not the case on this particular model, however. As you measure plank widths for other bulkheads, the width of the plank will change since the overall space to cover is less on the other bulkheads, but you want to strive, again, to have all of the planks on any given bulkhead to be the same width. In your last pic above, that final plank next to the batten concerns me a little because it seems way too narrow at the ends. It may, however, just appear that way in the photo. Still, I'd take a look at that before going further. You may need to re-do that one. Overall though, it seems to be coming along just fine.
By the way - I heartily agree with the suggestion to just buy basswood if you need more planking material. There's no point in buying expensive boxwood - especially if you plan to paint the hull.
Cheers -
John
-
Once the glue is dry and the pins are removed, you can dip a small paintbrush into water and put just a small dot of water on the pin hole. Often that's enough to cause the wood to swell so the hole disappears. If not, put a tiny amount of yellow glue on the hole, sprinkle on a bit of sanding dust and then sand the plank lightly over the hole.
Personally, I never use ammonia because I can't stand the smell and I don't think it's necessary to pre-bend the planks with this hull. Try gluing just a few bulkheads at a time - no more than you can easily reach with your fingers to hold the plank to the bulkhead. Once the glue sets up (30 secs to a minute or so with medium CA) then the plank should hold just fine. Then you can do a few more bulkheads. Rubber bands can help too. With CA, the glue can soak into the plywood bulkheads rather quickly, so don't wait too long after applying the glue before you put the plank in place and be sure you're using medium CA, not the thin stuff (it will soak in almost instantly). The soaking-in factor is one reason to only do a few bulkheads at a time.
Cheers -
John
-
If you have a thick, stiff, steel or aluminum ruler, you put some fine sandpaper on one side using double-sided tape or rubber cement. The sandpaper helps to hold the plank in place while you cut it with an Xacto knife and the ruler provides a nice, straight edge. I have a Permagrit tool that I use in this way. You'll still need to do some final sanding on the edge of the plank.
-
It's a bit funny to see my name used so often, but I wanted to let you know that I'm still alive and kicking and happy to clear up anything you may not understand about my tutorial. You're welcome to PM me any time or send me an email directly. Looks like you're doing well so far. My one piece of advice at this point is to take your time, read and think ahead, and work out what you're doing and why you're doing it in your head before you do it on the boat. I look forward to watching your progress and I hope you enjoy the build.
Cheers -
John
-
I'll offer a somewhat contrarian view. I bought my Preac in 2001 and it has served me well all these years. I have only had my Byrnes saw for a few weeks now. I don't have a lot of room on my tool bench, so I can't have both saws on there at the same time without removing another tool. But since having the Byrnes saw, I have yet to have any need to pull out the Preac.
One of the first things I did was make a sliding crosscut table and for the base, I used 3/16" hardboard. (It's sold as marker board and is smooth brown on one side and smooth white on the other). The reason for using 3/16" was so that any long stock placed on the crosscut table would go over the rip fence so that I would not have to be constantly removing/replacing it. I find myself changing between the two modes very frequently and I knew going in that dealing with the rip fence would be a big issue for me. Using such thick material for the base meant using 4" slitting saw blades, but they are working just fine for me. In fact, just the other day I ripped some 3/4" poplar with the 100-tooth blade that Jim sells and it cut through it with no problems at all. Only once have I used the carbide blade so far, and that was to cut some 3/4" boxwood. The slitting saw blade just wouldn't cut it. This was some true, European Box that I had harvested from some old-growth bushes and is hard as a rock.
One great advantage of the Byrnes saw over the Preac is the ability to cut thicker material. My Preac would barely cut 3/16" and to cut 1/2" stock meant cutting one side, turning the stock over and cutting the other. And because of the small motor, it would often bind up on something like that. That problem has been entirely solved with the Byrnes saw. The other real nuisance with the Preac was setting the blade to a particular height. The adjustment mechanism on that saw is quite primitive and I found that when I tightened the blade down, the height would change, so there was often a lot of trial and error to get it right. Not so with the Byrnes saw. The height adjustment is quick and precise and stays where you put it when you lock it down. If you need to cut lap joints or notches at a precise depth, this is something you will appreciate immediately. Unless I'm doing something precise like lap joints, I don't even lock down the blade height on the Byrnes saw. On the Preac, you had to lock down the height and it was always awkward (not to mention the hole in the cap screw always being full of sawdust).
On my current model, I've lately been making some planks that are about 1/2mm thick and 3mm wide. Pretty tiny stuff. I've had no problems cutting it using my crosscut table (I'm using a 220-tooth 4" blade for this). One issue I've had, however, is that when ripping wider material to get these planks, it is so thin, it slides under the rip fence. So I have to clamp a piece of wood to the fence so that the wood sits right down on the table. The rip fence on the Preac is designed differently and sits tight to the table, so it would be better for that kind of work, but then, I'd have to take one of my other tools off the bench, pull out the Preac, set it up to make the cut, then put everything back in place. If I had room for both saws, I'd probably use both, but as it is, I have not really missed the Preac at all so far.
Cheers -
John
- Heronguy, mtaylor, thibaultron and 4 others
-
7
-
-
In the same museum where Lagoda is to be found is a model of Kate Cory by Erik A. R. Ronnberg, Jr. I've attached a crappy picture of one of the whaleboats on that model. As you can see, more or less, everything is in there and the boat is ready to go although it's still lashed to the ship.
Cheers -
John

- Richvee, CaptainSteve, mtaylor and 2 others
-
5
-
Those of you who have purchased tiny nuts and bolts from Scale Hardware in the past will recall that they went out of business a while back. I just got an email this morning from Model Motorcars, Ltd. to inform that they have bought the Scale Hardware name and stock and will continue to produce their products. Here's a link to the new site:
https://model-motorcars.myshopify.com/collections/small-parts-hardware/bolts
Cheers -
John
- Canute, Ryland Craze, mtaylor and 6 others
-
9
-
I bought my Sherline gear from Discount Campus http://www.discountcampus.com/store/sherlineonline.htm and got a better price than Sherline was offering. No complaints at all on the service I received.
I heartily recommend getting the DRO on the mill. It really can be helpful. I didn't get CNC because I wouldn't know how to use it and don't really have a lot of interest in investing the time to learn it. Aside from that, it adds significantly to the cost since you also have to factor in a computer and software.
Although I live in the US, I bought my mill in metric. I just find it much easier to use than Imperial. I can divide by 10 in my head much more easily than I can divide by 16. I work in metric for all my measuring, not just the mill. That said, you'll likely be working with cutters measured in Imperial, such as 1/8" or 3/16". Sometimes you need to be able to move half the width of your cutter, so you have to convert to metric. I just made up a simple conversion chart that I tacked to the wall behind the mill. No big deal.
Cheers -
John
-
-
Chuck -
I decided to send the question to you as a PM rather than turn your tutorial into a discussion. But since it seems OK with you, here's what I said in the original post:
I recently watched a YouTube video about a product called Blue Stuff which allows you to press a mold material around a part. The material softens when heated and hardens when cooled. It is re-usable. It seems hard to find in the US, but there is a similar product called Instant Mold available from Amazon. A quick YouTube search will reveal many videos on both products.
I certainly understand that it would not be appropriate for delicate parts like the one in your demo. However, I need to make 8 hawse hole covers for the 1:24 scale model I'm working on and the master will be anything but delicate! So it seems like the Instant Mold might be useful for more robust parts. As I mentioned, I have not tried it, so I can't say for sure.
Cheers -
John
- thibaultron, mtaylor, Canute and 4 others
-
7
-
Jollyroger -
Maybe I can help with your confusion about the raw materials. It can be hard, with European kits, to identify one wood versus another. In general, African Walnut is dark, Mukali is light in color, and Sapele may be in between the two. There is a pretty decent database of woods that has pictures located here - http://www.wood-database.com/ Between similar-colored woods, you may have to rely on the overall dimensions (width and thickness) to tell them apart. That site I mentioned above doesn't list Mukali, but you can do a Google image search for it to find examples.
As to the lengths, you want to think about what they are used for. For example, you list "hold planking" at 155mm and "hull planking" at 730mm. What they are saying here is that you'll need 26 pieces, each 155mm long, to plank the hold. Since all the planking material is 730mm long, you'll need to cut those hold planks to length. Some may not wind up being a full 155mm long but none will be longer than that because of the small area you're planking. For the outside of the hull, on the other hand, they're telling you that you may need some long planks so you're starting out with the ones that are 730mm long. You will, of course, have to cut some of them shorter as you proceed. In other words, if they show you a length that is shorter than the overall length of the raw material, they expect you to cut it to the length they list.
This, of course, can make it difficult to check the contents of a kit. For example, you can only get four 155mm planks out of a 730mm length of raw stock and then you'll have a 110mm (or so) piece left over. That might be long enough to use in some other area or it may wind up just becoming scrap. Most kit manufacturers give you more wood than you should need. But if you have just opened the kit and you see a bunch of 730mm long pieces of wood, it may not occur to you to think about how many 155mm pieces that will make. Since the list shows you'll need 26 planks for the hold, that means if you can get 4 of those planks from each long strip, you'll need 7 long strips. Plus, you'll need 44 strips of the same dimension wood for the hull planking, so you should have at least 51 strips of that raw material. Likely you will have more.
I hope that helps to clear up your confusion a bit.
Cheers -
John
- mtaylor and jollyroger
-
2
-
One suggestion if you decide on Sherline - get the longer-bed lathe (17" vs 8"). When I bought my 8" lathe, I didn't think I'd have any need for the long-bed model, but I was definitely wrong about that. The initial cost difference between the two is around $100 but to upgrade mine now, is over $300. I'd also suggest you give some thought to whether or not you want metal lathe. It's easy to cut wood with a metal lathe, but pretty hard to machine metal with a wood lathe.
Cheers -
John
-
I own one and for most of what I do with a lathe, I found it to be much too large. It can be useful for tapering long masts but that's all I use it for and there are certainly other ways to do that. I eventually bought a Sherline lathe and find it much more useful. As well, the Sherline allows you to work with metal. For instance, I can turn small brass sheaves on the Sherline but that would be damn near impossible with the Rikon. If I had it to do over again, I surely would not buy the Rikon lathe. Of course, your needs may differ from mine. It's a fine piece of equipment - just not suitable for my needs.
Cheers -
John
-
I have a pair and use them when planking a hull, but in my opinion, they are overkill for someone new to the hobby. As others have said, they are expensive and not as frequently used as other things you might spend that $100 on. You can easily determine plank widths by using a planking fan such as the one Chuck Passaro has posted on the site - http://modelshipworldforum.com/resources/Framing_and_Planking/plankingfan.pdf
Instructions for using the fan are found in his excellent planking tutorial - http://modelshipworldforum.com/resources/Framing_and_Planking/Lining%20Off%20your%20hull%20for%20planking.pdf
One must be careful when using proportional dividers to take measurements directly from a frame or bulkhead if the bulkhead has much curvature. You wind up measuring the chord of the arc rather than the length of the arc itself. That can result in planks that are narrower than they should be. When I'm determining plank widths, I lay a tic strip in the space to get the overall length, then use the proportional dividers to determine the individual plank widths.
Of course, there are other uses for them than in just planking, but again, there are probably better things to spend your money on when you're getting started in the hobby.
Cheers -
John
-
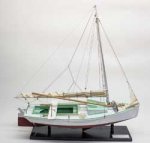
Glad Tidings is a really nice kit. Not too hard to plank and the instructions are very well done. I built the kit earlier this year and really enjoyed it. I made a number of modifications to the deck layout to make it more like a work boat than a pleasure boat. If you'd like to see pictures of mine, they are on my website - http://modelboatyard.com/pinky.html
I hope you enjoy the build.
Cheers -
John
- John Allen, mtaylor and RFP
-
3

Bluenose II by Bulwark - Artesania Latina - Scale 1:75
in - Kit build logs for subjects built from 1901 - Present Day
Posted
The hole for the bowsprit looks too high. The bowsprit sits down almost on the deck and although I can't see the deck in your pictures, I would assume that the hawse hole you've drilled on the side is down at the deck level. Picture below of mine at this point. You may want to cut a wedge-shaped piece to fill the existing hole and cut a new hole below it.
Cheers -
John