Homebrew Posted April 28, 2020 Share #1 Posted April 28, 2020 Ahoy! I'm returning to ship modelling to complete this model. I stopped after I fell down the stairs with it quite a while ago. Most of the damage was to the bowspirit, dislodged cannons, and small miscellaneous breaks. It had gathered a bit of dust over the years on the shelf. I cleaned of the dust bunnies with brushes. A couple of pieces had to be reconstructed because they were lost, then it was just rerigging. ccoyle, Jeff-E, GrandpaPhil and 1 other 4 Quote Cheers Mark from Tasmania Current Build: HMS Supply - Artesania Latina - Scale 1:56 USS Kearsarge Link to comment Share on other sites More sharing options...
ccoyle Posted April 28, 2020 Share #2 Posted April 28, 2020 3 minutes ago, Homebrew said: I stopped after I fell down the stairs with it quite a while ago. Ouch! With a backstory like that, completing her will be more than the usual accomplishment! Homebrew 1 Quote Chris Coyle Greer, South Carolina When you have to shoot, shoot. Don't talk. - Tuco Current builds: Brigantine Phoenix, Hawker Hurricane Link to comment Share on other sites More sharing options...
Jeff-E Posted April 28, 2020 Share #3 Posted April 28, 2020 Hi Mark, Looks like your restoration is off to a good start after your misadventure, this ship will be my next build but from a different manufacturer. Homebrew 1 Quote Cheers Jeff Current Builds; HMS Supply Completed Builds; AL Swift 1805; Colonial Sloop Norfolk; HMS Victory Bow Section; HM Schooner Pickle Link to comment Share on other sites More sharing options...
Thunder Posted April 28, 2020 Share #4 Posted April 28, 2020 She looks remarkably well considering your accident, you obviously built her well originally. Homebrew 1 Quote Current Build(s): H.M.S Diana 1794 - Caldercraft 1:64 Scale Completed Builds: H.M.S. Cruiser 1797 - Caldercraft 1:64 Scale H.M. Naval Cutter Speedy 1828 - Model Shipwright 1:48 Royal Caroline 1749 - Panart 1:47 H.M. Brig Supply 1759 - Caldercraft 1:64 H.M.S. Pickle 1778 - Caldercraft 1:64 H.M.Y. Chatham 1741 - Caldercraft 1:64 H.M.S. Resolution Cutter - Corel 1:50 H.M.S. Racehorse - Sergal 1:47 (Renamed H.M.S. Thunder 1740) first wooden kit build. Link to comment Share on other sites More sharing options...
Homebrew Posted April 29, 2020 Author Share #5 Posted April 29, 2020 (edited) In this session I added the Crowsfeet to the HMS Supply. It's the first Crowsfeet I have rigged so I had to work out how to do it. I consulted the usual books Lees and also Lennarth Petersson. They showed nice pictures but didn't explain how to actually rig it, but it doesn't look too difficult. First off I added the stays to the main mast including the snaking. For the crowsfeet I started by tying the long block with all the holes to the stay, then attaching the crowsfeet rigging to the crowsnest. I wanted to use one single line for the rigging. My method was to tied a knot to the end of the line feed it up under the far left hole in the crowsnest so that the line goes over the top of the front edge of the crowsnest pass the line thru the lowest hole in the block (the one furtherest from the crowsnest) feed it thru the far right hole in the crowsnest from the top feed the line back up thru the neighbouring hole feed back thru the block, etc, just keep repeating till all done. I didn't know how to tie off the line, so I superglued the line end underneath the final hole. In hindsight I should have put in a knot there too. Cheers Edited April 29, 2020 by Homebrew ccoyle, GrandpaPhil, steamschooner and 1 other 4 Quote Cheers Mark from Tasmania Current Build: HMS Supply - Artesania Latina - Scale 1:56 USS Kearsarge Link to comment Share on other sites More sharing options...
Jeff-E Posted April 29, 2020 Share #6 Posted April 29, 2020 Nicely done. Homebrew 1 Quote Cheers Jeff Current Builds; HMS Supply Completed Builds; AL Swift 1805; Colonial Sloop Norfolk; HMS Victory Bow Section; HM Schooner Pickle Link to comment Share on other sites More sharing options...
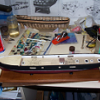
Homebrew Posted April 30, 2020 Author Share #7 Posted April 30, 2020 (edited) The Ship's Boat I wanted to put in the ship's boat while there wasn't much rigging in the way. The boat supplied with the kit is made of metal with a metal rudder. It's not very complex as the boat doesn't have any oars or sails - just some coils of rope. It is tied down very simply to iron bolts. Edited April 30, 2020 by Homebrew GrandpaPhil 1 Quote Cheers Mark from Tasmania Current Build: HMS Supply - Artesania Latina - Scale 1:56 USS Kearsarge Link to comment Share on other sites More sharing options...
Homebrew Posted May 3, 2020 Author Share #8 Posted May 3, 2020 This weekend all I did on the model was to rig the Stays. I discovered that I had rigged the deadeyes upside down on the Shrouds. To keep consistency I rigged the stays on the chainplate the same way. At least I got it right on the top. This is the rest of the mast. I completed both Main mast and Foremast Stays. Rigging deadeyes always takes me so long. GrandpaPhil and Jeff-E 2 Quote Cheers Mark from Tasmania Current Build: HMS Supply - Artesania Latina - Scale 1:56 USS Kearsarge Link to comment Share on other sites More sharing options...
GrandpaPhil Posted May 4, 2020 Share #9 Posted May 4, 2020 (edited) Running the shrouds (particularly getting the spacing on the deadeyes) is the hardest part of rigging for me. Well done on yours. Edited May 4, 2020 by GrandpaPhil Homebrew 1 Quote Building: 1:64 HMS Revenge (Victory Models plans) 1:64 Cat Esther (17th Century Dutch Merchant Ships) On the building slip: 1:72 French Ironclad Magenta (original shipyard plans) On hold: 1:98 Mantua HMS Victory (kit bash), 1:96 Shipyard HMS Mercury Favorite finished builds: 1:60 Sampang Good Fortune (Amati plans), 1:200 Orel Ironclad Solferino, 1:72 Schooner Hannah (Hahn plans), 1:72 Privateer Prince de Neufchatel (Chapelle plans), Model Shipways Sultana, Heller La Reale, Encore USS Olympia Goal: Become better than I was yesterday "The hardest part is deciding to try." - me Link to comment Share on other sites More sharing options...
Homebrew Posted May 9, 2020 Author Share #10 Posted May 9, 2020 Rigging the Spanker Gaff and Boom. I find it is very hard to keep the rigging taut. GrandpaPhil and Jeff-E 2 Quote Cheers Mark from Tasmania Current Build: HMS Supply - Artesania Latina - Scale 1:56 USS Kearsarge Link to comment Share on other sites More sharing options...
Homebrew Posted May 13, 2020 Author Share #11 Posted May 13, 2020 Shaping the Yards I have finished the Standing Rigging. So now it is time to move onto the yards. There are 7 yards on the Supply - 3 for each mast plus one for the Bowspirit. I shape yards by using a drill with several grades of sandpaper. I check the width with a vernier caliper. I have tried many other ways, but I like this method. It gives a surprising amount of control, which makes it effective and quick. Jeff-E and GrandpaPhil 2 Quote Cheers Mark from Tasmania Current Build: HMS Supply - Artesania Latina - Scale 1:56 USS Kearsarge Link to comment Share on other sites More sharing options...
Homebrew Posted June 15, 2020 Author Share #12 Posted June 15, 2020 Yards with Blocks and Footropes All the Yards are now finished at last. It was slow going. I had to constantly refer to the plans when adding the blocks, so I stood up the plans in front of me, so I could quickly check that I had the blocks in the right spot. It took me a few goes to work out how to rig the Footropes and Stirrups. There are two footropes for each yard. I found that when I measured then cut two lengths of thread that they didn't look the same after I had tied the footropes to the yard, maybe I was using different amounts of thread to tie the knots, anyway it was a problem for me. The method I used to keep the footropes the same length was to tie one side, then to tie the other side but with a slipknot so I could adjust the length so that they looked the same when I pulled them taut. Anyway this worked for me. I tried a few different ways to tie the stirrups. In the end I had it going pretty well and without the need to glue the knots, which made me happy. The Stirrups are tied around the yard and the also the footrope. Refer the Mastini diagram below: I use beeswax on one end. I wrap that around the yard. Then twist the two ends together as many times as possible. I put it on perpendicular to its final position because then I can easily rotate the entire yard to twist the two ends together. The beeswax holds this end in place. Rotate the 'knot' to the correct orientation. The next step is to tie the knot around the footrope as per Mastini "Ship Modelling Simplified" diagram. At this point the knot will travel beyond where I want it to go if I don't keep it in place. I find that by gently controlling the loop you can place the knot exactly where it needs to be. If you grab the footrope then you can stop the knot travelling down the line. Onto the next stage!! GrandpaPhil 1 Quote Cheers Mark from Tasmania Current Build: HMS Supply - Artesania Latina - Scale 1:56 USS Kearsarge Link to comment Share on other sites More sharing options...
Homebrew Posted August 16, 2020 Author Share #13 Posted August 16, 2020 The upper yards are now rigged to the ship. I had some trouble with the Fore Main Yard because the rigging plan for the blocks is wrong, and I had followed it The blocks on the end of the yard are shown on the opposite side to where they need to be according to Petersson, so I had to rerig these blocks. It should have been obvious that there was some issue because the foremast main yard is different to the main mast yard rigging plan - see below. The rigging should logically be similar for both. GrandpaPhil 1 Quote Cheers Mark from Tasmania Current Build: HMS Supply - Artesania Latina - Scale 1:56 USS Kearsarge Link to comment Share on other sites More sharing options...
Homebrew Posted July 19, 2021 Author Share #14 Posted July 19, 2021 I have made very slow progress over the last 12 months. Basically all that has changed is the rigging of the sails. Last night I rigged the last of the rigging for the sails. Now I only have to finish the rigging the lines connecting the masts to each other. Does anyone know what they are called? GrandpaPhil 1 Quote Cheers Mark from Tasmania Current Build: HMS Supply - Artesania Latina - Scale 1:56 USS Kearsarge Link to comment Share on other sites More sharing options...
Homebrew Posted September 14, 2021 Author Share #15 Posted September 14, 2021 HMS Supply is FINISHED !!! I started her about 11 years ago. I grew to enjoy the rigging. Thanks to the many modlers who aided and encouraged me over the years. Cheers Mark GrandpaPhil 1 Quote Cheers Mark from Tasmania Current Build: HMS Supply - Artesania Latina - Scale 1:56 USS Kearsarge Link to comment Share on other sites More sharing options...
GrandpaPhil Posted September 15, 2021 Share #16 Posted September 15, 2021 Congratulations! Well done! Quote Building: 1:64 HMS Revenge (Victory Models plans) 1:64 Cat Esther (17th Century Dutch Merchant Ships) On the building slip: 1:72 French Ironclad Magenta (original shipyard plans) On hold: 1:98 Mantua HMS Victory (kit bash), 1:96 Shipyard HMS Mercury Favorite finished builds: 1:60 Sampang Good Fortune (Amati plans), 1:200 Orel Ironclad Solferino, 1:72 Schooner Hannah (Hahn plans), 1:72 Privateer Prince de Neufchatel (Chapelle plans), Model Shipways Sultana, Heller La Reale, Encore USS Olympia Goal: Become better than I was yesterday "The hardest part is deciding to try." - me Link to comment Share on other sites More sharing options...

Recommended Posts
Join the conversation
You can post now and register later. If you have an account, sign in now to post with your account.